
MCN90 - Screwdriver Vevor - Free user manual and instructions
Find the device manual for free MCN90 Vevor in PDF.
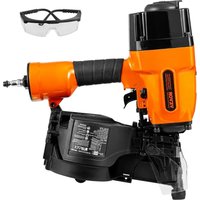


| Product Type | Pneumatic Coil Nailer |
| Brand | Vevor |
| Model | MCN90 |
| Working Pressure | 90-110 PSI (6.2-7.5 bar) |
| Max Pressure | 120 PSI (8.3 bar) |
| Magazine Capacity | 225 nails |
| Sound Pressure Level | LpA = 84 dB(A) |
| Sound Power Level | LwA = 97 dB(A) |
| Vibration | 4.6 cm/s² |
| Quick Connector | US, Europe, Japan types |
| Applications | Underlayment, wall sheathing, framing, decking, furring |
| Power Source | Pneumatic (compressed air) |
| Actuation Modes | Single sequential actuation and contact actuation |
| Safety | Safety bracket, hearing and eye protection required |
| Maintenance | Regular lubrication, magazine cleaning, seal inspection |
| Spare Parts | Only use genuine Vevor parts |
| Repairability | Repair by authorized agent or specialist |
| Warranty | Electronic warranty at www.vevor.com/support |
Frequently Asked Questions - MCN90 Vevor
User questions about MCN90 Vevor
0 question about this device. Answer the ones you know or ask your own.
Ask a new question about this device
Download the instructions for your Screwdriver in PDF format for free! Find your manual MCN90 - Vevor and take your electronic device back in hand. On this page are published all the documents necessary for the use of your device. MCN90 by Vevor.
USER MANUAL MCN90 Vevor
Technical Support and E-Warranty Certificate www.vevor.com/support
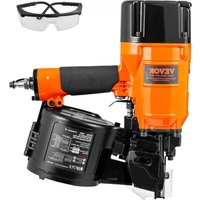
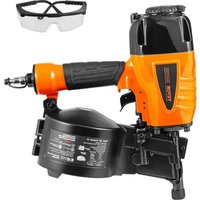
Coil Nailer
MODEL: MCN90
We continue to be committed to provide you with tools at competitive prices. "Save Half", "Half Price" or any other similar expressions used by us only represent an estimate of savings you might benefit from buying certain tools with us compared to top brands and does not necessarily mean to cover all categories of tools offered. We kindly remind you to verify carefully when placing an order with us that you are actually saving half in comparison with the top major brands.
MODEL: MCN90
NEED HELP? CONTACT US!
Have product questions? Need technical support? Please feel free to contact us:
Technical Support and E-Warranty Certificate www.vevor.com/support
This is the original instruction. Please read all manual instructions carefully before operating. VEVOR reserves the right to interpret the user manual. The appearance of the product shall be subject to the product you received. Please forgive us that we won't inform you if there are any technology or software updates on our product.
| Warning-To reduce the risk of injury, user must read instruct manual carefully. | |
| Always wear ANSI approved safety goggles when working wi and equipment. Wear eye protection. Wear ear protection. Wear dust masks Wear protective gloves. | |
Technical data
| MODEL | MCN90 | Noise according to EN12549:1999 at EN ISO 4871 | |
| QUICK COUPLER | USA TYPE EUROPE TYPE JAPAN TYPE | A-weighted sound pressure level | LpA=84dB (A) |
| Working pressure | 90- 110PSI (6.2-7.5bar) | Sound power level | LwA=97dB (A) |
| Max. pressure | 120PSI (8.3bar) | Vibration | 4.6cm/s² |
1.1 Fastener
capacity: 225pcs
Fastener size:
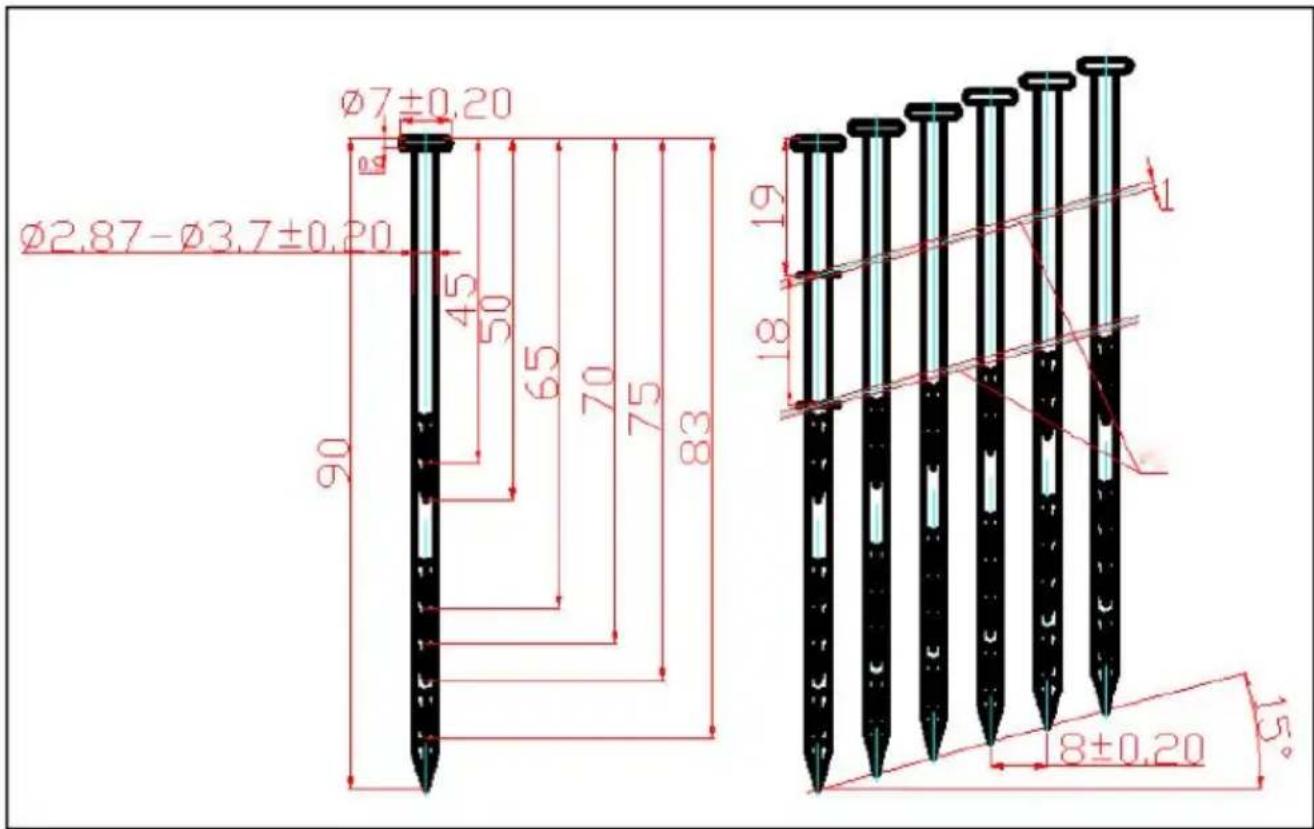
Application: Roof Decking Underlayment, Wall sheathing, Framing, Recreational decks, Furring strips
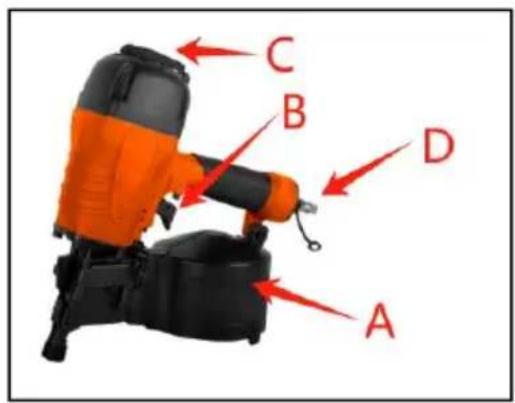
1.4 locations of Parts (see Figure)
A-Magazine
B-Trigger
C-Exhaust Vent
D-Air Quick Coupler
Special references
2.1 Instructions
The following standard is applicable to fastener driving tools: EN792-13:2000+A1:2008 "Hand-held non-electric power tools - safety requirements - Part 1: Fastener driving tools".
This standard requires that
- only those fasteners which are specified in the operating instructions (see TECHNICAL DATA) shall be used in fastener driving tools. The fastener driving tool and the fasteners specified in the operating instructions are to be considered as one unit safety system;
- quick action couplings shall be used for connection to the compressed air and the non-sealable nipple must be fitted at the tool in such a way that no compressed air remains in the tool after disconnection;
- oxygen or combustible gases shall not be used as an energy source for compressed air operated fastener driving tools;
- fastener driving tools shall only be connected to an air-supply where the maximum allowable pressure of the tool cannot be exceeded by more than 10%. In the case of higher pressure, a pressure reducing valve which includes a downstream safety valve shall be built into the compressed air supply;
- Only spare parts specified by the manufacturer or his authorized representative shall be used in the repair of fastener driving tools.
- Repairs shall be carried out only by the manufacturer's authorized agents or other experts, having due regard to the information given in the operating instructions.
- Stands for mounting the fastener driving tools to a support, for example to a table, shall be designed and constructed by the stand manufacturer in such a way that the fastener driving tools can be safely fixed for the intended use, thus avoiding damage, distortion, or displacement.
Special fields of application for the fastener driving tool may require the observance of additional provisions and regulations.
- Only the main energy and lubricants listed in the operating instructions may be used.
- Fastener driving tools marked with an inverted equilateral triangle standing on one point may only be used with an effective safety yoke.
- For the maintenance of fastener driving tools, only spare parts specified by the manufacturer or his authorized representative shall be used.
- Repairs shall be carried out only by agents authorized by the manufacturer or other specialists, having due regard to the information given in the operating instructions.
- NOTE: Specialists are those who, as a result of professional training or experience, have sufficient expertise in the field of fastener driving tools and sufficient familiarity with relevant governmental industrial protection provisions, accident prevention regulations, directives and generally recognized
technical regulations (e.g. CEN and CENELEC standards), to be able to assess the safe working condition of fastener driving tools.
2.2 Noise emission
The characteristic noise values for the fastener driving tool have been determined in accordance with EN12549:1999 and EN ISO 4871 "Acoustics - Noise test code for fastener driving tools - Engineering method" (see Technical Data).
These values are tool-related characteristic values and do not represent the noise development at the point of use. Noise development at the point of use will, for example, depend on the working environment, the work piece, the work piece support and the number of driving operations, etc.
Depending on the conditions at the workplace and the form of the workplace, individual noise attenuation measures may need to be carried out, such as placing work pieces on sound-damping supports, preventing work piece vibration by means of clamping or covering, adjusting to the minimum air pressure required for the operation involved, etc. It is necessary to wear hearing protection equipment.
2.3 Information on mechanical impact (vibration)
The characteristic vibration values for the fastener driving tool
have been determined in accordance with ISO 8662-11:1999 and EN
12096 - Measurement of vibration in hand-held power tools - Part 11: Fastening driving tools (see Technical Data).
This value is a tool-related characteristic value and does not represent the influence on the hand-arm system when using the tool. An influence on the hand-arm system when using the tool will, for example, depend on the gripping force, the contact pressure force, the working direction, the adjustment of energy supply, the workplace, and the work piece support.
2.4 Safety of the fastener driving tool
- Check prior to each operation that the safety and triggering mechanism is functioning properly and that all nuts and bolts are tight.
- Do not carry out any alterations to the fastener driving tool without the manufacturer's authorization.
- Do not disassemble or make inoperative any parts of the fastener driving tool such as the safety yoke.
- Do not perform any "emergency repairs" without proper tools and equipment.
- The fastener driving tool should be serviced properly and at regular intervals in accordance with the manufacturer's instructions.
- Avoid weakening or damaging the tool, for example by:
punching or engraving; modifications not authorized by the manufacturer; guiding against templates made of hard material such as steel; using the equipment as a hammer; applying excessive force of any kind.
2.5 Safety at work
Never point any operational fastener driving tool at yourself, any other person, or animals.
Hold the fastener driving tool during the work operation in a way that no injuries can be caused to the head or in the event of possible recoil consequent upon a disruption in energy supply or hard areas within the workplace. (see Fig. 2)
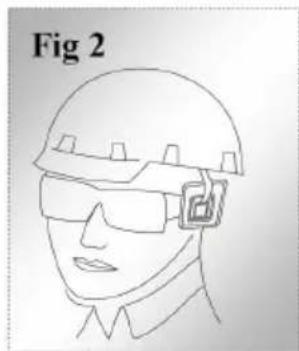
Never actuate the fastener driving tool into free space to avoid any hazard caused by free-flying fasteners or excessive strain on the tool.
The tool shall be disconnected from the compressed air system for the purpose of transportation, especially where ladders are used or where an unusual physical posture is adopted whilst moving (see Fig. 3).
Carry the fastener driving tool at the workplace using the handle, and never with the trigger actuated.
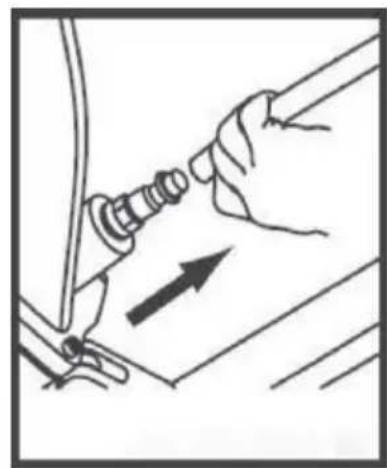
Take conditions at the workplace into account. Fasteners can penetrate thin workpieces or slip off corners and edges of workplaces, and thus put people at risk. For personal safety, use protective equipment such as hearing and eye protection (see Fig. 2).
IMPORTANT: DO NOT direct the adjustable vent hole to the operator or other
persons or animals during use.
2.6 Triggering devices
Fastener driving tools are operated by actuating the trigger using finger press. In addition, fastener driving tools are fitted with a safety yoke which enables the driving operation to be carried out only after the muzzle of the tool is pressed against a workpiece. These tools are marked with an inverted triangle ( ) behind the serial number and are not permitted for use without an effective safety.
2.7 Actuating systems
Depending on their purpose, fastener driving tools are fitted with actuating systems: single sequential actuation and contact actuation.
You can switch to one nail figure to choose single sequential actuation, and switch to two nail figure to choose contact actuation.
- Single sequential actuation: An actuating system in which the trigger and the safety yoke have to be activated so that only one single driving operation is actuated via the trigger after the muzzle of the tool has been applied to the location. Thereafter further driving operations can only be performed after the trigger has been returned to the non-driving position whilst the safety yoke is depressed.
- Contact actuation (restricted version): An actuating system in which the trigger and the safety yoke have to be actuated for each driving operation, with the order of actuation not being specified. For repeated driving operations, it is sufficient either the trigger remains activated and the safety yoke is activated thereafter or vice versa.
Fastener driving tools equipped with contact actuation must be marked with the symbol "Do not use on scaffoldings, ladders" (see Fig. 4) and shall not be used for specific applications, for example:
- when changing one driving location to another involves the use of scaffolds, stairs, ladders, or ladder-like constructions, e.g. roof laths;
- closing boxes or crates;
- fitting transportation safety systems e.g. on vehicles and wagons.
Fig. 4: Symbol "Do not use on scaffoldings, ladders"
3 Compressed air system
Proper functioning of the fastener driving tool requires filtered, dry and lubricated compressed air in adequate quantities.
| WARNING |
| Never free-fire the tool at high pressure. |
If the air pressure in the line system exceeds the maximum allowable of the fastener driving tool, a pressure reducing valve followed by a downstream safety valve shall additionally be fitted in the supply line to the tool.
NOTE: When compressed air is generated by compressors, the natural moisture in the air condenses and collects as condensed water in pressure vessels or pipelines. This condensate must be removed by water separators.
These water separators must be checked on a daily basis and if necessary drained, since corrosion can otherwise develop in the compressed air system in the fastener driving tool, which serves to accelerate wear.
The compressor plant shall be adequately dimensioned in terms of pressure output and performance (volumetric flow) for the consumption which is to be expected. Line sections which are too small in relation to the length of the pipes and hoses, as well as overloading the compressor, will result in pressure drops.
Permanently laid compressed air pipelines should have an internal diameter of at least 19 mm and a correspondingly larger
diameter where relatively long pipelines or multiple users are involved.
Compressed air pipelines should be laid so as to form a gradient (highest point in the direction to the compressor). Easily accessible water separators should be installed at the lowest points.
Junctions for users should be joined to the pipelines from above.
Connecting points for fastener driving tools should be fitted with a compressed air servicing unit (filter/water separator/oiler) directly at the junction point.
Oilers must be checked on a daily basis and, if necessary, topped up with the recommended grade of oil (see TECHNICAL DATA). Where hose lengths of ≤ 10 m are used, the oil supply for the fastener driving tool cannot be guaranteed. We therefore recommend that 2 to 5 drops (depending on the loading of the fastener driving tool) of the recommended oil (see TECHNICAL DATA) should be added via the air inlet of the tool, or an oiler attached directly to the fastener driving tool (see fig. 5).
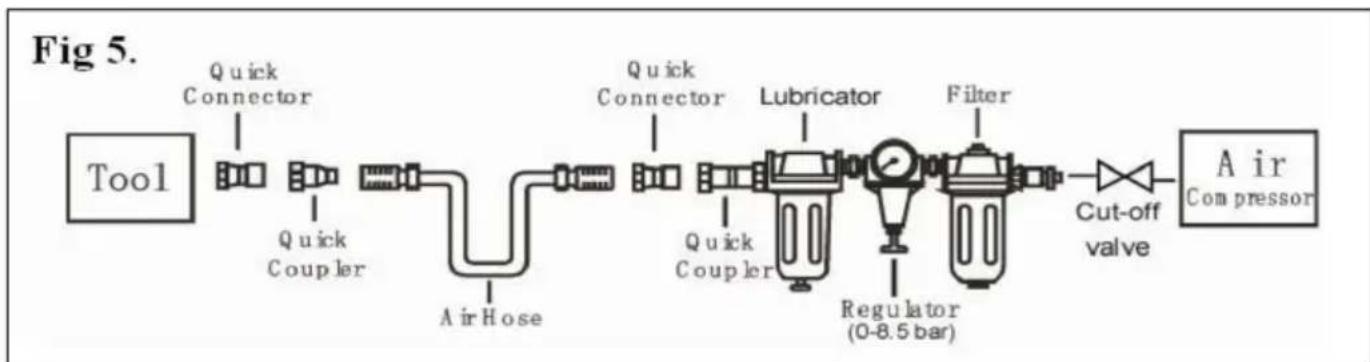
4 Preparing the tool for use
4.1 Preparing a tool for first time operation
Please read and observe these operating instructions before using the tool. Safety measures should always be strictly followed to protect against damage to the equipment and personal injury to the user or other people working in the vicinity of operation.
4.2 Connection to the compressed air system
Ensure that the pressure supplied by the compressed air system does not exceed the maximum allowable pressure of the fastener driving tool. Set the air pressure initially to the lower value of the recommended allowable pressure (see
TECHNICAL DATA).
Empty the magazine to prevent a fastener from being ejected at the next stage of work in the event that internal parts of the fastener driving tool are not in the starting position following maintenance and repair work or transportation.
Connect the fastener driving tool to the compressed air supply using a suitable pressure hose equipped with quick-action connectors.
Check for proper functioning by applying the muzzle of the fastener driving tool to a piece of wood or wooden material and actuating the trigger once or twice.
4.3 Filling the magazine
Only those fasteners specified under TECHNICAL DATA (see 1.1) may be used. When filling the magazine, hold the tool so that the muzzle is not pointing at the operator or any other person or animals.
4.4 Handling the tool
Pay attention to 2 Special Reference of these operating instructions.
Having checked that the fastener driving tool is functioning correctly, apply the tool to a work piece and actuate the trigger.
Check whether the fastener has been driven into the workpiece in accordance with the requirements.
- If the fastener is protruding, increase the air pressure in increments of 0.5 bar, checking the result after each new adjustment.
- If the fastener is driven to an excessive depth, reduce the air pressure in increments of 0.5 bar until the result is satisfactory.
You should endeavor in any event to work with the lowest possible air pressure. This will give you three significant advantages:
- Energy will be saved.
- Less noise will be produced.
3. A reduction in fastener driving tool wear will be achieved.
Avoid triggering the fastener driving tool if the magazine is empty.
Any defective or improperly functioning fastener driving tool must immediately be disconnected from the compressed air supply and passed to a specialist for inspection.
In the event of longer breaks in work or at the end of the working shift, disconnect
the tool from the compressed air supply and it is recommended to empty the magazine.
The compressed air connectors of the fastener driving tool and the hoses should be protected against contamination. The ingress of coarse dust, chips, sand, etc. can result in leaks and damage to the fastener driving tool and the couplings.
5. Maintenance
Disconnect the tool from the compressor before adjusting, clearing jams, servicing, maintenance, relocating, and during non-operation.
Regular lubrication: if your tool does not use the in-line automatic oiler, place 6 drops of pneumatic tool oil into the air inlet before each work day or after continuous use, depending on the characteristics of the work piece or type of fasteners.
Air-operated tools must be inspected periodically, and worn or broken parts must be replaced to keep the tool operating safely and efficiently. Check and change worn or damaged O-rings, seals, etc. Tighten all screws and caps to avoid personal injury. This should be done by an expert.
Make regular inspections for free movement of the trigger, spring, and safety mechanism to assure the safety system is complete and functional: no loose or missing parts, no buildup or sticking parts.
Keep the magazine and nose of the tool clean and free of any dirt, lint, or abrasive. When temperatures are below freezing, tools should be kept warm by any convenient, safe method.
6. Troubleshooting (See Table 1)
| SYMPTOM | PROBLEM | SOLUTIONS |
| Air leak near top of tool or in trigger area | 1. O-ring in trigger valve damaged. 2. Trigger valve head a damage. 3. Trigger valve stem, or O-ring are damaged. | 1. Check and replace O-ring 2. Check and replace. 3. Check and replace trigger valve stem, seal or O-ring |
| Air leak near bottom of tool. | 1. Loose screws. 2. Worn or damaged O-rings or bumper. | 1. Tighten screws. 2. Check and replace O-ring or bumper. |
| Air leak between body and cylinder cap. | 1. Loose screws. 2. Worn or damaged O-rings or seals. | 1. Tighten screw. 2. Check and replace O-ring or bumper. |
| Blade driving fastener too deep. | 1. Worn bumper. 2. Air pressure is too high | 1. Replace bumper. 2. Adjust the air pressure. |
| Tool does not operate well: cannot drive fastener or operate negligibly. | 1. Inadequate air supply 2. Inadequate lubrication 3. Worn or damaged O-rings or seals. 4. Exhaust port in cylind head is blocked. | 1. Verify adequate air supp 2. Place 2 or 6 drops of oil into air inlet. 2. Check and replace O-rings or seal. 4. Replace damaged internal parts. |
| Tool skips fasteners. | 1. Worn bumper or damaged spring. 2. Dirt in front plate. 3. Dirt or damage prevents fasteners from moving freely in magazine. 4. Worn or dry O-ring piston or lack of Lubrication. 5. Cylinder covers seal leaking. | 1. Replace bumper or push spring. 2. Clean drive channel on plate. 3. Magazine needs to be cleaned. 4. O-ring needs to be replaced. And lubricate. 5. Replace Sealing washer. |
| Tool jams. | 1. Incorrect or damaged fasteners. 2. Damaged or worn dr guide. 3. Magazine or nose so loose. 4. Magazine is dirty. | 1. Change and use correct fastener. 2. Check and replace the driver. 3. Tighten the magazine. 4. Clean the magazine. |
Coil nailer
MODEL: MCN90
Never free-fire the tool at high pressure.
Never free-fire the tool at high pressure.
www.vevor.com/support
VEVOR®
TOUGH TOOLS, HALF PRICE
Never free-fire the tool at high pressure.
Never free-fire the tool at high pressure.
NEED HELP? CONTACT US!
Do you have product questions? Need technical support? Feel free to contact us: Technical
coverings, furring strips
Never free-fire the tool at high pressure.
Never free-fire the tool at high pressure.
If the air pressure in the pipeline system exceeds the maximum allowed for
- MODEL: MCN
- NEED HELP? CONTACT US
- TECHNICAL DATA
- FASTENER
- LOCATIONS OF PARTS (SEE FIGURE)
- SPECIAL REFERENCES
- INSTRUCTIONS
- NOISE EMISSION
- INFORMATION ON MECHANICAL IMPACT (VIBRATION)
- SAFETY OF THE FASTENER DRIVING TOOL
- SAFETY AT WORK
- TRIGGERING DEVICES
- ACTUATING SYSTEMS
- COMPRESSED AIR SYSTEM
- PREPARING THE TOOL FOR USE
- PREPARING A TOOL FOR FIRST TIME OPERATION
- CONNECTION TO THE COMPRESSED AIR SYSTEM
- FILLING THE MAGAZINE
- HANDLING THE TOOL
- MAINTENANCE
- NEVER FREE-FIRE THE TOOL AT HIGH PRESSURE
- VEVOR®
- TOUGH TOOLS, HALF PRICE
Brand : Vevor
Model : MCN90
Category : Screwdriver