
LB2500P - Blower SCHEPPACH - Free user manual and instructions
Find the device manual for free LB2500P SCHEPPACH in PDF.

| Product type | Garden blower |
| Brand | Scheppach |
| Model | LB2500P |
| Dimensions (L x W x H) | 1050 x 250 x 350 mm |
| Weight | 4.7 kg |
| Engine type | 2-stroke engine, air-cooled |
| Displacement | 25.4 cm³ |
| Power | 0.7 kW |
| Idle speed | 3500 ± 300 rpm |
| Max blowing air flow | 268 km/h |
| Max suction power | 12 m³/min |
| Fuel tank capacity | 0.65 L |
| Fuel mixture ratio | 40:1 (unleaded gasoline/2-stroke oil) |
| Sound pressure level | 97 dB(A) |
| Sound power level | 108.4 dB(A) |
| Lower handle vibration | 15.1 m/s² |
| Upper handle vibration | 11.92 m/s² |
| Spark plug electrode gap | 0.63 mm |
| Air filter type | Washable foam |
| Delivery contents | Engine, blower tube, nozzle, spark plug wrench, mixing bottle, screws and washers |
| Intended use | Blowing or vacuuming leaves, grass and small garden debris |
| Approved fuel types | Unleaded gasoline/2-stroke oil mixture (40:1) |
| Housing material | Sturdy plastic |
Frequently Asked Questions - LB2500P SCHEPPACH
User questions about LB2500P SCHEPPACH
0 question about this device. Answer the ones you know or ask your own.
Ask a new question about this device
Download the instructions for your Blower in PDF format for free! Find your manual LB2500P - SCHEPPACH and take your electronic device back in hand. On this page are published all the documents necessary for the use of your device. LB2500P by SCHEPPACH.
USER MANUAL LB2500P SCHEPPACH
natural_image
Black and white photo of a Schleppacht electric shaver with a long blade, no visible text or symbols on the device itself.LB2500P
| DE | Benzin-LaubbläserOriginalbedienungsanleitung | 06 |
| GB | Petrol leaf blowerTranslation of original instruction manual | 19 |
| FR | Souffleuses à feuillesTraduction des instructions d'origine | 30 |
| ES | Soplador de hojasLas instrucciones originales | 42 |
| IT | Soffiatori di fogliameIstruzioni originali | 54 |
| PL | Benzynowa dmuchawa do liściTłumaczenie oryginalnej instrukcji obsługi | 66 |
natural_image
Illustration of a bottle pouring liquid into a container with a no-smoking symbol (no text or labels)

natural_image
Line drawing of hands operating a mechanical device with gears and a handle (no text or symbols)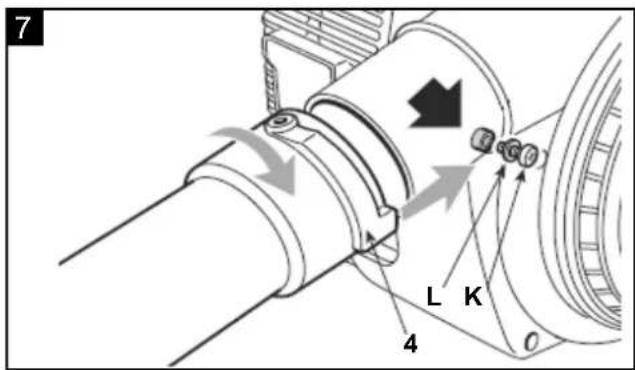
Günzburger Straße 69
D-89335 Ichenhausen
Verehrter Kunde,
Explanation of the symbols on the equipment
 | Read instruction manual and safety instructions before starting up and pay attention! |
 | Wear eye protection. |
 | Warning! Denotes risk of personal injury, loss of life, or damage to the tool in case of non-observance. |
 | Warning! Risk of injury! Never put your hands close to the blades. |
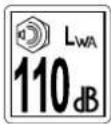 | Guaranteed sound power |
 | Warning! Beware of thrown objects hit by cutting attachments. Never use without properly mounted blade guard. |
 | Warning! The exhaust and other parts of the engine will get very hot during use, do not touch! |
 | Keep bystanders away. |
 | Wear ear protection |
 | The product complies with the applicable European directives and an evaluation method of conformity for this directives was done. |
 | Warning! Gasoline is very flammable. Avoid smoking or bringing any flame or sparks near fuel. |
 | Fuel pump |
 | Fuel tank capacity |
 | Symbol for refuelling the “MIX GASOLINE” on fuel tank cap. |
 | Wear protective gloves when using the device! |
 | Wear robust footwear when using the device! |
 | Beware of the rotating tool.Keep hands and feet out of openings while machine is running. |
 | Start lever (choke) "cold start"Start lever (choke) "warm start and work" |
Table of contents: Page:
- Introduction......22
- Layout 22
- Scope of delivery....22
- Intended use....23
- Important information 23
- Technical data 25
- Attachment and operation 25
- Working instructions....27
- Maintenance....27
- Storage....28
- Disposal and recycling 29
- Troubleshooting....29
1. Introduction
Manufacturer:
scheppach
Günzburger Straße 69
D-89335 Ichenhausen
Dear Customer,
We hope your new tool brings you much enjoyment and success.
Note:
According to the applicable product liability laws, the manufacturer of the device does not assume liability for damages to the product or damages caused by the product that occurs due to:
- Improper handling,
• Non-compliance of the operating instructions, - Repairs by third parties, not by authorized service technicians,
- Installation and replacement of non-original spare parts,
• Application other than specified,
We recommend:
Read through the complete text in the operating instructions before installing and commissioning the device.
The operating instructions are intended to help the user to become familiar with the machine and take advantage of its application possibilities in accordance with the recommendations.
The operating instructions contain important information on how to operate the machine safely, professionally and economically, how to avoid danger, costly repairs, reduce downtimes and how to increase reliability and service life of the machine.
In addition to the safety regulations in the operating instructions, you have to meet the applicable regulations that apply for the operation of the machine in your country.
Keep the operating instructions package with the machine at all times and store it in a plastic cover to protect it from dirt and moisture. Read the instruction manual each time before operating the machine and carefully follow its information. The machine can only be operated by persons who were instructed concerning the operation of the machine and who are informed about the associated dangers.
The minimum age requirement must be complied with.
In addition to the safety instructions in this operating manual and the separate regulations of your country, the generally recognised technical rules relating to the operation of identical devices must also be observed.
We accept no liability for accidents or damage that occur due to a failure to observe this manual and the safety instructions.
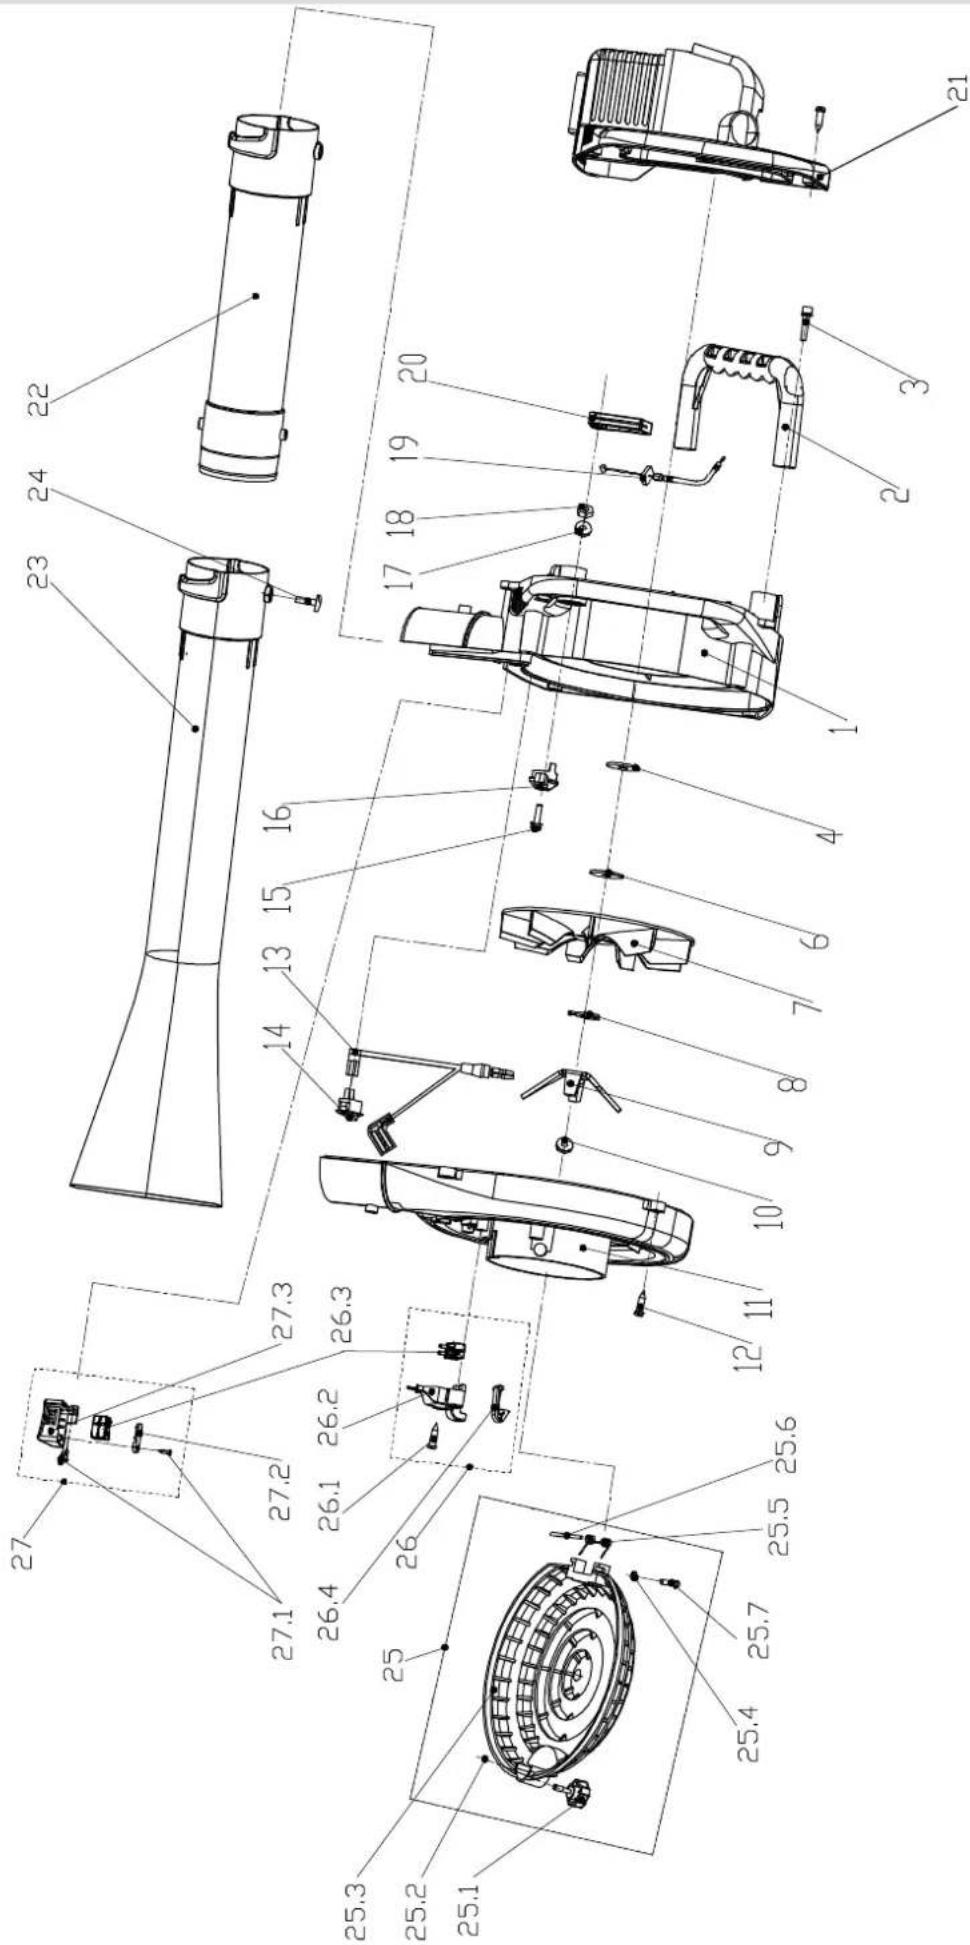
2. Layout
- Engine Stop switch
- Throttle lockout
- Throttle control
- First blower tube
- Second blower tube
- Motor unit
- Lower handgrip
- Starter
- Fuel tank cap
- Primer
- Choke
- Air filter cover
- Spark plug
- Upper handgrip
- Graduated fuel bottle
- Tool with screwdriver and spark plug wrench
- Transport protection ring
3. Scope of delivery
- Open the packaging and take out the equipment with care.
- Remove the packaging material and any packaging and/or transportation braces (if available).
- Check to see if all items are present.
- Inspect the equipment and accessories for transport damage. In case of complaints the supplier is to be informed immediately. Complaints received at a later date will not be acknowledged.
- If possible, keep the packaging until the end of the guarantee period.
- Read the operating instructions to make yourself familiar with the device prior to using it.
• After that, please dispose of it in an environmentally friendly way. - Only use original parts for accessories as well as for wearing and spare parts. Spare parts are available from your specialized dealer.
- Specify our part numbers as well as the type and year of construction of the device in your orders.
Important!
The equipment and packaging material are not toys. Do not let children play with plastic bags, foils or small parts. There is a danger of swallowing or suffocating!
- Power unit (6)
- First blower tube (4)
• Second blower tube (5)
• Graduated fuel bottle (15) - Toll with screwdriver and spark plug wrench (16)
4. Intended use
The machine meets the currently valid EU machine directive.
- Before starting any work, all protective and safety devices must be in place.
- The blower is designed to blow leaves as well as lawn debris such as grass clippings and small twigs. It is not to be used for any other purpose.
- The device is only to be used on dry surfaces.
- The machine has been designed to be operated by one person.
- The operator is responsible for third parties in the area of operations.
- All safety and hazard notices on the machine must be observed.
- All safety and hazard notices on the machine must be kept in a completely legible condition.
- Use the machine in a technically flawless condition only, as well as for its intended purpose, in a safe manner and being aware of dangers, in compliance with the operating instructions!
- Disruptions which can affect safety in particular must be eliminated straight away!
- The manufacturer's safety, operation and maintenance instructions as well as the technical data given in the calibrations and dimensions must be adhered to.
- Relevant accident prevention regulations and other generally recognized safety and technical rules must also be adhered to.
- The machine may only be used, maintained or repaired by trained persons who are familiar with the machine and have been informed about the dangers. Unauthorized modifications of the machine exclude a liability of the manufacturer for damages resulting from the modifications.
- The machine is intended for use only with original spare parts and original tools from the producer.
- Any other use is considered to be not intended. The manufacturer excludes any liability for resulting damages, the risk is exclusively borne by the user.
- The device must not be used for commercial, technical or industrial applications.
- If you are not sure whether working conditions are safe or unsafe, do not work with the machine.
WARNING! For your own safety, please thoroughly read this manual and the general safety instructions before turning the device on. If you give the device to third parties, always include these instructions.
The equipment is allowed to be used only for its prescribed purpose. Any other use is deemed to be a case of misuse. The user/operator and not the manufacturer will be liable for any damage or injuries of any kind resulting from such misuse.
5. Important information
General safety instructions for devices
⚠ CAUTION: Read all safety regulations and instructions. Any failures made in following the safety regulations and instructions may result in an, fire and/or serious injury.
WARNING: DO NOT USE ANY OTHER FUEL than that recommended in your manual. Always follow instructions in the Fuel and Lubrication section of this manual. Never use gasoline unless it is properly mixed with 2-cycle engine lubricant. Permanent damage to engine will result, voiding manufacturer's warranty.
Keep all safety regulations and instructions in a safe place for future use.
General instructions
- Read the complete operating manual with due care. Acquaint yourself with the controls and how to use the tool.
- All persons (including children) who, for reasons of physical, sensory or mental ability or inexperience or lack of knowledge, are not in a position to be able to use this device safely, should not use the device unsupervised or without instruction by or from a responsible person. Children must always be supervised in order to ensure that they do not play with the device.
- Never allow children to use the tool.
- Never allow other persons who are not familiar with the operating instructions to use the tool. Contact your local government offices for information regarding minimum age requirements for operating the tool.
- Never use the tool when there are people – particularly children – or pets nearby.
- The user is responsible for any accidents or hazards suffered by third parties or their property.
General instructions
- Do not wear wide clothing or jewellery. Wear long trousers to protect your legs. Wear safety helmet for long hair. Loose clothing, jewellery, and long hair can get caught in the moving parts. Wear suitable and durable tight working clothes.
- Always switch off the engine when removing the machine and before working on the unit.
- Wear safety goggles while you work.
- Use a dust mask when working on dusty jobs
- Never use the tool if any of its safety devices or guards are damaged or if any safety attachments such as deflectors and/or grass catching devices are missing.
Workplace safety
- Keep your work area clean and well illuminated. Untidy or unlit work areas can result in accidents.
- Do not operate the device in an environment where there is a risk of explosions and where there are inflammable liquids, gases or dust. Device produce sparks which could set the dust or vapours alight.
- Keep the device out of the reach of children and other persons. If there is a distraction, you may lose control of the appliance.
Safety of persons
- Be careful, watch what you are doing and use an device sensibly. Do not use the tool if you are tired or under the influence of drugs, alcohol or medication. A moment of inattention when using the device can result in serious injuries.
- Wear personal protection equipment and always wear safety goggles. Wearing personal protection (such as dust masks, non-slip safety shoes, safety helmet or ear protection, depending upon the type and use of the device) reduces the risk of injury.
- Make sure that the appliance cannot start up accidentally. If your finger is on the switch whilst carrying the device this can lead to accidents.
- Remove keys and wrenches before switching on the device. A tool or key which comes into contact with rotating parts of the appliance can lead to injuries.
- Avoid abnormal working postures. Make sure you stand squarely and keep your balance at all times. In this way, you can control the device better in unexpected circumstances.
- Wear suitable work clothes. Do not wear loose clothing or jewellery. Keep hair, clothes and gloves away from moving parts. Loose clothing, jewellery or long hair can get trapped in moving parts.
Usage and treatment of the device
- Do not overload the appliance. Use the correct tool for your work. You will be able to work better and more safely within the given performance boundaries.
- Do not use an device with a defective switch. An device tool that cannot be switched on or off is dangerous and must be repaired.
- Keep unused device out of the reach of children. Do not allow people who are not familiar with the appliance or who have not read these instructions to use the appliance. Device are dangerous if they are used by inexperienced people.
- Clean your device carefully. Check whether moving parts are functioning properly and not jamming, whether parts are broken or damaged enough that the functioning of this device is affected. Have damaged parts repaired before using the appliance. Many accidents are caused by badly maintained device.
- Make sure to use device, accessories, attachments, etc. in accordance with these instructions. Take the conditions in your work area and the job in hand into account. Using device for any purpose other than the one for which they are intended can lead to dangerous situations.
Safe handling with fuels
Fuels and fuel vapours are inflammable and may cause serious injury on the skin or when inhaled. Therefore be careful and provide sufficient ventilation when handling with fuels.
- Stop the engine and allow the device to cool down before fuelling it.
- Do not smoke and avoid open flames when fuelling. (fig. 2)
- Wear gloves when fuelling.
- Do not fuel in closed rooms. (Danger of explosion)
- Avoid spilling of fuel or oil. Clean the hedge trimmer immediately when you have spilled fuel or oil. Change your clothes immediately when you have spilled fuel or oil on them.
- Make sure that no fuel can come into the soil.
- Carefully close the tank cap after fuelling and check that it does not get loose during operation.
- Check that there is no leakage on the tank cap and fuel lines. If there are leaks this device may not be started.
- Only transport and store fuels in containers approved and identified for this.
- Keep children away from fuels.
- Do not handle and store fuels close to combustible and highly inflammable materials as well as sparks and open flames.
- Go away at least three metres from the fuelling place to start the device.
- To reduce the fire risk keep the motor and silencer free from cutting remainders, leaves and lubricants.
- Keep handles dry, clean and free of fuel mixture.
- Do not refuel a running engine or an engine that is hot.
Residual risks
Even if used properly, residual risks can exist even if the relevant safety regulations are complied with due to the design determined by the intended purpose. Observing these instructions, and taking proper care, will reduce the risk of personal injury or damage to the equipment.
- Injury by catapulted parts.
- Breaking or catapulting of knife pieces.
- Carbon monoxide poisoning when using the device in closed or poorly ventilated rooms.
- Burning when touching hot parts.
- Impairment of hearing when working on the machine for longer periods of time without ear protection.
In addition, in spite of all the precautionary measures taken, non-obvious residual risks can still exist. Residual risks can be minimised if the "Safety information" and the "Intended usage" as well as the whole of the operating instructions are observed.
6. Technical data
| Dimension L x W x H | 1050 x 250 x 350 mm |
| Air speed max. 268 km/h | |
| air volume min./max. 12 m | ^3 /min |
| Power unit | |
| Displacement 25,4 cm | ^3 |
| Max. engine output 0,7 kW | |
| Idle speed 3500 ± 300 min | ^-1 |
| Fuel tank capacity 0,65 cm | ^3 |
| Engine type 2-stroke engine, air- cooled | |
| Weight 4,7 kg | |
Subject to technical changes!
Information concerning noise emission measured according to relevant standards:
Sound pressure L_pA = 97.0 dB(A)
Sound power L_WA = 108.4 dB(A)
Uncertainty K_PA = 3 dB(A)
Wear ear-muffs.
The impact of noise can cause damage to hearing.
Vibration
Lower handle A_hv = 15,1 m/s ^2
Upper handle A_hv = 11,92 m/s^2
Uncertainty K_PA = 1.5 m/s^2
Reduce noise generation and vibration to a minimum!
- Use only equipment that is in perfect condition.
- Maintain and clean the equipment regularly.
- Adopt your way of working to the equipment.
- Do not overload the equipment.
- Have the equipment checked if necessary.
- Switch off the equipment when not in use.
- Wear gloves.
In these operating instructions we have marked the places that have to do with your safety with this sign: △
7. Attachment and operation
ATTENTION! Before working on the device - cleaning, inspection, maintenance or other work - always turn off the device.
ATTENTION!
Remove transport protection ring (17) fig. 1.
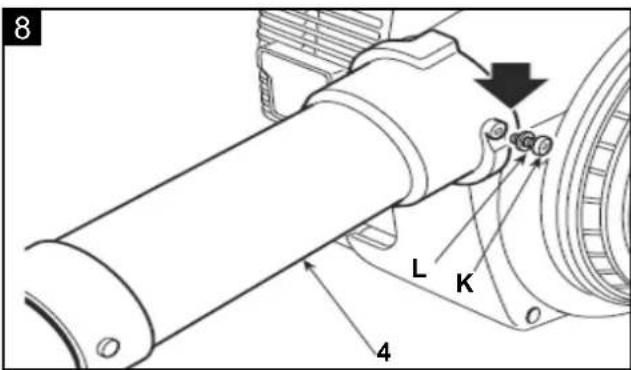
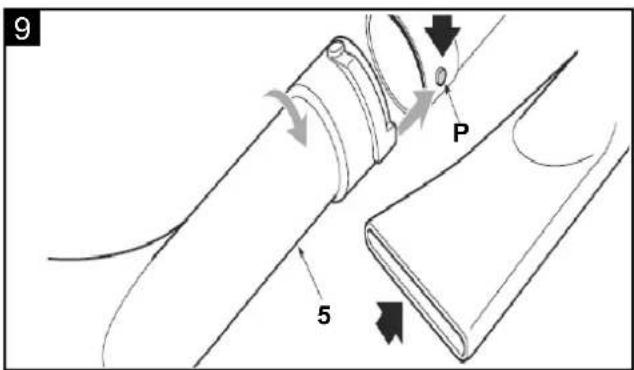
Assembly (fig. 7-9)
⚠ Warning: The blower must not be used or switched on until it has been fully assembled.
- Remove the screw (K) and its washers (L).
- Align the first blower tube(4) compartment with the protrusion of the air outlet, push the tube and turn it 90^ clockwise, in order to permanently fix it in place.
- Fix the tube (4) to the air outlet using the screw (K) and its washers (L).
- Align the second blower tube(5) compartment with the protrusion (P) of the first tube, push the tube and turn it 90^ clockwise, in order to permanently fix it in place.
⚠ Warning! Use only original manufacturer's replacement parts, accessories and attachments. Failure to do so can cause poor performance, possible injury and may void your warranty. Never use the machine without the guard assembled!
Operation
Before starting
Each time before use, check the following:
- That there are no leaks in the fuel system.
- That the equipment is in perfect condition and that the safety devices and cutting devices are complete.
- That all screws are securely fastened.
- That all moving parts move smoothly.
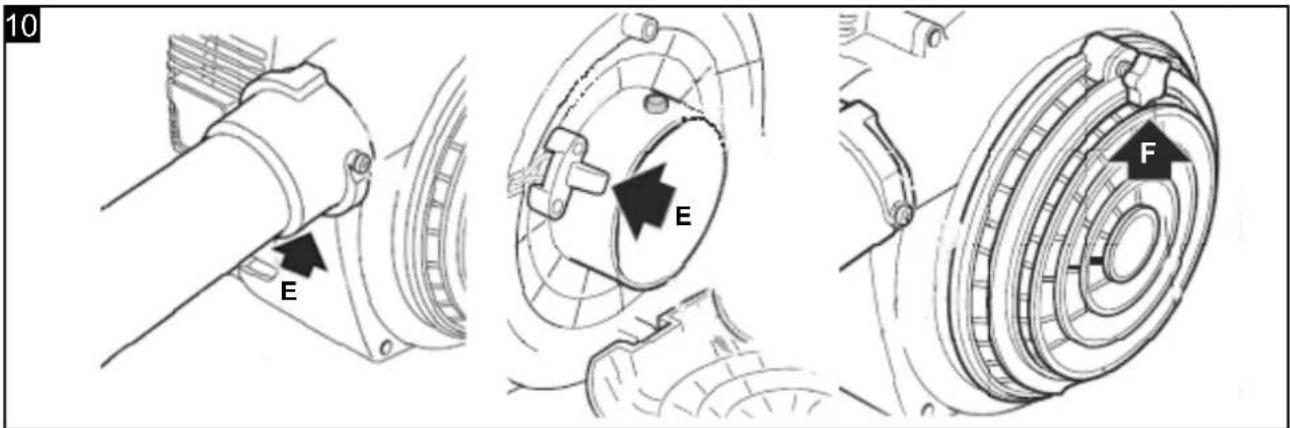
- That the protective flap (E) is closed and that all security switches (F) are activated (fig. 10).
Fuel and oil
Recommended fuels
Use only a mixture of unleaded petrol and special 2-stroke engine oil. Mix the fuel mixture as indicated in the fuel mixing table.
Important: Do not use a fuel mixture which has been stored for longer than 90 days.
Important: Never use 2-stroke oil with a recommended mixing ratio of 100:1. The manufacturer's warranty will be voided in case of engine damage due to inadequate lubrication.
Important: Only use containers designed and approved for the purpose to transport and store fuel.
Pour the correct quantities of petrol and 2-stroke oil into the mixing bottle (see scale printed on the bottle). Then shake the bottle well.
Never use oil for 4-cycle engine or use water cooled 2-cycle engine. It can cause spark plug fouling exhaust part blocking or piston ring sticking. Mixed fuels, which have been left unused for a period of one month or more, may clog the carburetor or result in the engine foiling to operate property. Put remained fuel into an airtight container and keep it in the dark and cool room.
Fuel mixing table
Mixing procedure: 40 parts petrol to 1 part oil
Example:
1 | Petrol : 0,025 | 2-stroke oil
5 | Petrol : 0,125 | 2-stroke oil
Warning! Take care of the emission of exhaust gases.
Always shut off engine before fuelling. Never add fuel to a machine with a running or hot engine. Take care of fire!
Only refuel outdoors or in well-ventilated areas. Make sure that no fuel is trapped in the soil (environmental Protection). Use suitable base.
Filling with fuel
Danger of injury! Fuel is explosive!
Turn the motor off and let the machine cool down.
- Wear safety gloves.
- Avoid contact with skin and eyes.
- Make sure you observe the "Safety Instructions" paragraph.
- Only ever refuel the tool outdoors or in sufficiently ventilated rooms.
- Clean around the filling area. Contaminants in the tank will cause operating problems.
- Before refuelling, shake the container with the fuel mixture.
- Carefully pour in the fuel mixture to the lower edge of the filler.
- Close the fuel filler cap. Ensure the fuel filler cap closes tightly.
- Clean the fuel filler cap and the area around it.
- Check the tank and the fuel line for leaks.
- Before starting the motor, remove yourself from the fuelling place by at least three metres.
Draining fuel.
Only ever empty the tank outdoors or in well-ventilated rooms. Make sure not to spill fuel or chain oil into the soil (environmental protection). Use a proper base.
- Hold a collection container beneath the fuel drain bolt.
- Unscrew the tank cap and remove it.
- Allow the fuel to run out completely.
- Screw the tank cap on firmly by hand.
Check before use!
- Check the safe condition of the device:
- Check the device for leaks.
- Check the device for visual defects.
- Check that all parts of the device have been securely fitted.
- Check that all safety devices are in proper condition.
Starting the blower
- To start the Blower Ensure that the intermediate suction/blower tube is fitted correctly
- To use the appliance follow the motor starting instructions as described in the operating instructions.
- Make sure that nothing is covering the exhaust pipe as this would cause heat to build up.
- Hold the handle firmly with your right hand and swing the nozzle back and forth so that the desired area is cleared of contamination.
- The throttle lever and the on / off switch are integrated in the handle.
- With the throttle lock, the engine can be locked at full throttle without constantly pressing the throttle. Caution: Before switching off the device, push the throttle lock to idle
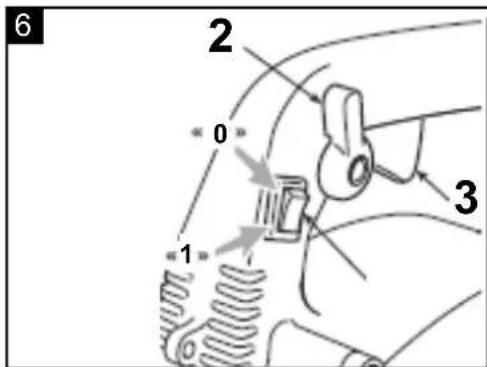
Start (fig 6)
Once the machine has been set up properly, start the engine as follow:
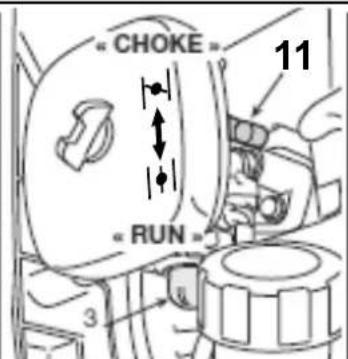
1 Turn the engine switch(1) to the ON position (E).
2 Put the choke lever(11) on the position.
3 Press the fuel pump(10) more than 5 times(G).
4 Pull the recoil starter handle (8) 3-5 times to start the engine.
5 Once the motor is running, briefly wait, then put the choke lever(11) into position.
6 If there are problems, immediately turn the motor switch (1) to "0" so the motor stops.
7 If the motor is warm, you can leave the choke lever(11) in the "warm start and work" position
Note: If the engine does not start up even after several attempts, read the section „Engine troubleshooting“.
Note: Always pull the starter cord out in a straight line. If it is pulled out at an angle, then friction will occur on the eyelet. As a result of this friction, the cable will become frayed and will wear away faster. Always hold the starter handle when the cable retracts.
Never allow the cable to snap back when it has been pulled out.
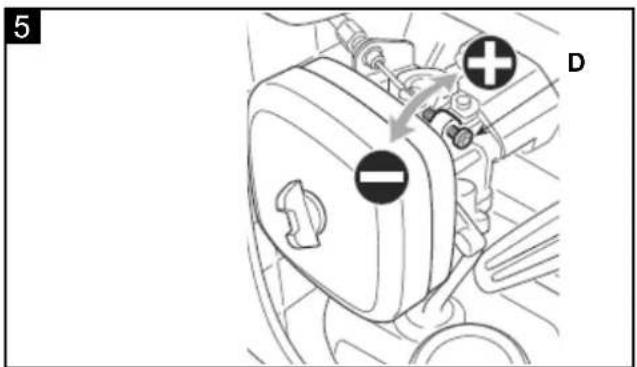
Tuning idle speed (fig. 5)
Idling must be adjusted when the engine tends to turn off or no significant speed differences are noted when using the throttle.
Adjustment is performed after starting the engine and letting it run idle for several minutes, using the screw (D):
- turn clockwise to increase engine rpm;
- turn counter-clockwise to decrease engine rpm.
After adjusting, the engine should idle without irregularities or pauses.
Stopping the engine
Emergency Stopping Procedure:
When it is necessary to stop blower engine immediately, DEPRESS the switch to OFF.
Normal procedure:
To stop the motor, push back the throttle lever lock, so that the motor runs in idling mode. Finally move the ON/OFF switch to "OFF".
8. Working instructions
Operation
- Do not smoke while refuelling or operating equipment.
- Do not touch or let your hands or body come in contact with a hot muffler or spark plug wire.
- Due to the danger of exhaust fumes, never operate blower in a confined or poorly ventilated area.
- Use the tool only in broad daylight or in well-lit conditions.
- Do not underestimate the forces involved. Make sure you stand squarely and keep your balance at all times.
- If possible, avoid using the tool on wet grass.
- Ensure that you maintain a steady foothold particularly while working on slopes.
• Always walk. Never run. - Always keep the ventilation opening clean.
- Never direct the blow hole at persons or animals.
- The machine may only be used at reasonable times of the day, i.e. not in the early morning or late evening when it will be a nuisance to other people. Permitted times of use specified by local authorities must be observed.
-
The machine must be run at the lowest possible motor speed required to carry out the work.
-
Remove all foreign objects with a rake and brush before starting any blowing work.
- Where conditions are dusty, dampen the surface a little or use a sprinkler attachment.
- Use the full-length blower nozzle extension so that the air current can work near to the ground.
- Watch out for children, pets, open windows etc. and blow the foreign objects safely away from them.
- If the device makes abnormal noises or has unusually high levels of vibration, it must be checked. Unusually high levels of vibration can injure the operator and damage the unit.
- Never operate the appliance with defective guards or shields, or without safety devices, for example debris collector in place
- Do not expose the hot engine to flammable materials.
- The blower can be used to blow debris from patios, paths, driveways, lawns, bushes and borders.
Blower mode
- Select the blow function using the selector lever on the side of the machine and switch on.
- Alternatively hold nozzle just above the ground and swing the machine from side to side, moving forwards and direct the nozzle at the debris to be cleared.
- Blow the debris into a convenient heap.
9. Maintenance
Injury warning!
Always wear protective gloves when working on or around the device.
Important!
Always pull out the spark boot plug each time before carrying out any cleaning.
Never immerse the equipment in water or other liquids in order to clean it.
Store the petrol multi-garden tool in a safe and dry place out of the reach of children.
Cleaning
- Keep the ventilation slots of the machine clean to prevent overheating of the engine.
- Regularly clean the machine housing with a soft cloth, preferably after each use.
- Keep the ventilation slots free from dust and dirt.
- If the dirt does not come off use a soft cloth moistened with soapy water.
- Regularly check the device before starting work.
- Never use water to clean or spray the device. Clean the motor casing with a damp cloth and never use detergents or solvents! This may damage the device's plastic parts. Dry the motor casing carefully afterwards.
- Only use OEM parts for maintenance work. Using parts other than original parts can cause damage to the machine.
Change and clean the spark plug (fig. 3)
Check the spark plug air gap at least once a year or when the engine starts poorly.
The correct gap between ignition flag and ignition contact is 0.25"/0.63 mm.
- Wait until the engine has cooled down completely.
- Pull the spark plug cap off the spark plug, and use the supplied spark plug wrench to remove the spark plug by turning.
- When the electrode is severely worn out or reveals a strong incrustation, the spark plug must be replaced with an equivalent plug.
- A strong incrustation of the spark plug can be caused by: Amount of oil is too high in the gasoline mix, poor oil quality, old gasoline mix, or plugged up air filter.
- Screw the spark plug by hand completely into the thread. (Avoid jamming it)
- Use the supplied spark plug wrench to tighten the spark plug.
- When using a torque wrench, the tightening torque is 12-15 Nm.
- Plug the spark plug socket correctly on the plug.
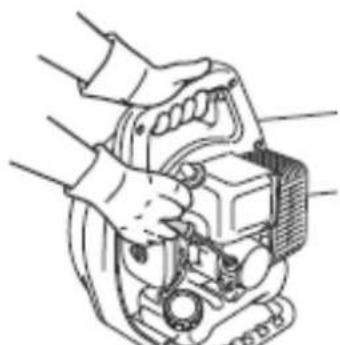
Clean the air filter (fig. 4)
Soiled air filters reduce the engine power by supplying too little air to the carburetor.
Dust and pollen plug up the pores of the filter made of foamed plastic. Regular checks are therefore essential.
- Unclip (A) the air filter cover (B) and remove the sponge filter element (C).
- To avoid objects falling into the air tank, replace the air filter cover.
- Wash the filter element in warm soap water, rinse and allow drying naturally.
Important: Never clean the air filter with petrol or inflammable solvents.
In order not to shorten the service life of the engine, a damaged air filter must be replaced at once.
Warning!
Never run the engine without the air filter element installed.
Fuel filter
Inside the fuel tank there is a filter which prevents impurities from entering the engine. The filter should be replaced once a year by your Retailer.
Our machines have been designed to operate over a long period of time with a minimum of maintenance.
Continuous satisfactory operation depends upon proper machine care and regular cleaning.
Keep all nuts, bolts and screws tight to be sure the appliance is in safe working condition.
- Replace worn or damaged parts.
- Use only genuine replacement parts and accessories
- Store the appliance only in a dry place.
The user is responsible for all damages caused by non-compliance with instructions in this manual. This also applies to non-authorized modifications of the tool, use of non-authorized spare parts, accessories, working tools, unrelated and not intended use, secondary damages due to use of faulty components.
Warning!
Use only original manufacturer's replacement parts, accessories and attachments. Failure to do so can cause poor performance, possible injury and may void your warranty.
Important hint in case of sending the equipment to a service station:
Due to security reasons please see to it that the equipment is sent back free of oil and gas!
Ordering replacement parts
Please quote the following data when ordering replacement parts:
- Type of machine
• Article number of the machine
Service information
Please note that the following parts of this product are subject to normal or natural wear and that the following parts are therefore also required for use as consumables.
Wear parts*: Spark plug, Air filter, Fuel filter
* Not necessarily included in the scope of delivery!
10. Storage
Important: Never put the equipment into storage for longer than 30 days without carrying out the following steps.
Storing the equipment
If you intend to store the equipment for longer than 30 days, the equipment must be prepared accordingly. Otherwise the fuel still remaining in the carburetor will evaporate and leave a rubbery sediment. This can cause problems when starting up the equipment and may require expensive repairs.
- Slowly remove the fuel tank cap to release any pressure that may have formed in the tank. Carefully empty the tank. Empty the tank only outdoors or in well-ventilated areas. Make sure that no fuel enters soil (environmental Protection). Use suitable base.
- To remove the fuel from the carburetor, start the engine and let it run until the equipment stops.
- Leave the engine to cool (approx. 5 minutes).
- Remove the spark plug (see section Change and clean the spark plug).
- Add one teaspoon of 2-stroke engine oil into the combustion chamber. Slowly pull the starter cord several times to apply a layer of oil to all internal components. Fit the spark plug again.
Note: Store the equipment in a dry place and far away from possible ignition sources such as an oven, a gas-fired hot water boiler, a gas-fired dryer, etc.
Putting the equipment back into operation
- Remove the spark plug (see section Change and clean the spark plug).
-
Quickly tug on the starter cord to remove excess oil from the combustion chamber.
-
Clean the spark plug and check that the electrode gap is correct, or insert a new spark plug with the correct electrode gap.
• Prepare the equipment for operation.
11. Disposal and recycling
The equipment is supplied in packaging to prevent it from being damaged in transit. The raw materials in this packaging can be reused or recycled. The equipment and its accessories are made of various types of material, such as metal and plastic. Defective components must be disposed of as special waste. Ask your dealer or your local council.
12. Troubleshooting
The table below contains a list of fault symptoms and explains what you can do to remedy the problem if your equipment fails to work properly. If the problem still persists after working through the list, please contact your nearest service workshop.
| Fault Possible cause Remedy | ||
| Machine does not start. • Air filter is contaminated.• Fuel filter is blocked.• Lack of fuel supply.• Fault in the fuel line.• Starting device is faulty.• Engine stalled.• Spark plug cap not attached.• No spark.• Engine faulty.• Carburetor faulty• Protective flap not completely closed• Safety switch (fig. 10) not activated | • Clean/replace the air filter.• Clean or renew the fuel filter.• Re-fuel.• Check the fuel line for kinks or damage.• Contact the service centre.• Remove the spark plug, clean and dry it; then pull the starter rope several times; re-fix the spark plug.• Check the correct position of the spark plug cap.• Clean the spark plug or replace it, if applicable.• Check the ignition cable for damage.• Contact the service centre.• Contact the service centre.• Close protective flap• Activate safety switch by correctly inserting the blast pipe | |
| Machine starts but stops again. | Wrong carburetor setting (idle speed). Contact the service centre. | |
| Machine works with interruptions (sputtering). | • Carburetor set up incorrectly.• Spark plug is sooty.• On/off switch faulty. | • Contact the service centre.• Clean the spark plug or replace it.• Contact the service centre. |
| Smoke is generated • Wrong fuel mix.• Carburetor set up incorrectly. | • Use two-stroke mixture at a ratio of 40:1.• Contact the service centre. | |
| Machine does not work at full power. | • Air filter is contaminated.• Carburetor set up incorrectly. | • Clean the air filter or replace it.• Contact the service centre.• Check the exhaust. |
Günzburger Straße 69
D-89335 Ichenhausen
Cher client,
Günzburger Straße 69
89335 Ichenhausen / Germany
Estimado cliente,
Günzburger Straße 69
89335 Ichenhausen / Germany
Egregio cliente,
Günzburger Straße 69
D-89335 Ichenhausen
Szanowny kliencie,
Günzburger Straße 69
89335 Ichenhausen / Germany
Arvoisa asiakas,
Günzburger Straße 69
D-89335 Ichenhausen
Geachte Klant,
Günzburger Straße 69
D-89335 Ichenhausen
Austatud klient!
Günzburger Straße 69
D-89335 Ichenhausen
Godātais klient!
Günzburger Straße 69
D-89335 Ichenhausen
Gerbiamas kliente,
B
CE - Declaration of Conformity
X 2000/14/EC_2005/88/EC
Noise: measured L_WA = 108.4 dB(A); guaranteed L_WA = 110 dB(A) P = xx KW; L/∅ = cm
X Annex V
Annex VI
Notified Body:
Notified Body No.:
X 2016/1628/EC
Emission. No: e24*2016/1628*2017/656SHA1/P*0093*00
Standard references:
EN15503:2009+A2:2015, EN ISO 14982:2009
This declaration of conformity is issued under the sole responsibility of the manufacturer.
Subject to change without notice
Documents registar: Stefan Hartinger
Günzburger Str. 69, | 89335 D-Ichenhausen
Garantie DE
Apparent defects must be notified within 8 days from the receipt of the goods. Otherwise, the buyer's rights of claim due to such defects are invalidated. We guarantee for our machines in case of proper treatment for the time of the statutory warranty period from delivery in such a way that we replace any machine part free of charge which provably becomes unusable due to faulty material
or defects of fabrication within such period of time. With respect to parts not manufactured by us we only warrant insofar as we are entitled to warranty claims against the upstream suppliers. The costs for the installation of the new parts shall be borne by the buyer. The cancellation of sale or the reduction of purchase price as well as any other claims for damages shall be excluded.
Garantie FR


- LB2500P
- Verehrter Kunde,
- Explanation of the symbols on the equipment
- Table of contents: Page:
- Introduction
- Manufacturer:
- Dear Customer,
- Note:
- We recommend:
- Layout
- Scope of delivery
- Important!
- Intended use
- Important information
- General instructions
- Workplace safety
- Safety of persons
- Usage and treatment of the device
- Safe handling with fuels
- Residual risks
- Technical data
- Subject to technical changes!
- Attachment and operation
- ATTENTION!
- Assembly (fig. 7-9)
- Operation
- Before starting
- Fuel and oil
- Fuel mixing table
- Warning! Take care of the emission of exhaust gases.
- Filling with fuel
- Danger of injury! Fuel is explosive!
- Draining fuel.
- Check before use!
- Starting the blower
- Start (fig 6)
- Tuning idle speed (fig. 5)
- Stopping the engine
- Working instructions
- Blower mode
- Maintenance
- Injury warning!
- Cleaning
- Change and clean the spark plug (fig. 3)
- Clean the air filter (fig. 4)
- Warning!
- Fuel filter
- Important hint in case of sending the equipment to a service station:
- Ordering replacement parts
- Service information
- Storage
- Storing the equipment
- Putting the equipment back into operation
- Disposal and recycling
- Troubleshooting
- Cher client,
- Estimado cliente,
- Egregio cliente,
- Szanowny kliencie,
- Arvoisa asiakas,
- Geachte Klant,
- Austatud klient!
- Godātais klient!
- Gerbiamas kliente,
- CE - Declaration of Conformity
- Standard references:
- Garantie DE
- Garantie FR
Brand : SCHEPPACH
Model : LB2500P
Category : Blower