Lugano 570 G Evo II - Barbecue Outdoorchef - Free user manual and instructions
Find the device manual for free Lugano 570 G Evo II Outdoorchef in PDF.

User questions about Lugano 570 G Evo II Outdoorchef
0 question about this device. Answer the ones you know or ask your own.
Ask a new question about this device
Download the instructions for your Barbecue in PDF format for free! Find your manual Lugano 570 G Evo II - Outdoorchef and take your electronic device back in hand. On this page are published all the documents necessary for the use of your device. Lugano 570 G Evo II by Outdoorchef.
USER MANUAL Lugano 570 G Evo II Outdoorchef
natural_image
Line drawing of a traditional electric grill with a dome-shaped top and side-mounted air vent (no text or symbols)LUGANO 570 G EVO II
Please read these instructions carefully before using your OUTDOORCHEF gas barbecue.

MODE D'EMPLOI
60
text_image
Diagram illustrating a hand gesture testing a device with a magnified view of the tool's internal structure.flowchart
graph TD
    A["RCHEF"] --> B["Step 1: Internal assembly with arrows indicating movement"]
    B --> C["Step 2: Cross-sectional assembly with arrows indicating movement"]
    C --> D["Step 3: Internal assembly with arrows indicating movement"]
    D --> E["Step 4: Internal assembly with arrows indicating movement"]
    E --> F["✓"]
natural_image
Two identical circular gauges with a valve and flame symbols, no text or labels present○ : Aus Position
: niedrige Leistung
: mittlere Leistung
: hohe Leistung
: Zündung
: Zünder
6.2 BRENNER-SYSTEME
6.2.1 KUGEL
natural_image
Exploded view of a mechanical device with three views: top panel, middle panel, and bottom panel (no text or symbols visible)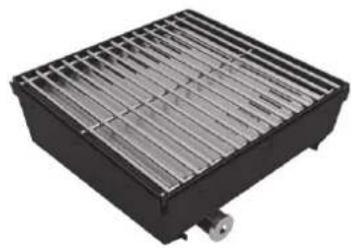
natural_image
Exterior view of a black rectangular industrial component with a metallic grid structure (no text or symbols visible)Mittlere Temperaturen 200 - 350°C
High-Performance Keramikbrenner Reguläres Grillen
HEAT DIFFUSER
natural_image
Exploded view diagram of a kitchen appliance showing internal components and mounting points (no text or labels)6.2.2.4 VOR DEM GRILLEN
natural_image
Technical line drawing of a mechanical assembly with pipes and a curved component (no text or symbols)
flowchart
graph TD
    A["1"] --> B["2"]
    B --> A
6.2.2.5 NACH DEM GRILLEN
text_image
Technical diagram showing three stages of a gas stove with fan and vent components, labeled 1 to 3.natural_image
Black plastic fan with six blades and mounting holes, mounted on a square base (no text or symbols visible)Hohe Hitze
natural_image
Black plastic fan with mounting holes and a square base (no text or symbols visible)Mittlere Hitze
natural_image
Black plastic fan or vent component with mounting holes and a central hub (no text or symbols visible)Tiefere Hitze
natural_image
Illustration of a bowl inside a container with arrows indicating flow or process (no text or symbols)natural_image
Illustration of a frying pan with a stovet and a pot on top, showing its interior (no text or symbols)natural_image
Two circular gauges with white segments and gray shading against a black background, no text or symbols visible.text_image
Diagram showing battery charging process with labeled components and magnified viewstext_image
Technical diagram of a portable electric stove with labeled components and airflow indicatorsnatural_image
Technical line drawing of a microwave oven with a door and fan blade (no text or symbols)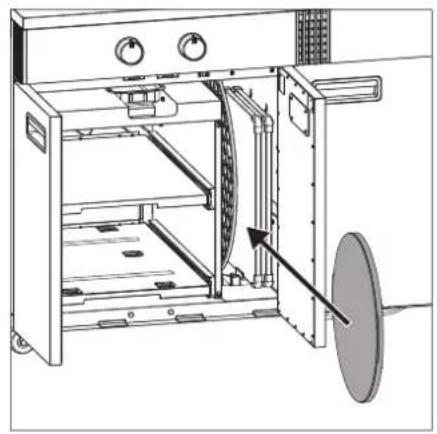
natural_image
Technical line drawing of an oven with a door, fan, and control panel (no text or symbols)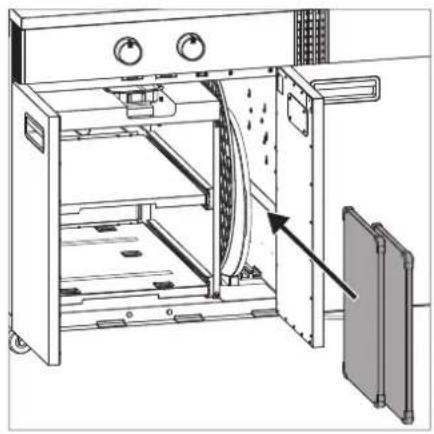
natural_image
Technical line drawing of an oven with a door, vent, and internal components (no text or symbols)
natural_image
Technical line drawing of an oven with a tray and control panel (no text or symbols)
natural_image
Line drawing of an open industrial oven with control panel and storage unit (no text or symbols)
natural_image
Line drawing of a mechanical device with a cylindrical container and open door (no text or symbols)natural_image
Technical line drawing of a portable air conditioner unit with control panel and directional arrows (no text or symbols)natural_image
Diagram of a mechanical component with an arrow indicating direction (no text or symbols present)OFF
natural_image
Mechanical diagram showing a clamp or lever mechanism with a circular head and arrow indicator (no text or symbols)ON
natural_image
Technical line drawing of a portable electric grill with a dome top and control panel (no text or symbols)text_image
Technical diagram showing three-step installation of a microwave oven system with labeled components and a 2x ratio indicator.natural_image
Line drawing of a portable electric grill with a dome-shaped top and open door, showing internal compartments and wheels (no text or symbols)2.1 Storage of the User Guide
- IMPORTANT SAFETY INFORMATION 35
3.1 Installation and assembly
3.2 Operation
3.3 Storage and/or non-use
5.1 Connecting the gas hose
5.2 Leak test
- EXPLANATION OF THE OPERATING CONSOLE AND BURNER SYSTEMS 40
6.1 Explanation of the symbols on the operating console of the barbecue
6.2 Burner systems
6.2.1 Kettle
6.2.2 BLAZING ZONE
6.2.2.1 Infrared barbecue
6.2.2.2 Two application areas
6.2.2.3 Installing the HEAT DIFFUSER
6.2.2.4 Before barbecuing
6.2.2.5 After barbecuing
6.2.3 COOKING ZONE
6.2.3.1 Three application areas
6.2.3.2 Before cooking
6.2.3.3 After cooking
6.3 GOURMET BURNER TECHNOLOGY (GBT)
6.4 GAS SAFETY SYSTEM (GSS)
6.5 SAFETY LIGHT
8.1 Before first use
8.2 Instructions for lighting
8.3 Temperature ranges / application LUGANO 570 G EVO II
9.1 Before first use
9.2 Instructions for lighting
10. POWER BANK 50
11 ACCESSORIES 51
12. STORAGE ON THE LUGANO 570 G EVO II 52
13. MOVING AND MANOEUVRING THE LUGANO 570 G EVO II 53
14. CLEANING AND MAINTENANCE 54
14.1 Cleaning the kettle barbecue
14.2 Maintenance of the barbecue
14.3 Cleaning the BLAZING ZONE ^③
14.4 Maintenance of the BLAZING/COOKING ZONE
15. INFORMATION ABOUT STAINLESS STEEL PARTS OF THE LUGANO 570 G EVO II 57
15.1 Barbecue grids and HEAT DIFFUSER
15.2 Funnel
16. TROUBLESHOOTING 58
17. CONSUMER WARRANTY/GUARANTEE 58
18. REPLACEMENT PARTS 58
19. WASTE DISPOSAL 58
20. TECHNICAL INFORMATION 59
1. YOUR BARBECUE'S SERIAL NUMBER AND WHY THIS IS IMPORTANT
CE
0063/
UK CA
0558/
Outdoorchef AG
Eggbühlstrasse 28, 8050 Zürich
Serial No.:
PIN:0063BP3505
Typ:
Article No.:
Butane / Propane
G30 / G31
30/37 mbar
DISTRIBUTION
You can find the serial number of your barbecue on the back of the enclosed "Manual & Inspiration" folder. Depending on the barbecue model, you will also find the serial number on the data sticker that is either attached to the barbecue frame or the base plate.
The serial number and item number are important to allow smooth processing of enquiries, orders for spare parts and any warranty claims. Keep the User Guide in a safe place. It contains important information about safety, operation and maintenance. Please make a note of the serial number of your barbecue in the 'Serial No.' field above.
2. USER GUIDE
Please read these instructions carefully before using your OUTDOORCHEF gas barbecue.
2.1 STORAGE OF THE USER GUIDE
Note to the consumer:
This User Guide must be kept by the consumer and be close at hand at all times.
Note for the installer: This User Guide must remain with the consumer.
3. IMPORTANT SAFETY INFORMATION
Please read this user guide carefully before using your OUTDOORCHEF gas barbecue. Use outdoors only.
DANGER, WARNING and CAUTION notes are provided in this user guide to highlight important and critical usage information. Please read and follow these instructions to ensure safety and to avoid damage to property and personal injury.
⚠️ DANGER: Indicates dangerous situations resulting in death or serious injury if these instructions are not observed.
⚠ WARNING: Indicates dangerous situations potentially resulting in death or serious injury if these instructions are not observed.
⚠️ CAUTION: Indicates dangerous situations potentially resulting in minor or moderate injuries if these instructions are not observed.
DANGER
If you smell gas:
- Disconnect the gas supply to the barbecue.
- Extinguish all open flames.
- Open the lid.
- If you still smell gas, move away from the barbecue and contact the fire services immediately.
WARNING
- Do not keep flammable liquids, materials and/or gases (petrol, gas, highly flammable material, etc.) in the immediate vicinity of your barbecue.
- Never store an unused gas bottle near the barbecue or in closed rooms.
3.1 INSTALLATION AND ASSEMBLY
Read the instructions before using the appliance.
Select a location that is as sheltered as possible from the wind before lighting the barbecue.
⚠️ DANGER: This barbecue is not suitable for installation in or on boats or caravans.
WARNING: The barbecue is supplied with the appropriate gas hose and gas pressure regulator. It is essential to keep the gas hose away from the hot outside surfaces of the barbecue. The hose must not be twisted. On barbecue models that have a hose guide, it is essential for the hose to be secured in this guide.
⚠ WARNING: The hose and regulator correspond to the respective national regulations and the EN standards and BS standard (gas pressure regulator BS EN 16129/gas hose BS EN 16436/gas pressure regulator EN 16129/gas hose EN 16436).
⚠ WARNING: Do not modify the appliance. Contact a specialist if you suspect there is a malfunction.
⚠ WARNING: Before first use and always after connecting a new gas bottle, check the connection parts in accordance with the instructions below in the LEAK TEST section of this operating manual.
3.2 OPERATION
Anyone who operates the barbecue must know and follow the ignition process precisely. Children must not be allowed to use the barbecue. Follow the assembly instructions exactly. Incorrect assembly can have dangerous consequences.
Do not position any flammable liquids, materials or spare gas bottles in the vicinity of the barbecue. Never set up the barbecue or the gas bottle(s) in enclosed rooms without ventilation.
Please read these instructions carefully before using your OUTDOORCHEF gas barbecue. The barbecue is for outdoor use only and a safety clearance of at least 1.5 m from flammable objects must be ensured.
⚠️ DANGER: Only use the barbecue outdoors. Never use indoors, e.g. in garages, buildings, tents and other enclosed areas or under flammable constructions.
⚠️ DANGER: Never use the barbecue under a canopy.
⚠️ DANGER: This appliance must be kept away from flammable materials during use.
⚠️ DANGER: Only use the barbecue on firm, secure ground. Never place the barbecue on wooden floors or other flammable surfaces while it is in use. Keep the barbecue away from flammable materials.
⚠️ DANGER: Turn off the gas supply at the gas cylinder after use.
⚠️ DANGER: After grilling, always turn the gas regulating knob to the ○ position and close the gas supply at the gas bottle.
⚠️ DANGER: When changing the gas bottle, make sure that the gas regulating knob is in the O position and the gas supply is closed at the gas bottle. Ensure that there are no ignition sources in the vicinity of the barbecue.
⚠ WARNING: Renew the hose and the gas pressure regulator after a usage period of 3 years from the purchase date. Make sure that the gas pressure regulator and hose comply with the corresponding EN standards and BS standards (gas pressure regulator BS EN 16129/gas hose BS EN 16436/gas pressure regulator EN 16129/gas hose EN 16436).
⚠ WARNING: Replace the gas hose immediately if it is damaged or displays signs of wear. The hose must be free from kinks and must not have any cracks. Do not forget to switch off the gas regulating knob and the gas supply before you remove the hose.
⚠ WARNING: If you suspect that parts are leaking, turn the gas regulating knob to the ○ position and close the gas supply at the gas bottle. Have the parts that carry gas checked at a specialist gas equipment retailer.
⚠ WARNING: Never leave the barbecue unsupervised during operation.
⚠ WARNING: Do not move the appliance during use.
⚠ WARNING: Fat residues in the drip pans may ignite and cause a fire. These must be cleaned after each use.
⚠ WARNING: Never block the large round air intake hole on the base of the bowl or the air slots in the lid. The ventilation openings in the gas bottle compartment must never be closed or covered.
⚠ WARNING: Never cover the surfaces of the BLAZING/COOKING ZONE during operation as this can lead to a build-up of heat.
⚠ WARNING: Never place cooking pots, pans or griddle plates on the BLAZING ZONE ^® , these may only be placed on the COOKING ZONE.
CAUTION: The recommended length of the gas hose is 90 cm, and it must not be longer than 150cm.
⚠️ CAUTION: Accessible parts may be very hot. Keep children away.
⚠️ CAUTION: The barbecue remains hot for quite some time after being switched off. Make sure you do not burn yourself or place any objects on the barbecue due to the danger of burns.
⚠️ CAUTION: Wear protective gloves when touching hot parts.
CAUTION: Contact a specialist gas equipment retailer if full power is not achieved and you suspect there may be a blockage in the gas supply.
⚠️ CAUTION: Appliances with castor wheels must not be pushed across uneven ground or steps.
⚠️ CAUTION: Never place hot objects such as barbecue grids, barbecue pans and cast-iron pans on the shelf or preparation surfaces of your barbecue. This could damage the varnish or paintwork on your barbecue.
⚠️ CAUTION: Make sure the drip pan is empty before changing the gas bottle to prevent the full drip pan from falling off and causing stains.
3.3 STORAGE AND/OR NON-USE
⚠️ DANGER: Do not store the barbecue in the vicinity of highly inflammable liquids or materials.
⚠️ DANGER: If you store the barbecue indoors over winter, it is essential for the gas bottle to be removed. It should always be stored outdoors in a well ventilated location which is inaccessible to children.
⚠️ CAUTION: When the barbecue is not in use, and once it has cooled down fully, protect it against weather damage by using a cover. Covers can be purchased from your barbecue retailer.
⚠️ CAUTION: To avoid condensation build-up, remove the cover after heavy rain and allow the barbecue to dry.
4. GAS BOTTLES
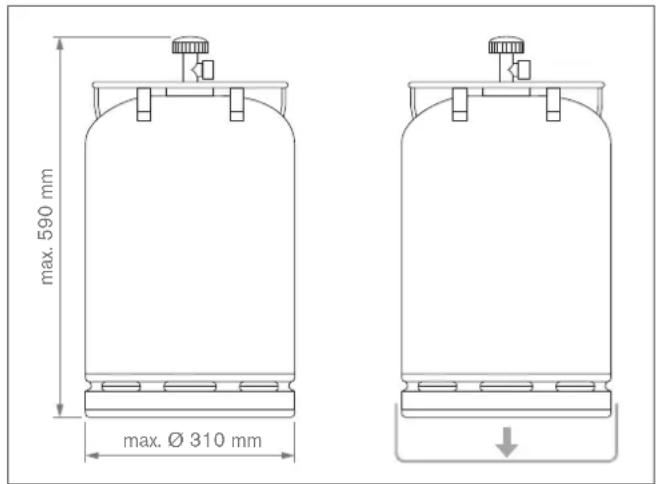
- Only gas bottles up to a maximum net weight of 11 kg may be placed on the base plate. Position the bottle in the space provided.
text_image
max. 590 mm max. Ø 310 mm- Make sure there are no leaking screw connections.
- Carry out the LEAK TEST before use and after each gas bottle change.
Gas bottles must not be exposed to temperatures exceeding 50^ , and must never be stored in an enclosed room or basement. - Read and follow the safety instructions on the gas bottles being used.
NOTE: Check whether the pressure regulator and gas bottle are approved for use in your country. Use only gas bottles that comply with the applicable national standard. The different sealing systems mean that any discrepancy in the pressure regulator and gas bottle systems will prevent the secure closure of the seal. This could result in a leakage of gas, which could then be ignited by an open fire or a spark. For safety and liability reasons, in all cases we recommend checking gas barbecues intended for sale and, if required, adapting the pressure regulator and gas hose in accordance with national regulations, or arranging for this work to be performed.
5. FIRST USE OF THE BARBECUE
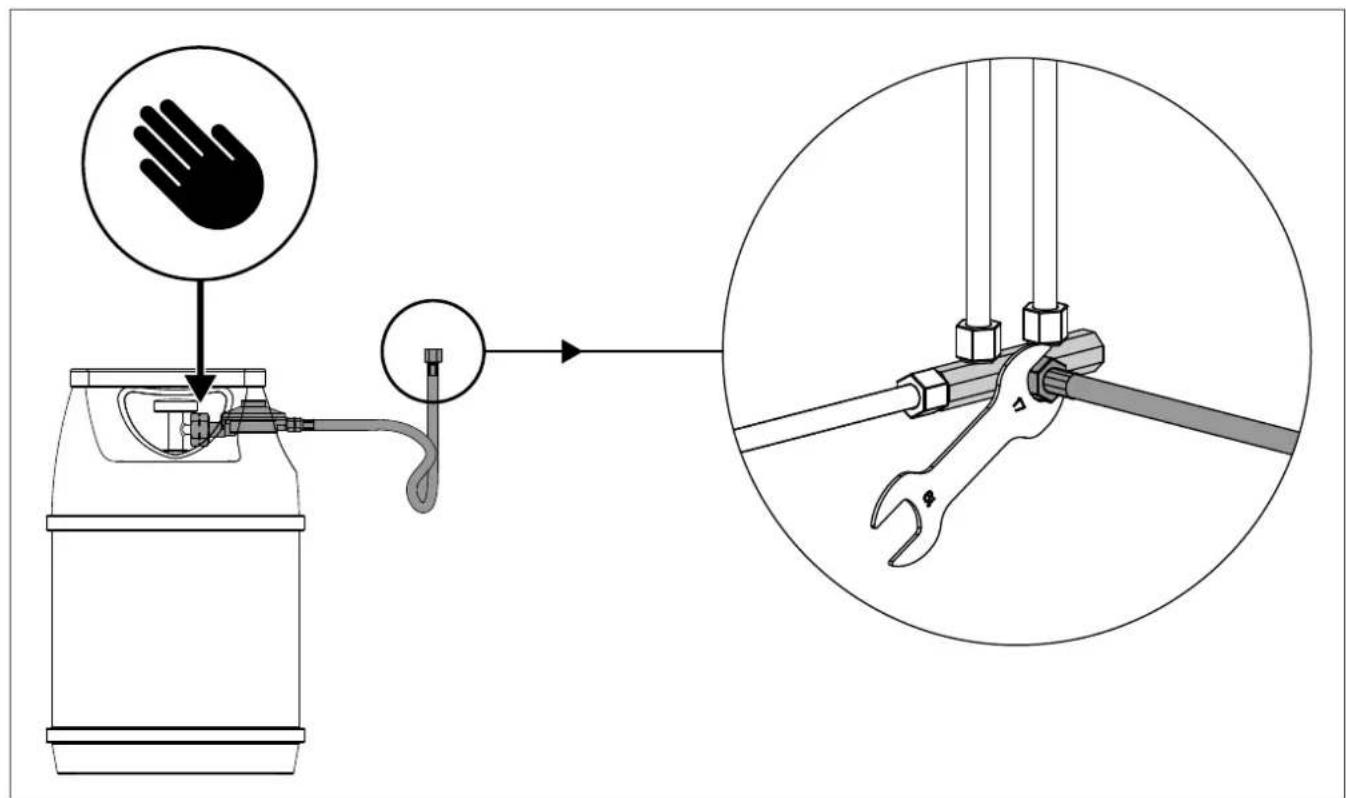
5.1 CONNECTING THE GAS HOSE
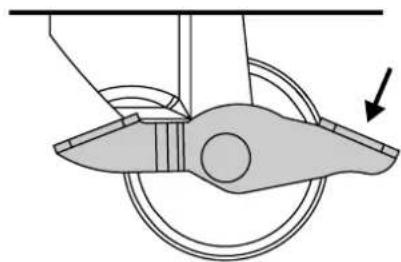
WARNING:
Always use the spanner supplied to attach the gas hose to ensure the connection is sufficiently secure. For your safety, never tighten the gas hose by hand to avoid any risk of barbecue fires.
text_image
Diagram illustrating a hand gesture application on a fuel pump, with an inset showing the tool's mechanical setup.Please refer also to the information in the separate assembly instructions for your barbecue.
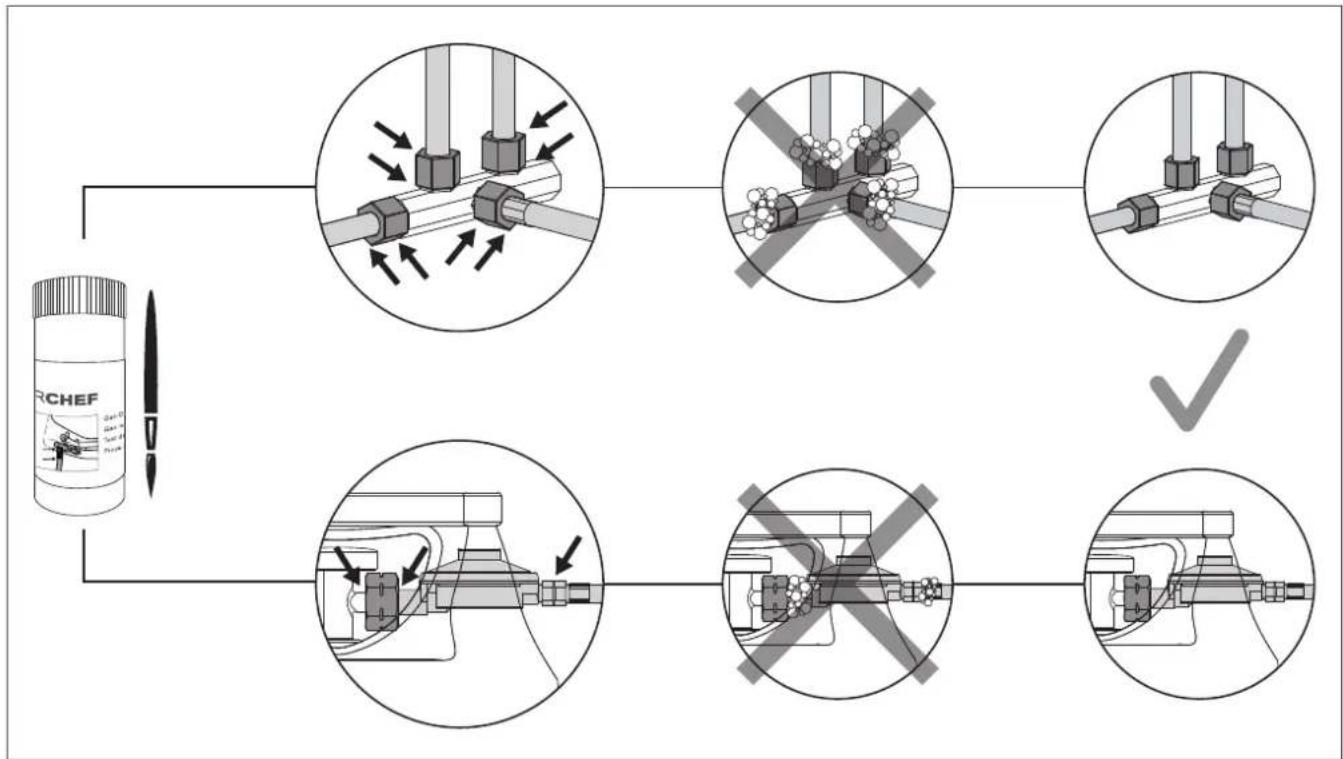
5.2 LEAK TEST
⚠ WARNING: Ensure that no ignition sources are in the vicinity during the leak test. This also includes smoking. Never check for leaks with a burning match or a naked flame, and always do this task outdoors.
⚠ WARNING: Carry out the LEAK TEST each time the gas bottle is connected or changed, and also at the start of the barbecue season.
⚠ WARNING: Do not use the barbecue until all leaks have been eliminated.
- The gas regulating knob must be in the position.
- Open the gas supply on the bottle and brush the soap-water solution provided or a home-made soap solution comprising 50% liquid soap and 50% water onto all parts that carry gas (connection at the gas bottle / gas pressure regulator / gas hose / gas inlet / connection on the valve). You can also use a leak spray
- Bubbles forming in the soap solution indicate that there are leaks. Turn off the gas supply at the gas bottle.
- Eliminate the leaks by re-tightening the connections if possible, or else renew the defective parts.
- Repeat steps 1 and 2.
- Contact your specialist gas equipment retailer if the leaks cannot be eliminated.
flowchart
graph TD
    A["RCHEF"] --> B["Step 1: Internal assembly with arrows indicating movement"]
    B --> C["Step 2: Cross-sectional assembly with arrows indicating movement"]
    C --> D["Step 3: Internal assembly with arrows indicating movement"]
    D --> E["✓"]
Heat settings/heat levels and Ignition
natural_image
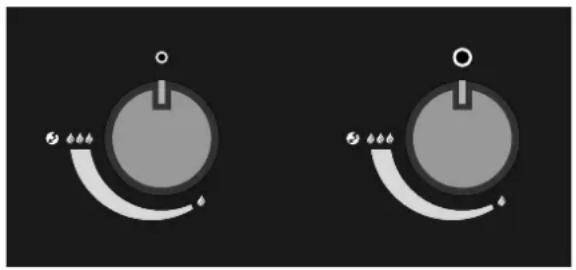
Two identical circular gauges with a pointer and curved arrows, no text or symbols present.Barbecue systems with two control dials

text_image
outdoorchefThe control dial on the right reaches its highest power at the setting and its lowest power at the setting. It is designed for applications in the medium to high temperature range.
The control dial on the left achieves its highest power at the setting and its lowest power at the setting. It is designed for applications in the medium to low temperature range.
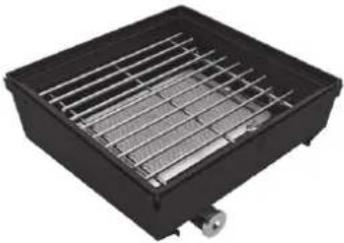
6.2.2 BLAZING ZONE
6.2.2.1 INFRARED BARBECUE
How does an infrared burner work?
The gas flame created when the BLAZING ZONE ^® is ignited is distributed evenly in the ceramic plate and generates infrared radiation on the surface. This emits concentrated direct heat of up to 900 degrees Celsius onto the food to be grilled. This makes it possible to work with far higher temperatures in comparison with a traditional gas burner.
6.2.2.2 TWO APPLICATION AREAS
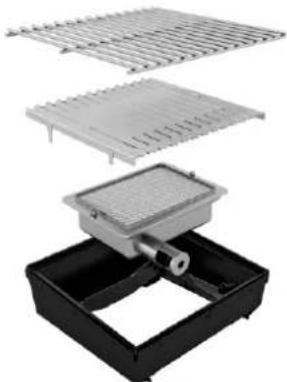
The BLAZING ZONE ^® is not a conventional ceramic burner. The difference is its wider temperature spectrum in comparison with traditional ceramic burners. While most ceramic burners can work only in the high temperature range (600-900°C), its clever system allows the BLAZING ZONE ^® to operate at medium temperatures from 200°C – 350°C as well, just like a standard gas barbecue.
This is made possible thanks to the novel HEAT DIFFUSER which retains the heat and distributes it evenly over the grid.
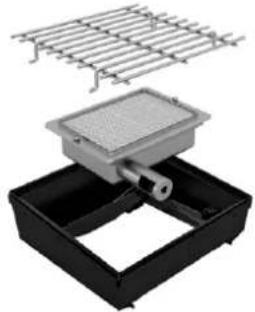 |  | High temperature 600 - 900°CHigh-performance ceramic burnerHigh-temperature grillingPerfect crust on meatHeight-adjustable grid, 2 levelsPerfect for lean cuts |
natural_image
Exploded view of a portable electrical heater with cooling panel and mounting base (no text or symbols visible)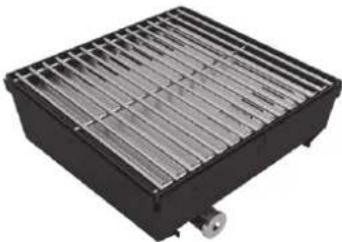
natural_image
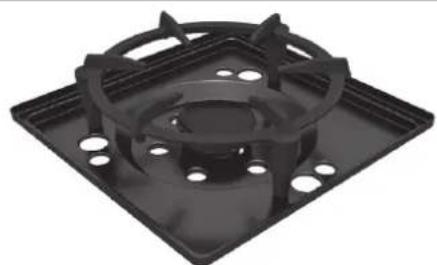
Exterior view of a black rectangular industrial fan or heater with metal grating (no text or symbols visible)Medium temperatures 200-350°C
High-performance ceramic burner Conventional grilling
HEAT DIFFUSER
- Prevents flare-ups
- Distributes heat evenly across the grid
- Channels fat away
Perfect for fattier cuts
Perfect for more delicate grilled food sausages, poultry, vegetables and fish
This makes it possible to cook steaks and other cuts of meat at maximum heat over 900 °C, for a perfect seared crust.
You simply need to remove the HEAT DIFFUSER.
If you want to cook more delicate foods such as fish, poultry or vegetables at medium temperatures (200 - 350°C) and prevent flare-ups, use the HEAT DIFFUSER. This directs the heat over a wider surface on the grid to ensure an even temperature – the same as with a classic gas barbecue.
This allows you to decide, depending on the food, whether you want to barbecue at maximum heat over 900^ C or at lower temperatures from 200-350^ C – for maximum flexibility!
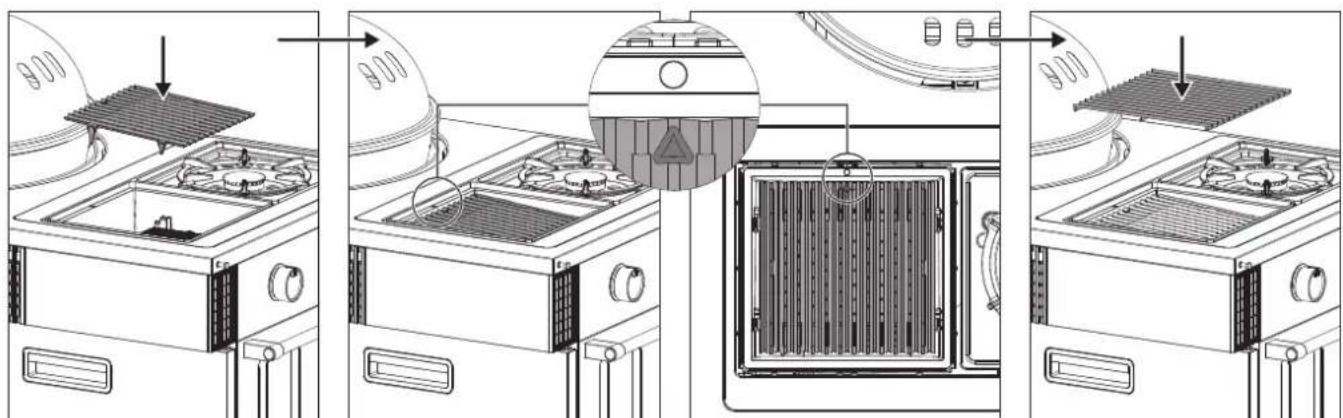
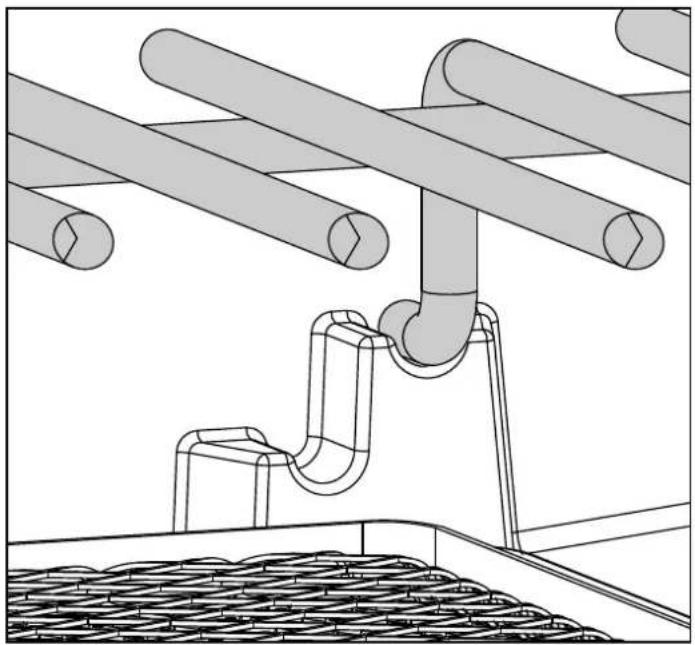
6.2.2.3 INSTALLING THE HEAT DIFFUSER
text_image
Technical diagram showing three stages of a heating or cooling system with labeled components and airflow indicators.⚠ WARNING: Always wear heat-resistant gloves when working.
Allow the BLAZING ZONE ^® to cool down completely before touching any parts.
Use the barbecue grid lifter supplied to adjust the barbecue grid and to remove the HEAT DIFFUSER.
- Move the barbecue grid and the HEAT DIFFUSER to the desired position.
- Heat the BLAZING ZONE ^® for around 10 minutes at the desired setting
- Place the food to be grilled on the barbecue grid and adjust the temperature as required between
natural_image
Technical line drawing of a mechanical assembly with pipes and a curved pipe (no text or symbols)
flowchart
graph TD
    A["1"] --> B["2"]
    B --> A
6.2.2.5 AFTER BARBECUING
- Set the gas regulating knob for the burner to .○
- Turn off the gas supply at the gas bottle.
The bottle tap must be closed even on empty bottles.
- Allow the BLAZING ZONE ^® to cool down completely and then clean the barbecue grid.
- Protect the barbecue and the complete BLAZING/COOKING ZONE with the corresponding cover.
6.2.3 COOKING ZONE
6.2.3.1 THREE APPLICATION AREAS
The completely newly developed COOKING ZONE is, as the name suggests, more than a conventional side cooking plate as it opens up a far wider temperature range. While standard side cooking plates are usually designed for medium and high temperatures, the COOKING ZONE can also be used to cook dishes at low heat (pasta sauces, soups, stews, etc.).
This is made possible by a completely new burner design and the option of using the side cooking plate at 3 different heights.
The concave shape of the solid cast-iron surface also allows the COOKING ZONE to be combined ideally with the OUTDOORCHEF BBQ Wok, which can be used directly on the surface (without the wok adapter ring)
Adjusting the height of the cast-iron cooking surface
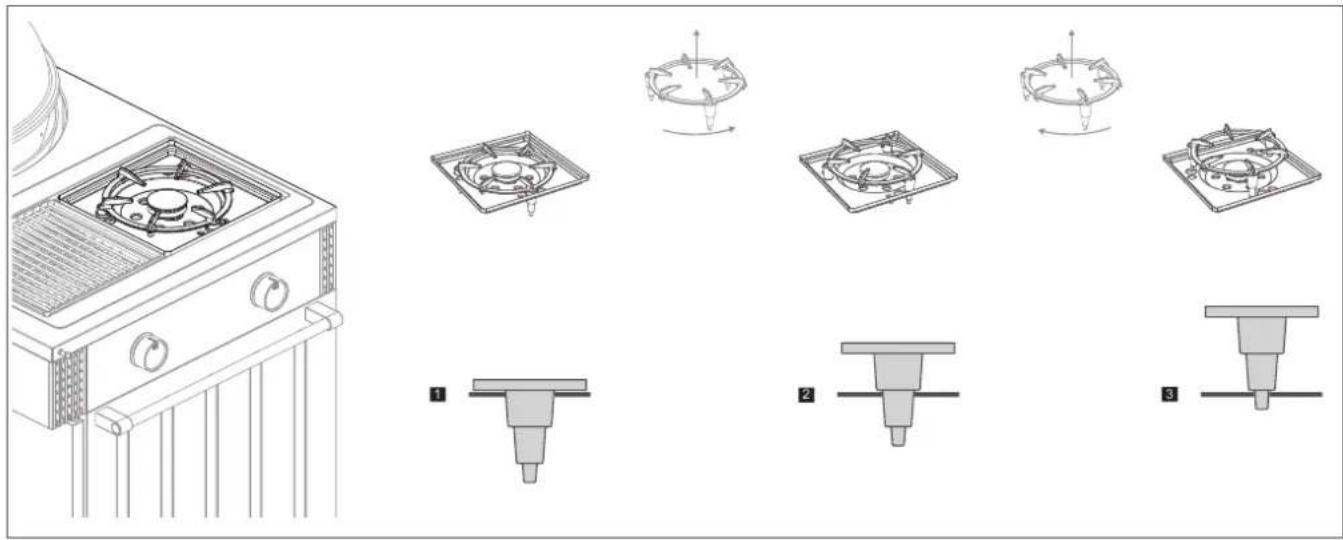
text_image
Technical diagram showing three stages of a gas stove with fan and vent components, labeled 1 to 3.Protective covers for the cast iron cooking surface
Make sure you always use the supplied protective silicone covers for the cast iron cooking surface. These protect the holes used to adjust the height of the grid from scratches.
natural_image
Black plastic fan with six blades and mounting holes, mounted on a square base (no text or symbols visible)High heat
In combination with the control dial, various applications are possible in the high-temperature range
- Searing meat, fish and vegetables
natural_image
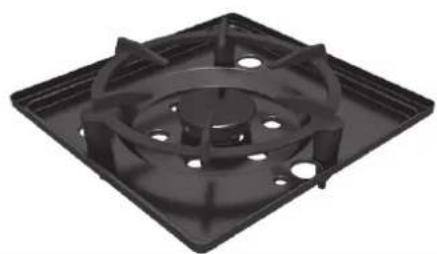
Black plastic fan with mounting holes and a square base (no text or symbols visible)Medium heat
In combination with the control dial, various applications can be covered in the medium temperature range
- Searing/steaming meat, fish and vegetables
- Searing starchy vegetables, e.g. fried potatoes, rösti, etc.
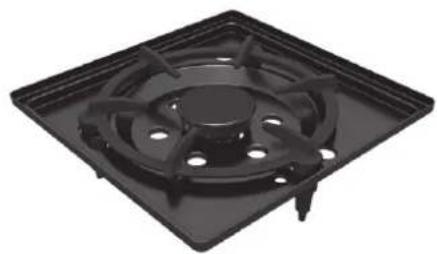
natural_image
Black plastic fan or vent component with mounting holes and a square base (no text or symbols visible)Lower heat
In combination with the control dial, various application areas can be covered in the low temperature range
- Heating sauces, soups and stews, boiling rice-based dishes
6.2.3.2 BEFORE COOKING
⚠ WARNING: Always wear heat-resistant gloves when working.
Allow the COOKING ZONE to cool down completely before touching any parts.
- Adjust the cast iron surface to the required position (3 height levels).
- Place the pan or wok on the cast iron surface and heat it for 5 minutes at the desired level 🔍. 🔍 🔍 🔍
- Place the food to be grilled in the pan or wok and adjust the temperature as required between
6.2.3.3 AFTER COOKING
- Set the gas regulating knob for the burner to .
- Turn off the gas supply at the gas bottle. The bottle tap must be closed even on empty bottles.
- Allow the COOKING ZONE to cool down completely and then clean the area below the cast-iron cooking surface.
- Protect the barbecue and the complete BLAZING/COOKING ZONE with the corresponding cover.
6.3 GOURMET BURNER TECHNOLOGY (GBT)
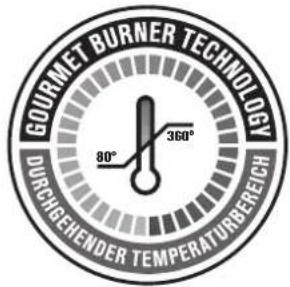
text_image
GOURMET BURNER TECHNOLOGY DURCHGEHENDER TEMPERATURBEREICH 80° 360°The LUGANO 570 G EVO II features the latest burner generation that allows you to use a consistent and continuous temperature range of 80-360 degrees. This opens up completely new possibilities for using your barbecue as it allows you to grill, cook or bake in all temperature ranges.
6.4 GAS SAFETY SYSTEM (GSS)

text_image
GAS SAFETY SYSTEM FLAME GUARD FLAME CHECK SAFETY LIGHTThe LUGANO 570 G EVO II incorporates the innovative GAS SAFETY SYSTEM (GSS) which includes the following features:
FLAME GUARD
The FLAME GUARD is a closed system consisting of ignition and flame. This system ignites after opening the gas tap and activating the ignition. The FLAME GUARD protects the flame from weather influences such as strong wind and ensures the burners always reignite automatically if they happen to be extinguished*. The ignited burners therefore operate reliably in a wide range of weather conditions (e.g. wind).
Benefits:
- The ignited burners are optimally protected from weather influences.
- Barbecuing at very low temperatures from 80 degrees, even in windy weather.
■ Prevention of escaping non-ignited gas.
* △ WARNING: There is no such thing as 100% certainty that burners will not be extinguished by extreme weather influences. When working with gas, you must always make sure that the barbecue is never left unattended. All tests are conducted under laboratory conditions.
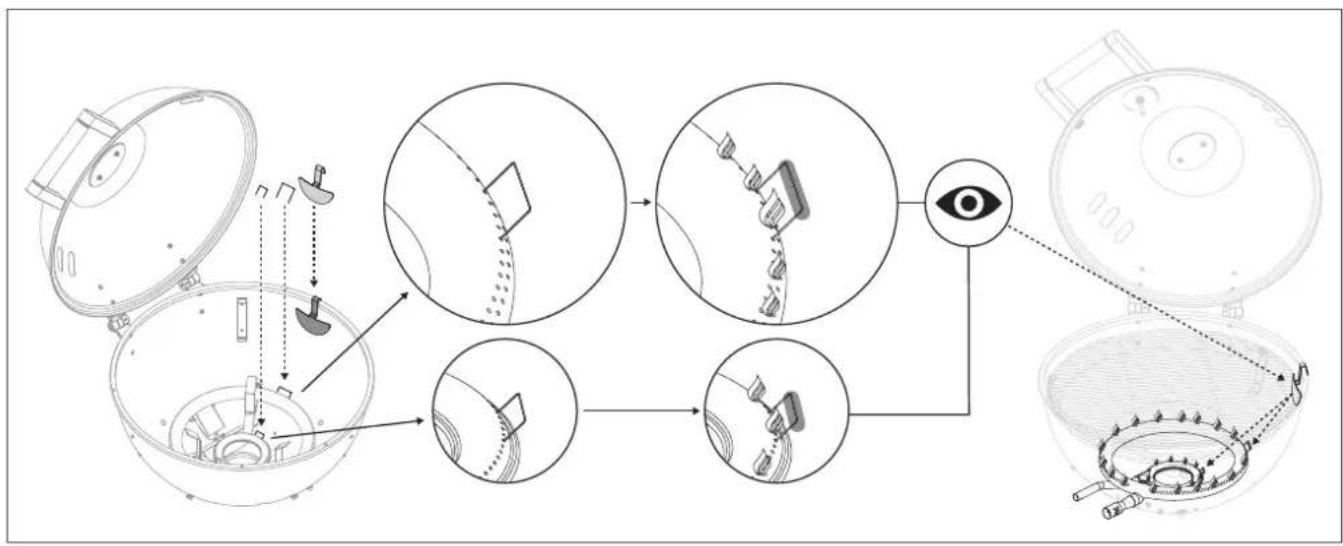
FLAME CHECK
The FLAME CHECK is an additional visual safety element. The two filaments are placed respectively on the small and large ring burners and illuminate brightly if these are lit after the barbecue is ignited. The mirror insert is simply attached in the barbecue and makes the glowing filament visible from the outside. This provides an additional check to ensure the burners are actually lit.
Benefit:
■ Additional visual safety check to ensure the burners are lit and no gas is escaping.
flowchart
graph TD
    A["Open cockpit"] --> B["Internal components"]
    B --> C{Eye Detection}
    C --> D["Internal components with visible wiring"]
    D --> E["Internal components with visible wiring"]
    E --> F["Internal components with visible wiring"]
    F --> G["Internal components with visible wiring"]
    G --> H["Internal components with visible wiring"]
    H --> I["Internal components with visible wiring"]
    I --> J["Internal components with visible wiring"]
    J --> K["Internal components with visible wiring"]
    K --> L["Internal components with visible wiring"]
    L --> M["Internal components with visible wiring"]
    M --> N["Internal components with visible wiring"]
    N --> O["Internal components with visible wiring"]
    O --> P["Internal components with visible wiring"]
    P --> Q["Internal components with visible wiring"]
    Q --> R["Internal components with visible wiring"]
    R --> S["Internal components with visible wiring"]
    S --> T["Internal components with visible wiring"]
    T --> U["Internal components with visible wiring"]
    U --> V["Internal components with visible wiring"]
    V --> W["Internal components with visible wiring"]
    W --> X["Internal components with visible wiring"]
    X --> Y["Internal components with visible wiring"]
    Y --> Z["Internal components with visible wiring"]
    Z --> AA["Internal components with visible wiring"]
    AA --> AB["Internal components with visible wiring"]
    AB --> AC["Internal components with visible wiring"]
    AC --> AD["Internal components with visible wiring"]
    AD --> AE["Internal components with visible wiring"]
    AE --> AF["Internal components with visible wiring"]
    AF --> AG["Internal components with visible wiring"]
    AG --> AH["Internal components with visible wiring"]
    AH --> AI["Internal components with visible wiring"]
    AI --> AJ["Internal components with visible wiring"]
    AJ --> AK["Internal components with visible wiring"]
    AK --> AL["Internal components with visible wiring"]
    AL --> AM["Internal components with visible wiring"]
    AM --> AN["Internal components with visible wiring"]
    AN --> AO["Internal components with visible wiring"]
    AO --> AP["Internal components with visible wiring"]
    AP --> AQ["Internal components with visible wiring"]
    AQ --> AR["Internal components with visible wiring"]
6.5 SAFETY LIGHT
⚠ WARNING: Remember to always close the gas supply at the gas bottle and turn off the gas tap after barbecuing.
The SAFETY LIGHT of your barbecue is activated when you turn the gas regulating knob anticlockwise from the ○ position towards 🐎 🐎 🐎 - thereby opening the gas supply. The power for the SAFETY LIGHT is supplied by the power bank provided.
Benefit:
- The SAFETY LIGHT reminds you that the valve is open and gas is escaping.
LUGANO EVO II operating console - Control dial with Safety Light

text_image
outdoorchefNOTE: The SAFETY LIGHT flashes if the charge level of the power bank is low. Please charge the power bank fully. If the power bank is empty, the electric ignition and lighting will no longer work.
Together with the SAFETY LIGHT, the lighting for the operating console is activated when you turn a gas regulating knob (OUTDOORCHEF logo and product name light up). This lighting is also powered by the power bank.
The light will switch off around 10 seconds after all gas regulating knobs are in the ○ position.
natural_image
Diagram of a bowl inside a container with arrows indicating flow or movement (no text or symbols)The standard position is the optimum funnel position for most barbecue applications and ensures the unique heat circulation inside the kettle. The food is grilled evenly all over – with no turning necessary. Meat, fish, vegetables and more all stay deliciously juicy, tender or crisp.
The standard position is thus perfect for all kinds of meat, gently grilled fish, gratins, crunchy vegetables, and also for baking pizza, tarte flambée or bread.
7.2 VOLCANO POSITION
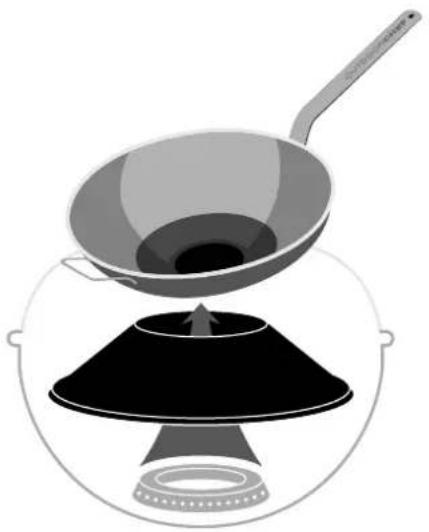
natural_image
Illustration of a frying pan being heated by a pan on a stand (no text or symbols)Turning the funnel to the volcano position allows you to work with very high, concentrated heat from below, ideal for OUTDOORCHEF accessories such as the Barbecue Wok, Flavouring Pan or Cast-Iron Griddle Plate.
This makes the volcano position perfect for flash-grilled food such as tuna steaks, scallops or wok-fried vegetables.
⚠ WARNING: Wear heat-resistant gloves if you want to change the funnel position while barbecuing.
⚠ WARNING: When barbecuing and cooking in the volcano position at the ⬆ ⬆ ⬆ setting, leave the lid open. The lid can only be kept closed at the ⬆ setting when grilling in volcano position.
CAUTION: The hot fat collected in the drip pan can cause burn injuries. Allow the fat to cool completely before removing the drip pan.
- Place the funnel in the required position (standard or volcano position).
- Select the appropriate accessories, if required.
- Preheat the barbecue with the lid closed for about 10-15 minutes at the opening (funnel in standard position).
- Place the food to be grilled on the barbecue grid and freely control the temperature between 🍻 – 🔊 🔊 according to your requirements.
7.4 AFTER BARBECUING
- Set the gas regulating knob for each burner to position.
- Turn off the gas supply at the gas bottle. The bottle tap must be closed even on empty bottles.
- Allow the barbecue to cool down fully and clean it.
- Protect the barbecue with the corresponding cover.
- Clean all parts that come into contact with food.
- Check all parts that carry gas, as described in the LEAK TEST section. Do this even if your barbecue was delivered already assembled by the retailer.
- Let the barbecue burn for about 20–25 minutes at the setting (funnel in standard position).
8.2 INSTRUCTIONS FOR LIGHTING
⚠ WARNING: Never ignite the barbecue when the lid is closed.
GAS KETTLE
- Make sure that all connections between the gas hose, the gas pressure regulator and the gas bottle are firmly tightened (as described in the LEAK TEST section).
- Open the barbecue lid.
- Open the gas supply at the gas bottle.
- Press the gas regulating knob of the selected ring burner and turn it anticlockwise to the cooling. Hold the gas regulating knob down until the gas is burning.

text_image
outdoorchef- If the gas does not ignite within 5 seconds, set the gas regulating knob to .
Wait 2 minutes to allow the uncombusted gas to dissipate. Then repeat step 4. - If it is not possible to light the barbecue after 3 attempts, look for the causes (as described in the TROUBLESHOOTING section).
8.3 TEMPERATURE RANGES / APPLICATION LUGANO 570 G EVO II
| TEMPERATURE LEFT CONTROL DIAL RIGHT CONTROL DIAL | |||
| min. approx. 80* | ○ | ||
| mid. approx. 120* | ○ | ||
| max. approx. 170* | ○ | ||
| min. approx. 170* | ○ | ||
| mid. approx. 240* | ○ | ||
| max. approx. 300* | ○ | ||
| absolute max. approx. 360* | |||
TEMPERATURE LEFT CONTROL DIAL RIGHT CONTROL DIAL
*Guide values without weather-related influences
- Clean all parts that come into contact with food.
- Check all parts that carry gas, as described in the LEAK TEST section. Do this even if your LUGANO 570 G EVO II was delivered pre-assembled by the retailer.
- Let the BLAZING/COOKING ZONE burn for around 20-25 minutes at the setting.
9.2 INSTRUCTIONS FOR LIGHTING
NOTE: Applies for both burners (BLAZING ZONE ^® and COOKING ZONE)
- Make sure that all connections between the gas hose, the gas pressure regulator and the gas bottle are firmly tightened (as described in the LEAK TEST section).
- Open the gas supply at the gas bottle.
- Press the gas regulating knob of the BLAZING ZONE ^® and/or COOKING ZONE and turn it anticlockwise to the setting. Hold the gas regulating knob down until the gas is burning.
natural_image
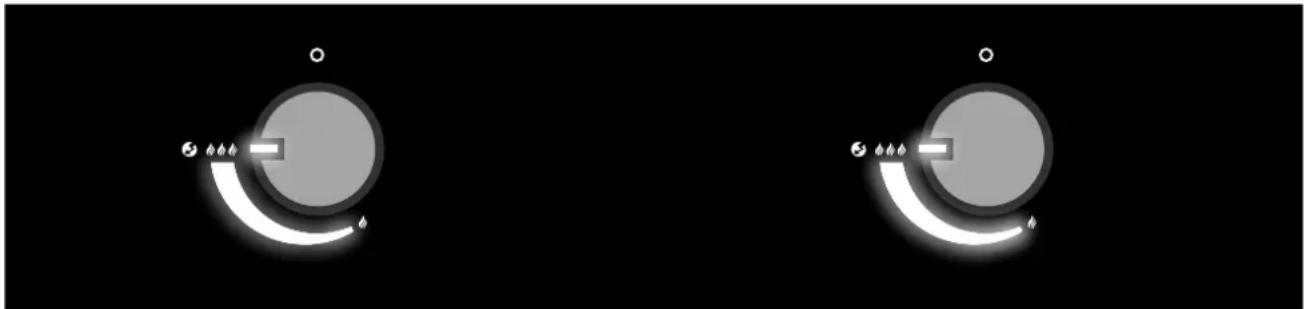
Two circular gauges with white segments and gray shades, no text or symbols visible- If the gas does not ignite within 5 seconds, set the gas regulating knob to Wait 2 minutes to allow the uncombusted gas to dissipate. Then repeat step 3.
- If it is not possible to light the burner of the BLAZING ZONE ^③ and/or COOKING ZONE after 3 attempts, look for the causes (as described in the TROUBLESHOOTING section).
10. POWER BANK
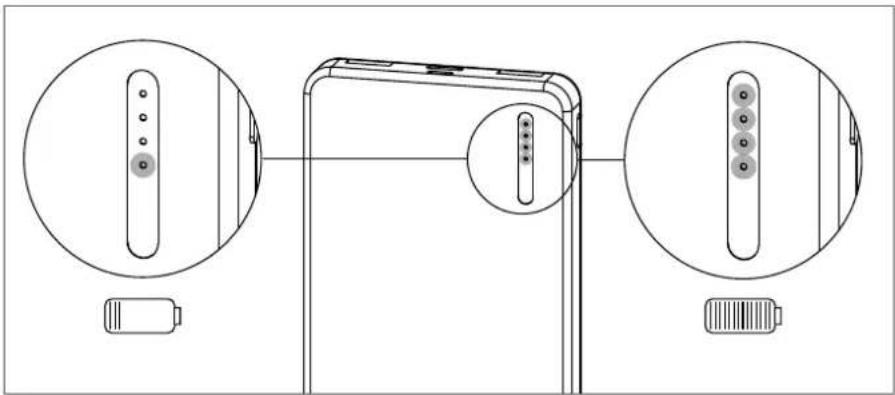
The power bank powers the SAFETY LIGHT, the electric ignition and all LED lighting on the LUGANO 570 G EVO II. We recommend removing it after using the barbecue each time, charging it fully and storing it in a dry place.
The operating period is around 8 hours; the charging time from empty to full is around 7 hours. The current charging status is visible on the display of the power bank.
text_image
Diagram showing battery charging mechanism with labeled components and magnified viewsTIP: We recommend charging the power bank fully after each use.
TIP: If you need a second power bank, you can order this at www.outdoorchef.com under Spare Parts.
NOTE: In general, we recommend using the OUTDOORCHEF power bank. However, if you wish to use a different one, make sure that the output does not exceed 5V/2.1A.
11 ACCESSORIES
The following accessories are included.
BLAZING/COOKING ZONE COVER
Two stainless steel BLAZING/COOKING ZONE covers, one each for the BLAZING ZONE ^③ and COOKING ZONE. These are designed mainly for protection, but they can also be used as an additional working surface.
NOTE: The OUTDOORCHEF plastic chopping mats (14.491.55) fit perfectly on these covers. See no. 2 in the diagram.

text_image
Technical diagram of a portable electric stove with labeled components and airflow indicatorsWhen not in use, the cover plates can be stored under the barbecue in the holders provided. See also point 12 in this documentation.
⚠ WARNING: The BLAZING/COOKING ZONE COVERS must be placed only over the completely cooled BLAZING ZONE® or COOKING ZONE.
⚠ WARNING: Never cover the surfaces of the BLAZING/COOKING ZONE during operation as this can lead to a build-up of heat.
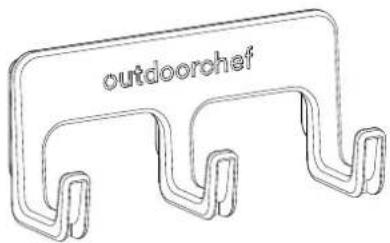
HOOK RAIL
The magnetic hook rail with three hooks can be used to hang barbecue tongs, a barbecue brush or other items within easy reach.
text_image
outdoorchefINFO: Additional accessories for your LUGANO 570 G EVO II can be found on www.outdoorchef.com or at your retailer.
12. STORAGE ON THE LUGANO 570 G EVO II
natural_image
Technical line drawing of a microwave oven with a door, fan, and control panel (no text or symbols)
natural_image
Technical line drawing of an oven with a door, fan, and control panel (no text or symbols)
natural_image
Technical line drawing of an oven with a door, vent, and internal components (no text or symbols)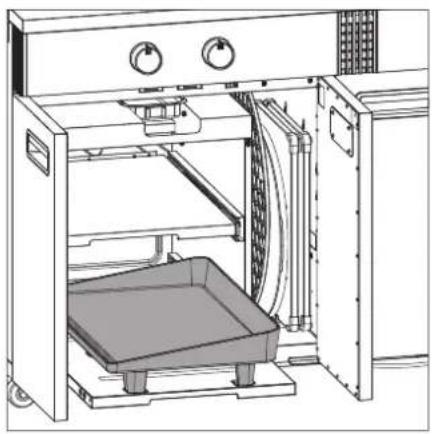
natural_image
Technical line drawing of an oven with a tray and control panel (no text or symbols)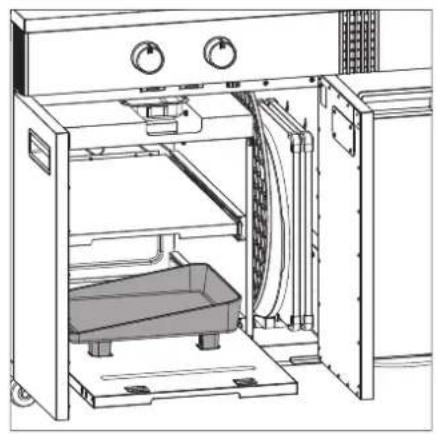
natural_image
Line drawing of an open industrial oven with control panel and storage unit (no text or symbols)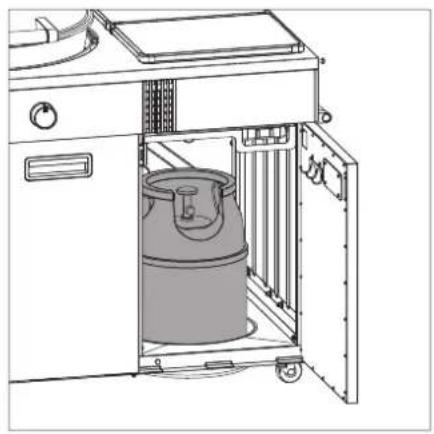
natural_image
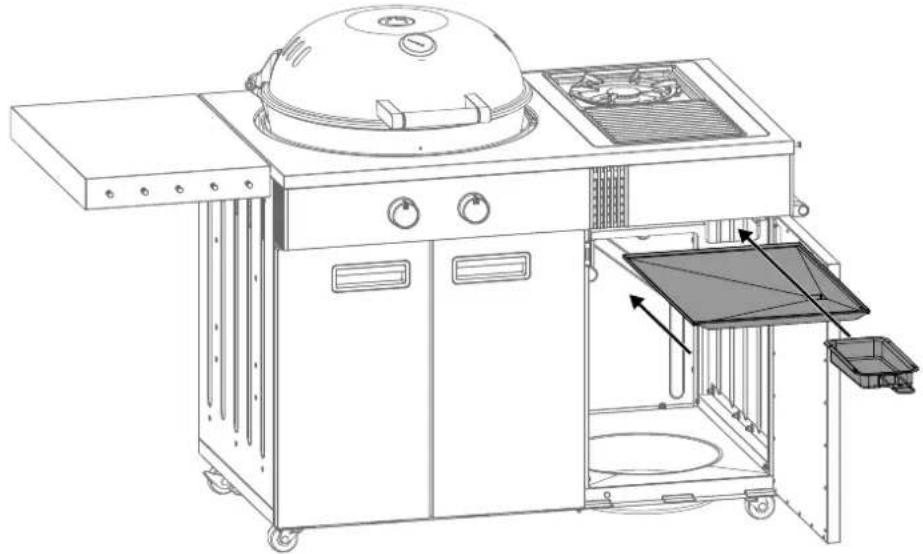
Line drawing of a mechanical device with a cylindrical container and open door (no text or symbols)The LUGANO 570 G EVO II offers lots of storage space. Behind the left double door are two pull-out deep shelves with a load capacity of up to 15 kg to store even a UNIVERSAL PLANCHA XL. The vertical side compartment has holders for an additional grid, a pizza stone and two covers. (Grid and pizza stone not included with delivery.)
An 11 kg gas bottle (max. 600 x 310 x 310 mm) can be placed behind the door on the right.
Interior LED lighting
As soon as the door of the storage space is opened, the interior LED lighting switches on.
The lighting is generated by the power bank supplied.
INFO: Accessories for your LUGANO 570 G EVO II can be found on www.outdoorchef.com or at your retailer.
⚠️ CAUTION: The doors are not designed to support loads, do not lean on them.
13. MOVING AND MANOEUVRING THE LUGANO 570 G EVO II
natural_image
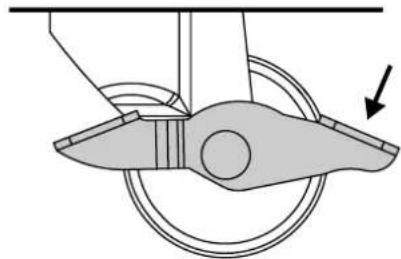
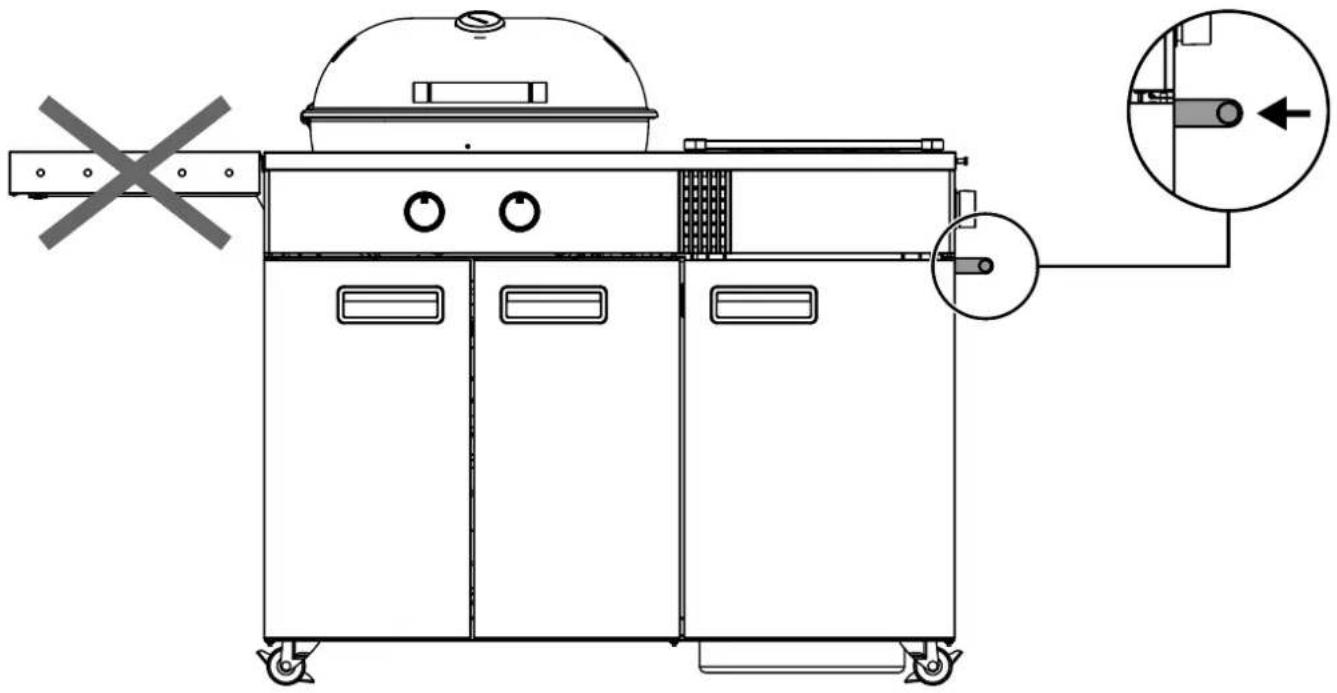
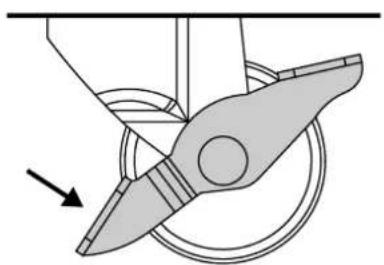
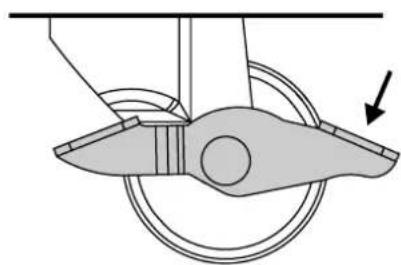
Technical line drawing of a portable industrial machine with control panel and directional arrows indicating movement (no text or symbols)Always release the brakes on the wheels before moving or manoeuvring the barbecue. To lift and move the barbecue, always use the push bar, NOT the tabletop. Only move and manoeuvre the barbecue when it is switched off and the gas bottle is closed.
CAUTION: Always lock the two parking brakes on the wheels after moving the barbecue.
natural_image
Diagram of a mechanical component with an arrow indicating direction (no text or symbols present)OFF
natural_image
Mechanical diagram showing a rotating component with a curved blade and circular head, no text or symbols present.ON
14. CLEANING AND MAINTENANCE
14.1 CLEANING THE KETTLE BARBECUE
⚠ WARNING: When cleaning inside the barbecue around the burner system, take care not to damage any components of the burners.
CLEANING THE OUTSIDE OF THE BARBECUE
NOTE: Never use glass cleaner or other cleaning sprays to clean the barbecue surfaces as these can damage the surfaces.
Clean the outside of the barbecue and shelf surfaces using only conventional non-aggressive cleaning agents (e.g. standard washing-up liquid). In the case of special barbecue cleaners (not recommended), we recommend testing the product first on a concealed area.
CLEANING THE INSIDE OF THE BARBECUE
NOTE: When cleaning with a nylon barbecue brush always make sure that the barbecue has cooled down completely.
Thanks to the unique funnel system, only very minor cleaning is required between uses of the barbecue because most of the grease either evaporates or is gathered in the collecting tray.
Recommended cleaning for heavier soiling:
- Heat the barbecue for around 10 minutes at full power to burn off food residue (residue from meat, fat, sugar from marinades, etc.).
- Allow the barbecue to cool completely to allow all food residue to solidify/harden (this allows easier and more effective cleaning)
- Clean the barbecue grid using an OUTDOORCHEF nylon or brass barbecue brush for optimum results (do not use a brush with steel bristles).
- Remove the barbecue grid and clean the funnel with the OUTDOORCHEF funnel brush.
TIP: Preparation for the next barbecue starts straight away because if you clean the barbecue grid after each use, this will save you having to do this before your next barbecue.
CLEANING THE DRIP PAN
WARNING: Neglecting to clean the drip pans can lead to flare-ups. Check the drip pans after each use and remove any fat residue.

natural_image
Technical line drawing of a portable electric grill with a dome top and control panel (no text or symbols)TIP: The perfect accessory for the collecting tray is the OUTDOORCHEF Grill Powder. This absorbs dripping fat and allows easy disposal.
14.2 MAINTENANCE OF THE BARBECUE
Regular maintenance of your barbecue will ensure it functions correctly.
- At least twice a year, check all parts that carry gas; also check them after extended periods of storage. Spiders or insects can cause blockages that must be cleared before use.
- If the barbecue is regularly pushed across uneven ground, check from time to time whether all screws are still tight.
- If you have not used the barbecue for a long period, you should carry out a LEAK TEST before using it again. If you have any doubts, please contact your gas supplier or the retailer.
- To prevent damage due to corrosion, oil all metal parts before long storage periods.
- Following long storage periods, and at least once a year during the barbecue season, you should check the gas hose for cracks, kinks and other damage. A damaged gas hose must be replaced immediately, as described in the SAFETY NOTES section.
- Once your barbecue has cooled down completely, protect it from the effects of the weather using a suitable OUTDOORCHEF cover.
- Always allow your barbecue to dry completely after cleaning or rain to prevent any condensation in the barbecue thermometer.
- Remove the cover after any rain in order to prevent condensation build-up. Covers can be purchased from your barbecue retailer.
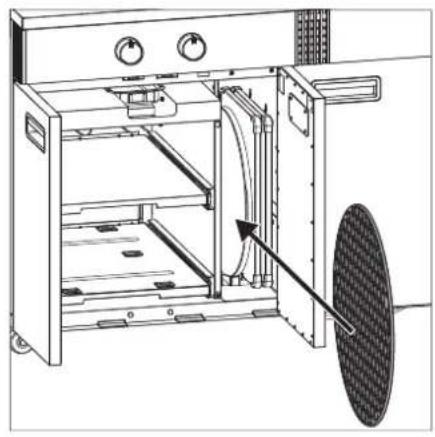
14.3 CLEANING THE BLAZING ZONE®
We recommend cleaning your BLAZING ZONE ^® after every 3rd use. Remove the barbecue grid and the HEAT DIFFUSER and simply clean them in your dishwasher. Wipe the inside with a dry cloth and empty the drip pan.
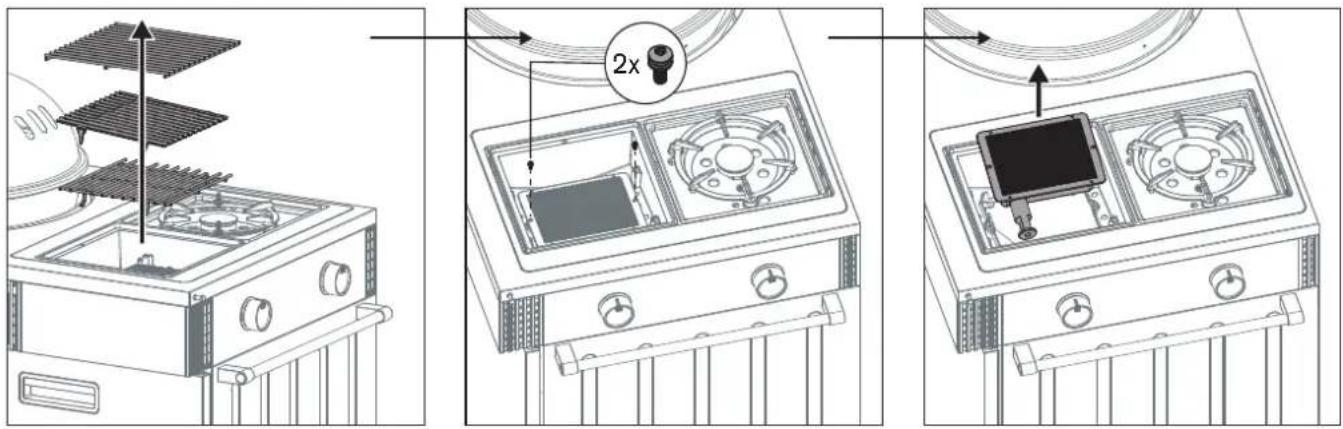
We also recommend that you dismantle the burner of the BLAZING ZONE ^® once a year to clean all surrounding parts and remove any spiders' webs and food residue.
text_image
Technical diagram showing three stages of a device with labeled components and a 2x magnified view highlighting the component.After removing the BLAZING ZONE ^® , carry out the following steps.
- Check the burner for any deformations or cracks.
- The Venturi pipes (pipe section on the burner) can be cleaned/brushed using a thin bottle brush.
- Clean the inside of the supporting frame of the BLAZING ZONE®. Do not use any harsh or flammable cleaning agents for this.
- Place the entire BLAZING ZONE ^3 back in the side table as described in the separate assembly instructions.
IMPORTANT: If you use a cleaning agent when cleaning, you must allow the barbecue to dry out correctly after cleaning. To accelerate the drying procedure, you can switch on the BLAZING ZONE® and let it burn off for a few minutes at the highest setting.
CLEANING THE DRIP PAN
⚠ WARNING: Neglecting to clean the drip pans can lead to flare-ups.
Check the drip pans after each use and remove any fat residue.
natural_image
Line drawing of a portable electric grill with a dome-shaped top and open door, showing internal components and airflow direction (no text or symbols)TIP: The perfect accessory for the collecting tray is the OUTDOORCHEF Grill Powder. This absorbs dripping fat and allows easy disposal.
Regular maintenance of your BLAZING/COOKING ZONE will ensure it functions correctly.
- At least twice a year, check all parts that carry gas; also check them after extended periods of storage. Spiders or insects can cause blockages that must be cleared before use.
- If the barbecue is regularly pushed across uneven ground, check from time to time whether all screws are still tight.
- If you have not used the barbecue for a long period, you should carry out a LEAK TEST before using it again. If you have any doubts, please contact your gas supplier or the retailer.
- To prevent damage due to corrosion, oil all metal parts before long storage periods.
- Following long storage periods, and at least once a year during the barbecue season, you should check the gas hose for cracks, kinks and other damage. A damaged gas hose must be replaced immediately, as described in the SAFETY NOTES section.
- To allow you to enjoy using your barbecue and BLAZING/COOKING ZONE for as long as possible, protect your barbecue from the effects of the weather using a suitable OUTDOORCHEF cover.
Remove the cover after any rain in order to prevent condensation build-up. Covers can be purchased from your barbecue retailer.
15. INFORMATION ABOUT STAINLESS STEEL PARTS OF THE LUGANO 570 G EVO II
15.1 BARBECUE GRIDS AND HEAT DIFFUSER
USAGE
Always coat the surfaces of the barbecue grids in the kettle barbecue and the BLAZING ZONE ^® with a light film of oil to stop food from burning. Use a refined vegetable oil with a high smoke point.
DISCOLOURATION
The heat will result in the formation of areas of iridescently bright discolouration on the surface of the stainless steel. This discolouration is characteristic of stainless steel and has no effect on the quality or functionality.
BEFORE FIRST USE
Clean the stainless steel barbecue grids with water or a mild soapy water solution before using them for the first time. Always put on protective gloves before touching the grids during use on the barbecue.
Never place the hot stainless steel barbecue grids on flammable or heat-sensitive surfaces.
CLEANING
See also point 14.1 in this documentation.
15.2 FUNNEL
DISCOLOURATION
The heat will result in the formation of areas of iridescent bright discolouration on the surface of the stainless steel. This discolouration is characteristic of stainless steel and has no effect on the quality or functionality.
CLEANING
See also point 14.1 in this documentation.
16. TROUBLESHOOTING
The burner does not ignite:
- Check if the gas supply is open at the gas bottle.
- Make sure there is enough gas in the bottle.
- Check if sparks are passing between the electrode and the burner.
⚠️ CAUTION: This inspection may only be performed with the gas supply fully closed!
No spark:
- Make sure the power bank has been connected correctly and is fully charged.
- The distance between the burner and electrode must only be 5–8 mm.
- Check whether the cables of the electric ignition and the electrode are plugged in and firmly connected.
No power or reduced power:
- Check whether the burners are blocked by any insects or spiders/cobwebs.
You can find more information on cleaning the burners here: https://de.outdoorchef.com/blogs/questions-lips/how should I clean my burners
The SAFETY LIGHT does not work:
- Check if the gas supply is open at the gas regulating knobs (with the gas bottle valve closed).
- Make sure the power bank is inserted correctly.
The axle is jammed:
To prevent the axle from jamming, we recommend you remove any dust, dirt and pollen from behind the wheels at least once a year to ensure they glide as smoothly as possible.
17. CONSUMER WARRANTY/GUARANTEE
For detailed information on the Consumer Warranty/Guarantee, please refer to the General Terms and Conditions (T&Cs) at https://www.outdoorchef.com/agb
The registered brand OUTDOORCHEF is represented by the following enterprise:
Outdoorchef AG | Eggbühlstrasse 28 | Postfach | 8050 Zurich, Switzerland | www.outdoorchef.com
* A dealer directory can be found on our website at www.outdoorchef.com
** The serial number and item number can be found on the information sticker on your barbecue (see the first section of this USER GUIDE).
18. REPLACEMENT PARTS
Replacement parts can be obtained from specialist dealers or very easily directly on www.outdoorchef.com.
19. WASTE DISPOSAL
Even an old barbecue still contains valuable resources that can be reused. You should therefore always dispose of your old barbecue properly. Observe local regulations as well as the local recycling facilities offered by specialist retailers or specific disposal centres.
20. TECHNICAL INFORMATION
LUGANO 570 G EVO II
CE 0063 BP 3505
Gas Butane G30 / Propane G31
I_3+ (28/30/37 mbar)
Butane 30 mbar / Propane 37 mbar
I3B/P (30 mbar) Butane / Propane 30 mbar
I_3H/P(50 mbar) Butane / Propane 50 mbar
Total gas consumption 1130 g/h
KETTLE
Power
- Small burner 2.90 kW
Gas consumption 210 g/h
- Large burner 6.60 kW
Gas consumption 476 g/h
Nozzles (28–30/37 mbar)
- Small burner nozzle 0.78 mm/mark: BD
- Large burner nozzle 1.22 mm/mark: BG
Nozzles (50 mbar)
- Small burner nozzle 0.68 mm/mark: AU
- Large burner nozzle 1.06 mm/mark: Al
BLAZING ZONE®
Power 3.40 kW
Gas consumption 238 g/h
Nozzle (28–30/37 mbar) 0.86 mm/mark: CG
Nozzles (50 mbar) 0.74 mm/mark: CF
COOKING ZONE
Power 2.90 kW
Gas consumption 206 g/h
Nozzle (28–30/37 mbar) 0.82 mm/mark: BH
Nozzles (50 mbar) 0.72 mm/mark: AO
POWER BANK
| Power | 10,000 mAh |
| Input | 5V / 2.0 A |
| Output | 5V / 2.1 A |
Electric ignition
The power bank supplied powers the operation of the electric ignition.
Note on the temperature display
The thermometer display is subject to a +/-10% fluctuation.
Web page
More information, tips, hints, recipes and all kinds of useful information about OUTDOORCHEF products can be found at www.outdoorchef.com
- LE NUMÉRO DE SÉRIE DE VOTRE BARBECUE ET POURQUOI IL EST IMPORTANT 62
- LE MODE D'EMPLOI 62
text_image
Diagram illustrating a hand gesture application on a fuel pump, with an inset showing the tool's mechanical setup.flowchart
graph TD
    A["RCHEF"] --> B["Step 1: Internal assembly with arrows indicating movement"]
    B --> C["Step 2: Cross-sectional assembly with arrows indicating movement"]
    C --> D["Step 3: Internal assembly with arrows indicating movement"]
    D --> E["Step 4: Internal assembly with arrows indicating movement"]
    E --> F["✓"]
6. EXPLICATION DE LA CONSOLE DE COMMANDE ET DES SYSTÈMES DE BRÛLEURS
6.1 EXPLICATION DES SIGNES SUR LA CONSOLE DE COMMANDE DU BARBECUE
natural_image
Two identical circular gauges with curved arrows indicating flow or movement, no text or symbols present.○ : position OFF
: puissance basse
: puissance moyenne
: puissance élevée
: allumage
: allumeur
6.2 SYSTÈMES DE BRÛLEURS
6.2.1 SPHÈRE
natural_image
Exploded view of a portable electrical enclosure with cooling rack, metal grating, and mounting base (no text or symbols visible)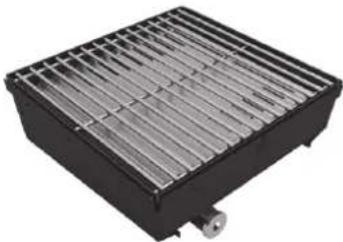
natural_image
Exterior view of a black rectangular industrial fan or heater with metal grating (no text or symbols visible)natural_image
Technical line drawing of a kitchen appliance with heat exchanger and fan assembly (no text or symbols)6.2.2.4 AVANT DE COMMENCER LES GRILLADES

AVERTISSEMENT :
natural_image
Technical line drawing of a mechanical assembly with pipes and a curved pipe (no text or symbols)
flowchart
graph TD
    A["1"] --> B["2"]
    B --> A
6.2.2.5 UNE FOIS LES GRILLADES TERMINÉES
text_image
Technical diagram showing three stages of a gas stove with fan and vent components, labeled 1 to 3.natural_image
Black plastic fan with six blades and mounting holes, mounted on a square base (no text or symbols visible)Chaleur élevée
natural_image
Black plastic fan with mounting holes and a square base (no text or symbols visible)Chaleur moyenne
natural_image
Black plastic fan or vent component with mounting holes and a central hub (no text or symbols visible)Chaleur basse
natural_image
Illustration of a bowl inside a container with arrows indicating flow or process (no text or symbols)natural_image
Illustration of a frying pan being heated by a pan, with a lid placed inside (no text or symbols)8.2 INSTRUCTIONS D'ALLUMAGE
9.2 INSTRUCTIONS D'ALLUMAGE
natural_image
Two circular gauges with white segments and a light blue arc, set against a black background (no text or symbols)text_image
Diagram showing battery charging mechanism with labeled components and magnified viewstext_image
Technical diagram of a portable electric stove with labeled components and airflow indicatorsnatural_image
Technical line drawing of a microwave oven with a door and fan blade (no text or symbols)
natural_image
Technical line drawing of an oven with a door, fan, and control panel (no text or symbols)
natural_image
Technical line drawing of an oven with a door, showing internal components and a close-up view of the lid (no text or symbols present)
natural_image
Technical line drawing of an oven with a tray and control panel (no text or symbols)
natural_image
Line drawing of an open industrial oven with control panel and storage unit (no text or symbols)
natural_image
Line drawing of an open industrial machine with a cylindrical barrel inside (no text or symbols)natural_image
Technical line drawing of a portable industrial machine with control panel and directional arrows indicating movement (no text or symbols)natural_image
Diagram of a mechanical component with an arrow indicating direction (no text or symbols present)OFF
natural_image
Mechanical diagram showing a blade-like component with a circular head and arrow indicating direction (no text or symbols)ON
14. NETTOYAGE ET ENTRETIEN
14.1 NETTOYAGE DU BARBECUE SPHÉRIQUE
natural_image
Line drawing of a portable electric grill with a dome top and control panel (no text or symbols)text_image
Technical diagram showing three stages of a device with labeled components and a 2x ratio indicator.natural_image
Line drawing of a portable electric grill with a dome-shaped top and open door, showing internal components and airflow direction (no text or symbols)text_image
Diagram illustrating a hand gesture application on a fuel pump, with an inset showing the tool's mechanical setup.flowchart
graph TD
    A["RCHEF"] --> B["Assembly Step 1"]
    B --> C["Assembly Step 2"]
    C --> D["Assembly Step 3"]
    D --> E["Assembly Step 4"]
    E --> F["Final Output"]

    subgraph Process Steps
    G["Start"] --> H["Assembly Point 1"]
    H --> I["Assembly Point 2"]
    I --> J["Assembly Point 3"]
    J --> K["Assembly Point 4"]
    end

    style A fill:#f9f,stroke:#333
    style K fill:#bbf,stroke:#333
6. DESCRIZIONE DEL PANNELLO DI CONTROLLO E DEI SISTEMI CON BRUCIATORI
6.1 SPIEGAZIONE DEI SIMBOLI SUL PANNELLO DI CONTROLLO DEL BARBECUE
natural_image
Two circular gauges with metallic contacts and curved segments, no text or symbols visiblenatural_image
Exploded view of a kitchen appliance with cooling rack, grating, and mounting base (no text or symbols visible)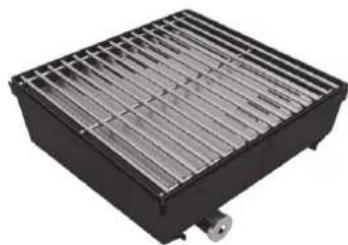
natural_image
Exterior view of a black rectangular industrial heat exchanger or cooling unit with metal grating (no text or symbols visible)Temperature intermedie 200 - 350°C
natural_image
Technical line drawing of a gas stove interior with cooling fans and a central fan (no text or symbols)6.2.2.4 PRIMA DI GRIGLIARE
natural_image
Technical line drawing of a mechanical assembly with pipes and a curved pipe (no text or symbols)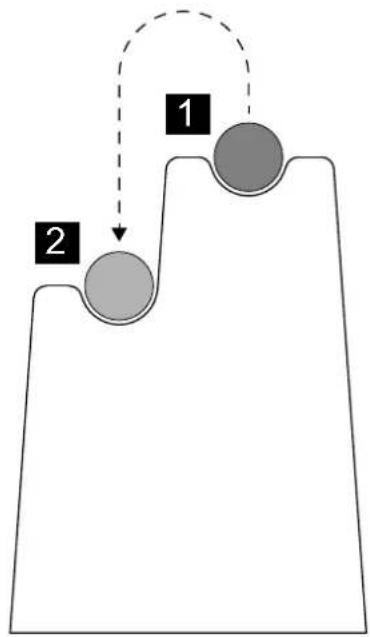
flowchart
graph TD
    A["1"] --> B["2"]
    B --> A
6.2.2.5 DOPO AVER GRIGLIATO
text_image
Technical diagram showing three stages of a gas stove with fan and vent components, labeled 1 to 3.natural_image
Black plastic fan with six blades and mounting holes, mounted on a square base (no text or symbols visible)Calore elevato
natural_image
Black plastic fan component with mounting holes and a square base (no text or symbols visible)Calore intermedio
natural_image
Black plastic fan or vent component with mounting holes and a central hub (no text or symbols visible)Calore basso
natural_image
Illustration of a bowl inside a container with arrows indicating flow or process (no text or symbols)natural_image
Illustration of a frying pan with a lid placed on top, showing its interior and exterior view (no text or symbols)natural_image
Two circular gauges with white segments and a light blue arc, set against a black background (no text or symbols)text_image
Diagram showing battery charging process with labeled components and magnified views of the device's internal structure.text_image
Technical diagram of a portable electric heater with labeled components and airflow indicatorsnatural_image
Technical line drawing of a microwave oven with a door, fan, and control panel (no text or symbols)
natural_image
Technical line drawing of an oven with a door, fan, and control panel (no text or symbols)
natural_image
Technical line drawing of an open industrial machine with a door and control panel, showing internal components and no text or symbols.
natural_image
Technical line drawing of an oven with a tray and control panel (no text or symbols)
natural_image
Line drawing of an open industrial oven with control panel and storage unit (no text or symbols)
natural_image
Line drawing of an open industrial machine with a cylindrical barrel inside (no text or symbols)natural_image
Technical line drawing of a portable industrial machine with control panel and directional arrows (no text or symbols)natural_image
Diagram of a mechanical component with an arrow indicating direction (no text or symbols present)OFF

natural_image
Mechanical diagram showing a blade-like component with a circular head and arrow indicating direction (no text or symbols)ON