
Elizabeth - Oven Klarstein - Free user manual and instructions
Find the device manual for free Elizabeth Klarstein in PDF.

| Brand | Klarstein |
| Model | Elizabeth |
| Product type | Built-in electric oven |
| Useful volume | 70 L |
| Total power | 2200 W |
| Electrical supply | 220-240 V ~ 50/60 Hz |
| Net weight | 29 kg |
| Dimensions (H x W x D) approx. | 595 x 595 x 545 mm |
| Energy efficiency index | 93.6 |
| Energy consumption (conventional) | 0.80 kWh/cycle |
| Energy consumption (convection) | 0.79 kWh/cycle |
| Number of cooking levels | 5 |
| Cooking functions | Top/bottom heat, convection, grill, bottom heat, top heat, bottom heat + convection |
| Display | Digital display with clock and timer |
| Control type | Rotary knobs + buttons |
| Oven door | Safety glass, removable for cleaning |
| Interior lighting | Replaceable bulb (type: refer to manual) |
| Supplied accessories | Grid, baking tray, removable shelves, fixing screws |
| Cleaning | Do not use steam cleaner; clean with damp cloth and mild detergent |
| Safety | Automatic shut-off, door hinge locks, overheating protection |
| Installation | Built-in, requires qualified electrician; minimum rear distance 45 mm |
| Color | Not specified (usually stainless steel or black) |
| Article numbers | 10034880, 10034881 |
Frequently Asked Questions - Elizabeth Klarstein
User questions about Elizabeth Klarstein
0 question about this device. Answer the ones you know or ask your own.
Ask a new question about this device
Download the instructions for your Oven in PDF format for free! Find your manual Elizabeth - Klarstein and take your electronic device back in hand. On this page are published all the documents necessary for the use of your device. Elizabeth by Klarstein.
USER MANUAL Elizabeth Klarstein
KLARSTEIN
www.klarstein.com

area
| Category | Value | | -------- | ----- | | 1 | 100 | | 2 | 100 | | 3 | 100 | | 4 | 100 | | 5 | 100 | | 6 | 100 | | 7 | 100 | | 8 | 100 | | 9 | 100 | | 10 | 100 | | 11 | 100 | | 12 | 100 | | 13 | 100 | | 14 | 100 | | 15 | 100 | | 16 | 100 | | 17 | 100 | | 18 | 100 | | 19 | 100 | | 20 | 100 | | 21 | 100 | | 22 | 100 | | 23 | 100 | | 24 | 100 | | 25 | 100 | | 26 | 100 | | 27 | 100 | | 28 | 100 | | 29 | 100 | | 30 | 100 | | 31 | 100 | | 32 | 100 | | 33 | 100 | | 34 | 100 | | 35 | 100 | | 36 | 100 | | 37 | 100 | | 38 | 100 | | 39 | 100 | | 40 | 100 | | 41 | 100 | | 42 | 100 | | 43 | 100 | | 44 | 100 | | 45 | 100 | | 46 | 100 | | 47 | 100 | | 48 | 100 | | 49 | 100 | | 50 | 100 | | 51 | 100 | | 52 | 100 | | 53 | 100 | | 54 | 100 | | 55 | 100 | | 56 | 100 | | 57 | 100 | | 58 | 100 | | 59 | 100 | | 60 | 100 | | 61 | 100 | | 62 | 100 | | 63 | 100 | | 64 | 100 | | 65 | 100 | | 66 | 100 | | 67 | 100 | | 68 | 100 | | 69 | 100 | | 70 | 100 | | 71 | 100 | | 72 | 100 | | 73 | 100 | | 74 | 100 | | 75 | 100 | | 76 | 100 | | 77 | 100 | | 78 | 100 | | 79 | 100 | | 80 | 100 | | Note: The actual values are not provided in the code. The code generates random data for the first three categories (categories) and is not included in the output. |INHALTSVERZEICHNIS
Produktdatenblatt 4
Einbau
BEDIENFELD UND FUNKTIONSREGLER
natural_image
Diagram showing a device with rotating and curved arrows, alongside a simplified diagram of a device with internal components (no text or symbols)natural_image
Symbol of a trash bin crossed with a diagonal line, no text or labels presentBerlin Brands Group UK Limited
PO Box 42
272 Kensington High Street
London, W8 6ND
United Kingdom
Dear Customer,
Congratulations on purchasing this device. Please read the following instructions carefully and follow them to prevent possible damages. We assume no liability for damage caused by disregard of the instructions and improper use. Scan the QR code to get access to the latest user manual and more product information.

CONTENT
Product Data Sheet 22
Safety Instructions 23
Installation 26
Product Overview 29
Control Panel and Function Controls 31
Cooking Times and Settings 32
Operation 33
Cleaning and Care 34
Disposal Considerations 36
Manufacturer & Importer (UK) 36
TECHNICAL DATA
| Item number 10034880, 10034881 | |
| Power supply 220-240 V ~ 50/60 Hz | |
| Total output 2200 W | |
| Cooking chamber volume 70 L |
PRODUCT DATA SHEET
Information according to 66/2104
| Symbol Value unit | |||
| Model identification | 10034880, 10034881 | ||
| Type of oven | Domestic electric oven | ||
| Mass of the appliance | M 29 kg | ||
| Number of cavities | 1 | ||
| Heat source per cavity (electricity or gas) | Electricity | ||
| Volume per cavity | V 70 L | ||
| Energy consumption (electricity) required to heat a standardised load in a cavity of an electric heated oven during a cycle in conventional mode per cavity (electric final energy) | EC electric cavity | 0,80 kWh/cycle | |
| Energy consumption required to heat a standardised load in a cavity of an electric heated oven during a cycle in fan-forced mode per cavity (electric final energy) | EC electric cavity | 0,79 | |
| Energy consumption required to heat a standardised load in a gas-fired cavity of an oven during a cycle in conventional mode per cavity (gas final energy) | EC gas cavity | - | MJ/cycle kWh/cycle (1) |
| Energy consumption required to heat a standardised load in a gas-fired cavity of an oven during a cycle in fan-forced mode per cavity (gas final energy) | EC gas cavity | - | MJ/cycle kWh/cycle (1) |
| Energy Efficiency Index per cavity | EEI cavity 93,6 | ||
(1) 1 kWh/cycle = 3,6 MJ/cycle.
SAFETY INSTRUCTIONS
CAUTION
Risk of burns. This device and the accessible parts of the device become very hot during use. Use extreme care and caution and never touch the heating elements.
- Keep children under 8 years away from the device.
- This device may be only used by children 8 years old or older and persons with limited physical, sensory and mental capabilities and / or lack of experience and knowledge, provided that they have been instructed in use of the device by a responsible person who understands the associated risks.
• The device is not a toy. - Do not use a steam cleaner to clean the unit.
- The accessible parts of the device may become very hot during use. Keep small children away from the device while it is in operation.
- Do not use aggressive or abrasive cleaners or metal scrapers to clean the oven door, as this will scratch the glass surface and shatter the oven door or otherwise cause damage to the appliance.
- Do not install the device behind a decorative door - this would create an overheating hazard.
- Only use accessories that are suitable for use in ovens.
- Never allow liquids or other foodstuffs to be heated in sealed containers, as this may cause a risk of explosion.
- Make sure that paper kitchen towels and cloths do not come into contact with the heating elements of the stove - risk of fire.
- Make sure that there are no harsh chemicals, flammable vapours or foreign bodies near the oven or in the oven. This device is only suitable for heating and food preparation.
- If any foodstuffs inside the oven catch fire, keep the oven door closed to choke the flames. Turn off the oven and unplug the power cord from the wall outlet.
- Be careful when opening the oven door. Stand sideways beside the oven and slowly open the oven to allow the hot air / steam to escape. Keep your face away from the oven and make sure there are no children or pets nearby before opening the oven door. After the hot air has escaped, you can continue with preparation. Keep the oven door closed at all times except for necessary cooking and cleaning work.
-
Keep accessories and electrical cables away from the hot parts of the equipment.
-
Never move the baking trays or baking grates while they are hot, but rather allow them to cool down first.
- Before cleaning and maintenance, always switch off the appliance and unplug the appliance from the mains socket.
- This appliance is designed for household use and can be installed in standard kitchens or residential units.
- All surfaces or furniture surrounding the oven and all materials used for installation must withstand at least 85 °C while the appliance is in use.
- Some vinyl and laminate types are particularly prone to heat damage and high temperature decolourisation. Before installing the device, check which surfaces are present.
- The user is responsible for any damage caused by the installation of the device in the vicinity of non-heat-resistant materials or due to insufficient distance to furniture.
- Only install and follow the device in accordance with the requirements listed in this manual.
- The installation must be carried out by a qualified person or a qualified electrician.
- Dispose of the packaging material in a timely manner and ensure that it does not get into the hands of children as this may cause suffocation.
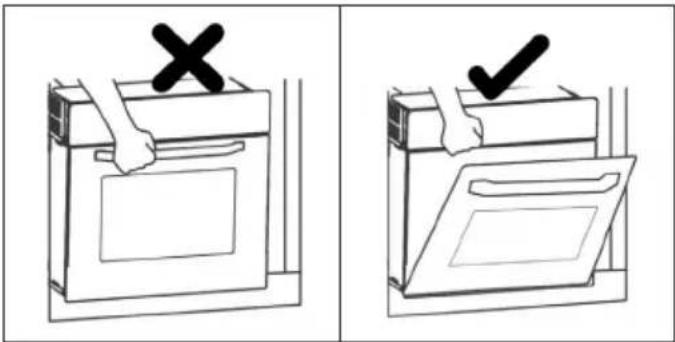
- Do not place heavy objects on the oven door and do not lean against them while the door is open, as this could damage the hinges.
- Do not place containers containing hot oil or grease in unattended areas, as these may give rise to a fire hazard.
- Do not place pans, baking trays or aluminium foil directly on the bottom of the oven as this could lead to heat build-up and damage the enamel.
- Be sure to select the appropriate temperature and function for all foods so food and liquids do not overflow or burn.
- Make sure the food is prepared in sufficiently large containers and that you use a drip tray where necessary.
- Do not install the device next to curtains or soft furniture.
- Never attempt to lift the unit by the oven door or handles, as this may damage the unit or cause personal injury.
- If the power cord is damaged, it must be replaced by the manufacturer, after-sales service or similarly qualified person to avoid danger.
• Install the device so that the socket used for the plug is easily accessible at all times. - Before connecting the plug of the device to the socket, check that the voltage of the socket corresponds to the voltage indicated on the type plate of the device.

CAUTION
Risk of electric shock! Do not attempt to repair a damaged device yourself and stop using it. Turn off the power, unplug the appliance and contact your service representative.
- To prevent damage, do not allow the power cord to run over sharp edges and do not bend or fold it. Keep it away from hot surfaces and open flames.
- Lay the power cord so that it will not become a trip hazard.
- Under no circumstances should you open the oven cabinet. Do not put foreign objects inside the cabinet.
- Only use accessories recommended by the manufacturer, as non-recommended accessories pose a safety hazard to the user and could damage the device.
- Only use the device on level, stable, clean and dry surfaces.
- Protect the device from heat, dust, direct sunlight, moisture and dripping or splashing water.
- Do not place objects with open flames, such as candles, on or beside the appliance.
- The fixed wiring of the device must be equipped with an all-pole disconnecting device.
• Always wear gloves when handling glass objects. - For your safety, the oven door is made of safety glass. This type of glass is very resistant, but has the property of storing vibrations. Therefore, be very careful with the unit to avoid shocks, especially during installation, and install the unit only in low-vibration areas.
- Do not place film on the glass surface as it could break into large pieces that could be dangerous.
- All electrical installations must be carried out by qualified personnel.
- This appliance must be earthed. Contact an electrician if no grounding line is available.
- The socket used must be accessible even if your oven is in its housing, so that the appliance can be disconnected from the mains at any time.
INSTALLATION

CAUTION
Risk of injury! Always have the installation carried out by trained specialist personnel to avoid electric shocks, personal injury and damage to the device.
Note on Fitting the Oven into the Kitchen Unit
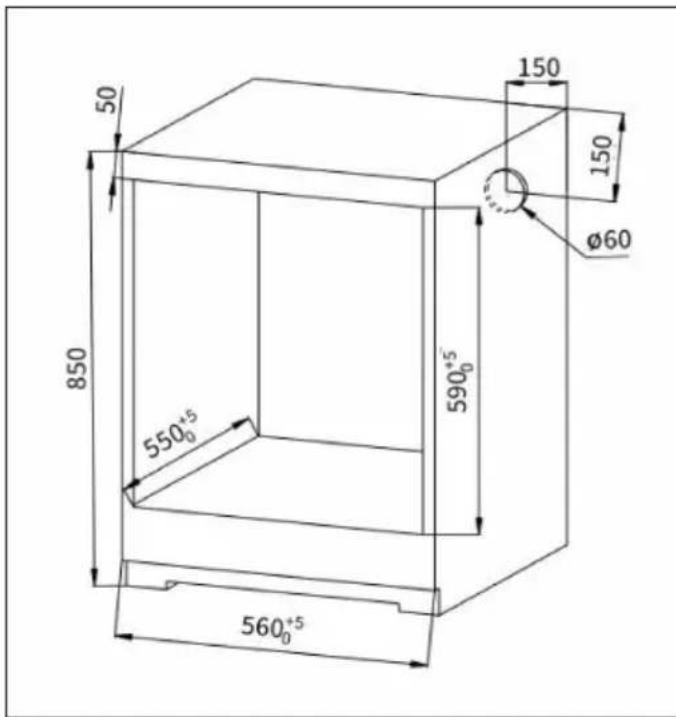
Fit the oven into the space provided in the kitchen unit; it may be fitted underneath a work top or into an upright cupboard. Fix the oven in position by screwing into place, using the two fixing holes in the frame. To locate the fixing holes, open the oven door and look inside. To allow adequate ventilation, the measurements and distances adhered to when fixing the oven.
- If the oven is to work properly, the kitchen housing must be suitable.
- The panels of the kitchen unit that are next to the oven must be made of a heat resistant material.
- Ensure that the glues of units that are made of veneered wood can withstand temperatures of at least 120 °C.
- Plastics or glues that cannot withstand such temperatures will melt and deform the unit, once the oven has been lodged inside the units, electrical parts must be completely insulated. This is a legal safety requirement.
- All guards must be firmly fixed into place so that it is impossible to remove them without using special tools.
- Remove the back of the kitchen unit to ensure an adequate current of air circulates around the oven.
• The hob must have a rear gap of at least 45 mm.
Notes on electrical connection
- The device is designed for fixed installation with a three-pole mains cable and may only be connected by an authorised specialist in accordance with the wiring diagram.
- Only a qualified electrician who complies with the relevant regulations may replace the mains cable.
- Do not use multiple plugs, socket strips or extensions, as overloading can lead to a fire hazard.
- If the connection is no longer accessible after installation, an all-pole disconnector with a contact opening of at least 3 mm is required.
Wiring
| Green-Yellow Earth wire (E) | 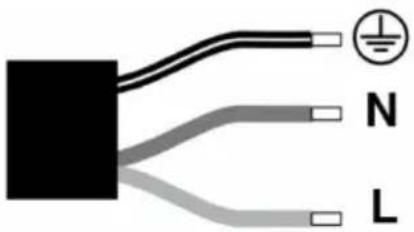 | |
| Blue Neutral wire (N) | ||
| Brown Live wire (L) |
Note for Great Britain: Do not connect the device with a 13 A plug and do not protect it with a 13 A fuse. The device must be protected with a fuse of 16 A or more. The unit must be disconnected from the mains supply for all installation work. During the installation of the device, protection against accidental contact must be provided.
Basic installation instructions
- Observe the specified installation dimensions exactly.
- To achieve optimum integration into the kitchen unit, install the oven in a standard 600 mm wide cabinet so that it is flush with the front of the cabinet.
- Do not hold the stove by the stove door when installing.
Installation
Before installing the unit, please make sure that the cabinet has the following empty internal dimensions. To ensure air circulation, the oven must be installed in accordance with the dimensions and distances shown in the figure below.

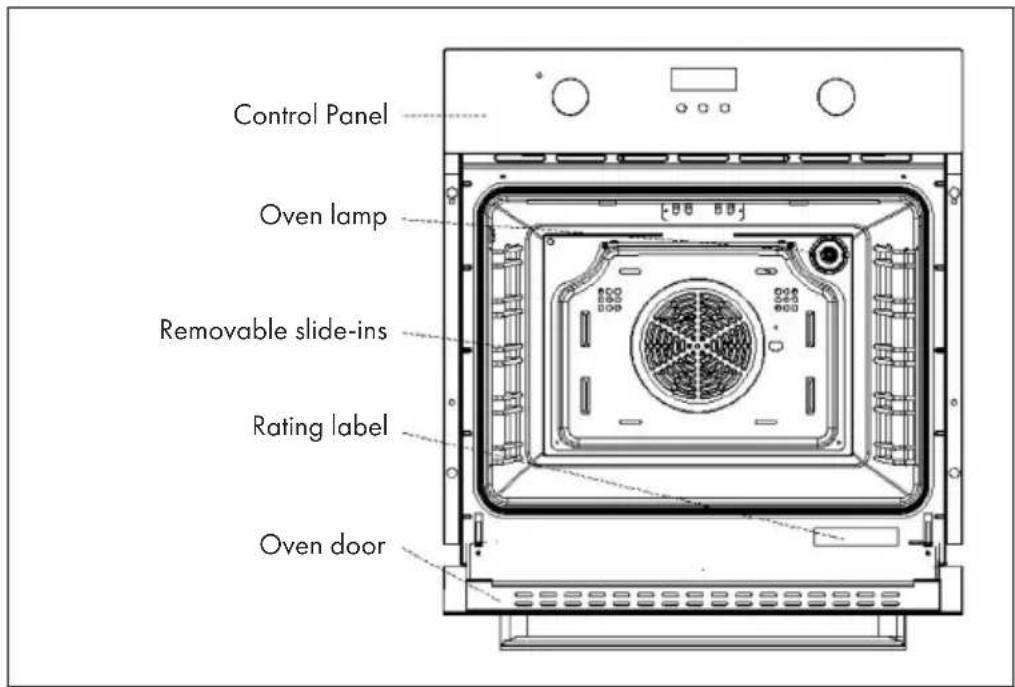
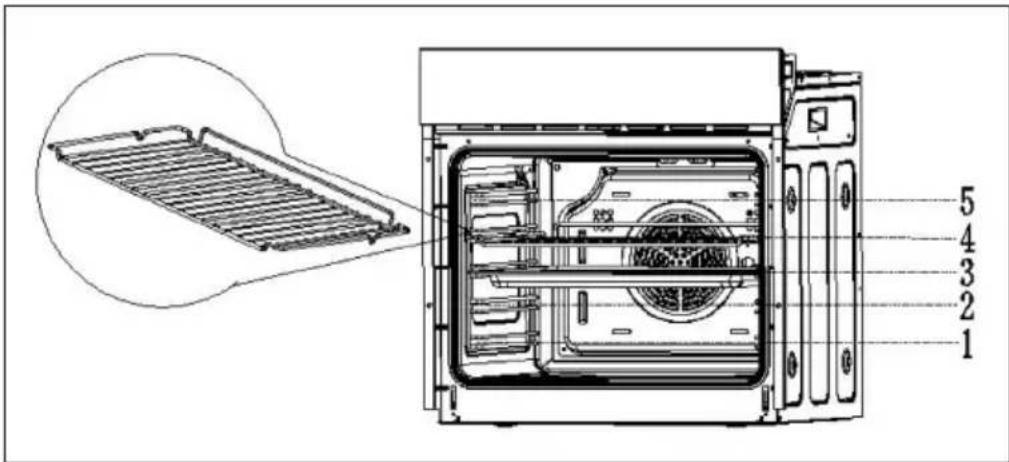
PRODUCT OVERVIEW
Accessories
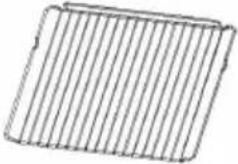 | Grating: for baking and grilling |
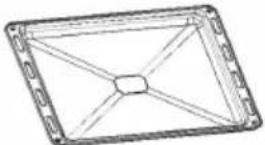 | Baking tray: Used to cook large quantities of food, such as moist cakes, pastries, frozen foods. Also used to collect fat, crumbs and sauce. |
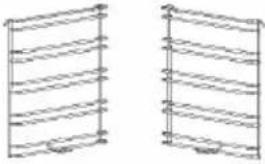 | Slide-ins: For easier cleaning of the oven, the two drawer units can be removed. |
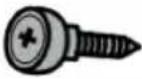 | 2 screws: For fixing the oven. |
Note: Before use, clean the accessories with a little water and detergent and use only original accessories.
Important note on the slide-in modules
- To ensure that the oven can be used safely, it is essential that the grilles and baking trays are placed correctly.
• The grilles and the baking tray may only be used between the first and the fifth level. - The grilles and baking trays should be pushed into the oven the right way round, as this ensures that they are removed carefully and that hot food cannot slip out.
CONTROL PANEL AND FUNCTION CONTROLS
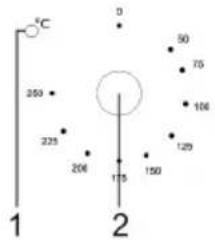 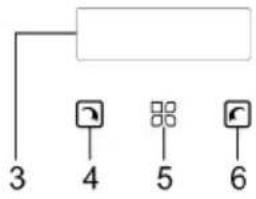  | |
| 1 | Operating light |
| 2 | Temperature controller: turn the controller to the desired temperature. |
| 3 | Display |
| 4 | Minus key |
| 5 | Setting the timer/clock |
| 6 | Plus key |
| 7 | Function controller: turn the controller to the desired function. |
Function controls
Turn the function control knob to the desired symbol. The following functions are available:
 | Top heat/bottom heat + circulating air |
| The combination of fan and upper and lower heating elements ensures more even heat distribution and saves up to 30-40 % energy. The crust is lightly browned on the outside, while the food does not dry out on the inside. This function is suitable for grilling or frying large pieces of meat at a higher temperature. | |
 | Top heat/bottom heat |
| The upper and lower heating elements are switched on. The function is suitable for most dishes that are baked. | |
 | Bottom heat |
| The concealed heating element at the bottom of the stove provides a more concentrated heat without tanning. The function is suitable for slow-cooking dishes such as casseroles, stews, pastries and pizzas. | |
 | Bottom heat + circulating air |
| The rear fan and the lower heating element work simultaneously. The temperature can be set between 50 °c and 250 °c. The temperature can be set between 50 °c and 250 °c. The temperature can be set between 50 °c and 250 °c. | |
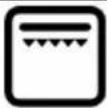 | Top heat + grill |
| The upper inner ring heating element and the upper outer ring heating element work simultaneously. The temperature can be set between 50 °c and 250 °c. The upper inner ring heating element and the upper outer ring heating element operate simultaneously. | |
 | Grill |
| The upper inner ring heating element works. The temperature can be adjusted between 50 °c and 250 °c. |
COOKING TIMES AND SETTINGS
| Weight Quantity | Stage Function Temp. Time | (1. side) | Time (2. side) | Accessories | |||
| Biscuits 500 g | 3 200 °C |  | 10-15 Min. | — Baking tray | |||
| Sandwich 200 g | 3 180 °C |  | 15-20 Min. | — Grating | |||
| Biscuit roll 200 g | 3 180 °C |  | 10-18 Min. | — Baking tray | |||
| Cakes | 300 g400 g | 3 185 |  | 20-25 Min. | — Baking tray | ||
| Sponge cake | 500 g 3 |  C C | 30-35 Min. | — Grating | |||
| Pizza | 350 g | 3 |  | 200 °C | 10 Min. | — | Baking tray |
| Apple pie | 1200 g | 3 185 |  | 50-60 Min. | — Grating | ||
| Toast | 9 Stk. | 5 240 |  | 1-2 Min. | — Grating | ||
| Hamburger | 1 | 5 240 | [XAST] | 10-20 Min. | 5-10 Min. | Baking tray | |
OPERATION
Setting the time
- When the unit is turned on for the first time, the clock displays [12.00] and the clock icon blinks.
- Press the or button to set the current time.
- Then wait 5 seconds until the time is set and the clock icon stops blinking.
Setting the Alarm
The alarm can be applied to any function. The adjustable time is between 1 minute to 23 hours and 59 minutes.
- Press the button until the bell symbol flashes.
- Press the or buttons to set the time for the alarm (= current time + set time).
- Wait 5 seconds until the time is set and the bell symbol stops flashing.
- When the working time reaches the set time, the alarm sounds and the bell symbol flashes. Press the 📄 on buffer to cancel the alarm, the bell symbol will go out. If you do not press any key, the alarm will go off after 2 minutes.
Setting the cooking time
If the food is only to be cooked for a certain time, you can set the oven to automatically turn off after the desired cooking time. The adjustable time is between 0-10 hours.
- Press the key until the following symbol flashes on the display: ||
- Press the ☑ buttons to set the cooking time. Wait briefly. When the icon stops blinking, the set time has been taken.
- Then set the desired temperature and function.
- When the set time (= current time + set cooking time) has elapsed, the oven stops. The alarm sounds and the symbol flashes. Press the 📄 or 📋 or 🌐 button to cancel the alarm. If you do not press any key, the alarm will go off after 2 minutes.
- When the oven goes out, the display returns to the current time.
- Turn the Function Knob to the [0] position to turn off the oven.
CLEANING AND CARE
Removing the oven door
Removing the oven door gives you easier access to the entire interior of the oven for cleaning and maintenance of the oven.
| Open the oven door and pull back the latches on the two door hangers. | Close the door to 15°, lift it up and remove the door. Proceed in reverse order to reinstall the door after cleaning the furnace. |
Removing the trays
Removing the drawers gives you easier access to the entire furnace interior for cleaning and maintenance of the furnace.
| Remove the grate and plate. Then push down the hook on the drawers. | Raise the drawers 90°. Unhook the drawers at the top and remove them. Proceed in reverse order to re-insert the drawers after cleaning the oven. | |
Cleaning
All parts of the appliance that come into contact with food must be cleaned regularly.
- Switch off the appliance before each cleaning and maintenance and disconnect it from the mains supply.
- Turn all switches to the "off" position.
- Wait until the appliance has cooled down to the point where it is only warm and not hot, as this makes cleaning the appliance easier.
- Clean the surface with a damp cloth, a soft brush, or a fine sponge and then rub dry. In case of heavy soiling, you can use hot water and a non-abrasive detergent to clean the unit.
- Do not use aggressive or abrasive detergents or sharp metal scrapers to clean the glass in the oven door as they may scratch the surface and damage the glass.
- Do not leave acidic substances (lemon juice, vinegar) on stainless steel parts.
- Do not use steam cleaners to clean the appliance. The baking trays and grilles can be cleaned with a mild detergent.
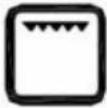
Replacing the lamp
To replace the lamp, follow these steps:
- Unplug the appliance from the wall outlet.
- Loosen the lamp cover by turning it counterclockwise (it could be very tight)
- Remove the bulb and replace it with a new bulb of the same type.
- Reattach the lamp cover.
natural_image
Diagram showing a device with rotational flow and a separate mechanical component with directional arrows (no text or symbols)DISPOSAL CONSIDERATIONS

natural_image
Symbol of a trash bin crossed with a diagonal line, no text or labels presentIf there is a legal regulation for the disposal of electrical and electronic devices in your country, this symbol on the product or on the packaging indicates that this product must not be disposed of with household waste. Instead, it must be taken to a collection point for the recycling of electrical and electronic equipment. By disposing of it in accordance with the rules, you are protecting the environment and the health of your fellow human beings from negative consequences. For information about the recycling and disposal of this product, please contact your local authority or your household waste disposal service.
MANUFACTURER & IMPORTER (UK)
Manufacturer:
Chal-Tec GmbH, Wallstrasse 16, 10179 Berlin, Germany.
Importer for Great Britain:
Berlin Brands Group UK Limited
PO Box 42
272 Kensington High Street
London, W8 6ND
United Kingdom
Estimado cliente:
ÍNDICE
Montaje
PANEL DE CONTROL Y PERILLAS
natural_image
Diagram showing a mechanical component with rotational flow and a separate view of a cylindrical component (no text or symbols)INDICACIONES SOBRE LA RETIRADA DEL APARATO
natural_image
Symbol of a trash bin crossed with a diagonal line, no text or labels presentBerlin Brands Group UK Limited
PO Box 42
272 Kensington High Street
London, W8 6ND
United Kingdom
Cher client, chère cliente,
SOMMAIRE
FICHE DE DONNÉES PRODUIT
Indications selon 66/2104
(1) 1 kWh/Cycle = 3,6 MJ/Cycle.
CONSIGNES DE SÉCURITÉ
ATTENTION
Installation
PANNEAU DE COMMANDE ET RÉGULATEUR DE FONCTION
natural_image
Diagram showing a mechanical component with rotational flow and a separate view of a cylindrical component (no text or symbols)INFORMATIONS SUR LE RECYCLAGE

natural_image
Symbol of a trash bin crossed out by a diagonal line, with no text or labels present.Berlin Brands Group UK Limited
PO Box 42
272 Kensington High Street
London, W8 6ND
United Kingdom
Gentile cliente,
INDICE
Montaggio
natural_image
Diagram showing a device with rotating and rotating components, and a close-up of a mechanical component (no text or symbols)AVVISO DI SMALTIMENTO
natural_image
Symbol of a trash bin crossed out by a diagonal line, with no text or labels present.PRODUTTORE E IMPORTATORE (UK)
Produttore:
Chal-Tec GmbH, Wallstraße 16, 10179 Berlino, Germania.
Berlin Brands Group UK Limited
PO Box 42
272 Kensington High Street
London, W8 6ND
United Kingdom
Geachte klant,
INHOUDSOPGAVE
Installatie
CONTROLEPANEEL EN FUNCTIETOETSEN
natural_image
Diagram showing a device with rotating and rotating components, and a separate diagram of a device with a curved arrow indicating rotation.INSTRUCTIES VOOR AFVOER

natural_image
Symbol of a trash bin crossed with a diagonal line, no text or labels presentBerlin Brands Group UK Limited
PO Box 42
272 Kensington High Street
London, W8 6ND
United Kingdom
KLARSTEIN


- INHALTSVERZEICHNIS
- Einbau
- BEDIENFELD UND FUNKTIONSREGLER
- Dear Customer,
- CONTENT
- PRODUCT DATA SHEET
- SAFETY INSTRUCTIONS
- CAUTION
- INSTALLATION
- Note on Fitting the Oven into the Kitchen Unit
- Notes on electrical connection
- Wiring
- Basic installation instructions
- PRODUCT OVERVIEW
- Accessories
- Important note on the slide-in modules
- CONTROL PANEL AND FUNCTION CONTROLS
- Function controls
- COOKING TIMES AND SETTINGS
- OPERATION
- Setting the time
- Setting the Alarm
- Setting the cooking time
- CLEANING AND CARE
- Removing the oven door
- Removing the trays
- Cleaning
- Replacing the lamp
- DISPOSAL CONSIDERATIONS
- MANUFACTURER & IMPORTER (UK)
- Manufacturer:
- Importer for Great Britain:
- Estimado cliente:
- ÍNDICE
- Montaje
- PANEL DE CONTROL Y PERILLAS
- INDICACIONES SOBRE LA RETIRADA DEL APARATO
- Cher client, chère cliente,
- SOMMAIRE
- FICHE DE DONNÉES PRODUIT
- CONSIGNES DE SÉCURITÉ
- ATTENTION
- PANNEAU DE COMMANDE ET RÉGULATEUR DE FONCTION
- INFORMATIONS SUR LE RECYCLAGE
- Gentile cliente,
- INDICE
- Montaggio
- AVVISO DI SMALTIMENTO
- PRODUTTORE E IMPORTATORE (UK)
- Produttore:
- Geachte klant,
- INHOUDSOPGAVE
- Installatie
- CONTROLEPANEEL EN FUNCTIETOETSEN
- INSTRUCTIES VOOR AFVOER
- KLARSTEIN
Brand : Klarstein
Model : Elizabeth
Category : Oven