
10031979 - Oven Klarstein - Free user manual and instructions
Find the device manual for free 10031979 Klarstein in PDF.


| Product type | Fan heater / electric convector |
| Brand | Klarstein |
| Model | 10031979 |
| Power supply | 220-240 V ~ 50 Hz |
| Nominal heat output | 2000 W (2,0 kW) |
| Minimum power | 1000 W (1,0 kW) |
| Control types | Mechanical thermostat (low/high), daily and weekly timer, ECO mode, open window detector, child lock |
| Display | LED screen with temperature, hours, days, function icons |
| Controls | Touch panel and remote control |
| Heat levels | 2 (low and high) |
| Timer | Daily and weekly (up to 4 cycles per day) |
| ECO function | Yes, reduction of energy consumption |
| Open window detection | Yes, automatic shutdown if temperature drops 3°C in 2 minutes |
| Child lock | Yes, via arrow keys held for 3 seconds |
| Installation | On stand with wheels or wall mounting |
| Approximate weight | 3.5 kg (approx) |
| Dimensions (approx.) | 40 x 20 x 30 cm (approx) |
| Cleaning | Unplug and let cool; clean the back by pulling the front panel forward |
| Storage | In a cool, dry place, preferably in original packaging |
| Safety instructions | Do not cover, keep away from combustible materials, do not use near water, do not use with external timer, repair by professional only |
| Intended use | Domestic, in well-insulated rooms or occasional use |
| Included accessories | Remote control, wheels, wall mounting kit (not specified, to check) |
| Warranty | 2 years (standard) |
Frequently Asked Questions - 10031979 Klarstein
User questions about 10031979 Klarstein
0 question about this device. Answer the ones you know or ask your own.
Ask a new question about this device
Download the instructions for your Oven in PDF format for free! Find your manual 10031979 - Klarstein and take your electronic device back in hand. On this page are published all the documents necessary for the use of your device. 10031979 by Klarstein.
USER MANUAL 10031979 Klarstein
Note: This product is only suitable for well insulated spaces or occasional use.
INHALTSVERZEICHNIS
natural_image
Symbol of a trash bin crossed with a diagonal line, no text or numbers presentBerlin Brands Group UK Limited
PO Box 42
272 Kensington High Street
London, W8 6ND
United Kingdom
Dear Customer,
Congratulations on purchasing this device. Please read the following instructions carefully and follow them to possible damages. We assume no liability for damage caused by disregard of the instructions and improper use. Scan the QR code to get access to the latest user manual and more product information.
CONTENTS
Safety Instructions 16
Product Data Sheet 17
Product Overview 18
Installation 18
Control Panel 20
Operation 21
Cleaning 23
Disposal Considerations 24
Manufacturer & Importer (UK) 24
TECHNICAL DATA
| Item number 10030918 | |
| Power supply 220-240 V ~ 50 Hz | |
| Power 1000 W / 2000 W |
SAFETYINSTRUCTIONS
- Check that the voltage indicates on the data plate corresponds with that of the local network before connecting the appliance to the mains power supply.
- If the supply cord is damaged, it must be replaced by a qualified engineer in order to avoid a hazard.
- The heater must not be positioned directly under the power socket.
- Keep furniture, curtains and other fl ammable material at least 1 meter away from the appliance.
- Keep out of reach of children and do not allow them to operate this appliance.
- This appliance is intended for household use only and should not be used for industrial purposes.
- Do not operate this appliance after a malfunction or after being damaged in any way.
• Repairs to electrical appliances should only be performed by a qualified electrician.
- Improper repairs may place user at serious risk.
- Do not run the mains cable under carpets, rugs, etc.
- Do not allow the mains cable to hang over sharp edges or come in contact with hot surfaces.
• In order to avoid overheating, do not cover the heater.
- Do not use this heater with a programmer, timer, separate remote control system or any other device that switches the heater on automatically, since a fire risk exists if the heater is covered or positioned incorrectly.
- Never immerse the product in water or any other liquid for any reasons.
- Do not use this heater in the immediate surroundings of a bath, a shower or a swimming pool.
- Do not use the appliance outdoors.
- Do not use if you have wet hands.
- Never use the appliance on or near hot surfaces.
- Do not operate with a damaged cord.
- Before cleaning the appliance, make sure it is unplugged from the power and that it is completely cooled.
- Do not clean the appliance with abrasive chemicals.
- Never use accessories that are not recommended or supplied by the manufacturer. It could cause danger to the user or damage to the appliance.
- This device may be only used by children 8 years old or older and persons with limited physical, sensory and mental capabilities and / or lack of experience and knowledge, provided that they have been instructed in use of the device by a responsible person who understands the associated risks.
• Children should be supervised to ensure that they do not play with the appliance.

CAUTION
Risk of burns! Some parts of this product can become very hot and cause burns. Particular attention has to be given where children and vulnerable people are present.
PRODUCT DATA SHEET
| Model identifier(s): 10030917, 10030918 | ||||||
| Item Symbol Value Unit Item Unit | ||||||
| Heat output Type of heat input, for electric storage local space | heaters only | |||||
| Nominal heat output P | nom | 2.0 kW | manual heat | heat | charge control, with integrated thermostat | NO |
| Minimum heat output P | min | 1.0 kW | manual heat | heat | charge control with room and/or outdoor temperature feedback | NO |
| Maximum continuous heat output | Pmax | 1.98 kW | electronic heat | heat | heat charge control with room and/or outdoor temperature feedback | NO |
| Auxiliary electricity consumption | fan assisted heat output | NO | ||||
| At nominal heat output | elmax | 1,875 | kW | Type of heat output/room temperature control (select one) | ||
| At minimum heat output | elmin | 0,936 | kW | single stage heat output and no room temperature control | NO | |
| In standby mode | elsB | 0,24 | W Two or more manual stages, no room temperature control | NO | ||
| with mechanic thermostat room temperature control | NO | |||||
| with electronic room temperature control | NO | |||||
| electronic room temperature control plus day timer | YES | |||||
| electronic room temperature control plus week timer | NO | |||||
| Other control options (multiple selections possible) | ||||||
| room temperature control, with presence detection | NO | |||||
| room temperature control, with open window detection | YES | |||||
| with distance control option | NO | |||||
| with adaptive start control | NO | |||||
| with working time limitation | NO | |||||
| with black bulb sensor | NO | |||||
| Contact details | Chal-Tec GmbH, Wallstraße 16, 10179, Berlin, Germany | |||||
PRODUCT OVERVIEW
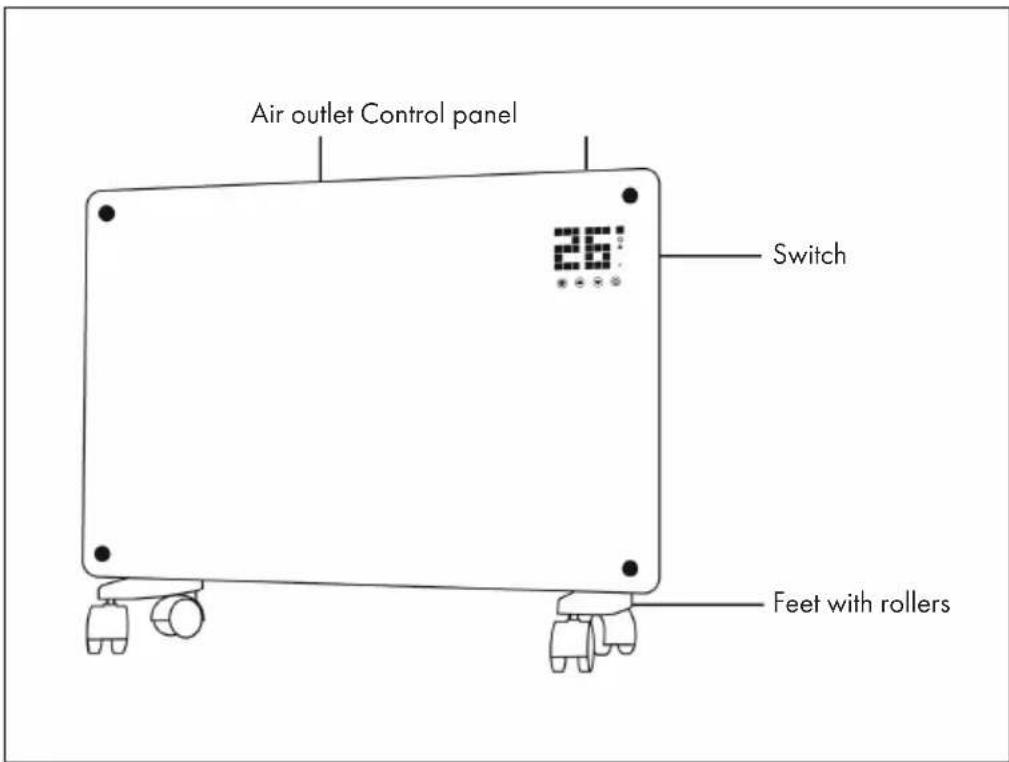
INSTALLATION
Freestanding installation with rollers
| Assemble rollers Removing the rollers | |
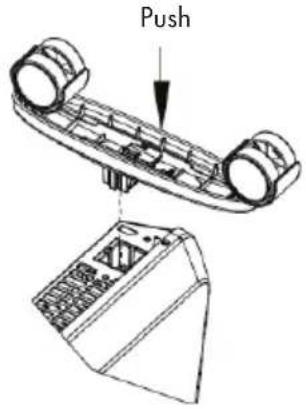 | Push button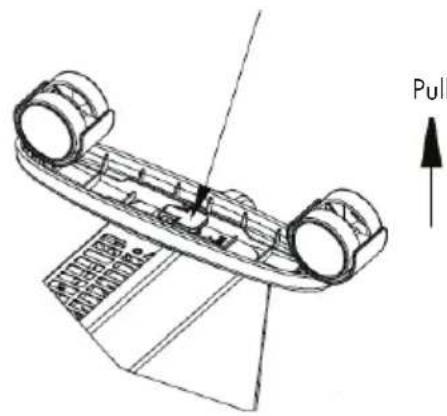 |
| When the assembly is complete, you will hear a click. | Press the button to remove the rollers. |
Wall mounting
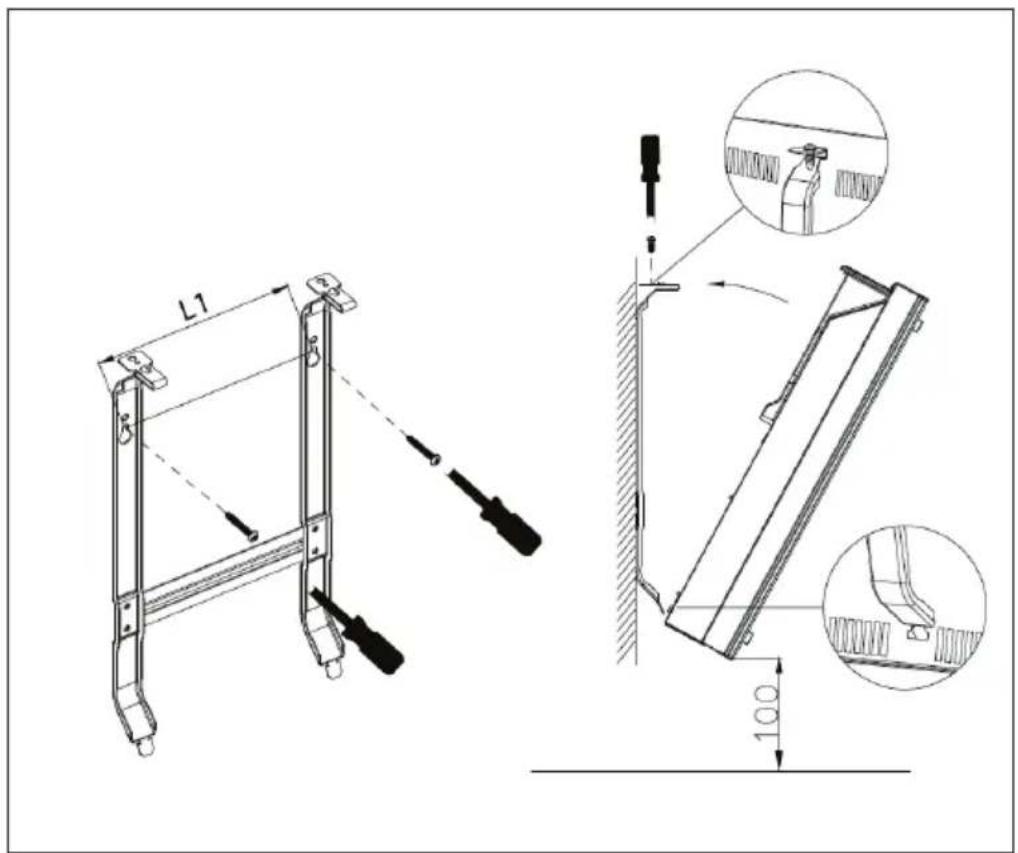
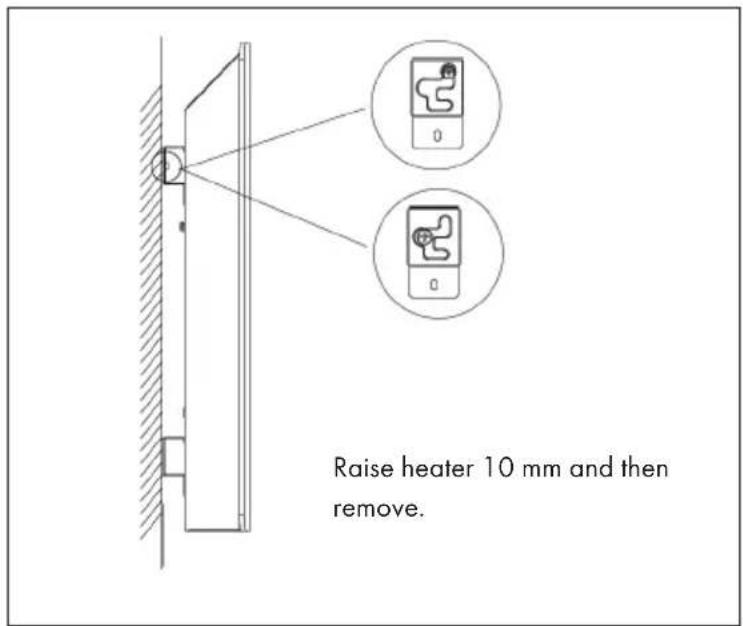
Take down from the wall
CONTROL PANEL
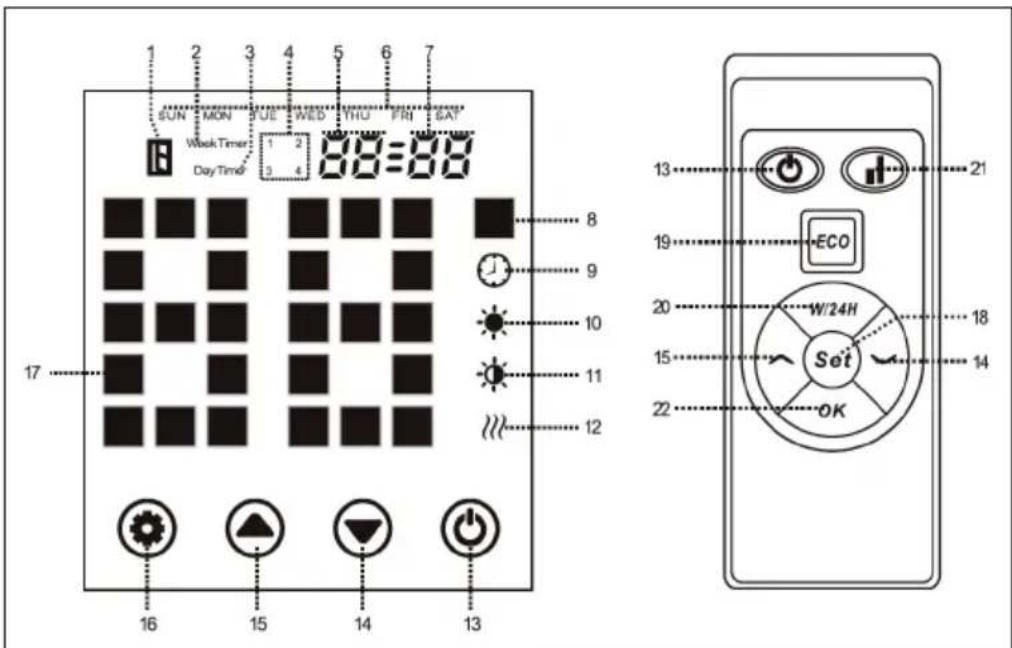
| Display indicators Keys | |||
| 1 | "Window open" | 13 | On/Off switch |
| 2 | Weekly timer | 14 | Value down |
| 3 | Day timer | 15 | Value up |
| 4 | Timer period | 16 | Settings (control panel) |
| 5 | Hours | 17 | Temperature display |
| 6 | Week | 18 | Settings (remote control) |
| 7 | Minute 19 ECO mode on/off | ||
| 8 | Temperature unit | 20 | Day/week change key |
| 9 | Timer 21 | high/low heating level 22 OK button | |
| 10 | high heating level | ||
| 11 | low heating level | ||
| 12 | Heating element operating status | ||
OPERATION
Commissioning
- Carefully remove the unit from the carton. Save the carton for storage outside of the heating season.
- Make sure the on/off switch is off before connecting the unit.
- The heater must be fully assembled and mounted according to the assembly instructions.
- It is better not to use the same electrical connection with other power-hungry devices to avoid overloading the circuit.
Power up
Connect the device to the power supply. Switch on the device with the On/Off key (13). The unit is now in standby mode and the current time is displayed. The keys (13), (14), (15) and (16) light up and go dark again after 10 seconds. Now the display shows the current room temperature.
Time setting
Press and hold the settings (16) and the up arrow key (15) simultaneously for three seconds. The weekly display (6) flashes and the time setting is active. Use the arrow keys to select a day of the week. Press the settings (16) and the hour display (5) flashes. Select the hour again with the arrow keys (14, 15). Press the settings (16) to move to the minutes setting. Select the minute with the arrow keys (14, 15) and confirm the set time with the settings (16).
Temperature setting
Press Settings (16). The temperature display (17) flashes. Then select the temperature with the arrow keys (14, 15). Confirm with the settings (16) or do not make any further entries for 5 seconds so that the settings are automatically accepted.
Selecting the power level
Select the low heating level with the down arrow key (14). The symbol appears in the display. Select the high heating level with the up arrow key (15). The symbol appears in the display. Alternatively, press the key (21) to switch between high and low heating level.
Child lock
Press and hold both arrow keys (14, 15) for three seconds. The child lock symbol ([ ]) appears in the display. The system is locked, no settings can be made. After 2 seconds, the display shows the ambient temperature. In this mode, only the child lock symbol appears each time the key is pressed. Unlocking: Press and hold the two arrow keys (14, 15) for 3 seconds. The device is unlocked. Now any settings can be made again.
Activating the touch-sensitive display keys
During operation, the display keys normally go off. Touch the area below the temperature display to activate the display keys.
ECO mode (economy mode)
Press and hold Settings (16) and the down arrow key (14) for three seconds (or press the ECO key on the remote control to set the unit to economy mode. In this operating mode, only some indications appear on the display (depending on the settings you made before ECO mode).
Sleep mode
If no keys are pressed for 10 seconds when the unit is heating, the display will go into a sleep mode and only ambient temperature will be displayed.
Open window detector
If the ambient temperature drops by 3 °C within 2 minutes, the heater activates the open window detector. The symbol appears in the display and it buzzes. The heater switches off.
Day/week timer
Press the „W/24H“ key to switch between the settings for the day timer and the week timer. The display shows „DayTimer“ and „Weektimer“ accordingly.
Day timer: With this setting, the display shows „DayTimer“. To set the hours, press „Weektimer“ on the remote control. Select an hour with the arrow keys (13, 14). Use the arrow keys (16) to change to the minutes setting. Set the minutes with the arrow keys. Confirm with the OK key and save the settings made.
Weekly timer: The weekly timer allows four operating cycles per day and seven days in a week. Weektimer" appears in the display. Press Settings (16) on the remote control to call up a day (display (6) flashes). Use the arrow keys (13, 14) to select the first operating cycle. Press Settings (16) to go to the selection of a start time, which you select with the arrow keys.
Press Settings (16) again to set a switch-off time. Proceed in the same way with the setting
Delete settings
Press and hold the key (16) for 10 seconds to delete all previous settings.
Switch off
Press the on/off button. The heater will stop operating.
CLEANING
It is very easy to clean the back of the unit. To clean the back, hold the convector heater by the sides with both hands and pull it forward.
After cleaning, put the heater back in place.
Storage
If you do not use the device for a long time, it is recommended to clean and store it (preferably in the original box) in a cool and dry place.
DISPOSAL CONSIDERATIONS
natural_image
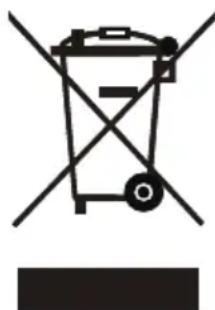
Symbol of a trash bin with crossed lines and a horizontal bar below (no text or labels)If there is a legal regulation for the disposal of electrical and electronic devices in your country, this symbol on the product or on the packaging indicates that this product must not be disposed of with household waste. Instead, it must be taken to a collection point for the recycling of electrical and electronic equipment. By disposing of it in accordance with the rules, you are protecting the environment and the health of your fellow human beings from negative consequences. For information about the recycling and disposal of this product, please contact your local authority or your household waste disposal service.
This product contains batteries. If there is a legal regulation for the disposal of batteries in your country, the batteries must not be disposed of with household waste. Find out about local regulations for disposing of batteries. By disposing of them in accordance with the rules, you are protecting the environment and the health of your fellow human beings from negative consequences.
MANUFACTURER & IMPORTER (UK)
Manufacturer:
Chal-Tec GmbH, Wallstrasse 16, 10179 Berlin, Germany.
Importer for Great Britain:
Berlin Brands Group UK Limited
PO Box 42
272 Kensington High Street
London, W8 6ND
United Kingdom
Estimado cliente:
natural_image
Symbol of a trash bin crossed with no text or labels
Berlin Brands Group UK Limited
PO Box 42
272 Kensington High Street
London, W8 6ND
United Kingdom
Chère cliente, cher client,
SOMMAIRE
FICHE DE DONNÉES PRODUIT
natural_image
Symbol of a trash bin with crossed x and y axes, no text or labels presentBerlin Brands Group UK Limited
PO Box 42
272 Kensington High Street
London, W8 6ND
United Kingdom
Gentile cliente,
INDICE
natural_image
Symbol of a trash bin crossed with a diagonal line, no text or numbers presentPRODUTTORE E IMPORTATORE (UK)
Produttore:
Chal-Tec GmbH, Wallstraße 16, 10179 Berlino, Germania.
Berlin Brands Group UK Ltd
PO Box 1145
Oxford, OX1 9UW
United Kingdom
Geachte klant,
INHOUDSOPGAVE
INSTRUCTIES VOOR AFVOER
natural_image
Simple line drawing of a trash bin with crossed lines indicating no waste or discharge (no text or symbols)Berlin Brands Group UK Limited
PO Box 42
272 Kensington High Street
London, W8 6ND
United Kingdom

bar
| Category | Value | |---|---| | Category 1 | 100 | | Category 2 | 100 | | Category 3 | 100 | | Category 4 | 100 | | Category 5 | 100 | | Category 6 | 100 | | Category 7 | 100 | | Category 8 | 100 | | Category 9 | 100 | | Category 10 | 100 | | Category 11 | 100 | | Category 12 | 100 | | Category 13 | 100 | | Category 14 | 100 | | Category 15 | 100 | | Category 16 | 100 | | Category 17 | 100 | | Category 18 | 100 | | Category 19 | 100 | | Category 20 | 100 | | Category 21 | 100 | | Category 22 | 100 | | Category 23 | 100 | | Category 24 | 100 | | Category 25 | 100 | | Category 26 | 100 | | Category 27 | 100 | | Category 28 | 100 | | Category 29 | 100 | | Category 30 | 100 | | Category 31 | 100 | | Category 32 | 100 | | Category 33 | 100 | | Category 34 | 100 | | Category 35 | 100 | | Category 36 | 100 | | Category 37 | 100 | | Category 38 | 100 | | Category 39 | 100 | | Category 40 | 100 | | Category 41 | 100 | | Category 42 | 100 | | Category 43 | 100 | | Category 44 | 100 | | Category 45 | 100 | | Category 46 | 100 | | Category 47 | 100 | | Category 48 | 100 | | Category 49 | 100 | | Category 50 | 100 | | Category 51 | 100 | | Category 52 | 100 | | Category 53 | 100 | | Category 54 | 100 | | Category 55 | 100 | | Category 56 | 100 | | Category 57 | 100 | | Category 58 | 100 | | Category 59 | 100 | | Category 60 | 100 | | Category 61 | 100 | | Category 62 | 100 | | Category 63 | 100 | | Category 64 | 100 | | Category 65 | 100 | | Category 66 | 100 | | Category 67 | 100 | | Category 68 | 100 | | Category 69 | 100 | | Category 70 | 100 | | Category 71 | 100 | | Category 72 | 100 | | Category 73 | 100 | | Category 74 | 100 | | Category 75 | 100 | | Category 76 | 100 | | Category 77 | 100 | | Category 78 | 100 | | Category 79 | 100 | | Category 80 | 100 | | Category 81 | 100 | | Category 82 | 100 | | Category 83 | 100 | | Category 84 | 100 | | Category 85 | 100 | | Category 86 | 100 | | Category 87 | 100 | | Category 88 | 100 | | Category 89 | 100 | | Category 90 | 100 | | Category 91 | 100 | | Category 92 | 100 | | Category 93 | 100 | | Category 94 | 100 | | Category 95 | 100 | | Category 96 | 100 | | Category 97 | 100 | | Category 98 | 100 | | Category 99 | 100 | | Total (Total) = [sum of bars] / [values] * (sum of bars + bars) * (sum of bars + bars) * (sum of bars + bars). The values in the table represent the sum of the bars and the corresponding sum of the bars. There is no additional data series or categories specified in the code.
KLARSTEIN


- INHALTSVERZEICHNIS
- Dear Customer,
- CONTENTS
- SAFETYINSTRUCTIONS
- CAUTION
- PRODUCT DATA SHEET
- PRODUCT OVERVIEW
- INSTALLATION
- Wall mounting
- Take down from the wall
- CONTROL PANEL
- OPERATION
- Commissioning
- Power up
- Time setting
- Temperature setting
- Selecting the power level
- Child lock
- Activating the touch-sensitive display keys
- ECO mode (economy mode)
- Sleep mode
- Open window detector
- Day/week timer
- Delete settings
- Switch off
- CLEANING
- Storage
- DISPOSAL CONSIDERATIONS
- MANUFACTURER & IMPORTER (UK)
- Manufacturer:
- Importer for Great Britain:
- Estimado cliente:
- Chère cliente, cher client,
- SOMMAIRE
- FICHE DE DONNÉES PRODUIT
- Gentile cliente,
- INDICE
- PRODUTTORE E IMPORTATORE (UK)
- Produttore:
- Geachte klant,
- INHOUDSOPGAVE
- INSTRUCTIES VOOR AFVOER
- KLARSTEIN
Brand : Klarstein
Model : 10031979
Category : Oven