
Omnichef 23 - Oven Klarstein - Free user manual and instructions
Find the device manual for free Omnichef 23 Klarstein in PDF.


| Product Type | Tabletop oven with cooking plates |
| Brand | Klarstein |
| Model | Omnichef 23 |
| Power Supply Voltage | 220 - 240 V ~ |
| Estimated Total Power | Approximately 2000 W |
| Oven Capacity | Approximately 23 L |
| Material | Stainless steel, tempered glass |
| Approximate Dimensions (W x D x H) | 50 x 40 x 30 cm |
| Approximate Weight | 15 kg |
| Main Functions | Oven cooking, grill, convection, rotisserie, cooking plates |
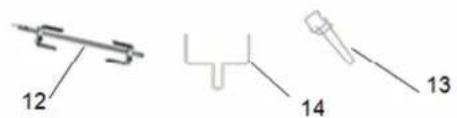
| Included Accessories | Drip tray, grill rack, cooking plate (x2), rotisserie spit, drip tray handle, rotisserie handle |
| Timer | Yes, with automatic shut-off and buzzer |
| Power Indicator | Yes |
| Cleaning and Maintenance | Unplug before cleaning; clean enameled surfaces with mild detergent; leave door open to dry; avoid metal sponges; clean acidic substances immediately |
| Safety | Do not touch hot surfaces; do not immerse in water; keep safety distances (4 cm); do not use unattended; do not repair yourself |
| Repairability | Repairs exclusively by a specialized workshop; any opening voids the warranty |
| General Information | Compliant with EC directives (EMC, LVD, RoHS); recycling according to directive 2002/96/EC |
Frequently Asked Questions - Omnichef 23 Klarstein
User questions about Omnichef 23 Klarstein
0 question about this device. Answer the ones you know or ask your own.
Ask a new question about this device
Download the instructions for your Oven in PDF format for free! Find your manual Omnichef 23 - Klarstein and take your electronic device back in hand. On this page are published all the documents necessary for the use of your device. Omnichef 23 by Klarstein.
USER MANUAL Omnichef 23 Klarstein
natural_image
Exterior view of a modern kitchen toaster with two top ovens and control knobs (no visible text or symbols)Omnichef-23 Backofen
10021587
10021588
10021589
KLARSTEIN
Warnung
Gerät:
Warnung
Gerät:
natural_image
Symbol of a trash bin crossed with a diagonal line, no text or numbers presentIMPORTANT SAFETY INSTRUCTIONS
Pls note the following safely notes to avoid malfunctions, damage or physical injury:
-
Make sure the voltage corresponds to the type label on the appliance and only connect the power plug of the oven to properly grounded sockets.
-
Persons with limited physical, sensorial or mental abilities are not allowed to use the unit, unless they are supervised and briefed for their safety by a qualified person.
-
Never leave the appliance for long time unsupervised when in use. Keep out of reach of children or persons in need of supervision.
-
Place the oven on a flat, heat-resistant and stable surface. Never place the appliance near or on hot surfaces such as gas or electric stove.
-
Attention: Hot Surface! Do not cover the ventilation holes and do not place any objects on the top of the oven. Make sure that the space between the oven and furniture or other objects is at least 15 cm (6 inches).
-
Keep infl ammable objects and materials, such as newspaper, PVC, alcohol, tablecloths, curtains etc. far away from the oven.
-
Please switch OFF the appliance and unplug from the power supply before cleaning or when not in use.
-
Guard against electric shock. Never immerse the whole appliance, the plug, the power cord or the heating element into water or let them have contact with water or any other liquid.
-
Do not splash water on the body or door when the oven is in operation.
-
Please keep this appliance and his accessories clean at all times as they come into direct contact with food.
-
Use only included accessory. Do not store the accessory in the hot oven. Remove the accessory only with oven gloves from the hot oven.
-
Never move the appliance by pulling the cord.
-
Make sure the cord cannot get caught in any way. Do not wind the cord around the appliance and do not bend it.
-
Do not allow the cord to hang over the edge of a table or countertop, or to touch hot surfaces.
-
Do not touch hot surfaces. risk of burn! Only open the glass door by grasping the door handle.
-
Use the handles and buttons only when handling the appliance. Wait until the oven has completely cooled down before carrying or cleaning it.
-
Do not operate the oven with a damaged cord or plug or when the oven malfunctions or has been dropped or damaged in any other manner.
-
When cleaning the oven, only use a moistened cloth and do not splash too much water on the body or inside the oven. Make sure that the oven is completely dry before connecting it to mains power again.
-
Only use the appliance for domestic purposes and in the way indicated in these instructions. The appliance is not designed for continuous, professional use.
-
Should the appliance become damaged do not use it and have it repaired by a professional or contact our customer support department. Do not disassemble the appliance or try repairing it yourself.
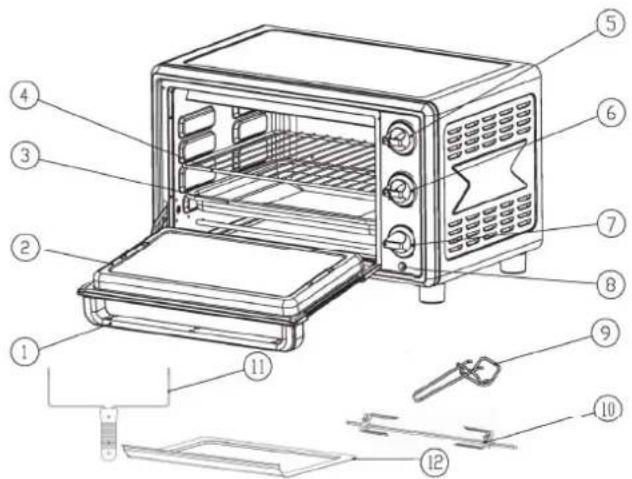
Name of parts
-
Door handle
-
Glass door
-
Bake tray
-
Wire rack
-
Temperature Control
-
Function switch control
-
Timer
-
Pilot lamp
-
Bake tray handle
-
Rotisserie sets
-
Rotisserie handle
-
Crumb tray
Operation
Before first Use
Remove the oven and all accessories from the packaging. Please check the cooking chamber, too. Please keep packing materials away from infants. There is danger of suffocation! Clean all parts of the appliance before using the first time as described below in the chapter "Cleaning".
Assembling the appliance and heating up
- Make sure the oven sits steadily on a solid, level surface. Make sure that there is enough space around the oven and the ventilation holes are free.
- Plug the appliance into a wall socket. The oven is now ready for use.
- The internal lamp inside will be always ON when the power is ON.
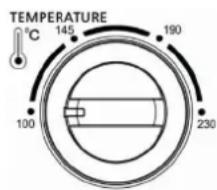
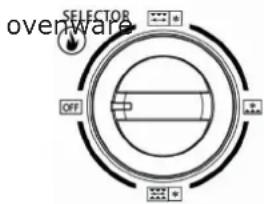
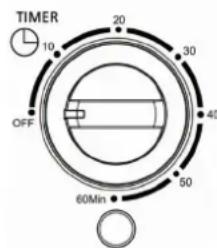
- Turn the TEMPERATURE switch to of 230^ C. Turn the TIMER clockwise and let the oven to heat up for 15 minutes. Turn the switch SELECTOR to top and bottom heat with convection and rotisserie function.
The smell is harmless and disappears in a while. Make sure, there is sufficient ventilation in the room.
Operating
- Select the desired temperature and turn the TIMER clockwise in order to set the time. If you have turned too far, turn the switch Counter clockwise back. The power indicator light turns on.
- Turn the switch SELECTOR to the desired position for Top heat with convection function, bottom heat with convection function, or bottom and top heat with convection function.
- Now, select the desired temperature with the switch TEMPERATURE.
- Place the grid into the desired shelves and insert the on the grid. When using ovenware, make sure that the material is heat-proof and fits in the oven. The ovenware should not touch the glass door.
- Close the oven door.
- You can check cooking through the heat-proof glass door. Do not open the glass door during cooking to avoid heat wastage. Never place any objects on the glass door. After baking process you will hear a sound and the oven automatically switches off. The power indicator switches off, too. To abort cooking process, turn the switch TIMER counter clockwise to the position OFF, until you hear a sound. Turn the switch TEMPERATURE counter clockwise to position 100.
- For removing the tray or the grid, use oven mitts or the provided handle! Please note the oven will be hot. There is risk of burns!
Using the Rotisserie Spit
1 Stick the rotisserie spit through the roast/poultry and insert the rotisserie-forks on the spit.
2 Hand tight the wing screws in order to secure the meat during grill process.
3 Insert the tray into the oven in order to collect dropping fat.
4 Place the rotisserie spit with the gripper into the provided supports. First insert the spiky side of the spit into the right opening and than insert the other end of the spit into the left rotisserie support.
5 Select the desired temperature and time and close the glass door.
6 For removing the roast/poultry only use the gripper! Do not touch the housing or the glass door during operation.
Using the Tray
When using ovenproof dishes for cooking, preferably place the dish on the tray. Do not use the oven grid for this purpose. By doing this overfl owing sauces and fat will not drop on the heating elements and the bottom of the oven.
- Place the ovenproof dish on the tray and slide the tray carefully into the oven.
- After cooking, remove the tray with the included handle or with oven mitts.
Using the Grid
You can toast several slices at the same time. Place the bread on the grid.
Always use the grid for toasting bread, sandwiches, muffi ns, frozen food or waffl es.
- Place the food on the wire rack carefully into the oven.
- After cooking, remove the tray with the included handle or with oven mitts.
Care and cleaning
- Unplug from power supply before cleaning the appliance.
- Allow the oven to cool down fully before cleaning it.
- Wipe the housing with a lightly moistened cloth. Use detergent if necessary. Clean the oven interior with a moistened sponge and detergent. Dry all parts well before next use.
- Never immerse the appliance in liquids and do not use too much water for cleaning.
- Do not use aggressive chemicals or abrasives in order not to damage the surfaces.
- Clean the pizza stone while still warm but not hot with water and a brush. Do not clean the tray with abrasive chemicals. Allow food residue to soak in water and wipe with a sponge to remove. Do not wash the accessory in the dishwasher but only in hot soapy water.
Hints on Disposal
natural_image
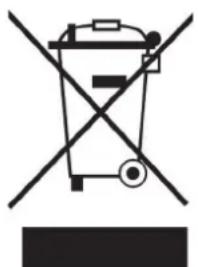
Symbol of a trash bin crossed with a diagonal line, no text or numbers presentAccording to the European waste regulation 2002/96/EC this symbol on the product or on its packaging indicates that this product may not be treated as household waste. Instead it should be taken to the appropriate collection point for the recycling of electrical and electronic equipment. By ensuring this product is disposed of correctly, you will help prevent potential negative consequences for the environment and human health, which could otherwise be caused by inappropriate waste handling of this product. For more detailed information about recycling of this product, please contact your local council or your household waste disposal service.
Declaration of Confromity
Producer: Chal-Tec GmbH, Wallstraße 16, 10179 Berlin, Germany.

This product is conform to the following European Directives:
2014/30/EU (EMC)
2014/35/EU (LVD)
2011/65/EU (RoHS)
Avertissement
Appareil :
Réparations
natural_image
Symbol of a trash bin crossed with a diagonal line, no text or numbers present

- Omnichef-23 Backofen
- Warnung
- Gerät:
- IMPORTANT SAFETY INSTRUCTIONS
- Pls note the following safely notes to avoid malfunctions, damage or physical injury:
- Name of parts
- Operation
- Before first Use
- Assembling the appliance and heating up
- Operating
- Using the Rotisserie Spit
- Using the Tray
- Using the Grid
- Care and cleaning
- Hints on Disposal
- Declaration of Confromity
- Avertissement
- Appareil :
- Réparations
Brand : Klarstein
Model : Omnichef 23
Category : Oven