
10031980 - Oven Klarstein - Free user manual and instructions
Find the device manual for free 10031980 Klarstein in PDF.


| Product Type | Electric Built-in Oven |
| Brand | Klarstein |
| Model | 10031980 |
| Dimensions (H x W x D) | 595 mm x 595 mm x 548 mm |
| Weight | Approx. 28 kg |
| Power Supply | 220-240 V, 50/60 Hz |
| Power Consumption | 2100 W (max) |
| Energy Efficiency Class | A |
| Oven Capacity | 65 L |
| Heating Functions | Top heat, bottom heat, grill, fan-assisted, convection |
| Temperature Range | 50°C - 250°C |
| Timer | Digital timer with auto shut-off |
| Interior Material | Enamel coating |
| Door Type | Cool-touch triple-glazed glass door |
| Cleaning | Catalytic liners for self-cleaning (back panel) |
| Safety Features | Child lock, overheat protection, door lock during pyrolysis |
| Spare Parts Availability | Replacement parts available via Klarstein service |
| Warranty | 2 years (manufacturer warranty) |
Frequently Asked Questions - 10031980 Klarstein
User questions about 10031980 Klarstein
0 question about this device. Answer the ones you know or ask your own.
Ask a new question about this device
Download the instructions for your Oven in PDF format for free! Find your manual 10031980 - Klarstein and take your electronic device back in hand. On this page are published all the documents necessary for the use of your device. 10031980 by Klarstein.
USER MANUAL 10031980 Klarstein
KLARSTEIN NIEIJSRATK TEIN NIEIJSRATK KLAR KLARSTEIN NIEIJSRATK TEIN NIEIJSRATK KLAR KLARSTEIN NIEIJSRATK TEIN NIEIJSRATK KLAR KLARSTEIN NIEIJSRATK
KLARSTEIN
Glaskonvektor
Glass Convector Heater
Artikelnummer 10037979 10031980
Note: This product is only suitable for well insulated spaces or occasional use.
bar
| Category | Value | |---|---| | Category 1 | 100 | | Category 2 | 100 | | Category 3 | 100 | | Category 4 | 100 | | Category 5 | 100 | | Category 6 | 100 | | Category 7 | 100 | | Category 8 | 100 | | Category 9 | 100 | | Category 10 | 100 | | Category 11 | 100 | | Category 12 | 100 | | Category 13 | 100 | | Category 14 | 100 | | Category 15 | 100 | | Category 16 | 100 | | Category 17 | 100 | | Category 18 | 100 | | Category 19 | 100 | | Category 20 | 100 | | Category 21 | 100 | | Category 22 | 100 | | Category 23 | 100 | | Category 24 | 100 | | Category 25 | 100 | | Category 26 | 100 | | Category 27 | 100 | | Category 28 | 100 | | Category 29 | 100 | | Category 30 | 100 | | Category 31 | 100 | | Category 32 | 100 | | Category 33 | 100 | | Category 34 | 100 | | Category 35 | 100 | | Category 36 | 100 | | Category 37 | 100 | | Category 38 | 100 | | Category 39 | 100 | | Category 40 | 100 | | Category 41 | 100 | | Category 42 | 100 | | Category 43 | 100 | | Category 44 | 100 | | Category 45 | 100 | | Category 46 | 100 | | Category 47 | 100 | | Category 48 | 100 | | Category 49 | 100 | | Category 50 | 100 | | Category 51 | 100 | | Category 52 | 100 | | Category 53 | 100 | | Category 54 | 100 | | Category 55 | 100 | | Category 56 | 100 | | Category 57 | 100 | | Category 58 | 100 | | Category 59 | 100 | | Category 60 | 100 | | Category 61 | 100 | | Category 62 | 100 | | Category 63 | 100 | | Category 64 | 100 | | Category 65 | 100 | | Category 66 | 100 | | Category 67 | 100 | | Category 68 | 100 | | Category 69 | 100 | | Category 70 | 100 | | Category 71 | 100 | | Category 72 | 100 | | Category 73 | 100 | | Category 74 | 100 | | Category 75 | 100 | | Category 76 | 100 | | Category 77 | 100 | | Category 78 | 100 | | Category 79 | 100 | | Category 80 | 100 | | Category 81 | 100 | | Category 82 | 100 | | Category 83 | 100 | | Category 84 | 100 | | Category 85 | 100 | | Category 86 | 100 | | Category 87 | 100 | | Category 88 | 100 | | Category 89 | 100 | | Category 90 | 100 | | Category 91 | 100 | | Category 92 | 100 | | Category 93 | 100 | | Category 94 | 100 | | Category 95 | 100 | | Category 96 | 100 | | Category 97 | 100 | | Category 98 | 100 | | Category 99 | 100 | | Total (Total) = [sum of bars] / [bar chart] + [line chart] = [bars] * (sum of bars + line chart) * (bars). The total bar is divided into two parts: 'Number of items' and 'Percentage'. The total bar is divided into two parts: 'Percentage' and 'Number of items'. The total bar is divided into two parts: 'Percentage' and 'Number of items'. The total bar is divided into two parts: 'Percentage' and 'Number of items'.natural_image
Technical line drawing of a mechanical assembly with a pipette and multiple bolts (no text or symbols)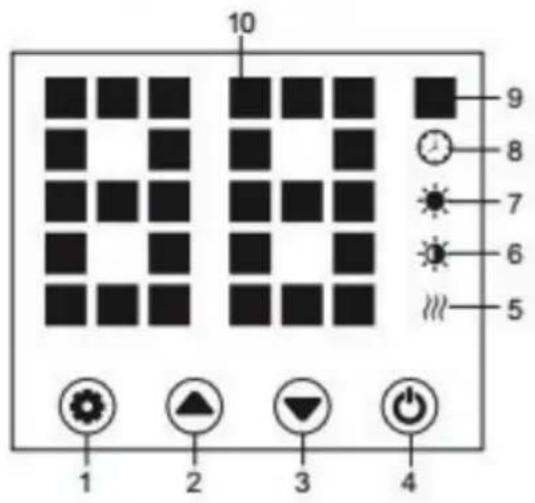
natural_image
Symbol of a trash bin with crossed lines indicating no waste or restriction, and a solid rectangle below (no text or labels)Congratulations on purchasing this equipment. Please read this manual carefully and take care of the following hints on installation and use to avoid technical damages. Any failure caused by ignoring the items and cautions mentioned in the operation and installation instructions are not covered by our warranty and any liability.
CONTENTS
Contents 12
Technical Data 12
Safety Instructions....14
Product Overview 16
Installation....17
Control Panel 18
Operation 18
Cleaning 20
Disposal Considerations 20
Declaration of Conformity . . . . . . . . . . . . . . . . . . . . . . . . . . . . . . . . . . . . . . . . . . . . . . . . 20
TECHNICAL DATA
| Item number 10031979 10031980 | |
| Power supply 220-240 V~, 50 Hz | |
| Power max. 2000 W | |
| Dimensions 82 x 10 x 45 cm |
| Model identifier(s): 10031979 | 10031980 | ||||||
| Item Symbol Value Unit Item Unit | |||||||
| Heat output Type of heat input, for electric storage local space | heaters only | ||||||
| Nominal heat output Pnom 2.0 | kW manual | heat charge | control, with | integrated thermostat | NO | ||
| Minimum heat output (indicative) | Pmin N/A | kW manual | heat charge | control with room and/or outdoor temperature feedback | NO | ||
| Maximum continuous heat output | Pmax,c | N/A kW | electronic heat | charge control with room and/or outdoor temperature feedback | NO | ||
| Auxiliary electricity consumption | fan assisted heat output | NO | |||||
| At nominal heat output (fan motor) | elmax | N/A kW | Type of heat output/room temperature control (select one) | ||||
| At minimum heat output (fan motor) | elmin | N/A kW | single stage | heat output and no room temperature control | NO | ||
| In standby mode | eISB | N/A W T | two or more | manual stages, no room temperature control | NO | ||
| with mechanic thermostat room temperature control | NO | ||||||
| with electronic room temperature control | NO | ||||||
| electronic room temperature control plus day timer | YES | ||||||
| electronic room temperature control plus week timer | NO | ||||||
| Other control options (multiple selections possible) | |||||||
| room temperature control, with presence detection | NO | ||||||
| room temperature control, with open window detection | NO | ||||||
| with distance control option | NO | ||||||
| with adaptive start control | NO | ||||||
| with working time limitation | NO | ||||||
| with black bulb sensor | NO | ||||||
| Contact details | Chal-Tec GmbH, Wallstraße 16, 10179, Berlin, Germany | ||||||
Read and follow all the instructions in this manual even if you feel you are familiar with the product, and find a place to keep it handy for future reference. Read all instructions before using this appliance and keep them for future reference.
When using any electrically powered product, basic safety precautions should always be followed, including the following:
- Use only the voltage specified on the rating plate of the heater.
- Do not cover or restrict airflow to the inlet or exhaust grilles in any manner as the appliance may overheat and become a fire risk.
- Do not cover grilles, block entry or exhaust of airflow by placing appliance against any surface. Keep all object at least 1 meter from the front, side and rear of the appliance.
- Do not place the appliance close to a radiant heat source.
- Do not operate in areas where gasoline, paint or other flammable liquids are used or stored.
- This appliance heats up when in use. To avoid burns, do not let bare skin touch hot surface.
- Switch off and let cooling before moving.
- Do not use the appliance to dry clothes.
- Do not insert or allow foreign object or metal utensils to enter any ventilation or exhaust opening, as this may cause an electric shock, fire or damage to the appliance.
- Do not immerse in liquid or allow running into the interior of the appliance, as this could create an electrical shock hazard.
- Do not reach for an appliance that has fallen into water. Switch of at supply and unplug immediately.
- Do not operate any appliance with a damaged cord, plug or after the appliance malfunctions or has been dropped or damaged in any manner. Return to a qualified electrical person for examination, electrical or mechanical adjustment, service or repair.
- Do not operate appliance with wet hands.
- The most common cause of overheating is deposits of dust or fluff in the appliance. Ensure these deposits are removed regularly by unplugging the appliance and vacuum cleaning air vents and grilles.
- Do not use this appliance in a window as rain may cause electric shock.
- Do not use a abrasive cleaning products on this appliance. Clean with a damp cloth (not wet) rinsed in hot soapy water only. Always remove plug from the mains supply before cleaning.
- Do not connect the appliance to the mains voltage until completely assembled and adjusted..
- This appliance is not intended for use in outdoor locations.
- Do not use this appliance in the immediate surrounds of a bath, a shower or a swimming pool or other liquids.
• Always operate upright. - Switch off and let cooling before moving.
- Do not operate with cord set coiled up as a build up of heat is likely, which could be sufficient to become a hazard.
-
The use of an extension cord with this appliance is not recommended.
-
Do not remove plug from power socket until the appliance has been switched off.
- Do not remove plug from power socket by pulling the supply cord-always grip plug.
• Always unplug appliance when not in use. - CAUTION: This product is NOT suitable to be used on long pile carpets or Flokati rugs.
- Do not allow cord to come in contact with heated surface during operation.
- Do not run cord under carpeting, throw rugs or runners etc. Arrange cord away from traffic areas so that it will not be tripped over.
- Do not twist, kink or wrap the cord around the appliance, as this may cause the insulation to weaken and split. Always ensure that all cord has been removed from any cord storage area.
- Do not use outdoors or whilst standing on a damp floor.
- Do not store appliance while it is still hot.
- This appliance is not intended for use by young children or infirm persons without supervision.
- Young children should be supervised to ensure they do not play with the appliance.
- The appliance must not be located immediately below a socket-outlet.
- Do not use this appliance with another programmer, timer or any other device that switches the heater on automatically, since a fire risk exists if the appliance is covered or positioned incorrectly.
- All covers of this appliance is intended to prevent direct access to the heating elements and must be in place when the appliance is in use.
- WARNING: In order to avoid overloading, do not cover the heater."
- To reduce the risk of electric shock, do not immerse or expose the product or flexible cord to rain, moisture or any liquid other than those necessary for correct operation of the product.
- The fireguard does not give full protection for young children and for infirm persons.
- If the supply cord is damaged, it must be replaced by a qualified electrical persons in order to avoid a hazard.
- Do not use this appliance outdoors or on wet surfaces Avoid spilling liquid on the appliance
- CAUTION: In order to avoid a hazard due to inadvertent resetting of the thermal cutout, this appliance must not be supplied through an external switching device, such a timer, or
- connected to a circuit that is regularly on and off by the utility."
- Use this appliance only as described in this manual. Any other use is not recommended by the manufacturer and may cause fire, electric shock or injury.
- This appliance is intended for household use only and not for commercial or industrial use.
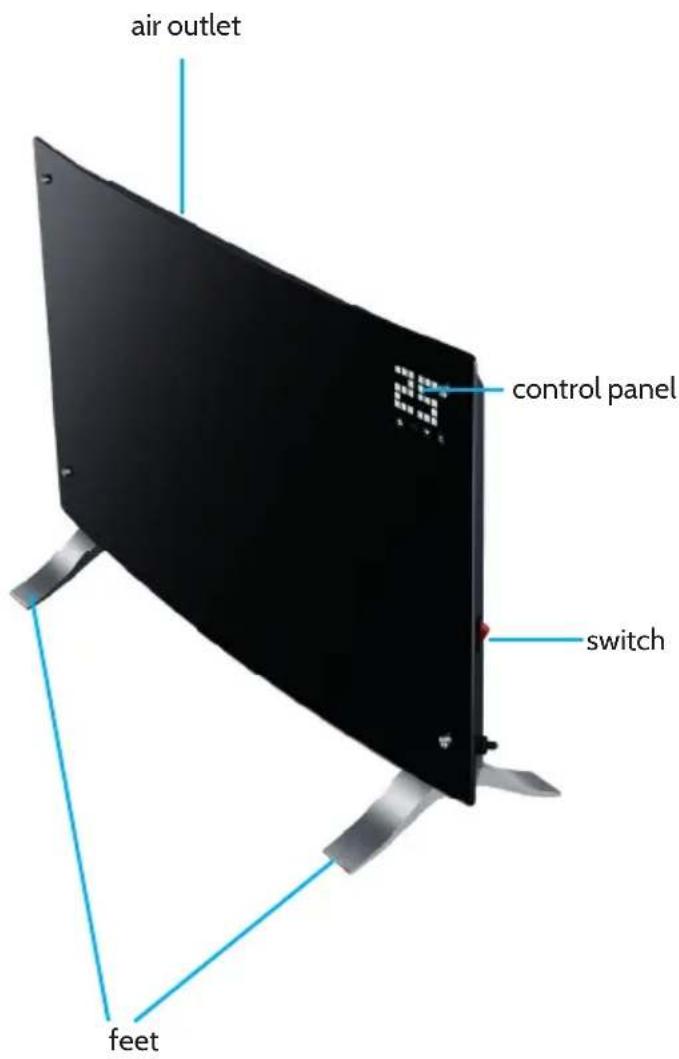
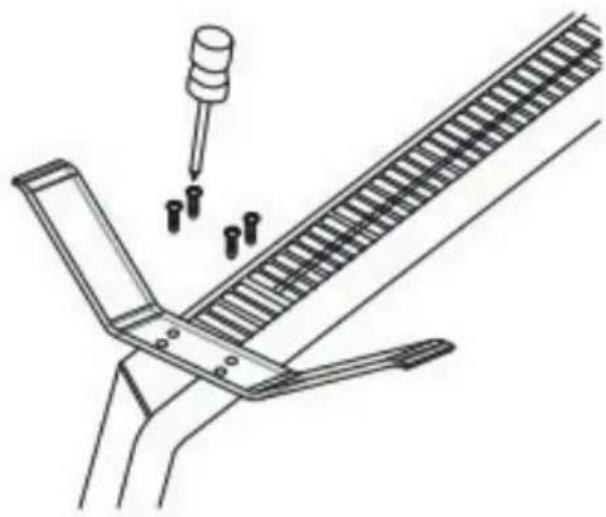
Freestanding installation (Feet installation and removal)
natural_image
Technical line drawing of a mechanical assembly with a pipette and three small components (no text or symbols)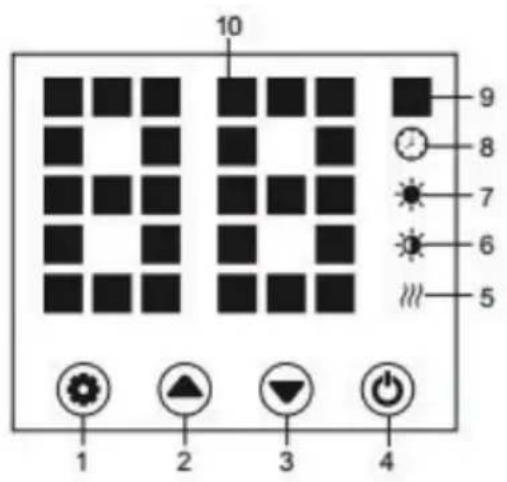
1 Setting Button
2 Up Button
3 Down Button
4 Power button
5 Heating element working indicator
6 Low heating indicator
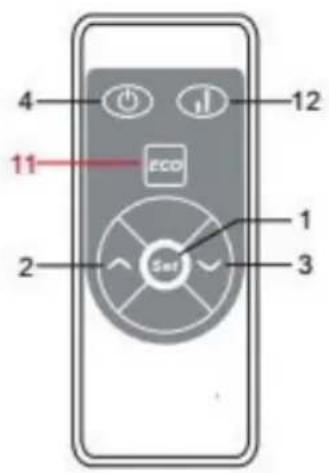
7 High heating indicator
8 Timer indicator
9 Temperature indicator (in °C)
10 LED number display
11 LED screen on/off button
12 Low/high heating selection
OPERATION
Starting
- Take out the heater from the carton carefully. Please save the carton for off-season storage.
- Make sure the power switch is in the OFF position before plugging it in.
- Ensure the heater is fully assembled according to the Mounting Guide.
- It is better not to use the same electric outlet with other high wattage electrical appliances in order to avoid overloading your circuit.
Turn on
Plug in the unit, the power indicator lights up after a short buzz. Press,, 4,, to turn on the unit, room temperature is displayed while the whole screen will be light up and the default-factory set temperature is 35 °C.
Setting the temperature
Press“1 „to set the temperature,” 10 „and“9 „will flash, then press“2 „or“3 „arrow buttons to add 1“C or reduce 1·c. The maximum setting temperature is 45“C, while the minimum one is 5“C. Keeping pressing“2 „or“3 „to add or reduce 1·c in 0.5 S. The last setting temperature is the valid one. If no operation within 3S, the system will return the running state,” 9 „indicator will not flesh while room temperature is displayed.
Switching the display between degrees Fahrenheit and Celsius
Press the keys SET and UP (the two keys on the left) simultaneously for about 10 seconds.
Setting timer
Press“1, once again to set timer, setting time is displayed while timer indicator flesh (the timer unite is hour). Pressing“2, or”3, to add or reduce 1 hour, the timer range is 0-24 hour.
Keeping pressing“2 „or“3 „to add or reduce 1 hour in 0.5 second. The factory-set timer is 0 hour. With indicator lighting, the system starts to time according to last setting time if there is no operation for 5 seconds. Each time“2 „or“3 „is pressed to set timer, system restarts to time by new time, or it does by original one till timing is over, then turns off and stops working. The unit is turned off without buzz hint when timing is over.
Turn off
Keeping pressing“ 4 „in any status to turn off the unit and power indicator keep light.
Children safety lock function
Under the working mode, press both “2 , or , 3 , at the same time for 3 seconds to lock the system. Then a square”[“is displayed. Methods to unlock:
1) Shut off the electric machine. 2) Press both "5" or ,, 6 ,for 3 seconds.
Power selected
When did not enter any models, pressing" 2 "to select the output power, the heater will work the full rated output while" 7 "is displayed. Pressing" 3 "to switch to" 6 "heating mode. Or through high/low on the remote control switch button" 12 "to choose the output power.
Wake-up function
The heater shows only area temperature on screen when in ready mode. You just touch (press) the screen below the numbers, then it wakes up and you could control its functions.
The sound hint of key-press
Press any button there have buzzer ringing sound.
Safety feature
The unit is equipped with a high limit switch, the heater will automatically shut off if it is in an over-heating condition. The heater will automatically turn back on when it has cooled down.
CLEANING
Cleaning
It is very easy to clean behind it. Hold two sides of the heater, after upwards pull the heater forwards. then you can clean behind. After cleaning, the heater must be fixed in the normal position.
Storage
If you do not plan to use the heater for extended periods of time, it is recommended that the heater is cleaned and then stored (preferably in its original packaging) in a cool dry place.
DISPOSAL CONSIDERATIONS
natural_image
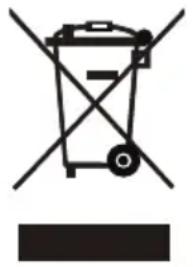
Symbol of a trash bin with crossed lines indicating no waste, and a solid rectangle below (no text or labels)According to the European waste regulation 2012/19/EU this symbol on the product or on its packaging indicates that this product may not be treated as household waste. Instead it should be taken to the appropriate collection point for the recycling of electrical and electronic equipment. By ensuring this product is disposed of correctly, you will help prevent potential negative consequences for the environment and human health, which could otherwise be caused by inappropriate waste handling of this product. For more detailed information about recycling of this product, please contact your local council or your household waste disposal service.
DECLARATION OF CONFORMITY

Producer: Chal-Tec GmbH, Wallstraße 16, 10179 Berlin. Germany
This product is conform to the following European Directives:
2009/125/EG (ErP)
2011/65/EU (RoHS)
2014/30/EU (EMC)
2014/35/EU (LVD)

bar
| Category | Value | |---|---| | Category 1 | 100 | | Category 2 | 100 | | Category 3 | 100 | | Category 4 | 100 | | Category 5 | 100 | | Category 6 | 100 | | Category 7 | 100 | | Category 8 | 100 | | Category 9 | 100 | | Category 10 | 100 | | Category 11 | 100 | | Category 12 | 100 | | Category 13 | 100 | | Category 14 | 100 | | Category 15 | 100 | | Category 16 | 100 | | Category 17 | 100 | | Category 18 | 100 | | Category 19 | 100 | | Category 20 | 100 | | Category 21 | 100 | | Category 22 | 100 | | Category 23 | 100 | | Category 24 | 100 | | Category 25 | 100 | | Category 26 | 100 | | Category 27 | 100 | | Category 28 | 100 | | Category 29 | 100 | | Category 30 | 100 | | Category 31 | 100 | | Category 32 | 100 | | Category 33 | 100 | | Category 34 | 100 | | Category 35 | 100 | | Category 36 | 100 | | Category 37 | 100 | | Category 38 | 100 | | Category 39 | 100 | | Category 40 | 100 | | Category 41 | 100 | | Category 42 | 100 | | Category 43 | 100 | | Category 44 | 100 | | Category 45 | 100 | | Category 46 | 100 | | Category 47 | 100 | | Category 48 | 100 | | Category 49 | 100 | | Category 50 | 100 | | Category 51 | 100 | | Category 52 | 100 | | Category 53 | 100 | | Category 54 | 100 | | Category 55 | 100 | | Category 56 | 100 | | Category 57 | 100 | | Category 58 | 100 | | Category 59 | 100 | | Category 60 | 100 | | Category 61 | 100 | | Category 62 | 100 | | Category 63 | 100 | | Category 64 | 100 | | Category 65 | 100 | | Category 66 | 100 | | Category 67 | 100 | | Category 68 | 100 | | Category 69 | 100 | | Category 70 | 100 | | Category 71 | 100 | | Category 72 | 100 | | Category 73 | 100 | | Category 74 | 100 | | Category 75 | 100 | | Category 76 | 100 | | Category 77 | 100 | | Category 78 | 100 | | Category 79 | 100 | | Category 80 | 100 | | Category 81 | 100 | | Category 82 | 100 | | Category 83 | 100 | | Category 84 | 100 | | Category 85 | 100 | | Category 86 | 100 | | Category 87 | 100 | | Category 88 | 100 | | Category 89 | 100 | | Category 90 | 100 | | Category 91 | 100 | | Category 92 | 100 | | Category 93 | 100 | | Category 94 | 100 | | Category 95 | 100 | | Category 96 | 100 | | Category 97 | 100 | | Category 98 | 100 | | Category 99 | 100 | | Total (Total) = [sum of bars] / [bar chart] + [line chart] = [bars] * (sum of bars + line chart) * (bars). The total bar is divided into two parts: 'Number of items' and 'Percentage'. The total bar is divided into two parts: 'Percentage' and 'Number of items'. The total bar is divided into two parts: 'Percentage' and 'Number of items'. The total bar is divided into two parts: 'Percentage' and 'Number of items'.KLARSTEIN NIEIJSYATX TEIN NIEIJSYATX KLAR KLARSTEIN NIEIJSYATX TEIN NIEIJSYATX KLAR KLARSTEIN NIEIJSYATX TEIN NIEIJSYATX KLAR KLARSTEIN NIEIJSYATX


- KLARSTEIN NIEIJSRATK TEIN NIEIJSRATK KLAR KLARSTEIN NIEIJSRATK TEIN NIEIJSRATK KLAR KLARSTEIN NIEIJSRATK TEIN NIEIJSRATK KLAR KLARSTEIN NIEIJSRATK
- KLARSTEIN
- CONTENTS
- TECHNICAL DATA
- OPERATION
- Starting
- Turn on
- Setting the temperature
- Switching the display between degrees Fahrenheit and Celsius
- Setting timer
- Turn off
- Children safety lock function
- Power selected
- Wake-up function
- The sound hint of key-press
- Safety feature
- CLEANING
- Storage
- DISPOSAL CONSIDERATIONS
- DECLARATION OF CONFORMITY
Brand : Klarstein
Model : 10031980
Category : Oven