
HT003MC - Oven Klarstein - Free user manual and instructions
Find the device manual for free HT003MC Klarstein in PDF.


| Product Type | Electric Heater (Fan Heater) |
| Model | HT003MC |
| Brand | Klarstein |
| Power Supply | 230V ~ 50/60 Hz |
| Power Consumption | 1500W (1200W / 1500W selectable) |
| Heating Element | Mica heating element |
| Control Type | Digital display with buttons and remote control |
| Temperature Range | 15°C to 35°C |
| Timer | 0-24 hours |
| Modes | Low power (1200W), High power (1500W), Thermostat |
| Installation Options | Free-standing with castors or wall-mounted |
| Recommended Mounting Height | 15 cm above floor, 50 cm below ceiling |
| Wall Mounting Hole Distance | 120 mm |
| Protection Class | I (earthed) |
| Safety Features | Overheat protection, tip-over switch (assumed), child lock (not specified) |
| Cleaning | Wipe with damp cloth; do not use abrasive cleaners or spray water |
| Storage | Store in cool dry place; wrap cord in cable box |
| Usage | Indoor use only; not near water or flammable materials |
| Remote Control | Included (On/Off/Power button) |
| Certificate / Approvals | CE (assumed) |
Frequently Asked Questions - HT003MC Klarstein
User questions about HT003MC Klarstein
0 question about this device. Answer the ones you know or ask your own.
Ask a new question about this device
Download the instructions for your Oven in PDF format for free! Find your manual HT003MC - Klarstein and take your electronic device back in hand. On this page are published all the documents necessary for the use of your device. HT003MC by Klarstein.
USER MANUAL HT003MC Klarstein
natural_image
Exterior view of a modern electric heater with control panel and display (no visible text or symbols)
electronic.star
www.elektronik-star.de
natural_image
Technical line drawing of a mechanical assembly with two circular components and a central shaft (no text or symbols)2. Wandmontage:
- Read all instructions carefully before using.
- Make sure the voltage is the same as that indicated on the rating plate of the appliance.
- Do not operate this appliance if the cable or plug becomes damaged.
- Keep the appliance and cable away from sources of heat, sharp objects or anything that may cause damage.
- If the cord is damaged, it must be replaced by the manufacturer, its service agent or similarly qualified persons in order to avoid a hazard.
- Ensure the appliance is switched off before connecting to the mains power supply.
- Switch off the power supply and disconnect from mains supply when not in use, before cleaning or other maintenance.
- To disconnect the appliance, switch it "OFF", and then remove the plug from outlet. Do not pull the cord to disconnect the plug.
- The heater must not be located immediately below a socket-outlet.
- Do not operate in areas where gasoline, paint or other flammable liquids are used or stored.
- Indoor use only.
- In order to avoid overheating, do not cover the heater.
- To prevent a possible fire, do not block air intakes or exhaust in any manner.
- Don't touch the hot surfaces.
- Do not insert or allow foreign objects to enter any ventilation or exhaust opening, as this may cause an electric shock, fire or damage to the appliance.
- Always ensure that hands are dry before operating or adjusting any switch on the product or touching the plug and socket-outlet.
- This appliance is not intended for use by persons (including children) with reduced physical, sensory or mental capabilities, or lack of experience and knowledge, unless they have been given supervision or instruction concerning use of the appliance by a person responsible for their safety.
- Children should be supervised to ensure that they do not play with the appliance.
- Do not leave this appliance unattended when it's in use.
- The most common cause of overheating is deposits of dust or fluff in the appliance. Ensure these deposits are removed regularly by disconnect the appliance and vacuum cleaning air vents and grilles.
- Do not place the heater on carpet, don't place the cable under carpets. Arrange cord away from traffic areas so that it will not be tripped over.
- Do not use this heater in the immediate surroundings of a bath, a shower or a swimming pool.
- Do not store away until the heater cools down, store the heater in cool dry location when not in use.
- The heater must not be used if the glass panel is damaged.
List of Main Parts
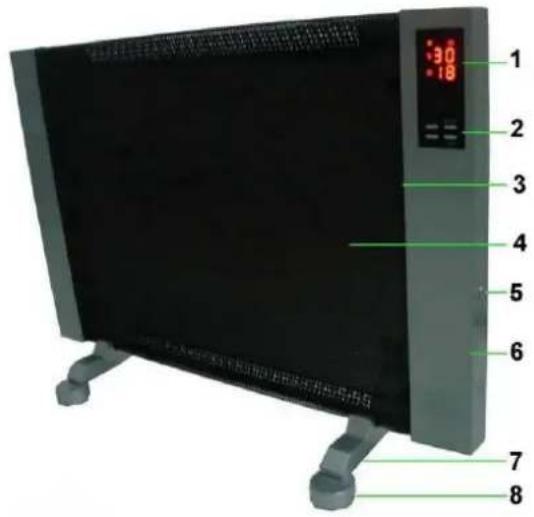
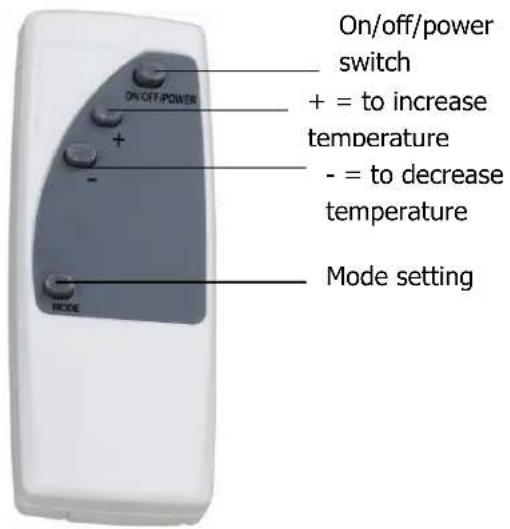
- Display window
- Operation buttons (Incl. Power button ON-OFF, mode button, + and - button)
- Mesh grill
- Mica heating element
- On/off switch
- Plastic side panel
- Leg support
- Castor
Technical Specifications
| Model | HT003MC |
| Voltage | 230V 50/60 Hz |
| Power | 1500W |
| Protective Class | I |
Operation
- Collecting the plug to the charge with VAC 230V.
- Press down the "On/off" switch down on the right side panel (plastic side panel), then the heater will connect to electricity.
- Then start to set the heat as your requirement.
Press the "Power" button on the right front display or the "On/Off/Power" button on the remote control to choose power 1200 or 1500W:
- sign mean the lower power 1200W
- sign means the high power 1500W
Press the "Mode" button plus "+" and "-" to set the timer and room temperature.
A) After pressing the "Mode" button, if the symbol "C" is blinking, then press "+" or "-" to set the room temperature, the setting temperature range is from 15°C to 35°C
Attention: When you set the room temperature, please make sure the set temperature is higher than the room temperature, or the product will not work normally. When the set temperature is low than the room temperature- the temperature sensor is sensing about 2 degrees centigrade- the half sun or total sun signs disappear, under this condition, the heater works normal.
B) After pressing the "Mode" button, if the symbol "+" is blinking, then press "+" or "-" to set the timer, the setting timer range is from 0-24 hours. After setting the timer, the symbol keeps blinking. When the timer has reached the set time, it sets back to zero (00) itself, and the time symbol will stop blinking.
Assembly
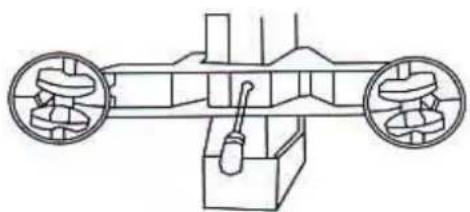
1. For free standing:
-
First, take the heater out of the package and place it upside down on soft surface.
-
Second, take two screws from the accessories (one screw for each castor, parallel the bevel of castor bracket to the bevel of the heater, if installed reversely, the screw cannot be revolved in.) and aim them at the taps to tighten them.
-
Then just upright the heater and put it into use. You may refer to the following figure.
natural_image
Technical line drawing of a mechanical assembly with two circular components and a central lever (no text or symbols)2. FOR WALL MOUNTING:
-
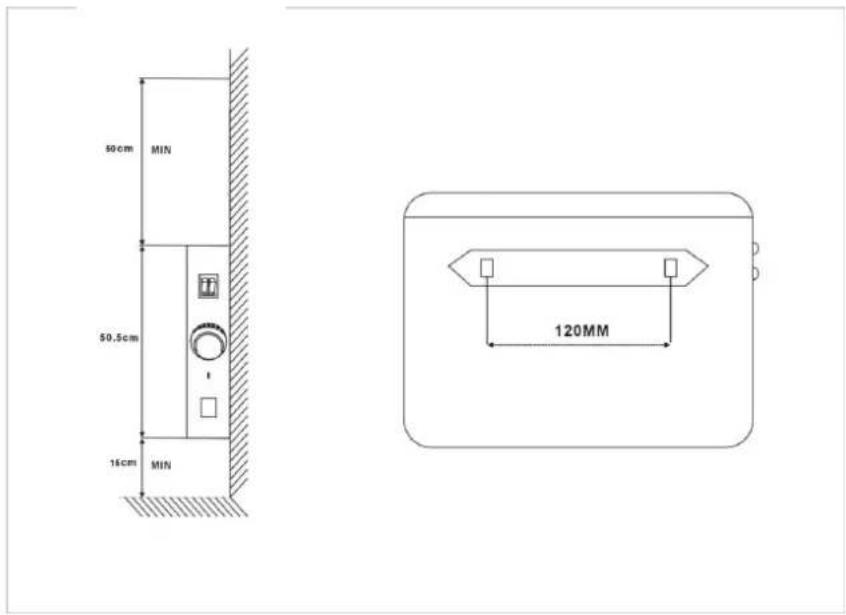
First, use an electric drill to drill two holes on the wall. Diameter and depth for the drilling holes are respectively 8mm and 35mm, the distance between the two drilling holes is 120mm.
-
Second, insert the plastic bulged screw into the drilling hole, then aim the screw at the hole and fix it on the wall. The screw head shall be about 6mm above the wall surface (To ensure safety, the screw shall be well fixed.).
-
Third, find the two holes locations on the handle at the rear of the heater and fix them to the pre-fixed screws. Pull the heater rightward to make the screws tally with the holes locations.
Note: If wall mount method is adopted, installation of truckles is not allowed. The mounting location shall be 15cm above the floor and 50cm beneath the ceiling or more. You may refer to the following figure.
Maintenance
- Always disconnect the appliance and let it completely cool before any maintenance.
- Clean the surface of the appliance with clean and wet cloth, and afterwards wipe it with a dry cloth. But don't let water to get into the cover.
- Do NOT use abrasive detergents or chemical products. Only use neutral or mild detergents.
- Never rinse the appliance or spray with water!
- Do not disassemble the device before cleaning.
Storing
- If the radiator is not used for a lengthy period of time, the supply cord must stored in the power cable box provided for it. Then radiator has to be stored in a dry place covered if possible.
- Always keep the appliance cool dry.


Brand : Klarstein
Model : HT003MC
Category : Oven