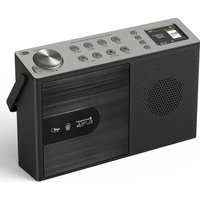
RCD1190 - CD player radio Soundmaster - Free user manual and instructions
Find the device manual for free RCD1190 Soundmaster in PDF.


User questions about RCD1190 Soundmaster
0 question about this device. Answer the ones you know or ask your own.
Ask a new question about this device
Download the instructions for your CD player radio in PDF format for free! Find your manual RCD1190 - Soundmaster and take your electronic device back in hand. On this page are published all the documents necessary for the use of your device. RCD1190 by Soundmaster.
USER MANUAL RCD1190 Soundmaster
natural_image
Black electronic device with sound waves and control knobs, no visible text or symbols on the device body.DEUTSCH
ENGLISH
FRANÇAIS
NEDERLANDS
ITALIANO
ČEŠTINA
SLOVENSKÝ
POLSKA
natural_image
Pure electrical circuit lines without any symbols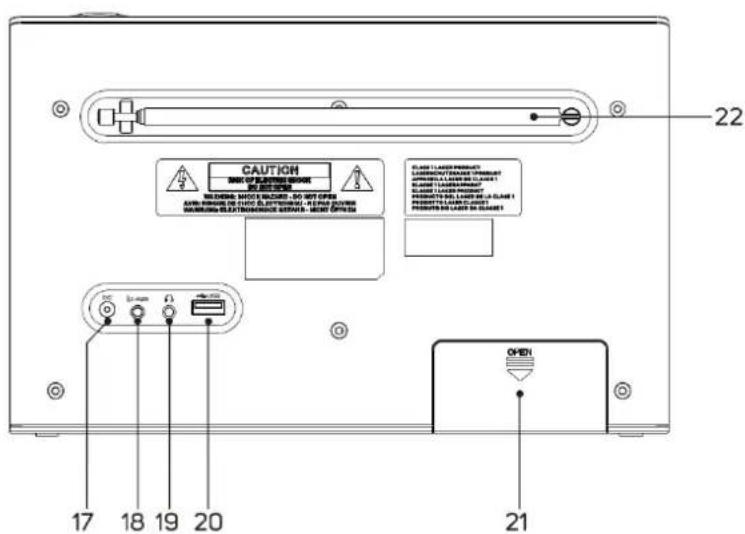
text_image
CAUTION NOTE OF SWITCHING DESIGN 22 GENERAL SHOCKS BACKOUT - DO NOT OPEN AVOC RANKS DE CUTO ELECTRONIC - RED FLOW ONION WARNING ELECTRONIC ACCESS - MEAT OFFICE CLASS 1: LARGE PRODUCT SHOWNING PLANS FOR CLASS 1 SHOWNING PLANS FOR CLASS 1 SHOWNING PLANS FOR CLASS 1 SHOWNING PLANS FOR CLASS 1 SHOWNING PLANS FOR CLASS 1 SHOWNING PLANS FOR CLASS 1 SHOWNING PLANS FOR CLASS 1 SHOWNING PLANS FOR CLASS 1 SHOWNING PLANS FOR CLASS 1 SHOWNING PLANS FOR CLASS 1 SHOWNING PLANS FOR CLASS 2 SHOWNING PLANS FOR CLASS 2 SHOWNING PLANS FOR CLASS 2 SHOWNING PLANS FOR CLASS 2 SHOWNING PLANS FOR CLASS 2 SHOWNING PLANS FOR CLASS 2 SHOWNING PLANS FOR CLASS 2 SHOWNING PLANS FOR CLASS 2 SHOWNING PLANS FOR CLASS 2 SHOWNING PLANS FOR CLASS 2 SHOWNING PLANS FOR CLASS 3 SHOWNING PLANS FOR CLASS 3 SHOWNING PLANS FOR CLASS 3 SHOWNING PLANS FOR CLASS 3 SHOWNING PLANS FOR CLASS 3 SHOWNING PLANS FOR CLASS 3 SHOWNING PLANS FOR CLASS 3 SHOWNING PLANS FOR CLASS 3 SHOWNING PLANS FOR CLASS 3 SHOWNING PLANS FOR CLASS 3 SHOWNING PLANS FOR CLASS 4 SHOWNING PLANS FOR CLASS 4 SHOWNING PLANS FOR CLASS 4 SHOWNING PLANS FOR CLASS 4 SHOWNING PLANS FOR CLASS 4 SHOWNING PLANS FOR CLASS 4 SHOWNING PLANS FOR CLASS 4 SHOWNING PLANS FOR CLASS 4 SHOWNING PLANS FOR CLASS 4 SHOWNING PLANS FOR CLASS 4 SHOWNING PLANS FOR CLASS 5 SHOWNING PLANS FOR CLASS 5 SHOWNING PLANS FOR CLASS 5 SHOWNING PLANS FOR CLASS 5 SHOWNING PLANS FOR CLASS 5 SHOWNING PLANS FOR CLASS 5 SHOWNING PLANS FOR CLASS 5 SHOWNING PLANS FOR CLASS 5 SHOWNING PLANS FOR CLASS 5 SHOWNING PLANS FOR CLASS 6 SHOWNING PLANS FOR CLASS 6 SHOWNING PLANS FOR CLASS 6 SHOWNING PLANS FOR CLASS 6 SHOWNING PLANS FOR CLASS 6 SHOWNING PLANS FOR CLASS 6 SHOWNING PLANS FOR CLASS 7 SHOWNING PLANS FOR CLASS 7 SHOWNING PLANS FOR CLASS 7 SHOWNING PLANS FOR CLASS 7 SHOWNING PLANS FOR CLASS 7 SHOWNING PLANS FOR CLASS 8 SHOWNING PLANS FOR CLASS 8 SHOWNING PLANS FOR CLASS 8 SHOWNING PLANS FOR CLASS 8 SHOWNING PLANS FOR CLASS 8 SHOWNING PLANS FOR CLASS 9 SHOWNING PLANS FOR CLASS 9 SHOWNING PLANS FOR CLASS 9 SHOWNING PLANS FOR CLASS 9 SHOWNING PLANS FOR CLASS 9 SHOWNING PLANS FOR CLASS 10 SHOWNING PLANS FOR CLASS 10 SHOWNING PLANS FOR CLASS 10 SHOWNING PLANS FOR CLASS 10 SHOWNING PLANS FOR CLASS 10 SHOWNING PLANS FOR CLASS 10 SHOWNING PLANS FOR CLASS 11 SHOWNING PLANS FOR CLASS 11 SHOWNING PLANS FOR CLASS 11 SHOWNING PLANS FOR CLASS 11 SHOWNING PLANS FOR CLASS 11 SHOWNING PLANS FOR CLASS 12 SHOWNING PLANS FOR CLASS 12 SHOWNING PLANS FOR CLASS 12 SHOWNING PLANS FOR CLASS 12 SHOWNING PLANS FOR CLASS 12 SHOWNING PLANS FOR CLASS 13 SHOWNING PLANS FOR CLASS 13 SHOWNING PLANS FOR CLASS 13 SHOWNING PLANS FOR CLASS 13 SHOWNING PLANS FOR CLASS 13 SHOWNING PLANS FOR CLASS 14 SHOWNING PLANS FOR CLASS 14 SHOWNING PLANS FOR CLASS 14 SHOWNING PLANS FOR CLASS 14 SHOWNING PLANS FOR CLASS 14 SHOWNING PLANS FOR CLASS 15 SHOWNING PLANS FOR CLASS 15 SHOWNING PLANS FOR CLASS 15 SHOWNING PLANS FOR CLASS 15 SHOWNING PLANS FOR CLASS 15 SHOWNING PLANS FOR CLASS 16 SHOWNING PLANS FOR CLASS 16 SHOWNING PLANS FOR CLASS 16 SHOWNING PLANS FOR CLASS 16 SHOWNING PLANS FOR CLASS 17 SHOWNING PLANS FOR CLASS 17 SHOWNING PLANS FOR CLASS 17 SHOWNING PLANS FOR CLASS 17 SHOWNING PLANS FOR CLASS 17 SHOWNING PLANS FOR CLASS 18 SHOWNING PLANS FOR CLASS 18 SHOWNING PLANS FOR CLASS 18 SHOWNING PLANS FOR CLASS 18 SHOWNING PLANS FOR CLASS 18 SHOWNING PLANS FOR CLASS 18 SHOWNING PLANS FOR CLASS 18 SHOWNING PLANS FOR CLASS 18 SHOWNING PLANS FOR CLASS 18 SHOWNING PLANS FOR CLASS 18Displayanzeigen

Wecker 1 aktiv

Wecker 2 Aktiv

Do not dispose of this product with the normal household waste at the end of its life cycle. Return it to a collection point for the recycling of electrical and electronic devices. This is indicated by the symbol on the product, user manual or packaging
The materials are recyclable according to their labeling. By reusing materials or other forms of recycling old devices and packaging, you are making an important contribution to protecting our environment. If necessary, remove batteries and personal data before disposal free of charge and ask your local authority about the responsible disposal point.
| WARNINGRisk of electric shockDo not open! |
Caution: To reduce the risk of electric shock, do not remove the cover (or back). There are no user serviceable parts inside. Refer servicing to qualified service personnel.

This symbol indicates the presence of dangerous voltage inside the enclosure, sufficient enough to cause electric shock.
This symbol indicates the presence of important operating and maintenance instructions for the device
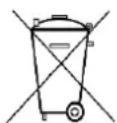
Used batteries are hazardous waste and NOT to be disposed of with the household waste! As a consumer you are legally obligated to return all batteries for environmentally responsible recycling – no matter whether or not the batteries contain harmful substances*)
Return batteries free of charge to public collection points in your community or shops selling batteries of the respective kind. Only return fully discharged batteries ^* marked Cd = cadmium, Hg = mercury, Pb = lead
- Only use mercury and cadmium-free batteries.
- Used batteries are hazardous waste and NOT to be disposed of with the household waste!!!
- Keep batteries away from children. Children might swallow batteries.
- Contact a physician immediately if a battery was swallowed.
- Check your batteries regularly to avoid battery leakage.
- Batteries shall not be exposed to excessive heat such as sunshine, fire or the like.
- CAUTION: Danger of explosion if battery is incorrectly replaced
- Replace only with the same or equivalent type
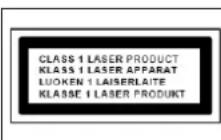
CAUTION - INVISIBLE LASER RADIATION WHEN OPENING THE COVER OR PRESSING THE SAFETY INTERLOCK. AVOID EXPOSURE TO THE LASER BEAM.
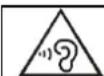
To prevent possible hearing damage, do not listen at high volume levels for long periods
- Use the device in dry indoor environments only.
- Protect the device from humidity.
- This apparatus is for moderate climates areas use, not suitable for use in tropical climates countries.
Safety, Environmental and Setup Instructions
- No objects filled with liquids, such as vases, shall be placed on the apparatus.
- The mains plug or an appliance coupler is used as the disconnect device, the disconnect devices shall remain readily operable.
- Connect this device to a properly installed and earthed wall outlet only. Make sure the mains voltage corresponds with the specifications on the rating plate.
- Make sure the mains cable stays dry during operation. Do not pinch or damage the mains cable in any way.
- A damaged mains cable or plug must immediately be replaced by an authorized service center.
- In case of lightning, immediately disconnect the device from the mains supply.
- Children should be supervised by parents when using the device.
- Clean the device with a dry cloth only.
- Do NOT use CLEANING AGENTS or ABRASIVE CLOTHS!
- Do not expose the device to direct sunlight or other heat sources.
- Install the device at a location with sufficient ventilation in order to prevent heat accumulation.
- Do not cover the ventilation openings!
- Install the device at a safe and vibration-free location.
- Install the device as far away as possible from computers and microwave units; otherwise radio reception may be disturbed.
- Do not open or repair the enclosure. It is not safe to do so and will void your warranty. Repairs only by authorized service/ customer center.
- No naked flame sources, such as lighted candles, should be placed on the unit.
- When you are necessary to ship the unit store it in its original package. Save the package for this purpose.
- In case of malfunction due to electrostatic discharge or fast transient (burst), remove and reconnect the power supply.
- If the unit is not using for a long period of time, disconnect it from the power supply by unplugging the power plug. This is to avoid the risk of fire.
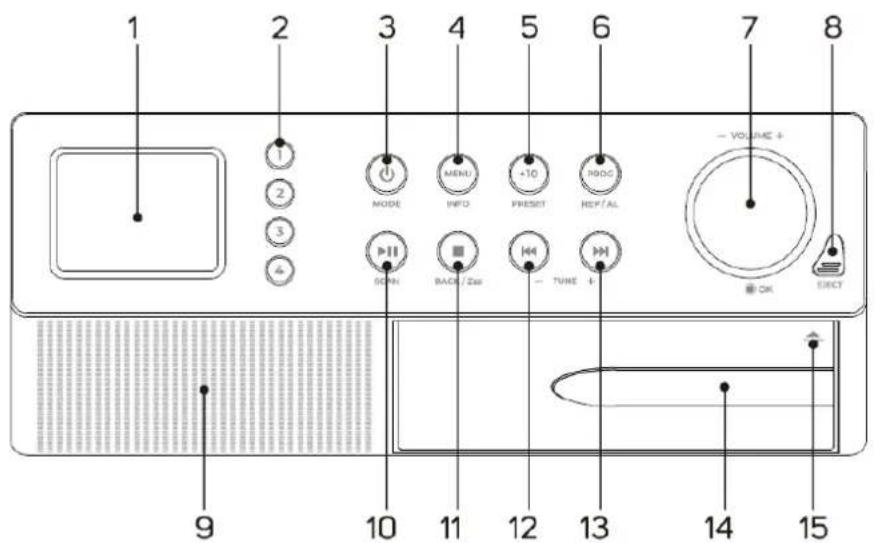
LOCATION OF CONTROLS
1 Display
2 PRESET 1-4 Preset 1 - 4
3 ⏻ / MODE ON/OFF source selection
4 INFO / MENU Info / menu
5 PRESET / +10 Preset and title +10 at CD / USB
6 PROG / REP / AL Program / repeat and alarm function
7 VOLUME / OK Volume, navigation and confirm
8 EJECT open CD door 9 Loudspeaker
10 ▶II / SCAN Play / pause and scan 11 ■ / BACK / Zzz Stop, back and snooze
12 /TUNE - Skip and search backwards
13 ▶/TUNE + Skip and search forwards
14 CD door
15 Push for close CD door
16 AC/DC power adaptor
17 Power adaptor jack
18 3.5mm AUX-IN jack
19 3.5mm headphone jack
20 USB-MP3 socket
21 Battery compartment
22 Telescope antenna
text_image
1 2 3 4 5 6 7 8 MODE MENU +10 MODE REF/AL — VOLUME + SEN BACK/Zas — TUME + OK EXIT 9 10 11 12 13 14 15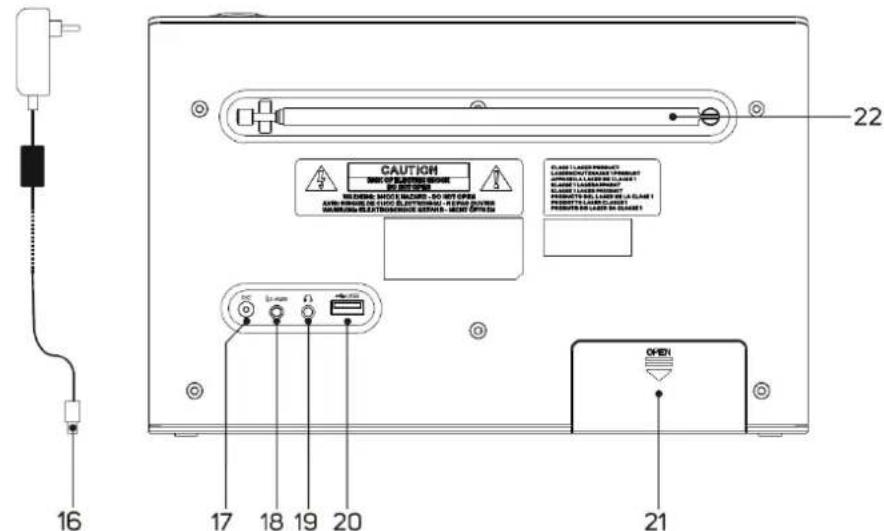
text_image
CAUTION DO NOT OPENING NO OPENING BEARING MOUNTS ACCORD. DO NOT OPEN AVOC FLOOR IN LAYOUT, COVERTISING, 10" FOR SWITCH WARNING ELECTRONOMANCE SETTING, LIGHT OPENING CLASS I: BASED PRODUCTION LEMONOLOGY ORDER IS COLDOUT CLASS II: BASED PRODUCTION CLASS III: BASED PRODUCTION PROSETS NO LEAM NO LEAM 1 PROSETS NO LEAM 2 PROSETS NO LEAM 3 21 22 16 17 18 19 20 OHEIDisplay announcements:

Alarm 1 activ

Alarm 2 activ

Sleep with 120 minutes

Volume indication

Preset 1

Radio station with RDS

Stereo reception

Signal level indication
GETTING STARTED
DAB/FM AERIAL
Before using your radio for DAB or FM reception, pull out the telescopic antenna. You may need to adjust the position of the telescopic antenna for maxing signal strength.
CONNECTING POWER
This unit is supplied with an AC adaptor.
- Connect the DC cable to the DC socket at the rear of unit
- Plug the provided AC adaptor into a household power socket and switch the power on.
BATTERY OPERATION
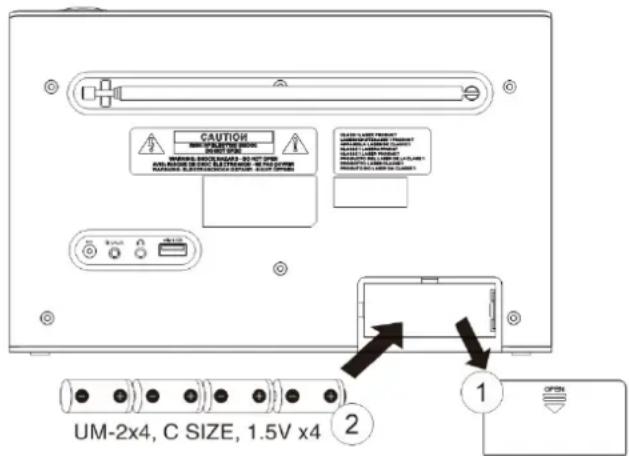
- Remove the battery compartment cover carefully.
- Install 4 x "C" size batteries (UM-2 or equivalent) while observing the correct polarities. There is an engraved diagram showing battery installation directions inside the battery compartment.
- Replace the battery compartment cover. Only adults should handle the batteries. Do not allow a child to use this product unless the battery cover is securely attached to the battery compartment.
text_image
CAUTION MINISSIONAL CNTS CNC/CCN MINISSIONAL CNTS CNC/CCN MINISSIONAL CNTS CNC/CCN MINISSIONAL CNTS CNC/CCN MINISSIONAL CNTS CNC/CCN MINISSIONAL CNTS CNC/CCN MINISSIONAL CNTS CNC/CCN MINISSIONAL CNTS CNC/CCN UM-2x4, C SIZE, 1.5V x4 ② ① OPTONThe adaptor cable must be detached from the DC socket of the player for the batteries to power the unit.
Leaking batteries may damage the battery cabinet and the player as a whole, so they should be removed from the cabinet when becoming flat or when the player is not to be used with batteries for some time.
BASIC OPERATIONS
- Press "⏻ / MODE" to switch the unit on
- Press and hold "∅ / MODE" to switch the unit in standby.
SELECTING MODES
During playing, press “☐ / MODE” repeatedly to switch between the modes.
ENERGY SAVING/ ERP2 REGULATION
The unit will turn off automatically after about 15 – 20 minutes in standby mode if there is no audio signal. This is regulated by an EU-standard and is NOT A MALFUNCTION.
To turn on the unit again press the “☐ / MODE” button.
MENU NAVIGATION
Press and hold "MENU / INFO" 2 seconds to enter menu, rotate "VOLUME / OK" to select the requested option and confirm with "VOLUME / OK".
Press „■ / BACK / Zzz” to previous step or “MENU / INFO” to exit menu.
VOLUME
Rotate "VOLUME / OK" for increase or decrease volume level.
SETTING THE CLOCK
The clock on your radio is automatically set when first used from the time signal broadcast with DAB radio stations.
If a DAB station is not available, the clock may be set manually via the system menu.
DAB
-
Press „© / MODE“ button repeatedly to select the DAB.
The unit automatically perform full scan at first switch on.
If no stations found, DAB menu will be displayed. -
Press and hold „▶II / SCAN“ to perform scanning.
This product automatically stores radio stations with sufficient signal strength.
→ After the search is complete, the first stored radio station is broadcast automatically.
- Press „▶/ TUNE+“ or „◀/ TUNE-“ repeatedly to select a station for listening.
FM
- Press "⏻ / MODE" repeatedly to select FM.
-
Press and hold "▶/ TUNE+" or ,,◀/ TUNE-" for 2 seconds.
→ [Scanning...] is displayed.
→ The unit tunes to a station with strong reception automatically. -
Repeat step 2 to tune to more stations.
MANUAL TUNING
Press „▶/ TUNE+“ or „◀/ TUNE-“ repeatedly until you find better reception.
Each press increases or decrease the radio frequency by 0.05 MHz.
AUTO SCANNING & STORING
You can program a maximum of 40 pre-set FM radio stations.
- In FM mode
- Press and hold „▶II / SCAN” for 2 seconds to perform auto scanning.
→ The unit stores all the available FM radio stations.
→ The first stored radio station is broadcast automatically.
DAB / FM PRESET STORING & RECALL
STORING
- Tune to desired radio station.
- Press and hold one of the 4 preset buttons to store the preset station or press
"PRESET / +10" for 2 seconds to enter [Preset Store] option. - Rotate "VOLUME / OK" to allocate preset number (1 to 40) to this radio station, then press
"VOLUME / OK". The [Preset "#" stored] are displayed. - Repeat the above of steps to store other stations.
Note: To remove a pre-stored station, store another station in its place.
RECALL
- Press 1-4 button to recall preset or press "PRESET / +10" button to enable preset recall.
- Rotate "VOLUME / OK" for select the requested station.
- Press "VOLUME / OK" to confirm the selection.
STATION INFORMATIONS
Press "MENU / INFO" repeatedly to cycle through the following information (if available).
DAB : Dynamic label segment (DLS) Signal strength Program type (PTY) Ensemble name Frequency Signal error rate Bitrate codec Date
FM : Radio text/ Program type (PTY) ⇒ Station Name ⇒ Mono-Stereo ⇒ Time ⇒ Date
DAB/ FM MENU
- Press and hold "MENU / INFO" 2 seconds to access menu.
- Rotate "VOLUME / OK" to scroll the through menu.
- Press "VOLUME / OK" to save or enter.
- Press „■ / BACK / Zzz” to go back in the menu.
DAB menu
→ [Full scan]: Scan for the DAB stations.
→ [Preset Recall]
Recalls stored stations
→ [Preset save]
Save station to preset
→ [Manual tune]: Tune to a frequency/station manually.
→ [Prune Invalid]:
No or Yes (Remove all the invalid station(s)
→ [ASA Alerts]: Alarm Safety Alerts setting for status, location and alarm volume
→ [System Settings]
Systems setting are described in detail on end of manual
FM menu
→ [Preset Recall]
Recalls stored stations
→ [Preset save]
Save station to preset
→ [Scan setting]
[All stations]: Scan all the available FM stations.
[Strong stations]: Scan the strong FM stations only.
→ [Audio setting]
[Stereo allowed]: Stereo broadcast.
[Forced mono]: to improve the reception, change to monaural sound
→ [System Settings]
ASA (AUTOMATIC SAFETY ALERT)
The ASA (Automatic Safety Alert) function makes it possible to receive locally adapted warning messages in DAB+ mode via the DAB+ signal.
Further information on the ASA function can be found online at: www.dabplus.de/asa
Important!
In order for the warning messages to be received correctly even in standby mode, the radio must be connected to the power supply and in standby mode (the date and time are shown in the display). If an ASA ensemble from a DAB+ station is received, [ASA] appears in the display next to the time.
STATE
- In the [ASA - Alerts] menu, use rotary controller to select [ASA - state].
- Press "VOLUME / OK" button repeatedly to set the ASA - state to [ON].
- Now, ASA ensemble to be monitored in standby mode.
LOCATION
- Press and hold "MENU / INFO" and use the rotary controller to select [ASA Alerts].
- Press "VOLUME / OK".
- Rotate "VOLUME / OK" to select [Location] and press "VOLUME / OK" to confirm.
- Scan the QR code, visit the webpage and enter your location code in the radio.
- Rotate "VOLUME / OK" to enter each digit of the 12-digit location code. After entering each digit, press "VOLUME / OK" to enter the next digit. If the last digit is correct, [ASA Location OK] will appear.
Info: If you want to enter a different location code, use rotary controller when the old code is displayed. The digit entry will now start again.
ASA ALERT VOLUME
- In the [ASA Alerts] menu, select [Alerts Volume] and press "VOLUME / OK" to confirm.
- Rotate "VOLUME / OK" to preselect the volume of the warning message. If possible, select a volume that you would be able to hear in an emergency.
- Press the "VOLUME / OK" button to save the setting.
Further information about ASA warning messages
To mute warning messages, press the "VOLUME / OK" or "① / MODE" button. The radio will then return to the last operating mode.
- To ensure correct reception of warning messages via the ASA system, the correct time must be set. The radio always updates the time when in DAB+ mode, even if the time has been manually changed.
- In operation, the radio will only receive ASA warning messages when it is in DAB+ mode. In standby, it will always receive ASA warning messages, regardless of the previously selected source.
BLUETOOTH
- Switch the unit on and select Bluetooth mode.
- The symbol on LCD display will flash while the device is searching for a Bluetooth signal.
- Start the device scan on your mobile device and select [RCD1190] on your mobile device.
- After successful pairing the display shown "Connected"
- You can now stream over your mobile device.
- You can use the playback control buttons for track control.
Note: When unit is 15 minutes in pause it will switch automatically in standby mode.
CD OPERATION
LOAD A CD
- Press "EJECT" to open the CD door.
- Load a CD DISC onto the CD tray with the label facing upwards.
- Close the CD door.
PLAYING A CD
- Select CD mode
- The player reads the disc and starts playback.
- Press ▶II/SCAN" once to pause the music playback, the display indicates the player is in pause mode. Pressing "▶II/SCAN" for playback.
- Press "■ / BACK / Zzz" to stop music playback.
SELECT THE TRACKS
- Press "▶/TUNE+" to skip to the next track.
- Press "TUNE - to the beginning of the current track or again for previous track
- Press "PRESET / +10" to skip 10 tracks forward
REPEAT PLAYBACK
During CD playback, press "PROG/REPEAT/AL" repeatedly to enable different playback mode.
Repeat 1, Repeat all), (Repeat folder; only at MP3), Random.
CD RESUME FUNCTION

RESUME – continuing from where you have stopped.
- During CD playback stop the CD playback
- Switch off or change the source.
- After switch on again the playback continues from where you have stopped.
- To deactivate RESUME, open the CD door or press "■ / BACK / Zzz" button in twice.
CD PROGRAMMED PLAYBACK (MEM)
To program an alternative playback order of tracks follow the below steps.
- Make sure the unit is not playing a disc.
- Press "PROG / REP / AL" to activate programming.
- Press "▶/ TUNE+" or „◀/ TUNE-" to select the first track to be programmed.
- Press "PROG / REP / AL" again to store and advance to the next programmed track. The program sequence indication changes to "P02" momentarily waiting for your next input.
- Repeat the steps above to program more tracks. A maximum of 20 for CD/99 for MP3 tracks can be programmed.
- Press "▶II / SCAN" to begin the programmed playback in the preferred order.
- Press "■ / BACK / Zzz" to stop programmed playback.
- To erasing a program, during stop mode press "■ / BACK / Zzz" twice or open the CD door.
MP3 - ID3 TAG DISPLAY
Press "MENU / INFO" during MP3 playback to activate the ID3 display.
USB OPERATION
- Connect your USB drive with the USB port
- Switch the unit on and select USB mode.
- The operation procedures are the same as CD operation.
-Compatible storage device (up to 128GB, FAT32)
-Always connect your USB flash drive directly to the USB port without USB extension cable.
-Due to some USB drive manufacturer's non-compliance with the full USB 1.1/2.0 standard. A small percentage (about 5% ) of USB flash drive might not be compatible.
AUXILIARY INPUT
Connect an external audio source like an MP3 player using a 3.5mm audio cable (not supplied).
- Connect one end of the cable to the external device headphone output and the other end to the AUX socket at the backside of the unit.
- Switch the unit on and select AUX mode
- Starts playback and adjust the volume on the external audio source e.g. MP3 player.
HEADPHONES

There is a headphone output jack at the backside of the unit. If headphones are connected to this socket for private listening, the speakers will switch off.
Note: Adjust the volume lever lower during the PHONES operation.
To prevent possible hearing damage, do not listen at high volume levels for long periods.
SYSTEM MENU
SLEEP
This unit can switch to standby automatically after a preset period.
When the unit is turned on, press and hold "MENU / INFO" 2 seconds and enter to [System] menu, select [Sleep] then press "VOLUME / OK" to access.
Press "button repeatedly to select the sleep timer period (Sleep timer Off, 15, 30, 45, 60, 90, 120 minutes) and confirm with "VOLUME / OK".
ALARM
- Press and hold "MENU / INFO" button to enter menu to select [System] > [Alarm], then press "VOLUME / OK" button for confirm.
- In the alarm menu, choose [Alarm1] / [Alarm2], then press „VOLUME / OK“.
- Rotate "VOLUME / OK" to select below alarm options; always confirm the selected option by pressing with "VOLUME / OK".
→ Alarm: On/Off
→ Frequency: Daily, Once, Weekends, Weekdays
Date: MM-DD-YYYY (if frequency set to "Once")
On time: Wake up time
→ Source: Buzzer, DAB, FM, CD, USB
At DAB or FM you can choose the preset too
→ Duration: 15, 30, 45, 60, 90, 120 minutes
→ Volume: Alarm sound level
Note: Press "■ / BACK / Zzz" or "MENU / INFO" to exits the Alarm setup.
Alarm 2 setup is same as Alarm 1 operation.
When selected alarm source is not available, the system switches to the BUZZER source.
In standby mode, press "PROG / REP / AL" repeatedly to enable/disable alarm 1/2 or press and hold "PROG / REP / AL" for 2 seconds to open alarm setting.
When the Alarm is enabled, Alarm 1 or 2 icon(s) appears.
When the ALARM sounds, press "⏻ / MODE" to turn off the alarm sound or press
“■ / BACK / Zzz” button to temporarily stop the alarm from sounding for 10 minutes on each press.
TIME
- Press and hold "MENU / INFO" 2 seconds to enter menu to select [System] > [Time], then press "VOLUME / OK" button for confirm.
- In the TIME menu, you can select below options:
[Set Time/Date]: set the current time and date.
[Clock style]: analogue or digital
[Auto update]: Update from Any/ Update from DAB/ Update from FM/ No Update
[Set 12/24 hour]: Set 12/24 hour - Press "VOLUME / OK" to save setting, press "■ / BACK / Zzz" button to previous step or press "MENU / INFO" to exit.
BACKLIGHT
Low, Medium, High.
LANGUAGE
English, Deutsch, Italiano, Francais, Nederlands, Espanol, Portugues, Svenska, Dansk, Norsk, Suomi, Polski
EQUALIZER
Select one of the preset sound settings.
With My EQ, you have the option of defining your own sound settings.
FACTORY RESET
Reset the product to factory default status.
SW VERSION
Check the version of software.
Note: If the system is idle for 30 seconds, it exits time setting mode automatically.
The current version of the operating instructions can be downloaded from www.soundmaster.de
Technical changes and misprints reserved
Copyright by Woerlein GmbH, 90556 Cadolzburg, www.soundmaster.de
Duplication only with the permission of Woerlein GmbH


PROTECTION DE L'ENVIRONNEMENT

natural_image
Pure electrical circuit lines without any symbols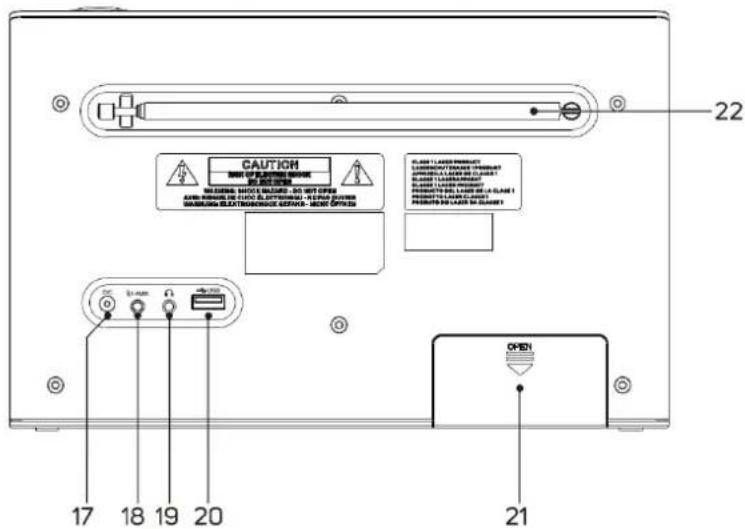
text_image
CAUTION WARNING: METER BOUNDING DO NOT OPEN AVEN INSULDING ON LATOR 0.10750000 - 0.10750000 WARNING: ELECTRONIC ACCESS - NOO OPEN SLABE 1.250000000 SLABE 1.250000001 SLABE 1.250000002 SLABE 1.250000003 SLABE 1.250000004 SLABE 1.250000005 SLABE 1.250000006 SLABE 1.250000007 SLABE 1.250000008 SLABE 1.250000009 SLABE 1.250000010 SLABE 1.250000011 SLABE 1.250000012 SLABE 1.250000013 SLABE 1.250000014 SLABE 1.250000015 SLABE 1.250000016 SLABE 1.250000017 SLABE 1.250000018 SLABE 1.250000019 SLABE 1.250000020 OPEN 17 18 19 20 21natural_image
Pure electrical circuit lines without any symbols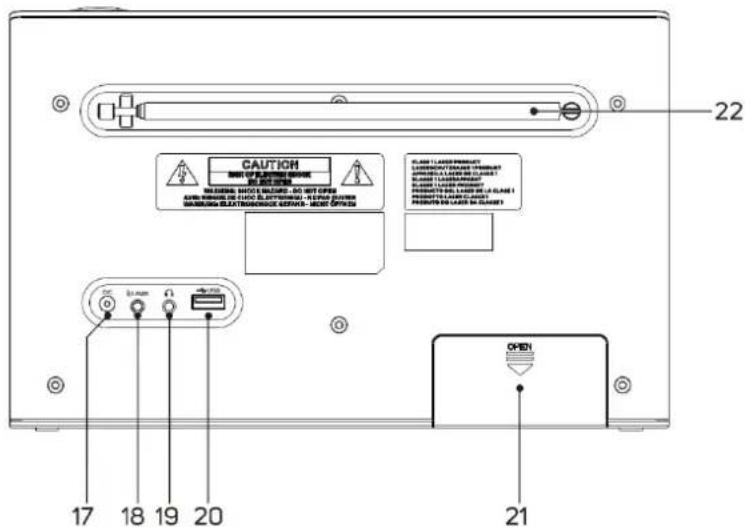
text_image
CAUTION SHORT OF PLANNING SWITCH FOR SWITCH MASCULAR SWITCH BASED - DO NOT OPEN AVOC NUMBER OR WATER IS RETURNED - 100% OFFICE MASCULAR ELECTRONICANCE SWITCH - DOWN OFFICE PLAKE 1.2 LANE PROWEET MASCULAR PLANE SWITCH PROWEET 1.2 LANE PLANE PLAKE 1.2 LANE PROWEET PROWEET 1.2 LANE PLANE PROWEET 1.2 LANE PLANE PROWEET 1.2 LANE PLANE OPEN 17 18 19 20 21Displaymeldingen:

Alarm 1-actief

Alarm 2-actief

text_image
CAUTION MINI-2X4/100V 1.5V x4 MINI-2X4/100V 1.5V x4 MINI-2X4/100V 1.5V x4 MINI-2X4/100V 1.5V x4 MINI-2X4/100V 1.5V x4 MINI-2X4/100V 1.5V x4 MINI-3X4/100V 1.5V x4 MINI-3X4/100V 1.5V x4 MINI-3X4/100V 1.5V x4 MINI-3X4/100V 1.5V x4 UM-2x4, C SIZE, 1.5V x4 ② ①natural_image
Pure electrical circuit lines without any symbols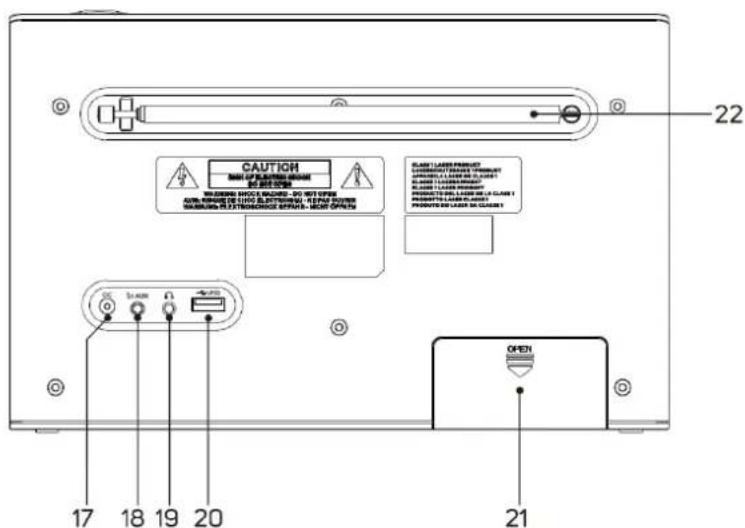
text_image
CAUTION MAIN OF PLANTINUM DRAM DO NOT OPEN WARNING SHOC/SPACING - DO NOT OPEN AUTO-FORMING DE LATOR ELECTRICAL / SHEET SWITCH WARNING IT EXTERIORANCE SWITCH - LIGHT SWITCH PLANT 1. LATOR PROCEDURE PRODUITS FOR LATOR WITH SWITCH PRODUITS FOR LATOR IN CLAUSE PLANT 2. LATOR PROCEDURE PRODUITS FOR LATOR IN CLASSE PRODUITS FOR LATOR IN CLASSE 17 18 19 20 OPENAnnunci del display:

Sveglia 1 attiva

Sveglia 2 attiva

text_image
CAUTION MINIMUM DEPTH REDUCE BEET ROOT MINIMUM DEPTH REDUCE BEET ROOT MINIMUM DEPTH REDUCE BEET ROOT MINIMUM DEPTH REDUCE BEET ROOT MINIMUM DEPTH REDUCE BEET ROOT MINIMUM DEPTH REDUCE BEET ROOT MINIMUM DEPTH REDUCE BEET ROOT MINIMUM DEPTH REDUCE BEET ROOT MINIMUM DEPTH REDUCE BEET ROOT MINIMUM DEPTH REDUCE BEET ROOTRotate "VOLUME / OK" for increase or decrease volume level.
- Selezionare la modalità CD
- The player reads the disc and starts playback.
- Press “▶/SCAN” once to pause the music playback, the display indicates the player is in pause mode. Pressing “▶II / SCAN” for playback.
- Premere “■ / BACK / Zzz” per terminare la riproduzione del CD.
SELEZIONE DEI BRANI
→ Durata: 15, 30, 45, 60, 90, 120
natural_image
Pure electrical circuit lines without any symbols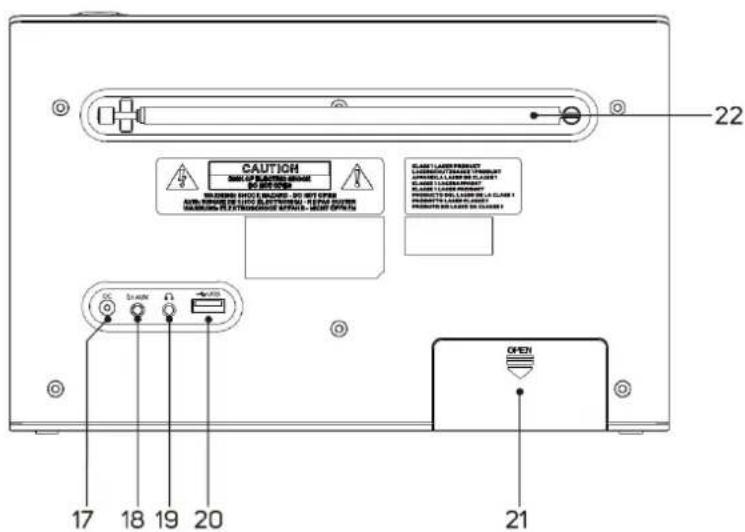
text_image
CAUTION SMALL OF FLUORES EXAM IN FEET OFFER BEANSING DUCTS & COLDING 30 INT OFFER AUTO-FRMD DE LUTO, ELECTRICAL, RENTAL GENDER BEANSING IN FUTURES AND PARTS - MEAT OFFER CLASS 1: LAYER PRODUCT PRODUITS PAIL LAYER REE. 20 CLARE 1 PRODUITS PAIL LAYER REE. 20 CLARE 1 PRODUITS PAIL LAYER REE. 20 CLARE 1 OPEN 17 18 19 20 21
Budík 1 aktivní

Budík 2 aktivní

Spánek po 120 minutách

Indikace hlasitosti

Předvolba 1
RDS
natural_image
Pure electrical circuit lines without any symbols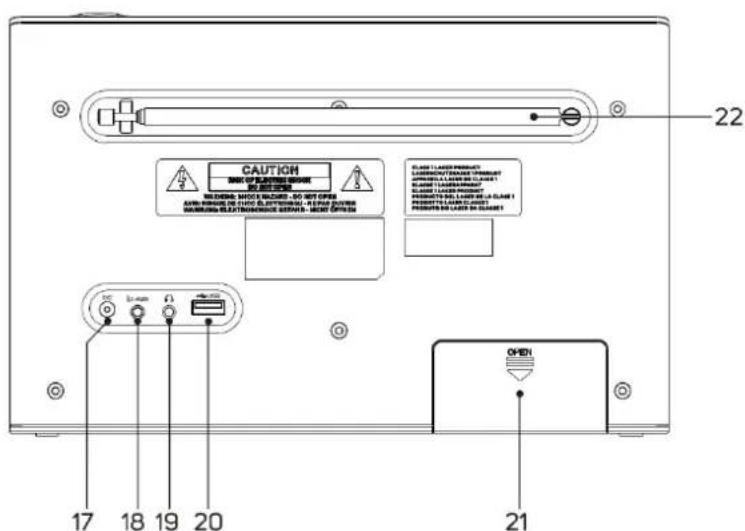
text_image
CAUTION MARKS OF FLUORES SODING WE GET ON BEANS: MOUNTS BEACHED. DO NOT OPEN AUTO FLOWING DE LUX TO ELECTRICAL - REACH SWITCH WARNING ELECTRONICANCE SWITCH - MEAT OFFICE 17 18 19 20 21 22 OHEItext_image
CAUTION MINI-200 V (MAX) MAX MINI-200 V (MAX) MAX MINI-200 V (MAX) MAX MINI-200 V (MAX) MAX MINI-200 V (MAX) MAX MINI-200 V (MAX) MAX MINI-200 V (MAX) MAX MINI-200 V (MAX) MAX MINI-200 V (MAX) MAX MINI-V (MAX) MAX MINI-V (MAX) MAX MINI-V (MAX) MAX MINI-V (MAX) MAX MINI-V (MAX) MAX MINI-V (MAX) MAX MINI-V (MAX) MAX MINI-V (MAX) MAX MINI-V (MAX) MAX UM-2x4, C SIZE, 1.5V x4 ② ① CP38
CPRODUKT Z LASEREM
KLASY 1
UWAGA – EMITOWANA JEST NIEWIDOCZNA WIĄZKA LASEROWA PRZY OTWARTEJ POKRYWIE LUB PRZY NACIŚNIĘCIU ZATRZASKÓW BEZPIECZEŃSTWA. UNIKAJ KONTAKTU Z WIĄZKA LASERA.

natural_image
Pure electrical circuit lines without any symbols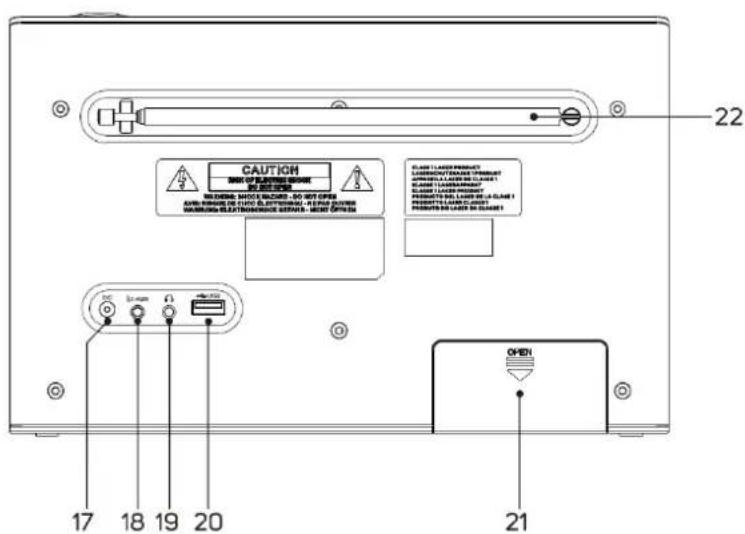
text_image
CAUTION NOTE OF SWITCHING SWITCH 22 GENERAL SWITCHING SWITCHED: DO NOT OPEN AVOC RESPONSE DE TUTO ELECTRICAL, 10 PAMS OUTPUT WARNING ELECTRIFICATION OUTPUT - MEET OPTION CLASS 1: LARGE PRODUCT ORDERING ORDER IS SUBJECT TO CURRENT ORDERING ORDER IS LIQUID CLASS 1: LARGE PRODUCT ORDERING ORDER IS SUBJECT TO CURRENT ORDERING ORDER IS LIQUID CLASS 1: LARGE PRODUCT ORDERING ORDER IS SUBJECT TO CURRENT CLASS 1: LARGE PRODUCT ORDERING ORDER IS LIQUID CLASS 1: LARGE PRODUCT ORDERING ORDER IS LIQUID CLASS 1: LARGE PRODUCT ORDERING ORDER IS LIQUID CLASS 1: LARGE PRODUCT ORDERING ORDER IS LIQUID CLASS 1: LARGE PRODUCT ORDERING ORDER IS LIQUID CLASS 1: LARGE PRODUCT ORDERING ORDER IS LIQUID CLASS 1: LARGE PRODUCT ORDERING ORDER IS LIQUID CLASS 1: LARGE PRODUCT ORDERing OFFEN 17 18 19 20 21Copyright by Woerlein GmbH, 90556 Cadolzburg, www.soundmaster.de
D 90556 Cadolzburg, Germany
Hereby, Wörlein GmbH declares that this device is in compliance with the essential requirements and other relevant provisions of Directive 2014/53/EU.
A copy of the declaration of conformity can be obtained from the above address.
