
NR912 - Turntable Soundmaster - Free user manual and instructions
Find the device manual for free NR912 Soundmaster in PDF.


| Product Type | Turntable with AM/FM Radio, Cassette Player, and CD Player |
| Turntable Speeds | 33 1/3, 45, 78 RPM |
| Radio Bands | FM 87.5 - 108 MHz, AM 530 - 1600 kHz |
| Cassette Player | Auto start, forward, eject |
| CD Player | Play, pause, skip, repeat, program, random |
| Speaker Type | Big horn speaker (classical design) |
| Headphone Jack | 3.5mm (standard) |
| Power Supply | AC 230 V ~ 50 Hz |
| Power Consumption | 19 Watts |
| Dimensions | Not specified in manual |
| Weight | Not specified in manual |
| Laser Class | Class 1 laser product |
| Safety | Do not open; risk of electric shock; refer to qualified service personnel |
| Cleaning Instructions | Use dry cloth only; no cleaning agents or abrasive cloths |
| Environmental Disposal | Do not dispose with household waste; recycle at collection points |
| Main Functions | Turntable, radio, cassette, CD playback with various modes |
| Control Buttons | Volume, tuning, function selector, CD controls, cassette controls, tone arm |
| Antenna | FM wire antenna (fully extend for best reception) |
| Warranty | Refer to service center; unauthorized repair voids warranty |
Frequently Asked Questions - NR912 Soundmaster
User questions about NR912 Soundmaster
0 question about this device. Answer the ones you know or ask your own.
Ask a new question about this device
Download the instructions for your Turntable in PDF format for free! Find your manual NR912 - Soundmaster and take your electronic device back in hand. On this page are published all the documents necessary for the use of your device. NR912 by Soundmaster.
USER MANUAL NR912 Soundmaster
natural_image
Black-and-white photo of a classic gramophone with a horn, no visible text or symbolsDEUTSCH
ENGLISH
FRANÇAIS
NEDERLANDS
ESPAÑOL
PORTUGUÊS
ENVIRONMENTAL PROTECTION
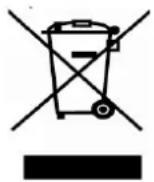
Do not dispose of this product with the normal household waste at the end of its life cycle. Return it to a collection point for the recycling of electrical and electronic devices. This is indicated by the symbol on the product, user manual or packaging.
The materials are reusable according to their markings. By reusing, recycling or other forms of utilization of old devices you make an important contribution to the protection of our environment.
Please contact your local authorities for details about collection points.
CLASS 1 LASER PRODUCT KLASSE 1 LASER PRODUKT LUOKAN 1 LASER LAITE KLASS 1 LASER APPARAT PRODUCTO LASER CLASE 1
CAUTION - INVISIBLE LASER RADIATION WHEN OPENING THE COVER OR PRESSING THE SAFETY INTERLOCK. AVOID EXPOSURE TO THE LASER BEAM.

WARNING
Risk of electric shock Do not open!
Caution: To reduce the risk of electric shock, do not remove the cover (or back). There are no user serviceable parts inside. Refer servicing to qualified service personnel.

This symbol indicates the presence of dangerous voltage inside the enclosure, sufficient enough to cause electric shock.

This symbol indicates the presence of important operating and maintenance instructions for the device.
Safety, Environmental and Setup Instructions
- Use the device in dry indoor environments only.
- Protect the device from humidity.
- Do not open the device. RISK OF ELECTRIC SHOCK! Refer opening and servicing to qualified personnel.
- Connect this device to a properly installed and earthed wall outlet only. Make sure the mains voltage corresponds with the specifications on the rating plate.
• Make sure the mains cable stays dry during operation. Do not pinch or damage the mains cable in any way. - A damaged mains cable or plug must immediately be replaced by an authorized service center.
• In case of lightning, immediately disconnect the device from the mains supply. - Children should be supervised by parents when using the device.
- Clean the device with a dry cloth only.
Do NOT use CLEANING AGENTS or ABRASIVE CLOTHS!
- Do not expose the device to direct sunlight or other heat sources.
• Install the device at a location with sufficient ventilation in order to prevent heat accumulation. - Do not cover the ventilation openings!
• Install the device at a safe and vibration-free location. - Install the device as far away as possible from computers and microwave units; otherwise radio reception may be disturbed.
- Do not open or repair the enclosure. It is not safe to do so and will void your warranty. Repairs only by authorized service/ customer center.
- The device is equipped with a "Class 1 Laser". Avoid exposure to the laser beam as this could cause eye injuries.
- Only use mercury and cadmium-free batteries.
- Used batteries are hazardous waste and NOT to be disposed of with the household waste!!! Return the batteries to your dealer or to collection points in your community.
- Keep batteries away from children. Children might swallow batteries. Contact a physician immediately if a battery was swallowed.
- Check your batteries regularly to avoid battery leakage.

Used batteries are hazardous waste and NOT to be disposed of with the household waste! As a consumer you are legally obligated to return all batteries for environmentally responsible recycling – no matter whether or not the batteries contain harmful substances*).
Return batteries free of charge to public collection points in your community or to shops selling batteries of the respective kind.
Only return fully discharged batteries.
*) marked Cd = cadmium, Hg = mercury, Pb = lead
Installation of Classical Speaker
Figure 1
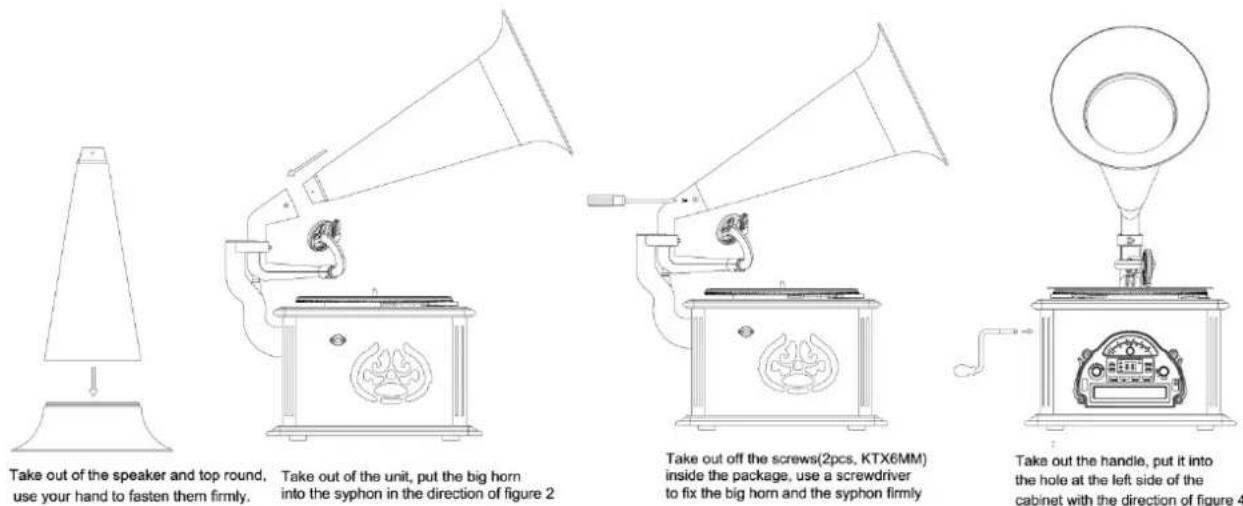
Take out of the speaker and top round, use your hand to fasten them firmly.
Take out of the unit, put the big horn into the syphon in the direction of figure 2
Take out off the screws(2pcs, KTX6MM) inside the package, use a screwdriver to fix the big horn and the syphon firmly
Take out the handle, put it into the hole at the left side of the cabinet with the direction of figure 4
Figure 2
Figure 3
Figure 4
FUNCTIONS AND CONTROLS

TURNTABLE/PHONO
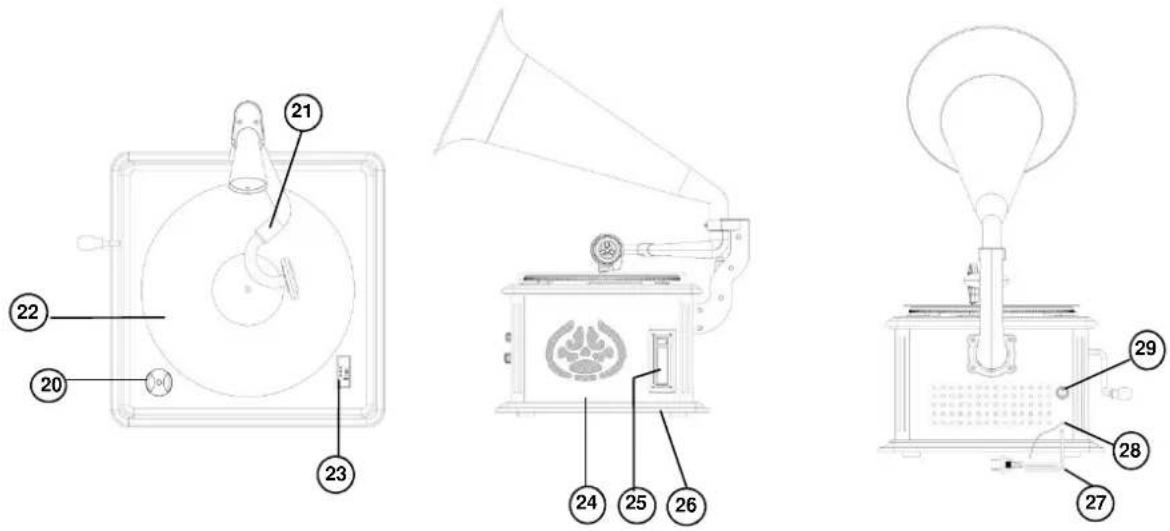
- BIG HORN SPEAKER
- ROCKER
- RADIO DIAL LENS
- TUNING CONTROL
- FUNCTION SELECTOR
- OFF / VOLUME CONTROL
- CD REPEAT BUTTON
- CD PROGRAM BUTTON
- CD PLAY/PAUSE BUTTON
- CD STOP
- CD RWD.
- CD F.FWD.
- CD RANDOM
- CD OPEN/CLOSE BUTTON
-
HEADPHONE JACK
-
LED DISPLAY
- CD COMPARTMENT
- STYLI
- TURNTABLE
- 45 RPM ADAPTOR
- TONE ARM
- TURNTABLE
- SPEED SELECTOR (33 ^1/3 /45/78 RPM)
- SPEAKERS
- CASSETTE EJECT/F.FWD
- CASSETTE SLOT
- AC POWER CORD
- *FM WIRE ANTENNA
- MAINPOWER SWITCH ON/OFF
AC OPERATION
This OLD FASHION TURNTABLE AM/FM CASSETTE PLAYER operates from AC 230V\~50Hz line power. Insert the plug of the AC power cord into a wall outlet with AC power supply.
TURN ON/OFF THE UNIT
Turn on the unit: Press the mainpower switch (backside of unit) to pos. "I" Turn the VOLUME CONTROL in right side to set the unit on.
Turn off the unit: Press the mainpower switch (backside of unit) to pos. "O" Turn the VOLUME CONTROL in left side to set the unit off.
RADIO RECEPTION
- Set the FUNCTION SELECTOR to desire BAND AM or FM.
- Turn the TUNING CONTROL to select the desire radio station.
- Adjust the VOLUME CONTROL to obtain the desired sound level from the Speaker
TIPS FOR GOOD RADIO RECEPTION
- To insure maximum FM tuner sensitivity, the FM WIRE ANTENNA should be fully extended to obtain the best possible reception.
- To insure best AM sensitivity, try repositioning the unit until the best reception is obtained.
-
Set the FUNCTION SELECTOR to "TAPE" position.
-
Insert the cassette fully into the cassette slot. Play starts automatically.
To F.FWD the cassette, press F.FWD/EJECT button half way in until it locks, press button
- Press F.FWD/EJECT button full in to elect the cassette.
- Set the FUNCTION SELECTOR to "CD" position.
- Press OPEN/CLOSE button to open the CD drawer. Place a compact disc with the label facing up. Then press OPEN/CLOSE button again to close.
- The number of total tracks is displayed.
- Press the PLAY/PAUSE button once. Play start from the first track. When all tracks have been played, it will stop automatically and the total number of tracks will be displayed again.
- To stop playing, simply press the STOP button.
- For short pauses while playing the disc, it can be stopped temporarily by pressing. The PLAY/PAUSE button once. The CD LED display will flash. Though the sound stops. The disc continues to spin. To re-start play, press the PLAY/PAUSE button once again. Play will start from the exact position where it was interrupted, and the CD LED display will stop flashing.
B. SKIP FUNCTION
To skip to the beginning of the current track or skip to another desired track, press "SKIP FWD." or "SKIP REV.". When track 3 is being played, for example, press "SKIP REV.", then track 3 will be played from the beginning again. To skip to the previous track, i.e. Track 2, press the "SKIP FWD." to skip to track 7 when track 3 is being played, for example, press the "track forward" key 4 times.
C. VARIOUS PLAYING MODES
- Normal play mode
In the normal playback condition play will star at track No.1
- Repeat play mode
This function allows all the tracks on a disc or the same track to be played repeatedly.
A. To repeat the same track:
Press the REPEAT button before play or during play. The REPEAT ONE / ALL LED indicator will flash.
B. To repeat the entire disc:
Press the REPEAT button two times; REPEAT ONE / ALL LED indicator lights up.
C. To release the repeat play function.
Press the REPEAT button again. (The REPEAT indicator is goes off).
3) Random play mode
In CD playback mode, press RANDOM button once enter into random function. Press RANDOM again to cancel the random function.
- Program Mode.
A. Press the PROGRAM button in the stop mode. The program LED will flash.
B. Press the Reverse Skip Button or the SKIP FWD. / SKIP REV. button to select a track number, the select track number will be shown.
C. Press the PROGRAM button, the first selected track is now programmed. The PROGRAM LED will flash.
D. Repeat step 2 and 3 to enter other tracks into the program up to a maximum of 20.
E. After entering a program, press the PROGRAM button to check the program content. The PROGRAM LED will flash and the track numbers in order of the programmed tracks will be shown. At last, the PROGRAM LED will stop flashing and the total track number on the disc will be shown. After the program is played, press the PROGRAM button twice in the stop mode to check the program contents. (Up to 20 tracks can be entered into the program memory, for play in any order desired. If you try to enter more tracks, the track can not be selected.)
F. After entering a program, press the PLAY/PAUSE button, Program play starts from the beginning of the first programmed track. The PROGRAM will light, and the track number which is currently playing will be shown.
G. Note: A program can not be entered during play. After entering a program, if the STOP button is pressed twice, all of the programmed tracks will be clear. The program can not be changed. Clear the program and enter tracks into the program again. The programmed tracks can not be played at random.
PHONO OPERATION
- Set FUNCTION SELECTOR to "PH".
- Put the record on the turntable flat.
Note: First insert the 45 rpm adaptor in the center of the turntable then place the record.
- Set the SPEED SELECTOR to 33 13 , 45 or 78 RPM according to the size of the record you are playing.
- Taking out the stylus guard of the tone arm first, then place the electric tone arm on the record carefully.

natural_image
Hand operating a mechanical device on a circular base (no text or symbols visible)- Adjust the VOLUME CONTROL to obtain the desired sound level from the Speakers.
- To stop operation, carefully lift up the TONE ARM and return it to TONE ARM-REST.
TECHNICAL SPECIFICATIONS
FM frequency: 87,5 - 108MHz
AM frequency: 530 – 1600KHz
Power supply: AC 230V\~50Hz
Power consumption: 19 Watt
Copyrights by Woerlein GmbH, D-90556 Cadolzburg, Germany Any technical changes without any further announcement


- ENVIRONMENTAL PROTECTION
- CAUTION - INVISIBLE LASER RADIATION WHEN OPENING THE COVER OR PRESSING THE SAFETY INTERLOCK. AVOID EXPOSURE TO THE LASER BEAM.
- WARNING
- Safety, Environmental and Setup Instructions
- Installation of Classical Speaker
- FUNCTIONS AND CONTROLS
- AC OPERATION
- TURN ON/OFF THE UNIT
- RADIO RECEPTION
- TIPS FOR GOOD RADIO RECEPTION
- SKIP FUNCTION
- VARIOUS PLAYING MODES
- PHONO OPERATION
- TECHNICAL SPECIFICATIONS
Brand : Soundmaster
Model : NR912
Category : Turntable