
VCS3 - Turntable Soundmaster - Free user manual and instructions
Find the device manual for free VCS3 Soundmaster in PDF.


| Product Type | Turntable |
| Brand | Soundmaster |
| Model | VCS3 |
| Dimensions (W x D x H) | 420 x 350 x 120 mm |
| Weight | 3.5 kg |
| Power Supply | AC 100-240V, 50/60Hz |
| Power Consumption | 10 W |
| Speed Settings | 33 1/3, 45 RPM |
| Drive Type | Belt drive |
| Platter Material | Aluminum |
| Tonearm Type | Balanced with adjustable counterweight |
| Cartridge | Moving magnet (pre-installed) |
| Output Connectors | RCA stereo (via built-in phono preamp) |
| Headphone Output | 3.5 mm jack |
| Auto Stop | Yes |
| Anti-skate | Adjustable |
| Dust Cover | Included, hinged |
| Turntable Mat | Rubber mat |
| Warranty | 1 year |
| Recommended Maintenance | Keep stylus clean, replace every 500 hours |
Frequently Asked Questions - VCS3 Soundmaster
User questions about VCS3 Soundmaster
0 question about this device. Answer the ones you know or ask your own.
Ask a new question about this device
Download the instructions for your Turntable in PDF format for free! Find your manual VCS3 - Soundmaster and take your electronic device back in hand. On this page are published all the documents necessary for the use of your device. VCS3 by Soundmaster.
USER MANUAL VCS3 Soundmaster
natural_image
Black convertible t-shirt with open lid and magazine case, featuring a classic vinyl logo (no text or symbols on the device itself)DEUTSCH
ENGLISH
FRANÇAIS
NEDERLANDS
ITALIANO
ESPANOL
PORTUGUÊS
NORSK
SVENSKA
DANSK
SLOVENSKÝ
ČEŠTINA
ENVIRONMENTAL PROTECTION
Do not dispose of this product with the normal household waste at the end of its life cycle. Return it to a collection point for the recycling of electrical and electronic devices. This is indicated by the symbol on the product, user manual or packaging
The materials are reusable according to their markings. By reusing, recycling or other forms of utilization of old devices you make an important contribution to the protection of our environment.
Please contact your local authorities for details about collection points.
| WARNING | ! | |
| Risk of electric shockDo not open! |
Caution: To reduce the risk of electric shock, do not remove the cover (or back). There are no user serviceable parts inside. Refer servicing to qualified service personnel.
This symbol indicates the presence of dangerous voltage inside the enclosure, sufficient enough to cause electric shock.
This symbol indicates the presence of important operating and maintenance instructions for the device
Used batteries are hazardous waste and NOT to be disposed of with the household waste! As a consumer you are legally obligated to return all batteries for environmentally responsible recycling – no matter whether or not the batteries contain harmful substances*)
Return batteries free of charge to public collection points in your community or shops selling batteries of the respective kind.
Only return fully discharged batteries ^* marked Cd = cadmium, Hg = mercury, Pb = lead
- Only use mercury and cadmium-free batteries.
- Used batteries are hazardous waste and NOT to be disposed of with the household waste!!!
- Keep batteries away from children. Children might swallow batteries.
- Contact a physician immediately if a battery was swallowed.
- Check your batteries regularly to avoid battery leakage.
- Batteries shall not be exposed to excessive heat such as sunshine, fire or the like.
- CAUTION: Danger of explosion if battery is incorrectly replaced
- Replace only with the same or equivalent type

To prevent possible hearing damage, do not listen at high volume levels for long periods
- Use the device in dry indoor environments only.
- Protect the device from humidity.
- This apparatus is for moderate climates areas use, not suitable for use in tropical climates countries.
- No objects filled with liquids, such as vases, shall be placed on the apparatus.
Safety, Environmental and Setup Instructions
- The mains plug or an appliance coupler is used as the disconnect device, the disconnect devices shall remain readily operable.
- Connect this device to a properly installed and earthed wall outlet only. Make sure the mains voltage corresponds with the specifications on the rating plate.
- Make sure the mains cable stays dry during operation. Do not pinch or damage the mains cable in any way.
- A damaged mains cable or plug must immediately be replaced by an authorized service center.
- In case of lightning, immediately disconnect the device from the mains supply.
- Children should be supervised by parents when using the device.
- Clean the device with a dry cloth only.
- Do NOT use CLEANING AGENTS or ABRASIVE CLOTHS!
- Do not expose the device to direct sunlight or other heat sources.
• Install the device at a location with sufficient ventilation in order to prevent heat accumulation. - Do not cover the ventilation openings!
- Install the device at a safe and vibration-free location.
- Install the device as far away as possible from computers and microwave units; otherwise radio reception may be disturbed.
- Do not open or repair the enclosure. It is not safe to do so and will void your warranty. Repairs only by authorized service/ customer center.
- No naked flame sources, such as lighted candles, should be placed on the unit.
- When you are necessary to ship the unit store it in its original package. Save the package for this purpose.
- In case of malfunction due to electrostatic discharge or fast transient (burst), remove and reconnect the power supply.
- If the unit is not using for a long period of time, disconnect it from the power supply by unplugging the power plug. This is to avoid the risk of fire.
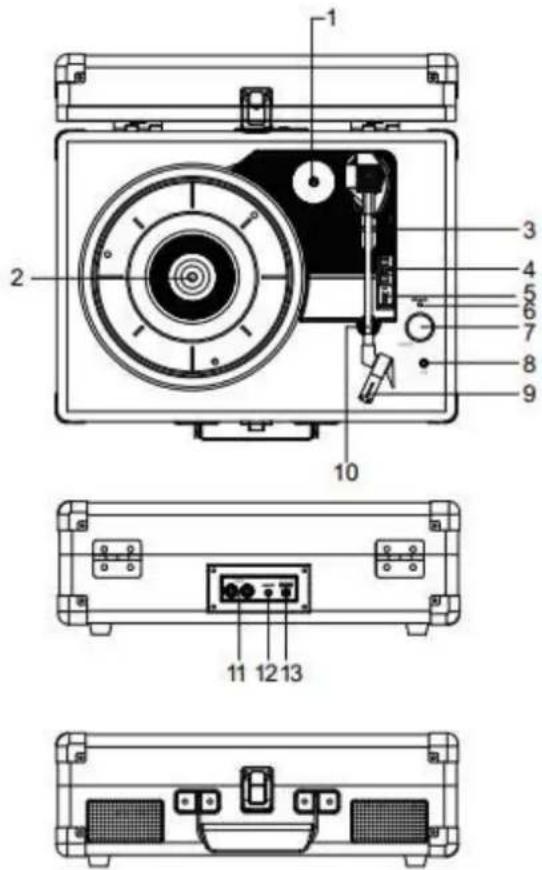
LOCATIONS OF CONTROLS
- 45 RPM ADAPTOR
- TURNTABLE SHAFT
- LIFT LEVER
- SPEED SELECTION SWITCH
- AUTO AND MANUAL STOP SWITCH
- LED POWER INDICATOR
- POWER ON/OFF AND VOLUME KNOB
- EARPHONE JACK
- STYLUS CARTRIDGE
- TONE ARM CLIP/REST
- RCA OUTPUT JACK
- AUX-IN JACK
- POWER ADAPTOR JACK
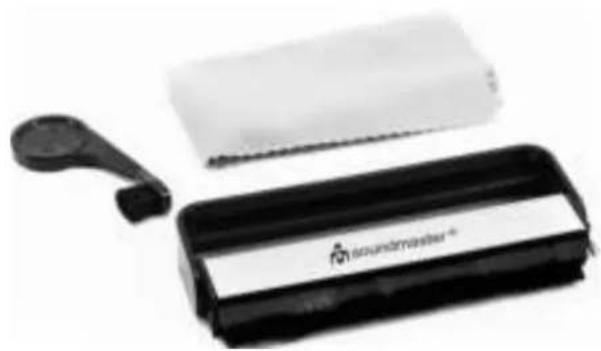
- CLEANING KIT
a. Carbon Fibre Brush
b. Stylus Cleaning Brush
c. Cloth
natural_image
Black and white photo of a soundmaster branded electronic device with a handle, next to a plastic sheet (no visible text or symbols on the device itself)GETTING STARTED
An AC-DC adaptor with an output of 5V DC 1000 mA (included) is required to use the main unit in AC power mode.
Connecting to power
Connect the cord of the power adapter to the DC IN jack of the turntable.
Connect the plug of the power adapter to a wall socket.
PHONOGRAPH FUNCTION
- Rotate the POWER/VOLUME knob clockwise until you hear a "click" sound to turn the device on. The Power LED indicator will light up.
- Put a record on the turntable platter. Remember to use the 45 RPM adaptor located on the top-right corner when playing a 45 RPM record.
- Remove the white plastic needle cover. Keep the needle cover in a safe and accessible place for future use.
- Select the speed according to the record you are playing.
- Release the tone arm by unlocking the tone arm lock. Lift the tone arm by pushing back the lift lever.
- Gently move the tone arm towards the turntable. Then, push the lift lever forward. The tone arm will gently descend onto the record and start playback.
- When the AUTO / MANUAL switch is set to ON. the record stops at the end.
- To pause or stop playing, you need to manually lift and move the tone arm back to the tone arm rest.
LINE OUT
-
Connect the RCA line out jacks to auxiliary input sockets of your home amplifier device (cable not incl.). Make sure to match the socket colours up to the jack colours.
-
Then power on your amplifier device and adjust its volume level to your preference.
LINE IN
- Rotate the POWER/VOLUME knob clockwise until you hear a "click" sound to turn the device on.
- Connect the line-in cable (not incl.) to the 3.5mm line-in jack on the unit and your audio source. Unit is switching automatically to AUX IN when plug is in
HEADPHONE
To listen to music privately, use headphones with a 3.5 stereo jack plug and connect it to the headphones socket. The speakers will then be muted.

To prevent possible hearing damage, do not listen at high volume levels for long periods.
HOW TO REPLACE THE TURNTABLE STYLUS (NEEDLE)
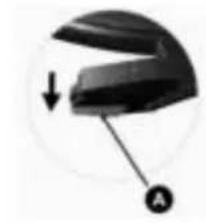
Removing old stylus
- Hold a screwdriver at the tip of the stylus and push down in the direction of "A".
- Remove the stylus by pulling it forward and down.
Installing a new stylus
- Hold the tip of the stylus and insert the other edge by pressing in the direction of "B".
- Push up in the direction of "C" until it locks at the tip.
natural_image
Close-up of a black object with a downward arrow and labeled point A, no readable text or symbols present.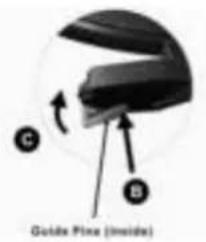
text_image
C B Guide Plane (Inside)CARE AND MAINTENANCE
Please read these instructions in order to achieve the best results for your vinyl and to prevent accidental damage due to incorrect use of the cleaning kit contents.
Regular cleaning of vinyl records prevents build-up of dust, keeps them in the best condition and allows them to sound as good as possible.
Carbon Fibre Brush
This eliminates static charges while removing fine dust particles.
- Whilst the vinyl record is in place on the player and rotating, hold the metal handle of the brush and place it on the record.
- Move the brush slowly from the centre of the record to the outside edge, repeating the action if necessary.
- Move the black handle across the brush to clean off dust and debris and then click it into place over the brushes for storage.
Stylus Cleaning Brush
Designed to clean your stylus and hard to reach places, the small brush is great for reaching the stylus tip.
- Simply place the brush on the back of the stylus and brush forward.
- Repeat this action until the stylus is clean.
TROUBLESHOOTING
| Problem | Cause | Solution | |
| THE WHOLE UNIT | Power does not come on when the unit is switched on. | Unit is unplugged. | Connect the unit to the AC power supply. |
| No sound comes out of the speakers. | The volume is turned down (to MIN). | Adjust the volume. | |
| The input selector does not match the playback source. | Re-select the desired input source. | ||
| The sound is distorted. | The unit is too close to a TV set or another similar appliance. | Turn off the TV or other appliances and relocate the unit. | |
| The unit does not respond. | External factors such as ESD (electro-static discharge) can affect the unit. | Remove the power cord and all other power supplies from the device, then plug in the unit again after one minute. | |
| PHONO PLAYER | The sound is distorted when playing the record. | The stylus is not placed in the centre. | Place the stylus in the centre. |
| The sound is distorted when used for a period of time. | The stylus is damaged. | Please insert a new stylus. | |
TECHNICAL SPECIFICATIONS
AC power adaptor: Input: AC 100-240 V, 50/60Hz 0.15A
Output: DC 5 V 1A

Power consumption 5W
Features and specifications are subject to change without prior notice.