
VOYAGER 4 FLY - Vacuum Cleaner Ghibli & Wirbel - Free user manual and instructions
Find the device manual for free VOYAGER 4 FLY Ghibli & Wirbel in PDF.

| Device type | Backpack vacuum cleaner |
| Brand | Ghibli & Wirbel |
| Model | VOYAGER 4 FLY |
| Nominal voltage | 115 V~, 400 Hz |
| Suction power | 650 W |
| Sound pressure | 60 dB(A) |
| Protection rating | IPX0 |
| Filter area (cloth filter) | 0,1 m² |
| Filter area (cartridge filter) | 0,42 m² |
| Airflow | 51 l/s |
| Vacuum | 165 mbar |
| Filter bag capacity | 3,3 L |
| Cloth filter capacity | 4 L |
| Cable length | 15 m |
| Dimensions (L x W x H) | 310 x 273 x 573 mm |
| Weight (without accessories) | 5,8 kg |
| Suction hose diameter | 33 mm |
| Filtration type | Polar bag, cloth filter, cartridge filter, safety filter, air outlet filter |
| Filter cleaning | Washable with water (cloth filter, safety filter, air outlet filter) |
| Included accessories | Floor nozzle, dust nozzle with wheels, telescopic extension, curtain/sofa nozzle, brush nozzle, crevice tool |
| Carrying system | Adjustable shoulder straps and waist belt |
| Intended use | Suction of dry dust only |
Frequently Asked Questions - VOYAGER 4 FLY Ghibli & Wirbel
User questions about VOYAGER 4 FLY Ghibli & Wirbel
0 question about this device. Answer the ones you know or ask your own.
Ask a new question about this device
Download the instructions for your Vacuum Cleaner in PDF format for free! Find your manual VOYAGER 4 FLY - Ghibli & Wirbel and take your electronic device back in hand. On this page are published all the documents necessary for the use of your device. VOYAGER 4 FLY by Ghibli & Wirbel.
USER MANUAL VOYAGER 4 FLY Ghibli & Wirbel
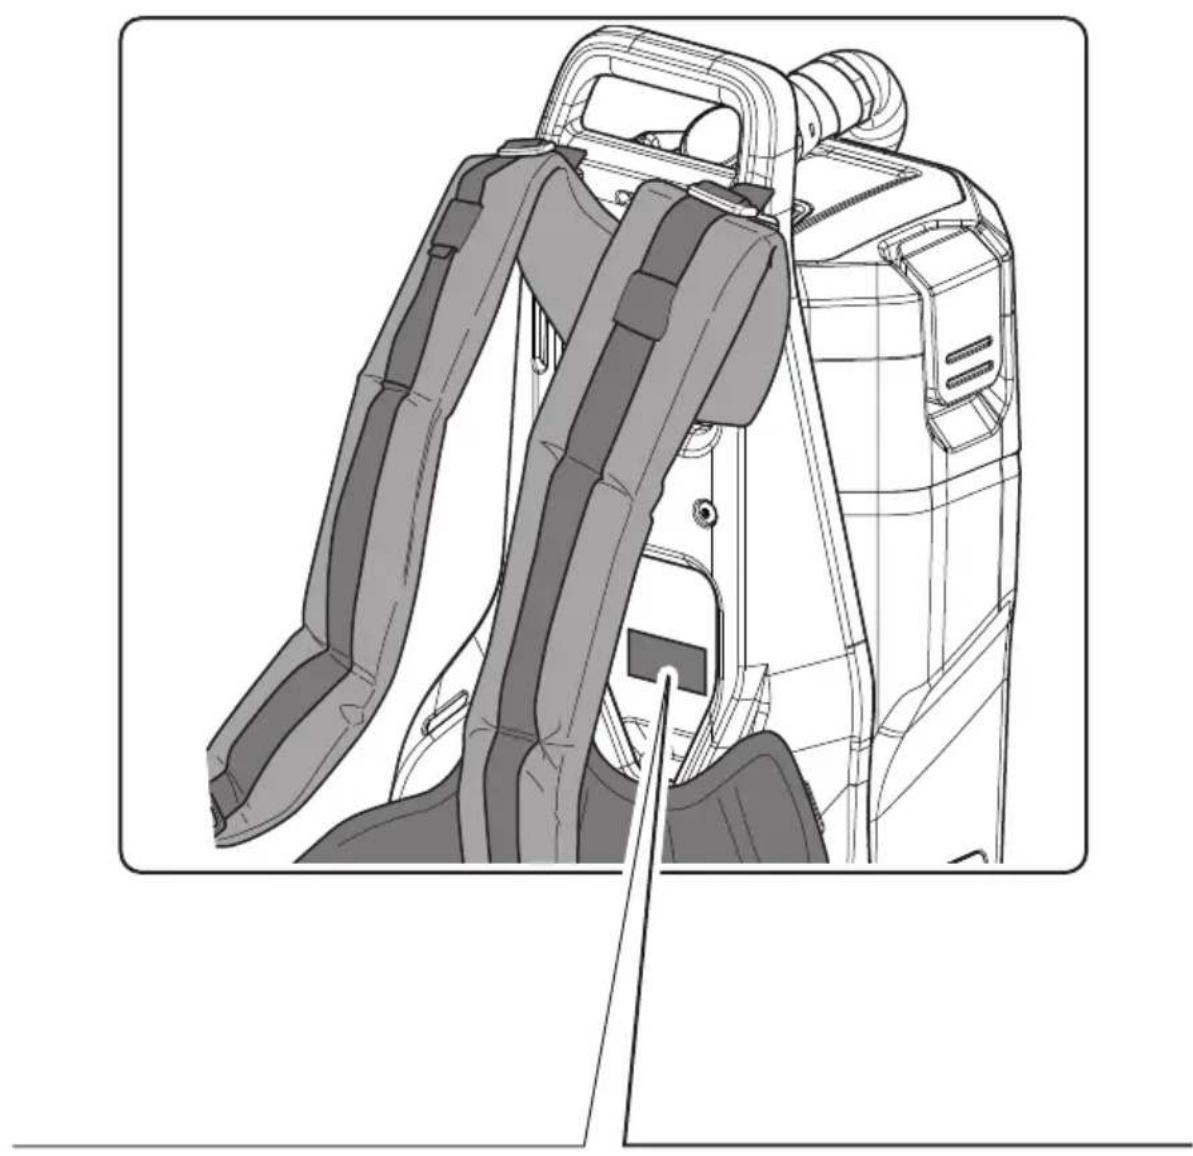
natural_image
Line drawing of a vacuum cleaner with attached hose and control panel (no text or symbols)IT Uso e manutenzione
EN Use and Maintenance
FR Utilisation et Entretien
DE Gebrauch und Wartung
ES Uso y Mantenimiento
PT Uso e manutenção
NL Gebruik en Onderhoud
CS Použití a Údržba
RU Эксплуатация и обслуживание
PL Obsługa i Konserwacja
AR
الاستخدام والصيانة
natural_image
Technical line drawing of a mechanical device with attached straps and a handle (no text or symbols)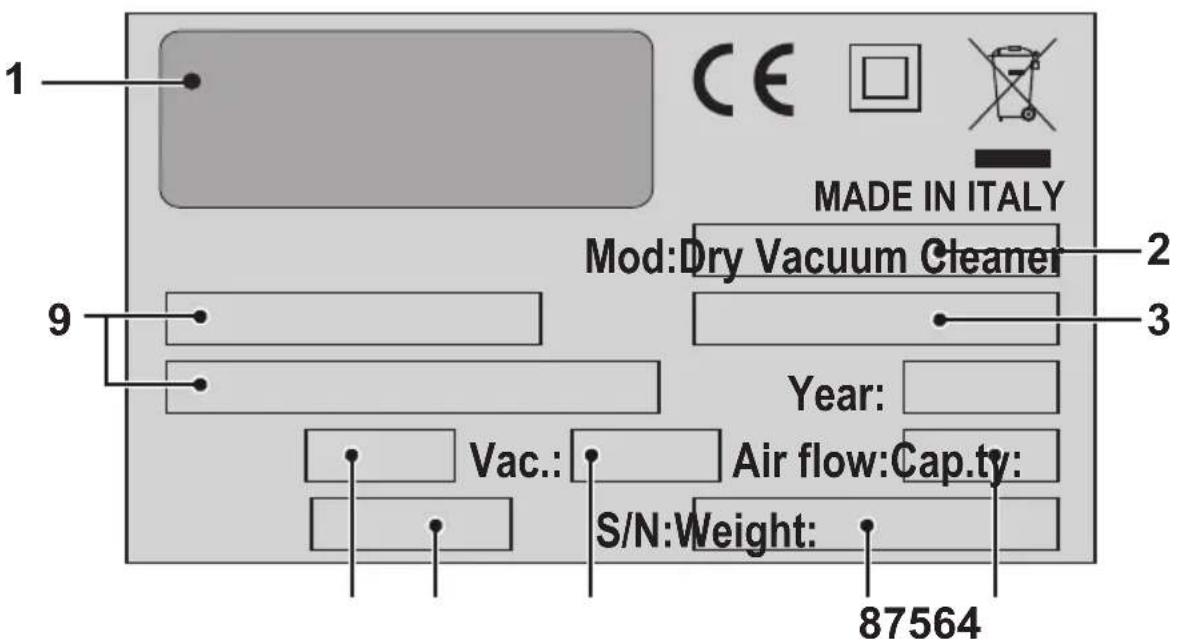
| 1 2 3 | |||
| IT | Produttore Modello Articolo | ||
| EN | Manufacturer Model Article | ||
| FR | Producteur Modèle Article | ||
| DE | Hersteller Modell Artikel | ||
| ES | Fabricante Modelo Artículo | ||
| PT | Produtor Modelo Artigo | ||
| NL | Producent Model Artikel | ||
| CS | Výrobce Model Typ | ||
| RU | Изготовитель Модель Артикул | ||
| PL | Producent Model Artykuł | ||
| AR | الصنع | الطراز | النوع |
| 456 | |||
| IT | Capacità fusto | Capacità aspirazione | Portata d'aria |
| EN | Container capacity | Vacuum | Air flow |
| FR | Capacité de la cuve | Capacité d'aspiration | Débit d'air |
| DE | Fassungsvermögen des Körpers | Ansaugleistung | Luftdurchsatz |
| ES | Capacidad del bidón | Capacidad de aspiración | Caudal de aire |
| PT | Capacidade do reservatório | Capacidade de aspiração | Caudal de ar |
| NL | Inhoud reservoir | Zuigcapaciteit | Luchtdebiet |
| CS | Obsah nádoby | Sací výkon | Množství dopravovaného vzduchu |
| RU | Емкость бака | Мощность всасывания | Расход воздуха |
| PL | Pojemność zbiornika | Podciśnienie (mbar) | Przepływ powietrza |
| AR | سعة الخزان | تدفق الهواء قدرة الشفط |
| 789 | |||
| IT | Peso macchina | N° Matricola | Caratteristiche elettriche |
| EN | Machine weight | Serial N° | Electrical characteristics |
| FR | Poids machine | N° Matricule | Caractéristiques électriques |
| DE | Maschinengewicht | Matrikelnr. | Elektrische Eigenschaften |
| ES | Peso de la máquina | N° Matrícola | Características eléctricas |
| PT | Peso da máquina | Número de série | Características elétricas |
| NL | Machine gewicht | Serienummer | Elektrische eigenschappen |
| CS | Hmotnost stroje | Výrobní č. | Elektrické údaje |
| RU | Вес машины | Заводской No | Электрические характеристики |
| PL | Hmotnost stroje | Nr. Fabryczny | Właściwości elektryczne |
| AR | وزن الآلة | الرقم التسلى | المواصفات الكهربائية |
CFig
ITALIANO....ITALIANO - 1
(Istruzioni originali)
EN English......ENGLISH - 1
(Translation of original instructions)
FR Français....FRANÇAIS - 1
(Traduction des instructions d'origine)
DEutsch ....DEUTSCH - 1
(Übersetzung der Originalanleitung)
ES Español.... ESPAÑOL - 1
(Traducción de las instrucciones originales)
PT Português PORTUGUÊS - 1
(Tradução das instruções originais)
NL Nederlands NEDERLANDS - 1
(Vertalinig van de originele instructies)
CS Česky....ČESKY - 1
(Překlad originálního návodu)
RU Русский....РУССКИЙ - 1
(Перевод оригинальной инструкции)
PL Polski....POLSKI - 1
(Tłumaczenie z oryginalnej instrukcji obsługi)
AR
العربيية 1
(ترجمة الإرشادات الأصلية)
DATI TECNICI
| VOYAGER 4 - DBP 4 FLY | |
| Dust suction device ■ | |
| Voltage - Frequency 115 V~ 400 Hz | |
| Nominal power (suction) 650 W | |
| Sound pressure (LpA) 60 dB(A) | |
| IP code IPX0 | |
| Filter surface (fabric filter) 0,1 m | 2 |
| Filter surface (cartridge filter) 0,42 m | 2 |
| Air flow 51 l/s | |
| Suction 165 mbar | |
| Filter paper bag capacity 3,3 l | |
| Filter fabric capacity 4 l | |
| Supply cable length 15 m | |
| Dimensions (Length x Width x Height) 310 x 273 x 573 mm | |
| Weight (without accessories) 5,8 kg | |
| Suction tube diameters | ø33 mm |
INTRODUCTION

DANGER:
Before using the machine, carefully read the “Safety recommendations for vacuum cleaners” booklet attached to this manual.
TYPE OF USE
Use this device only as a vacuum cleaner to suck up dust, crumbs, etc...
Uses different from those listed above are not allowed.
Any use different from the one for which
the appliance has been built represents an anomalous condition which could harm the appliance and constitute a serious hazard for the user.

DANGER:
The manufacturer can not be held responsible for any damage due to improper or incorrect use.
Any other use releases the manufacturer from liability for harm to persons and/or property and invalidates any warranty condition.

WARNING:
Vacuum dry material only.
Do not use the appliance to:
- Vacuum liquids of any kind.
- Vacuum hot substances.
- Vacuum incandescent, flammable, explosive, toxic substances/mixtures.
This appliance is not suitable for collecting dangerous dust.
Do not use the appliance in environments with risk of explosion.
Operators must be adequately trained in the use of this appli- ance.

WARNING:
Do not use outdoors.
This appliance must be stored, taking its weight into consideration, on a solid, steady, safe and not sloping plane, indoor and in a dry area.
PREPARING THE APPLIANCE
Control filter systems

NOTE:
The vacuum cleaner is assembled and packaged with all filters already mounted and ready for use.
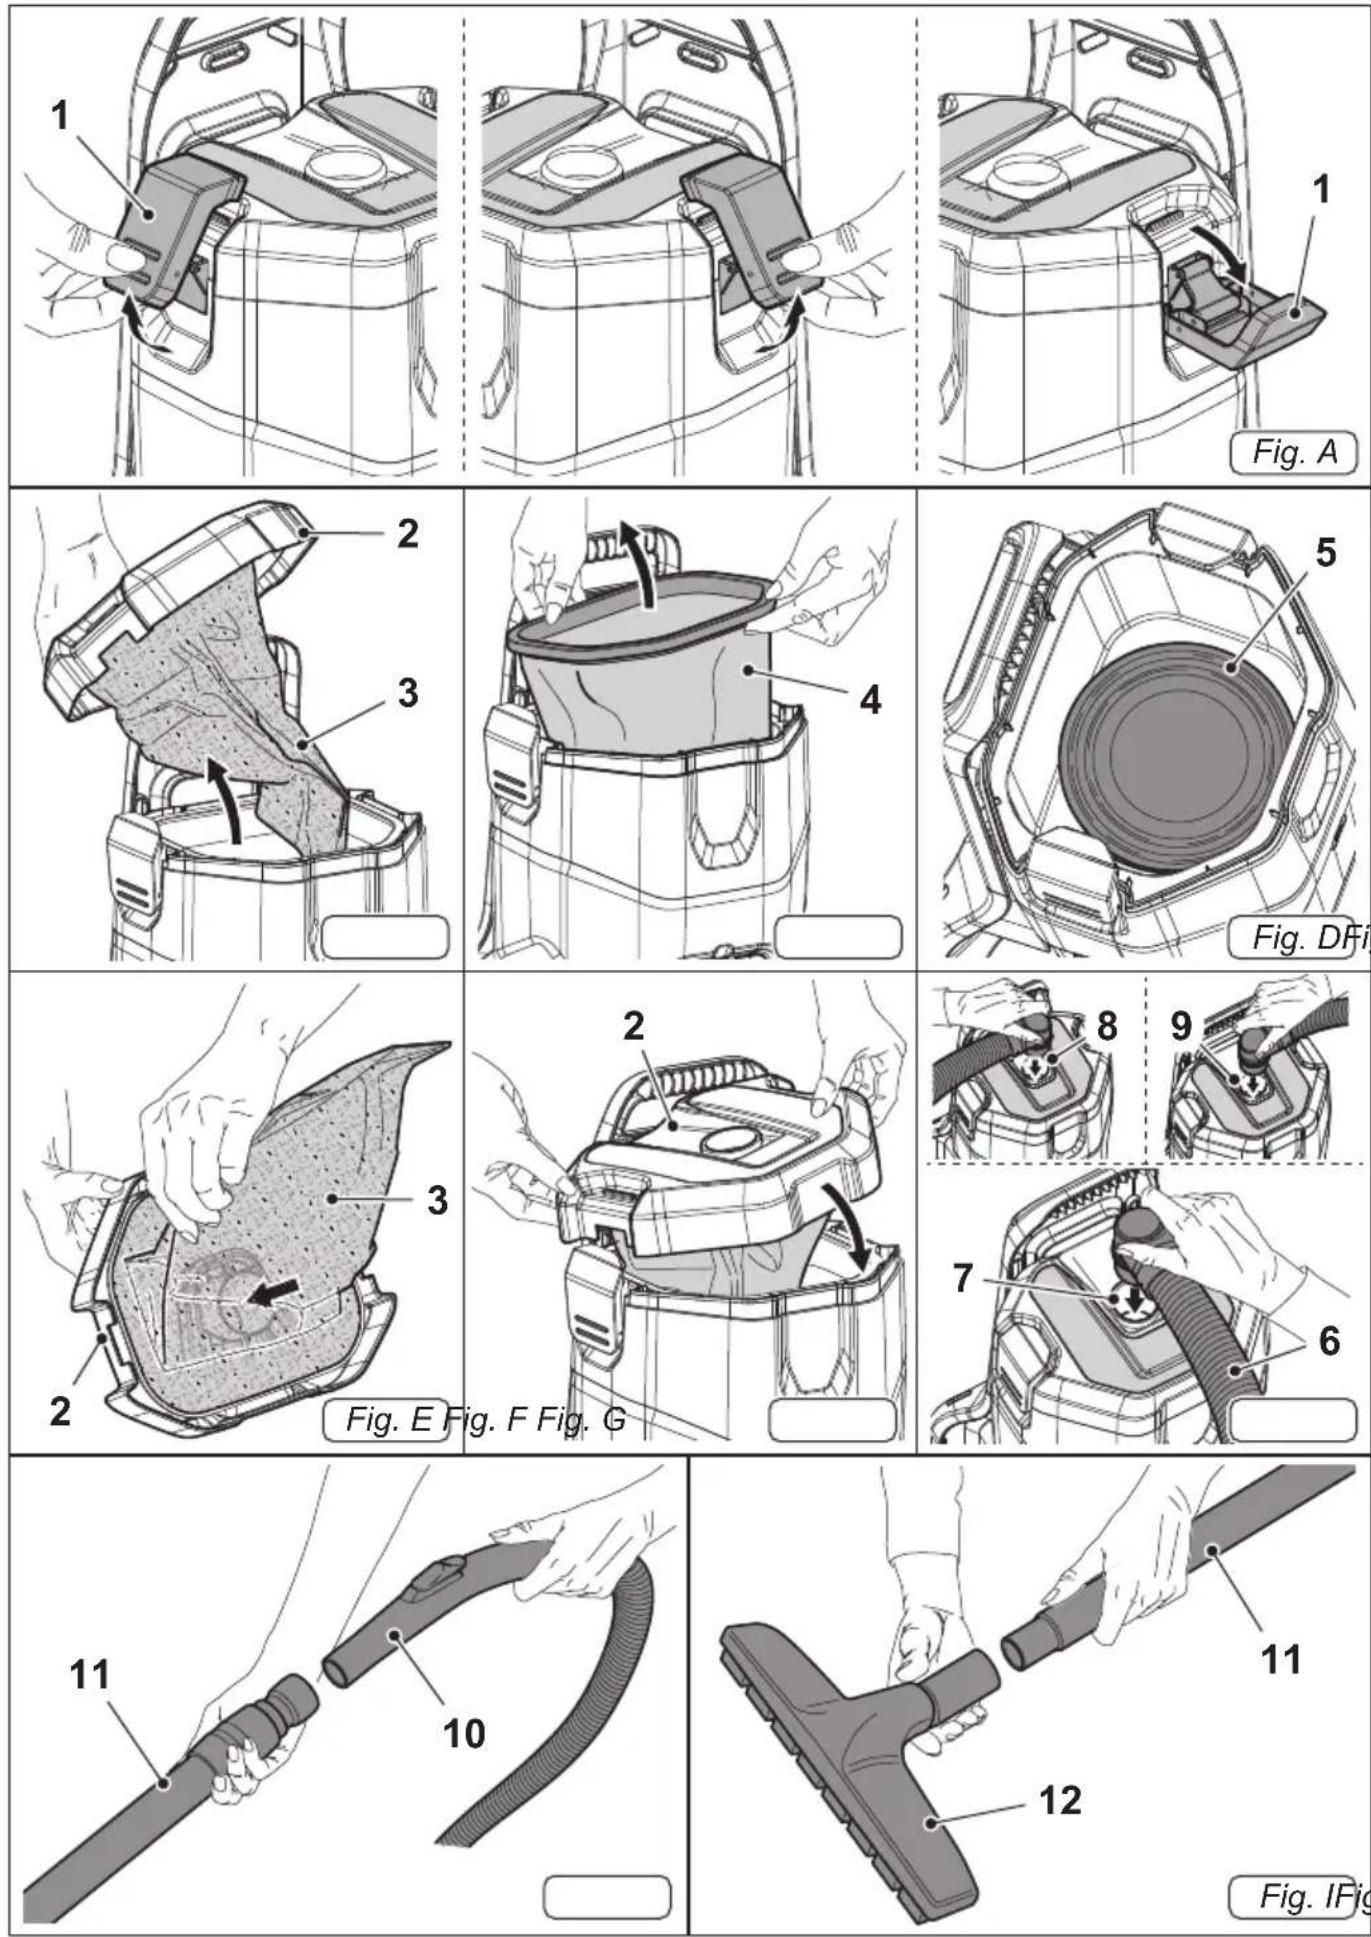
- Release the levers (1 Fig. A) and remove the lid (2 Fig. B) complete with fleece bag (3 Fig. B).
- Remove the cloth filter (4 Fig. C) and check that the cartridge filter (5 Fig. D) is mounted inside the appliance.
- Reassemble the cloth filter (4 Fig. C), re-assemble the lid (2 Fig. E) with the fleece bag (3 Fig. E) and holding it in position reassemble the lid (2 Fig. F) to the appli-ance.
- Lock the lid using the levers (1 Fig. A).

WARNING:
Check at regular intervals if the fleece bag is full. Continued use with a full fleece bag reduces the suction power of the appliance.
Do not use a used fleece bag. The fleece bag is designed for single use. Repeated use of the same fleece bag may cause clogging of the cartridge filter and may damage the vacuum cleaner.

NOTE:
If necessary, the vacuum cleaner can also be used with the canvas filter only (4 Fig. C).
Assembling of pipes
- Insert the elbow sleeve (6 Fig. G) of the flexible tube supplied into the air intake hole (7 Fig. G).

NOTE:
The elbow sleeve can be mounted on the appliance rotated as necessary as shown in the figure (8-9 Fig. G).
- Attach the telescopic extension (11 Fig. H) to the ergonomic handle (10 Fig. H) of the flexible hose.
- Attach the desired accessory to the telescopic extension (11 Fig. I):
• Floor dust nozzle (12 Fig. I).
- Dust nozzle with wheels (13 Fig. J).
• Rigid extension (14 Fig. J).
- Curtain/sofa nozzle (15 Fig. J).
- Brush nozzle (16 Fig. J).
- Crevice tool (17 Fig. J).

NOTE:
If necessary, accessories (dusting brush, crevice nozzle, curtain/sofa nozzle) can be mounted directly to the ergonomic handle.
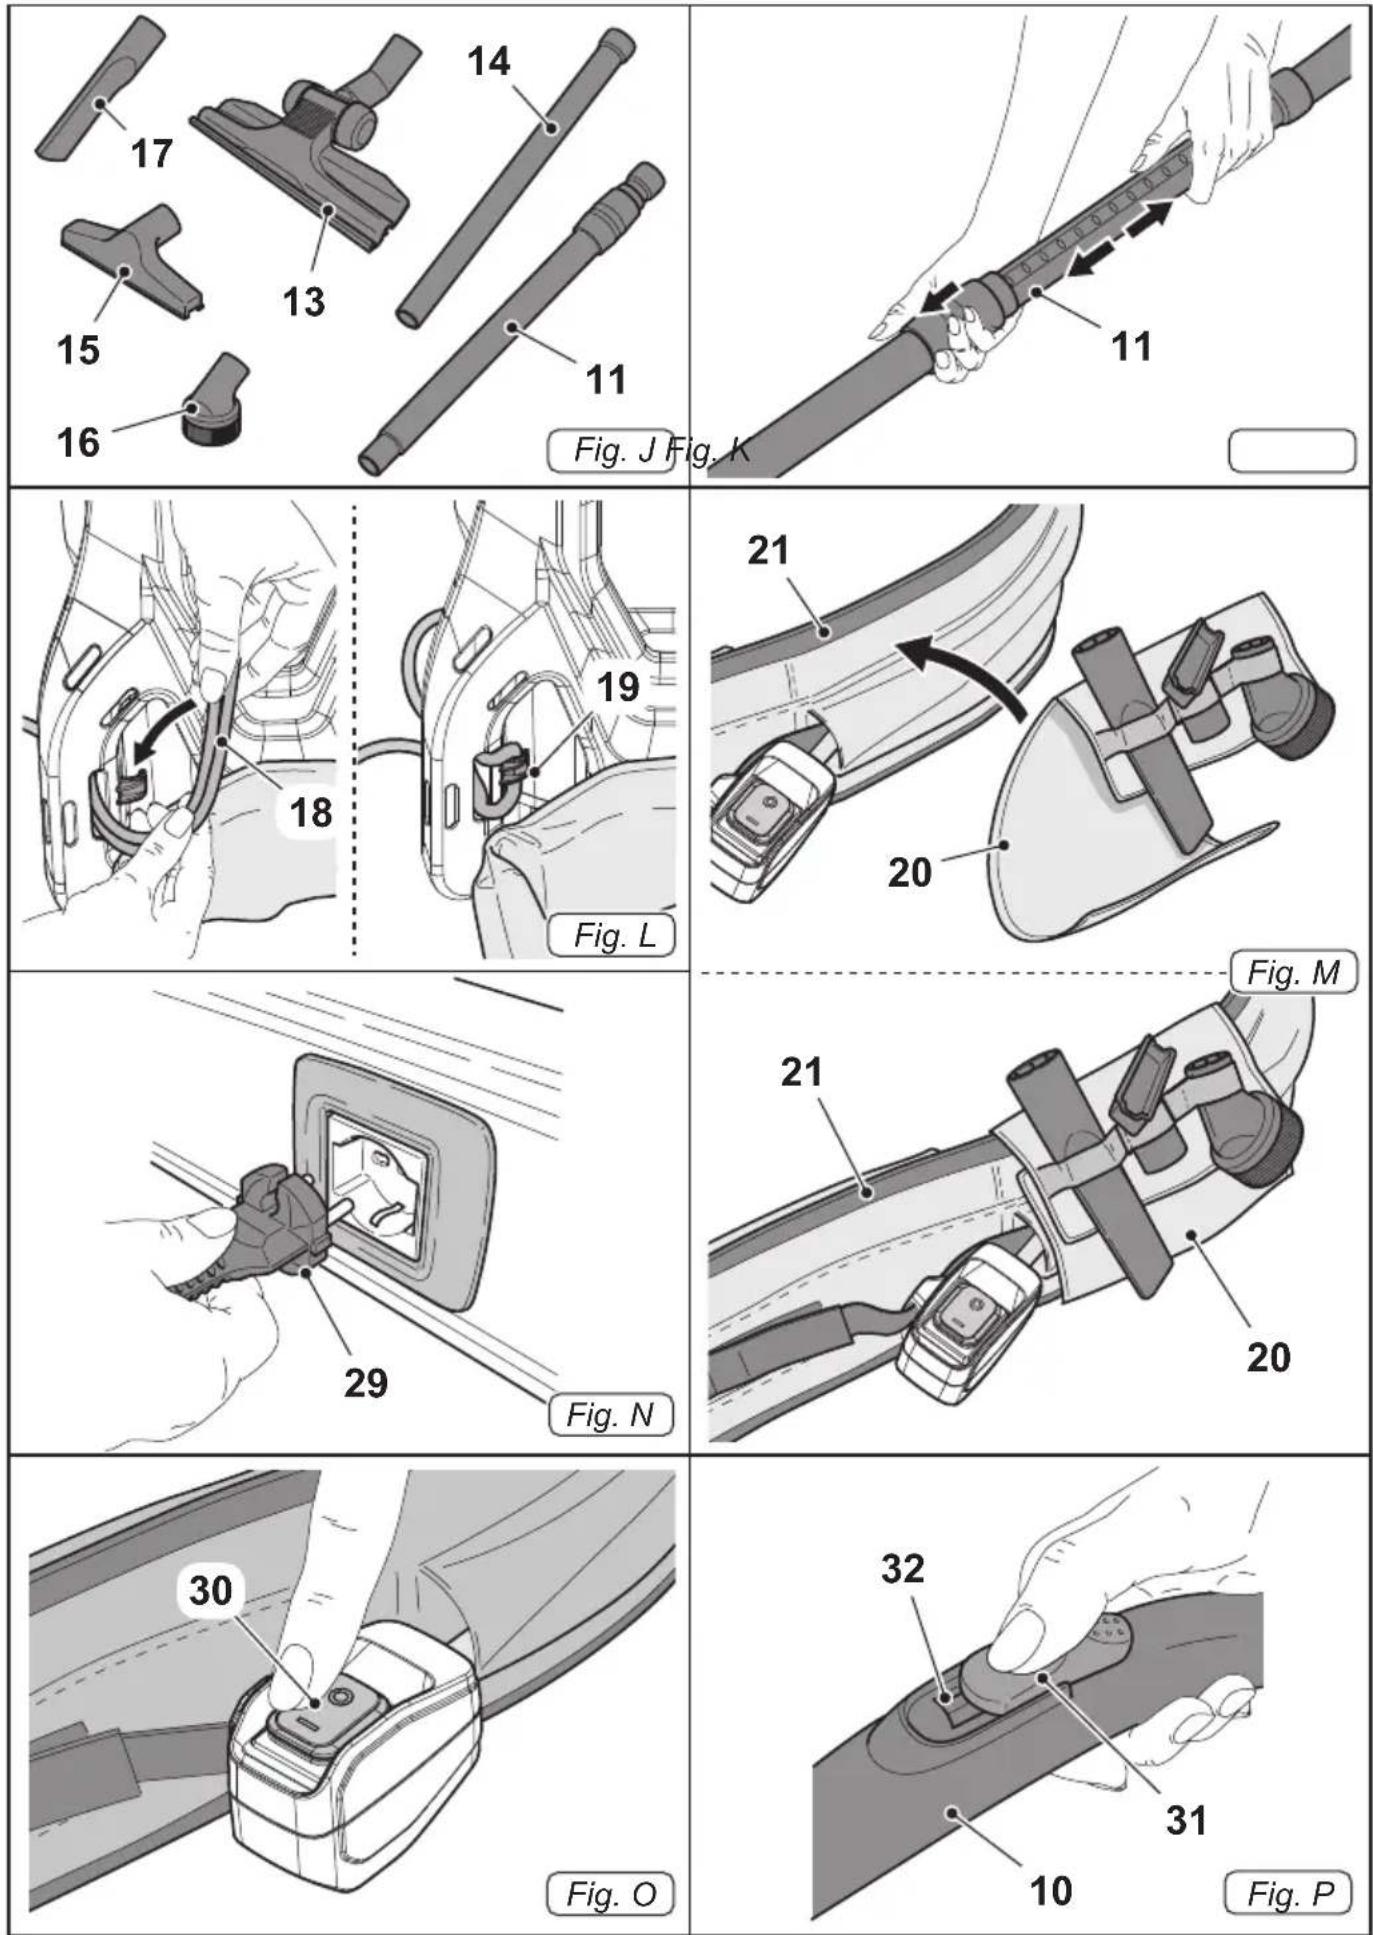
- Extend the telescopic extension (11 Fig. K) to the desired length.
Positioning the power cable

WARNING:
Form a ring with the electrical cable (18 Fig. L) and hook it onto the tooth (19 Fig. L) placing it as shown in the figure.
Accessory holder assembly
- On the lower belt (20 Fig. M), insert the accessory carrier flap (21 Fig. M), then attach it to the Velcro.
- There are elastic straps on the flap to arrange the accessories (brush nozzle, crevice nozzle and curtain/sofa nozzle).
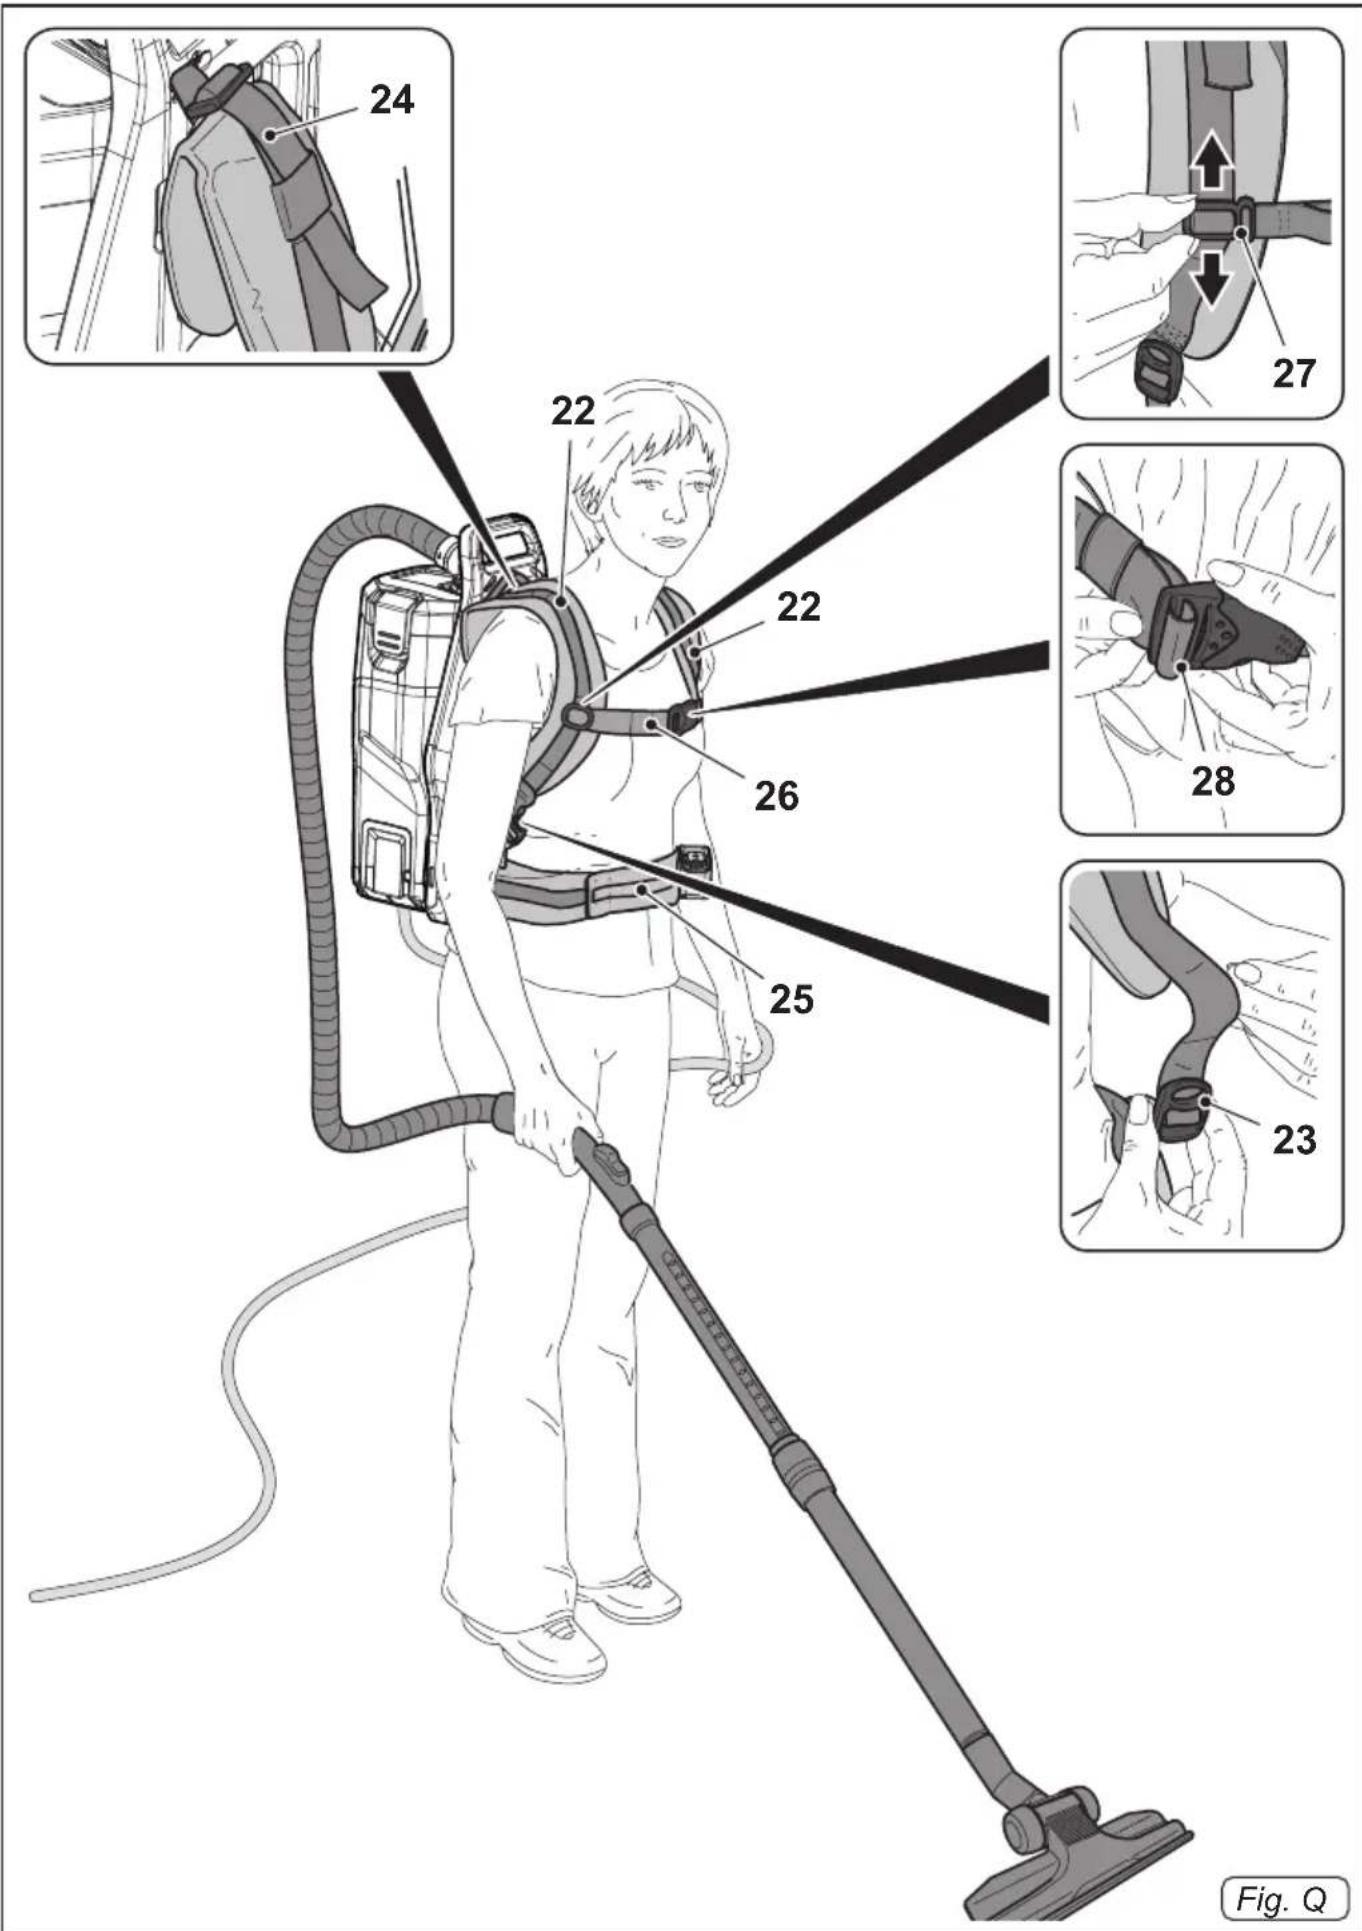
Arrangement the appliance on your shoulders
- Lift the appliance and put it on your shoulders.
- Use the buckles (23 Fig. Q) to adjust the should straps (22 Fig. Q), if necessary adjusting the height at the shoulders by means of the straps (24 Fig. Q).
- Attach and close the lower belt (25 Fig. Q) using the Velcro.
- Hook and adjust the height of the chest belt (26 Fig. Q) using the buckles (27 Fig. Q), if necessary using the buckle (28 Fig. Q) to adjust the width.
USE OF THE APPLIANCE
Starting the appliance
- Insert the plug (29 Fig. N) into the power socket.
- On the control, press the switch (30 Fig. O) to "I" to start suction (the switch lamp lights up).

NOTE:
You can adjust the suction force by acting on the selector (31 Fig. P) located on the ergonomic handle (10 Fig. P). Opening the window (32 Fig. P) results in less suction action.
Switching off the appliance
- Press the switch (30 Fig. O) to "O" to turn off the appliance (the switch light turns off).
- Unplug the plug (29 Fig. N) from the power socket.
CLEANING AND MAINTENANCE

DANGER:
Before carrying out any maintenance operation, remove the plug from the power socket.
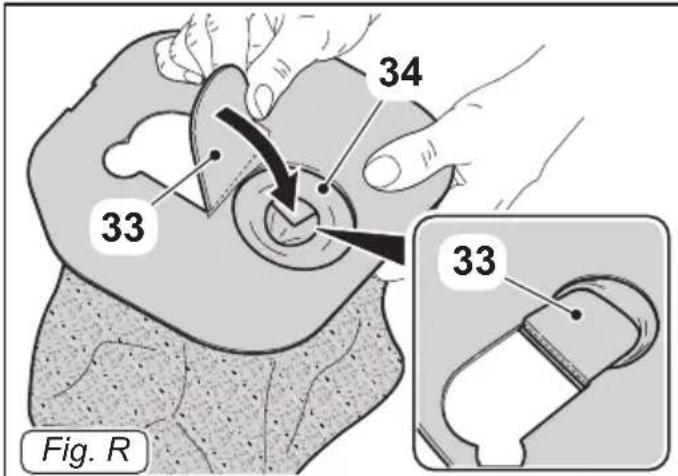
Removal and replacement dust collector filter fleece
- Release the levers (1 Fig. A) and remove the lid (2 Fig. B) complete with fleece bag (3 Fig. B).
- Remove the fleece dust bag (3 Fig. B) from the lid (2 Fig. B), lift the tab (33 Fig. R) and fold it inside the hole (34 Fig. R) fitting it onto the rubber edge and then throw it away.
- Replace the fleece bag and reassemble everything by proceeding in reverse order to the disassembly.
Control and cleaning of the cloth filter
- Release the levers (1 Fig. A) and remove the lid (2 Fig. B) complete with fleece bag (3 Fig. B).
- Remove the cloth filter (4 Fig. C) and clean it by removing any dust present.

NOTE:
The cloth filter (4 Fig. C) can be washed with warm water and detergent, taking into account that it must be thoroughly dry before reusing it.
- Reassemble everything by proceeding in reverse order to disassembly.
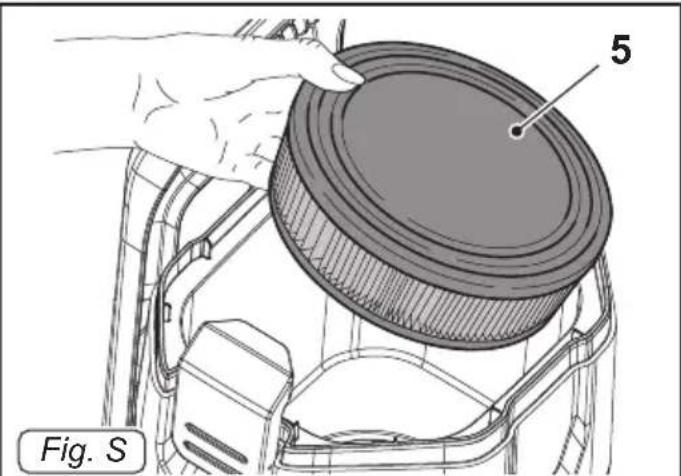
Checking and cleaning the cartridge filter
- Release the levers (1 Fig. A), remove the cover (2 Fig. B), the fleece bag filter (3 Fig. B) and the cloth filter (4 Fig. C).
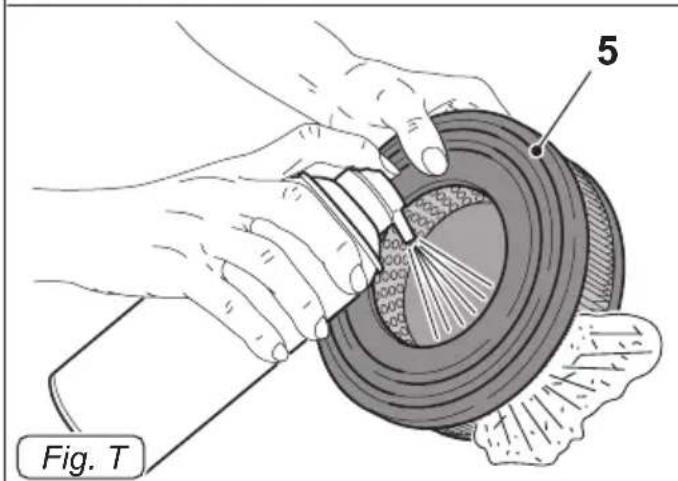
- Remove the cartridge filter (5 Fig. S) from the appliance.
- Clean the cartridge filter from the inside out with a jet of air (5 Fig. T); if it is too dirty, it must be replaced.
- Reassemble everything by proceeding in the reverse order to disassembly.
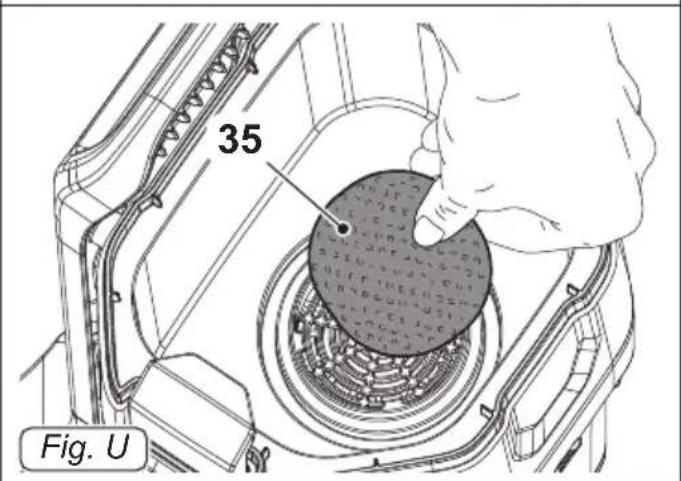
Checking and cleaning the safety filter
- Release the levers (1 Fig. A), remove the cover (2 Fig. B), the fleece bag filter (3 Fig. B) and the cloth filter (4 Fig. C). then remove the cartridge filter (5 Fig. S).
- Remove the filter (35 Fig. U) and clean it in running water.
- Reassemble everything by proceeding in the reverse order to disassembly.

WARNING:
Ensure that the filter (35 Fig. U) is completely dry before replacing.
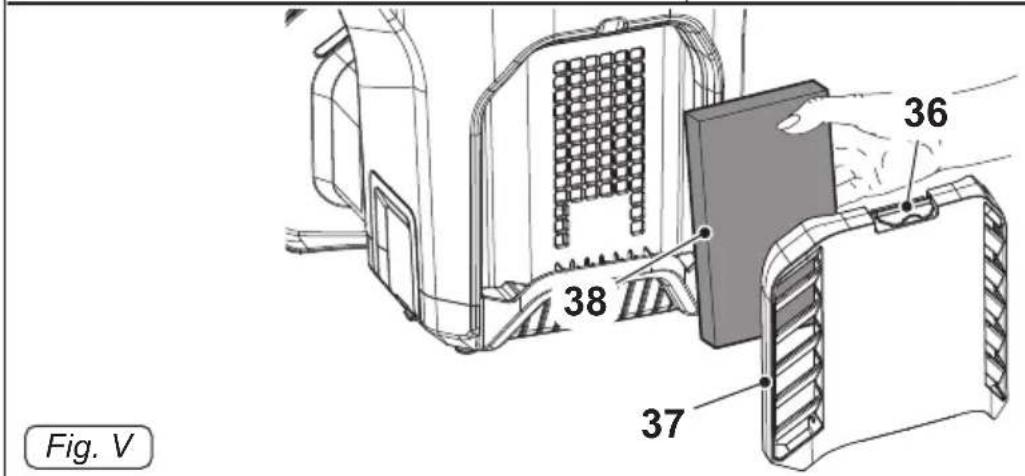
Checking and cleaning the air outlet filter
- Release the tab (36 Fig. V) and remove the grille cover (37 Fig. V).
- Remove the air outlet filter (38 Fig. V) and clean it in running water and dry it completely.
- Reassemble everything by proceeding in the reverse order to disassembly.
Cleaning the shoulder straps, belt and body of the device
- Clean the shoulder straps (22 Fig. Q) and the belt (25 Fig. Q) with a cloth dampened with water or a neutral detergent.
- Clean the body of the device using a cloth dampened with water or a neutral detergent.

DANGER:
Do not wash the unit with water jets.
SPARE PARTS
Cloth Filter Cod. 6547000
Pack of 10 fleece filter bag Cod. 6650031
Cartridge filter Cod. 2512749
TROUBLESHOOTING
| PROBLEM CAUSE SOLUTION | ||
| The vacuum cleaner does not work. | Switch is not pressed. Press the switch. | |
| Device is not plugged in. Insert the plug into the socket. | ||
| Lack of electricity. Check power line. | ||
| The intake is not satisfactory. | Paper bag is full. Replace dust collection bag. | |
| Filter elements are blocked. Clean the filter elements. | ||
| Accessories or hoses blocked. | Check and clean the hose and nozzle. | |
CARACTÉRISTIQUES TECHNIQUES
- Desengate as alavancas (1 Fig. A), retire
a tampa (2 Fig. B), o filtro do saco polar (3 Fig. B) e o filtro de pano (4 Fig. C).
فREAMCoCoCoCoCoCoCoCoCoCoCoCoCoCoCoCoCoCoCoCoCoCoCoCoCoCoCoCoCoCoCoCoCoCoCoCoCoCoCoCoCoCoCoCoCoCoCoCoCoCoCoCoCoCoCoCoCoCoCoCoCoCoCoCoCoCoCoCoCoCoCoCoCoCoCoCoCoCoCoCoCoCoCoCoCoCoCoCoCoCoCoCoCoCoCoCoCoCoCoCoO
- INTRODUCTION
- DANGER:
- TYPE OF USE
- WARNING:
- Operators must be adequately trained in the use of this appli- ance.
- PREPARING THE APPLIANCE
- Control filter systems
- NOTE:
- Assembling of pipes
- Positioning the power cable
- Accessory holder assembly
- Arrangement the appliance on your shoulders
- USE OF THE APPLIANCE
- Starting the appliance
- Switching off the appliance
- CLEANING AND MAINTENANCE
- Removal and replacement dust collector filter fleece
- Control and cleaning of the cloth filter
- Checking and cleaning the cartridge filter
- Checking and cleaning the safety filter
- Checking and cleaning the air outlet filter
- Cleaning the shoulder straps, belt and body of the device
- Do not wash the unit with water jets.
- SPARE PARTS
Brand : Ghibli & Wirbel
Model : VOYAGER 4 FLY
Category : Vacuum Cleaner