HCG2000D - Grill plate HISENSE - Free user manual and instructions
Find the device manual for free HCG2000D HISENSE in PDF.

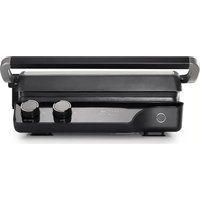
| Product type | Electric grill plate |
| Brand | Hisense |
| Model | HCG2000D |
| Product dimensions (L x D x H) | 376 mm x 362 mm x 179 mm |
| Package dimensions (L x D x H) | 435 mm x 238 mm x 430 mm |
| Net weight | 5.6 kg |
| Gross weight | 6.9 kg |
| Power supply | 220-240 V, 50/60 Hz |
| Total power | 2000 W (2 x 1000 W) |
| Cooking plate dimensions | 281 mm x 237 mm |
| Control type | LED touch screen with buttons |
| Number of preset programs | 10 (Steak, Hamburger, Hot-dog, Chicken, Sandwich, Fish, Vegetables, etc.) |
| Temperature ranges | 160°C to 230°C (depending on program) |
| Built-in timer | Up to 99 minutes |
| Food temperature probe | Included, for precise steak cooking |
| Removable plates | Yes, reversible (grill and flat) |
| Opening | Up to 180° (barbecue mode) |
| Height adjustment | Yes, with locking notches |
| Oil drip tray | Yes, removable with recommended water filling |
| Cleaning | Plates washable with water, body wiped with a damp cloth |
| Safety | Automatic shut-off, hot surface, transport lock |
| Intended use | Domestic, indoor only |
Frequently Asked Questions - HCG2000D HISENSE
User questions about HCG2000D HISENSE
0 question about this device. Answer the ones you know or ask your own.
Ask a new question about this device
Download the instructions for your Grill plate in PDF format for free! Find your manual HCG2000D - HISENSE and take your electronic device back in hand. On this page are published all the documents necessary for the use of your device. HCG2000D by HISENSE.
USER MANUAL HCG2000D HISENSE
natural_image
Technical line drawing of a mechanical device with no visible text or symbolsHCG2000D
| INSTRUCTION MANUAL | EN | 02 |
| BEDIENUNGSANLEITUNG | DE | 09 |
| MANUEL D'INSTRUCTIONS | FR | 17 |
| MANUALE DI ISTRUZIONI | IT | 25 |
| MANUAL DE INSTRUCCIONES | ES | 33 |
| UPUTE ZA UPORABU | HR | 41 |
| NAVODILA ZA UPORABO | SI | 49 |
| MANUAL UDHËZIMI | SQ | 57 |
| UPUTSTVA ZA UPOTREBU | SRB | 65 |
| UPUTSTVA ZA UPOTREBU | BIH | 73 |
| MANUAL DE INSTRUCTIUNI | RO | 81 |
| ИНСТРУКЦИЯ ПО ЭКСПЛУАТАЦИИ | RU | 89 |
| NÁVOD K OBSLUZE | CZ | 97 |
| HASZNÁLATI ÚTMUTATÓ | HU | 104 |
| INSTRUKCJA OBSLUGI | PL | 112 |
| NÁVOD NA POUŽITIE | SK | 120 |
| ПОСІБНИК З ЕКСПЛУАТАЦІЇ | UA | 128 |
| РЪКОВОДСТВО ЗА УПОТРЕБА | BG | 136 |
| MANUAL DE INSTRUÇÕES | PT | 144 |
| ПРИРАЧНИК ЗА УПАТСТВО | MK | 152 |
| объщемъщвою სახეომდვანელ | KA | 161 |
| НУСКАУЛЫК НУСКАУЛЫ | KZ | 172 |
SAFETY FIRST

When using electrical appliances, the following basic safety precautions should always be followed:
- Please read all instructions before using the product for the first time. • This product does not apply to persons with reduced physical, sensory or mental capabilities or lack of experience and knowledge (including children under the age of 8), unless they are under the supervision of an adult with civil conduct. • This product is a household appliance and is only suitable for indoor use at home; any outdoor use is prohibited. • To prevent electric shock, do not immerse wires, plugs or electrical appliances in water or other liquids, and do not operate electrical appliances with wet hands. • When the power cord or appliance fails or is damaged in any way, do not use it and return the appliance to the nearest authorized service agency for inspection or repair. • When using electrical appliances or connecting electrical appliances to the power supply, it is necessary to prevent children from touching them, so as to avoid personal injury caused by electric shock or burns. • Accessories not provided by our company should not be used in this appliance, so as not to cause unnecessary personal injury, electric shock and fire. • Do not disassemble, repair, or refit the appliance without authorization. • Before using the product, if the package is found to be damaged, do not use it; return it to the retailer or dealer for disposal. • Before using the product, carefully check the nameplate on the bottom of the appliance to confirm that the voltage of the appliance is consistent with your household voltage. • This product is not a movable electrical appliance. When in use, it should be placed on a level and stable table. • Do not place the appliance on or near flammable materials, such as tablecloths or curtains. Pay attention to the surrounding operating environment, and keep away from explosive materials. • Do not place the product near high-temperature gas and electric stoves, and cannot be placed in a working oven. • Do not use the product under the electrical cabinet or closet to avoid fire. • Don’t put the product against the wall or other products, leave at least 10cm space on the back and side, leave at least 10cm space above the product, and don’t put other products on the product. • Do not use this product for any purpose other than those specified in this manual. Electrical appliance manufacturers do not recommend using accessories other than this product to avoid injury. • Do not use the product for unintended purposes. • Do not leave the product running unattended. • Do not put any of the following materials on the grill plate: paper, cardboard, clothing and plastic, etc.
- When using the product, pay attention to the high-temperature surface of the grill plate and surrounding areas, and avoid being burned by touching bare fingers. • When using the product, do not touch the power cord, control panel and other live parts with wet body parts. • When using the product, do not let the power cord hang on the edge of the table or counter, touch sharp objects or high-temperature surfaces, etc., to avoid electrical accidents. • Do not connect this product to an external timer switch or a separate remote control system to avoid dangerous situations. • Unplug the power plug in time when you finish using the product. • After using the product, perform necessary cleaning first, store in a dry, ventilated environment, and avoid direct sunlight. • This product is for home use only.
Never touch the surfaces of heating or cooking appliances. They will become hot during operation. Keep children at a safe distance. There is a risk of burning!
SPECIFICATIONS
| Model No. | HCG2000D |
| Voltage/Frequency | 220-240V, 50/60Hz |
| Upper Plate Rated Power | 1000W |
| Lower Plate Rated Power | 1000W |
| Grill plate size | 281*237mm |
| Product size | 376mmx362mmx179mm |
| Package size | 435mmx238mmx430mm |
| N.W. | 5.6kg |
| G.W. | 6.9kg |
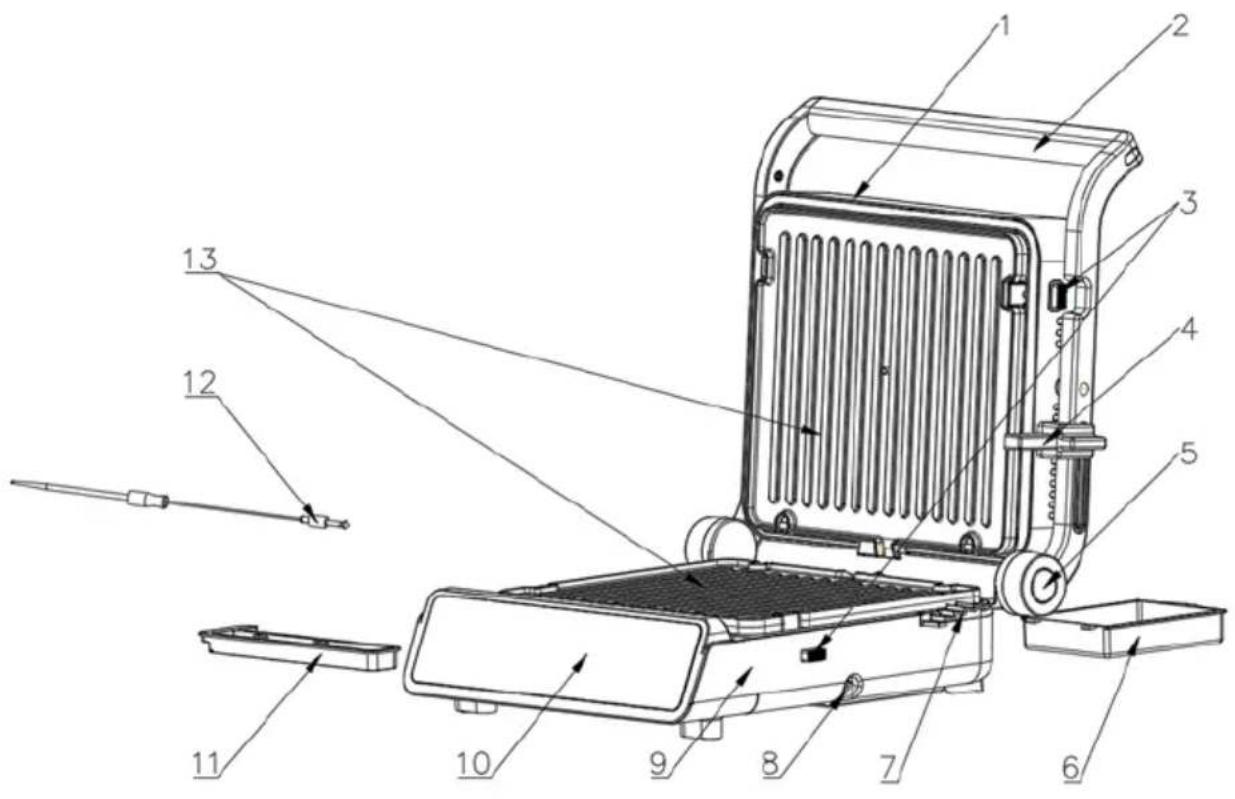
KNOW YOUR GRILL
-
Top cover - supports the heating tube and grill plate;
-
Handle - used to open and close the top cover;
-
Plate release button - press the button, the plate pops out from the machine.
-
Slide lock - used to lock the top cover and adjust the suspension height.
-
Flat button - press the button, the top cover can be opened 180°
-
Oil collection box - collects grease.
-
Height and lock steps – defines lock and height positions.
-
Thermoprobe insert hole- used to connect food thermoprobe
-
Base - supports heating tube and grill plate, installs circuit board
-
Control panel - touch control, digital tube and LED light display
-
Thermoprobe storage box - used to store food thermoprobe
-
Food probe - detects the internal temperature of steak depends on selected program.
-
Grill plate - both sides of the grill plate can be used, grill or flat.
GRILL MODES
- Locking mode - Close the cover (1) and push the slide lock (4) backward to make it engage with the height and lock steps (7). This mode can be used for product storage or product carrying. Reverse procedure and you will unlock your grill.
- Opening modes - Hold the handle (2) and push it backward to open the top cover (1) to about 95 degrees until it stops.
- 180°BBQ mode - press the Flat button (5) and push the handle forward at the same time.
- Floating or height adjustment - push the sliding lock (4) to the appropriate position so that the sliding lock is contacted with the height and lock steps (7). The upper plate will be floated to a fixed height in this mode.
REMOVE AND ASSEMBLY GRILL PLATES
- Removing plates - open the top cover (1) to 95^ or 180^ , press the plate release button (3) and the plates will pop up automatically. NOTE: When top cover is in 95^ state, please hold the plate by hand when take out the upper plate to avoid it drops out. When the plates are hot after heating, do not take out the plates immediately to avoid burns, and take out the plates after cooling down.
- Assembly plates - open grill to 95^ or 180^ position, insert the two ends of plate with notches into the fixing bracket, then press the plate down. With a click, the plate is assembled. NOTE: The grill plates are the necessary utensil of this product, it must be installed well before the machine is power on.
BEFORE FIRST USE
- Remove all packaging materials from this product. • Before discarding the packaging materials, please check all the parts to avoid components missing and cause troubles. • Read the product manual carefully and keep it properly for later use. • Check whether the machine is broken or damaged; Especially the power cord; If damage is found, please contact the distributor. • Use hot water, dishwashing liquid and a non-abrasive sponge to clean the upper and lower grill plates and oil drip tray, and wait for the grill plate to dry before assembling. • Add an appropriate amount of water into the oil drip tray and push it into the bottom of grill slowly.
Notes: When using the product for the first time, there is a slight smell or a short period of smoke, which is a normal phenomenon.
CONTROL PANEL
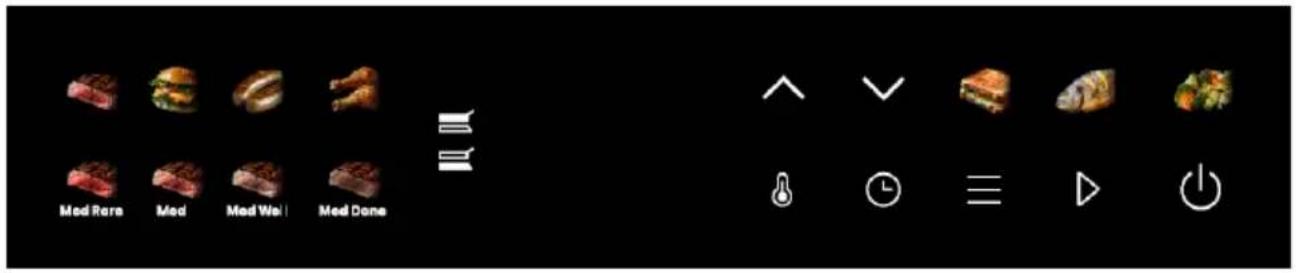
(1) ⏻ - ON/OFF, (2) ▶ - Start/Enter, (3) ≡ - Select program, (4) ⏻ - Timer,
(5) - Temperature, (7) - Time or Temp. UP, (8) - Time or Temp. DOWN

Steak program. You can access to steak program by pressing Select program (3) and confirm with pressing Start/Enter (2). Now you can select desired grill stage by pressing Select program (3). Confirm desired program by pressing Start/Enter (2) and grill will start heating (display status H--). Once grill is at correct temperature, display status will change to Add. Now you can add your stake and confirm with Start/Enter (2). After program is finished, grill will beep and automatically turned off. If you will be using Thermoprobe, take it out of grill and storage box, connect it to grill before choosing steak program. Insert probe in the middle of the steak. Selecting steak program is the same as described above but now grilling will be done until pre-set temperature is reached. Minor Time and Temperature adjustment can be made with pressing Timer (4) or Temperature (5) after selecting program and before Start/Enter (2) confirmation. Adjustments are shown in chart below. Time (4) can be adjusted only without Thermoprobe.

Burger meat. You can access to program by pressing Select program (3) and confirm with pressing Start/Enter (2). Once grill is at correct temperature, display status will change to Add. Now you can add your meat and confirm with Start/Enter (2). After program is finished, grill will beep and automatically turned off. Minor Time and Temperature adjustment can be made with pressing Timer (4) or Temperature (5) after selecting program and before Start/Enter (2) confirmation. Adjustments are shown in chart below.
Same process as for Burger meat is valid also for:

Sausages/ Hot dog
Chicken meat
Sandwiches
Fish meat
Vegetable
DIY program. Start with turning ON your grill (1). Press Temperature (5). At this moment you can cycle by pressing Temperature (5) between using both plates, upper plate only or lower plate only. Chosen setting will be blinking and now you can select desired Temperature by pressing UP (7) or DOWN (8). Then press Timer (4) and select desired time by pressing UP (7) and DOWN (8). Once you are satisfied with your settings press Start/Enter (2) and wait for grill to heat up. Once grill is at correct temperature, display status will change to Add. Now you can add your meal. Grill will Start DIY program automatically after 3 beeps. There is no need for confirming like in other pre-set programs.
PRE-SET PROGRAMS
| No | Program | Default heating temperature (°C) | Heating temperature | Default heating time (Min) | Heating time range (Min) | Thermoprobe temperature (°C) |
| range (°C) | ||||||
| 1 | Rare | 230 | 210-230 | 5 | 3-5 | 55 |
| 2 | Medium | 230 | 210-230 | 6 | 4-9 | 60 |
| 3 | Med. well | 230 | 210-230 | 7 | 5-10 | 65 |
| 4 | Well done | 230 | 210-230 | 8 | 6-11 | 73 |
| 5 | Hamburger | 200 | 190-210 | 5 | 3-8 | |
| 6 | Hot dog | 180 | 160-230 | 3 | 2-5 | |
| 7 | Chicken | 230 | 210-230 | 5 | 3-8 | |
| 8 | Sandwich | 180 | 160-230 | 2 | 2-5 | |
| 9 | Fish | 220 | 210-230 | 6 | 4-9 | |
| 10 | Vetagetable | 200 | 170-230 | 3 | 1-4 |
Q&A
| No | Common problems | Causing | Methods |
| 01 | The grill does not work | The power cord is not plugged in to the power outlet | Insert the power cord into the power outlet |
| 02 | Smoke between the two grill plates | After the last use, there are residual left | After each use, clean the upper and lower grill plates and oil drip box to remove the residue |
| 03 | Food is grilled for too long (burnt) or uncooked | After switching on, the temperature is not adjusted according to the food tobe grilled; the temperature level of the machine is adjustable | According to the food, adjust the corresponding temperature |
| 04 | Burred when when baking bread | Different baking times for cold and hot machines, longer baking times for cold machines | In the hot machine state, shorten the time of baking bread |
| 05 | After working for a period of time, the machine is suddenly shut down, and accompanied by a "beep" sound; | The maximum working time of this product timer is 99 minutes; automatic shutdown after the time limit | Turn on again |
| 06 | The food is unevenly fried | 1. Different sizes of food2. Different varieties of food3. When the grill is opened at 95° & 180°, the food is not turned over during frying | 1. The food is the same size2. the same type of food3. Turning the food over during the frying process |
| 07 | Roast the steak, scorched on the surface | Time is too long | The time set by the reference menu |
CLEANING AND MAINTENANCE
Warning: •Unplug the power cord before cleaning; wait till the machine and the plate cool completely to avoid burns. • Do not immerse the power cord, plug or the entire appliance in water or other liquids. • Do not use metal cleaning objects, such as cleaning balls and scouring pads, to clean the plate. • Do not use metal spatulas and scrapers to clean the baking tray. • Wipe the inner and outer surfaces with a damp cloth or sponge after each use; there are charged parts inside, which cannot be immersed in water. • The plate can be immersed in water for cleaning. • Add an appropriate amount of alkaline cleaning liquid for cleaning. • Wipe them dry with a clean rag to prevent oxidation and rust after cleaning all parts. • Finally, follow the correct steps to install the plate for next use.
DISPOSAL AND RECYCLING

Compliance with the WEEE Directive and Disposing of the Waster Product: This product complies with EU WEEE Directive (2012/19/EU). This product bears a classification symbol for waster electrical and electronic equipment (WEEE). This symbol indicates that this product shall not be disposed with other household wastes at the end of its service life. Used device must be returned to official collection point for recycling of electrical electronic devices. To find these collection systems please contact to your local authorities or retailer where the product was purchased. Each household performs important role in recovering and recycling of old appliance. Appropriate disposal of used appliance helps prevent potential negative consequences for the environment and human health.
Saucisses / Hot-dogs

Poulet

Sandwichs

Poisson

Légumes
-
Gornji poklopac – podupire grijač i ploču za roštilj.
-
Ručka – upotrebljava se za otvaranje i zatvaranje gornjeg poklopca.
-
Gumb za otpuštanje ploče – pritisnite gumb, ploča iskače iz uređaja.
-
Klizna brava – upotrebljava se za zaključavanje gornjeg poklopca i podešavanje visine ovjesa.
-
Gumb za poravnanje – pritisnite gumb, gornji poklopac može se otvoriti za 180°.
-
Posuda za sakupljanje ulja – skuplja mast.
-
Koraci visine i zaključavanja – definira položaje zaključavanja i visine.
-
Otvor za umetanje termosonde – upotrebljava se za spajanje termosonde za hranu.
-
Baza – podupire grijač i ploču za roštilj, postavlja strujnu ploču.
-
Upravljačka ploča – kontrola na dodir, digitalna cijev i led svjetlosni zaslon.
-
Kutija za pohranu termosonde – upotrebljava se za pohranu termosonde za hranu.
-
Sonda za hranu – otkriva unutarnju temperaturu odreska ovisno o odabranom programu.
-
Ploča za roštilj – mogu se upotrebljavati obje strane ploče za roštilj, žar ili ravna ploča.
NAČINI RADA ROŠTILJA
- Način zaključavanja – zatvorite poklopac (1) i gurnite kliznu bravu (4) unatrag kako bi se povezala s koracima za visinu i zaključavanje (7). Ovaj način rada može se upotrebljavati za pohranu proizvoda ili nošenje proizvoda. Obrnite postupak i otključat ćete roštilj.
-
Gornji poklopac – podržava grejač i ploču za roštilj.
-
Ručka – koristi se za otvaranje i zatvaranje gornjeg poklopca.
-
Dugme za otpuštanje ploče – pritisnite dugme, ploča iskače iz uređaja.
-
Klizna brava – koristi se za zaključavanje gornjeg poklopca i podešavanje visine vešanja.
-
Ravni taster – pritisnite taster, gornji poklopac se može otvoriti na 180°.
-
Kutija za sakupljanje ulja – sakuplja masnoću.
-
Visina i položaj zaključavanja – definiše visinu i položaj zaključavanja.
-
Otvor za umetanje termosonde – koristi se za povezivanje termosonde za hranu.
-
Osnova – podržava grejač i ploču za roštilj, smešta ploču strujnog kola.
-
Kontrolna tabla – komande na dodir, digitalna cev i led ekran.
-
Kutija za skladištenje termosonde – koristi se za skladištenje termosonde za hranu.
-
Sonda za hranu – detektuje unutrašnju temperaturu odreska u zavisnosti od izabranog programa.
-
Ploča za roštilj – obe strane ploče za roštilj mogu da se koriste, roštilj strana ili ravna.
REŽIMI ROŠTILJA
- Režim zaključavanja – zatvorite poklopac (1) i gurnite kliznu bravicu (4) unazad kako bi podesila sa visinom i položajem zaključavanja (7). Ovaj režim se može koristiti za skladištenje ili nošenje proizvoda. Obrnite postupak i otključaćete roštilj.
- Režimi otvaranja – držite ručku (2) i gurnite je unazad da biste otvorili gornji poklopac (1) na oko 95 stepeni dok se ne zaustavi.
- Režim roštilja 180° – pritisnite dugme Flat (5) i istovremeno gurnite ručku napred.
- Podešavanje položaja ili visine – gurnite kliznu bravu (4) u odgovarajući položaj tako da je klizna brava u dodiru sa visinom i položajem zaključavanja (7). U ovom režimu će gornja ploča biti podignuta na fiksnu visinu.
UKLANJANJE I SKLAPANJE PLOČA ZA ROŠTILJ
-
Gornji poklopac – podupire grijač i ploču roštilja.
-
Ručka – koristi se za otvaranje i zatvaranje gornjeg poklopca.
-
Dugme za otpuštanje ploče – pritisnite dugme, ploča se otpušta iz uređaja.
-
Klizna brava – koristi se za zaključavanje gornjeg poklopca i podešavanje visine ovjesa.
-
Ravno dugme – pritisnite dugme, gornji poklopac se može otvoriti za 180°.
-
Posuda za sakupljanje ulja – sakuplja masnoću.
-
Položaji visine i zaključavanja – definiše položaje zaključavanja i visine.
-
Otvor za umetanje temperaturne sonde – koristi se za priključivanje temperaturne sonde za hranu.
-
Baza – podupire grijač i ploču roštilja, ima ugrađenu strujnu ploču.
-
Upravljačka ploča – kontrola na dodir, digitalna cijev i LED ekran.
-
Kutija za skladištenje temperaturne sonde – koristi se za skladištenje temperaturne sonde za hranu.
-
Sonda za hranu – detektuje unutrašnju temperaturu odreska u zavisnosti od izabranog programa.
-
Ploča roštilja – mogu se koristiti obje strane ploče roštilja, roštiljna ili ravna.
NAČINI RADA ROŠTILJA
LIKVIDACE A RECYKLACE

WSTĘPNIE USTAWIONE PROGRAMY
UTYLIZACJA I RECYKLING
natural_image
Simple line drawing of a trash bin with crossed lines and a blank rectangular base (no text or symbols)- 6005 osglubgno - ofm u zomdomol domu qs zmoomol gomgoys.
- სახელური - გამოიუნება ზედა თავსახურის გახსისა და დახურვისთვის.
- ГОМОЗОЮДОЛ ДСОДМНЗОДОМО МОМЗО - ООЛФОМОS SA МОМЗО ЗЗБИОМБ ГОМОЗОЮЛ ЗАДМУЖДСО.
- དམས་བྱིས་པདྨོལ་- རནམའུབྱོར་ཉུལ་འགྱིས་བྱིལ་འགྱིས་བྱིལ་བྱིས་བྱིལ་བྱིས་བྱིལ་བྱིས་བྱིལ་བྱིས་བྱིལ་བྱིས་བྱིལ་བྱིས་བྱིལ་བྱནས་བྱིལ་བྱནས་བྱིལ་བྱནས་བྱིལ་བྱནས་བྱིལ་བྱནས་བྱིལ་བྱནས་བྱིལ་བྱནས་བྱིལ།
-
δόθυγμον ρομεσο - ρασβούρον δα ρομεσο 6000 υσχλυδικόν 180°-ων αλυδικόν.
-
borough 3m600060 - 586m3900 3b0d4.
-
სიმალითა და დაბლოკვის მარეგულირებელი მპერილები - განსაზლვრავს თაცსახურის მდებარეობის სიმალოეს და მის დაბლოკვას.
-
ΜΥΜΔΜΥΜΒΩΟΥ 65b3ΜΥΟ - 35dΜΟΥΜΒΟΥS ICSΦΔΜΟΥ ΜΥΜΔΜΥΜΒΩΟΥ ΑγιλυγΜΟΥΜΒΟΥΣΟ.
-
ʃɜːɡʌsɒʒədən - οθμι ζσοδόμον δομι ως ζόσμονος θομοχούς, ὁροχεζις 6sδgʃω δασύς.
-
მართვის პანელი – სუხსორული მართვა, ციგრული მილი და მუქდიოდიანი დისპლეი.
-
ογδαπβαρού αγλεδας γγωσι - γδαπαγβαδας ωγδαπού ογδαπβαρού αγλεδας σο.
-
ཕུན་ལྡན་ལྷ་བྱིས་-སྟོདང་ཉུའིན་པའུར་ཉུན་མོས་པརྒྱུར། དྱོད་པུགས་མོས་པའུར་པའུར་པའུར་པའུར་པའུར་པའུར་པའུར་པའུར་པའུར་པའུར་པའུར་པའུར་པའུར་པའུར་པའུར་པའུར་པའུར་པའན་པའུར་པའུར་པའུར་པའུར་པའུར་པའུར་པའུར་པའུར་པའུར་པའུར་པའུར་པའུར་པའུར་པའུར་པའུར་པའུར་པའབྱོད་པའུར་པའུར་པའུར་པའུར་པའུར་པའུར་པའུར་པའུར་པའུར་པའུར་པའུར་པའུར་པའུར་པའུར་པའུར་པའུར་པའགྱོད་པའུར་པའུར་པའུར་པའུར་པའུར་པའུར་པའུར་པའུར་པའུར་པའུར་པའུར་པའུར་པའུར་པའུར་པའུར་པའབྱོན་པའུར་པའུར་པའུར་པའུར་པའུར་པའུར་པའུར་པའུར་པའུར་པའུར་པའུར་པའུར་པའུར་པའུར་པའུར་པའུར་པལྟན།
-
გრილის ფირვიცა - მეგიმლითი, გამოიუნოთ გრილის ფირვიცის ლრივე მხარე: ცხაურიანი ან მრტელი.
azimuthol mgodgdo
• δαμησομόδου ήγγοδο – ροσβυμόσω συσλυσθύσο (1) ρος γσδμήσων χογλυσθύσο (4) ήγεδ υγ, ἐπα δίσμγρομι λοσσμπολυς ρος δαμησομόδου δυσγχυμομόγδων δυξικομηδυ (7). γις ήγγοδο δροσμόδως γσδμγβδύσων υγδυ δυσμηγβύδου δυλυδυδων δυξικομηδυ δυξικομηδυ δυξικομηδυ δυξικομηδυ δυξικομηδυ δυξικομηδυ δυξικομηδυ δυξικομηδυ δυξικομηδυ δυξικομηδυ δυξικομηδων δυξικομηδων δυξικομηδων δυξικομηδων δυξικομηδων δυξικομηδων δυξικομηδων δυξικομηδων δυξικομηδων δυξικομηδων
• zsblbou mggodgdo - qosofmgn lsbgmngno (2) qos zsdmfgon mzs, kmd bqos oszlsbngno (1) zsblbson qssbmmgdoon 95 gnsqnglbg, lsbsd sm zshgngqgs.
• 180° δυμδυγογιν ήγγόσο - ροςχόμηση δυμγγων χομαςλύ (5) ρος οδυμφωνμησωρ
βοδ δοσύγδοσω υυθυμησιλύ.
- དའདསལ་བྱུར་པའགས་པའད་པའད་པའད་པའད་པའད་པའད་པའད་པའད་པའད་པའད་པའད་པའད་པའད་པའད་པའད་པའད་པའད་པའད་པའད་པའད་པའད་པའད་པའད་པའད་པའད་པའ�ྲོབས་པའད་པའད་པའད་པའད་པའད་པའད་པའད་པའད་པའད་པའད་པའད་པའད་པའད་པའད་པའད་པའད་པའད་པའད་པའད་པའད་པའད་པའད་པའད་པའད་པνοχούνις