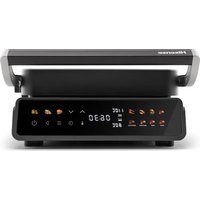
HCG2000XXL - Grill plate HISENSE - Free user manual and instructions
Find the device manual for free HCG2000XXL HISENSE in PDF.

| Product type | Electric grill plate |
| Brand | Hisense |
| Model | HCG2000XXL |
| Rated voltage | 220-240 V ~ 50 Hz |
| Rated power | 2000 W (2 x 1000 W) |
| Product dimensions (W x D x H) | 426 x 338 x 162 mm |
| Plate dimensions | 343 x 233 mm |
| Net weight | 6.4 kg |
| Gross weight (packaging) | 8.0 kg |
| Color | Black / Stainless steel |
| Temperature adjustment | Independent top and bottom plates with rotary knobs |
| Integrated steak probe | Yes, 5 cooking levels (blue rare to well done) |
| Timer | Yes, adjustable up to 90 minutes |
| Automatic shut-off | Yes, at the end of the timer or when the probe reaches target temperature |
| 180° opening | Yes, for use as a double cooking surface |
| Removable plates | Yes, dishwasher safe |
| Removable oil tray | Yes, to collect grease |
| Plate material | Non-stick coating |
| Maintenance and cleaning | Plates dishwasher safe; wipe exterior with a damp cloth |
| Safety | Hot surfaces, do not immerse the housing, do not use an external timer |
| Usage | Household, indoor only |
| Included accessories | Steak probe, oil tray, spatula |
| Warranty | 2 years (according to local regulations) |
| Country of manufacture | China |
Frequently Asked Questions - HCG2000XXL HISENSE
User questions about HCG2000XXL HISENSE
0 question about this device. Answer the ones you know or ask your own.
Ask a new question about this device
Download the instructions for your Grill plate in PDF format for free! Find your manual HCG2000XXL - HISENSE and take your electronic device back in hand. On this page are published all the documents necessary for the use of your device. HCG2000XXL by HISENSE.
USER MANUAL HCG2000XXL HISENSE
USER MANUALS HCG2000XXL
User manual / Contact Grill EN....3
We sincerely thank you for your purchase. We believe you will soon find ample evidence that you can really rely on our products. To make the use of the appliance easier, we attach these comprehensive instruction manual.
The instructions should aid you in getting familiar with your new appliance. Please, read them carefully before using the appliance for the first time.
In any case, please make sure the appliance was supplied to you undamaged. Should you identify and transport damage, contact your sales representative or the regional warehouse from where the product was delivered. You will find the telephone number on the receipt or delivery report.
We wish you a lot of pleasure with your new household appliance.

INSTRUCTIONS FOR USE
These instructions are intended for the user.
They describe the grill and how to use it. They also apply to different types of appliances, therefore you may find some descriptions of functions that may not apply to your appliance.
Never touch the surfaces of heating or cooking appliances. They will become hot during operation. Keep children at a safe distance. There is a risk of burning!
WARNING!
This product does not apply to persons with reduced physical, sensory or mental capabilities or lack of experience and knowledge (including children under the age of 8), unless they are under the supervision of an adult with civil conduct;
- This product is a household appliance and is only suitable for indoor use at home; any outdoor use is prohibited;
- To prevent electric shock, do not immerse wires, plugs or electrical appliances in water or other liquids, and do not operate electrical appliances with wet hands;
- When the power cord or appliance fails or is damaged in any way, do not use it and return the appliance to the nearest authorized service agency for inspection or repair;
- When using electrical appliances or connecting electrical appliances to the power supply, it is necessary to prevent children from touching them, so as to avoid personal injury caused by electric shock or burns;
- Accessories not provided by our company should not be used in this appliance, so as not to cause unnecessary personal injury, electric shock and fire;
- Do not disassemble, repair, or refit the appliance without authorization;
WARNING!
- Before using the product, if the package is found to be damaged, do not use it; return it to the retailer or dealer for disposal;
- Before using the product, carefully check the nameplate on the bottom of the appliance to confirm that the voltage of the appliance is consistent with your household voltage;
- This product is not a movable electrical appliance. When in use, it should be placed on a level and stable table;
- Do not place the appliance on or near flammable materials, such as tablecloths or curtains. Pay attention to the surrounding operating environment, and keep away from explosive materials;
- Do not place the product near high-temperature gas and electric stoves, and cannot be placed in a working oven;
- Do not use the product under the electrical cabinet or closet to avoid fire;
- Don’t put the product against the wall or other products, leave at least 10cm space on the back and side, leave at least 10cm space above the product, and don’t put other products on the product;
- Do not use this product for any purpose other than those specified in this manual.
- Do not use the product for unintended purposes;
- Do not leave the product running unattended;
- Do not put any of the following materials on the grill plate: paper, cardboard, clothing and plastic, etc.;
- When using the product, pay attention to the high-temperature surface of the grill plate and surrounding areas, and avoid being burned by touching bare fingers;
WARNING!
- When using the product, do not touch the power cord, control panel and other live parts with wet body parts;
- When using the product, do not let the power cord hang on the edge of the table or counter, touch sharp objects or high-temperature surfaces, etc., to avoid electrical accidents;
- Do not connect this product to an external timer switch or a separate remote control system to avoid dangerous situations;
- Unplug the power plug in time when you finish using the product.
- After using the product, perform necessary cleaning first, store in a dry, ventilated environment, and avoid direct sunlight;
• This product is for home use only.
PRODUCT SPECIFICATIONS
Product number : PG-102A / HCG2000XXL
Rated voltage/frequency: 220\~240V/50HZ
Upper plate rated power: 1000W
Lower plate rated power : 1000W
Grill plate size: 343 x 233mm
Product size: 426mm x 338mm x 162mm
Package size: 480mm x 255mm x 430mm
Net weight: 6.4Kg
Gross weight: 8.0Kg
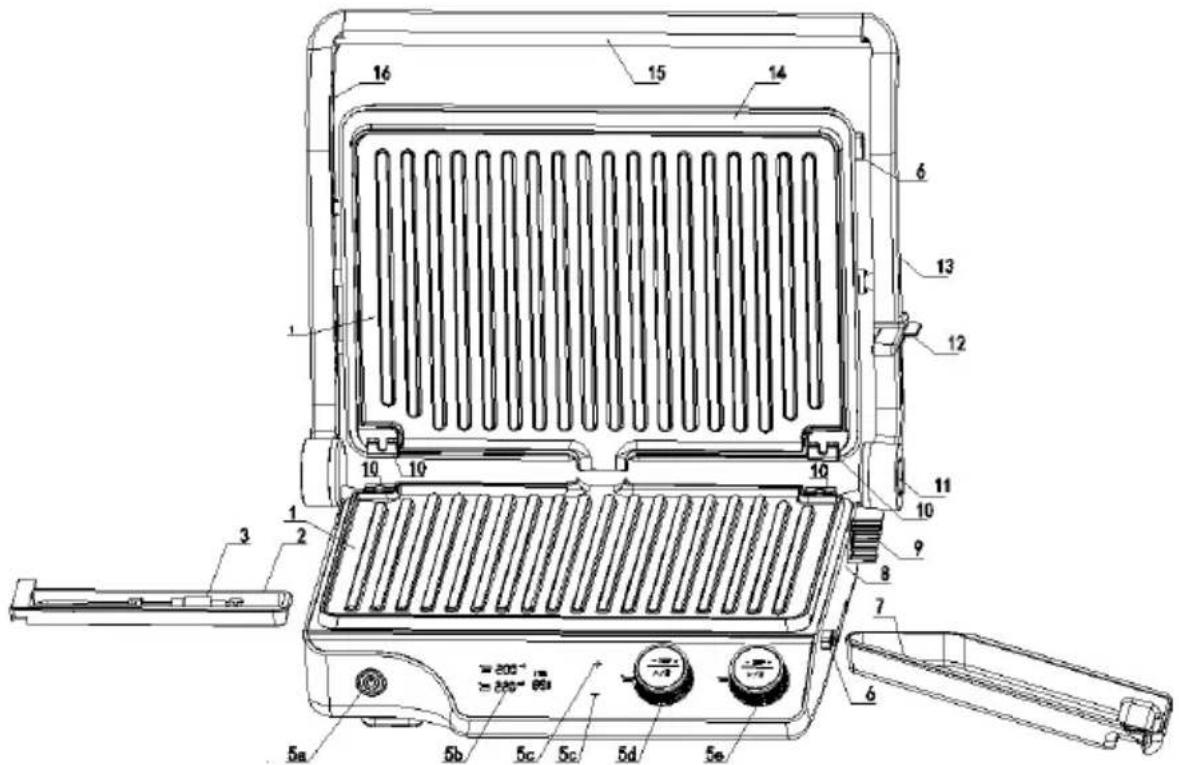
GRILL COMPONENTS
-
Grill plate
-
Steak probe box
-
Steak probe
-
Operation control part
5a. ON/OFF switch
5b. Digital display
5c. Time touch key >>for using in manual mode<<
5d. Upper plate temperature knob >>rotate to set temperature and press<< *Press before choosing temp. and you can set both plates at the same time!
5e. Lower plate temperature knob >>rotate to set temperature and press<<
GRILL COMPONENTS
- Grill plate release button
- Oil container
- Lower shell assembly
- Right shaft
- Fixture
- 180 Button >>press for positioning grill in 180 degrees mode<<
- Sliding lock >>lock or set height<<
- Right handle
- Upper shell assembly
- Handle
- Left handle
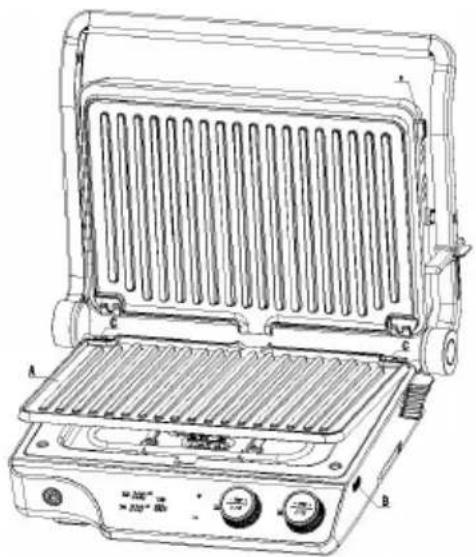
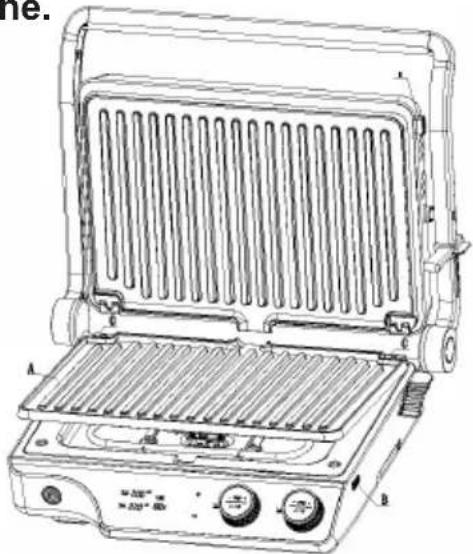
REMOVE/INSTALL GRILL PLATES
Attention: Make sure the pan is cool before taking it out. If you have just finished baking, you must use insulated gloves to prevent burns
natural_image
Line drawing of a grater with heat exchanger and control knobs (no text or symbols)- Put the upper and lower grill plates of the whole machine at 105 degrees or 180 degrees, press the grill plate release button B, the grill plate A will be released from the lock, and then take the grill plate out of the fixture C, as shown in the figure above.
- Assemble the grill plates, place the whole machine with the upper and lower grill plates open at 105 degrees or 180 degrees, insert the grill plate A with the gaps at both ends, insert the grill plates fixture C, and then place the grill plates on the reflective plate, press the grill plate A, when you hear a click, the grill plate is assembled
BEFORE USE
- Remove all packaging materials from this product.
- Before discarding the packaging materials, please check that all parts are not missing.
- Use hot water, dish-washing liquid and a non-abrasive sponge to clean the upper and lower grill plates, spatula and oil pan, and wait for the grill plate to dry before assembling.
- Put the oil pan on the bottom of the grill.
Note: When using the product for the first time, there is a slight smell or a short period of smoke, which is a normal phenomenon.
USING STEAK PROBE
- The food probe is only suitable for cooking steaks.
- Pull out the probe box from the left side of the grill, remove the food probe, and insert the terminal into the round hole at the lower end of the probe box, ensuring that it is inserted in place.
- The food probe is only suitable for cooking steaks. When inserting the food probe, align it with the center of the steak and insert it forcefully, about half the depth of the steak.
-
When using food probes, the upper and lower plates must be closed.
-
Operation steps:
a. Press the left knob and then rotate to 230 degrees.
b. Rotate right knob to choose program. At this time, the program number displays on the lower plate automatically.
c. Press right knob for start grilling!
Attention: If any of the 5 types of doneness is selected, it will cook according to the selected doneness. No other operation is required. When the food probe detects the selected doneness temperature, the machine will automatically turn off.
No. NAME CODE COOKING TEMP. COOKING TIME PROBE TEMP.
| 1 | Blue rare | 1 | 230 | 4 | 50 |
| 2 | Rare | 2 | 230 | 5 | 55 |
| 3 | Medium | 3 | 230 | 6 | 60 |
| 4 | Med. well | 4 | 230 | 7 | 65 |
| 5 | Well done | 5 | 230 | 8 | 73 |
FOOD GRILLING GUIDE
REMEMBER: When selecting same temperature for upper and lower plate, just press one of knob before temp. selection and you can set both plates with one knob.
REMEMBER: Don't forget to set time manually, otherwise grill won't start working.
NOTE: Table below is just for general guiding. Adjust temperatures in minutes according to your favorite taste!
No. NAME COOKING TEMP. COOKING TIME
| 1 | Bacon | 180 | 2 | ||
| 2 | Sausage | 180 | 3 | ||
| 3 | Sandwich | 180 | 3 | ||
| 4 | Chicken 230 | 5 | |||
| 5 | Fish | 210 | 6 | ||
| 6 | Vegetable 200 | 3 | |||
| 7 | Waffles | 210 | 5 | ||
| 8 | Shrimp | 200 | 3 | ||
| 9 | Potato | 230 | 7 | ||
| 10 | Tomato | 230 | 2 |
PROBLEMS AND MAINTENANCE
| No. | Common problems Reason | Approaches | |
| 01 | Multi-grill not working | The power cord is not plugged into a power outlet | Plug the power cord into a power outlet |
| 02 | Smoke between two grill plates | Residue left after last use | After each use, clean the upper and lower plates and oil pan to remove residue |
| 03 | Food is grilled too long (burned) or undercooked | After booting, the corresponding temperature is not adjusted according to the grilled food; the temperature of the machine can be adjusted | According to the grilled food, adjust the corresponding temperature and adjust the temperature to the highest position |
| 04 | Burnt toast | The toasting time is different between the cold machine state and the hot machine state, and the toasting time is longer in the cold machine state | In the hot state, shorten the time to bake bread. |
| 05 | After the machine has been working for a period of time, it suddenly stops with a "beep" sound; | The longest single working time of the timer of this product is 90 minutes; it will automatically shut down when it is overtime; | Re-boot; |
| 06 | Food cooked unevenly 1. | Different food sizes2. Different types of food3. When the plates are opened at 100°C & 180°C, the food is not turned over during the frying process. | 1. Consistent food size2. T e same food3. In the process of roasting and frying food, the food should be turned over. |
| 07 | Seared steak surface | Time is too long | Refer to the time set in the menu |
WARNING
Before cleaning, the power cord must be unplugged; stand by and cool the plate completely to avoid burns.
Do not immerse the power cord, plug or the entire appliance in water or other liquids.
When cleaning, do not use metal cleaning objects, such as cleaning balls and scouring pads.
When cleaning, do not use metal spatulas and scrapers to clean the grill plate.
After each use, wipe the inner and outer surfaces with a damp cloth or sponge; there is a charged body inside, so it cannot be soaked in water.
The plates can be immersed in water for cleaning; it can also be cleaned in the dishwasher.
When cleaning, you can add an appropriate amount of alkaline cleaning solution.
After all parts are cleaned, dry them with a clean rag to prevent oxidation and rust.
Finally, according to the correct steps, put the plates into the body for the next use.
THANK YOU AND ENJOY GRILLING WITH
Hisense
Hisense
natural_image
Line drawing of a standard 3D grill with heat exchanger and control knobs (no text or labels)SPÉCIFICATIONS DU PRODUIT
natural_image
Line drawing of a grating machine with heat exchanger and control knobs (no text or labels)natural_image
Line drawing of a grating machine with heat exchanger and control knobs (no text or symbols)UPORABA TERMOMETRA ZA HRANO
HVALA IN UŽIVAJTE V PEKI NA ŽARU S
Hisense
Hisense
KORISNIČKI PRIRUČNICI HCG2000XXL
POŠTOVANI KUPCI
- Ploča roštilja
- Kutija sonde za odrezak
- Sonda za odrezak
- Dio za upravljanje radom
5a. Prekidač za UKLJUČIVANJE/ISKLJUČIVANJE
5b. Digitalni zaslon
5c. Tipka za vrijeme >>za uporabu u ručnom načinu rada<<
5d. Gumb za temperaturu gornje ploče >>okrenite za podešavanje temperature i pritisnite<<
*Pritisnite prije odabira temp. i možete podesiti obje ploče istovremeno!
5e. Gumb za temperaturu donje ploče >>okrenite za podešavanje temperature i
DIJELOVI ROŠTILJA
- Gumb za otpuštanje ploče roštilja
- Posuda za ulje
- Sklop donjeg kućišta
- Desna osovina
- Elementi za učvršćivanje
- Gumb 180 >>pritisnite za pozicioniranje roštilja u načinu rada od 180 stupnjeva <<
- Klizna brava >>zaključavanje ili podešavanje visine<<
- Desna ručka
- Sklop gornjeg kućišta
- Ručka
- Lijeva ručka
UKLONITE/POSTAVITE PLOČE ROSTILJA
natural_image
Line drawing of a portable grater with heat exchanger and control knobs (no text or symbols)- Podesite gornju i donju ploču roštilja na 105 ili 180 stupnjeva, pritisnite tipku za otpuštanje ploče roštilja B, ploča roštilja A će se otpustiti iz brave, a zatim izvadite ploču roštilja iz elementa za pričvršćivanje C, kao što je prikazano na gornjoj slici.
- Sastavite ploče roštilja, podesite cijeli uređaj s gornjom i donjom pločom roštilja na 105 ili 180 stupnjeva, umetnite ploču roštilja A s rupama na oba kraja, umetnite element za učvršćivanje ploča roštilja C, a zatim postavite ploče roštilja na reflektirajuću ploču, pritisnite ploču roštilja A, kada čujete klik, ploča roštilja je sastavljena.
PRIJE UPORABE
HVALA VAM I UŽIVAJTE U ROŠTILJANJU S
Hisense
Hisense
UPUTSTVA ZA UPOTREBU HCG2000XXL
DRAGI KUPČE
- Ploča za gril
- Kutija sonde za odrezak
- Sonda za odrezak
- Deo za kontrolu rada
5a. Prekidač za uključivanje/isključivanje
5b. Digitalni ekran
5c. Taster na dodir za vreme >>za upotrebu u ručnom režimu<<
5d. Dugme za temperaturu gornje ploče >>okrenite da biste podesili temperaturu i pritisnite<<
*Pritisnite pre nego što izaberete temperaturu i možete podesiti obe ploče istovremeno!
5e. Dugme za temperaturu donje ploče >>okrenite da biste podesili temperaturu i pritisnite<<
DELOVI GRILA
- Dugme za otpuštanje ploče za gril
- Posuda za ulje
- Sklop donjeg kućišta
- Desna osovina
- Učvršćenje
- Taster 180 >>pritisnite za pozicioniranje grila u režimu 180 stepeni <<
- Klizna brava >>zaključavanje ili podešavanje visine<<
- Desna ručka
- Sklop gornjeg kućišta
- Ručka
- Leva ručka
UKLANJANJE/POSTAVLJANJE PLOČE ZA GRIL
Pažnja: Proverite da li je ploča hladna pre nego što je izvadite. Ako ste upravo završili sa pečenjem, morate koristiti izolovane rukavice kako biste sprečili opekotine.
natural_image
Line drawing of a grating machine with heat exchanger and control knobs (no text or symbols)- Stavite gornju i donju ploču grila uređaja na 105 ili 180 stepeni, pritisnite dugme za otpuštanje ploče grila B, ploča grila će se osloboditi iz brave A, a zatim izvadite ploču grila iz elementa C, kao što je prikazano na gornjoj slici.
2 Montirajte ploče za gril, postavite celi uređaj sa gornjom i donjom pločom za gril na 105 stepeni ili 180 stepeni, umetnite ploču za gril A sa razmacima na oba kraja, umetnite učvršćenje ploča za gril C, a zatim postavite ploče za gril na reflektujuću ploču, pritisnite ploču za gril A, kada čujete klik, ploča za gril je sastavljena. 68
PRE UPOTREBE
- Uklonite sav ambalažni materijal sa ovog proizvoda.
- Pre bacanja ambalažnog materijala, proverite sve komponente kako biste bili sigurni da ništa ne nedostaje.
- Koristite vruću vodu, tečnost za pranje posuđa i neabrazivni sunder da očistite gornju i donju ploču grila, lopaticu i posudu za ulje i sačekajte da se ploča grila osuši pre sastavljanja.
- Stavite posudu za ulje na dno grila.
Napomena: Prilikom prve upotrebe proizvoda javlja se blagi miris ili malo dima, što je normalna pojava.
KORIŠĆENJE SONDE ZA ODREZAK
- Sonda za hranu je pogodna samo za pripremu odrezaka.
- Izvucite kutiju sonde iz leve strane grila, uklonite sondu za hranu i umetnite terminal u okrugli otvor na donjem kraju kutije sonde, pazeći da je postavljen na mesto.
- Sonda za hranu je pogodna samo za pripremu odrezaka. Prilikom ubacivanja
sonde za hranu, poravnajte je sa središtem odreska i snažno umetnite, otprilike na polovinu dubine odreska. - Kada koristite sondu za hranu, gornja i donja ploča moraju biti zatvorene.
- Radni koraci:
a. Pritisnite levo dugme, a zatim okrenite na 230 stepeni.
b. Okrenite desno dugme da biste izabrali program. U tom trenutku, broj programa se automatski prikazuje na donjoj ploči.
c. Pritisnite desno dugme za početak roštiljanja!
HVALA VAM I UŽIVAJTE U ROŠTILJANJU SA
Hisense
Hisense
KORISNIČKI PRIRUČNICI HCG2000XXL
POŠTOVANI KUPČE
natural_image
Line drawing of a standard 3D grill with heat exchanger and control knobs (no text or labels)-
Podesite gornju i donju ploču roštilja na 105 ili 180 stepeni, pritisnite tipku za otpuštanje ploče roštilja B, ploča roštilja A će se otpustiti iz brave, a zatim izvadite ploču roštilja iz elementa za pričvršćivanje C, kao što je prikazano na gornjoj slici.
-
Sastavite ploče roštilja, podesite cijeli uređaj s gornjom i donjom pločom roštilja na 105 ili 180 stepeni, umetnite ploču roštilja A s rupama na oba kraja, umetnite element za učvršćivanje ploča roštilja C, a zatim postavite ploče roštilja na reflektirajuću ploču, pritisnite ploču roštilja A, kada čujete klik, ploča roštilja je sastavljena.
PRIJE UPÔTREBE
- Uklonite sav materijal za pakovanje s proizvoda.
- Prije bacanja ambalaže provjerite jesu li svi dijelovi tu.
- Koristite vruću vodu, tečnost za pranje posuđa i neabrazivnu spužvu da očistite gornju i donju ploču roštilja, lopaticu i posudu za ulje i sačekajte da se ploča roštilja osuši prije sastavljanja.
- Stavite posudu za ulje na dno roštilja.
Napomena: Prilikom prve upotrebe proizvoda javlja se blagi miris ili malo dima, što je normalna pojava.
UPOTREBA SONDE ZA ODREZAK
- Sonda za hranu je pogodna samo za pečenje odrezaka.
- Izvucite kutiju sonde s lijeve strane roštilja, uklonite sondu za hranu i umetnite priključak u okrugli otvor na donjem kraju kutije sonde, osiguravajući da je umetnut na mjesto.
- Sonda za hranu je pogodna samo za pečenje odrezaka. Prilikom umetanja sonde za hranu, poravnajte je sa središtem odreska i snažno umetnite, otprilike do polovine odreska.
-
Kada koristite sondu za hranu, gornja i donja ploča moraju biti zatvorene.
-
Radni koraci:
a. Pritisnite lijevo dugme, a zatim okrenite na 230 stepeni.
b. Okrenite desno dugme da biste izabrali program. U ovom trenutku, broj programa se automatski prikazuje na donjoj ploči.
c. Pritisnite desno dugme za početak pečenja na roštilju!
Pažnja: Ako je odabrana bilo koja od 5 vrsta nivoa pečenja, hrana će se peći prema odabranom nivou pečenja. Nije potrebna druga radnja. Kada sonda za hranu otkrije odabranu temperaturu nivoa pečenja, uređaj će se automatski isključiti.
| Br. | NAZIV | KOD | TEMP. PEČENJA | VRIJEME | PEČENJA | TEMP. SONDE |
| 1 | Blue rare | 1 | 230 | 4 | 50 | |
| 2 | Rare | 2 | 230 | 5 | 55 | |
| 3 | Medium | 3 | 230 | 6 | 60 | |
| 4 | Med. well | 4 | 230 | 7 | 65 | |
| 5 | Well done | 5 | 230 | 8 | 73 |
VODIČ ZA PEČENJE HRANE NA ROŠTILJU
ZAPAMTITE: Prilikom odabira iste temperature za gornju i donju ploču, samo pritisnite jedan od dugmadi prije odabira temperature i možete podesiti obje ploče pomoću jednog dugmeta.
ZAPAMTITE: Ne zaboravite ručno podesiti vrijeme jer u protivnom roštilj neće početi raditi.
NAPOMENA: Tabela u nastavku služi samo za okvirna uputstva. Podesite temperaturu u minutama prema svom omiljenom ukusu!
Br. NAZ IV TEMP. PEČENJA VRIJEME PEČENJA
1 Slanina 180 2
2 Kobasica 180 3
3 Sendvič 180 3
4 Piletina 230 5
5 Riba 210 6
6 Povrće 200 3
7 Vafli 210 5
8 Škampi 200 3
9 Krompir 230 7
10 Paradajz 230 2
| Br. | Uobičajeni problemi | Razlog | Metode |
| 01 | Višenamjenski roštilj ne radi | Kabal za napajanje nije priključen u utičnicu | Priključite kabal za napajanje u utičnicu |
| 02 | Dim između dvije ploče roštilja | Ostali su ostaci hrane nakon zadnje upotrebe | Nakon svake upotrebe očistite gornju i donju ploču i posudu za ulje kako biste uklonili ostatke |
| 03 | Hrana je prepečena (zagorjela) ili nedovoljno pečena | Nakon pokretanja, odgovarajuća temperatura nije podešena u skladu s hranom koja se peče; temperatura uređaja može se podesiti | U skladu s hranom koja se peče, podesite odgovarajuću temperaturu i podesite temperaturu na najviši položaj |
| 04 | Zagorjeli tost | Vrijeme tostiranja se razlikuje u zavisnosti od toga da li je uređaj hladan ili vruć, pa je vrijeme tostiranja duže ako je uređaj hladan | Kada je uređaj vruć, vrijeme pečenja kruha je kraće. |
| 05 | Nakon što je uređaj radio neko vrijeme, iznenada se zaustavlja i oglašava se zvučni signal; | Najduže pojedinačno radno vrijeme tajmera ovog proizvoda je 90 minuta; automatski će se isključiti kada dođe do prekovremenog rada; | Ponovo pokrenite; |
| 06 | Hrana je neravnomjerno pečena | 1. Različite veličine hrane2. Različite vrste hrane3. Kad su ploče podešene na 100 °C i 180 °C, hrana se ne okreće tokom postupka prženja. | 1. Odgovarajuća veličina hrane2. Ista vrsta hrane3. U procesu pečenja i prženja hrane, hranu treba preokrenuti. |
| 07 | Prepečen odrezak | Vrijeme pečenja je predugo | Pogledajte podešavanje vremena u meniju |
UPOZORENJE
Prije čišćenja, kabal za napajanje mora biti odspojen; sačekajte i potpuno ohladite ploču kako biste izbjegli opekotine.
HVALA VAM I UŽIVAJTE U ROŠTILJANJU S
Hisense
Hisense
MANUAL DE USUARIO HCG2000XXL
ESTIMADO CLIENTE
natural_image
Line drawing of a standard 35-inch grater with heat exchanger and control knobs (no text or labels)natural_image
Line drawing of a grating machine with heat exchanger and control knobs (no text or labels)- Грил плоча
natural_image
Line drawing of a portable grater with heat exchanger and control knobs (no text or symbols)426mm x 338mm x 162mm
480mm × 255mm × 430mm
Pesha neto:
6.4kg
Pesha bruto:
8.0kg
PËRBËRËSIT E SKARËS

natural_image
Line drawing of a standard 3D grill with heat exchanger and control knobs (no text or labels)The instructions should aid you in getting familiar with your new appliance. Please, read them carefully before using the appliance for the first time.
natural_image
Line drawing of a portable grater with heat exchanger and control knobs (no text or symbols)natural_image
Line drawing of a portable electric grill with heat exchanger and control knobs (no text or labels)480mm x 255mm x 430mm
6,4 кг
8,0 кг
ОПИСАНИЕ ПРИБОРА