SURQ 4 A1 - Smart Home SILVERCREST - Free user manual and instructions
Find the device manual for free SURQ 4 A1 SILVERCREST in PDF.

User questions about SURQ 4 A1 SILVERCREST
0 question about this device. Answer the ones you know or ask your own.
Ask a new question about this device
Download the instructions for your Smart Home in PDF format for free! Find your manual SURQ 4 A1 - SILVERCREST and take your electronic device back in hand. On this page are published all the documents necessary for the use of your device. SURQ 4 A1 by SILVERCREST.
USER MANUAL SURQ 4 A1 SILVERCREST
Operating instructions and safety instructions
Operating
BLUETOOTH®-WEKKERRADIO
BOLI/GOOTH - WERREKRADIO
Hud
RADIOVÝ BUDÍK S BLUETOOTH®
KADIOVY BUDIK'S BLUE
natural_image
Black silvercrest electronic device labeled A, connected to a plug and cable with a separate open book icon (D), no visible text or symbols on the device itself.https://www.targa.gmbh/downloads/conformity/364481_2010.pdf
- Trademarks 38
- Intended use....38
- Package contents 39
- Technical specifications .... 40
- Safety instructions .... 41
- Operating environment 46
- Copyright 47
- Overview of controls and button functions 47
8.1 Display....48
- Before you start....49
9.1 Wire antenna 49
9.2 Connecting the power adapter....49
- Getting started 49
10.1 Display lighting....49
10.2 Switching the device on/off....49
10.3. Adjusting the volume....50
10.4 Selecting the mode....50
10.5 Setting the date and time....50
10.5.1 Automatic setting via the RDS signal....50
10.5.2 Setting the time manually....50
10.6 SLEEP timer....52
10.7 NAP timer....52
10.8 Setting the alarm (Alarm)....52
10.9 Equalizer 54
10.10 DAB radio....54
10.10.1 Recalling stations....54
10.10.2 Recalling stations from favourites....54
10.10.3 Adjusting the display 55
10.10.4 Station search with automatic storage (AMS) 55
10.11 FM radio....55
10.11.1 Recalling stations 55
10.11.2 Adjusting the display 56
10.11.3 Station search with automatic storage (AMS) 56
10.11.4 Manual tuning....56
10.11.5Manually tuning a station....57
10.11.6 Toggling stereo/mono 57
10.12 Bluetooth ^® 57
10.13 AUX mode....58
10.14 Displaying the day of the week....58
10.15 Connecting headphones....59
10.16 Wireless charging....59
10.17 Charging a device with a USB charger cable....59
11. Settings....60
11.1 DAB Radio 60
11.1.1 FULL SCAN....60
11.1.2 SYSTEM 60
11.1.2.1 "AUTO TIME SYNC" (automatic clock synchronisation) 60
11.1.2.2 "SW VER" (Software Version) 60
11.1.2.3 "RESET" (Factory reset)....60
11.1.3 PRUNE (Clear up station list)....61
11.1.4 DRC (Dynamic Range Control) 61
11.1.5 MANUAL (Manual scan) 61
11.1.6 PRESET STORE (Save favourites) 61
11.2 FM radio....62
11.2.1 PRESET STORE (Save station)....62
11.2.2 SYSTEM....62
11.2.2.1 "AUTO TIME SYNC" (automatic clock synchronisation)....62
11.2.2.2 "SW VER" (Software Version) 62
11.2.2.3 "RESET" (Factory reset) 62
11.2.3 AUDIO SET (Toggling stereo/mono)....62
11.2.4 SCAN SET (Scan settings) 62
- Storage when not in use....63
- Troubleshooting 63
- Environmental regulations and disposal information....64
- Conformity notes 64
- Warranty and service information....65
Congratulations!
By purchasing the SilverCrest SURQ 4 A1 clock radio, hereinafter referred to as the radio, you have opted for a quality product.
Before first using it, familiarise yourself with the way the radio works and read these operating instructions through carefully. Be careful to follow the safety instructions and only use the radio as described in the operating instructions and for the applications given.
Keep these operating instructions in a safe place. If you pass the radio on to someone else, make sure to give them all the relevant documents with it.
1. Trademarks
The Bluetooth ^® wording and its logo are registered trademarks of Bluetooth SIG, Inc. (Special Interest Group). TARGA GmbH is using these marks under license.
The SilverCrest trademark and the SilverCrest brand are the property of their respective owners.
USB is a registered trademark of USB Implementers Forum, Inc.
"Qi" and the Qi logo are trademarks of the Wireless Power Consortium (WPC).
Other names and products may be the trademarks or registered trademarks of their respective owners.
2. Intended use
This device is a consumer electronics device. It has been designed to receive and play back analogue and digital radio stations and to charge up mobile devices. The device can also be used as an alarm clock and NAP timer. It is suitable only for private use, not for industrial or commercial purposes. The device may not be used outdoors or in tropical climates. The device fulfils all relevant standards. The manufacturer is not liable for any damage or problems caused by unauthorised modifications.
Observe the regulations and laws in the country of use.
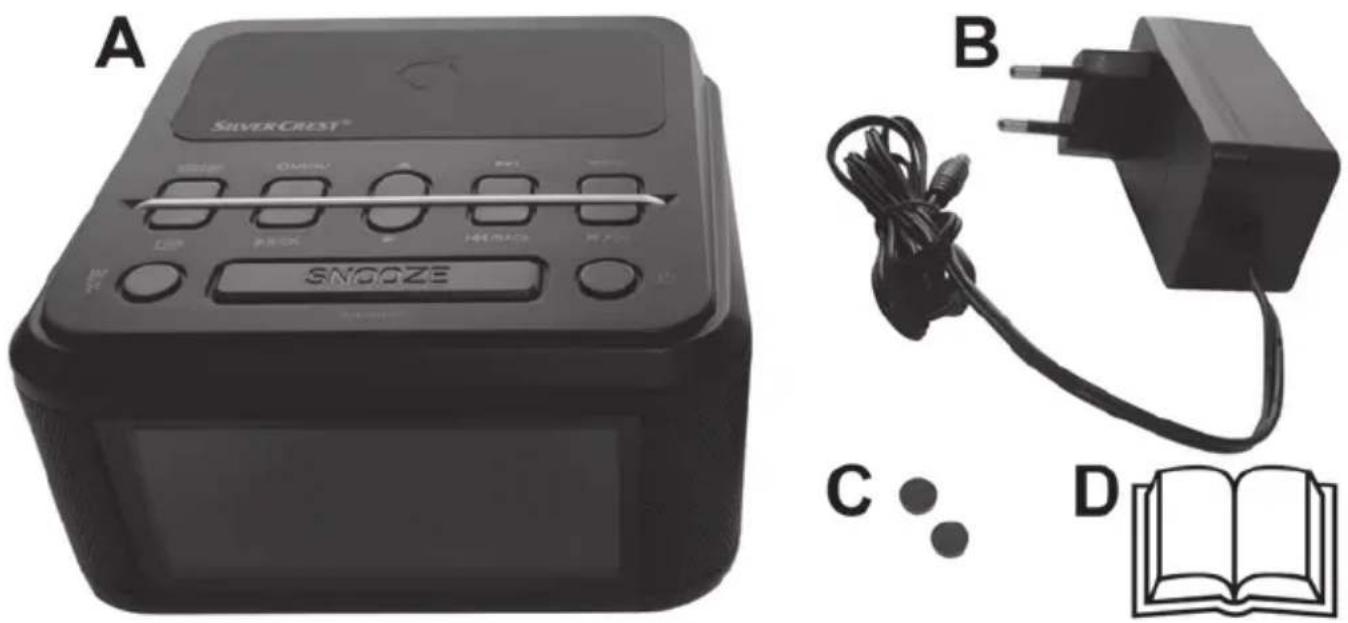
3. Package contents
Remove the device and all the accessories from the packaging. Remove all packaging material and check that all parts are complete and undamaged. If you find anything missing or damaged, please contact the manufacturer.
natural_image
Product display of SilverCrest brand electronic device (A) and charging plug (B/D) with cable and open book (C/D) nearby (no text or symbols on main components)A SilverCrest SURQ 4 A1 Alarm Clock Radio
B Power adapter
c 2 x silicone stoppers
D These operating instructions (line-art illustration)
4. Technical specifications

This information describes the technical characteristics of your device. Different national regulations may apply in different countries with respect to the frequency bands that are free for public use. Please note that receiving any information from bands outside these frequency bands may be illegal and punishable by law.
Radio
The rating plate can be found on the underside of the radio.
| Input voltage/current 9,0 V , 2,5 A |  |
| USB output voltage/current 5 V / 1 A | |
| Power consumption Standby in as-delivered condition: < 1 W *Operation: max. 8 W | |
| Output power 2 x 4 W RMS | |
| Qi charging power on normal charge 5 W | |
| Qi charging power on fast charge** 10 W | |
| QI frequency band 110 - 205 kHz | |
| FM frequency band 87.5 - 108 MHz | |
| DAB+ frequency band 174 - 240 MHz | |
| Station presets 60 (30 per reception band) | |
| Bluetooth® specification V. 5.0 | |
| Profiles supported A2DP / AVRCP | |
| Bluetooth® transmission power max. 10 dBm | |
| Bluetooth® frequency band 2.402 - 2.480 GHz | |
| Bluetooth® range | max. 10 metres (in optimum conditions) |
| Connectors and sockets | Headphones: 3.5 mm stereo jackAUX IN: 3.5 mm stereo jackUSB charging outlet |
| Dimensions (W x H x D) | approx. 150 x 84 x 150 mm |
| Weight (incl. power adapter) | approx. 780 g |
| Operating temperature | 5 °C to 40 °C |
| Operating humidity | max. 85 % rel. humidity |
| Permissible storage conditions | 0°C to 40°C, max. 85% rel. humidity |
* The display brightness setting on delivery (lowest level) meets the ecodesign requirement. All other brightness settings increase power consumption.
** Your mobile device must support this feature.
Power adapter
| Vendor, register of commerce number, address | TARGA GmbH / HRN: 12035Coesterweg 45, 59494 Soest, Germany |
| Manufacturer Dong Guan Reyi Power Electronics Co., Ltd. | |
| Type RY36A090250EU | |
| Input 100-240 V | ~, 50/60 Hz |
| Current consumption 1 A | |
| Output power 22,5 W | |
| Output 9,0 V , 2,5 A | [BYDZ]  |
| Average efficiency when in use 88.1 % | |
| Efficiency at low load (10%) 87.7 % | |
| Power consumption at zero load 0,07 W | |
| Safety class |  |
| Degree of protection IP20 (Protected against solid foreign bodies with diameter ≥ 12.5 mm) | |
The technical data and design may be changed without prior notice.
5. Safety instructions
Before using this device for the first time, please read the following instructions carefully and take note of the safety warnings, even if you are familiar with the use of electronic devices. Keep these operating instructions in a safe place for future reference. If you sell the device or pass it on, it is essential that you also hand over these operating instructions. They are an integral part of the product.
Explanation of symbols used

DANGER! This signal word indicates a danger with a high risk, which could lead to death or major injuries if not avoided.

WARNING! This signal word indicates a danger with a moderate risk, which can lead to death or major injuries if not avoided.

ATTENTION! This signal word indicates a danger with a low risk, which can lead to minor or moderate injuries if not avoided.

CAUTION! This symbol indicates important instructions to protect against damage to property.

This symbol denotes possible danger due to electric shock.

This symbol on the device indicates that the operating instructions must be observed. Please only use the supplied power adapter (manufacturer: Dong Guan Reyi Power Electronics Co., Ltd./ Type designation: RY36A090250EU) to power the radio.

This symbol denotes further information on the topic.

AC voltage

DC voltage

Power adapter polarity
A short-circuit protected, sealed safety transformer is built into the power adapter.
ta=40°C
This indicates the maximum ambient temperature at which the power adapter can be operated.

Efficiency class VI

The power adapter is a switchable power adapter.

Use only in dry, indoor areas

Protection Class II

text_image
WARNING!DANGER OF ELECTRIC SHOCK!
DO NOT OPEN THE DEVICE!

DANGER! Personal safety
This device may be used by children older than 8 years as well as by persons with physical, sensory or mental impairments or persons without sufficient knowledge or experience, providing they are supervised or they have received instructions regarding the proper use of the device and they understand the associated risks. This device is not a toy. Small parts can represent choking hazards. If small parts are swallowed, seek medical help immediately. The product must not be cleaned or maintained by unsupervised children. Keep the packaging out of the reach of these people. Packaging material is not a toy!

There is a risk of suffocation!

DANGER! Power adapter

Please only use the supplied power adapter for the product. Only plug the power adapter into a suitable and easily accessible power socket. Do not touch the power adapter with wet hands. This could cause an electric shock. The power adapter automatically adjust to the relevant mains frequency (50 Hz or 60 Hz).
To unplug the power adapter from the mains socket, always hold its casing and never pull from the cable. Unplug the power adapter from the mains in the following circumstances:
■ in any dangerous situation.
■ if the radio or the power adapter makes an unusual noise or gives off smoke.
■ before a storm and/or thunderstorm.
■ if the power adapter is damaged.
■ if the power adapter has been exposed to rain, liquids or high levels of humidity.
■ before a prolonged absence, e.g. holiday.
■ when you wish to clean it.
Please follow these instructions to avoid risk of potential fatal injury or fire! Never cover the power adapter, otherwise there is a risk of fire. Never open the housing on the power adapter. This could result in potentially fatal electrocution. Please only use the power adapter with the SilverCrest SURQ 4 A1 radio.

WARNING! Radio interface
Turn the device off when on board an aircraft, in a hospital, in an operating theatre or in the vicinity of electronic medical equipment. The RF signals may interfere with the functionality of sensitive devices. Keep the device at least 20 cm (8 inches) away from pacemakers or implanted defibrillators, as the RF signals could interfere with their functionality. The RF signals transmitted can interfere with hearing aids. If wireless mode is switched on, do not place the device near flammable gases or in a potentially explosive area (e.g. a paint shop), as the RF signals transmitted could cause explosions or fire. The range of the radio frequency signals depends on environmental conditions. If data is transmitted via a wireless connection, it can also be received by unauthorised parties. Targa GmbH is not liable for any interference caused to RF or TV signals through unauthorised modification to this device. Furthermore, Targa accepts no liability for replacing any cables or devices that have not been specifically approved by Targa GmbH. The user is solely responsible and liable for remedying any interference caused by such unauthorised modification of this device or for replacing the device.

WARNING! Make sure that:
■ there is free circulation of air (do not place the device on shelves, on a carpet, on a bed, or anywhere that obstructs the ventilation slots and leave at least 10 cm clearance on all sides)
- contact with water spray and drops and aggressive fluids is avoided and the device is never operated near water. the device is never submerged (do not place any items containing liquids, such as drinks, vases, etc. on or near the device).

WARNING! Cables
Always handle the cables by the connector and do not pull on the cables themselves. Do not touch the connector with wet hands. Never place heavy objects or furniture on the cables and take care that the cable does not become trapped, especially near the plug and sockets. To avoid damaging them, never install the cables around hot or sharp objects. Never tie knots in cables and do not tie them to other cables. All cables must be positioned so that nobody can trip over them or be obstructed by them.

ATTENTION! Repairs
Maintenance work is required if this device has been damaged in any way, for example, if the power adapter or device housing is damaged, if liquids or objects have penetrated the device or if the product has been exposed to rain or moisture. Servicing is also necessary when the product does not perform normally or if it has been dropped. If you notice any smoke, unusual noise or strange smells, switch off the device immediately and pull the power adapter from the power supply. If this occurs, the device should not be used before it has been inspected by authorised service personnel. All servicing work must be carried out by qualified specialist personnel. Never open the housing of the device.

WARNING! Cleaning
Disconnect the device from the mains. Only use a clean, dry cloth for cleaning the radio. Never use any corrosive liquids. Never open the housing of the device. Doing so will void the warranty.
WARNING! Risks associated with high volumes
Be careful when using headphones. Listening to high-volume audio for long periods can damage your hearing. Adjust the volume to the lowest setting before putting on the headphones.

Attention! Make sure that:
■ no naked flames (e.g. burning candles) are placed on or near the device
■ no foreign bodies can penetrate into the device
■ the device is not subject to major great temperature fluctuations as this can cause condensation and short-circuits. If the device has been exposed to extreme temperature fluctuations, wait for it to reach the ambient temperature before switching it on (about 2 hours).

Caution! Make sure that:
■ the device is not exposed to direct heat sources (e.g. radiators)
■ the device is not exposed to direct sunlight or bright artificial light
■ the device is not placed near magnetic fields (e.g. speakers)
■ no metal objects are placed on the Qi charging base (16)
■ the device is not subjected to excessive shocks or vibrations.
Note on mains disconnection
The [b] button (7) does not disconnect the device from the mains fully. The power adapter consumes electricity even in standby mode. In order to completely disconnect the device from the mains, the power adapter must be pulled out from the mains socket.
6. Operating environment
The device is not designed for use in environments with high temperatures or humidity (e.g. bathrooms) or those with above-average levels of dust. Operating temperature and operating humidity: 5 to 40°C, max. 85% relative humidity.
7. Copyright
All the contents of this user manual are protected by copyright and provided to the reader for information only.
Copying data and information without the prior explicit written consent of the author is strictly forbidden. This also applies to any commercial use of the contents and information.
All texts and diagrams are up-to-date as of the date of printing.
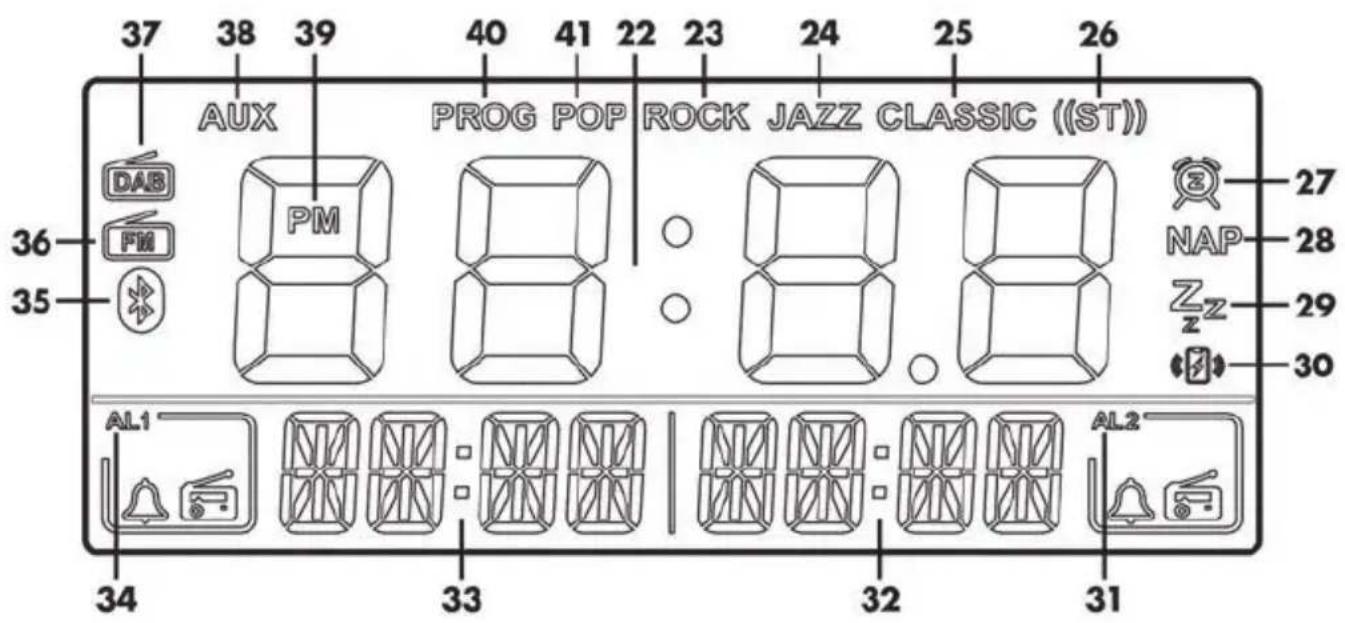
8. Overview of controls and button functions
These operating instructions have a fold-out cover. Fold-out the cover so you can refer to the relevant controls at any time.
1 Display
2 Speakers
3 [▲button (ascending selection)
4 [▶]button (station scan upwards - manual or automatic; next)
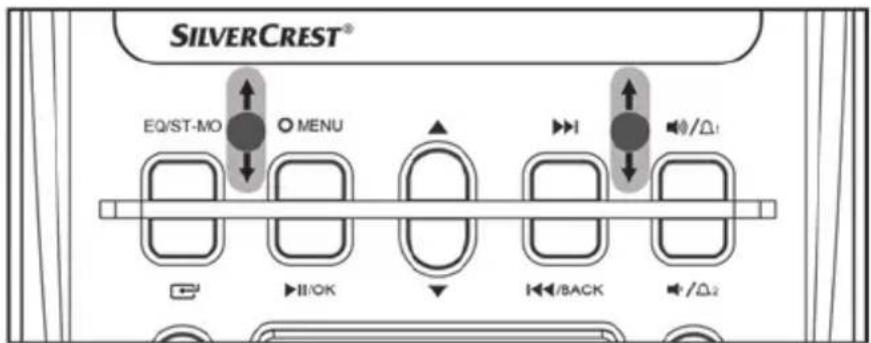
5 [■] button (increase volume, alarm 1)
6 [■button (reduce volume, alarm 2)
7 [button (ON/STANDBY)
8 [1] button (station scan downwards - manual or automatic; previous)
9 [ ] button (decreasing selection)
10 [SNOOZE] button (snooze alarm/display brightness)
11 [▶] button (start or pause playback; confirm settings)
12 [Z/NAP] button (sleep timer, NAP timer)
13 [button (mode selection)
14 [EQ/ST-MO] button (equalizer, stereo/mono)
15 [∅ button (menu, information on current station)
16 QI charging base
17 Wire antenna
18 AUX IN jack
19 Headphone jack
20 Power adapter connection
21 USB connection 5 V/1 A (for charging mobile devices)
8.1 Display
text_image
37 38 39 40 41 22 23 24 25 26 AUX PROG POP ROCK JAZZ CLASSIC ((ST)) DAB PM NAP 27 FM 28 35 36 37 38 39 40 41 22 23 24 25 26 AL1 AL2 34 33 32 31Time
Equalizer settings [ROCK]
Equalizer settings [JAZZ]
Equalizer settings [CLASSIC]
Stereo reception (FM radio)
SNOOZE function enabled
NAP timer enabled
SLEEP timer enabled
Qi (wireless charging)
Alarm 2 active (⚠ Alarm type alarm sound / ⚡ Alarm type radio)
Display alarm time 2 (volume, radio frequency, station name, remaining time, etc.)
Display alarm time 1 (volume, radio frequency, station name, remaining time, etc.)
Alarm 1 active (⚠ Alarm type alarm sound / - Alarm type radio)
Bluetooth®
FM radio
DAB radio
AUX mode
PM (indicates afternoon in 12-hour time mode)
PROG (store stations)
Audio settings [POP]
9. Before you start
Position the device on a stable, flat surface and do not place any heavy objects on it.
9.1 Wire antenna
A wire antenna (17) can be found on the rear of the device. It is wound up on delivery. Unwind it completely to improve the reception on the radio.
9.2 Connecting the power adapter
Connect the connector of the power adapter (B) supplied into the power adapter connection (20) on the back of the radio. Plug the power adapter (B) into an easily accessible mains socket. "SYNC" appears at the bottom of the display (1). When it is first started up and after a reset, the device automatically displays the correct time, then scans for all available stations in the DAB and FM frequency bands and saves them. This process may take a few minutes.
Note: To start this process after resetting the device, unplug the power plug and then plug it in again after the display has turned off completely.

If there RF interference or the reception conditions are not favourable, e.g. in buildings with thick walls, the reception of the time signal via DAB+ or RDS can be impaired or even impossible. In this case, you can set the time manually as described in the chapter "Manual time setting".

The default settings and saved radio stations are stored permanently and automatically restored after a power cut.
The time is updated via DAB+ or RDS after a power cut.
10. Getting started
10.1 Display lighting
You can adjust the display brightness to your needs in 3 steps. To do this, press the [SNOOZE] button (10) multiple times until the display is the brightness you want.
Press and hold the [SNOOZE] button (10) for approx. 2 seconds to switch the display (1) off. The display (1) switches to the lowest brightness level for about 10 seconds as soon as a button is pressed. Press the [SNOOZE] button (10) briefly to switch the display (1) back on permanently.
10.2 Switching the device on/off
Press the [💡] button (7) briefly to switch the radio on. Press the [💡] (7) button briefly to switch the device into standby mode.
10.3. Adjusting the volume
When the device is switched on, you can adjust the volume from "00" (minimum volume) to "32" (maximum volume). Press the [ ] button (5) to increase the volume or press the [ ] button (6) to lower the volume.
10.4 Selecting the mode
Press the [←] button (13) several times to toggle through the different modes. The current mode is shown on the display (1). The following modes are available: DAB radio 5, FM radio [ ] (36), Bluetooth® 9, and AUX mode [AUX] (38).
10.5 Setting the date and time
10.5. 1 Automatic setting via the RDS signal
The radio alarm clock has an automatic time display. The date and time are set automatically after it is first connected to the mains. The "SYNC" indicator on the display (1) indicates that the radio alarm clock is waiting for the date and time signal. After receiving the signal, the display (1) shows the current time.

Due to high-frequency interference and unfavourable reception conditions, e.g. in heavily shielded buildings, the reception of time signals may be limited or not possible at all. In this case, you can set the time manually as described in the chapter "Manual time setting".
10.5.2 Setting the time manually
In addition to the automatic setting of the time, it is also possible to set the time manually. This can be useful if the RDS signal cannot be received for some reason:
- In standby mode, press and hold the [○MENU] button (15) for approx. 2 seconds until the display setting switches from the current time to "24H" or "12H". Now press [▲] (3) or [▼] (9) to switch between 12 and 24-hour mode. Confirm your selection by pressing the [●(15)or[▶]button (11).
- The hours start flashing. Set the correct hour using the [▲] (3) or [▼] (9) buttons. Confirm your selection by pressing the [∅(1,5),or[ ] button(1,1).
- The minutes start flashing. Set the correct minute using the [▲] (3) or [▼] (9) buttons. Confirm your selection by pressing the [○(15)or [ ] button (1k1).
- The day of the week starts flashing. Set the correct day of the week using the [▲] (3) or [▼] (9) buttons based on the table below and then confirm your selection by pressing the [○MENU] (15) or ▶ button.
| d-1 | Monday |
| d-2 | Tuesday |
| d-3 | Wednesday |
| d-4 | Thursday |
| d-5 | Friday |
| d-6 | Saturday |
| d-7 | Sunday |
Next, you can set a time period every day during which the display is automatically set to the lowest level.
- "AUTO DIM" appears at the bottom of the display, and "ON" or "OFF" flashes above it.
- If you do not wish to use the function, use the [▲] (3) or [▼] (9) buttons to select "OFF" and confirm your selection by pressing the [○ MENU] (15) or [▶II/OK] (11) button.
or
- If you wish to use the function, use the [▲] (3) or [▼] (9) buttons to select "ON" and confirm your selection by pressing the [○MENU] (15) or [▶II/OK] (11) button.
- "DIMSTART" appears at the bottom of the display, and a default start time above it. The hours start flashing. Set the hours you want using the [▲] (3) or [▼] (9) button. Confirm your selection by pressing the [□] (15) or [ ] button (11).
- The minutes start flashing. Set the minutes you want using the [▲] (3) or [▼] (9) buttons. Confirm your selection by pressing the [○MENU] (15) or [▶II/OK] button (11).
- "DIM ENDS" appears at the bottom of the display, and a default end time above it. The hours start flashing. Set the hours you want using the [▲] (3) or [▼] (9) button. Confirm your selection by pressing the [●] (15) or [ ] button (1k1).
- The minutes start flashing. Set the minutes you want using the [▲] (3) or [▼] (9) buttons. Confirm your selection by pressing the [Φ(15)] or [ ] button (1k1). You have finished setting the display brightness dimming time.
Manual time setting is now complete and the set time is shown on the display (1).
10.6 SLEEP timer
The SLEEP timer function lets you set a time of between 5 and 120 minutes, after which the radio will automatically switch into standby mode. The procedure is as follows:
- While the device is powered on, press the [zz/NAP] button (12). The number of minutes increases every time you press the [zz/NAP] button (12). You can select a value of 5, 10, 15, 30, 60, 90 or 120 minutes. The “SLP OFF” option disables the sleep timer.
- If the SLEEP timer is active, the corresponding symbol [716] (29) is shown on the display (1).
- While the SLEEP timer is active, you can press the [ ^2 /NAP] button (12) once to check the remaining time or several times to change it. The remaining time reads at the bottom of the display (1).
• After the set time has elapsed, the radio automatically switches to standby mode.
10.7 NAP timer
You can set a one-off NAP timer (alarm sound only). The alarm time can be selected in 1 minute increments between 1 minute and 120 minutes:
- In standby mode, press the [ ^zz /NAP] button (12) until the alarm time you want is shown on the display (1). This allows you to change the settings in 5-minute intervals. After "120" (120 minutes), the "OFF" option appears. This option deactivates the NAP timer.
- You can adjust the alarm time in 1 minute increments by pressing the [▲] (3) and [▼] (9) buttons.
- If the NAP timer is active, the corresponding [NAP] symbol (28) is shown on the display (1).
- Once the set time has expired, an alarm sounds; this can be switched off by pressing any button.

The alarm volume starts very low and gets louder until the maximum volume is reached.

While the NAP timer is active, you can disable the NAP timer by pressing the [7/NAP] button (12).
10.8 Setting the alarm (Alarm)
You can set up to two alarm times (alarm 1 and alarm 2). You can select an alarm tone or the radio station last played for both alarms. Use the [ ] button (5) for alarm 1 and the [ ] button (6) for alarm 2. Check that the clock is displaying the correct time.
Please note that when using the radio as an alarm, the last frequency set is always played.
- In standby mode, press and hold the [ / _1] button (5) or [ / _2] button (6) for approx. 2 seconds in order to adjust the alarm time. The hours of alarm time 1 (33) or alarm time 2 (32) flash on the display (1).
- You can now use the [▲] (3) and [▼] (9) buttons to adjust the hours of the alarm time. To adopt the setting, briefly press the [▶II/OK] button (11) or the [◀/△1] button (5) or the button [◀/△2] (6). The minutes of alarm time 1 (33) or alarm time 2 (32) flash on the display (1).
- You can now set the minutes for the alarm time you want using the [▲] (3) and [▼] (9) buttons. To adopt the setting, briefly press the [▶II/OK] button (11) or the [◀/△1] button (5) or the button [◀/△2] (6). The day of the week of alarm time 1 (33) or alarm time 2 (32) flashes on the display (1).
- You can now use the [▲] (3) and [▼] (9) buttons to adjust the days on which the alarm should sound. The following settings are available.
1T (once)
1-7 (Monday through Sunday)
1-5 (Monday through Friday)
6-7 (Saturday and Sunday)
To adopt the setting, briefly press the [▶II/OK] button (11) or the [◀/△] button (5) or the button [◀/△2] (6). The alarm type of alarm time 1 (33) or alarm time 2 (32) flashes on the display (1).
- You can now set the type of alarm you want using the [▲] (3) and [▼] (9) buttons. The following settings are available.
BB (Alarm sound)
DAB (DAB radio)
FM (FM radio)
To adopt the setting, briefly press the [▶II/OK] button (11) or the [◀/△1] button (5) or the button [▶/6]. The volume of alarm time 1 (33) or alarm time 2 (32) flashes on the display (1).
- You can now set the alarm volume you want using the [▲] (3) and [▼] (9) buttons. You can set it from level "08" (minimum volume) to level "32" (maximum level). To adopt the setting, briefly press the [▶] button (11) or the [ ] button (5) or the button [ ] (6).
The alarm clock is now programmed and activated. The alarm times set are shown on the display (1) via the Alarm time 1 (33) and Alarm time 2 (32) indicators.
If the alarm is enabled, the display (1) indicates alarm 1 active (34) or alarm 2 active (31), also showing the alarm type selected, either [ ] alarm sound or [ ] radio playback.
You can activate or deactivate a pre-set alarm simply by pressing the [▶/△] button (5) or the [▶button (6) one or more times. The alarm type selected is shown in the display:
- (Alarm sound)
- (Radio playback)
- No indication with alarm 1 active (34) or alarm 2 active (31) means that no alarm is activated.

When the alarm sounds, you can disable it at any time by using the [button (7). Press the [SNOOZE] button (10) to pause the alarm for approx. 9 minutes. After this time, the alarm continues to sound. During this time, the [symbol (27) flashes on the display (1), as does alarm 1 active (34) or alarm 2 active (31).

The volume of the alarm starts low and gradually increases until the set volume is reached.

If the radio station cannot be received, 'DAB alarm' is automatically switched to 'Alarm sound' and 'FM alarm' will be noise with no station.
10.9 Equalizer
You can toggle through the following equalizer settings during music playback by pressing the [EQ/ST-MO] button (14). The selected equalizer setting is then shown at the top of the display (1). If no equalizer setting is shown, the audio is played with the default settings.
| POP (41) |
| ROCK (23) |
| JAZZ (24) |
| CLASSIC (25) |
10.10 DAB radio
When the radio is switched on, press the [←] button (13) several times until [DAB] (37) is shown on the display (1).
10.10.1 Recalling stations
You can recall stations you have saved to your station list as follows:
- Use the [▶▶] (4) and [◀◀/BACK] (8) buttons to toggle between the saved stations.
10.10.2 Recalling stations from favourites
You can recall stations you have saved to your favourites (see Chapter "11.1.6 PRESET STORE (Saving favourites)) as follows:
- Use the [▲] (3) and [▼] (9) buttons to toggle between your favourite stations.
10.10.3 Adjusting the display
The name of the radio station is shown on the bottom edge of the display (1). Press the [Φ MENU button (15) several times to adjust the display:
| Radio station |
| Radio text |
| Signal strength |
| Genre |
| Group |
| Frequency |
| Signal error |
| Bit rate |
| Transmission type |
| Time |
| Date |
10.10.4 Station search with automatic storage (AMS)
The easiest way to search and store stations is the automatic station search with automatic station storage (AMS function).
- While the radio is switched on, press and hold the [▶//OK] button (11) for approx. 2 seconds to activate the station search with automatic storage (AMS).
- With this function, any stations found are saved automatically in alphabetical order.

The unit only scans for DAB or for FM stations, depending on the mode selected.

Please note that any station presets already used will be overwritten.
10.11 FM radio
When the radio is switched on, press the [←] button (13) several times until [→] (36) is shown on the display (1).
10.11.1 Recalling stations
You can recall stations you have saved to your station list as follows:
- Use the [▲] (3) and [▼] (9) buttons to toggle between the saved stations.
10.11.2 Adjusting the display
The name of the radio station is shown on the bottom edge of the display (1). Press the [O MENU button (15) several times to adjust the display:
| Preset* / Frequency |
| Radio text |
| Genre |
| Radio text |
| Mono/ Stereo |
| Time |
| Date |
* Only if the station has already been saved.
10.11.3 Station search with automatic storage (AMS)
The easiest way to search and store stations is the automatic station search with automatic station storage (AMS function).
- While the radio is switched on, press and hold the [▶II/OK] button (11) for approx. 2 seconds to activate the station search with automatic storage (AMS).
- With this function, any stations found are saved automatically in increasing frequency order.

The unit only scans for DAB or for FM stations, depending on the mode selected.

Please note that any station presets already used will be overwritten.
10.11.4 Manual tuning
This function allows you to manually search for a strong station in FM radio mode without automatically saving it.
- Press and hold the [▶▶] (4) or [◀◀/BACK] (8) button for approx. 2 seconds to launch the station scan in the selected direction. The search stops at the next station found.
10.11.5 Manually tuning a station
As well as the automatic station search, in FM radio mode you can also tune in a station manually. This makes it possible to find even weaker stations. Proceed as follows:
- Briefly press the [▶▶] (4) or [◀◀/BACK] (8) button to increase or reduce the frequency by one step (0.05 MHz).
- When the end of the frequency band is reached, the search continues at the other end.
10.11.6 Toggling stereo/mono
Press and hold the button [EQ/ST-MO] for about 2 seconds to toggle playback between "Stereo" and "Mono". "Stereo" or "Mono" is briefly shown on the display (1). If you have selected "Stereo" and a station is received in stereo, then the ((ST)) symbol (26) is shown on the display (1).

Change the setting to "Mono" to reduce noise on weak stations.
10.12 Bluetooth®
Via Bluetooth ^® , you can pair a Bluetooth ^® -compatible music player (such as a smartphone or MP3 player) with the radio. After pairing, you can play the music on the radio and control basic player functions remotely using the buttons on the radio.
Proceed as follows to pair the radio with your mobile phone or player:
- When the radio is switched on, press the [←] button (13) several times until [®] (35) is shown on the display (1).
- "PAIRING" flashes on the bottom edge of the display (1) and pairing mode is active for approx. 15 minutes. If no device is paired during this time, the radio switches off.
- Now pair your mobile phone or music player to the radio via Bluetooth®. Please read the operating instructions of your mobile phone. From the list of devices found, select "SURQ 4 A1" and establish the connection. If you are prompted to enter a PIN, use "0000".
- The radio beeps to confirm the pairing and "CONNECT" is shown on the display (1).
- You can now start playback from your Bluetooth ^ device. The radio starts playing the audio.

When it is switched on, the radio automatically reconnects to the last-paired Bluetooth ^® device. To pair the radio with a different Bluetooth ^® device, you first need to disconnect the existing connection from your mobile phone. Please read the operating instructions of your mobile phone. The radio is then in pairing mode.
The radio buttons have the following functions in Bluetooth ^® mode:
| Button | Function |
| [▶]1(14) Playback/Pause | |
| [▶](4) Next title | |
| [▶](8) Start of track/Previous track | |
| [▶]/△·] ( 5 ) | l n c r e a |
| [▶](6)2 Reduce volume | |
| [EQ/ST-MO] (14) Select equalizer settings | |
s e v o l
10.13 AUX mode
Use this mode to play music from an external audio source on your radio. Proceed as follows:
- When the radio is switched on, press the [☐] button (13) several times until [AUX] (38) is shown on the display (1).
- Use a 3.5 mm jack-type audio cable (not supplied) to connect your audio source to the AUX/IN port (18) on the radio.
- Start playback on your audio source. All playback functions have to be controlled directly from your audio source. You can also set the volume on the radio.
10.14 Displaying the day of the week
In standby mode, briefly press the [O MENU] button (15) to display the day of the week. The day of the week is now shown on the display (1) for a few seconds. Please refer to the table below:
| d-1 | Monday |
| d-2 | Tuesday |
| d-3 | Wednesday |
| d-4 | Thursday |
| d-5 | Friday |
| d-6 | Saturday |
| d-7 | Sunday |
10.15 Connecting headphones
Be careful when using headphones. Listening at a high volume can damage your hearing.
You can connect headphones (not supplied) with a 3.5 mm jack connector to the headphones jack (19). The speakers (2) are switched off if headphones are connected.
10.16 Wireless charging

Your mobile device must support the Qi standard to allow wireless charging.

Your mobile device can charge faster in standby mode than with the radio switched on. Your mobile device must support this feature.
Proceed as follows to charge your mobile device:
- Place your mobile device centrally on the Qi charging base (16). It will start to charge automatically. The [icon] symbol (30) is shown on the display (1) during the charging process.
- If you use a case for your mobile device, it can hamper the charging process. Remove the case before charging the device.

Large mobile devices or those with smooth surfaces can sometimes slide off the Qi charging base (16). If this happens, place the two self-adhesive silicone stoppers (C) parallel to one another under the QI charging base (16). Stick the silicone stoppers (C) in the marked area depending on the size of your mobile device, as shown in the diagram below. To charge your mobile device, place it centrally on the Qi charging base (16), touching the silicone stoppers (C).
text_image
SILVERCREST® EQ/ST-MO ○ MENU ▶II/OK ▶I/BACK ▶/Ω110.17 Charging a device with a USB charger cable
You can also charge your mobile device with a USB charger cable. Only devices with a USB A plug charging cable can be charged. The procedure is as follows:
• Use the original USB charging cable from the respective device manufacturer.
- Connect the USB-A connector on your USB charger cable to the USB port (21) on the radio.
- Connect the other end of the USB charger cable to the charging port on the device you wish to charge. Charging starts automatically.
- Disconnect the USB charger cable from the radio and your mobile device to stop charging.

You can charge a mobile device on the QI charging base (16) and another with a USB charger cable at the same time.
11. Settings
The menu allows you to configure further settings. Press and hold the [○ MENU] button (15) for approx. 2 seconds to access the menu. Depending on the DAB radio or FM radio mode selected, different settings are available. Within the menu, you can navigate with the [▲] (3) and [▼] (9) buttons. Press the [▶II/OK] button (11) briefly to confirm your selection. To go back one step in the menu, press the [◀button (8) briefly.
11.1 DAB Radio
11.1.1 FULL SCAN
The device searches for all available DAB stations. They are saved in the DAB station list. You can select the stations from this list using the [▶▶] (4) and [◀◀/BACK] (8) buttons to go up and down in the list starting from the station currently selected.
Please note that stations found are not automatically added to the favourite list.
11.1.2 SYSTEM
11.1.2.1 "AUTO TIME SYNC" (automatic clock synchronisation)
Select one of the following options: "UPDATE FROM ANY" (update from DAB and FM), "UPDATE FROM DAB" or "UPDATE FROM FM" to enable automatic clock synchronisation. Select "NO UPDATE" to disable it.
The station selected must support automatic time synchronisation in order for this function to work.
11.1.2.2 "SW VER" (Software Version)
Displays the software version of your radio.
11.1.2.3 "RESET" (Factory reset)
Here you can restore the factory-default settings of your device. This will erase all custom settings (station presets, alarm times, etc.) on your device.
11.1.3 PRUNE (Clear up station list)
This function allows you to prune a station list that was created by a station scan. This can be useful if some station cannot be received because of changed reception conditions. These stations will be removed from the station list.
11.1.4 DRC (Dynamic Range Control)
This allows you to reduce the dynamic range between low and high-volume sounds.
| Option | Effect |
| OFF | No adjustment |
| LOW The difference between high and low-volume sound is reduced slightly | |
| HIGH High and low-volume sound is aligned | |
11.1.5 MANUAL (Manual scan)
This option lets you add DAB stations in a DAB group to the station list manually.

Please note that you can only enter groups (ensembles) manually if they can be received in your region.
Select the group you want and then confirm your selection by pressing the [▶] button (11). The group signal strength is displayed. Confirm by pressing the [▶//OK] button (11). The stations are now added to the station list automatically. No further messages are displayed.
11.1.6 PRESET STORE (Save favourites)
This lets you save stations contained in the station list in one of the 30 station presets as a favourite.
- After you select this option, first select the preset you want using the [▲] (3) and [▼] (9) buttons. Empty presets are labelled "EMPTY", used presets are labelled with the station names.
- When you have selected the preset you want, confirm your selection by pressing the [▶11/01] button (11). "STORED" reads at the bottom of the display (1). The station you are currently playing is now saved as a favourite.

Please note that any station presets already used will be overwritten.
11.2 FM radio
11.2.1 PRESET STORE (Save station)
This setting allows you to save the station you are currently playing to the station list.
- After you select this option, first select the preset you want using the [▲] (3) and [▼] (9) buttons. Empty presets are labelled "EMPTY", used presets show the frequency of the corresponding stations.
- When you have selected the preset you want, confirm your selection by pressing the [▶II/OK] button (11). "STORED" reads at the bottom of the display (1). The station you are currently playing is now saved.

Please note that any station presets already used will be overwritten.
11.2.2 SYSTEM
11.2.2.1 "AUTO TIME SYNC" (automatic clock synchronisation)
Select one of the following options: "UPDATE FROM ANY" (update from DAB and FM), "UPDATE FROM DAB" or "UPDATE FROM FM" to enable automatic clock synchronisation. Select "NO UPDATE" to disable it.
The station selected must support automatic time synchronisation in order for this function to work.
11.2.2.2 "SW VER" (Software Version)
Displays the software version of your radio.
11.2.2.3 "RESET" (Factory reset)
Here you can restore the factory-default settings of your device. This will erase all custom settings (station presets, alarm times, etc.) on your device.
11.2.3 AUDIO SET (Toggling stereo/mono)
You can set the playback in FM radio mode to "STEREO" or "MONO".

Change the setting to "Mono" to reduce noise on weak stations.
11.2.4 SCAN SET (Scan settings)
Here you can specify whether all stations found or only strong stations are to be used in a station scan.
- Select "ALL" for all stations or "STRONG" for strong stations.
12. Storage when not in use
If the clock radio is not to be used for an extended period, store it in a clean, dry and cool place.
13. Troubleshooting
The device does not switch on
- Check that the power adapter (B) is firmly plugged into the mains socket and the connector from the power adapter cable is securely plugged into the power adapter connection (20) on the radio.
- Check whether the power socket is live.
No radio reception, poor radio reception
- Unwind the wire antenna (17) completely and try to align it better for optimum reception.
- Tune in the station correctly. If necessary, start a new station search.
Time not set automatically
- Unwind the wire antenna (17) completely and try to align it for optimal reception.
- Set the clock manually.
Device switched on but no sound
- Check the volume setting.
- Please check if you have connected headphones and, if so, disconnect them.
- Please check if the correct operating mode has been selected.
Mobile device not charging on the Qi charging base (16).
- Check whether your mobile device supports the Qi standard.
- Place your mobile device centrally on the Qi charging base (16) with the screen facing upwards.
- If you have fitted one, remove the case from your mobile device before charging.
The [symbol (30) is flashing rapidly on the display (1).
- Check whether there is a metallic object on the Qi charging base (16) and remove it if so.
- Check that your mobile device is the right way up on the Qi charging base (16) (with the screen facing upwards).
14. Environmental regulations and disposal information

A symbol depicting a crossed-out rubbish bin on a product means it is subject to European Directive 2012/19/EU. All electrical and electronic devices must be disposed of separately from household waste at official disposal centres. With the proper disposal of old or defective devices you avoid damage to the environment and your personal health. For further information about proper disposal, contact your local government, disposal bodies or the shop where you bought the device.

Disposal of packaging

Dispose of all packaging in an environmentally friendly manner. Cardboard packaging can be taken to paper recycling centres or public collection points for recycling. Any film or plastic contained in the packaging should be taken to your public collection points for disposal.

Please note the markings on the packaging material when disposing of it, it is labelled with abbreviations (a) and numbers (b), the meanings of which are as follows:

1-7: plastic / 20-22: paper and cardboard / 80-98: composite materials.

The packaging material for the silicone stoppers (C) is made from polyethylene (low density).

Only relevant for France:
The product can be recycled, is subject to an extended producer responsibility and is collected separately.
15. Conformity notes

This device complies with the basic and other relevant requirements of the RE Directive 2014/53/EU, the ERP Directive 2009/125/EC and the RoHS Directive 2011/65/EU.

The product complies with the requirements of the applicable national directives for Great Britain.
The complete EU Declaration of Conformity is available for download from this link:
https://www.targa.gmbh/downloads/conformity/364481_2010.pdf
16. Warranty and service information
Warranty of TARGA GmbH
Dear Customer,
This device is sold with three years warranty from the date of purchase. In the event of product defects, you have legal rights towards the seller. These statutory rights are not restricted by our warranty as described below.
Warranty conditions
The warranty period commences upon the date of purchase. Please keep the original receipt in a safe place as it is required as proof of purchase. If any material or manufacturing faults occur within three years of purchase of this product, we will repair or replace the product free of charge as we deem appropriate.
Warranty period and legal warranty rights
The warranty period is not extended in the event of a warranty claim. This also applies to replaced and repaired parts. Any damage or defects discovered upon purchase must be reported immediately when the product has been unpacked. Any repairs required after the warranty period will be subject to charge.
Scope of warranty
The device was carefully manufactured in compliance with stringent quality guidelines and subjected to thorough testing before it left the works. The warranty applies to material and manufacturing faults. This warranty does not cover product components which are subject to normal wear and which can therefore be regarded as wearing parts, or damage to fragile components such as switches, rechargeable batteries or components made of glass. This warranty is void if the product is damaged, incorrectly used or serviced. To ensure correct use of the product, always comply fully with all instructions contained in the user manual. The warnings and recommendations in the user manual regarding correct and incorrect use and handling of the product must always be observed and complied with. The product is solely designed for private use and is not suitable for commercial applications. The warranty is rendered void in the event of incorrect handling and misuse, if it is subjected to force, and also if any person other than our authorised service technicians interfere with the device. No new warranty period commences if the product is repaired or replaced.
Submitting warranty claims
To ensure speedy handling of your complaint, please note the following:
Before using your product for the first time, please read the enclosed documentation carefully. Should any problems arise which cannot be solved in this way, please call our hotline.
- Always have your receipt, the product article number as well as the serial number (if available) to hand as proof of purchase.
- If it is not possible to solve the problem on the phone, our hotline support staff will initiate further servicing procedures depending on the fault.

Service

Phone: 0800 404 7657
E-Mail: targa@lidl.co.uk

Phone: 1890 930 034
E-Mail: targa@lidl.ie

Phone: 800 62230
E-Mail: targa@lidl.com.mt

Phone: 8009 4409
E-Mail: targa@lidl.com.cy
IAN: 364481_2010

Manufacturer
Please note that the following address is not a service address. First contact the service point stated above.
TARGA
GmbH
Coesterweg 45
59494 Soest
GERMANY
Table des matières
natural_image
Black device labeled A (SVERChest) and a plug connected to a power cord, with an open book below (no visible text or symbols on main components)Cher client, chère cliente,
Cher client, chère cliente,
11.2.2.2 "SW VER" (Softwareversie)....131
11.2.2.3 "RESET" (Fabrieksinstellingen herstellen)....131
11.2.3 AUDIO SET (Schakelen tussen stereo/mono)....131
11.2.4 SCAN SET (Scaninstellingen)....131
natural_image
Black silver chest device with control buttons and a power adapter connected to an open book (no visible text or symbols)text_image
WAARSCHUWING!OPEN HET APPARAAT NIET!

WAARSCHUWING! Radio-interface
WAARSCHUWING! Kabels
WAARSCHUWING! Reinigen
Equalizer-instellingen [CLASSIC]
Stereo-ontvangst (FM-radio)
https://www.targa.gmbh/downloads/conformity/364481_2010.pdf
16. Garantie- en servicegegevens
natural_image
Black SilverChest electronic device with control buttons, connected to a power plug and an open book (no visible text or symbols on main components)https://www.targa.gmbh/downloads/conformity/364481_2010.pdf
natural_image
Black device labeled A (SVERChest) and a plug connected to a power cord, with an open book below (no visible text or symbols on main components)https://www.targa.gmbh/downloads/conformity/364481_2010.pdf
text_image
SILVERCREST® EQ/ST-MO ○ MENU ▶II/OK ▶I/BACK ▶/Δ↓10.17 Nabijanie zariadenia nabijacím káblom USB
https://www.targa.gmbh/downloads/conformity/364481_2010.pdf
16. Informácie o záruke a servise
Záruka spoločnosti TARGA GmbH
11.1.1 FULL SCAN....261
11.1.2 SYSTEM 261
natural_image
Black device labeled A (SVERChest) and a plug connected to a power cord, with an open book below (no visible text or symbols on main components)https://www.targa.gmbh/downloads/conformity/364481_2010.pdf
11.2 FM-radio....295
11.2.1 PRESET STORE (GEM FORUDINDSTILLING) (Gem station) 295
11.2.2 SYSTEM 295
11.2.2.1 "AUTO TIME SYNC" (AUTOMATISK TIDSSYNKRONISERING)(automatisk synkronisering af ur) 295
11.2.2.2 "SW VER" (Softwareversion)....295
11.2.2.3 "RESET" (NULSTIL) (fabriksnulstilling) 295
11.2.3 AUDIO SET (LYDINDSTILLING) (Skift mellem stereo/mono) 295
11.2.4 SCAN SET (SCANNINGSINDSTILLINGER)....296
natural_image
Black SilverChest electronic device with control buttons, connected to a power plug and an open book (no visible text or symbols on main components)text_image
ADVARSEL!RISIKO FOR ELEKTRISK ST∅D!
ÅBN IKKE KABINETTET!

FARE! Personlig sikkerhed
PROG (gem stationer)
Lydindstillinger [POP]
11.1.2.2 "SW VER" (Softwareversion)
Viser din radios softwareversion.
11.1.2.3 "RESET" (NULSTIL) (fabriksnulstilling)
11.1.5 MANUAL (MANUEL) (Manuel scanning)
11.2.2.2 "SW VER" (Softwareversion)
Viser din radios softwareversion.
11.2.2.3 "RESET" (NULSTIL) (fabriksnulstilling)
https://www.targa.gmbh/downloads/conformity/364481_2010.pdf