
SSE 25 A1 - Mop SILVERCREST - Free user manual and instructions
Find the device manual for free SSE 25 A1 SILVERCREST in PDF.

| Product Type | Electric Mop (Spray Mop) |
| Model | SSE 25 A1 (HG13535) |
| Brand | SilverCrest |
| Power Supply | Rechargeable Li-Ion battery 7.4 V (2 x 3.7 V), 2200 mAh |
| Charger | Power adapter 5.0 V / 2.0 A (10 W) |
| Charging Time | < 4 hours |
| Battery Life | ≥ 35 minutes (standard use) |
| Water Tank Capacity | 450 ml |
| Main Functions | Water spray, interchangeable microfiber cleaning cloths, LED guide light |
| Use | Indoor hard floors (tile, parquet, linoleum, etc.) |
| Package Contents | 1 machine, 4 cleaning cloths, 1 removable battery, 1 power adapter, 1 USB cable |
| Cloth Cleaning | Machine washable at 60°C or hand wash with soapy water |
| Battery Indicator | 4 LED lights (charge level and charging status) |
| Safety | Overload protection, protection class II, auto-shutoff? (not specified) |
| Material | ABS plastic, microfiber cloth |
| Dimensions (approx.) | Length: ~110 cm (assembled), height: ~45 cm (base), width: ~30 cm (base) |
| Weight (approx.) | ~1.5 kg (with battery and empty tank) |
| Article Number (IAN) | 518620_2504 |
| Warranty | 3 years |
| Spare Parts | Cleaning cloths available at www.optimex-shop.com |
Frequently Asked Questions - SSE 25 A1 SILVERCREST
User questions about SSE 25 A1 SILVERCREST
0 question about this device. Answer the ones you know or ask your own.
Ask a new question about this device
Download the instructions for your Mop in PDF format for free! Find your manual SSE 25 A1 - SILVERCREST and take your electronic device back in hand. On this page are published all the documents necessary for the use of your device. SSE 25 A1 by SILVERCREST.
USER MANUAL SSE 25 A1 SILVERCREST
natural_image
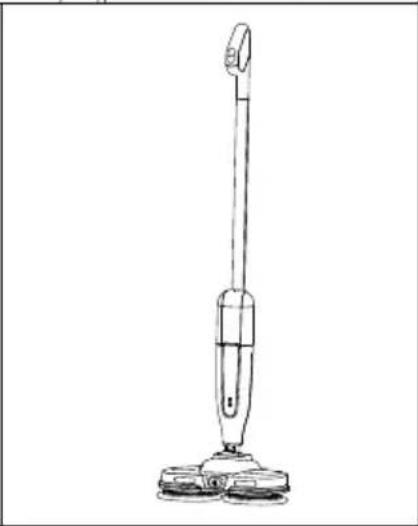
White vacuum cleaner with a single head-mounted blade and control panel (no visible text or symbols)ELEKTRISCHER SPRÜHMOP / ELECTRIC SPRAY MOP / BALAI PULVÉRISATEUR ÉLECTRIQUE SSE 25 A1
DE AT BE CH
Operation and safety notes
FR BE
BALAI PULVÉRISATEUR ÉLECTRIQUE
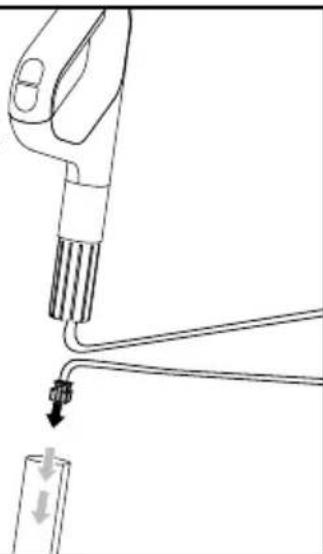
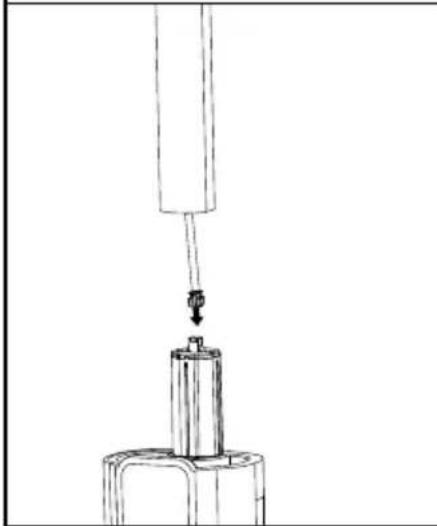
A
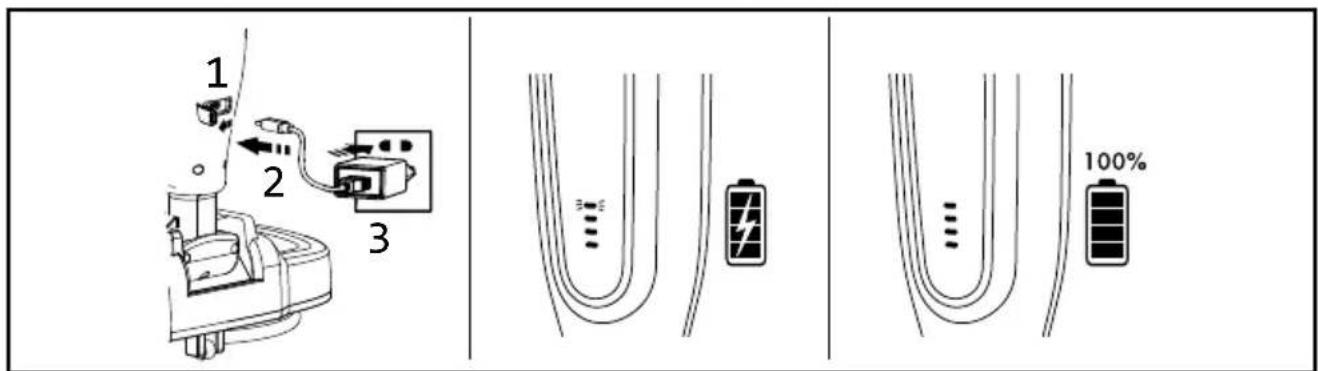
Falls der Griff 3 nach dem Auspacken separat aus dem Rohr 5 herausgezogen wird. / In case of pulling out the handle 3 separately from the tube 5 after unpacked. / En cas de retrait de la poignée 3 séparément du tube 5 après le déballage. / In het geval dat de handgreep 3 afzonderlijk uit de buis 5 wordt getrokken na het uitpakken. / Jeśli po wyjęciu z opakowania rękojeść 3 zostanie wysunięta z rury 5 osobno. / V prípadě, že po rozbalení vytáhnete rukojeć 3 odděleně od trubky 5. / V prípade, že po rozbalení vytiahnete rukováť 3 oddelene od rúrky 5. / En caso de que el mango 3 se separe del tubo 5 después de desembalar el producto. / Hvis håndtaget 3 trækkes ud separat fra røret 5 efter udpakning. / Se l'impugnatura 3 è scollegata dal tubo 5. / Kicsomagolás után a fogantyút 3 a csótól 5 elkülönítve húzza ki.
natural_image
Line drawing of a hand holding a tool with a cable, connected to a small object (no text or symbols present)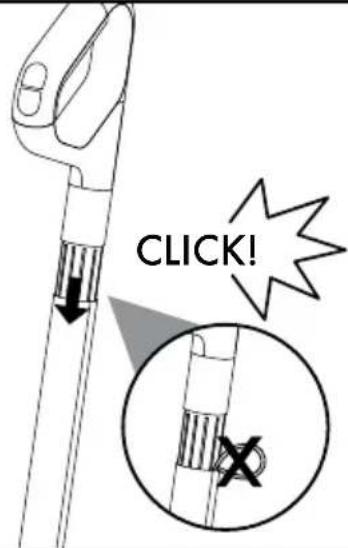
natural_image
Technical line drawing of a mechanical assembly with a suspended component (no text or symbols)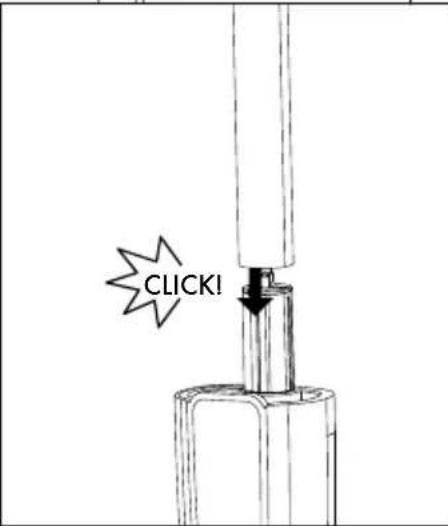
natural_image
Line drawing of a vacuum cleaner with a single arm and base (no text or symbols)B
natural_image
Technical line drawing of a mechanical device with two circular components and two base plates (no text or symbols)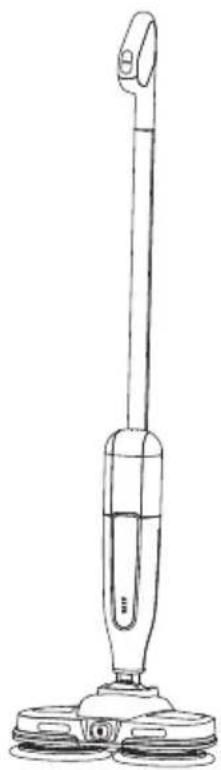
natural_image
Line drawing of a vacuum cleaner with three wheels and handle (no text or symbols)
natural_image
Line drawing of a mechanical device with two circular components and hatched patterns (no text or symbols)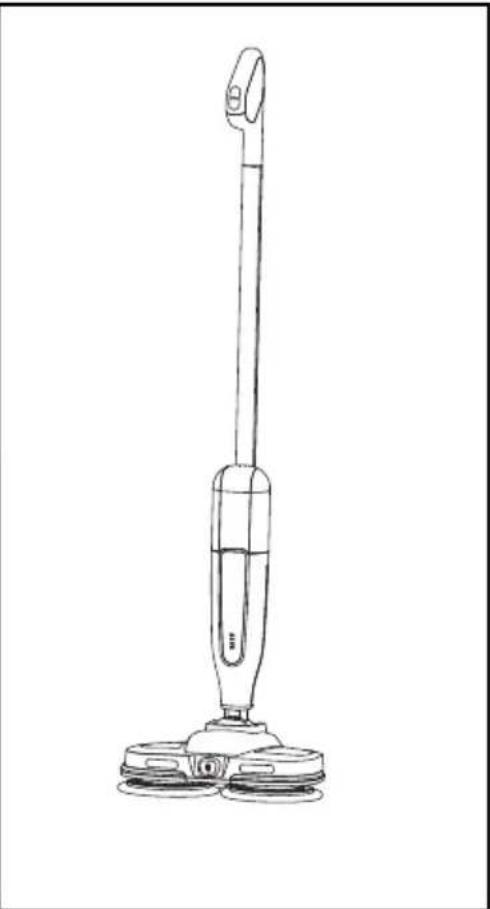
natural_image
Line drawing of a vacuum cleaner with three wheels and handle (no text or symbols)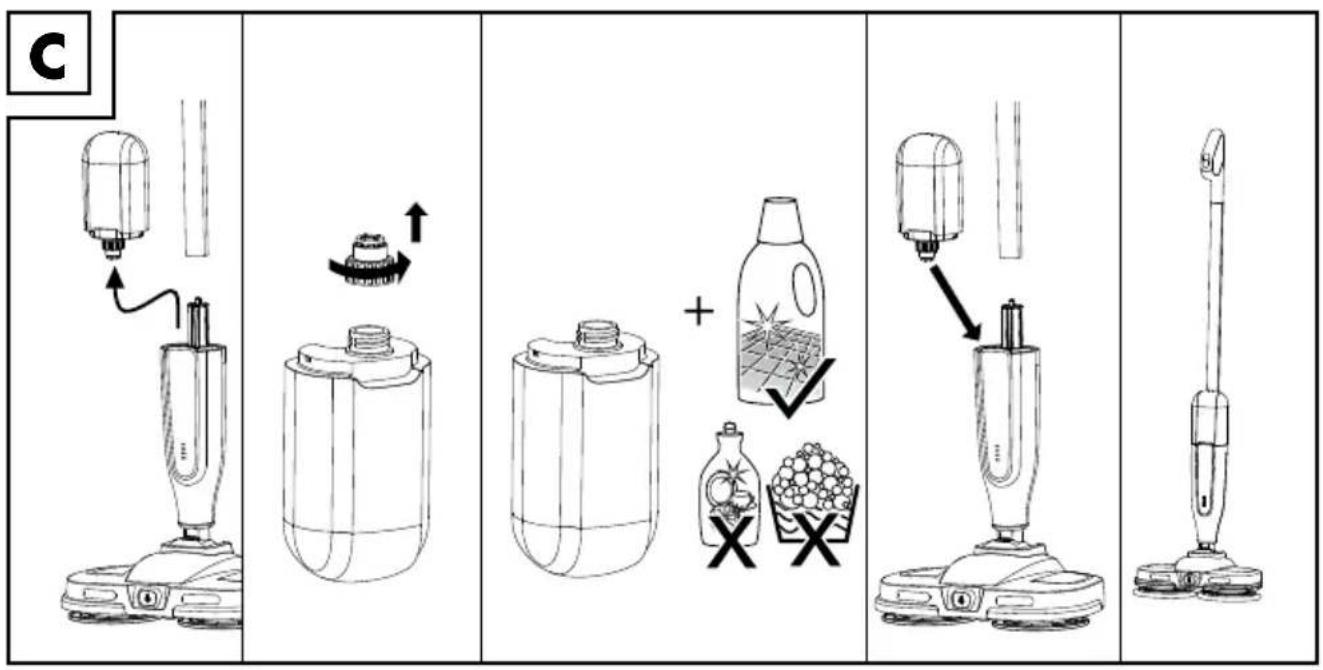
Ladevorgangs: +4 to +30 °C
GEFAHR! STROMSCHLAGGEFAHR!
⚠ GEFAHR! EXPLOSIONSGEFAHR!
⚠️ WARNING! AUSLAUFGEFAHR BEI BATTERIEN/AKKUS!
natural_image
Technical line drawing of a mechanical assembly with no visible text or symbolsi INFO:
Website: www.optimex-shop.com
Reinigung

GEFAHR! STROMSCHLAGGEFAHR!
Warnings and symbols used Page 18
Introduction Page 19
Intended use.... Page 19
Scope of delivery.... Page 19
Description of parts ...... Page 19
Technical data Page 20
Safety notes.... Page 20
Before first use....Page 22
Product unpacking....Page 22
Assembling the handle 3 Page 22
Assembling the Cleaning Cloth 13 Page 22
Operation.... Page 23
Charging the battery 14 Page 23
Battery Pack 14 Disposal Instructions Page 24
Filling the water tank 6 Page 24
Adjusting the angle of the handle 3 and Main Unit 9 Page 24
Cleaning hard floors Page 24
Changing the cleaning cloth 13 Page 25
Ordering replacement parts ...... Page 25
Cleaning Page 25
Cleaning the housing Page 25
Cleaning the cleaning cloth 13 Page 25
Troubleshooting...... Page 25
Storage Page 26
Disposal Page 26
Warranty Page 27
Warranty claim procedure.... Page 27
Service Page 27
| Warnings and symbols usedThe following warnings are used in this user manual and on the packaging: | |||
 | DANGER! This symbol in combination with the signal word “Danger” marks a high-risk hazard that if not prevented could result in death or serious injury. |  | This symbol in combination with “Info” provides additional useful information. |
 | Danger - risk of electric shock! | ||
 | WARNING! This symbol in combination with the signal word “Warning” marks a medium-risk hazard that if not prevented could result in death or serious injury. |  | Alternating current/voltage |
| --- | Direct current/voltage | ||
 | Protection Class II | ||
 | CAUTION! This symbol in combination with the signal word “Caution” marks a low-risk hazard that if not prevented could result in minor or moderate injury. |  | On/off |
 | NOTICE! This symbol with the signal word “Notice” indicates possible property damage. |  | Spray button |
 [ABAZ] [ABAZ] | This symbol means that the operating instructions must be observed when using the product. | Li-Ion Lithium-Ion battery | |
 | Use the product in indoor spaces only. | ||
 | CE mark indicates conformity with relevant EU directives applicable to this product. | [809] | Safety-relevant information and other notesInstructions for use |
| [ACOT] | |||
 | SMPS (Switch mode power supply unit) (switching power supply) |  | Polarity of the output terminal |
 | Short-circuit proof safety transformer |  | Do not use the charger if the pins of the plug are damaged. |
| [CSCC] | Tested product. May contain residual water droplets |  | Charging point |
ELECTRIC SPRAY MOP
● Introduction
We congratulate you on the purchase of your new product. You have chosen a high quality product. The instructions for use are part of the product. They contain important information concerning safety, use and disposal. Before using the product, please familiarise yourself with all of the safety information and instructions for use. Only use the product as described and for the specified applications. If you pass the product on to anyone else, please ensure that you also pass on all the documentation with it.
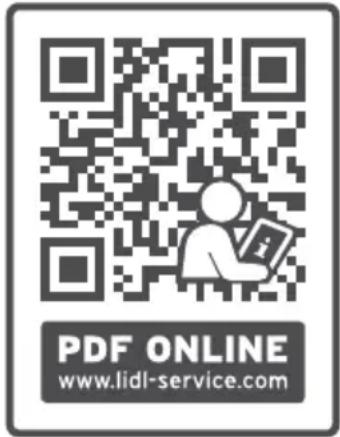
You can download and view this and numerous other manuals at www.lidl-service.com. By scanning this QR code, you will be taken straight to the Lidl service website (www.lidl-service.com) where you can open your instruction manual by entering the article number (IAN) 518620_2504.
Intended use
This product is designed for cleaning indoor hard floors only.
Always use the correct accessories according to the intended use (see "Ordering replacement parts")! Observe the technical requirements of this product (see "Technical data") when purchasing and using accessories!
The product is not intended for commercial or similar uses. Any other usage or modification of the product is deemed improper and carries a significant risk of accidents. The manufacturer accepts no responsibility for damage(s) attributable to misuse.
The product is suitable for indoor use only.
- Scope of delivery
1× Electric Floor Cleaner
1x Power Adaptor
4x Cleaning cloth
1x Detachable battery pack
• Description of parts
1 On/Off button
2 Spray button
3 Handle
4 Cable plug
5 Tube
6 Water tank
7 Cable connector
8 Adaptor
9 Main unit
10 Battery indicator (battery level and battery charging status)
11 Spray outlet
12 LED indicator light/Guiding light
13 Cleaning cloth
14 Detachable battery pack
15 Foot press area
16 USB cable
17 Charging port
18 Cap
- Technical data
Model: HG13535
Standby mode power
consumption: 0.3 W
Re-chargeable battery: 7.4 V

Battery cell Lithium-ion: 2×3.7 V

Battery capacity: 2,200 mAh
Charging time: < 4 hours
Clean water tank capacity: 450 ml
Operating time (standard): ≥ 35 mins.
Recommended ambient temperature
While charging: +4 to +30 °C
Only charge the product with the following mains adapter:
| Information Value | Unit | |
| Manufacturer name or trade mark, commercial registry number and address | Shenzhen ShiGuangkatyuanTechnology Ltd91440300053998927W2 floor,41 TianSheng Road,TianLiao Village, GongMing Street, Guangming, shenzhen, Guangdong,P.R.China | |
| Model identifier | GKYZY0200050EU1 | |
| Input voltage | 100-240 | V |
| Input AC frequency | 50/60 | Hz |
| Output voltage | 5.0 | VDC |
| Output current 2.0 A | ||
| Output power | 10.0 | W |
| Average active efficiency | 79.3 | % |
| Input current | 0.5 Max | A |
| Effizienz at low load (10 %) | 72.4 | % |
| No-load power consumption | 0.05 | W |
| Protection class | II/ ☐ | |

Safety notes
⚠️ DANGER! RISK OF SUFFOCATION OR CHOKING AND ACCIDENTS FOR INFANTS AND CHILDREN!
The product and the packaging are not children's toys! Children must not play with plastic bags and small parts! There is a danger of choking and suffocation!
This appliance can be used by children aged from 8 years and above and persons with reduced physical, sensory or mental capabilities or lack of experience and knowledge if they have been given supervision or instruction concerning use of the appliance in a safe way and understand the hazards involved. Children shall not play with the appliance.
- Cleaning and user maintenance shall not be made by children without supervision.
No action needed from users to shift the product between 50 and 60 Hz. The product can adapt itself for both 50 and 60 Hz.
■ Always pull on the mains plug to disconnect the mains cord and the product from the mains socket. Do not pull on the mains cord itself.
■ Remove the mains cord from the socket in case of a malfunction, before cleaning the product, during a thunderstorm and after each use.
Do not kink, crush or damage the mains cord, and route the mains cord so that it cannot be stepped on or tripped over.
If you notice that the mains cord, mains plug, housing or any other part has become damaged, the mains adapter can no longer be used.
■ Ensure that the mains cord does not become wet or damp during use.
Do not push or pull the product over the mains cord.
■ Remove the mains plug from the mains socket before filling the product with water, changing parts or cleaning the product.
■ To prevent risks, stop using the product immediately if it is damaged.
Do not operate or touch the product with wet hands. This will help reduce the effect of electric shock in the event of a malfunction.
■ Never immerse the product in water or other liquids.
- Never aim the product at moisture sensitive objects, floors or surfaces.
⚠ WARNING: For the purposes of recharging the battery, only use the mains power adapter provided with this appliance.
⚠️ DANGER! RISK OF EXPLOSION!
■ Never recharge non-rechargeable batteries. Do not short-circuit batteries/rechargeable batteries nor open them. Overheating, fire or bursting can be the result. Only use the mains adapter provided with this product.
■ Never throw batteries/rechargeable batteries into fire or water.
- Do not exert mechanical loads on batteries/rechargeable batteries.
■ Protect the electrical parts against moisture. Do not immerse such parts in water or
other liquids to avoid electrical shock.
- Never hold the product under running water. Pay attention to the instructions provided for cleaning, maintenance and repair. Clean the product as described in chapter "Cleaning".
⚠ WARNING! RISK OF LEAKAGE OF BATTERIES/ RECHARGEABLE BATTERIES!
- Avoid extreme environmental conditions and temperatures, which could affect batteries/rechargeable batteries, e.g. radiators and direct sunlight.
If batteries/rechargeable batteries have leaked, avoid contact of the skin, eyes and mucous membranes with the chemicals! Immediately flush the affected areas with fresh water and seek medical attention!

WEAR PROTECTIVE GLOVES!
Leaked or damaged batteries/rechargeable batteries can cause burns upon contact with skin. Wear suitable protective gloves at all times if such an event occurs.
This product has a built-in rechargeable battery that cannot be replaced/removed by the user. The batteries are only replaceable/removed by skilled persons.
⚠ WARNING! RISK OF INJURY!
- Repairs should only be carried out by a specialist. Improper repairs may result in considerable danger to the user. This will also make any warranty claims void.
- Be careful while using the product on steps or stairs.
- Keep children away from the blade.
CAUTION! RISK OF INJURY!
■ Use only the original parts recommended by the manufacturer with the product.
- Only use the product when it is properly and completely assembled.
- Do not use the product if it has been dropped or if there are any signs of physical damage or leakage.
⚠ NOTICE! RISK OF DAMAGE!
Do not leave the product standing on wooden floors for any length of time when it is switched on. The wood could swell.
- Do not operate the product with an empty clean water tank, otherwise the pump could run dry and overheat.
Do not vacuum up hard, pointed or sharp objects (e.g. glass, nails, screws, coins, etc.) with the product.
■ Ensure the product, mains cord and mains plug do not come into contact with heat sources, such as hotplates or naked flames.
- Never leave the product unattended during operation.
- Notice that the plug must be removed before cleaning or maintaining the appliance included in instruction sheet of appliances.
Before first use
Product unpacking
- Take the product out of the packaging and remove all packaging materials and plastic wrappings.
NOTE: The product's battery is not charged on delivery. Charge the battery completely before first use (see "Charging the battery" section). - Check to make sure that all listed parts are included (see "Scope of delivery").
- Check whether the product and all parts are in good condition, if any damage or defect is detected, do not use the product, instead follow the procedure described in chapter "Warranty".
- Assembling the handle 3
Refer to Fig. A.
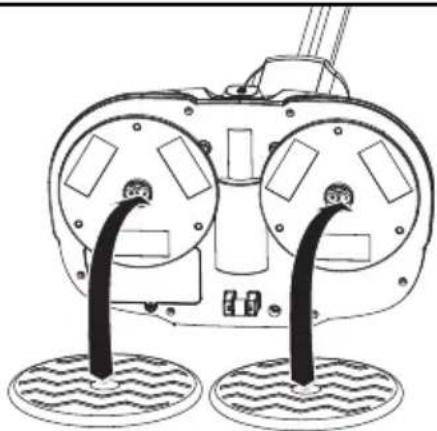
Assembling the Cleaning Cloth
13
Refer to Fig. B.
Operation
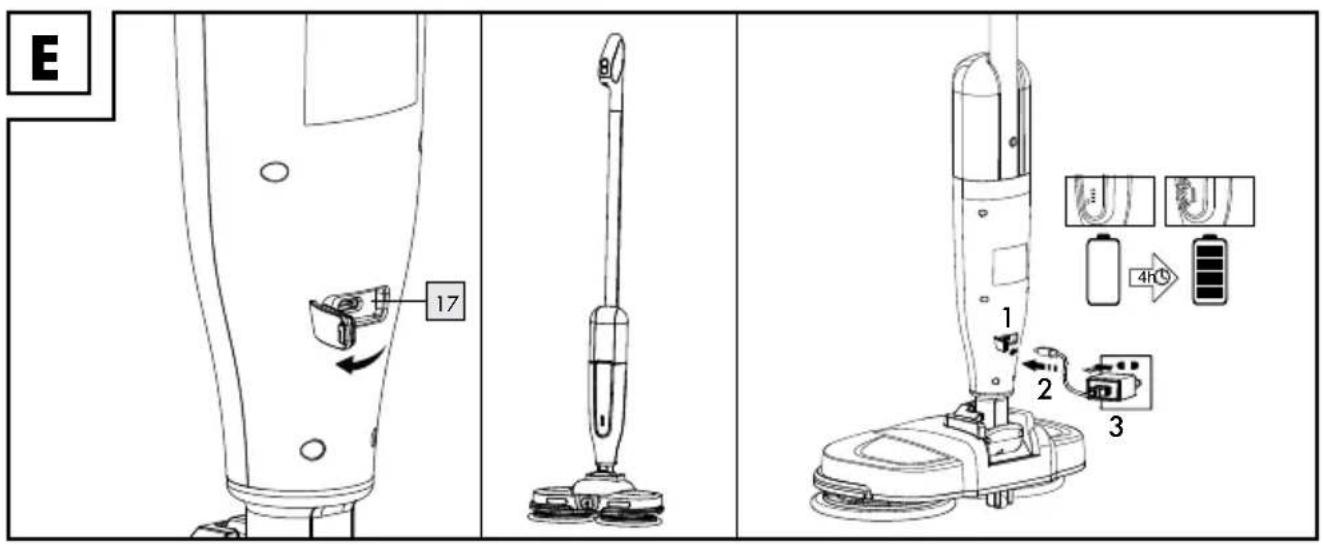
● Charging the battle 14
4 Indication lights 10 on product show battery level
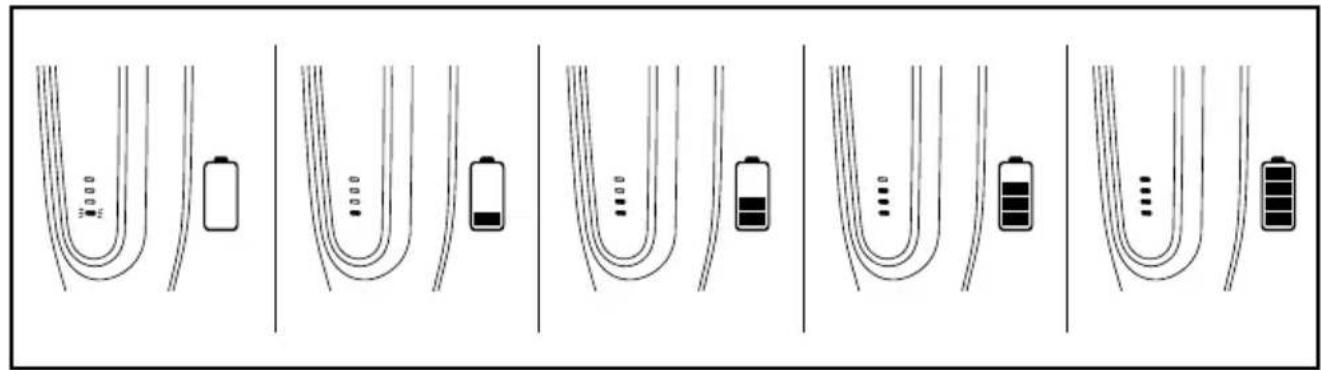
4 indication lights 10 on product showing charging status
NOTICE! RISK OF DAMAGE!
- Never charge the product outside of the recommended ambient temperature (4 °C–30 °C). Doing so might damage the product.
NOTE: Do not put the product to direct sunshine or heat.
Extreme low or high temperature may damage the battery 14 or the product. Suggest to charge the product at least 3 hours when you wanted to store the item more than 6 months etc.
i INFO:
Li-Ion batteries can be charged at any time without adversely affecting their service life. Interruption of the charging process will not damage the battery.
Whilst charging, it is normal for the detachable battery pack 14 warm up slightly.
NOTE: After Fully charged 5 mins, all 4 lights off without unplugged.
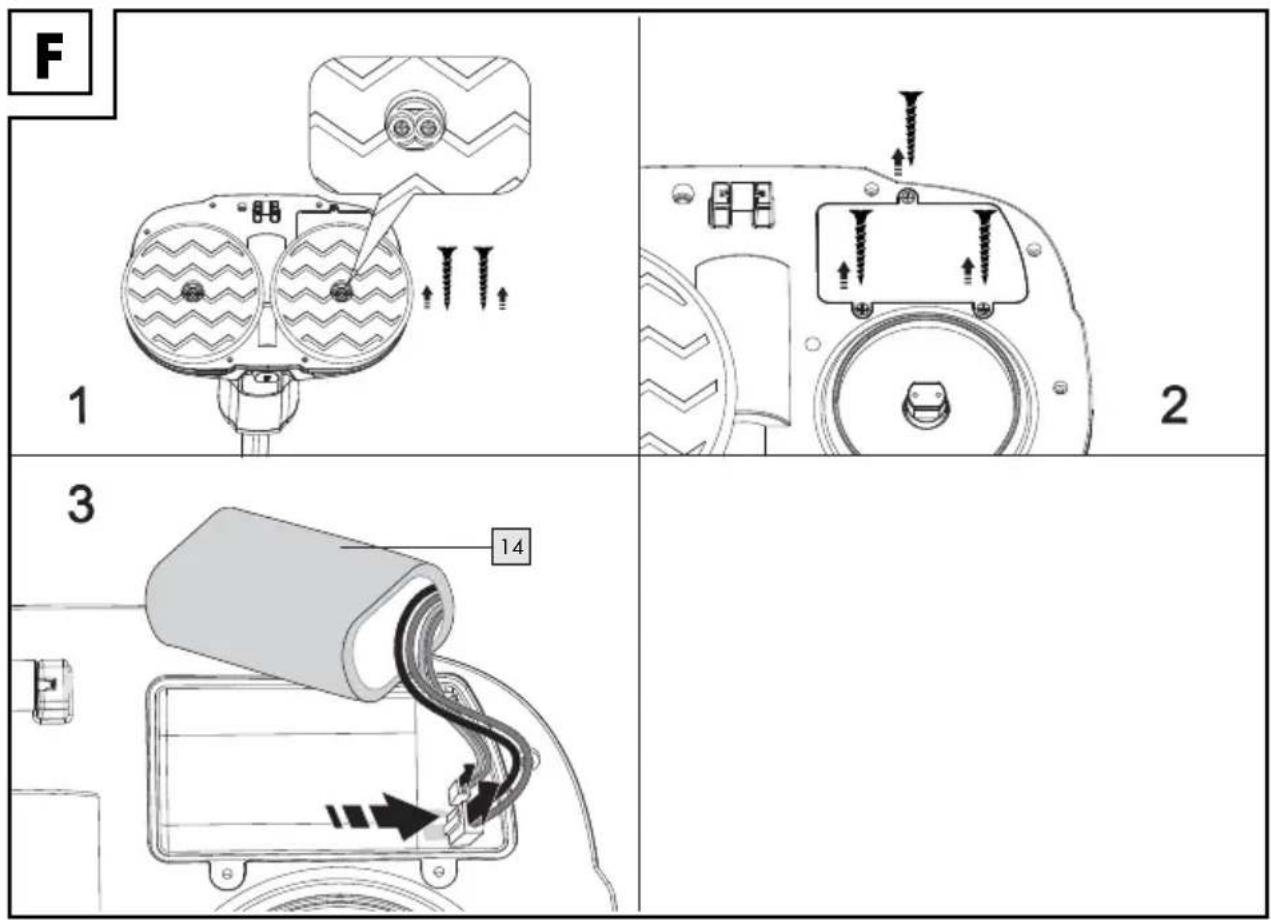
Battery Pack 14 Disposal Instructions
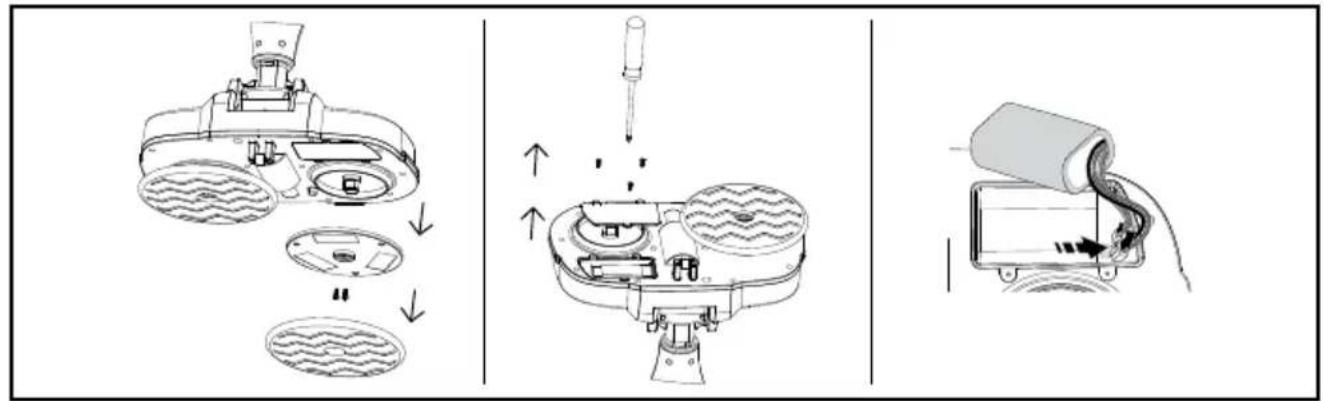
■ Turn off the spray mop and unplug it from any power source.
- Locate the battery compartment which is on the base.
■ Remove the cleaning cl13 and then use a screwdriver to open the compartment.
Carefully disconnect the battery pc14 from the terminals, avoiding contact with metal objects.
● Filling the water tank 6
NOTICE! RISK OF DAMAGE!
Fill the water to 6 with cold tap water or distilled water only. Do not use boiling water.
■ Never operate the product without water in the water tank 6, otherwise the product may run dry and overheat.
Refer to Fig. C.
⚠ WARNING! Tank capacity is 0.45 litres. Do not fill the tank above the maximum capacity.
Only non-foaming detergent (non-foaming) can be added to the water tank 6.
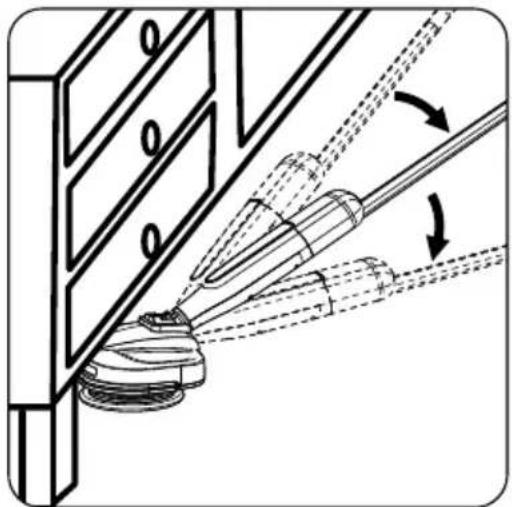
- Adjusting the angle of the handle 3 and Main Unit 9
natural_image
Technical line drawing of a mechanical assembly with no visible text or symbolsi INFO:
-
Put your foot on the foot press area 15 to stabilise the product then lower the upright handle 3 and main unit 9 to a comfortable usage angle.
-
Grip the handle 3 firmly to angle the handle 3 and the main unit 9 to the left or right to adjust the cleaning angle of the product.
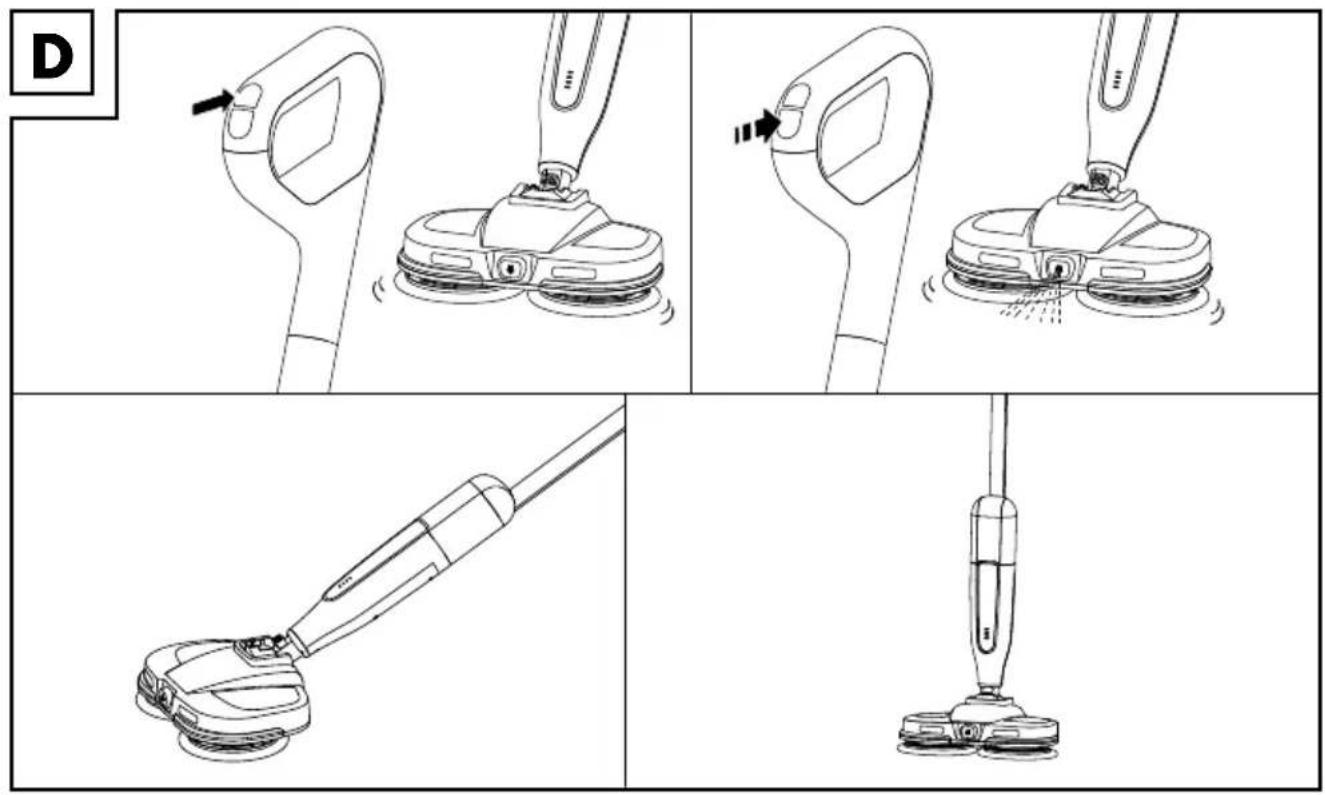
● Cleaning hard floors
NOTICE! RISK OF DAMAGE!
When operating the product, make sure cleaning cloth 13 does not get blocked by loose objects lying on the floor. These can damage the product and stop it from working properly.
i INFO:
Before and after operating check the product and its parts for damage and leakage.
When the lowest blue indicator li12 flashes, it means the product reaches low battery level, please turn off the and charge the product.
- Press and hold the On/Off button 1 to turn on the product.
☐ Press and hold the On/Off button 1 again to turn off the product (ref. to fig. D). - Press the spray button 2 while moving the product back and forth to spray water to the area in front of the floor head. Press and hold the spray button 2, water will be sprayed continuously for 1.5 seconds.

Changing the cleaning cloth
13
- Turn the product up side down until the cleaning clothes 13 are facing upward.
- Tear off both cleaning clothes 13.
- Replace both cleaning clothes 13 as described in Assembling the Cleaning Cloth 13.

Ordering replacement parts
■ Replacements for the following parts can be ordered online:
- Cleaning clot13 (remark: regarding how ro replace it, please refer to Fig. B)
Item number: 518620_2504
Website: www.optimex-shop.com
- Cleaning
■ Never immerse the product in water or other liquids or place under running water.
■ Turn off the product and remove the mains plug and mains cord before cleaning the product!
!
CAUTION! RISK OF DAMAGE!
Do not use chemical, alkaline, abrasive or other aggressive detergents or disinfectants to clean this product as they might damage its surfaces.
■ Never allow fluids to get into the product except for the clean water and non-foaming detergent.
Before cleaning, turn off the product then disconnect and remove the adaptor 8.
□ Always keep the product clean, dry and free from oil or grease.
☐ Remove debris from the product after each use and before storage.
☐ Regularly and properly clean the product to help ensure safe use and prolong the service life of the product.

Cleaning the housing
□ Clean the main unit 9 and the handle 3 with a dry cloth.

Cleaning the cleaning cloth 13
!
WARNING! RISK OF INJURY!
The cleaning cl ^13 can be hand wash with soapy water or machine washable in 60°C. Let the cleaning cloth air dry, or dry them with a soft cloth, before replacing them.

Troubleshooting
| Issue Possible | cause | Solution |
| The product will not switch on. | The product is not charged. | Charge the product according to fig. E and the description in Charging the battery 14 to charge the product. |
| The product is defective. | Switch off the product and remove the mains power adapter 8. Contact customer service (see “Service”). | |
| Issue Possible cause Solution | ||
| Not enough water spray. | The water tank 6 is empty. | Fill the water tank 6 to the MAX line with water according to the fig. C and the description in Filling the Water Tank 6. |
| The water tank 6 is not closed properly. | Remove the water tank 6 and tighten the cap 18 (see “Filling the clean water tank”). | |
Storage
■ Store the product in a dry indoor location protected from direct sunlight and out of reach of children.
● Disposal
The packaging is made of environmentally friendly materials, which may be disposed of through your local recycling facilities.

Observe the marking of the packaging materials for waste separation, which are marked with abbreviations (a) and numbers (b) with following meaning: 1-7: plastics/20-22: paper and fibreboard/80-98: composite materials.
Product:
The product incl. accessories, manual and packaging materials are recyclable and are subject to extended producer responsibility. Dispose them separately, following the illustrated Info-tri (sorting information), for better waste treatment.
The Triman logo is valid in France only.
Contact your local refuse disposal authority for more details of how to dispose of your wornout product.
To help protect the environment, please dispose of the product properly when it has reached the end of its useful life and not in the household waste. Information on collection points and their opening hours can be obtained from your local authority.
This product has a built-in re chargeable battery that cannot be replaced or removed by the user. The batteries are only replaceable or removed by skilled persons. When disposing of the product, it must be noted that this product contains a rechargeable battery.
Faulty or used batteries/rechargeable batteries must be recycled. Return the batteries/rechargeable batteries and the product to the available collection points.
Environmental damage through incorrect disposal of the batteries / rechargeable batteries!
Batteries / rechargeable batteries may not be disposed of with the usual domestic waste. They may contain toxic heavy metals and are subject to hazardous waste treatment rules and regulations. The chemical symbols for heavy metals are as follows: Cd = cadmium, Hg = mercury, Pb = lead. That is why you should dispose of used batteries / rechargeable batteries at a local collection point.
Warranty
The product has been manufactured to strict quality guidelines and meticulously examined before delivery. In the event of material or manufacturing defects you have legal rights against the retailer of this product. Your legal rights are not limited in any way by our warranty detailed below.
The warranty for this product is 3 years from the date of purchase. The warranty period begins on the date of purchase. Keep the original sales receipt in a safe location as this document is required as proof of purchase.
Any damage or defects already present at the time of purchase must be reported without delay after unpacking the product.
Should the product show any fault in materials or manufacture within 3 years from the date of purchase, we will repair or replace it – at our choice – free of charge to you. The warranty period is not extended as a result of a claim being granted. This also applies to replaced and repaired parts.
This warranty becomes void if the product has been damaged, or used or maintained improperly.
The warranty covers material or manufacturing defects. This warranty does not cover product parts subject to normal wear and tear, thus considered consumables (e.g. batteries, rechargeable batteries, tubes, cartridges), nor damage to fragile parts, e.g. switches or glass parts.
For this product, the rechargeable batteries are also covered by its warranty period.
● Warranty claim procedure
To ensure quick processing of your claim, observe the following instructions:
Make sure to have the original sales receipt and the item number (IAN 518620_2504) available as proof of purchase.
You can find the item number on the rating plate, an engraving on the product, on the front page of the instruction manual (bottom left), or as a sticker on the rear or bottom of the product.
If functional or other defects occur, contact the service department listed below either by telephone or by e-mail.
Once the product has been recorded as defective you can return it free of charge to the service address that will be provided to you.
Ensure to enclose the proof of purchase (sales receipt) and a short, written description outlining the details of the defect and when it occurred.
Service
GB Service Great Britain
Tel.: 0800 404 7657
E-Mail:owim@lidl.co.uk
IE Service Ireland
Tel.:1800101010
E-Mail:owim@lidl.ie
CE
⚠️ REMARQUE ! RISQUE DE DOMMAGES !
natural_image
Technical line drawing of a mechanical assembly with no visible text or symbolsi INFO :
⚠ WAARSCHUWING! RISICO OP LEKKEN VAN BATTERIJEN/ OPLAADBARE ACCU'S!
WAARSCHUWING! RISICO OP LETSEL!
natural_image
Technical line drawing of a mechanical assembly with no visible text or symbolsi INFO:
Website: www.optimex-shop.com
Reiniging
⚠️ GEVAAR! RISICO OP ELEKTRISCHE SCHOKKEN!
⚠ WAARSCHUWING! RISICO OP LETSEL!
NOŚ RĘKAWICE OCHRONNE!
natural_image
Technical line drawing of a mechanical assembly with no visible text or symbolsi INFORMACJA:
natural_image
Technical line drawing of a mechanical assembly with no visible text or symbolsi INFO:
natural_image
Technical line drawing of a mechanical assembly with no visible text or symbolsi INFO:
natural_image
Technical line drawing of a mechanical assembly with no visible text or symbolsi INFORMACIÓN:
natural_image
Technical line drawing of a mechanical assembly with no visible text or symbolsi INFO:
AVVISO! RISCHIO DI DANNI!
natural_image
Technical line drawing of a mechanical assembly with no visible text or symbolsi INFORMAZIONI
Sito web: www.optimex-shop.com