
DKC4536X - Microwave Oven DE DIETRICH - Free user manual and instructions
Find the device manual for free DKC4536X DE DIETRICH in PDF.

User questions about DKC4536X DE DIETRICH
0 question about this device. Answer the ones you know or ask your own.
Ask a new question about this device
Download the instructions for your Microwave Oven in PDF format for free! Find your manual DKC4536X - DE DIETRICH and take your electronic device back in hand. On this page are published all the documents necessary for the use of your device. DKC4536X by DE DIETRICH.
USER MANUAL DKC4536X DE DIETRICH
natural_image
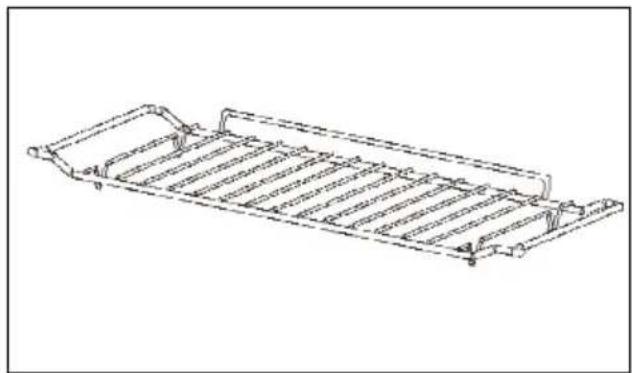
Technical line drawing of a mechanical component with ribbed structure (no text or symbols)- Plat émaillé multi usages, lèchefrite 45 mm
natural_image
3D model of a rectangular tray or container with internal compartments and a black arrow pointing to the bottom-right corner (no text or symbols)- Les gradins
natural_image
Line drawing of a ladder mounted on a wall, no text or symbols present• 3 PRÉSENTATION DE VOTRE APPAREIL
LES ACCESSOIRES (SELON MODÈLE)

natural_image
Diagram showing two circular components with a connector and an arrow pointing to a mechanical component (no text or symbols)LE PLATEAU TOURNANT
RELATIONS CONSOMMATEURS FRANCE
You have just purchased a De Dietrich product. This choice reflects your high standards and taste for the French way of life.
Resulting from over 300 years' know-how, the De Dietrich creations embody the fusion between design, authenticity and technology at the service of culinary arts. Our appliances are manufactured using noble materials and offer an irreproachable quality of finish.
We are certain this high-quality product will enable cooking enthusiasts to express all their talents.
The De Dietrich Customer Service Department is at your disposal for all your questions and suggestions to always better meet your expectations.
We are honoured to be your new partner in the kitchen and thank you for your trust.

BVCert.6011825
With its factories based in France, in Orléans and Vendôme, De Dietrich cultivates a constant search for excellence, perpetuating exceptional know-how in the design of perfectly finished products. Many of our electrical appliances are certified by the “Origine France Garantie” label, an acknowledgement which certifies they are manufactured in France.
This label both ensures the quality and durability of our appliances, as well as their traceability, thus offering a clear and objective indication of their provenance.
www.de-dietrich.com
De Dietrich
CRÉATEUR D'ÉMOTIONS DEPUIS 1684
IMPORTANT SAFETY ADVICE AND PRECAUTIONS 4-6
1 INSTALLATION 7-8
Choice of location and fitting....7
Electrical connection....8
2 ENVIRONMENT 9
Caring for the environment 9
3 PRESENTATION OF YOUR APPLIANCE 10-13
The controls and display 11
Locking the controls....11
Controlling the turntable....11
Accessories (depending on model)....12
The turntable....13
Operating principles 13
4 FIRST USE AND SETTINGS....14
Using the oven for the first time 14
Settings menu (depending on model)....14
5 MANUAL COOKING MODE.... 15-17
Microwave function 15
Combined microwave function....16
Traditional cooking functions....16
Starting a cooking programme 17
6 AUTOMATIC COOKING MODE....18
PRESENTATION OF DISH CATEGORIES....18
7 OTHER FUNCTION....19
Timer function 19
8 CARE....19
9 ANOMALIES AND SOLUTIONS....20
10 SUITABILITY FOR THE FUNCTION TEST 21
IMPORTANT SAFETY INSTRUCTIONS - READ CAREFULLY AND KEEP FOR FUTURE USE.
This user guide is available for download on the brand's website.
Once you receive the appliance, unpack it or have it unpacked immediately. Give it an overall inspection. Make a note of any reservations on the delivery slip and keep a copy.

This appliance must be installed more than 850mm up off the ground.
— The appliance must not be installed behind a decorative door to prevent overheating.
— Centre the oven in the cabinet so as to ensure a minimum gap of 10mm between the appliance and the surrounding unit.
The material of the unit supporting the appliance must be heat-resistant (or covered with a heat-resistant material). For greater stability, attach the oven to the unit with 2 screws through the holes provided on the side panels.

It must be possible to disconnect the appliance from the power supply by fitting a switch on the fixed wiring system in accordance with installation rules. — If the power cable is damaged, it should be replaced by the manufacturer, its after-sales service department or by a
similarly qualified person in order to avoid danger.

WARNING:
It is dangerous for anyone other than a qualified person to perform maintenance or repairs that requires the removal of the cover providing protection against exposure to microwave power.
— This appliance is designed to cook with the door closed.
— This appliance is designed to be used for domestic and similar applications such as kitchen areas for the staff of shops, offices and other professional premises; farms; use by clients of hotels, motels and other residential type establishments; guest house type environments.
— This appliance may be used by children aged 8 years and older, and by persons with impaired physical, sensory or mental capacities, or without experience or knowledge, if they are supervised or have received prior instructions on how to use the appliance safely and have understood the risks involved.
— Children must not play with the appliance. The appliance should
IMPORTANT SAFETY ADVICE AND PRECAUTIONS
not be cleaned or maintained by unsupervised children.
— Children should be supervised to prevent them from playing with the appliance.

WARNING:
The appliance and its accessible parts become hot during use. Be careful not to touch the heating elements inside the oven. Children under 8 years of age should not be allowed near the appliance, unless they are constantly supervised.

WARNING:
If the appliance is being used in combination mode, it is recommended that children only use the oven under adult supervision due to the temperatures generated.
— Only use utensils suitable for use in microwave ovens. Metal food and beverage containers cannot be used for microwave cooking.
— The microwave oven is intended for heating food and drinks. Drying food products or linen or heating heat pads, slippers, sponges, damp clothes or similar could cause injury, combustion or fire.

WARNING:
Liquids and other foods should not be heated in tightly closed containers as they may explode.
— When heating food items in plastic or paper containers, monitor the microwave's contents due to the risk of combustion.
— If smoke appears, stop or unplug the oven and keep the door closed to smother any flames.
— Heating beverages in the microwave oven can cause the sudden and/or delayed splattering of boiling liquid, so care must be taken when handling their containers.
— The contents of baby bottles and baby food jars must be stirred or shaken and the temperature must be checked before consumption, so as to prevent burns.
— It is not recommended to heat eggs in their shells or whole hard-boiled eggs in a microwave oven, as they may explode, even after cooking has ended.
— It is recommended to clean the oven regularly and to remove any food residue.
— If the appliance is not cleaned regularly, its surface could become damaged, permanently affecting the appliance's lifespan and possibly causing a safety hazard.
IMPORTANT SAFETY ADVICE AND PRECAUTIONS

WARNING:
If the door or door seal is damaged, the oven must not be operated until it has been repaired by an authorised person.
— Do not use abrasive cleaning products or hard metal scrapers to clean the glass oven door as this may scratch the surface and can cause the glass to crack.
— Do not use a steam cleaner.
— Only allow children to use the oven without supervision if adequate instructions have been given so that the child is able to use the oven safely and understands the dangers of incorrect use.
• 1 INSTALLATION
CHOICE OF LOCATION AND FITTING
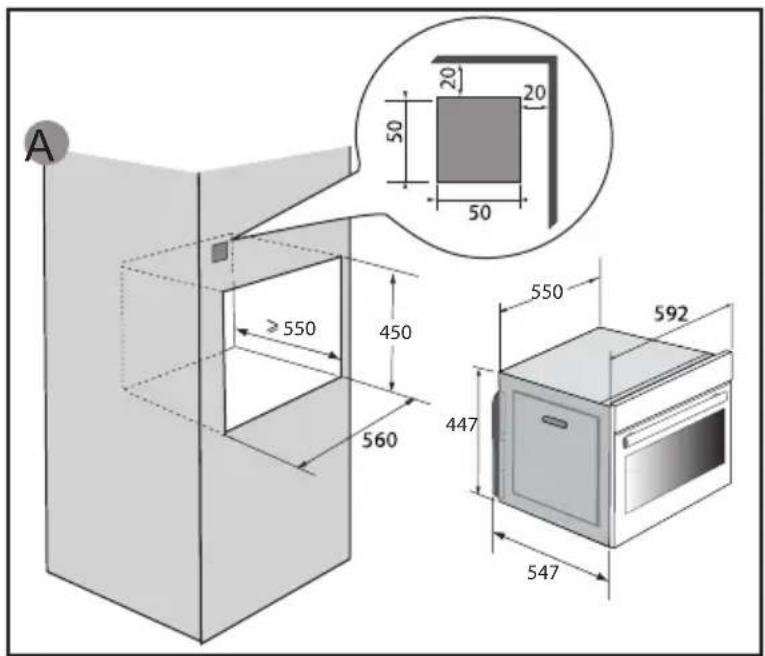
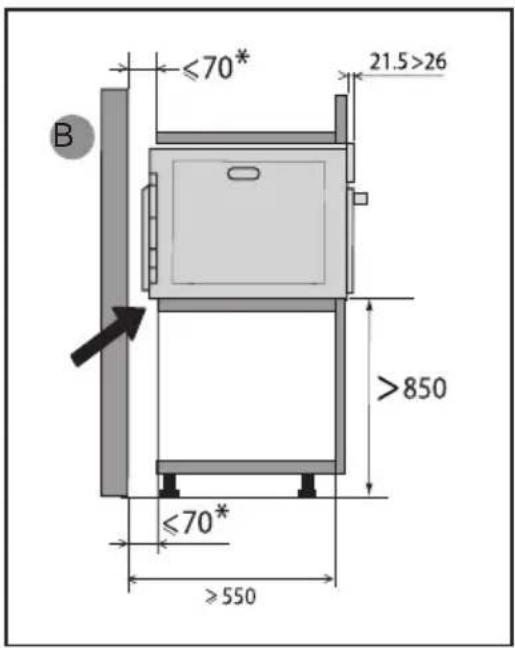

This appliance must be installed more than 850 mm up off the ground. This appliance may be installed in a cabinet column, as indicated on the installation diagram (fig. A).
Caution: if the back of the cabinet is open, the space between the wall and the surface on which the oven rests must be no more than 70 mm* (fig. B).
Do not use your appliance immediately (wait for about 1 to 2 hours) after transferring it from a cold place to a warm place, as condensation may cause a malfunction.
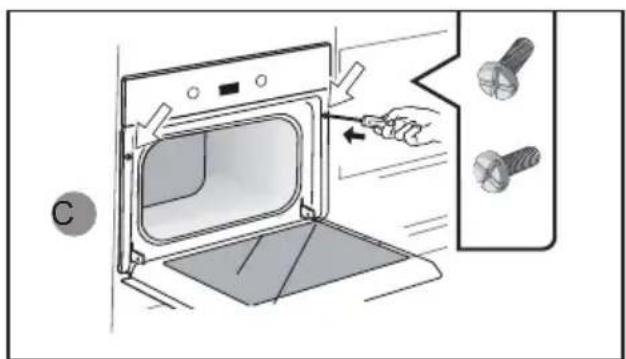
Centre the oven in the cabinet so as to ensure a minimum gap of 10 mm between the appliance and the surrounding unit. The material of the unit supporting the appliance must be heat-resistant (or covered with a heat-resistant material). Drill a 2 mm diameter hole in the cabinet panel to avoid splitting the wood.
For greater stability, attach the oven to the unit with 2 screws through the holes provided on the side panels (fig. C).
• 1 INSTALLATION
ELECTRICAL CONNECTIONS
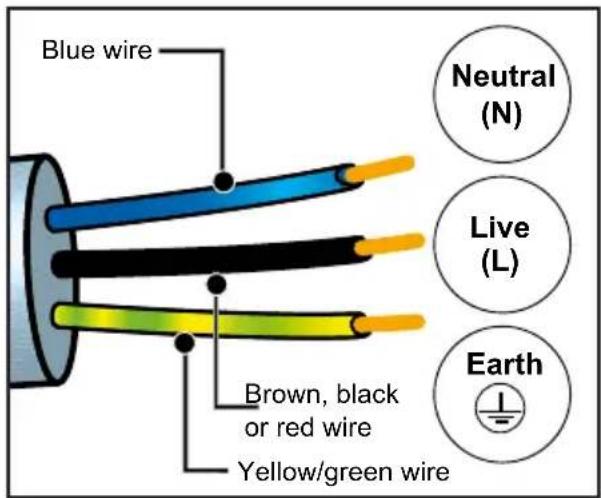
The appliance must be recess-fitted correctly to ensure electrical safety. The electrical connections should be made before the appliance is installed in its The oven is supplied with a standardised power cable with 3 conductors of 1.5mm ^2 (1 live + 1 neutral + earth) which must be connected to a 220-240V single-phase system by means of an IEC 60083 standard power socket or via an all-pole cut-off device in compliance with the installation rules.
Check that:
- the electrical installation has sufficient voltage (220-240 Volts\~ 16 Amps). If the electrical installation of your home requires a modification to connect the appliance, call a qualified electrician.
During maintenance, the appliance must be disconnected from the mains, the fuses must be switched off or removed.

Important:
The safety wire (green-yellow) is connected to the appliance's terminal and must be connected to the installation's earth.
If the oven malfunctions in any way, unplug the appliance or remove the fuse for the oven's connection line.

Important:
We cannot be held responsible for any accident or incident resulting from non-existent, defective or incorrect earthing or non-compliant connection.

Important:
This appliance should be installed by a qualified technician / installer.
• 2 ENVIRONMENT
ENVIRONMENTAL COMPLIANCE
The packaging material of this appliance is recyclable. Please recycle it and help protect the environment by depositing it in municipal containers provided for this purpose.
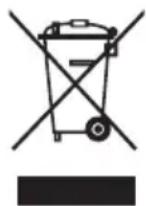
Your appliance also contains many recyclable materials. It is therefore marked with this logo to indicate that used appliances should not be mixed with other waste. Recycling of appliances organised by your manufacturer
is carried out under the best possible conditions, in accordance with the European directive in force on waste electronic and electrical equipment.
Contact your local authority or retailer for information on used appliance collection points close to your home.
We thank you for your help in protecting the environment.
• 3 PRESENTATION OF YOUR APPLIANCE
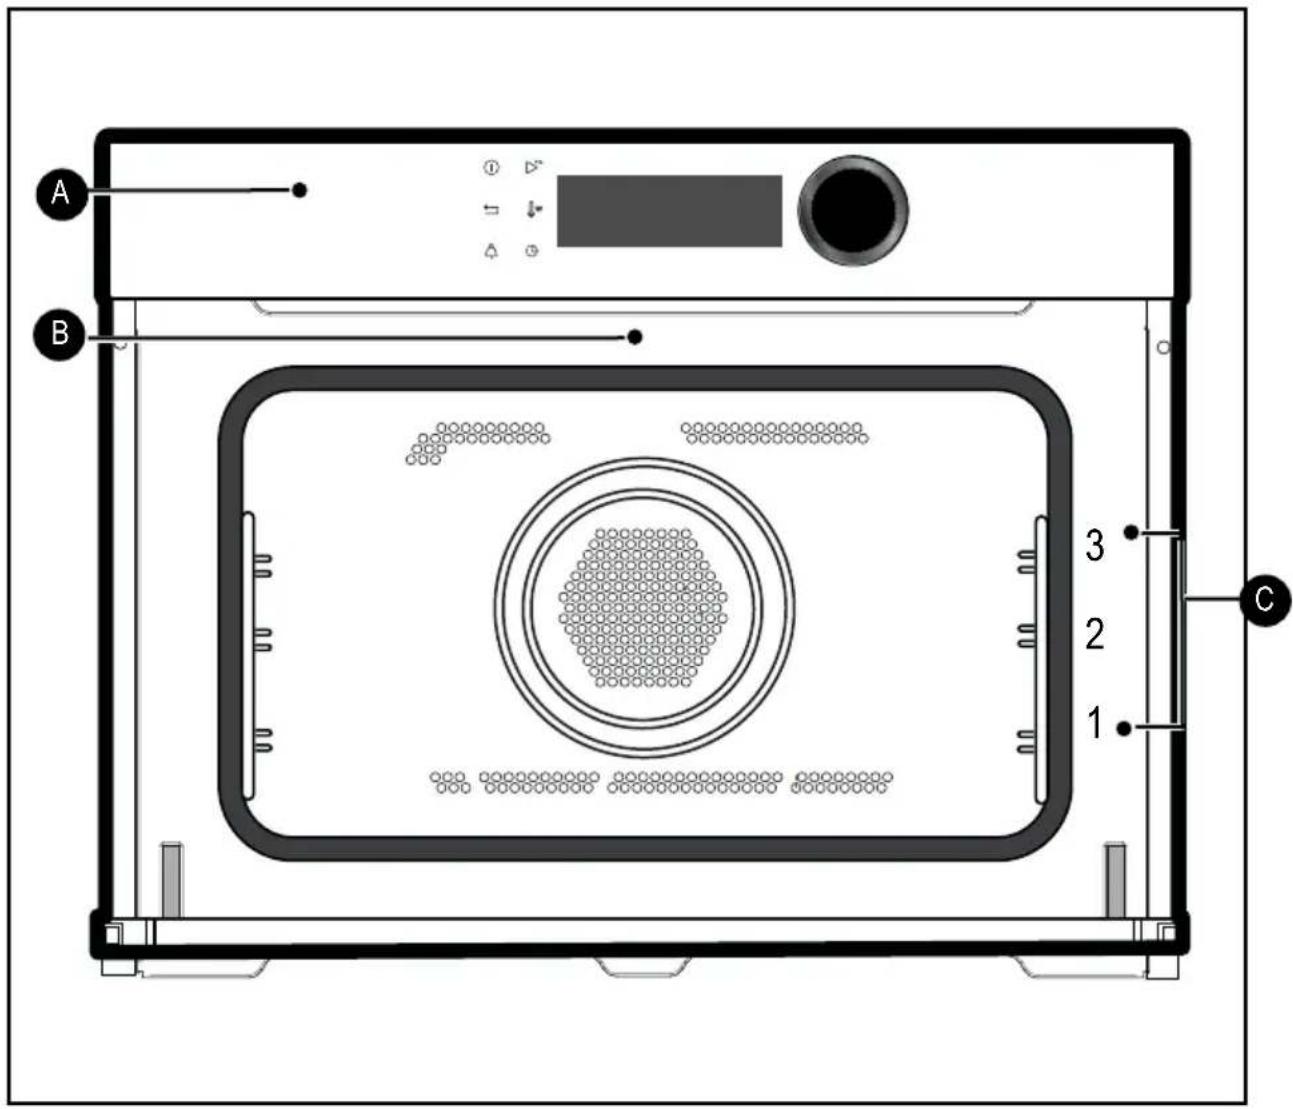
A Control panel
B Light
C Shelf runners (3 heights available)
• 3 PRESENTATION OF YOUR APPLIANCE
THE CONTROLS AND DISPLAY
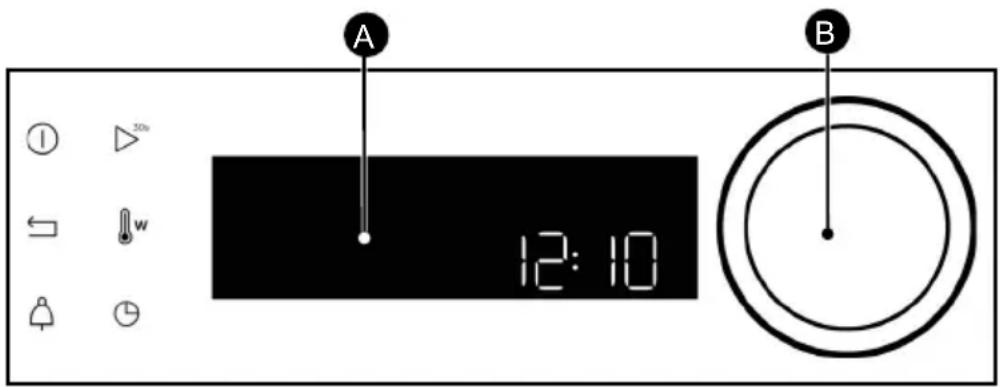
A Display Rotating knob with central button
(cannot be removed):
- Choose programmes, increase or reduce values by turning it.
- Validate each action by pressing the centre.
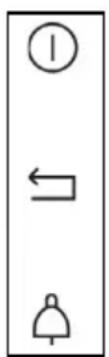
Oven off touch control (press and hold)
Key timer display
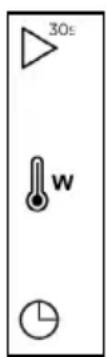
Quick start key for the microwave function (1000W +30s)
Temperature and power settingBack key
Cooking time / delayed start key
LOCKING THE CONTROLS
Press ← and at the same time until the symbol appears on the screen.
Control locking is accessible during cooking or when the oven has stopped.
NOTE: only the stop key Ⓡremains active.
To unlock the keypad, press the back and stop keys at the same time until the padlock symbol disappears from the screen.
CONTROLLING THE TURNTABLE
If you think that there is not enough space for it to rotate freely in the oven, you can stop the turntable before or during the programme.
Press the ▶ and buttons at the same time for a few seconds.
The symbol flashes in the display.
Restarting the turntable:
Press and hold the keys simultaneously again for a few seconds until the symbol disappears in the display.
• 3 PRESENTATION OF YOUR APPLIANCE
ACCESSORIES (DEPENDING ON MODEL)
- Anti-tip safety rack.
Allows you to toast, brown or grill.
The grill rack must never be used with other metal containers in microwave, grill + microwave or convection + microwave mode.
However, you can heat food in an aluminium tray by isolating it from the rack using a plate.
natural_image
Technical line drawing of a mechanical component with ribbed structure (no text or symbols)- Multi-purpose enamel tray, 45 mm drip tray
It can be used half filled with water for boiling food with convection heat. It can serve as a cooking dish.

natural_image
3D model of a rectangular tray with internal compartments and a black arrow pointing to the bottom-right corner (no text or symbols)- Grill + enamel tray
To roast and save the cooking juices, place the grill rack on the drip tray.

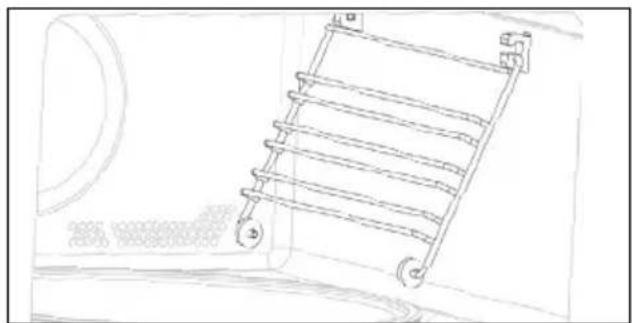
- Shelf runners
2 shelf supports allow you to use the rack at 3 heights.
natural_image
Line drawing of a wall-mounted rack with a circular vent and a hanging hook (no text or symbols)• 3 PRESENTATION OF YOUR APPLIANCE
ACCESSORIES (DEPENDING ON MODEL)

natural_image
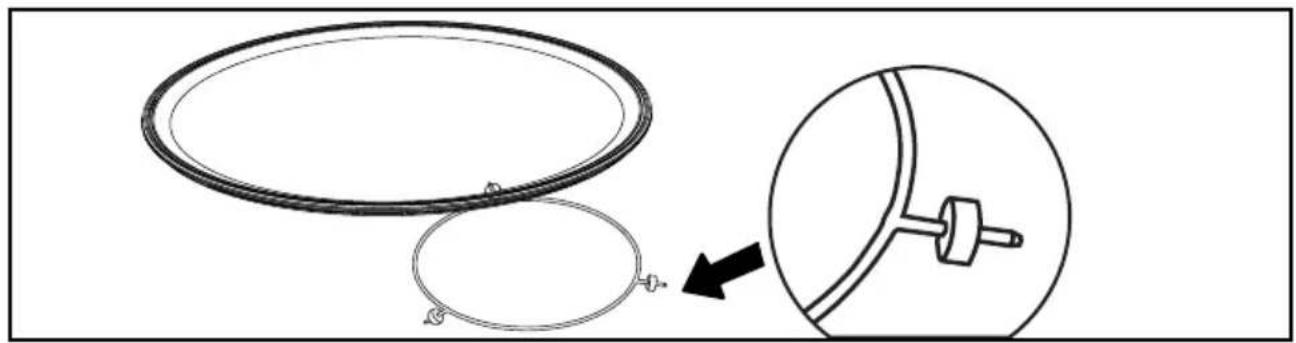
Diagram showing two circular components with a pointer and an arrow pointing to a mechanical component (no text or symbols)TURNTABLE
The turntable allows even cooking of the food without having to handle it.
It rotates in both directions. If it does not rotate, verify that all components are properly positioned.
It can be used as a cooking dish. To remove it, grab it by using the access areas in the cavity.
The turntable allows the glass plate to turn.
If you remove the turntable, avoid getting water in the motor shaft hole.
Do not forget to put the turntable, the roller frame and the glass turntable plate back in.
OPERATING PRINCIPLE
Microwaves used for cooking are electromagnetic waves. They are commonly found in our environment in the form of radio waves, light, or infrared radiation.
Their frequency is in the
2450 Mhz range.
This is how they work:
• They are reflected by metals.
• They pass through any other material.
• They are absorbed by water, fat and sugar molecules.
Do not attempt to manually turn the glass plate as this may damage the drive system. If it does not turn properly, check that there is nothing underneath the plate stopping it from turning.
If the plate is set to the stop position, large dishes can be placed on the entire surface of the oven.
In this case you will need to manually turn the container or mix its contents mid-program.
When food is exposed to microwaves, its molecules begin moving rapidly, causing it to heat up.
The depth of penetration of the waves into the food is about 2.5 cm. If the food is thicker, cooking at its centre occurs by conduction just like traditional cooking.
In essence, microwaves simply cause a thermal change inside the food and are therefore not harmful to health.
USING THE OVEN FOR THE FIRST TIME
- Select the language
The first time you use your oven or after a power cut, turn the knob to select your language and press to confirm your choice.
- Set the time
Adjust the hours and minutes successively by turning the knob, then press to confirm.
Your oven displays the time.
USING THE OVEN FOR THE FIRST TIME
In the general menu, select the "SETTINGS" function by turning the control knob and confirm. Different settings are proposed.
Select the setting you want by turning the control knob then confirm.
Then set your parameters and confirm them.
- Time
Modify the hour, validate, then modify the minutes and validate again. If you oven is connected, the time updates automatically.
- Sound
Your oven emits sounds when you use the keys. To keep these sounds, select ON, otherwise select OFF to deactivate them and confirm.-
- Brightness
Select the desired brightness level.
- Sleep mode
You can also put your display on standby:
ON position: the display switches off after a certain amount of time.
OFF position: the brightness diminishes after a certain amount of time.
- Language
Choose your language and confirm.
- DEMO mode
By default, the oven is configured in normal heating mode.
If it is activated in DEMO mode (ON position), the mode for presenting products in stores, your oven will not warm up.
- Diagnostic
Access the Diagnostic menu if a problem occurs.
If you contact the After-Sales Service, you will be asked to provide the codes displayed in the diagnostic.
• 5 MANUAL COOKING MODE
COOKING
This oven enables you to access 3 types of cooking mode, the settings of which can be adjusted:
- The microwave function.
- The combined microwave functions (microwave + traditional cooking).
- The traditional cooking functions.
MICROWAVE FUNCTIONS
| Position Power | Use | |
| Microwave | 1000W | When quickly heating drinks, water and dishes containing a large amount of liquid.When cooking food containing lots of water (soups, sauces, tomatoes, etc.). |
| 800W/900W | When cooking fresh or frozen vegetables | |
| 500W | When cooking fish and shellfish. 2 level reheating.When cooking dried vegetables over low heat. Reheating or cooking delicate egg-based foods. | |
| 400W/300W | When cooking dairy products or jams at low heat. | |
| 200W | Manual defrost. To soften butter or ice cream. | |
| 100W | When defrosting pastries containing cream. | |
| Defrost | 200W | Thawing delicate food |
| Reheating | 500W | Reheating or cooking delicate foods |

Caution
Do not use the enamel tray.
• 5 MANUAL COOKING MODE

Note: With the combined microwave function, you can use the enamel drip tray with the grill.
COMBINED MICROWAVE FUNCTIONS
| Position | Recommended T°C and power mini - maxi | Use | |
 | Express cooking | 200°C50°C -200°C | This combined function combines microwave and convection cooking, saving you considerable time. |
| 300W100W -300W | Recommended for meat, chicken and roasts cooked in a dish. | ||
 | Grill + microwave | 31 - 4 | This function lets you use the grill and the micro-wave simultaneously, which makes cooking very quick. |
| 500W100W -700W | This function lets you cook and brown foods such as gratin dishes and meats. It can be used before or after cooking, depending on the recipe. | ||
TRADITIONAL COKING FUNCTIONS
| Position | T°C and power mini - maxi | Use | |
 | Fan oven* | 200°C50°C -220°C | Recommended for keeping white meat, fish and vegetables moist |
 | Ventilated grill | 200°C50°C -200°C | Roasts and poultry are juicy and crisp all over.To retain the moist texture of fish steaks. |
 | Grill | 21 - 4 | Recommended for grilling cutlets, sausages, toasting bread and prawns placed on the grill. |
*Cooking mode as per standard EN 60350-1: 2016 to demonstrate compliance with requirements of the energy label of European regulation UE/65/2014.
STARTING A COOKING PROGRAMME
IMMEDIATE COOKING
The programmer must only display the time. It should not be flashing.
Turn the control knob until you get to the cooking function of your choose, then confirm.
SETTING THE COOKING END TIME (delayed start)
You can change the cooking end time if you want it to be delayed by pressing twice on the key, then enter the cooking end time by turning the knob and confirm.
CHANGING THE TEMPERATURE
- Press the 🔊 key, the Temperature flashes and can be adjusted.
- Adjust the temperature by turning the knob and then press to confirm.
- Example: 180°C.
CHANGING THE POWER SETTING
- Press the key, the power (300W) flashes and can be adjusted
- Set the power, using the knob.
- Example: 200 Watts.
- Confirm by pressing the knob.
Once you have set the cooking end time, confirm. An animated picture displays and indicates the cooking end time.
NB: You may start cooking without selecting a duration or end time.
In this case, when you feel that you have cooked your dish for long enough, stop cooking (see the "Stopping cooking in progress" chapter).
STOPPING COOKING IN PROGRESS
To stop a cooking programme in progress, press the control knob.
"STOP" displays on the screen
Confirm by pressing the knob.
PROGRAMMING THE DURATION
Use the immediate cooking programme, then press ☐ the cooking time flashes and can be set.20
Turn the knob to adjust the cooking time. Press to confirm.
Your oven has the “SMART ASSIST” function which, when programming a cooking time, will suggest a cooking time which can be modified depending on the selected cooking mode.
The cooking time is saved automatically after a few seconds.
• 6 AUTOMATIC COOKING MODE
PRESENTATION OF DISH CATEGORIES
In the general menu, select the "AUTO COOKING or AUTO DEFROST" function by turning the control knob and confirm. Different dish categories are available to you (see table):
| FOOD |
| FRESH FIBROUS VEGETABLES |
| FRESH VEGETABLES |
| FROZEN VEGETABLES |
| EXPRESS POULTRY (COMBINED FUNCTION) |
| EXPRESS BEEF (COMBINED FUNCTION) |
| FISH |
| FRESH PIZZA (COMBINED FUNCTION) |
| EXPRESS FROZEN PIZZA (COMBINED FUNCTION) |
| FROZEN PIZZA (TRADITIONAL COOKING) |
| EXPRESS FRESH DISH (MICROWAVE) |
| READY-TO-COOK FROZEN DISH |
| EXPRESS FROZEN DISH |
| SAVOURY TART |
| QUICHE |
| POTATO GRATIN |
| FOOD |
| BREAD |
| PREPARED DISH |
| MEAT |
| POULTRY |
| FISH |
• 7 OTHER FUNCTION
TIMER FUNCTION
This function can only be used either when the oven is off or during cooking.
- Press the key.
Set the minute minder by turning the knob and then press to confirm. The timer starts.
Once the time has lapsed, there is a sound signal. To stop it, press any key.
Note: You can modify or cancel the timer at any time.
Press the 🔊 key again and set your time or set it to 0m00s to cancel. Pressing the control knob during the countdown will also stop the timer.
• 8 CARE
CLEANING THE INNER AND OUTER SURFACES
We recommend you clean the oven regularly and remove any deposits of food inside and outside of the appliance. Use a damp sponge and a little soap. If the appliance is not cleaned regularly, its surface could become damaged, permanently affecting the appliance's lifespan and possibly causing a safety hazard.
if the door or door seal are damaged, the oven should not be used until it has been repaired by a qualified person.
The use of abrasive products, alcohol or thinners is not recommended as they are likely to damage the appliance.
If the oven smells bad or is dirty, boil a cup of water with lemon juice for 2 minutes and clean the walls with a small amount of washing up liquid.
The turntable can be removed for easy cleaning. To remove it, pick it up using the hand-holds provided for the purpose. If you remove the drive hub, avoid getting water in the motor shaft hole. Remember to put back the support, the support wheels and the turntable.
Warning
Do not use scouring products, abrasive sponges or metal scrapers to clean the glass oven door as this could scratch the surface and cause the glass to shatter.
REPLACING THE LIGHT BULB
Contact the After Sales Service for any work on the light bulb, or a qualified professional accredited to work on the brand.
• 9 ANOMALIES AND SOLUTIONS
Questions Troubleshooting and Solutions
| - Default code starting with "F". Your oven has | detected a problem.Stop the oven for 30 minutes.If the fault is still there, cut off the power supply for at least one minute. If the fault persists, contact the After Sales Service. |
| - The oven is not heating. Check that the oven is correctly connected and that your installation's fuse is not out of service. Check that the oven is not set to "DEMO" mode (see settings menu). | |
| - The oven light is not working. Replace the bulb or fuse. Make sure the oven is properly plugged in. See chapter on replacing the light bulb | |
| - The cooling fan continues to operate after the oven stops. | This is normal, the fan may run for up to one hour after cooking to cool down the oven. If it continues beyond this, contact the After Sales Service. |
FUNCTIONAL SUITABILITY TESTS IN ACCORDANCE WITH IEC/ EN/ EN 60705 STANDARDS
The International Electrotechnical Commission, SC.59K, has established a standard for comparative performance tests carried out on various microwave ovens. We recommend the following for this appliance:
| Test Load Time | time | Power selector | Containers / Tips | |
| Egg cream(12.3.1) | 1000 g 16- | 18 min 500W Pyrex 227 | On the turntable plate | |
| Sponge cake (12.3. | 475 g 6-7 | minutes 700W Pyrex 827 | On the turntable plate | |
| Meat loaf(12.3.3) | 900 g 14 min 700W Pyrex 838 | Cover with cling film.On the turntable plate | ||
| Defrost meat(13.3) | 500 g 11- | 2 min 200W On a flat plate | On the turntable plate | |
| Defrost raspberries(B.2.1) | 250 g 6-7 | min 200W On a flat plate | On the turntable plate | |
| Potato gratin(12.3.4) | 1100 g 23- | 25 min Slow grill | + 700 W | Pyrex 827On the turntable plate |
| Chicken(12.3.6) | 1200 g 24- | 26 min High Grill | + 500 W | Place on the grill assembly+ Enamel plate.Insert at level 1 from the bottomTurn at half-time |
| 35-40 min Fan | assisted200°C+ 200 W | In an enamelled earthenware dishPlace on the rack insertedat level 1 from the bottom | ||
| Cake (12.3.5) | 700 g 20 min | Fan | assisted220°C+ 200 W | Pyrex 828Place on the grill rack at level 1 |

VÁŽENÁ ZÁKAZNICE, VÁŽENÝ ZÁKAZNÍKU
natural_image
Technical line drawing of a mechanical component with ribbed structure (no text or symbols)natural_image
3D model of a rectangular tray with internal compartments and a black arrow pointing to the bottom-right corner (no text or symbols)- Vodicí lišty
natural_image
Line drawing of a ladder mounted on a wall, with no visible text or symbols• 3 POPIS VAŠEHO PŘÍSTROJE
PŘÍSLUŠENSTVÍ (PODLE MODELU)

natural_image
Diagram showing two circular components with a connector and an arrow pointing to a mechanical component (no text or symbols)OTOČNÝ TALÍŘ
TILBEH∅R (IF∅LGE MODELLEN)
natural_image
Technical line drawing of a mechanical component with ribbed structure (no text or symbols)- Emaljeret universalplade, bradepande 45 mm
natural_image
3D model of a rectangular tray with internal compartments and a black arrow pointing to the bottom-right corner (no text or symbols)- Rist + emaljeret bradepande
Sæt risten på bradepanden for at stege og opsamle stegesaft eller fedt.

- Ribberne
natural_image
Line drawing of a ladder mounted on a wall, with no visible text or symbols• 3 BESKRIVELSE AF APPARATET
TILBEH∅R (IF∅LGE MODELLEN)

natural_image
Diagram showing two circular components with a pointer and an arrow pointing to a mechanical component (no text or symbols)DREJENDE PLADE
GENNEMF∅RE EN TILBEREDNING
ZUBEHÖR (JE NACH MODELL)
natural_image
Technical line drawing of a mechanical component with ribbed structure (no text or symbols)natural_image
3D model of a rectangular tray or container with internal compartments and a black arrow pointing to the bottom-right corner (no text or symbols)natural_image
Technical line drawing of a structural beam with support details and an inset detail (no text or symbols)- Einschubleisten
natural_image
Line drawing of a ladder-like structure with wheels, mounted on a curved surface (no text or symbols)ZUBEHÖR (JE NACH MODELL)

natural_image
Diagram showing two circular components with a connector and an arrow pointing to a mechanical component (no text or symbols)DREHTELLER
central (no desmontable):
natural_image
Technical line drawing of a mechanical component with ribbed structure (no text or symbols)- Bandeja esmaltada multiusos, grasera 45 mm
natural_image
3D model of a rectangular tray with internal compartments and a black arrow pointing to the bottom-right corner (no text or symbols)- Los niveles
natural_image
Line drawing of a wall-mounted rack with a circular vent and a hanging hook (no text or symbols)natural_image
Diagram showing two circular components with a connector and an arrow pointing to a mechanical component (no text or symbols)EL PLATO GIRATORIO
natural_image
Technical line drawing of a mechanical component with ribbed structure (no text or symbols)natural_image
3D model of a rectangular tray with internal compartments and a black arrow pointing to the bottom-right corner (no text or symbols)- Ράγες στήριξης
natural_image
Line drawing of a ladder mounted on a wall, with no visible text or symbolsnatural_image
Diagram showing two circular components with a connector and an arrow pointing to a mechanical component (no text or symbols)5 MANUAALINEN KYPSENNYSTILA.... 15-17
7 MUUT TOIMINNOT ....19
natural_image
Technical line drawing of a mechanical component with ribbed structure (no text or symbols)
natural_image
3D model of a rectangular tray with internal compartments and a black arrow pointing to the bottom-right corner (no text or symbols)- Peltitasot
natural_image
Line drawing of a ladder mounted on a wall, with no text or symbols present• 3 LAITTEEN KUVAUS
LISÄVARUSTEET (MALLIKOHTAISET)

natural_image
Diagram showing two circular components with a connector and an arrow pointing to a mechanical component (no text or symbols)PYÖRIVÄ ALUSTA
• 5 MANUAALINEN KYPSENNYSTILA
KYPSENNYKSEN KÄYTTÖ 6
• 5 MANUAALINEN KYPSENNYSTILA

natural_image
Technical line drawing of a mechanical component with ribbed structure (no text or symbols)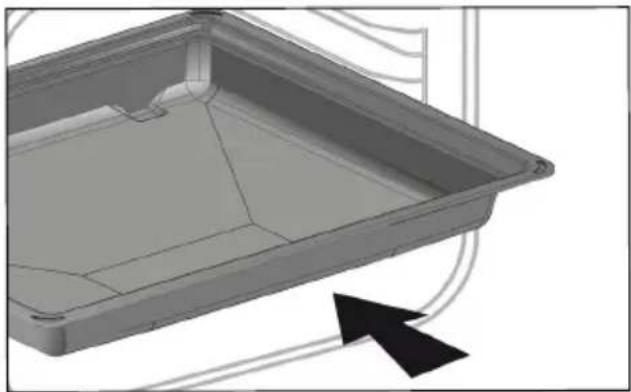
natural_image
3D model of a rectangular tray with internal compartments and a black arrow pointing to the bottom-right corner (no text or symbols)- A szintemelők
natural_image
Line drawing of a ladder mounted on a wall, with no text or symbols present• 3 A KÉSZÜLÉK BEMUTATÁSA
TARTOZÉKOK (MODELLTÓL FÜGGÖEN)

natural_image
Diagram showing two circular components with a connector and an arrow pointing to a mechanical component (no text or symbols)A FORGÓTÁNYÉR

natural_image
Technical line drawing of a mechanical component with ribbed structure (no text or symbols)- Teglia smaltata multiuso, leccarda 45 mm.
natural_image
3D model of a rectangular tray with internal compartments and a black arrow pointing to the bottom-right corner (no text or symbols)- La griglia + teglia smaltata
- I ripiani
natural_image
Line drawing of a ladder mounted on a wall, with no visible text or symbols• 3 PRESENTAZIONE DELL'APPARECCHIO
GLI ACCESSORI (A SECONDA DEL MODELLO)

natural_image
Diagram showing two circular components with a connector and an arrow pointing to a mechanical component (no text or symbols)IL PIATTO GIREVOLE
PROGRAMMARE LA DURATA
natural_image
Technical line drawing of a mechanical component with ribbed structure (no text or symbols)natural_image
3D model of a rectangular tray with internal compartments and a black arrow indicating direction (no text or symbols)- De niveauhouders
natural_image
Line drawing of a ladder mounted on a wall, with no visible text or symbols• 3 VOORSTELLING VAN UW APPARAAT
DE ACCESSOIRES (AFHANKELIJK VAN HET MODEL)
natural_image
Diagram showing two circular components with a pointer and an arrow pointing to a mechanical component (no text or symbols)HET DRAAIPLATEAU
natural_image
Technical line drawing of a mechanical component with ribbed structure (no text or symbols)- Flerbrukspanne, langpanne 45 mm
natural_image
3D model of a rectangular tray with internal compartments and a black arrow pointing to the bottom-right corner (no text or symbols)- Rist + flerbrukspanne
- Riller
natural_image
Line drawing of a wall-mounted rack with a circular vent and a hanging hook (no text or symbols)• 3 PRESENTASJON AV APPARATET
TILBEH∅R (AVHENGIG AV MODELL)

natural_image
Diagram showing two circular components with a pointer and an arrow pointing to a mechanical component (no text or symbols)ROTERENDE TALLERKEN
Den roterende tallerkenen varmer opp matvarene like mye overalt.
9 ROZWIĄZYWANIE PROBLEMÓW....20
10 TESTY ZDOLNOŚCI DO WYKONYWANIA OKREŚLONEJ FUNKCJI ...... 21
WAŻNE ZALECENIA BEZPIECZEŃSTWA I ŚRODKI OSTROŻNOŚCI
WAŻNE ZALECENIA BEZPIECZEŃSTWA – TĘ CZEŚĆ NALEŻY UWAŻNIE PRZECZYTAĆ I ZACHOWAĆ DO WGLĄDU.
WYBÓR MIEJSCA INSTALACJI I WBUDOWANIA


natural_image
Line drawing of a rectangular metal grate or rack structure (no text or symbols)natural_image
3D model of a rectangular tray with internal compartments and a black arrow indicating direction (no text or symbols)- Stopnie
natural_image
Line drawing of a ladder with wheels, no text or symbols present• 3 PREZENTACJA URZĄDZENIA
AKCESORIA (W ZALEŻNOŚCI OD MODELU)

natural_image
Diagram showing two circular components with a connector and an arrow pointing to a mechanical component (no text or symbols)PŁYTA OBROTOWA
9 ANOMALIAS E SOLUÇÕES....20
natural_image
Line drawing of a mechanical rack or ladder component (no text or symbols)- Pratos vidrado multiusos, pingadeira de 45 mm
natural_image
3D model of a rectangular tray with internal compartments and a black arrow pointing to the bottom-right corner (no text or symbols)- Níveis
natural_image
Line drawing of a ladder mounted on a wall, with no visible text or symbolsnatural_image
Diagram showing two circular components with a connector and an arrow pointing to a mechanical component (no text or symbols)PRATO GIRATÓRIO

natural_image
Technical line drawing of a mechanical component with ribbed structure (no text or symbols)natural_image
3D model of a rectangular tray or container with internal compartments and a black arrow pointing to the bottom-right corner (no text or symbols)- Направляющие
natural_image
Line drawing of a wall-mounted rack with a circular vent and a hanging hook (no text or symbols)natural_image
Diagram showing two circular components with a connector and an arrow pointing to a mechanical component (no text or symbols)ВРАЩАЮЩЕЕСЯ БЛЮДО

natural_image
Technical line drawing of a mechanical component with ribbed structure (no text or symbols)
natural_image
3D model of a rectangular tray or container with internal compartments and a black arrow pointing to the bottom-right corner (no text or symbols)- Stupienky
natural_image
Line drawing of a ladder mounted on a wall, with no visible text or symbols• 3 PREZENTÁCIA VÁŠHO ZARIADENIA
PRÍSLUŠENSTVO (V ZÁVISLOSTI OD MODELU)

natural_image
Diagram showing two circular components with a connector and an arrow pointing to a mechanical component (no text or symbols)TOČŇA
VAL AV PLACERING OCH INBYGGNAD
A
B
550 550 450
447
547
C
natural_image
Technical line drawing of a mechanical component with ribbed structure (no text or symbols)natural_image
3D model of a rectangular tray with internal compartments and a black arrow pointing to the bottom-right corner (no text or symbols)natural_image
Line drawing of a wall-mounted rack with a circular vent and a hanging hook (no text or symbols)• 3 PRESENTATION AV APPARATEN
natural_image
Diagram showing two circular components with a connector and an arrow pointing to a mechanical component (no text or symbols)DEN ROTERANDE TALLRIKEN
natural_image
Technical line drawing of a mechanical component with ribbed structure (no text or symbols)natural_image
3D model of a rectangular tray with internal compartments and a black arrow pointing to the bottom-right corner (no text or symbols)- Яруси