
Z40 Station - Broom DREAME - Free user manual and instructions
Find the device manual for free Z40 Station DREAME in PDF.

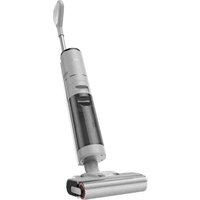
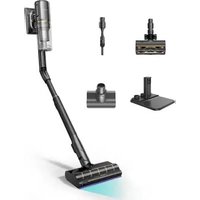
| Product Type | Stick vacuum cleaner with wash |
| Brand | DREAME |
| Model | Z40 Station |
| Power Supply | 100-240 V ~50/60 Hz 0.8 A (input), 34 V ---0.9 A (output) |
| Battery Type | Rechargeable lithium-ion |
| Charging Time | Approximately 4 hours |
| Charge Indicator | Display screen with battery percentage |
| Main Functions | Suction (3 modes: eco, auto, turbo) and wash (rotating jet mop) |
| Particle Detection | Dirt level indicator and particle types (10 μm, 50 μm, 200 μm, 500 μm) |
| Dust Station | Included, with dust bag and automatic collection |
| Included Accessories | Dust station, storage stand, charger, anti-shedding tool, extension hose, lighting omnibrush, soft dusting brush, rotating dusting brush, combo tool, flexible adapter, mini motorized brush, dust bag x2, rotating jet cloth, extension rod, measuring cup, mop x4, spare battery |
| Filter Maintenance | Clean every 4 to 6 months, replacement recommended |
| Dust Bag Maintenance | Replace every 3 months (or when button blinks orange) |
| Mop Cloth Maintenance | Rinse and dry; replace every 3 to 6 months |
| Safety | Battery overheat protection, error shutdown |
| Environmental Information | Complies with WEEE regulations; recyclable |
Frequently Asked Questions - Z40 Station DREAME
User questions about Z40 Station DREAME
0 question about this device. Answer the ones you know or ask your own.
Ask a new question about this device
Download the instructions for your Broom in PDF format for free! Find your manual Z40 Station - DREAME and take your electronic device back in hand. On this page are published all the documents necessary for the use of your device. Z40 Station by DREAME.
USER MANUAL Z40 Station DREAME
Registration Quick Start

A-1
A-2
A-3

A-4
A-5
B-1
natural_image
Simple line drawing of a mechanical component with a downward arrow and base, no text or symbols present.B-2
flowchart
graph TD
    A["Top Component"] --> B["Bottom Component"]
    B --> C["Left Component"]
    B --> D["Right Component"]
    C --> E["Left Base"]
    D --> F["Right Base"]
    E --> G["Bottom Base"]
    F --> H["Left Base"]
C-1
natural_image
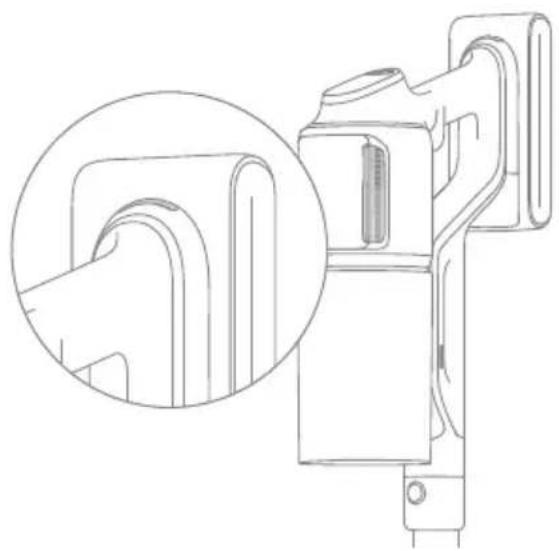
Technical line drawing of a vertical electric shock absorber with attached mounting flange and wiring, shown in 3D perspective (no text or symbols)C-2
natural_image
Technical line drawing of a mechanical device with labeled components and wiring (no text or symbols present)C-3 C-4
natural_image
Technical line drawing of a mechanical device with an inset close-up view (no text or symbols)
D-1
D-2

D-3
D-4
natural_image
Line drawing of a sewing machine tool on a base (no text or symbols)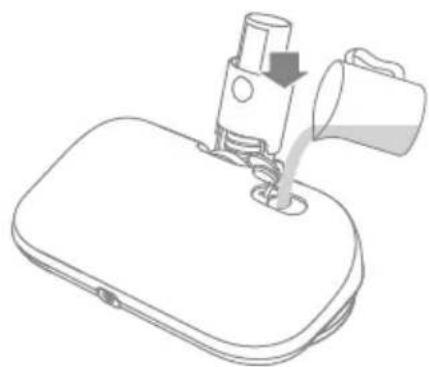
natural_image
Line drawing of a sewing machine needle and handle assembly (no text or symbols)D-5 D-6

natural_image
Diagram showing a vertical mechanical device with an upward arrow indicating motion or assembly (no text or symbols present)

D-7
natural_image
Technical line drawing of a vertical mechanical device with a circular button and base plate (no text or symbols)D-8

natural_image
Line drawing of a mop with a handle and spool, showing mechanical components and wiring (no text or symbols)D-9
natural_image
Line drawing of a mechanical component with no visible text or symbolsD-10
natural_image
Line drawing of a hand holding a brush near a wall, with no visible text or symbolsD-11
natural_image
Line drawing of a hairdryer applying paint to a grid-patterned surface (no text or symbols)D-12
natural_image
Technical line drawing of a mechanical assembly with no visible text or symbolsD-13 D-14
natural_image
Technical line drawing of a mechanical assembly with a magnified inset showing a component detail (no text or symbols)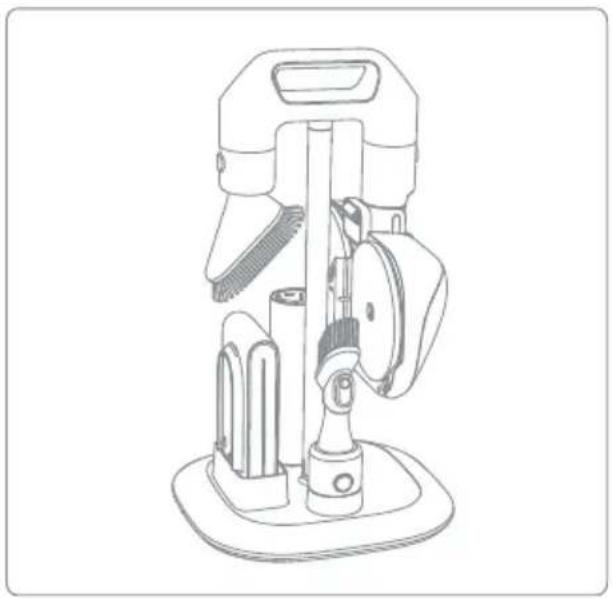
natural_image
Line drawing of a mechanical device with no visible text or symbolsE-1 E-2
natural_image
Line drawing of a handheld device with a scroll wheel and directional arrow indicating rotation (no text or symbols)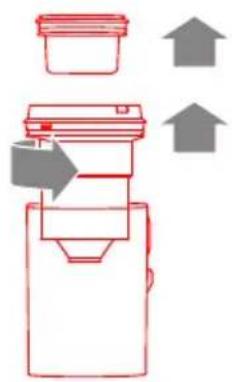
E-3

natural_image
Illustration of six different household items: a faucet, sun, circular arrow, container, trash bin, and bucket (no text or symbols)E-4
natural_image
Line drawing of a handheld device with a scroll wheel and directional arrow indicating rotation (no text or symbols)E-5 E-6
natural_image
Diagram of a handheld device with a cylindrical component and a downward arrow indicating compression or disassembly (no text or symbols present)
natural_image
Illustration of a faucet releasing water into two red waste bins with arrows indicating flow (no text or symbols)E-7


natural_image
Simple line drawing of a red trash bin (no text or symbols)E-8 E-9
natural_image
Line drawing of a hand using a tool to press or install a component on a cylindrical object (no text or symbols)E-10
natural_image
Line drawing of a hand holding a tool next to a cylindrical device (no text or symbols)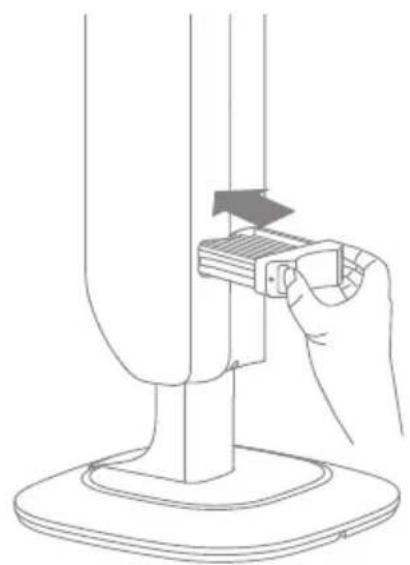
natural_image
Line drawing of a hand using a tool to press or install a component on a vertical stand (no text or symbols)E-11
natural_image
Line drawing of a hand placing a red object into a vertical container, with a separate empty bucket nearby (no text or symbols)E-12

natural_image
Illustration of a hand inserting a red component into a vertical cylindrical device (no text or symbols)E-13
natural_image
Line drawing of a hand holding a tool interacting with a vertical mechanical component (no text or symbols)E-14
E-15
natural_image
Technical line drawing of a mechanical device with scissors, handle, and base components (no text or symbols)E-16
E-17
natural_image
Technical line drawing of a mechanical assembly with no visible text or symbolsE-18
natural_image
Diagram of a mechanical device with an inset showing a circular button labeled '←' (no text or symbols present)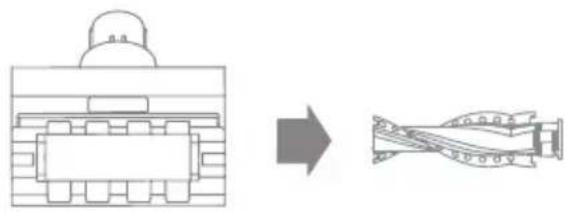
natural_image
Diagram showing a mechanical component before and after transformation, with no visible text or symbols.E-19

E-20
natural_image
Diagram illustrating the process of a water supply system with a pump, fan, and solar radiation (no text or labels)E-21
natural_image
Technical line drawing of a handheld device with no visible text or symbolsSafety Instructions
EN
Warning

Product Overview
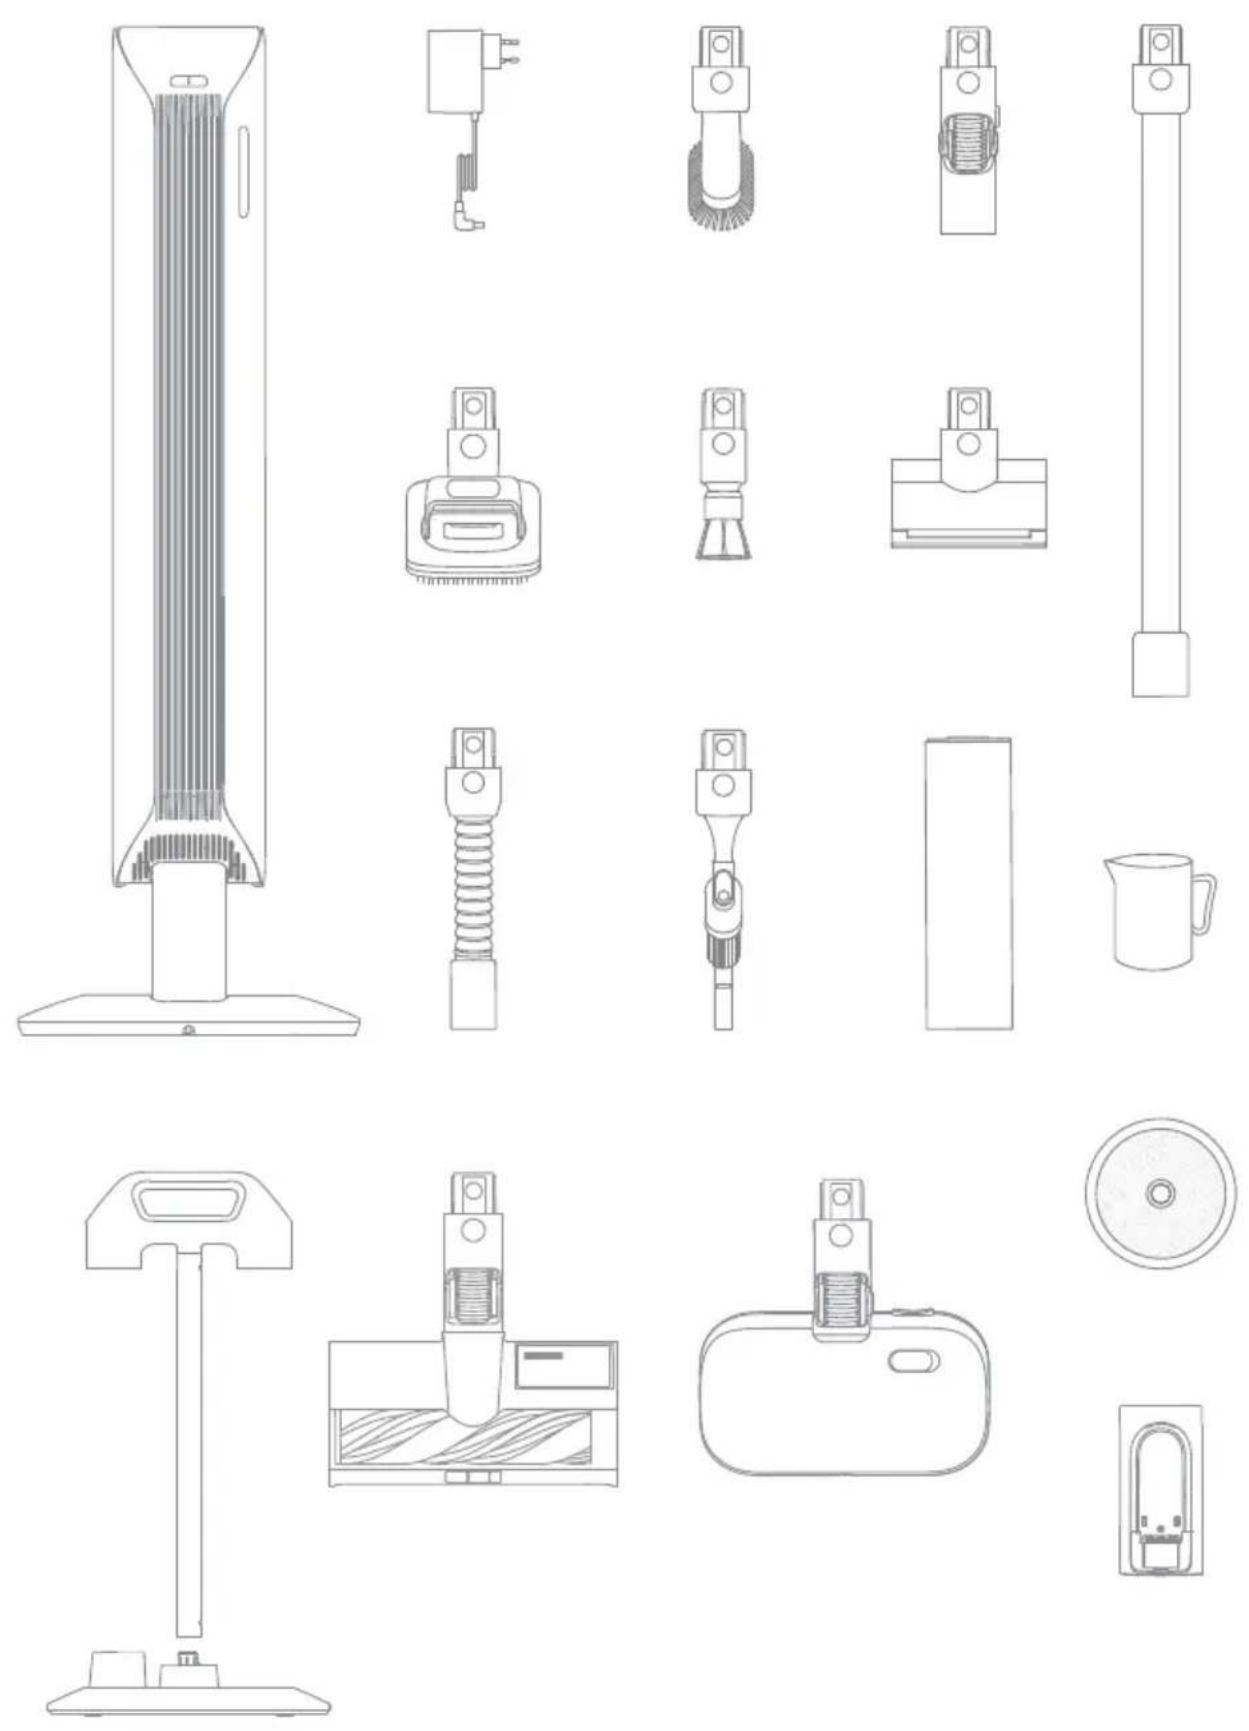
Accessories
- Dust-Removal Hub
- Charger
- Pet Deshedding Tool
- Extension Hose
- Illumination Omni-Brush
- Soft Dusting Brush
- Rotating Soft Dusting Brush
- Combination Tool
- Flexible Adapter
- Motorized Mini-Brush
- Dust Collection Bag x2 (x1 pre-installed)
- Spin Spray Mop
- Extension Rod
- Measuring Cup
- Mop Pad x4 (x2 pre-installed)
-
Spare Battery Pack
-
Accessory Storage Mount (Support Rod ×1, Storage Mount ×1)
Fig. A-1
Note: The illustrations in this manual are indicative only. The actual product may differ.
Component Names
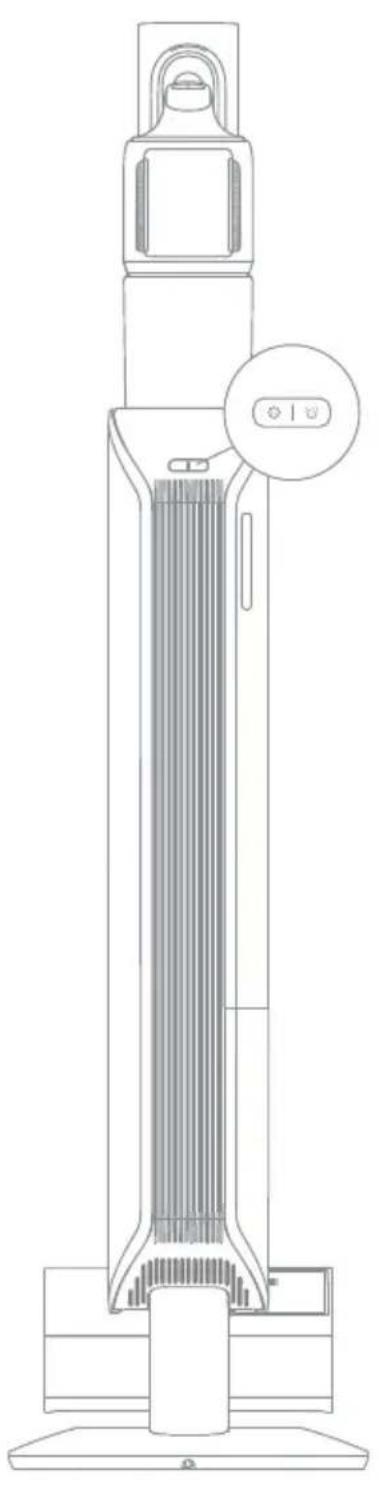
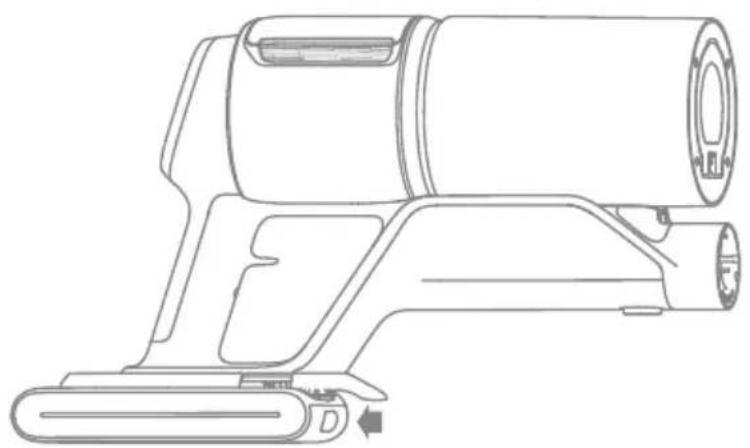
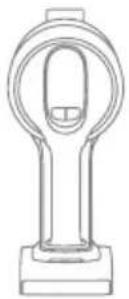
Vacuum Body
- Dust Cup
- Dust Cup Release Button
- Charging Contacts
- Battery Pack Release Button
- Display Screen
- ⏻ Power Button
- ○ Suction Level Switch
- Battery Status Indicator
- Antistatic Contact
Fig. A-2
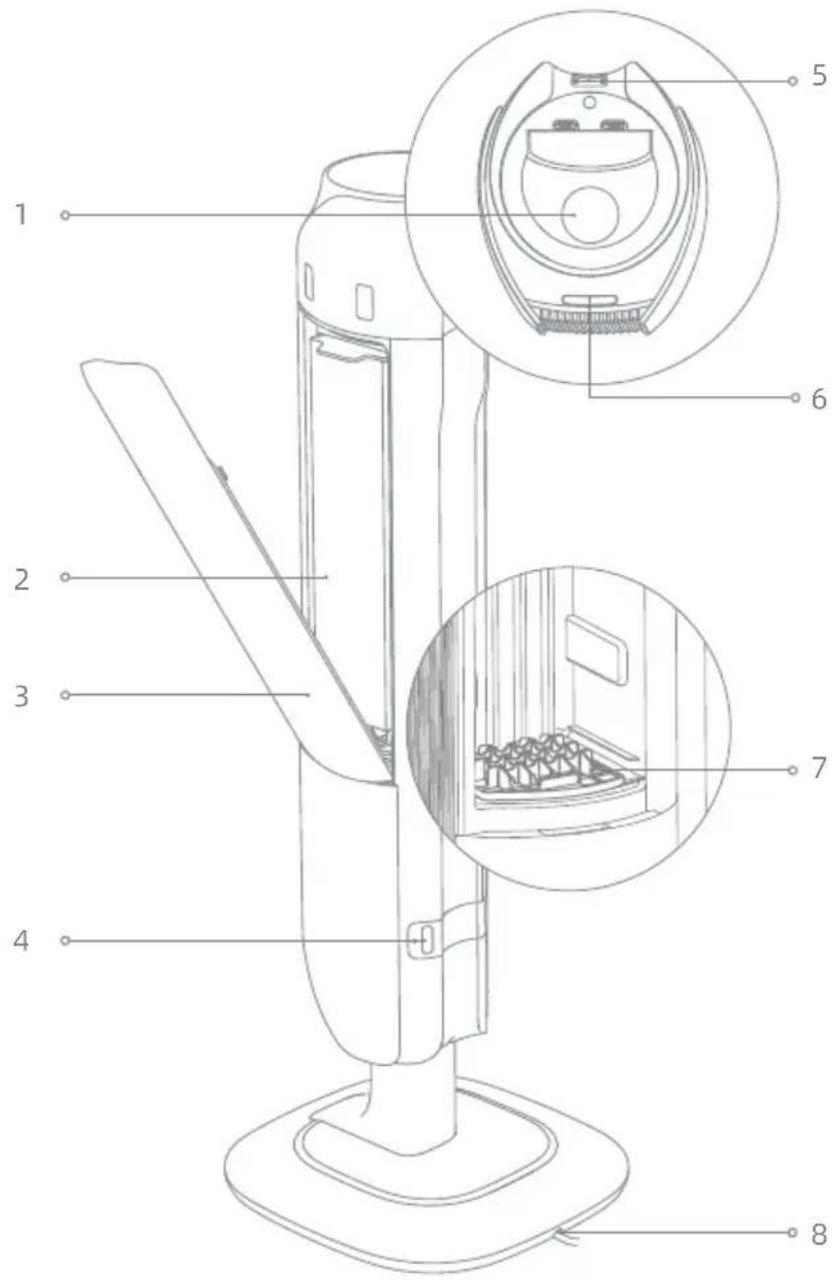
Display Screen
-
Dirty Level Indicator The color changes with the amount of dust in real time (only in Auto Mode).
-
Particulate Matter Amount Indicator
-
Suction Level
Eco
Auto
Turbo
-
Suction Level Switch Press briefly to switch between eco, auto and turbo mode.
-
Particulate Matter Types
10μm (eg. pollen)
50μm (eg. hair)
200μm (eg. dust)
500μm (eg. mite)
-
Battery Level Percentage When the display screen shows "LO", it indicates that the battery level is lower than 10%.
-
Power Button Press briefly to turn on/off
Fig. A-3
- Charging Contacts


-
Dust Cabinet Filter
-
Power Cord
Fig. A-4

Fig. A-5
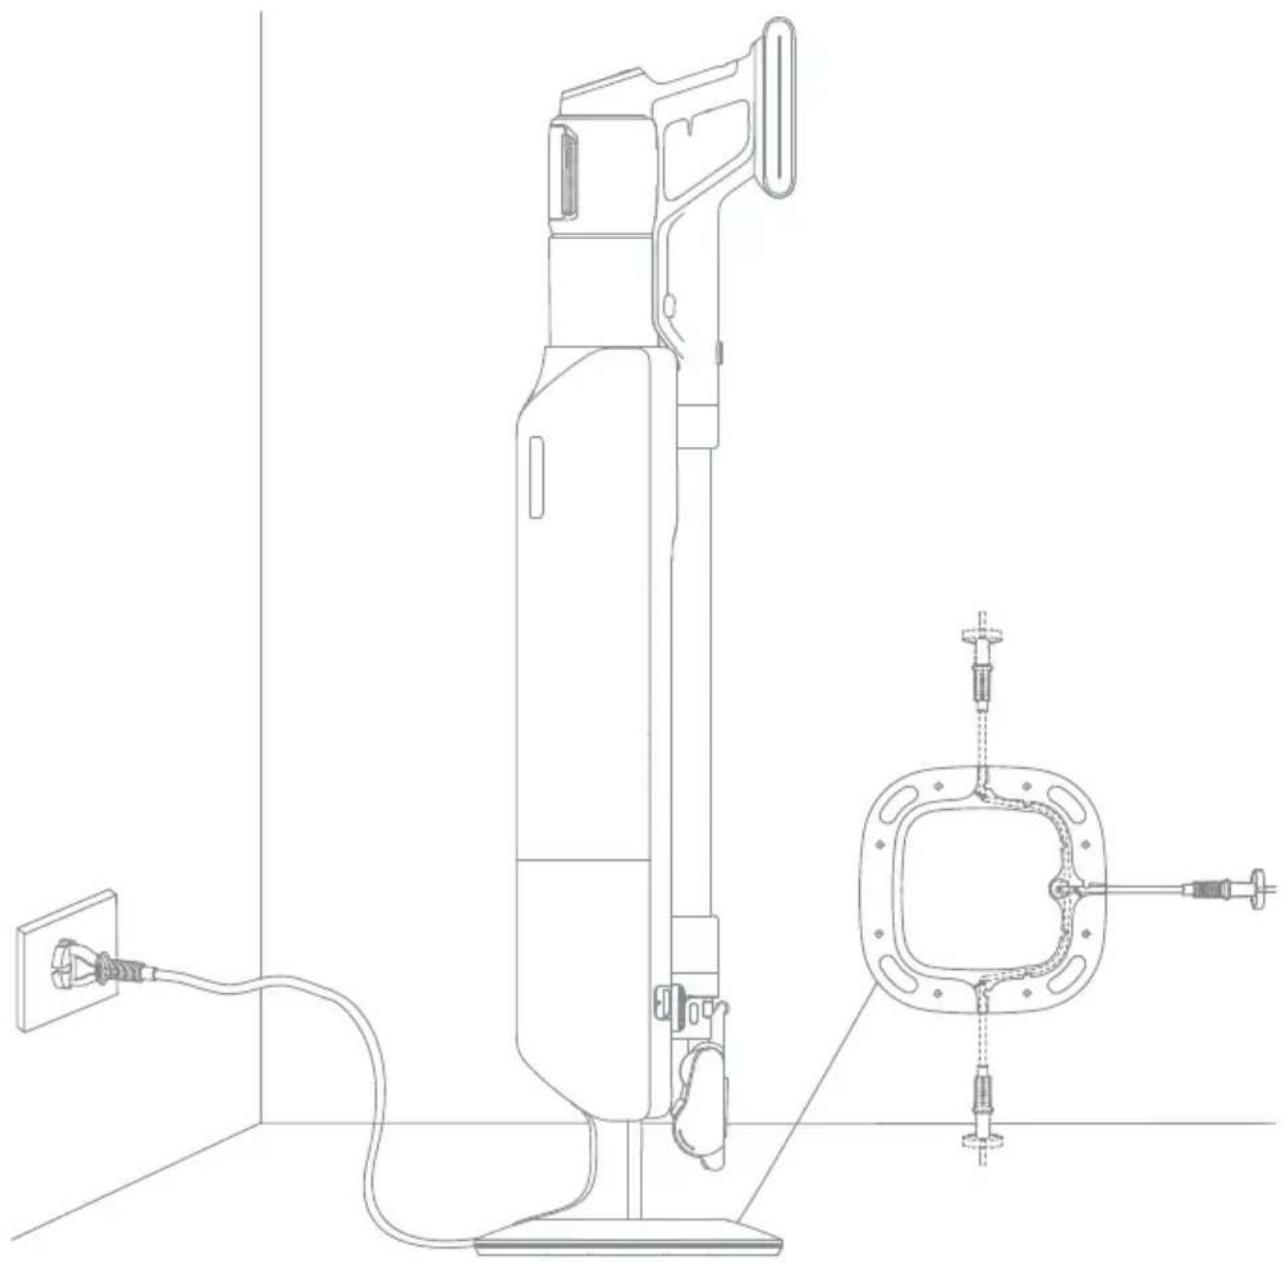
Installation
Installing the Accessory Storage Mount
Insert the support rod vertically into the storage mount and ensure it is installed into place.
Fig.B-1
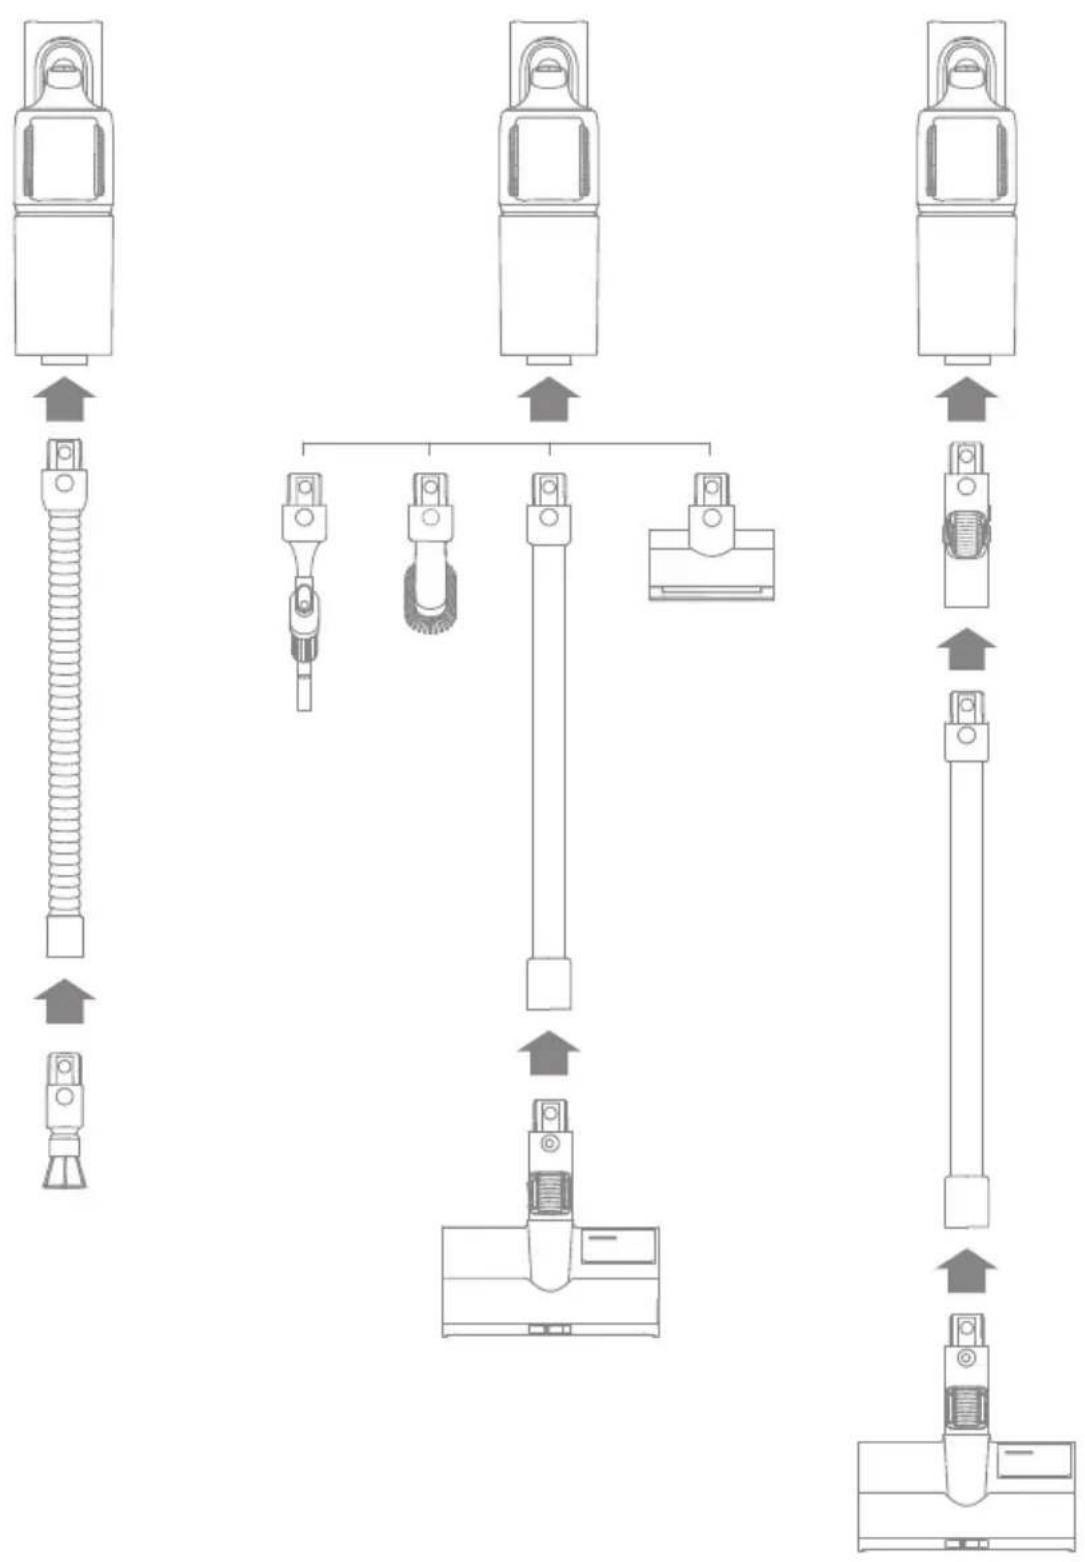
Installing the Accessories
Note:
- It is not recommended to use the motorized mini-brush with the extension rod.
- Please install the accessories according to the actual cleaning needs.
- It is recommended to use the flexible adapter when cleaning the low-lying furniture and not recommended to be connected to the vacuum body all the time for daily floor cleaning.
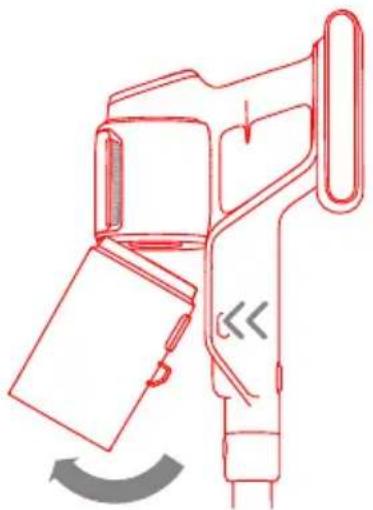
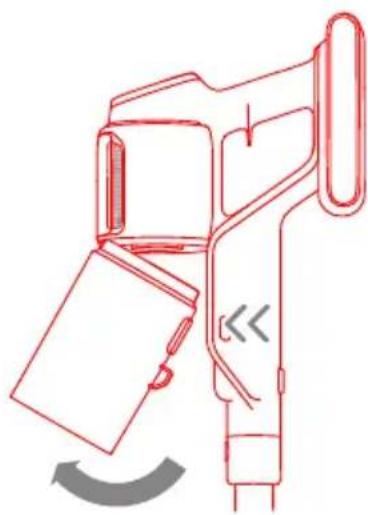
Fig. B-2
Note:
- The vacuum cannot be used while charging.
- When fully charged, the battery status indicator will turn off after 5 minutes and the vacuum will enter the power saving mode.
- This will take about 4 hours. Vacuuming at Turbo mode for a prolonged period will cause the battery to heat up, which increases charging time. Allow the vacuum to cool down for 30 minutes before charging it.
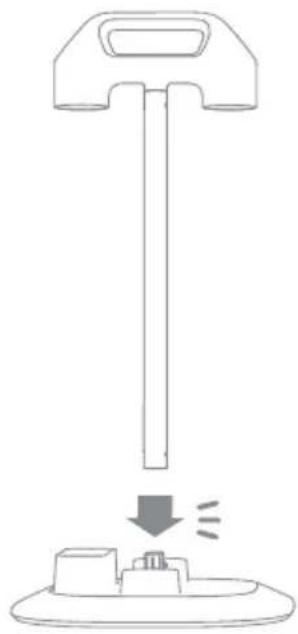
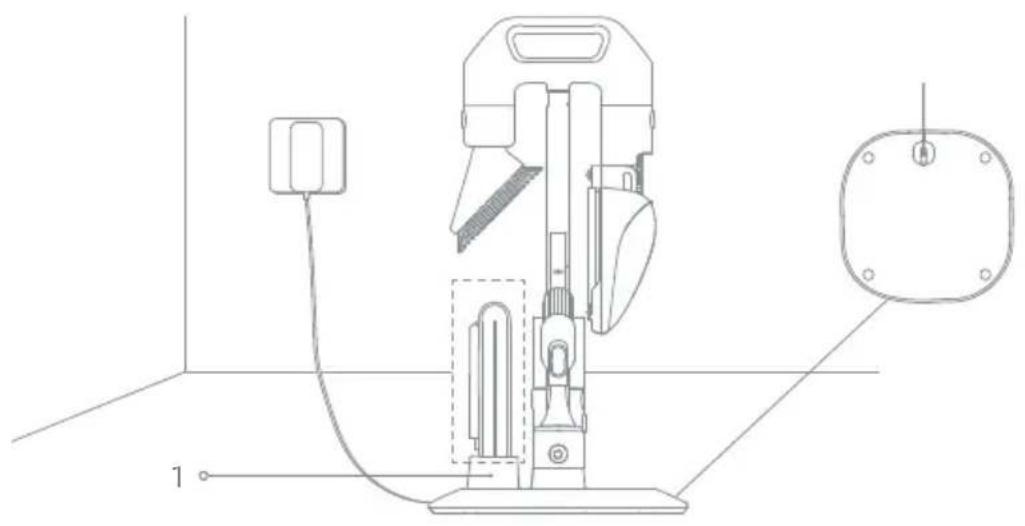
- When the vacuum is not in use, it can be placed on the dust-removal hub. The outlet of the power cord can be adjusted according to users' needs.
Fig. C-1
Fig. C-2
Battery Status Display
Battery Status Indicator

Blinking white
Solid white
Off
Charging
- Fully charged

Charging
Standby Mode
Fig. C-3
Display Screen
The number on the display screen represents the current battery level in a percentage during charging. When the number becomes 100, the battery is fully charged.
Fig. C-4
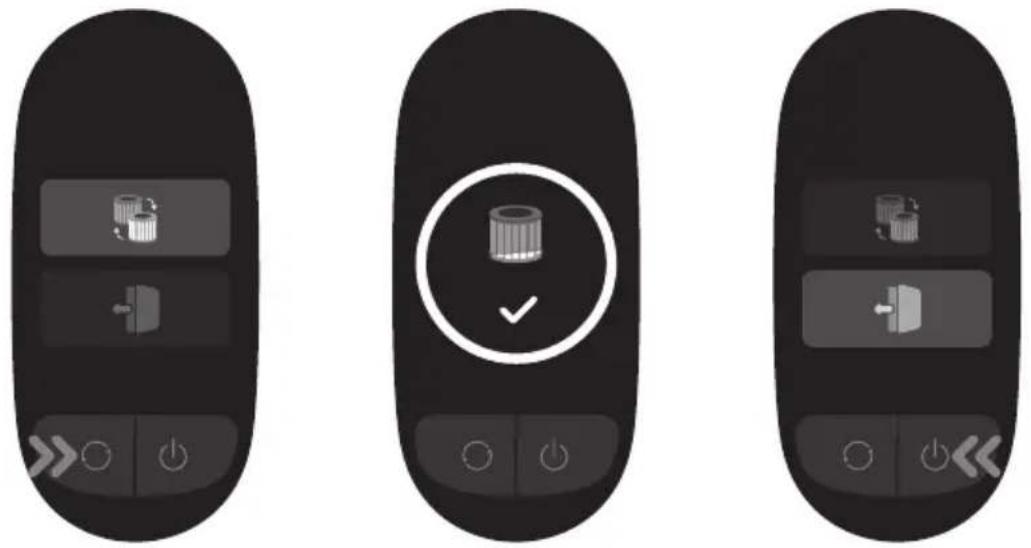
How to Use
Settings
In the standby state, press and hold the suction level switch ○

for 3 seconds to confirm.
Reset Filter
Press and hold the suction level switch ○ for 3 seconds to select resetting filter and the filter will automatically complete the reset.
Exit
Press the power button ⏻ when it is in the setting interface to return to the main interface directly, or select ⏻, then press and hold the suction level switch ⏻ seconds to return to the main interface.
Note:
- If there is no operation for more than 15 seconds, the screen will turn off, and it will return to the main interface when lit up again.
- If the vacuum is not working properly, the screen display will show an error message. Please refer to the troubleshooting table to find your solution.
Fig. D-1
Starting Cleaning
Vacuuming
Press the power button ⏻ to start operating. After the vacuuming is completed, press the ⏻ button and the amount of various particle matters vacuumed will show on the screen.
Press the button ○ to switch levels between auto, eco and turbo and the corresponding icon will show on the screen.
Note:
- When any cleaning mode stops running, the vacuum cleaner will default to auto mode when it is started again. Factory default setting is the auto mode.
- Only when running in auto mode, the suction power and the color of the dirty level indicator change with the amount of particulate matter in real time.
Fig. D-2
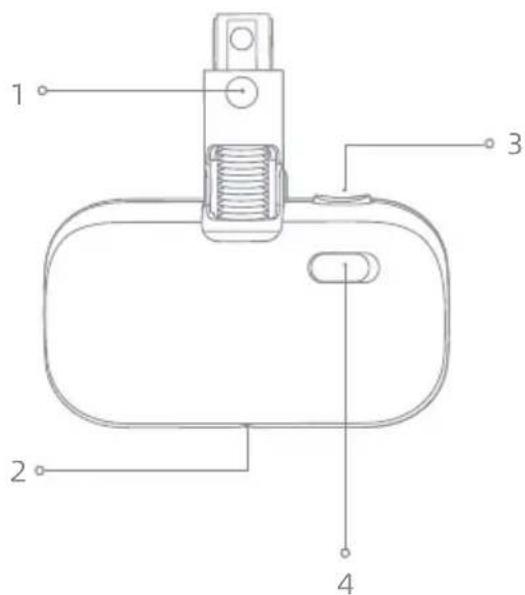
Mopping
Fig. D-3
Fig. D-4
Fig. D-5
Fig. D-6
Fig. D-7
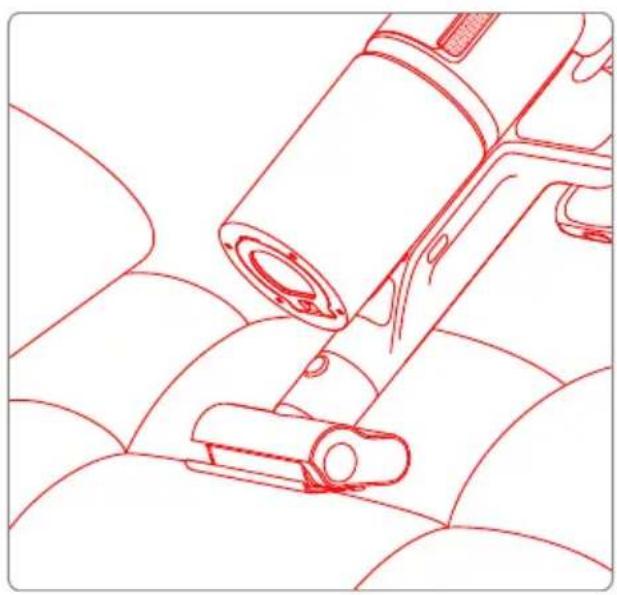
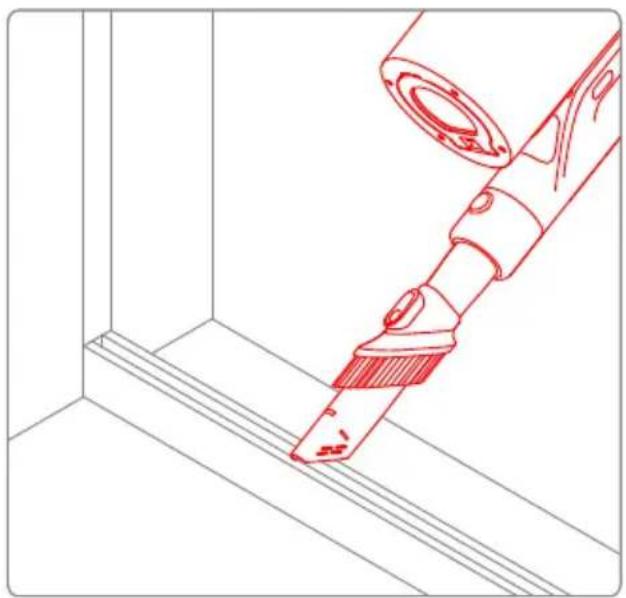
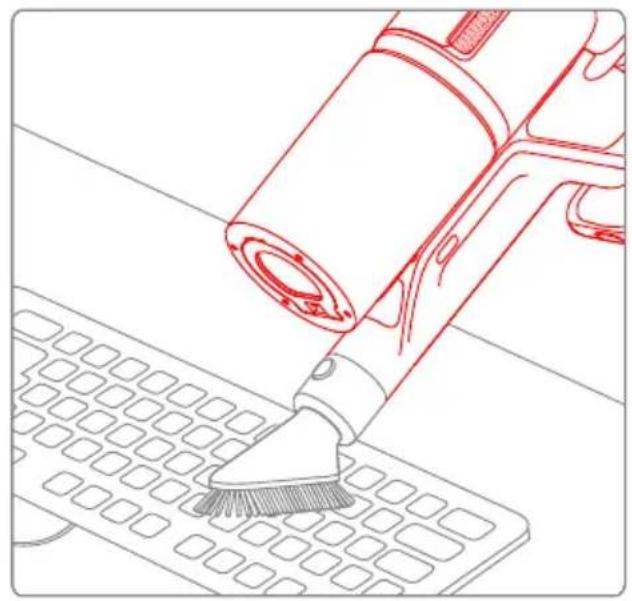
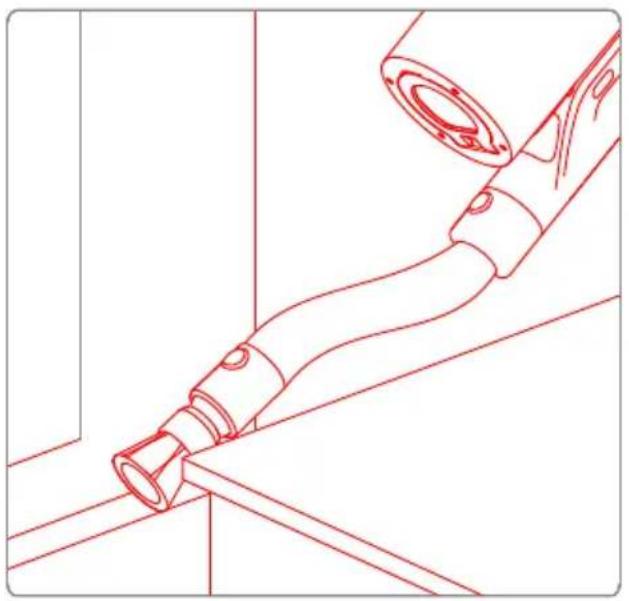
Using Different Accessories
Starting Ultra Cleaning


Fig. D-8
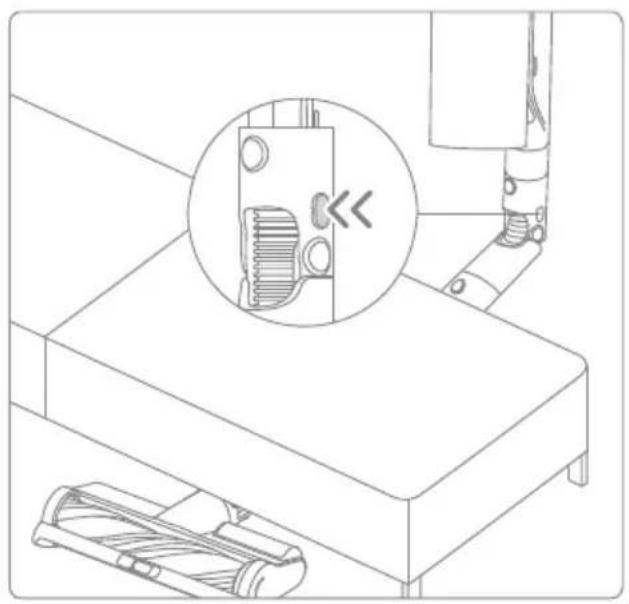
Starting Dust Collection

Fig. D-9
Fig. D-10
Fig. D-11
Fig. D-12
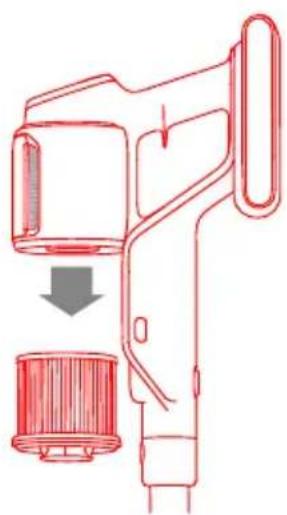
Cleaning the Vacuum
Fig. D-13
Cleaning the Dust Cup, Pre-Filter, and Cyclone Assembly
Fig. D-14
Fig. E-1-Fig. E-3
Care & Maintenance
Tips:
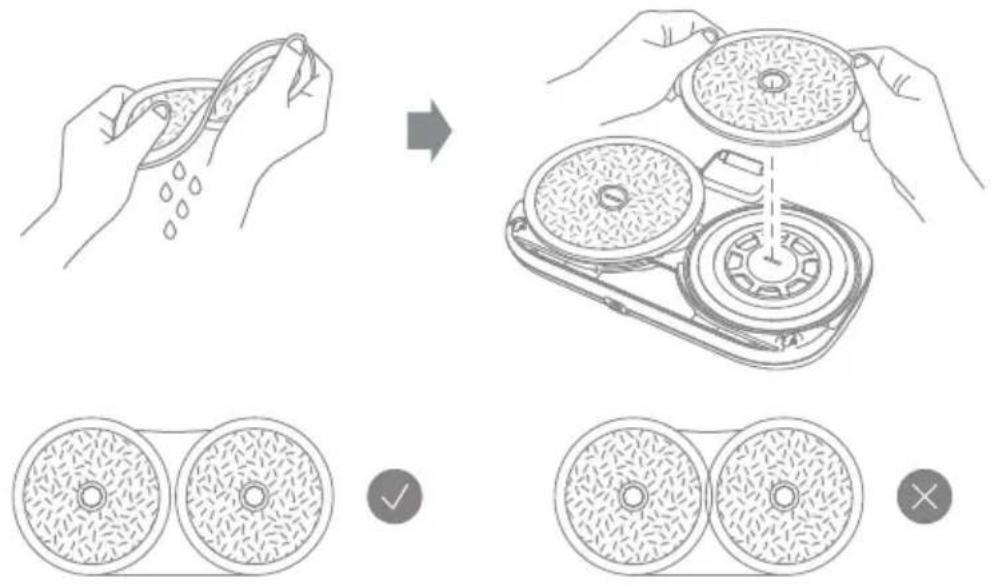
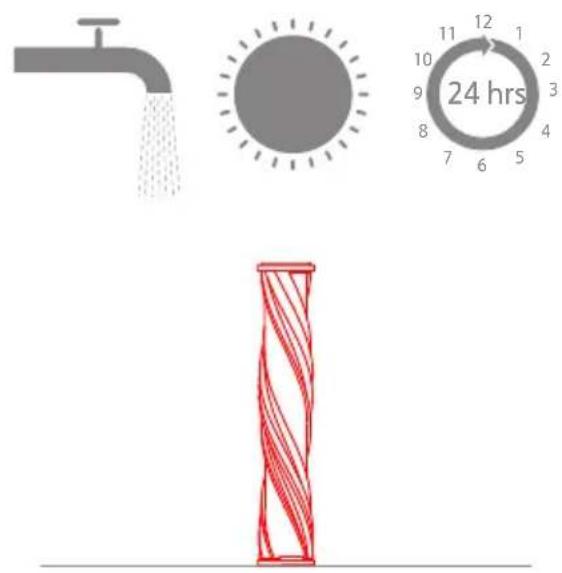
Cleaning the Filter
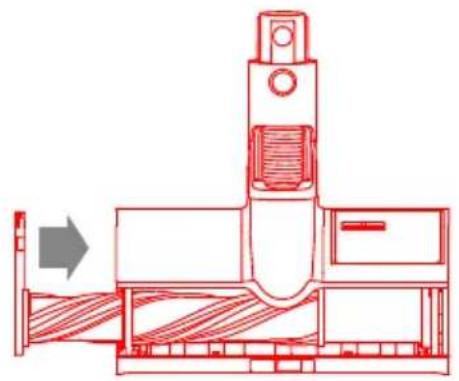
- Remove the dust cup as shown in the figure.
- Remove the filter from the vacuum by pulling it down in the direction shown in the figure.
- Rinse the filter with rotating it 360^ . Lightly tap the filter several times to remove any debris caught in it.
- Allow the filter to air dry for 24 hours.
Fig. E-4-Fig. E-7
Note:
- Only use clean water to wash the filter. Do not use detergent.
- Do not attempt to clean the filter with a brush or finger.
- It is recommended to clean the filter once every 4 to 6 months.
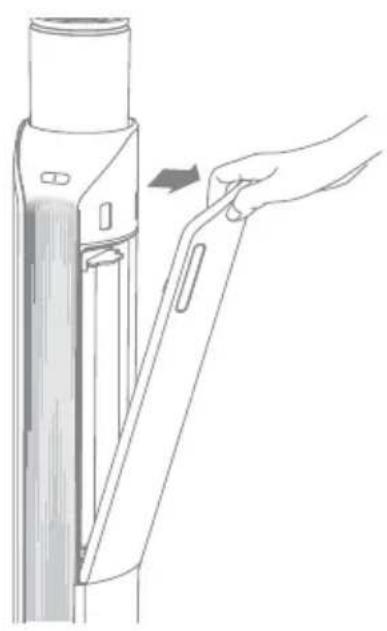
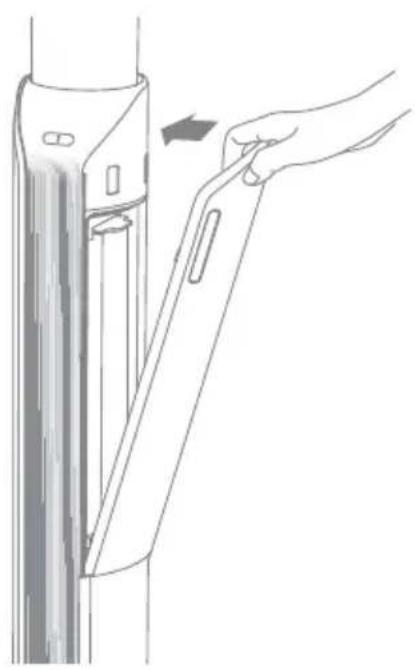
Replacing the Air Outlet Filter
Cleaning the Illumination Omni-Brush
Fig. E-8-Fig. E-9
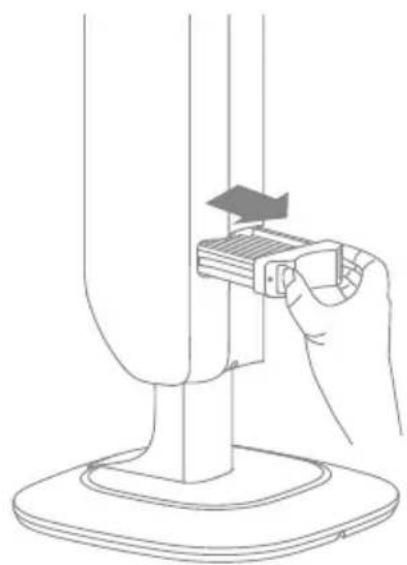
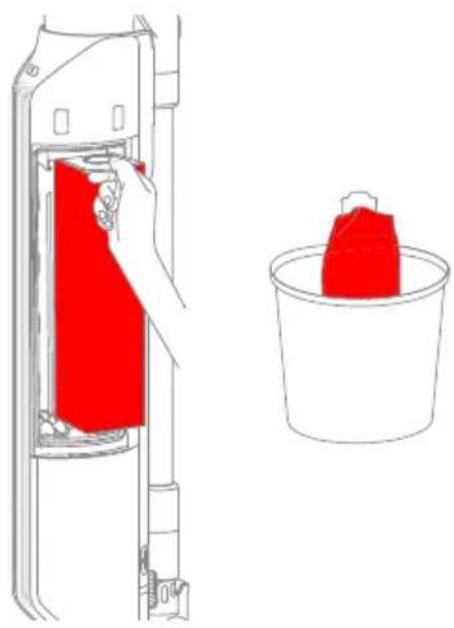
Replacing the Dust Collection Bag
Fig. E-10-Fig. E-13
Note:
- When the dust collection button blinks orange, it indicates that the dust collection bag is full and needs to be replaced.
- It is recommended to replace the dust collection bag every three months.
Fig. E-14-Fig. E-17
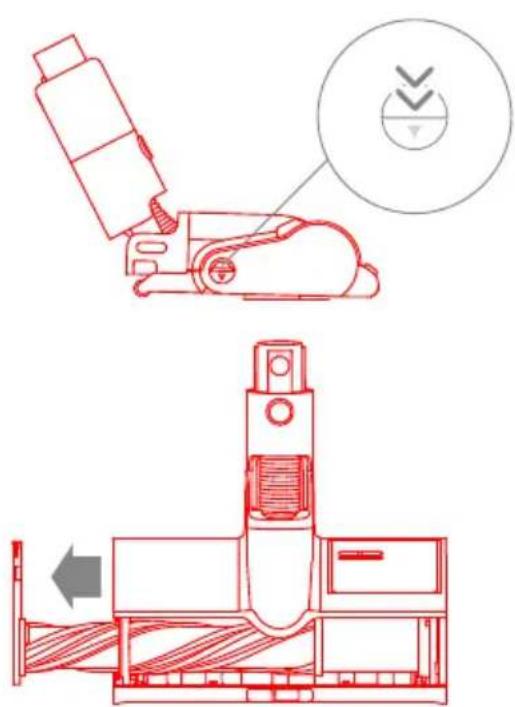
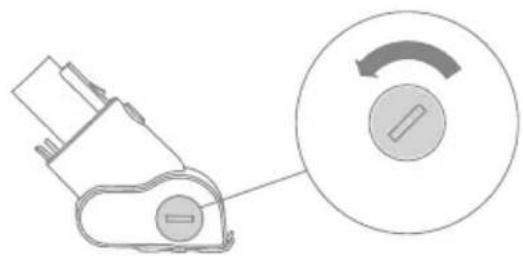
Cleaning the Motorized Mini-Brush
- Use a coin as illustrated to rotate the lock counterclockwise until you hear a click. After unlocking the motorized mini-brush, remove the brush roller.
- Rinse and clean the brush roller. Stand the brush roller upright in a well-ventilated area for at least 24 hours until it is fully dry.
Fig. E-18-Fig. E-19
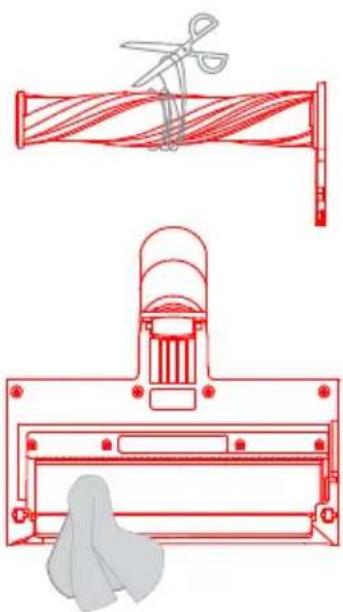
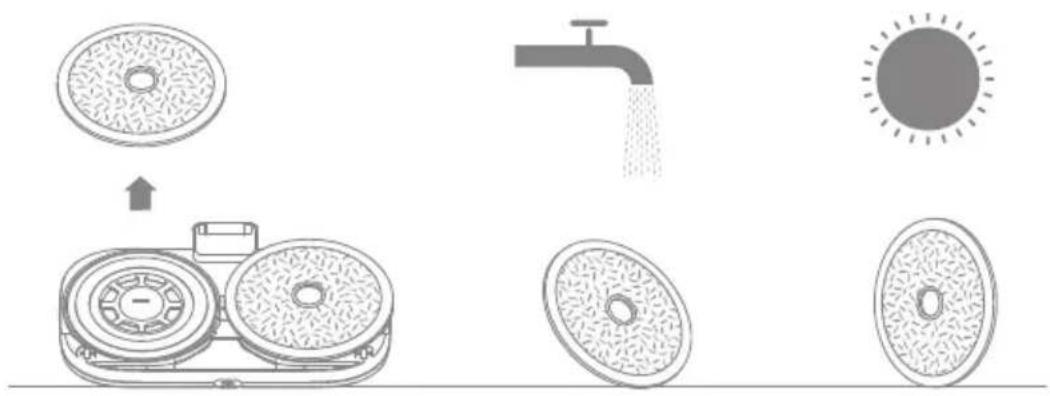
Cleaning the Mop Pad
Flip the mop head and remove the mop pad. Rinse the mop pad until it is clean, and thoroughly dry it before re-installing.
Fig. E-20
Note:
- It is recommended to replace the mop pad once every 3 to 6 months.
- Before storing the mop head for an extended period, empty the water tank and turn the outflow control switch to OFF.
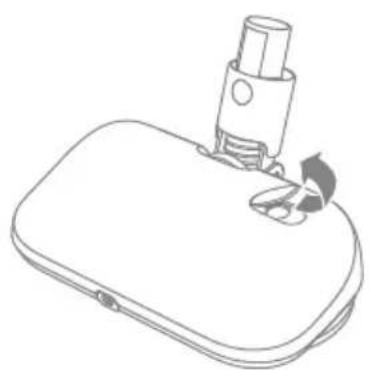
Replacing the Battery Pack
The vacuum contains a removable rechargeable lithium-ion battery pack which has a limited number of recharge cycles. After extended use, the battery pack may no longer hold a charge. If this happens, it means the battery pack has reached the end of its life cycle and needs to be replaced.
Fig. E-21
| Status Possible Causes | Solutions | 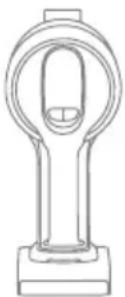 | |
| The indicator is red. | Battery pack is damaged. | Please contact the after-sales department for maintenance. | |
| The indicator blinks red. | Error | Please contact the after-sales department for maintenance. | |
| The indicator blinks white. | The battery temperature is too low or too high. | Wait until the battery temperature returns normal, and then reuse. |
Troubleshooting
If the vacuum is not working properly, the screen display will show an error message.
Please refer to the troubleshooting table to find your solution.
| Error Icon Error | Message Solutions | |
| [8064] | Low battery Please charge in time. | |
| [24w3] | Out of Battery Please charge in time. | |
| [4009] | Battery temperature is too high | Wait until the battery's temperature returns normal, then resume use. |
| [17w4] | Air duct blocked | Check whether the dust cup, extension rod, illumination omni-brush or motorized mini-brush is blocked. |
 | Brush roller stuck | Refer to the [Cleaning the Illumination Omni-Brush] section to clean the debris and hair tangled on the brush roller.Check whether the spin spray mop is blocked. |
| [48x5] | Filter is expiring Please replace the filter in time. | |
| [40x4] | Replace the filter | After replacing the filter, please refer to the [Settings] to reset filter. |
| [0707] | Error | Please contact the after-sales department for maintenance. |
Specifications
| --- | |||
| --- | |||
| --- | |||
| --- | |||
| ~ | --- | ||
| Model | ZD024M340090EU/TPQ-88E340090VW01 | Average ActiveEfficiency | 87.04% |
| Input | 100V-240 V ~50/60 Hz 0.8 A | Efficiency at Low Load(10%) | 77.01% |
| Output | 34 V ===0.9 A | No-load PowerConsumption | 0.1 W |
| --- | |||
| --- | |||
WEEE Information

Sicherheitshinweise
DE
WARNUNG
Produktübersicht
Zubehör

Abb. A-3
Abb. A-1

Bauteilbezeichnung


Abb. A-2
Ladevorgang läuft
Abb. A-4
Schleuder-Sprühmopp
Aufladen mit der
RACCOLTA DIFFERENZIATA
(1 X Household, 1 X Household)
3.הכלה
4.תְרָה
- כרָה
6.הכלה (
.הכלההוּרָהוּרָהוּרָהוּרָהוּרָהוּרָהוּרָהוּרָהוּרָהוּרָהוּרָהוּרָהוּרָהוּרָהוּרָה
 | הכלהה | הכלהה-הכלהה-הכלהה-הכלהה-הכלהה-הכלהה-הכלהה-הכלהה-הכלהה-הכלהה-הכלהה-הכלהה-הכלהה-הכלהה-הכלהה-הכלהה-הכלהה-הכלהה-הכלהה-הכלהה-הכלהה -הכלהה-הכלהה-הכלהה-הכלהה-הכלהה-הכלהה-הכלהה-הכלהה-הכלהה-הכלהה-הכלהה-הכלהה-הכלהה-הכלהה-הכלהה-הכלהה-הכלהה-הכלהה-הכלהה-הכלהה. | .הכלהה-הכלהה-הכלהה-הכלהה-הכלהה-הכלהה-הכלהה-הכלהה-הכלהה-הכלהה-הכלהה-הכלהה-הכלהה-הכלהה-הכלהה-הכלהה-הכלהה-הכלהה-הכלהה-הכלהה |
| הכלהה-הכלהה-הכלהה-הכלהה-הכלהה-הכלהה-הכלהה-הכלהה-הכלהה-הכלהה-הכלהה-הכלהה-הכלהה-הכלהה-הכלהה-הכלהה-הכלהה-הכלהה-הכלהה-הכלה |
אַלְרָה אַלְרָה
- Particulate Matter Types
10 μm (f.eks. pollen)
50 μm (f.eks. hår)
200 μm (f.eks. støv)
500 μm (f.eks. midd)
- Batterinivåets prosent

- Safety Instructions
- Product Overview
- Accessories
- Fig. A-1
- Component Names
- Vacuum Body
- Fig. A-2
- Display Screen
- Fig. A-3
- Fig. A-4
- Installation
- Installing the Accessory Storage Mount
- Fig.B-1
- Installing the Accessories
- Note:
- Battery Status Display
- Battery Status Indicator
- Charging
- Fig. C-3
- Fig. C-4
- How to Use
- Settings
- Reset Filter
- Exit
- Fig. D-1
- Starting Cleaning
- Vacuuming
- Fig. D-2
- Mopping
- Fig. D-3
- Fig. D-4
- Fig. D-5
- Starting Ultra Cleaning
- Starting Dust Collection
- Cleaning the Vacuum
- Cleaning the Dust Cup, Pre-Filter, and Cyclone Assembly
- Care & Maintenance
- Cleaning the Filter
- Fig. E-4-Fig. E-7
- Replacing the Air Outlet Filter
- Cleaning the Illumination Omni-Brush
- Replacing the Dust Collection Bag
- Fig. E-10-Fig. E-13
- Cleaning the Motorized Mini-Brush
- Cleaning the Mop Pad
- Fig. E-20
- Replacing the Battery Pack
- Troubleshooting
- Specifications
- WEEE Information
- Sicherheitshinweise
- Produktübersicht
- Ladevorgang läuft
- RACCOLTA DIFFERENZIATA
- אַלְרָה אַלְרָה
Brand : DREAME
Model : Z40 Station
Category : Broom