DKP4531 - Oven DE DIETRICH - Free user manual and instructions
Find the device manual for free DKP4531 DE DIETRICH in PDF.

User questions about DKP4531 DE DIETRICH
0 question about this device. Answer the ones you know or ask your own.
Ask a new question about this device
Download the instructions for your Oven in PDF format for free! Find your manual DKP4531 - DE DIETRICH and take your electronic device back in hand. On this page are published all the documents necessary for the use of your device. DKP4531 by DE DIETRICH.
USER MANUAL DKP4531 DE DIETRICH
1 INSTALLATION ....6

Afficheur

natural_image
Diagram of a kitchen appliance with a grater and a curved handle, showing no text or symbols
natural_image
Line drawing of a rectangular tray or container with no text, numbers, or symbolsnatural_image
Illustration of a person using a tool to interact with a wall-mounted cable or wire (no text or symbols visible)
natural_image
Illustration of a hand holding a wall-mounted rack with arrows indicating upward motion (no text or symbols)natural_image
Illustration showing a hand using a tool to cut a component, with a close-up of a smartphone displaying a 3D model (no text or symbols present)natural_image
Technical line drawing of a mechanical bracket with circular annotation highlighting a specific feature (no text or symbols present)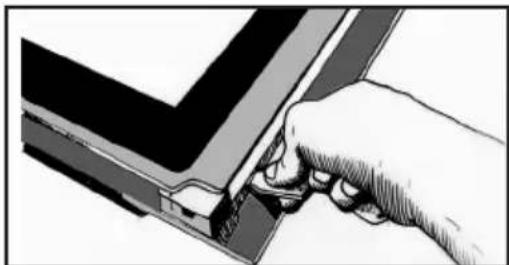
natural_image
Illustration of a hand inserting a small component into a V-shaped structure (no text or symbols)natural_image
Illustration of hands holding a device with a transparent panel and internal structure (no text or symbols visible). 9 ENTRETIEN
natural_image
Illustration of a hand using a tool to cut or mark a piece of paper or metal (no text or symbols visible)natural_image
Technical line drawing of a mechanical component with a circular feature, shown in an inset view (no text or symbols)natural_image
Illustration of a hand holding a rectangular device with internal components, no visible text or symbolsREPLACEMENT DE LA LAMPE

Mise en garde
natural_image
Diagram of a kitchen appliance opening with a black arrow pointing to the interior area (no text or symbols)| A | B | G | |
| SERVICE: | C | TYPE: D | I CE |
| E | F | ||
| Nr | H | Made in France |
You have just purchased a De Dietrich product. This choice reflects your high standards and taste for the French way of life.
Resulting from over 300 years' know-how, the De Dietrich creations embody the fusion between design, authenticity and technology at the service of culinary arts. Our appliances are manufactured using noble materials and offer an irreproachable quality of finish.
We are certain this high-quality product will enable cooking enthusiasts to express all their talents.
The De Dietrich Customer Service Department is at your disposal for all your questions and suggestions to always better meet your expectations.
We are honoured to be your new partner in the kitchen and thank you for your trust.
With its factories based in France, in Orléans and Vendôme, De Dietrich cultivates

a constant search for excellence, perpetuating exceptional know-how in the design of perfectly finished products. Many of our electrical appliances are certified by the "Origine France Garantie" label, an acknowledgement which certifies they are manufactured in France.
This label both ensures the quality and durability of our appliances, as well as their traceability, thus offering a clear and objective
indication of their provenance.
www.de-dietrich.com
De Dietrich
CRÉATEUR D'ÉMOTIONS DEPUIS 1684
IMPORTANT SAFETY ADVICE AND PRECAUTIONS......4
1 INSTALLATION ....6
Choice of location and fitting....6
Electrical connection....7
2 ENVIRONMENT....7
Caring for the environment....7
3 DESCRIPTION OF THE OVEN....8
The controls and display 9
Locking the controls....9
Accessories (depending on model)....10
4 FIRST USE AND SETTINGS....11
Using the oven for the first time ....11
Settings menu (depending on model)....11
5 MANUAL COOKING MODE....12
Start a cooking programme ....14
6 COOKING TIPS....15
Drying function 15
7 AUTOMATIC COOKING MODE....16
Presentation of the automatic mode 16
Presentation of dish categories....16
Starting an automatic cooking programme ....18
Immediate cooking....18
8 OTHER FUNCTIONS....19
Cooking end options (according to the type of cooking)....19
Timer function 19
9 CARE....20
Cleaning and maintenance: 20
Pyrolytic self-cleaning 22
Replacing the light bulb....23
10 TROUBLESHOOTING AND SOLUTIONS....24
11 SUITABILITY TEST ......25
IMPORTANT SAFETY INSTRUCTIONS - READ CAREFULLY AND KEEP FOR FUTURE USE.
This user guide is available for download on the brand's website.
Once you receive the appliance, unpack it or have it unpacked immediately. Give it an overall inspection. Make a note of any reservations on the delivery slip and keep a copy.

Important
This appliance may be used by children aged 8 years and older, and by persons with impaired physical, sensory or mental capacities, or without experience or knowledge, if they are supervised or have received prior instructions on how to use the appliance safely and have understood the risks involved.
— Children must not play with the appliance. The appliance should not be cleaned or maintained by unsupervised children.
— Children should be supervised to prevent them from playing with the appliance.

WARNING:
— The appliance and its accessible parts become hot during use. Be careful
not to touch the heating elements inside the oven. Children under
8 years old must be kept away from the hob unless they are supervised at all times.
— This appliance is designed to cook with the door closed.
— Before pyrolytic cleaning of your oven, remove all accessories and any thick deposits.
— During cleaning, the surfaces may become warmer than under normal conditions of use.
It is advisable to keep children away from the appliance.
— Do not use a steam cleaner.
— Do not use abrasive cleaners or hard metal scrapers to clean the oven's glass door; they could scratch the surface and cause the glass to.

WARNING:
Make sure the appliance is disconnected from the power before replacing the lamp in order to avoid the risk of electric shock. Change the lamp only when the appliance has cooled down. To unscrew the view port and the light, use a rubber glove, which will make disassembly easier.

It must be possible to disconnect the appliance from the power supply by fitting a switch on the fixed wiring system in accordance with installation rules.
— the power cable is damaged, it should be replaced by the manufacturer, its after-sales service department or by a similarly qualified person in order to avoid danger.
— This appliance may be installed either under a worktop or in a column as shown in the installation diagram.
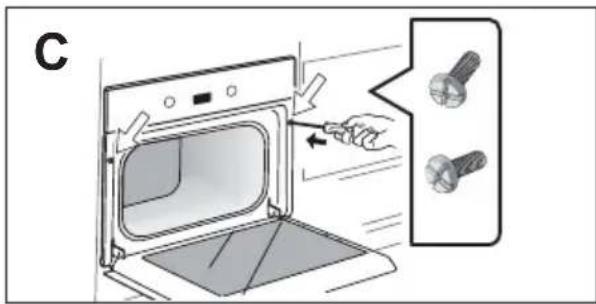
— Centre the oven in the cabinet so as to ensure a minimum gap of 10mm between the appliance and the surrounding unit. The material of the unit supporting the appliance must be heat-resistant (or covered with a heat-resistant material). For greater stability, attach the oven to the unit with
2 screws through the holes provided on the side panels.
— The appliance must not be installed behind a decorative door to prevent overheating.
— This appliance is designed to be used for domestic and similar applications such as kitchen areas for the staff of shops, offices and other professional premises; farms; use by clients of hotels, motels and other residential type establishments; guest house type environments.
— The oven must be turned off when cleaning inside the oven.
Do not modify the characteristics of this appliance; doing so could be dangerous.
Do not use your oven as a larder or to store any items after use.
• 1 INSTALLATION
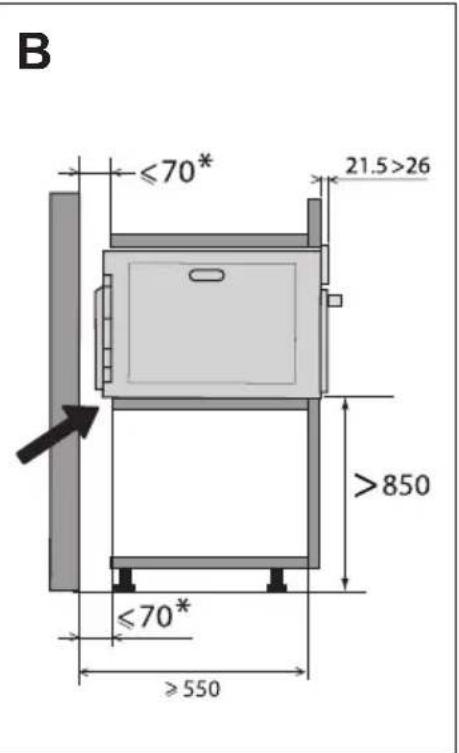
CHOICE OF LOCATION AND FITTING
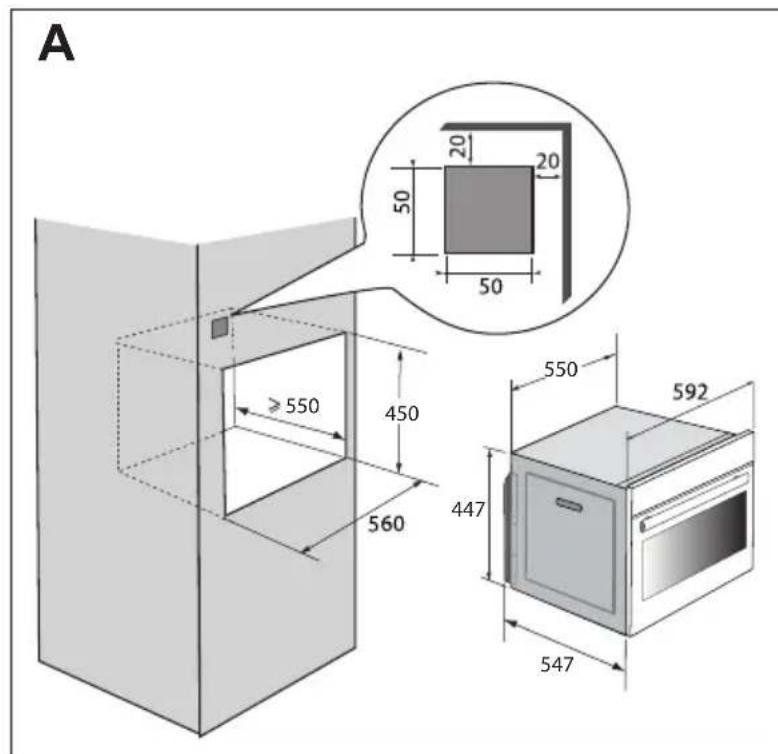

The diagrams show the dimensions of a cabinet that will be able to hold your oven. This appliance may be installed either under a worktop (fig. A) or in a column (fig. B).
Caution: if the back of the furniture is open (under a worktop or in a column), the space between the wall and the surface on which the oven rests must be no more than 70 mm* (fig. C).
If the furniture is closed at the back, make a 50 x 50 mm opening through which to route the electrical cable.
Install the oven in the cabinet. To do this, remove the rubber stops and pre-drill a 2-mm diameter hole in the wall of the furniture to avoid splitting the wood. Attach the oven with the two screws. Re-position the rubber stops.

Tip
To be certain that you have properly installed your appliance, do not hesitate to call on a household appliance specialist.
• 1 INSTALLATION
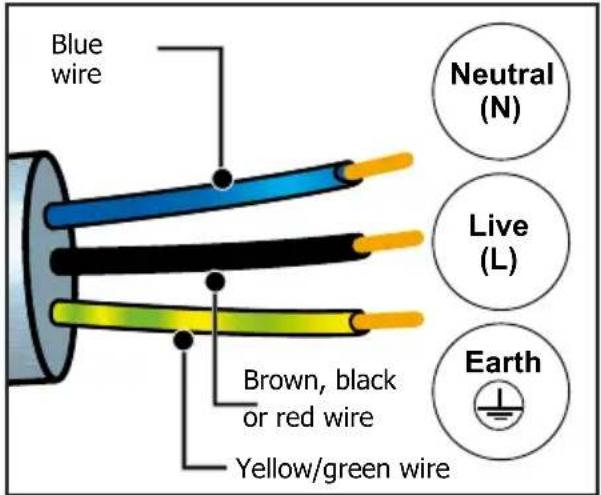
ELECTRIC CONNECTION
The oven is supplied with a standardised power cable with 3 conductors of 1.5mm^2 (1 live + 1 neutral + earth) which must be connected to a 220-240V single-phase system by means of an IEC 60083 standard power socket or via an all-pole cut-off device in compliance with the installation rules. The safety wire (green-yellow) is connected to the appliance's terminal and must be connected to the installation's earth. The fuse in your set-up must be 16 amperes. We cannot be held responsible for any accident or incident resulting from non-existent, defective or incorrect earthing or non-compliant connection.

Important:
If the electrical installation of your home requires a modification to connect the appliance, call a qualified electrician.
If the oven malfunctions in any way, unplug the appliance or remove the fuse for the oven's connection line.
• 2 ENVIRONMENT
CARING FOR THE ENVIRONMENT
The packaging material of this appliance is recyclable. Please recycle it and help protect the environment by depositing it in municipal containers provided for this purpose.
Your appliance also contains many recyclable materials. It is therefore marked with this logo to indicate that used appliances should not be mixed with other waste.
Recycling of appliances organised by your manufacturer is carried out under the best conditions, in accordance with the European regulation on waste disposal of electronic and electrical equipment.
Contact your local authority or retailer for information on used appliance collection points close to your home.
We thank you for your help in protecting the environment.
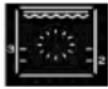
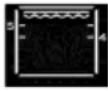
• 3 DESCRIPTION OF THE OVEN
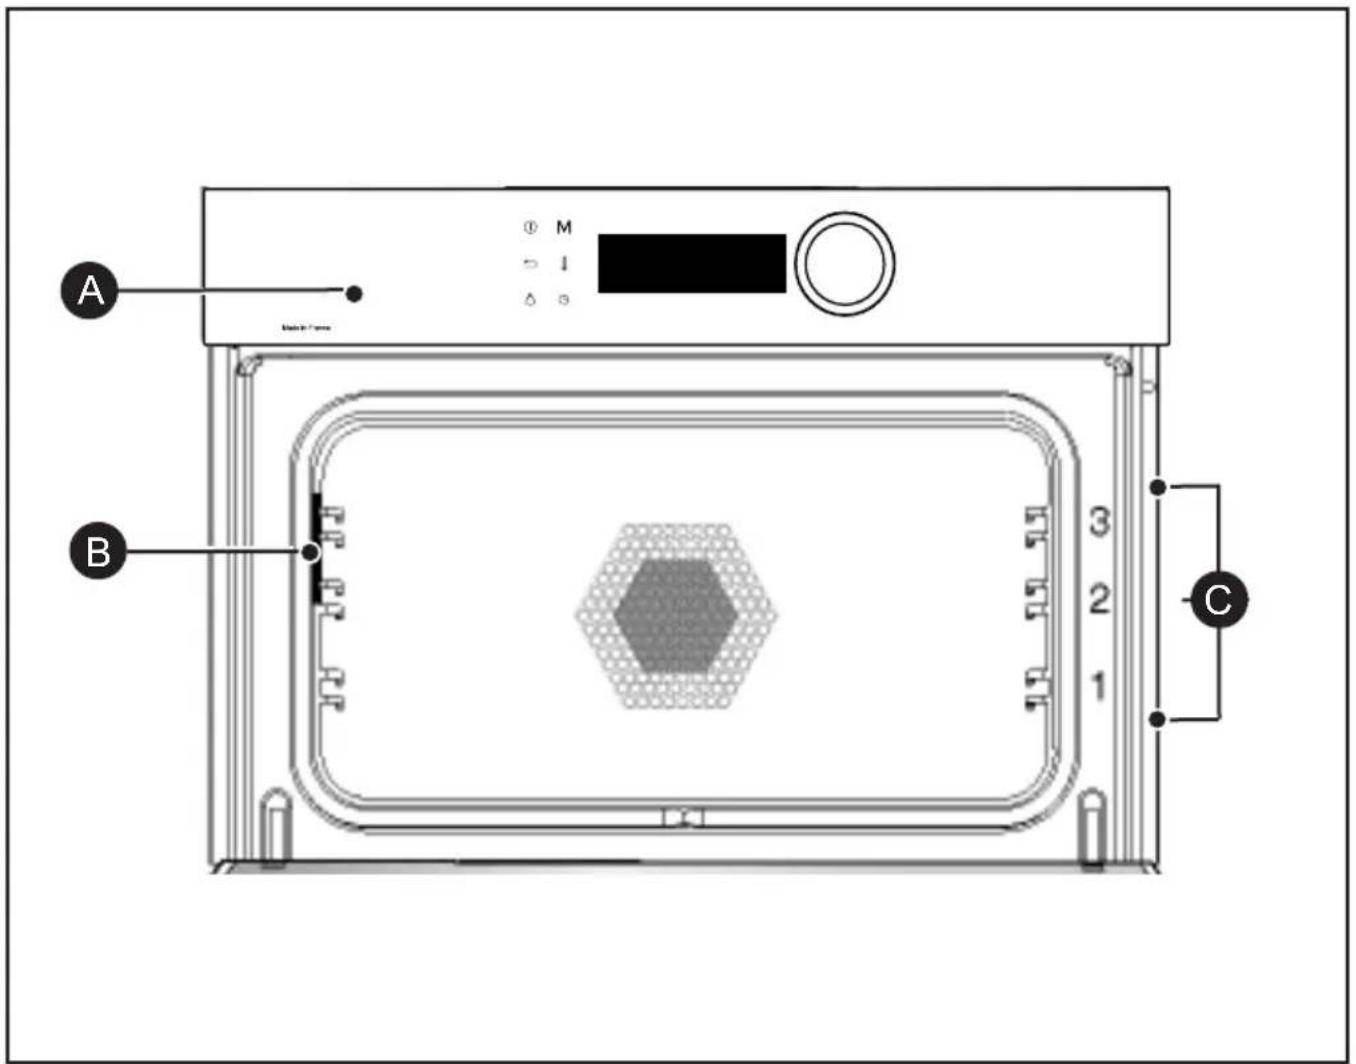
A Control panel
B Light
C Shelf runners (3 heights available)
• 3 DESCRIPTION OF THE OVEN
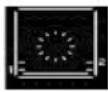
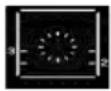
THE CONTROLS AND DISPLAY
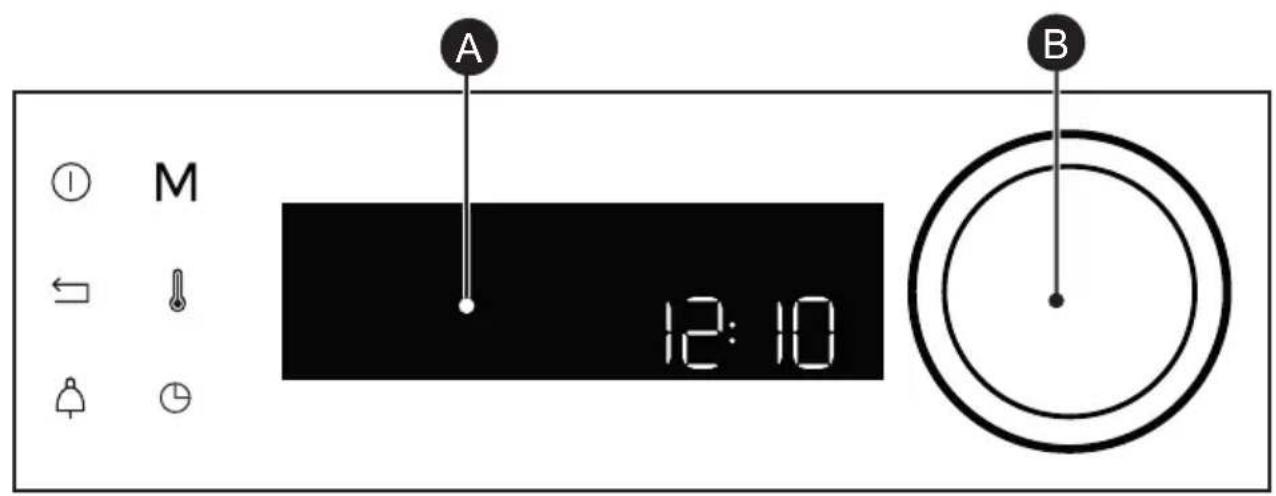

Display

Rotating knob with central button (cannot be removed):
- programme selection, increase or reduce values by turning it.
- Validate each action by pressing the centre.
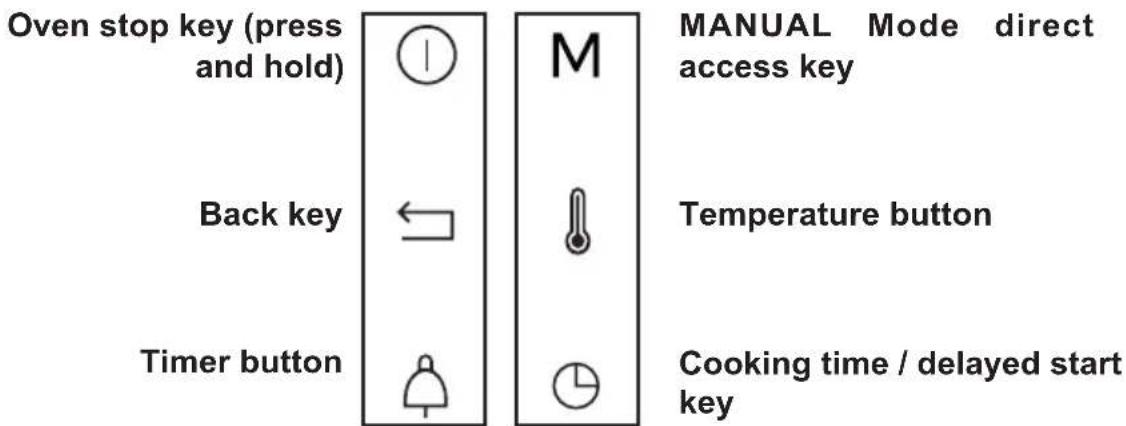
LOCKING THE CONTROLS
Press and at the same time until the symbol appears on the screen.
Control locking is accessible during cooking or when the oven has stopped.
NOTE: only the stop key Ⓛremains active.
To unlock the keypad, press the back and stop keys at the same time until the padlock symbol disappears from the screen.
• 3 DESCRIPTION OF THE OVEN
ACCESSORIES (DEPENDING ON MODEL)
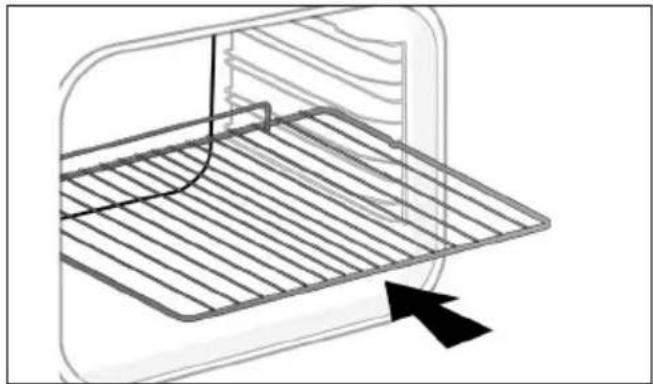
- Anti-tip safety rack. When inserted into the supports, the rack can be used to support dishes and moulds containing the food to be cooked or browned, or for grilling (place food directly onto the rack). Position the anti-tip stop towards the back of the oven.
- 45 mm multi-purpose drip tray. To be inserted into the supports or placed on the sliding rails. When placed under the rack, it collects juices and fat from grilling, and can also be used half-filled with water as a double-boiler.
natural_image
Diagram of a kitchen appliance with a grater and a curved handle, showing no text or symbols
natural_image
Line drawing of a rectangular tray or container with rounded corners and a flat top (no text or symbols)USING THE OVEN FOR THE FIRST TIME
- Select the language
The first time you use your oven or after a power cut, turn the knob to select your language and press to confirm your choice.
- Set the time
Adjust the hours and minutes by turning the knob, then press to confirm.
Your oven displays the time.
SETTINGS MENU (DEPENDING ON MODEL)
In the general menu, select the
"SETTINGS" function by turning the control knob and confirm. Different settings are proposed.
Select the setting you want by turning the control knob then confirm.
Then set your parameters and confirm them.
- Time
Modify the hour, validate, then modify the minutes and validate again. If you oven is connected the time updates automatically.
- Sound
Your oven emits sounds when you use the keys. To keep these sounds, select ON, otherwise select OFF to deactivate them and confirm.
- Brightness
Select the desired brightness level.
- Sleep mode
You can also put your display on standby:
ON position: the display switches off after a certain amount of time.
OFF position: the brightness diminishes after a certain amount of time.
- Lamp management
Two setting options are proposed: ON position: the lamp remains on during all cooking programmes (except in ECO function). AUTO position: the oven lamp goes off after a certain period of time during the cooking programmes. Select your position and confirm.
- Language
Choose your language and confirm.
- DEMO mode
By default, the oven is configured in normal heating mode.
If it is activated in DEMO mode (ON position), the mode for presenting products in stores, your oven will not warm up.
- Diagnostic
Access the Diagnostic menu if a problem occurs.
If you contact the After-Sales Service, you will be asked to provide the codes displayed in the diagnostic.
• 5 MANUAL COOKING MODE
This mode lets you set the cooking parameters yourself: temperature, cooking type, cooking time. During your navigation, you can directly access this menu by pressing the "M" key.

** Pre-heat your oven empty before cooking
| Position | T°C recommended mini - maxi | Use | |
 | Combined heat ** | 180°C35°C - 230°C | Recommended for meat, fish, vegetables, preferably in an earthenware dish. |
 | Fan-assisted */** | 190°C35°C - 250°C | Recommended for keeping white meat, fish and vegetables moist. For cooking multiple items on up to three levels. |
 | Traditional ** | 200°C35°C - 275°C | Recommended for meat, fish, vegetables, preferably in an earthenware dish. |
 | ECO* | 190°C35°C - 275°C | This setting saves energy while maintaining the quality of the cooking. In this setting, pre-heating is not required. |
 | Ventilated grill ** | 190°C100°C - 250°C | Roasts and poultry are juicy and crisp all over. Slide the drip tray on to the bottom shelf support. Recommended for all spit-roasted poultry or meat, for sealing and thoroughly cooking a leg or a rib of beef. To retain the moist texture of fish steaks. |
 | Ventilated floor ** | 180°C75°C - 250°C | Recommended for meat, fish, vegetables, preferably in an earthenware dish. |
 | Variable grill | 41 - 4 | Recommended for grilling cutlets, sausages, toasting bread and prawns placed on the grill. Cooking controlled by the upper element. The grill covers the entire shelf surface. |
*Cooking mode as per standard EN 60350-1: 2016 to demonstrate compliance with requirements of the energy label of European regulation UE/65/2014.
• 5 MANUAL COOKING MODE
| Position | Recommended T°C mini - maxi | Use | |
 | Keep warm function | 60°C35°C - 100°C | Recommended for letting dough rise for bread, brioche, kügelhopf.Put the mould on the bottom, not exceeding 40°C (plate-warming, defrosting). |
 | Defrost | 35°C30°C - 75°C | Ideal for delicate dishes (fruit tarts, custard pies, etc.). Defrost meat, bread rolls, etc. at 50°C (meat should be placed on the rack with a dish underneath to catch the drips). |
 | Drying | 80°C35°C - 80°C | Sequence to dehydrate certain food items such as fruits, vegetables, roots, seasoning plants and herbs. Refer to the specific table on P.16. |

Never place tin foil directly in contact with the oven floor as the build up of heat may damage the enamel.

Advice on how to save energy Avoid opening the door during cooking to avoid heat escaping from the oven.
• 5 MANUAL COOKING MODE
STARTING A COOKING PROGRAMME
IMMEDIATE COOKING
When you have selected and validated your cooking function, example: Ventilated floor, press the knob to confirm, preheating starts; a beep informs you the oven has reached the set temperature. Place your dish in the oven at the recommended level.
NB: Certain parameters may be modified before cooking starts (temperature, cooking time and delayed start); see the following chapters.
CHANGING THE TEMPERATURE
Based on the type of cooking you already selected, the oven will recommend the ideal cooking temperature.
This can be adjusted as follows:
- Press the 🔊key.
- Turn the control knob to change the temperature then confirm your choice.
COOKING TIME
You can enter the cooking time for your dish by pressing the ⏻key, enter the cooking time by turning the control knob then confirm.
SETTING THE COOKING END TIME (delayed start)
You can change the cooking end time if you want to delay it by pressing twice on the ⏻ key, then enter your cooking end time by turning the knob and confirm.
Once you have set the cooking end time, confirm. The cooking end time remains displayed.
NB: You may start cooking without selecting a duration or end time.
In this case, when you feel that you have cooked your dish for long enough, stop cooking (see the "Stopping cooking in progress" chapter).
STOPPING COOKING IN PROGRESS
To stop a cooking programme in progress, press the control knob.
"STOP" displays on the screen
Confirm by pressing the knob or by pressing and holding the oven stop key.
DRYING FUNCTION
Drying is one of the oldest methods of preserving food. The aim is to remove all or some of the water in the food to preserve foodstuffs and prevent the development of microbes. Drying preserves the nutritional qualities of food (minerals, proteins and other vitamins). It allows food to be stored in optimal conditions thanks to their reduced size and makes food easy to use once rehydrated.
Only use fresh food. Wash the food carefully, drain and wipe.
Cover the grill in parchment paper and distribute the cut food evenly on top. Use shelf level 1 (if you have several grill pans, put them on levels 1 and 3). Turn the food over several times during drying. The values provided in the table may vary depending on the type of food to dehydrate, its maturity, its thickness and its humidity rate.
GUIDE TABLE TO DEHYDRATE YOUR FOOD
| Fruits, vegetables and herbs | Temperature | Time in hours | Accessories |
| Fruits with seeds (in 3 mm slices, 200 g per grill pan) | 80°C | 5-9 | 1 or 2 grill pans |
| Fruits with stones (plums) | 80°C | 8-10 | 1 or 2 grill pans |
| Edible roots (carrots, parsnips), grated and blanched | 80°C | 5-8 | 1 or 2 grill pans |
| Sliced mushrooms | 60°C | 8 | 1 or 2 grill pans |
| Tomato, mango, orange, banana | 60°C | 8 | 1 or 2 grill pans |
| Sliced red beetroot | 60°C | 6 | 1 or 2 grill pans |
| Herbs | 60°C | 6 | 1 or 2 grill pans |
• 7 AUTOMATIC COOKING MODE
PRESENTATION OF THE AUTOMATIC MODE
In the AUTO mode, you will find many varied recipes sorted into categories, which you can cook in different ways. The oven AI will offer you automatically a preselected automatic cooking mode or alternatives to be selected from the navigation interface.
PRESENTATION OF DISH CATEGORIES
In the general menu, select the "AUTO" function by turning the control knob and confirm. Different dish categories are available to you:
- Meat, Fish, Dishes, Bread & Doughs, Desserts.
Select the setting you want by turning the control knob then confirm.

Tip
Before inserting your dish, for all cooking programmes, the oven indicates which shelf level to place your dish on
| MEAT |
| MEAT TERRINE |
| SHOULDER OF LAMB |
| VEAL RIBS |
| VEAL ROAST |
| PORK SHANK |
| PORK LOIN |
| PORK ROAST |
| BEEF ROAST |
| Poultry |
| DUCK |
| DUCK BREAST |
| TURKEY LEG |
| FISH |
| TROUT |
| SALMON |
| LARGE FISH |
| LOBSTER |
| FISH TERRINE |
• 7 AUTOMATIC COOKING MODE
PRESENTATION OF DISH CATEGORIES
| TYPE OF FOOD |
| STUFFED VEGETABLES |
| STUFFED TOMATOES |
| LASAGNE |
| SAVOURY TART |
| CHEESE TART |
| QUICHE |
| PIZZA |
| POTATO GRATIN |
| SOUFFLÉ |
| DESSERTS |
| SPONGE CAKE |
| APPLE CAKE |
| LOAF CAKE |
| CHOCOLATE CAKE |
| YOGHURT CAKE |
| FRUIT CRUMBLE |
| FRUIT PIE |
| BISCUITS/COOKIES |
| CUPCAKES |
| CHOUX PASTRY |
| CRÈME CARAMEL |
| BREAD AND DOUGHS |
| BRIOCHE |
| BAGUETTES |
| BREAD |
| SHORTCRUST PASTRY |
| PUFF PASTRY |
• 7 AUTOMATIC COOKING MODE
STARTING AN AUTOMATIC COOKING PROGRAMME
The “AUTO” function selects for you the suitable cooking parameters based on the food to be prepared.
IMMEDIATE COOKING
- Select the "AUTO" mode when you are in the general menu then confirm.
The oven suggests several categories of dishes (Meat, Fish, Dishes, Bread & Doughs, Desserts):
Depending on the selected dish, the AI mode suggests a default weight which you will need to adjust if needed before confirming. The oven automatically calculates the cooking time and temperature parameters. The shelf height displays, insert your dish and confirm.
- The oven beeps and turns off when the cooking time is finished; your screen then indicates that the dish is ready.

For certain AI recipes the oven must be preheated before you e your dish in it.
You may open your oven to baste your dish at any time during cooking.
COOKING END OPTIONS (ACCORDING TO THE TYPE OF COOKING)
Once cooked in both the manual and Auto mode, the oven offers three options to adjust to the expected result: CRISP, KEEP WARM and ADD 5 MIN.
CRISP
You can brown a dish once cooked with the "Crisp" function.
Select a cooking function, add the temperature and set a cooking time. Once cooked, select the “Crisp” function and confirm by pressing the control knob.
Cooking starts. The grill will automatically switch on during the 5 last minutes of your cooking time.
KEEP WARM
Once cooked, you can select the “KEEP WARM” option, which enables you to leave your dish in the oven without overcooking it. The oven temperature will adjust to an eating temperature until you are ready.
TIMER FUNCTION
This function can only be used either when the oven is off or during cooking.
- Press the key.
Set the minute minder by turning the knob and then press to confirm. The timer starts.
Once the time has lapsed, there is a sound signal. To stop it, press any key.
Note: You can modify or cancel the timer at any time.
ADD 5 MIN (only in manual mode)
You can select the “ADD 5 MIN” option at the end of your cooking with a set time. By activating “ADD 5 MIN”, the oven will use the same cooking mode and temperature settings for 5 more minutes. You may press this again if necessary.
BON APPETIT: once cooked, your oven displays "Bon Appétit" and you can remove your dish from it. To switch off your oven, press the control knob or the stop oven key.
Press the key again and set your time or set it to 0m00s to cancel. Pressing the control knob during the countdown will also stop the timer.
. 9 CARE
CLEANING AND MAINTENANCE:
EXTERNAL SURFACE
Use a window washing product applied to a soft cloth. Do not use abrasive creams or scouring sponges.
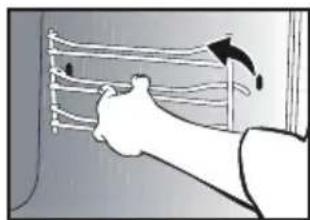
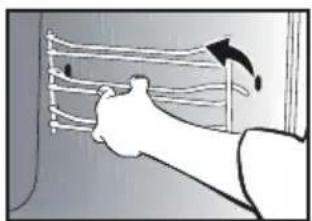
REMOVING THE SHELF RUNNERS
Side liners with shelf runners:
Lift the front part of the shelf runner upwards. Press the entire shelf runner and release the front hook from its housing. Then, gently pull the whole of the shelf runner towards you to release the rear hooks from their housing. Pull out the two shelf supports.
natural_image
Illustration of a person using a tool to interact with a wall-mounted cable or wire (no text or symbols visible)
natural_image
Illustration of a hand holding a wall-mounted rack with arrows indicating upward motion (no text or symbols)CLEANING THE INNER GLASS
To clean the inner glass, remove the door. Before disassembling the glass, remove any excess grease on the insdie glass with a soft cloth and washing up liquid.

Warning
Do not use scouring products, abrasive sponges or metal scrapers to clean the glass oven door as this could scratch the surface and cause the glass to shatter.
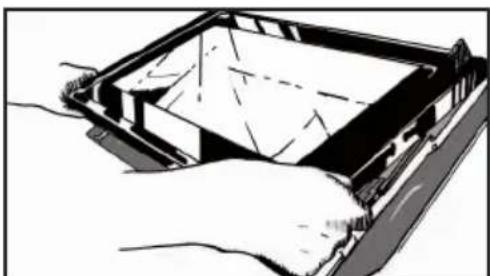
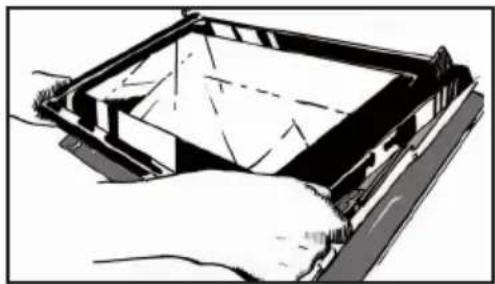
REMOVING AND PUTTING BACK THE DOOR
Open the door fully and block it with one of the plastic wedges provided in your appliance's plastic pouch.
natural_image
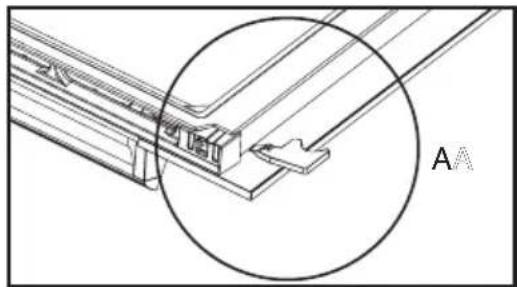
Illustration showing a hand using a tool to adjust or install a component, with a close-up of a device (no text or symbols visible)To remove the frame and glass assembly, proceed as follows: Insert the stop in its intended slot A on the right.
natural_image
Technical line drawing of a mechanical bracket with a circular annotation highlighting a specific feature (no text or symbols present)
natural_image
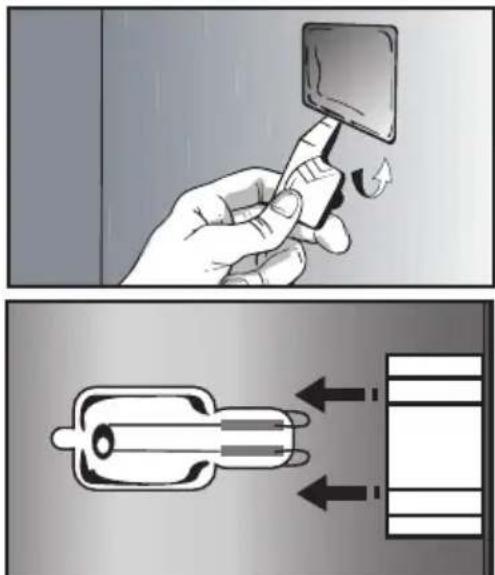
Hand inserting a small component into a V-shaped structure (no text or symbols visible)Lever the assembly to detach the frame and the glass. Conduct the same operation on the left
natural_image
Illustration of hands holding a device with a partially open panel (no text or symbols visible). 9 CARE
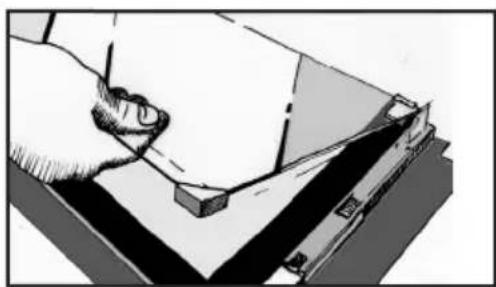
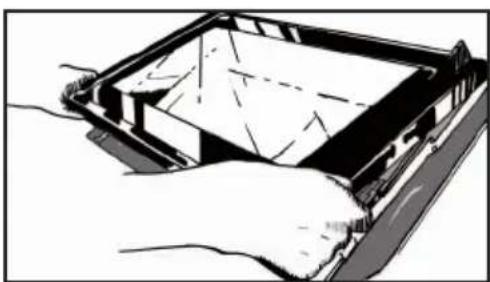
Remove the frame and the glass.
Remove all the door's interior windows by rotating them.
natural_image
Illustration of a hand using a tool to cut or mark a piece of paper on a flat surface (no text or symbols visible)This assembly comprises 2 glass windows, the ^t of which has 2 rubber stops on the 2 front corners.
Clean the glass using a soft sponge and washing-up liquid.
Do not soak the glass panel in water.
Do not use abrasive creams or scouring sponges. Rinse with clean water and dry off with a lint-free cloth.
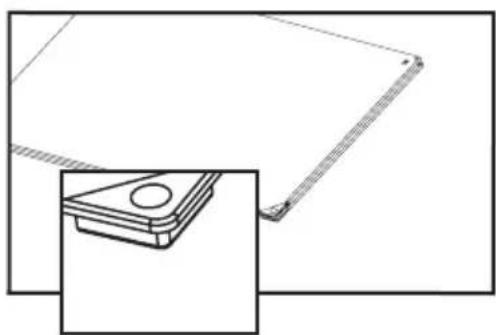
After cleaning, replace the 1st glass pane in the door.
Reposition the 2 black rubber stops on the front corners of the 2^nd pane:
natural_image
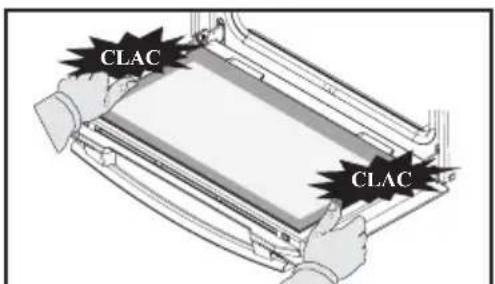
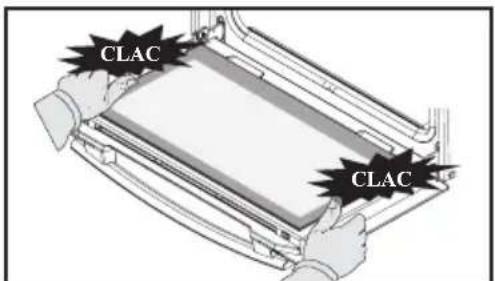
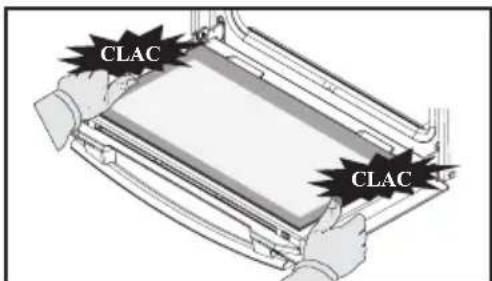
Technical line drawing of a mechanical component with a side view showing a circular feature (no text or symbols)Then replace the door and the 2nd pane, positioning it onto the first.
Place the external glass frame assembly back in the door.
natural_image
Illustration of a hand holding a rectangular object with internal lines and shading (no text or symbols)Make sure you correctly slot the frame under the spigot next to the hinge.

Attach the frame by tightening it with the door. Do not press on the frame alone.
Your appliance is now ready to use again.
PYROLYTIC SELF-CLEANING
This oven is equipped with a pyrolysis cleaning function:
Pyrolysis is a cycle during which the oven cavity is heated to a very high temperature in order to eliminate soiling from splattering and spills.
Before starting pyrolysis cleaning, remove any large overspills, if any. Remove the excess grease on the door using a damp sponge.
As a safety measure, cleaning only occurs after the door locks automatically; it is impossible to unlock the door.
Remove the dish and rack before starting a pyrolysis cycle. "You may leave the oven shelf runners in place".
PERFORM A SELF-CLEANING CYCLE
Proposed cycles:

Pyro ECO: in 1h30

2h pyrolysis
IMMEDIATE CLEANING
The timer must only display the time. It should not be flashing.
Turn the function selector to one of the self-cleaning functions.
The pyrolysis cycle begins. The time starts to count down as soon as it is set (press the knob).
During pyrolysis, the symbol displays in the programmer to indicate that the door is locked.
After the pyrolysis, a cooling phase occurs during which your oven remains unavailable.
When the oven is cool, use a damp cloth to remove the white ashes. The oven is clean and once again ready for the cooking application of your choice.
SELF CLEANING WITH DELAYED START
Follow the instructions in the previous paragraph, then set the pyrolysis end time you want by pressing the Ⓛkey. The display flashes. Set the end time with + and -. After these steps, the start of pyrolysis is delayed so that it finishes at the programmed time. When the pyrolysis cycle has finished, put the function selector back to 0.
. 9 CARE
REPLACING THE LIGHT BULB

Warning
Make sure the appliance is disconnected from the power supply before replacing the bulb in order to avoid the risk of electric shock. Change the lamp only when the appliance has cooled down.
Bulb specification:
25 W, 220-240 V\~, 300°C, G9. This product contains a light source with energy rating G.
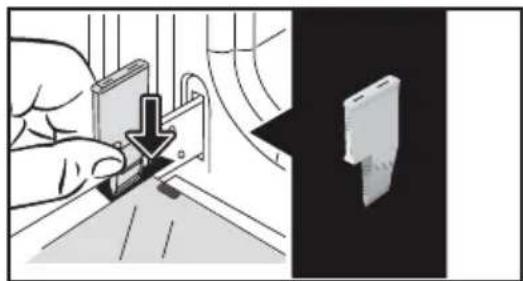
You can replace the bulb yourself. First disassemble the left-hand side shelf support.
The bulb is accessible inside the oven.
Use the plastic stop as a lever to remove the glass.
Change the bulb (use a rubber glove to facilitate its removal) then reattach the glass.
Plug your oven back in.
• 10 TROUBLESHOOTING AND SOLUTIONS
| Questions | Troubleshooting and Solutions |
| - "AS" is displayed (Auto Stop system). | This function stops heating the oven if you forget to switch it off. Turn your oven to STOP. |
| - Fault code starting with "F". | Your oven has detected a problem. Stop the oven for 30 minutes. If the fault is still there, cut off the power supply for at least one minute. If the fault persists, contact the After Sales Service. |
| - The oven is not heating. | Check that the oven is correctly connected and that your installation's fuse is not out of service. Check that the oven is not set to "DEMO" mode (see settings menu). |
| - The oven light is not working. | Replace the bulb or the fuse. Check that the oven is correctly connected. See chapter on replacing the light bulb. |
| - The cooling fan continues to operate after the oven has stopped. | This is normal. It can work for up to one hour after cooking to cool down the oven. If it continues beyond this, contact the After Sales Service. |
| - The "door locking" symbol flashes in the display. | Door locking fault. Contact the Customer Services Department. |
FUNCTIONAL SUITABILITY TESTS IN ACCORDANCE WITH
THE EN 60350 STANDARD:
| Test | Cooking sequence | T°C | Shelf position | Time Observations |
| Short-bread (8.4.1) | Fan-assisted 165 2 18-20 min Pastry tray | |||
| Tradition 200 2 20-23 min | Lissium pastry tray | |||
| Fan-assisted 165 3 / 1 22-25 min | Preheated oven:-Pastry tray-Enamel plate | |||
| Small cakes (8.4.2) | Fan-assisted 165 2 22-25 min Pastry tray | |||
| Fan-assisted 160 3 / 1 22 min | Preheated oven:-Pastry tray-Enamel plate | |||
| Savoy sponge (8.5.1) | Fan-assisted 170 1 35-40 min | Preheated oven,mould on the grid + 5 min in switched off oven without preheating | ||
| Tradition 175 1 45 min | 2 levels (not applicable) | |||
| Apple tart (8.5.2) | Combined 180 1 50-55 min | 20 cm mould on the grid | ||
| Fan-assisted 180 3 / 1 50-55 min | Preheated oven:-Enamel plate on 1st level | |||
| Surface grill (9.1) | High grill P4 2 2-3 min | Preheat for 5 min Bread on grid with the door closed | ||
Domestic Electric Oven - Product Fiche As per the Commission Delegated Regulation (EU) N° 65/204
| Trade Mark | DE DIETRICH |
| Commercial code | DKP4531* |
| Energy Efficiency Index (EEI cavity) | 94,4 |
| Energy Efficiency Class | A |
| Energy consumption per cycle in conventional mode | 0,68kWh |
| Energy consumption per cycle in fan-forced convection mode | 1,01kWh |
| Number of cavities | 1 |
| Heat source(s) per cavity | Electric |
| Volume of the cavity | 40l |
| European Union eco-label |

VÁŽENÁ ZÁKAZNICE, VÁŽENÝ ZÁKAZNÍKU
8 DALŠÍ FUNKCE ....19

Displej

natural_image
Diagram of a kitchen appliance with a grater and a curved handle, showing no text or symbols
natural_image
Line drawing of a rectangular tray or container with no text, numbers, or symbolsnatural_image
Illustration of a hand holding a curved object with internal lines, no text or symbols present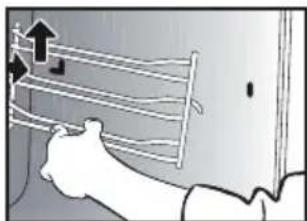
natural_image
Illustration of a hand holding a rack with arrows indicating upward motion (no text or symbols)VNITŘNÍ PLOCHY SKEL
natural_image
Illustration showing a hand using a tool to adjust or install a component, with a close-up of the device (no text or symbols visible)natural_image
Technical line drawing of a structural joint or bracket with circular annotation and label 'A' (no text or symbols beyond label)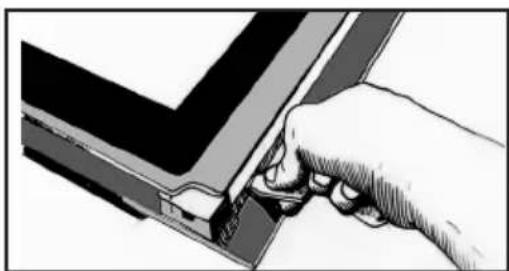
natural_image
Illustration of a hand using a tool to adjust or install a component, no text or symbols visiblenatural_image
Illustration of hands holding a device with a grid pattern inside (no text or symbols). 9 ÚDRŽBA
natural_image
Illustration of a hand using a tool to cut or mark a piece of paper or document (no text or symbols visible)natural_image
Technical line drawing of a mechanical component with a magnified inset showing a circular feature (no text or symbols)natural_image
Illustration of a hand holding a rectangular device with internal components, no visible text or symbolsnatural_image
Illustration showing a hand holding a square object with a finger, and a close-up of a device with arrows indicating motion (no text or symbols)1 INSTALLATION ....6

Display

natural_image
Simple line drawing of a vertical panel with three symbols: circle, left-pointing arrow, and bell (no text or labels)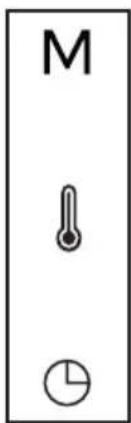
TILBEH∅R (IF∅LGE MODELLEN)
natural_image
Diagram of a kitchen appliance with a grater and a curved panel, showing no text or symbols
natural_image
Line drawing of a rectangular tray or container with no text, numbers, or symbols• 4 IBRUGTAGNING OG INDSTILLINGER
F∅RSTE IBRUGTAGNING
- Vælg sprog
natural_image
Illustration of a person using a tool to interact with a grid-like device (no text or symbols visible)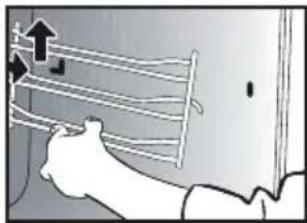
natural_image
Illustration of a hand holding a metal rack with an upward arrow, no text or symbols presentGLASRUDERNE INDVENDIGT
natural_image
Illustration showing a hand using a tool to cut a component, with a close-up of the component being held (no text or symbols present)natural_image
Technical line drawing of a mechanical bracket with circular annotation highlighting a specific feature (no text or symbols present)
natural_image
Hand inserting a component into a device (no text or symbols visible)natural_image
Illustration of hands holding a device with a tray and screen (no text or symbols visible). 9 VEDLIGEHOLDELSE
Udtag rammen og ruden.
natural_image
Illustration of a hand using a tool to cut or mark a piece of paper or metal (no text or symbols visible)natural_image
Technical line drawing of a mechanical component with a close-up inset showing a circular feature (no text or symbols)natural_image
Diagram of a hand holding a device with a grid pattern, no visible text or symbolsRENG∅RING MED UDSKUDT START
natural_image
Illustration showing a hand holding a square object with a finger, and a close-up of a battery plug with arrows indicating flow direction (no text or symbols)1 INSTALLATION ....6

Anzeige

ZUBEHÖR (JE NACH MODELL)
natural_image
Diagram of a kitchen appliance with a grater and a curved handle, showing no text or symbols
natural_image
Line drawing of a rectangular tray or container with rounded corners and a flat center (no text or symbols)natural_image
Illustration of a hand holding a curved object with internal lines and an arrow indicating direction (no text or symbols)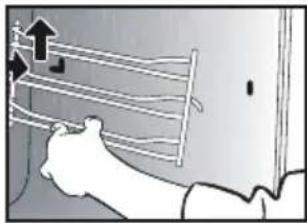
natural_image
Illustration of a hand holding a ladder with an upward arrow, no text or symbols presentnatural_image
Illustration of a hand using a tool to adjust or install a component, with a close-up view of a device (no text or symbols visible)natural_image
Technical line drawing of a mechanical bracket with circular annotation and label 'A' (no text or symbols beyond label)
natural_image
Illustration of a hand inserting a component into a V-shaped structure (no text or symbols)natural_image
Illustration of hands holding a device with a partially open lid (no text or symbols visible). 9 PFLEGE
natural_image
Illustration of a hand using a tool to press or install a mechanical component (no text or symbols visible)natural_image
Technical line drawing of a mechanical component with a circular feature, shown in two orthographic views (no text or symbols)natural_image
Illustration of hands holding a rectangular device with internal components (no text or symbols visible)A Panel de control
B Lámpara
C Niveles (3 alturas disponibles)

Visualizador

natural_image
Diagram of a kitchen appliance with a grater and a curved panel, showing no text or symbols
natural_image
Line drawing of a rectangular tray or container with no text, numbers, or symbols• 4 PUESTA EN SERVICIO Y AJUSTES
natural_image
Illustration of a hand holding a tool with curved lines and arrows indicating motion (no text or symbols)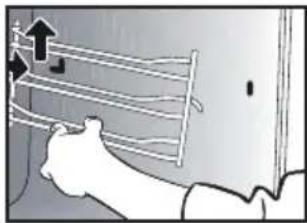
natural_image
Illustration of a person using a tool to lift a wall-mounted rack (no text or symbols visible)natural_image
Illustration of a hand using a tool to cut a device into a panel, with a close-up of the device showing internal components (no text or symbols)natural_image
Technical line drawing of a structural joint or bracket with a circular annotation and label 'A' (no text or symbols beyond the label)
natural_image
Illustration of a hand inserting a component into a V-shaped structure (no text or symbols)natural_image
Illustration of hands holding a device with a grid pattern (no text or symbols). 9 MANTENIMIENTO
natural_image
Illustration of a hand using a tool to cut or mark a piece of paper or metal (no text or symbols visible)natural_image
Technical line drawing of a mechanical component with a circular feature, shown in an inset view (no text or symbols)natural_image
Illustration of a hand holding a rectangular device with internal components, no visible text or symbols
Οθόνη

natural_image
Pure electrical circuit lines without any symbols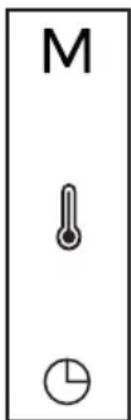
natural_image
Diagram of a kitchen appliance with a grater and a black arrow indicating direction (no text or symbols)
natural_image
Line drawing of a rectangular tray or container with rounded corners and a flat center (no text or symbols)natural_image
Illustration of a person using a tool to interact with a wall-mounted cable or wire (no text or symbols visible)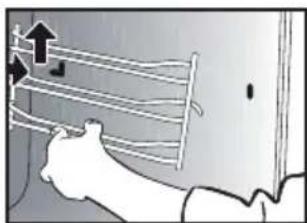
natural_image
Illustration of a person using a ladder to lift a wall, with an upward arrow indicating motion (no text or symbols present)ΕΣΩΤΕΡΙΚΑ ΤΖΑΜΙΑ
natural_image
Illustration showing a hand using a tool to cut a device into a black box (no text or symbols present)natural_image
Technical line drawing of a mechanical bracket with circular annotation highlighting part AA (no text or symbols present)
natural_image
Illustration of a hand inserting a component into a device (no text or symbols visible)natural_image
Illustration of hands holding a device with a grid pattern (no text or symbols).9 ΣΥΝΤΗΡΗΣΗ
natural_image
Illustration of a hand using a tool to cut or mark a piece of paper or document (no text or symbols visible)natural_image
Technical line drawing of a mechanical component with a close-up inset showing a circular feature (no text or symbols)natural_image
Illustration of a hand holding a rectangular device with internal components, no visible text or symbols5 MANUAALINEN KYPSENNYSTILA....12
6 KYPSENNYSVINKIT....15
8 MUUT TOIMINNOT ....19

Näyttö

natural_image
Simple line drawing of three basic symbols: circle with minus sign, left-pointing arrow, and bell (no text or labels)
Suorapainike MANUAALISEEN tilaan
Lämpötilapainike
natural_image
Diagram of a kitchen appliance with a grater and a curved panel, showing no text or symbols
natural_image
Line drawing of a rectangular tray or container with rounded corners and a flat center (no text or symbols)• 4 KÄYTTÖÖNOTTO JA ASETUKSET
ENSIMMÄINEN KÄYTTÖÖNOTTO
- Valitse kieli
• 5 MANUAALINEN KYPSENNYSTILA
• 5 MANUAALINEN KYPSENNYSTILA
• 5 MANUAALINEN KYPSENNYSTILA
KYPSENNYKSEN KÄYNNISTYS
PIKAKYPSENNYS
KYPSENNYKSEN KESTOAIKA
natural_image
Illustration of a person using a tool to interact with a wall-mounted cable or wire (no text or symbols visible)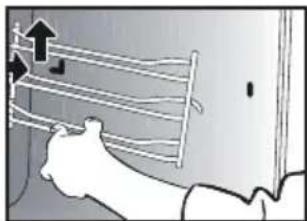
natural_image
Illustration of a hand holding a rack with an upward arrow indicating motion (no text or symbols)UUNIN SISÄPUOLELLA OLEVAT LASIT
natural_image
Illustration showing a hand inserting a device into a panel, with a close-up of the device's screen (no text or symbols present)natural_image
Technical line drawing of a mechanical bracket with circular annotation and label 'A' (no text or symbols beyond label)
natural_image
Illustration of a hand inserting a component into a device (no text or symbols visible)natural_image
Illustration of hands holding a device with a partially open lid (no text or symbols visible). 9 _HUOLTOTOIMET
natural_image
Illustration of a hand pressing down on a mechanical component (no text or symbols visible)natural_image
Technical line drawing of a mechanical component with a circular feature, shown in two orthographic views (no text or symbols)natural_image
Illustration of hands holding a tray with a lid, showing internal components (no text or symbols)natural_image
Illustration showing a hand holding a square object with a finger, and a close-up of a device with arrows indicating motion (no text or symbols)
Kijelző

natural_image
Simple vertical diagram with three symbols: circle, left-pointing arrow, and bell (no text or labels)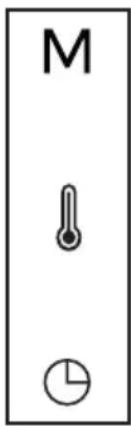
natural_image
Diagram of a kitchen appliance with a grater and a curved panel, showing no text or symbols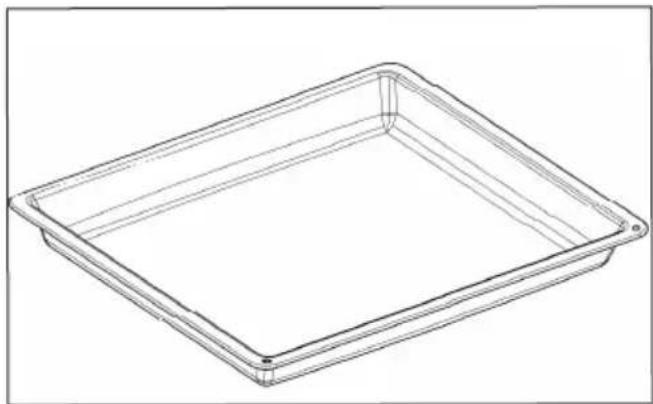
natural_image
Line drawing of a rectangular tray or container with no text, numbers, or symbolsnatural_image
Illustration of a person using a tool to interact with a wall-mounted cable or wire (no text or symbols visible)
natural_image
Illustration of a hand holding a rack with an upward arrow, no text or symbols presentBELSŐ ÜVEGEK
natural_image
Illustration showing a hand using a tool to cut a component, with a close-up of a device on the right (no text or symbols visible)natural_image
Technical line drawing of a structural joint or bracket with circular annotation (no text or symbols)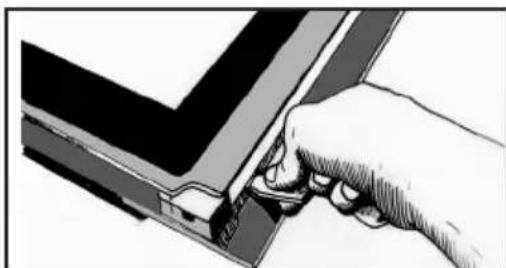
natural_image
Hand inserting a small component into a V-shaped electronic component (no text or symbols visible)natural_image
Illustration of hands holding a device with a grid pattern (no text or symbols). 9 KARBANTARTÁS
natural_image
Illustration of a hand pressing down on a flat surface with a ruler, no text or symbols presentnatural_image
Technical line drawing of a mechanical component with a close-up inset showing a circular feature (no text or symbols)natural_image
Illustration of a hand holding a rectangular object with internal lines and shading (no text or symbols)
Display

natural_image
Simple line diagram with three symbols: circle, left-pointing arrow, and bell (no text or labels)
natural_image
Diagram of a kitchen appliance with a grater and a curved panel, showing no text or symbols
natural_image
Line drawing of a rectangular tray or container with no text, numbers, or symbolsnatural_image
Illustration of a person using a tool to interact with a wall-mounted cable or wire (no text or symbols visible)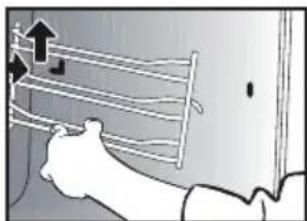
natural_image
Illustration of a hand holding a wall-mounted rack with arrows indicating upward motion (no text or symbols)I VETRI INTERNI
natural_image
Illustration showing a hand using a tool to cut a component, with a close-up of a smartphone displaying a 3D model (no text or symbols present)natural_image
Technical line drawing of a mechanical bracket with a circular annotation highlighting a specific feature (no text or symbols present)
natural_image
Illustration of a hand inserting a component into a V-shaped structure (no text or symbols)natural_image
Illustration of hands holding a device with a partially open lid (no text or symbols visible). 9 MANUTENZIONE
natural_image
Illustration of a hand using a tool to cut or mark a piece of paper or tape (no text or symbols visible)natural_image
Technical line drawing of a mechanical part with a circular hole and a side view inset (no text or symbols)natural_image
Illustration of hands holding a rectangular device with internal components (no text or symbols visible)natural_image
Illustration of a hand holding a small electronic device with a scroll wheel (no text or symbols visible)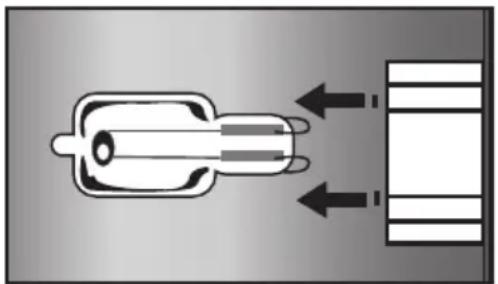
natural_image
Diagram showing a connector with two input arrows and a output connector (no text or symbols)8 ANDERE FUNCTIONS....19
11 BEKWAAMHEIDSPROEF ....25
VEILIGHEID EN BELANGRIJKE VOORZORGS-MAATREGELEN
BELANGRIJKE VEILIGHEIDSINSTRUCTIES. LEES ZE AANDACHTIG EN BEWAAR ZE VOOR TOEKOMSTIG GEBRUIK.

Display

flowchart
graph TD
    A["Start Circle"] --> B["Direction Arrow"]
    B --> C["Bell Icon"]

natural_image
Diagram of a kitchen appliance with a grater and a curved panel, showing no text or symbols
natural_image
Line drawing of a rectangular tray or container with no text, numbers, or symbolsnatural_image
Illustration of a person holding a wall-mounted cable or wire, with no visible text or symbols
natural_image
Illustration of a person using a tool to lift a wall-mounted rack (no text or symbols visible)BINNENKANT VAN DE RUITEN
natural_image
Illustration of a hand using a tool to cut a component, with a magnified view showing the same part (no text or symbols present)natural_image
Technical line drawing of a mechanical bracket with a circular annotation highlighting a specific feature (no text or symbols present)
natural_image
Illustration of a hand using a tool to adjust or install a component, no text or symbols visiblenatural_image
Illustration of hands holding a device with a grid pattern (no text or symbols visible). 9 ONDERHOUD
natural_image
Illustration of a hand pressing down on a mechanical component (no text or symbols visible)natural_image
Technical line drawing of a mechanical component with a close-up inset showing a circular feature (no text or symbols)natural_image
Illustration of a hand holding a rectangular device with internal components (no text or symbols visible)5 MANUELL MODUS....11
Starte en tilberedning....11
6 RÅD OG ANBEFALINGER....14
Tørking 14
7 AUTOMATISK MODUS....15
9 VEDLIKEHOLD ....19

Display

natural_image
Diagram of a kitchen appliance with a grater and a curved panel, showing no text or symbols
natural_image
Line drawing of a rectangular tray or container with rounded corners and a flat center (no text or symbols)• 4 IDRIFTSETTING OG INNSTILLINGER
F∅RSTE GANGS BRUK
- Velg språk
natural_image
Illustration of a hand holding a wire with arrows indicating motion or force (no text or symbols)
natural_image
Illustration of a person using a tool to lift a wall-mounted cable or hose (no text or symbols visible)INNVENDIGE GLASSRUTER
natural_image
Illustration of a hand using a tool to adjust or install a component, with a close-up view of a device (no text or symbols visible)natural_image
Technical line drawing of a structural joint or bracket with a circular annotation and label 'A' (no text or symbols beyond the label)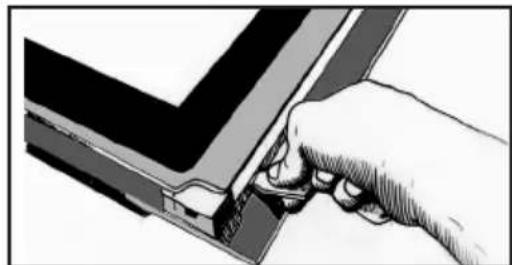
natural_image
Illustration of a hand inserting a component into a device (no text or symbols visible)natural_image
Illustration of hands holding a device with a partially open lid (no text or symbols visible).9 VEDLIKEHOLD
natural_image
Illustration of a hand using a tool to cut or mark a piece of paper or metal (no text or symbols visible)Denne enheten består av 2 ruter. Den første har 2 gummistoppere på de 2 hjørnene foran.
natural_image
Technical line drawing of a mechanical component with a circular feature, shown in two orthographic views (no text or symbols)natural_image
Illustration of a hand holding a rectangular device with internal components, no visible text or symbolsKlips rammen fast ved å klemme den inntil døren. Ikke trykk kun på rammen.
8 INNE FUNKCJE....19
WYBÓR MIEJSCA INSTALACJI I WBUDOWANIA


Wyświetlacz


natural_image
Diagram of a kitchen appliance with a grater and a curved panel, showing no text or symbols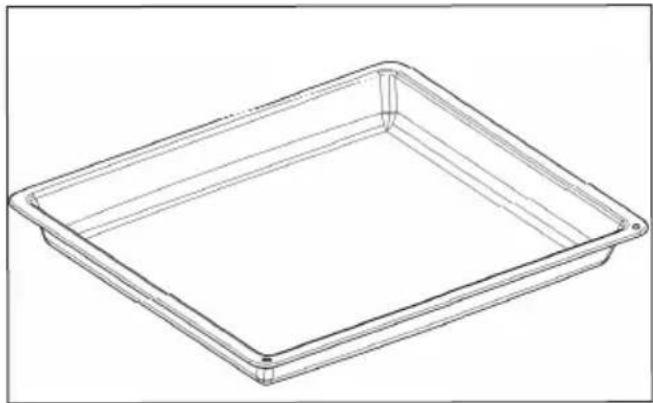
natural_image
Line drawing of a rectangular tray or container with no text, numbers, or symbols• 4 URUCHOMIENIE I REGULACJA
PIERWSZE URUCHOMIENIE
- Wybór języka
natural_image
Illustration of a hand holding a curved object with horizontal lines and arrows indicating motion (no text or symbols)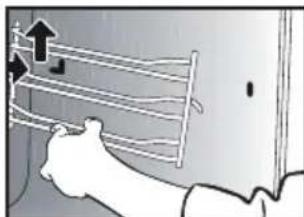
natural_image
Illustration of a hand holding a coiled cable or wire, with arrows indicating upward motion (no text or symbols)SZYBY WEWNETRZNE
natural_image
Illustration showing a hand using a tool to cut a component, with a close-up of the device on its side (no text or symbols present)natural_image
Technical line drawing of a mechanical bracket with a circular annotation labeled 'A' (no text or symbols beyond label)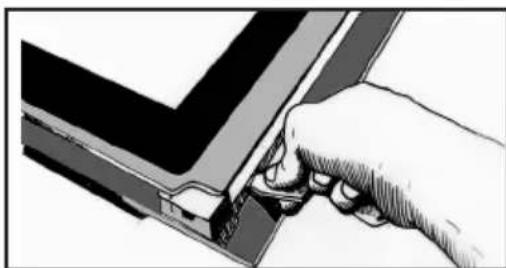
natural_image
Hand inserting a component into a V-shaped electronic device (no text or symbols visible)natural_image
Illustration of hands holding a device with a tray and internal components (no text or symbols visible). 9 KONSERWACJA
Zdjąć ramę i szybę.
natural_image
Illustration of a hand using a tool to cut or mark a piece of paper or document (no text or symbols visible)natural_image
Technical line drawing of a mechanical component with a close-up inset showing a circular feature (no text or symbols)natural_image
Illustration of a hand holding a rectangular device with internal components (no text or symbols visible)
Visualizador

natural_image
Simple line drawing of a vertical rectangle with three symbols: circle, left-pointing arrow, and bell (no text or labels)
natural_image
Diagram of a kitchen appliance with a grater and a curved panel, showing no text or symbols
natural_image
Line drawing of a rectangular tray or container with no text, numbers, or symbolsnatural_image
Illustration of a hand using a tool to interact with a wall-mounted grid, showing motion lines (no text or symbols)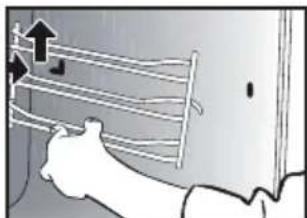
natural_image
Illustration of a person using a tool to lift a wall-mounted rack (no text or symbols visible)VIDROS INTERIORES
natural_image
Illustration of a hand using a sewing machine to cut a component, with a close-up of the part showing a magnified view (no text or symbols)natural_image
Technical line drawing of a structural joint or bracket with circular annotation (no text or symbols)
natural_image
Illustration of a hand using a tool to adjust or install a component, no text or symbols visiblenatural_image
Illustration of hands holding a device with a tray and internal components (no text or symbols visible). 9 CONSERVAÇÃO
natural_image
Illustration of a hand using a tool to cut or mark a piece of paper or metal (no text or symbols visible)natural_image
Technical line drawing of a mechanical component with a close-up inset showing a base detail (no text or symbols)natural_image
Illustration of a hand holding a rectangular device with internal components, no visible text or symbols
Дисплей

natural_image
Simple line drawing of a vertical rectangle with three symbols: circle, left-pointing arrow, and bell (no text or labels)
natural_image
Diagram of a kitchen appliance with a grater and a curved panel, showing no text or symbolsnatural_image
Line drawing of a rectangular tray or container with rounded corners and a flat center (no text or symbols)• 4 ВКЛЮЧЕНИЕ И НАСТРОЙКА
ПЕРВЫЙ ЗАПУСК
- Выберите язык
natural_image
Illustration of a person using a tool to interact with a wall-mounted cable or wire (no text or symbols visible)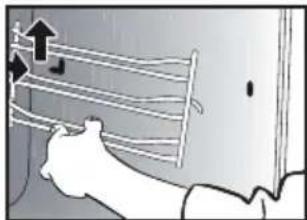
natural_image
Illustration of a person using a tool to lift a wall-mounted rack (no text or symbols visible)ВНУТРЕННИЕ СТЕКЛА
natural_image
Illustration of a hand using a tool to adjust or install a component, with a magnified view showing a separate device (no text or symbols present)natural_image
Technical line drawing of a structural joint or bracket with a circular annotation highlighting a specific section (no text or symbols present)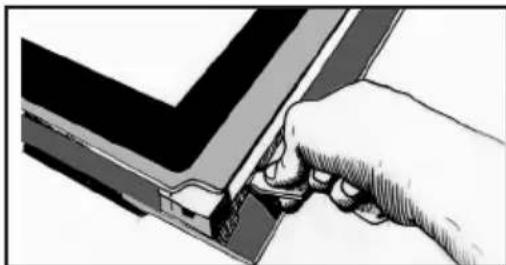
natural_image
Illustration of a hand using a tool to adjust or install a component, no text or symbols visiblenatural_image
Illustration of hands holding a device with a partially open panel (no text or symbols visible). 9 уход
natural_image
Illustration of a hand using a tool to cut or mark a piece of paper or metal (no text or symbols visible)natural_image
Technical line drawing of a mechanical component with a circular feature, shown in two orthographic views (no text or symbols)natural_image
Illustration of a hand holding a rectangular device with internal components, no visible text or symbolsnatural_image
Illustration showing a hand holding a square object with a finger, and a close-up of a battery plug with arrows indicating direction (no text or symbols)
Displej

natural_image
Diagram of a kitchen appliance with a grater and a handle, showing internal structure and an arrow indicating direction (no text or symbols)
natural_image
Line drawing of a rectangular tray or container with no text, numbers, or symbolsPRVÉ UVEDENIE DO PREVÁDZKY
- Vyberte jazyk
natural_image
Illustration of a person using a tool to interact with a wall-mounted cable or wire (no text or symbols visible)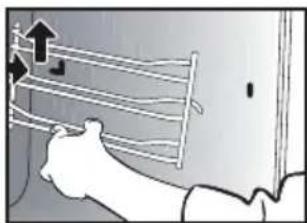
natural_image
Illustration of a hand holding a rack with an upward arrow indicating motion (no text or symbols)VNÚTORNÉ OKNÁ
natural_image
Illustration of a hand using a tool to adjust or install a component, with a separate close-up showing a device (no text or symbols visible)natural_image
Technical line drawing of a mechanical bracket with a circular annotation labeled 'A' (no text or symbols beyond label)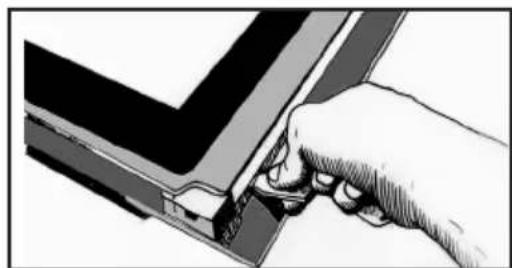
natural_image
Illustration of a hand inserting a component into a device (no text or symbols visible)Zdvihnite zostavu na odpojenie rámu a skla. To isté spravte vl'avo.
natural_image
Illustration of hands holding a device with a tray and internal components (no text or symbols visible). 9 ÚDRŽBA
Zložte rám a sklo.
natural_image
Illustration of a hand using a tool to press or install a document on a flat surface (no text or symbols visible)natural_image
Technical line drawing of a mechanical component with a close-up inset showing a circular feature (no text or symbols)natural_image
Illustration of hands assembling a rectangular frame with internal components (no text or symbols)Zacvaknite rám utiahnutím s dvierkami. Nezatláčajte samotný rám.
natural_image
Illustration showing a hand holding a device with a close-up of its internal components (no text or symbols present)1 INSTALLATION ....6

Display

natural_image
Diagram of a kitchen appliance with a grater and a handle, showing internal structure and an arrow indicating direction (no text or symbols)
natural_image
Line drawing of a rectangular tray or container with no text, numbers, or symbols• 4 START OCH INSTÄLLNINGAR
FÖRSTA ANVÄNDNING
- Välj språk
natural_image
Illustration of a person using a tool to interact with a wall-mounted grid (no text or symbols visible)
natural_image
Illustration of a person using a tool to lift a wall-mounted rack (no text or symbols visible)GLASET INVÄNDIGT
natural_image
Illustration of a hand using a tool to cut a component, with a close-up of a smartphone showing the same part (no text or symbols present)natural_image
Technical line drawing of a mechanical bracket with a circular annotation highlighting a specific feature (no text or symbols present)
natural_image
Illustration of a hand using a tool to adjust or install a component, no text or symbols visiblenatural_image
Illustration of hands holding a device with a grid pattern (no text or symbols). 9 UNDERHÅLL
natural_image
Illustration of a hand using a tool to cut or mark a piece of paper or metal (no text or symbols visible)natural_image
Technical line drawing of a mechanical component with a circular feature, shown in an inset view (no text or symbols)natural_image
Illustration of a hand holding a rectangular device with internal components, no visible text or symbolsSJÄLVRENGÖRING MED PYROLYS
SJÄLVRENGÖRINGSCYKEL
SJÄLVRENGÖRING MED FÖRDRÖJD START
natural_image
Illustration showing a hand holding a square object with a finger, and a close-up of a cylindrical device with arrows indicating motion (no text or symbols)
Дисплей

natural_image
Simple line diagram with three symbols: circle, left-pointing arrow, and bell (no text or labels)
natural_image
Diagram of a kitchen appliance with a grater and a curved panel, showing no text or symbols
natural_image
Line drawing of a rectangular tray or container with no text, numbers, or symbolsnatural_image
Illustration of a person using a tool to interact with a surface, showing motion lines and arrows (no text or symbols)
natural_image
Illustration of a hand holding a rack with arrows indicating upward motion (no text or symbols)ВНУТРІШНІ СТЕКЛА
natural_image
Illustration showing a hand using a tool to cut a device into a panel, with a separate close-up of the device (no text or symbols visible)natural_image
Technical line drawing of a mechanical bracket with a circular annotation labeled 'A' (no text or symbols beyond label)
natural_image
Illustration of a hand using a tool to adjust or install a component, no text or symbols visiblenatural_image
Illustration of hands holding a tray with a lid, showing internal components (no text or symbols).9.догляд
natural_image
Illustration of a hand pressing down on a mechanical component (no text or symbols visible)natural_image
Technical line drawing of a mechanical component with a close-up inset showing a circular feature (no text or symbols)natural_image
Illustration of a hand holding a rectangular object with internal lines and shading (no text or symbols)natural_image
Illustration showing a hand holding a small object with a curved arrow indicating rotation, and a close-up of a device with arrows pointing to a rectangular block (no text or symbols present)תִיַעְרָה
A
תְרָה
B
B :(הכלהה)
A
natural_image
Simple line drawing of a vertical rectangle with three symbols: circle, left-pointing arrow, and bell (no text or labels)natural_image
Diagram of a kitchen appliance with a grater and a black arrow indicating direction (no text or symbols)natural_image
Line drawing of a rectangular tray or container with no text, numbers, or symbols.הכלההוּרָה,הכלההוּרָה,הכלההוּרָה,הכלההוּרָה,
.הכלה
תְרָה -
.הכלההוּרָהוּרָהוּרָהוּרָהוּרָהוּרָהוּרָהוּרָהוּרָהוּרָהוּרָהוּרָהוּרָהוּרָהוּרָה
natural_image
Illustration of a hand using a sewing machine to cut a cable or cable, with a separate close-up of the cable (no text or symbols visible)natural_image
Technical line drawing of a mechanical bracket with circular annotation highlighting a specific feature (no text or symbols present)
natural_image
Illustration of a hand inserting a component into a device (no text or symbols visible)natural_image
Illustration of hands holding a tablet device with a grid overlay (no text or symbols)תַלְרָה בְּרָה
natural_image
Illustration of a hand holding a ladder with an upward arrow, no text or symbols present