
SS-21280 - Fan Sogo - Free user manual and instructions
Find the device manual for free SS-21280 Sogo in PDF.

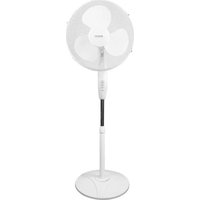
| Product Type | 3-in-1 Pedestal Fan |
| Brand | Sogo |
| Model | SS-21280 |
| Supply Voltage | 220-240 V ~ 50 Hz |
| Rated Power | 50 W |
| Number of Speeds | 3 (Low, Medium, High) |
| Oscillation Function | Yes |
| Timer | Yes, up to 7.5 hours |
| Remote Control | Yes (AAA batteries not included) |
| Height Adjustment | Yes, via telescopic column |
| Tilt | Yes, adjustable |
| Protective Grille | Yes |
| Housing Material | Plastic |
| Power Cord | Short, do not use extension cord |
| Cleaning | Damp cloth, no solvents |
| Safety | Do not use near water, do not insert objects |
| After-Sales Service | www.sogosat.com / 0034 902 222 161 |
| Country of Origin | Made in China |
| Certifications | CE, Low Voltage, Electromagnetic Compatibility |
| Intended Use | Indoor, household use only |
| Package Contents | Fan, column, base, remote control, screws, manual |
Frequently Asked Questions - SS-21280 Sogo
User questions about SS-21280 Sogo
0 question about this device. Answer the ones you know or ask your own.
Ask a new question about this device
Download the instructions for your Fan in PDF format for free! Find your manual SS-21280 - Sogo and take your electronic device back in hand. On this page are published all the documents necessary for the use of your device. SS-21280 by Sogo.
USER MANUAL SS-21280 Sogo
natural_image
Black outdoor fan with blue blades and black base, standing on a stand (no text or symbols visible)Caution: please read and preserve these important instructions
ÍNDICE
1 Important Note P.11
2. Symbol definitions P.11
3. Safety instructions for the user P.11
I. General precautions during the use of electrical equipment P.11
II. Restrictions on use to avoid personal injury P.12
III. Product use restrictions due to poor condition or breakdown
IV. Restrictions on use when used with children and elders P.14
V. IMPORTANT WARNING P.15
VI. Instructions to follow when using the device P.15
- Technical information P.17
- Parts of the fan P.17
- Instructions for assembly and use P.17
- Cleaning and maintenance P.18
- (ERP) Technical specifications P.55
- Declaration of conformity P.57
- Responsibility of disposal, details of the manufacturer and after-sales service P.58
ÍNDICE
natural_image
Diagram showing four different mechanical components or assemblies with no visible text or symbols• Always read the instruction book carefully before using.
- This manual can be downloaded from our web page www.sogo.es
- Keep these instructions for future reference.
2. Symbol definitions
1
2
GENERAL PRECAUTIONS
3
1- Important information and useful hinds on use
2- Warning against dangerous situations in terms of life and property
3- Cautions while using electrical and electronic equipment.
3. GENERAL PRECAUTIONS Safety instructions for the user
I. General precautions during the use of electrical equipment
Do not use the appliance for any other purpose than described in this manual.
Do not use or store the appliance outdoors.
• Always place the appliance on to the flat and even surface.
- This product is intended for indoor, non-industrial, non-commercial and only for household use. Do not use the item outdoors or for any other purpose. Misuse or improper handling may cause problems in the appliance and cause injury to the user.
- The unit must be used only for the intended purposes. No liability is accepted for damages arising from improper use or wrong handling.
- Ensure that the voltage indicated on the nameplate matches the mains voltage before plugging in the appliance.
- Always remove the plug from the power socket when the appliance is not in use. Do not leave the appliance unattended when switched on.
- Close supervision is necessary when any appliance is being used by or near children.
- The device is not completely disconnected from the power source, even after it has been turned off. To disconnect it completely, disconnect it from the mains plug.
- The appliances are not intended to be operated by means of an external timer or separate remote-control system.
II. !Restrictions on use to avoid personal injury
- Do not let the appliance operate unattended.
- Do not place or operate this appliance near water sources.
- Do not place or operate the appliance and its power cord on or near hot surfaces (e.g., stove plates) or open flames.
- Do not leave the power cord hanging from sharp edges and keep away from hot objects and flames. Do not wind the cord around the appliance and do not bend it.
- Never use accessories that are not recommended by the manufacturer.
- The use of accessories not recommended or sold by the appliance manufacturer may result in fire, electric shock or injury to persons.
- When you want to remove the plug from the wall contact, please do this at the plug itself and not by pulling on the cable or the appliance itself.
- To avoid electric shock, make sure your hands are dry before plugging or unplugging.
- Do not use the device with wet hands, on damp floors or when the atmosphere is humid, there is a risk of electric shock.
- While using the appliance, make sure that the power cord must not be caught or crushed.
- Do not let the motor unit, cord or plug get wet to protect against risk of electric shock.
III. Product use restrictions due to poor condition or breakdown
- Never immerse the appliance or the plug-in water or any other liquid. In the event of the appliance falling in water, disconnect immediately from the mains supply and take it to an authorized service agent for repair before reusing.
- Do not use the appliance if it has fallen on the floor, if there are visible signs of damage or if it has a leak.
- Do not use the appliance if the cable or plug is damaged. In case of the cord be damaged, it must be replaced only by the manufacturer, its service agent or similarly qualified persons in order to avoid Hazard.
- In case of appliance malfunction, or if it has been damaged in any manner, return the appliance to the nearest authorized service facility for examination, repair or adjustment.
- In case of hardware problems, do not attempt to repair the product yourself. Repairs should only be carried out by qualified technicians.
IV. ■! Restrictions on use when used with children and elders
- Cleaning and user maintenance shall not be made by children without supervision.
• Children shall not play with the appliance.
- The appliance is not to be used by persons (including children) with reduced physical, sensory or mental capabilities, or lack of experience and knowledge, unless they have been given supervision or instruction.
• Children should be supervised to ensure that they do not play with the appliance.
V. IMPORTANT WARNING
- To avoid a circuit overload when using this product, do not operate another high-watt-age product on the same electrical circuit.
- A short power supply cord is provided with this product. An extension cord is not recommended for use with this product, but if one must be used:
- The marked electrical rating of the cord must be at least as great as that of the product.
- Arrange the extension cord so that it does not hang where it can be tripped over or pulled unintentionally.
VI. Instructions to follow when using the device
• Children aged less than 8 years shall only switch on/off the appliance provided that it has been placed or installed in its intended
normal operating position and they have been given supervision or instruction concerning use of the appliance in a safe way and understand the hazards involved.
- Please make sure that the fan will not meet any obstruction when oscillating.
- Do not put your fingers or any other object into the front case of the fan at any times. Please pay special attention when using the fan near children, to avoid children play with fan.
- Do not let hair, net curtains, tablecloth, clothes or curtains be next to the inlet or outlet of the fan. They could be sucked into the fan, causing damage or injuries.
- Do not use this fan with any semi-conductors speed control.
- Do not operate the fan in an area where gasoline is used or stocked, painting or such flammable liquids.
- Once the fan is assembled, it is forbidden to di-sassemble the housing when cleaning.
- If the unit requires external cleaning, make sure it is unplugged from the power supply. Use a soft tissue or dry cloth for general cleaning. To remove more persistent dirt or grime with a warm soapy dampened cloth.
Do not use any solvents (such as thinners), and these may damage the plastic casing.
4. Technical information
| Model No Voltage Frequency Power | ||
| SS-21280 220-240V 50Hz 50W |
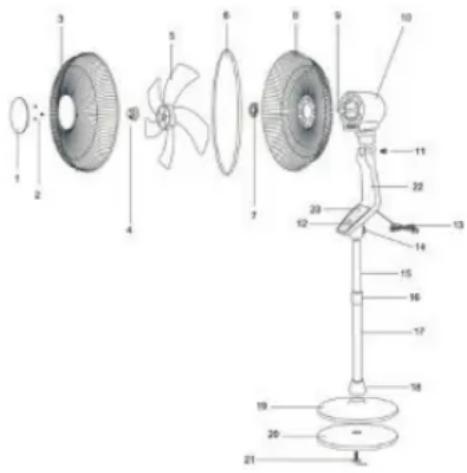
5. Parts of the fan
- Protective cover
- Protective cover screws
- Front grille
- Fan blade retaining nut
- fan blade
- Grille ring
- Rear grille nut
- Rear grille
- Motor shaft
- Motor housing
- Pivot screw
- Control Panel
- Power cord
- Column retaining screw
- Inner pipe
- Height adjustment knob
- Outer pipe
- Screw cover
-
Base plate
-
Base weight
-
L-screw
-
Fan body
-
Touch control panel
-
Remote control
6. Instructions for assembly and use
How to install
Fan assembling for stand fan
Extension column assembling with the fan base:
In order to assemble the extension column with the base, place the base (part no.19) and fix with the base weight (no.20), tighten up from the bottom with the L shape knob (#21) given with the unit. now take the extension column (already mounted with part 15, 16 and 17), part 17 is lower column which fixed to the base and part 15 is extension column, with the help of extension tube you can enhance the height of the fan as per need and part 16 height adjustment rings helps to connect the extension column and lower column and keep them intact and tighten.
Grille & blade assembly to motor:
Mount the rear grill (part 8) on to the Motor and tighten up with plastic nut by tightening in clockwise direction. Mount blade (Part 5) and tighten up with plastic spinner to hold the blade in its place. Install the front grill on to the rear grill with the help of plastic ring and tighten up with the screw.

natural_image
Diagram showing four different mechanical components with no visible text or symbolsMotor assembly to the extension column:
Enhance the desired height of the fan with the help of extension column, insert the motor bottom (already assembled with blade and grills) part in to the extension tube and tighten up with fan connecting screw(14).
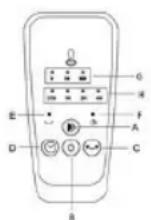
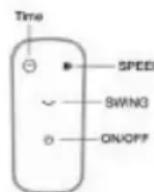
Control Panel:
A. Power on and speed Button
J. Power off button
K. Oscillation button
L. Timer button
M. Oscillation Indicator
N. Power Indicator
O. Speed indicators (Low-Med-High)
P. Time Indicators (0.5H, 1H; 2H; 4H)
Operational Use:
- Plug in the fan in the wall outlet and need to make sure that fan voltage and power matches with the wall outlet voltage.
- After plugging in the power cord, the power indicator (F) will turn on and fan enters into standby mode.
- With the help of power on button (A) we can turn on the fan and with the same button we can change speed as well. By pressing it once the fan will start working on low speed and speed indicator (G) will turn on, to change the speed need to press it again and fan will start working on Med speed mode and pressing it 3rd time make it works on high speed. With changing speed every time, speed indicator continues changing its position by lighting up respective indicator light.
- To turn off the fan, press the off button (B).
Oscillation:
To bring the fan in oscillation mode, need to press Oscillation button (C) located on below right position and the fan will start oscillating, and oscillation indicator (E) will turn on. To bring back the fan in steady mode need to press same oscillation button (C) again.
Timer:
This fan has a timer function and you can set the timer up to 7.5 hrs. In order to set the timer function, plug in the fan and turn it on, once the fan is turned on, you can set the timer by pressing Timer button (D) and first timer indicator light (H) of 0.5 hrs will turn on, so it means the fan will run till 0.5 hrs and turn off. To set the timer for long period or as per requirement, keep pressing timer button (D) and timer indicator lights keep changing. With the help of this button we can set the timer from 0.5hr up to 7.5 hrs max. when the set time will elapse, the fan will switch of automatically.
Tilt Function:
The air flow direction can be changed by tilting the fan. To tilt the fan, make sure the fan is turned off, Loosen the neck screw (11), Hold the fan grill and pull it upwards or push it downwards gently to get the desired angle. Once get the desired angle tighten up the screw again.
Height Adjustment:
To adjust the fan height, grip the extension column and loosen the height adjustment locking nut (16). Move upwards or downwards the extension column and once get the desired height, tighten up again with the help of height adjustment locking nut.
Remote control:
This fan has been provided a remote control.
To use the remote control, insert 2 x AAA size batteries (Batteries not provided) in the battery compartment and now your remote control is ready to use.
With the help of remote control, you can turn on and turn off the fan with on/Off button.
Remote control has Time, speed and Oscillation buttons as well. With the help of all these buttons you can change same fan settings, as you can change with fan control panel.
7. Cleaning & maintenance
Cleaning & maintenance:
- Always disconnect the cord from the electrical outlet when cleaning your fan.
- Light accumulated dust may be removed by using a soft cloth to wipe away the dust at the back grille of the fan.
- Wipe the exterior surfaces of the fan occasionally with a damp cloth (not dripping wet) and dry thoroughly with a soft dry cloth before operating the fan.
- Do not use harsh cleaners or materials to clean this unit, doing so will cause damages to it
Storage:
- Follow cleaning instructions 1-4 above. Make sure to disassemble and clean fan before storing.
- Retain the original packaging to store your fan.
- Always store in a dry place.
- Never store while still plugged in.
- Never wrap cord tightly around the fan or put any stress on the cord where it enters the fan as it could cause the cord to fray or break.
1. IMPORTANT:
natural_image
Diagram showing four different mechanical or electrical components with no visible text or symbolsnatural_image
Diagram showing four different mechanical components with no visible text or symbolsnatural_image
Diagram showing four different mechanical components or assemblies with no visible text or symbolsnatural_image
Diagram showing four different mechanical components or assemblies with no visible text or symbolsDirective 2009/125/EC
Directive 2009/125/EC
| Description Symbol Value Unit | ||||
| Alimentation / Fonte de energia | 220 – 240V~ 50Hz | |||
| Puissance / Potência | 50W | |||
| Classe / Class | II | |||
| Débit du ventilateur / Caudal do ventilador | F 48.9 m3/min | |||
| Puissance d'entrée du ventilateur / Entrada de energia do ventilador | P 43.1 W | |||
| Valeur du service / Valor do serviço | SV 1.1 (m3/min) /W | |||
| Consommation électrique en veille / Consumo de energia em espera | P_SB | 0.47 W | ||
| Consommation d'électricité utilisée / Consumo de eletricidade em uso | Q | 14.9 | kWh/a | |
| Niveau de puissance acoustique du ventilateur / Nível de potência sonora do ventilador | L WA 60 dB(A) | |||
| Vitesse de l'air / Velocidade do ar | C 3.15 Meters/sec | |||
| Norme de mesure pour voler du service /Padrão de medição para sair do serviço | IEC 60879:1986 (corr. 1992) | |||
| Détails du contact /Detalhes do contato | SANYSAN APPLIANCES S.L.C/BARCAS 2°, 2A , 46002, VALENCIA, SPAIN | |||
ITA / ALE
Directive 2009/125/EC
| Description Symbol Value Unit | ||||
| Alimentazione / Stromversorgung | 220 – 240V~ 50Hz | |||
| Potere / Potenz | 50W | |||
| Classe / Klasse II | ||||
| Portata del ventilatore / Lüfterdurchfluss | F m3/min | 48.9 | ||
| Potenza assorbita dal ventilatore / Lüfterleistungseingang | P | 43.1 | W | |
| Valore del servicio / Servicewert | SV (m3/min) | 1/M | ||
| Consumo energético in standby / Standby-Stromverbrauch | PSB | 0.47 | W | |
| Consumo di elettricità in uso / Stromverbrauch im Einsatz | Q kWh/a | 14.9 | ||
| Livello di potenza sonora del ventilatore / Lüfter-Schallleistungspegel | L WA dB(A) | 60 | ||
| Velocità dell'aria / Luftgeschwindigkeit C Meters/sec | 3.15 | |||
| Standard di misura per volare dal servicio / Messstandard, um vom Dienst zu fliegen | IEC 60879:1986 (corr. 1992) | |||
| Detalles de contacto /Contact details | SANYSAN APPLIANCES S.L.C/BARCAS 2°, 2A , 46002, VALENCIA, SPAIN | |||
DECLARATION OF CONFORMITY
This device complies with EU Low Voltage Directive 2014/35/EC.
Electromagnetic Compatibility Directive 2014/30/EU. Directive 2015/863/EU on the restriction of the use of certain hazardous substances in electrical.
Directive 2009/125/EC on the eco-design requirements applicable to energy-related products.


This symbol on the product or on the packaging indicates that this product can't be disposed as normal rubbish or household waste. All the electrical, electronic equipment's and battery-operated units must recycle in proper manner and according to the local municipal laws. You can recycle them by taking them to government authorized disposal centres or specialized bins which you can find in any nearby big super markets, electronics or electro domestics products stores or malls who have these types of facilities available.
Designed by: SOGO based on European quality standards Imported by: Sanysan Appliances S.L, NIF: B98753056, C/ Barcas 2, 2, 46002 Valencia, Spain Product manufactured in China. After-sales service: www.sogosat.com.sogosat@sogosat.com / 0034 902 222 161

- ÍNDICE
- Symbol definitions
- GENERAL PRECAUTIONS Safety instructions for the user
- General precautions during the use of electrical equipment
- !Restrictions on use to avoid personal injury
- Product use restrictions due to poor condition or breakdown
- ■! Restrictions on use when used with children and elders
- IMPORTANT WARNING
- Instructions to follow when using the device
- Technical information
- Parts of the fan
- Instructions for assembly and use
- Fan assembling for stand fan
- Extension column assembling with the fan base:
- Grille & blade assembly to motor:
- Motor assembly to the extension column:
- Control Panel:
- Operational Use:
- Oscillation:
- Timer:
- Tilt Function:
- Height Adjustment:
- Remote control:
- Cleaning & maintenance
- Cleaning & maintenance:
- Storage:
- IMPORTANT:
- DECLARATION OF CONFORMITY
Brand : Sogo
Model : SS-21280
Category : Fan