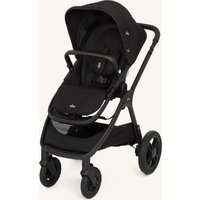
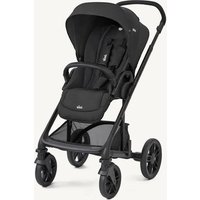
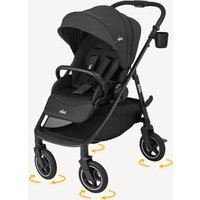
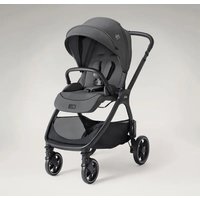
Estrella - Stroller Joie - Free user manual and instructions
Find the device manual for free Estrella Joie in PDF.

| Product type | Double stroller |
| Brand | Joie |
| Model | Estrella |
| Recommended age | From birth up to 22 kg per child |
| Number of seats | 2 |
| Frame material | Metal |
| Folding type | One-hand with secondary lock |
| Recline adjustment | Multiple recline positions |
| Adjustable leg rest | Yes, 2 positions |
| Safety harness | 5-point, height adjustable |
| Canopy | Yes, with peek window |
| Storage basket | Yes, max capacity 4.5 kg |
| Front wheels | Swivel with lock |
| Parking brake | Pedal operating rear wheels |
| Maximum weight capacity | 22 kg per seat (total 44 kg max) |
| Standard compliance | EN 1888-2:2018 +A1:2022 |
| Fabric care | Cold wash, flat dry, no detergent or bleach |
| Frame care | Warm water and mild soap, avoid detergents |
| Included accessories | Rain cover (depending on model), reversible seat cushion |
| Warranty | Check joiebaby.com |
Frequently Asked Questions - Estrella Joie
User questions about Estrella Joie
0 question about this device. Answer the ones you know or ask your own.
Ask a new question about this device
Download the instructions for your Stroller in PDF format for free! Find your manual Estrella - Joie and take your electronic device back in hand. On this page are published all the documents necessary for the use of your device. Estrella by Joie.
USER MANUAL Estrella Joie
natural_image
Line drawing of a two-wheeled baby stroller with canopy and wheels (no text or symbols)IMPORTANT - READ CAREFULLY AND KEEP FOR FUTURE REFERENCE
Stroller Assembly
natural_image
Illustration of a car seatbelt with a hand inserting a nut (no text or symbols)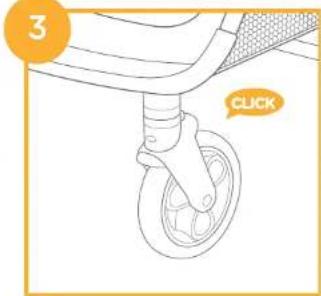
natural_image
Line drawing of a bathtub with legs and feet, showing motion arrows (no text or symbols)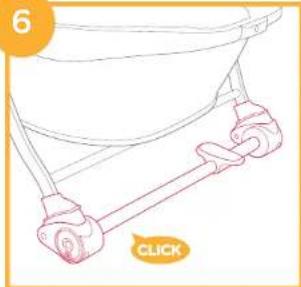
natural_image
Line drawing of a bicycle suspension system with no text or symbols
natural_image
Line drawing of a bicycle suspension system with a wheel and attached bracket (no text or symbols)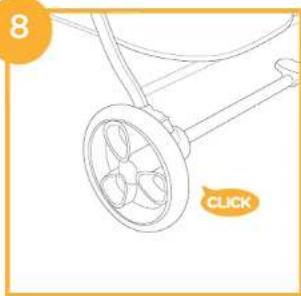
natural_image
Line drawing of a bicycle steering wheel with a pull rod and three blades, labeled 'CLICK' in an orange speech bubble (no text or symbols on the diagram itself)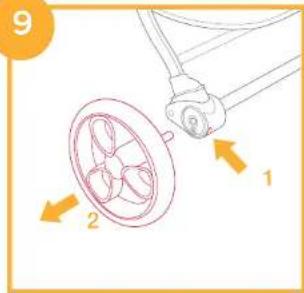
10
natural_image
Line drawing of a car seatbelt mechanism with no text or symbols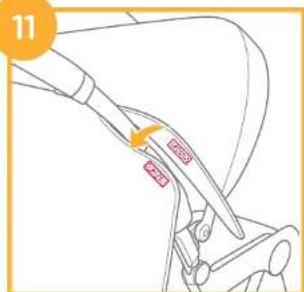


natural_image
Line drawing of a two-wheeled baby stroller with wheels and a matching canopy (no text or symbols)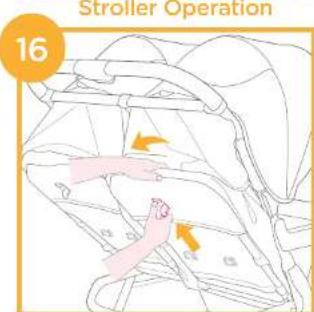

natural_image
Line drawing of a car seatbelt with a highlighted seat area and orange arrow (no text or symbols)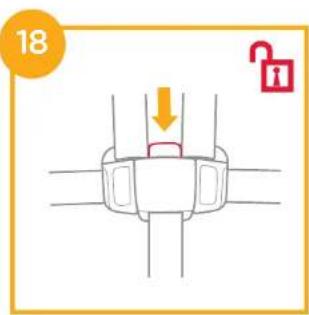

natural_image
Line drawing of a baby stroller with highlighted seat area (no text or symbols)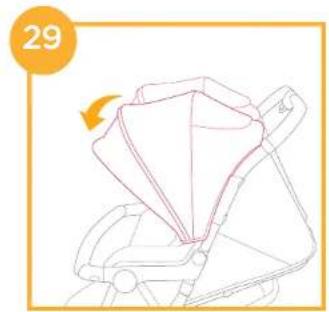
natural_image
Line drawing of a car seat with a folded seat and seatbelt, no text or symbols present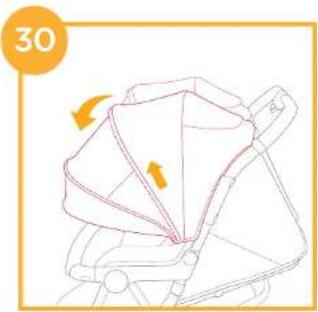
natural_image
Line drawing of a backpack seatbelt with orange arrows indicating rotation (no text or symbols)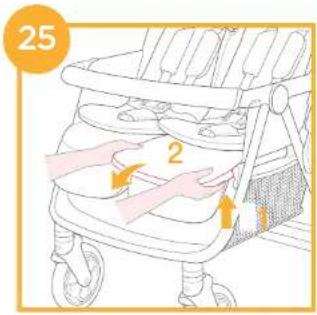
natural_image
Line drawing of a car seatbelt with a highlighted seatbelt and orange arrow indicating rotation (no text or symbols)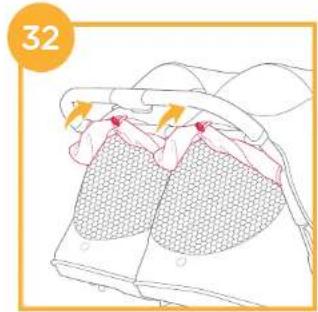

natural_image
Illustration of a person using a stroller with a lock icon, no text or symbols present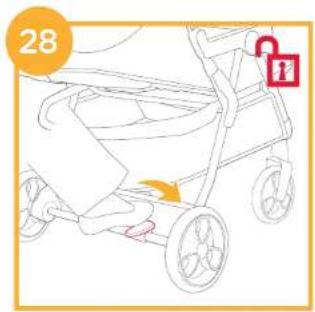
natural_image
Line drawing of a stroller with a hand and orange arrow indicating motion (no text or symbols)

natural_image
Line drawing of a stroller with wheels and a seat, no text or symbols presentAccessories (May not be included in purchase)
Accessories may be sold separately or may not be available depending on region.
natural_image
Line drawing of a baby stroller with wheels and compartments (no text or symbols)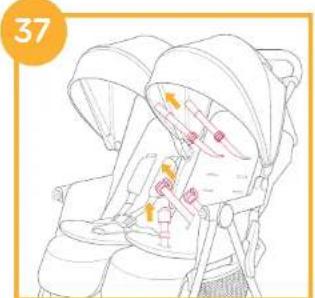

natural_image
Line drawing of a stroller with two seats and a handle, no text or symbols present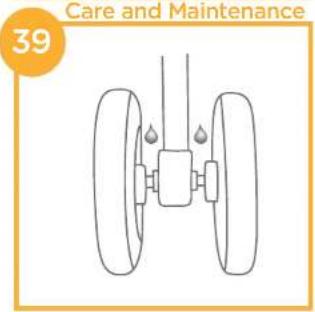
Note

Welcome to Joie ^TM
Congratulations on becoming part of the Joie family! We are so excited to be part of your journey with your little one. While traveling with the Joie estrella™, you are using a high quality, fully certified stroller, approved to European safety standards EN 1888-2:2018+A1:2022. This product is suitable for children up to 22kg or 4 years whichever comes first in each seat. Please carefully read this manual and follow each step to ensure a comfortable ride and best protection for your child.
IMPORTANT - READ CAREFULLY AND KEEP FOR FUTURE REFERENCE.
Visit us at joiebaby.com to download manuals and see more exciting Joie products!
For warranty information, please visit our website at joiebaby.com
Emergency
In case of emergency or accident, it is most important to have your child taken care of with first aid and medical treatment immediately.
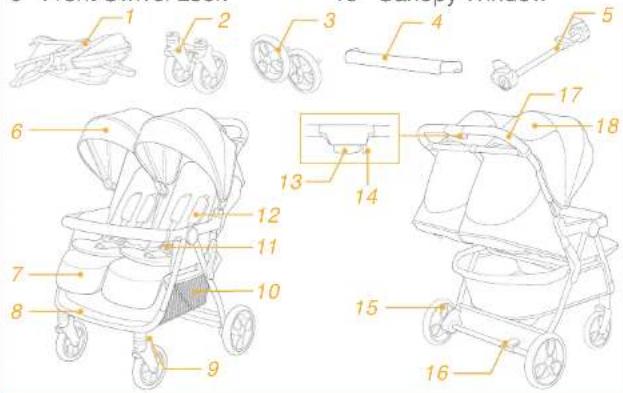
Parts List
Make sure all parts are available before assembly. If any part is missing, please contact local retailer. No tools are required for assembly.
1 Stroller Frame
2 Front Wheels
3 Rear Wheels
4 Armbar
5 Brake Assembly
6 Canopy
7 Calf Support
8 Footrest
9 Front Swivel Lock
10 Storage Basket
11 Buckle
12 Shoulder Harness
13 One-Hand-Fold Handle
14 Secondary Lock
15 Rear Wheel
16 Brake Lever
17 Handle
18 Canopy Window
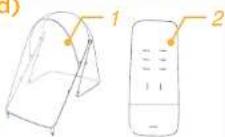
Accessories (May not be included)
1 Rain Cover (on certain models)
2 Reversible Seat Pad (on certain models)
Accessories may be sold separately or may not be available depending on region.
WARNING
! Never leave the child unattended.
! Ensure that all the locking devices are engaged before use.
! To avoid injury ensure that the child is kept away when unfolding and folding this product.
! Do not let the child play with this product.
! This product is suitable for children up to 22kg or 4 years whichever comes first in each seat.
! Always use the restraint system.
! This product is not suitable for running or skating.
! Use the stroller with a child weighing less than 22kg in each seat. It will cause damage to the stroller with an unfitted child.
! Pushchair designed to be used from birth shall recommend the use of the most reclined position for new born babies.
! The parking device shall be engaged when placing and removing children.
! To prevent a hazardous, unstable condition, do not place more than 4.5kg in the storage basket.
! Do not attach items to the handle, seat back or sides of the stroller. Any additional load will affect the stability of the stroller and could cause the stroller to tip.
! Any load attached to the handle and/or on the back of the backrest and/or on the sides of the stroller will affect the stability of the stroller.
! Accessories which are not approved by the manufacturer shall not be used. Only replacement parts supplied or recommended by the manufacturer shall be used.
! To avoid suffocation, remove plastic bag and packaging materials before using this product. The plastic bag and packaging materials should then be kept away from babies and children.
! Adult assembly required.
! Please read all the instructions in the manual before using the product. Please save instruction manual for future use. Failure to follow these warnings and instructions may result in serious injury or death.
! To avoid serious injury from falling or sliding out, always use seat belt.
! Make sure your child's body is clear from the moving parts when adjusting the stroller.
! Never use stroller on stairs or escalators.
! Keep away from high temperature objects, liquids, and electronics.
! Never place the stroller on roads, slopes or dangerous areas.
! To avoid strangulation, DO NOT place items with a string around your child's neck, suspend strings from this product, or attach strings to toys.
! DO NOT use storage basket as a child carrier.
! To avoid finger entrapment, use care when folding and unfolding the stroller.
! To ensure your child's safety, please make sure all parts are assembled and fastened properly before using the stroller.
! To avoid strangulation, do make sure your child is clear from the canopy.
! Always engage the brakes when parking the stroller.
! Discontinue using stroller if it is damaged or broken.
! Use the stroller with one child per seat at a time.
! Check that the pram body attachment devices are correctly engaged before use.
Stroller Assembly
(Please refer to figures on page 1-7)
Please read all the instructions in this manual before assembling and using this product.
Open Stroller
see image
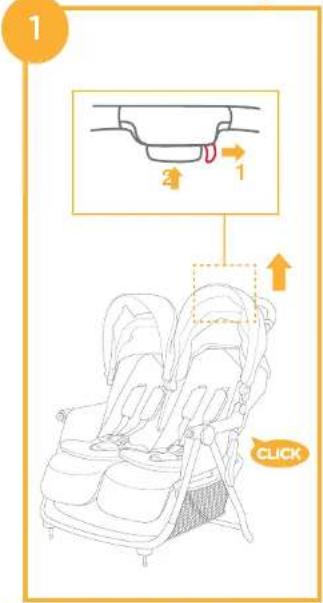
Push secondary lock 1 - 1 and squeeze one-hand-fold handle 2 - 2. Meanwhile, pull the stroller backward to open. Latches should click into place.
1 Check that the stroller is completely latched before continuing to use.
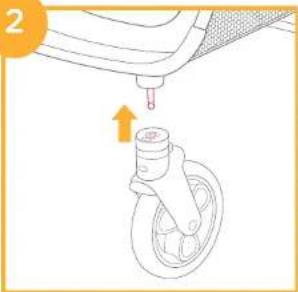
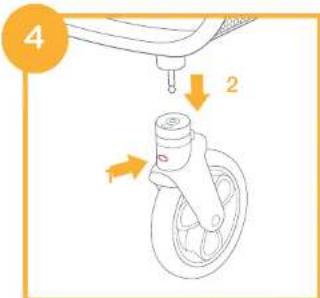
Assemble & Detach Front Wheel
see images -
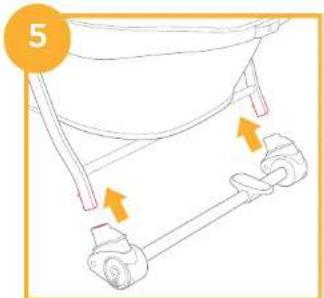
Assemble & Detach Rear Wheel
see images -
Assemble Canopy
see images ⑪ - ⑪
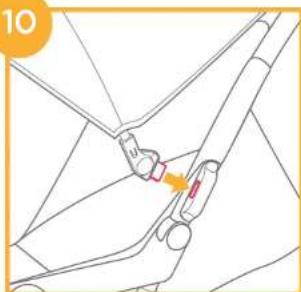
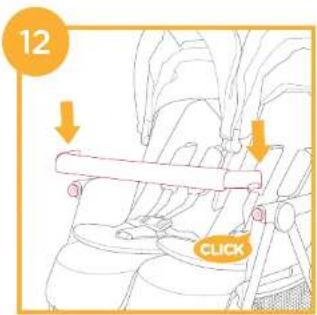
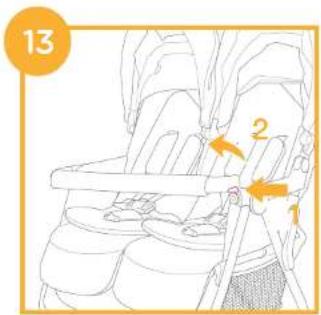
Assemble & Detach Armbar
see images
Assemble Storage Basket
see image
The completely assembled stroller is shown as
Stroller Operation
Adjust Recline
see images ⑰ - ⑪
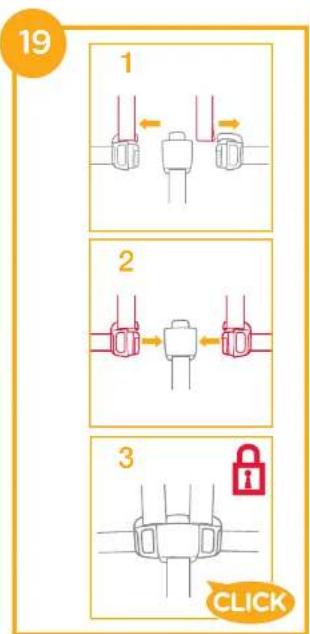
Use Buckle
see images ① - ②
Release Buckle
Press the button, the buckle will release automatically.
Lock Buckle
Match the waist belt buckle with the shoulder buckle 1, and align them with the center buckle; the buckle can lock automatically. 2 A "click" sound means the buckle is locked completely. 3
To avoid serious injury from falling or sliding out, always secure your child with harness.
! Make sure your child is snugly secured. The space between the child and the shoulder harness is about the thickness of one hand.
Do not cross the shoulder belts. This will cause pressure on a child's neck.
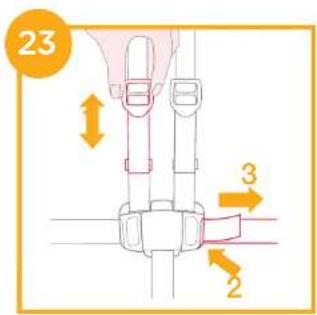
Use Shoulder & Waist Harnesses
see images -
In order to protect your child from falling out, after your child is placed into the seat, check whether the shoulder and waist harnesses are at proper height and length.
21 - 1 Shoulder harness anchor
-2 Slide adjuster
For larger child, use shoulder harness anchor and the highest shoulder slots.
For smaller child, use shoulder harness anchor and the lowest shoulder slots.
To adjust the position of the shoulder harness anchor, turn the anchor to be level with the side facing forward. Thread it through the shoulder harness slot from back to front. Retread it through the slot that is closest to child's shoulder height.
Use slide adjuster to change the harness length.
Press the button ⚙ - 2, while pulling the waist harness to proper length ⚙ - 3
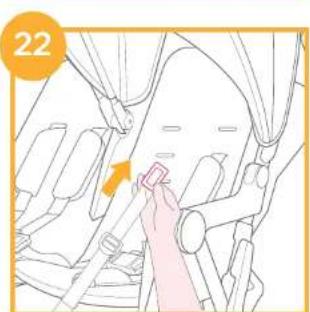
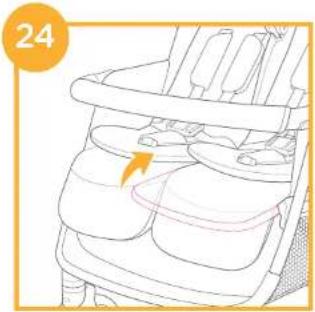
Adjust Calf Support
see images 📄 - 📄
The calf support has 2 positions.
To raise the calf support, push it upwards.
To lower calf support, press the adjustment buttons on both sides of the calf support -1, and rotate the calf support downwards.
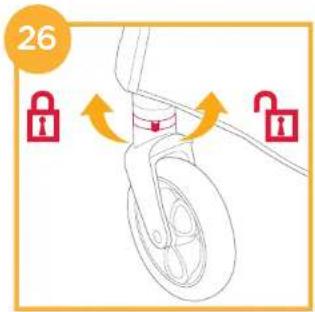
Use Front Swivel Lock
see image
Front wheel locked or unlocked status as
Tip It is recommended to use swivel locks on uneven surfaces.
Use Brake
see images -
To lock wheels, step the brake lever downwards.
To release wheels, step the brake lever forwards.
Tip Always set the parking brake when stroller is not moving.
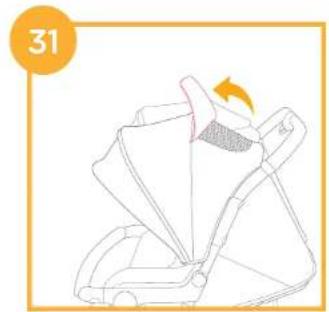
Use Canopy
see images Ⓡ - Ⓡ
Use Shoulder Harness Pad Cover and Crotch Harness Pad Cover see image
The shoulder harness pad cover or crotch harness pad cover can be removed from the webbing.
To assemble shoulder harness pad cover and crotch harness pad cover in reverse steps.
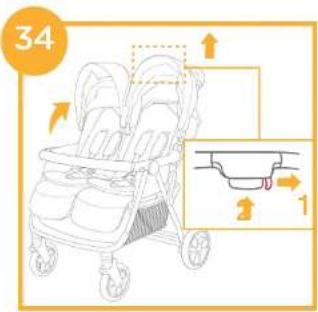
Fold Stroller
see images 32 - 35
! Please fold the canopy before folding the stroller.
Push secondary lock 34 -1 and squeeze one-hand-fold handle 34 -2. Pull the armrest rearwards to fold
stroller, then the stroller can stand when folded. 35
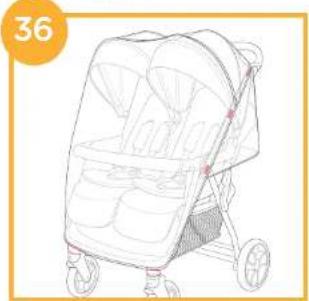
Use Accessories
Accessories may be sold separately or may not be available depending on region.
Use Rain Cover
see image
To assemble the rain cover, place it over the seat. 38
When using the rain cover, please always check its ventilation.
When not in use, please check that the rain cover has been cleaned and dried before folding.
! Do not fold the stroller after assembling the rain cover.
! Do not place your child into the stroller assembled with rain cover during hot weather.
Use Reversible Seat Pad
see images 37 - 38
Care and Maintenance
All removable fabric parts may be washed in cold water and drip-dried. No bleach. Please refer to the care label for instructions on cleaning the fabric parts of the stroller.
! Any fabric parts which are not removable should be spot-cleaned using a soft cloth and warm soapy water.
From time to time, check your stroller for loose screws, worn parts, torn material or stitching. Replace or repair the parts as needed.
Excessive exposure to sun or heat could cause fading or warping of parts.
! If stroller becomes wet, open canopy and allow to dry thoroughly before storing.
If wheels squeak, use a light oil (e.g., Silicon Spray, antirust oil, or sewing machine oil). It is important to get the oil into the axle and wheel assembly.
If brake pedal stiff/hard to fully engage, flush any debris from brake system with clean water first before lubricating.
When using your stroller at the beach or areas of high dust/sand, completely clean your stroller after use to remove sand and salt from brake mechanisms and wheel assemblies.
Note

Accessoires
Zubehör
Accessoires
Accessori
Accesorios
Acessórios
Akcesoria
Príslušenstvo
Dodaci
Dodatki
(morda niso priloženi)
Принадлежности
Tartozékok
Εξαρτήματα
Allison Baby UK Ltd, Venture Point, Towers Business Park Rugeley, Staffordshire, WS15 1UZ
NUNA International B.V. Van der Valk Boumanweg 178 C, 2352 JD Leiderdorp, The Netherlands