
Z1 Pro - Robot vacuum DREAME - Free user manual and instructions
Find the device manual for free Z1 Pro DREAME in PDF.

| Product type | Pool cleaning robot |
| Brand | Dreame |
| Model | PIXZ4110 |
| Dimensions (L x W x H) | 470.2 x 423.8 x 281.2 mm |
| Weight | 12.1 kg |
| Battery type | Lithium-ion, 9600 mAh |
| Operating voltage | 21.6 Vdc |
| Charger | Input 100-240 V ~ 50/60 Hz, Output 25.2 V == 3 A |
| Runtime | 3 to 5 hours |
| Charging time | 4 to 5 hours |
| Filter basket capacity | 4.5 L |
| Maximum pool surface area | 200 m² |
| Maximum working depth | 2.5 m |
| Cleaning modes | Standard, Floor only, Walls only, Waterline only |
| Surfaces cleaned | Floor, walls, waterline |
| Brush type | Rear TPU brushes and Front Active brush |
| Maximum suction power | 30 m²/h |
| Connectivity | Wi-Fi 2.4/5 GHz, Bluetooth, Dreamehome App |
| Remote control included | Yes (IPX8, range 7 m) |
| Robot protection rating | IP68 |
| Water operating temperature | 5 °C to 35 °C |
| Recommended water pH | 7.0 to 7.8 |
| Cleaning and maintenance | Regularly clean the filter basket, water outlets, and roller brushes |
| Winter storage | Ambient temperature -20 °C to 55 °C, battery between 80 and 100% |
Frequently Asked Questions - Z1 Pro DREAME
User questions about Z1 Pro DREAME
0 question about this device. Answer the ones you know or ask your own.
Ask a new question about this device
Download the instructions for your Robot vacuum in PDF format for free! Find your manual Z1 Pro - DREAME and take your electronic device back in hand. On this page are published all the documents necessary for the use of your device. Z1 Pro by DREAME.
USER MANUAL Z1 Pro DREAME
natural_image
Line drawing of a tracked robot with visible sensor array and control panel (no text or symbols)Robotic Pool Cleaner
Dreame Z1 Pro
User Manual
The illustrations in this manual are for reference only. Please refer to the actual product for accuracy.
EN P01\~P25
FR P26\~P51
DE P52\~P77
IT P78\~P103
ES P104\~P129
DECLARATION OF CONFORMITY
Quilo Technology (Jiaxing) Co., Ltd.
Room 199, No. 2176 Fanggong Road, Dongzha Street, Nanhu District, Jiaxing City, Zhejiang
Province, P.R.China
On behalf of Quilo Technology declare that the product
Description: Robotic Pool Cleaner
Type: PIXZ4110
Function: Pool cleaning
Complies with the following Directives
2006/42/EC, 2014/30/EU, 2014/35/EU, 2011/65/EU&(EU)2015/863,2014/53/EU
Standards conform to,
EN 60335-1:2012+A11+A13+A1+A14+A2:2019+A15:2021, EN 60335-2-41: 2021,
EN 60335-2-29:2004+A2+A11:2018, EN 62233:2008, EN 55014-1:2017+A11:2020,
EN 55014-2:2015, EN IEC 61000-3-2:2019, EN 6 1000-3-3:2013+A1:2019, EN ISO 3744:2005,
EN300 328V2.2.2, EN 301 489-1V2.2.3, EN 301 489-17 V3.2.4, EN IEC 62311:2020,
EN 61558-1:2005+A1:2009, EN 61558-2-16:2 009+A1:2013, EN 55011:2016+A11:2020,
EN 303 447 V1.1.1, EN 55032:2015+A11:2020, EN 55035:2017+A11:2020
Manufacturers authorized EU Representative
EUREP GmbH
Unterlettenweg 1a, 85051 Ingolstadt, Germany
eurep@eurep-gmbh.com
+49 841 8869 7744
Place of Issue: Suzhou
Date of Issue: 05/01/2024
Issuer's signature: Lucien. Shen
Name of Issuer: Lucien.Shen
Position of the issuer: Quality Director
Room 199, No. 2176 Fanggong Road, Dongzha Street, Nanhu District, Jiaxing City, Zhejiang Province, P.R.China
C€
Original Instructions
- Safety Instructions P02
- Product Introduction P07
- Preparations for First Time Use P12
- Operations P14
- Cleaning and Maintenance P21
- Winter Storage and Transport P23
- Troubleshooting P23
- Specifications P25
Table of Contents
1. Safety Instructions
1.1 Safety Regulations
- READ AND FOLLOW ALL INSTRUCTIONS.
- SAVE THESE INSTRUCTIONS.
- Remove the robotic pool cleaner from the pool before allowing people to enter the pool.
- When examining the robotic pool cleaner, make sure the robotic pool cleaner is switched OFF.
- Charge the battery only in the temperature range between 5^ to 45^ / 41^ to 113^ .
- This appliance can be used by children aged from 8 years and above and persons with reduced physical, sensory or mental capabilities or lack of experience and knowledge if they have been given supervision or instruction concerning use of the appliance in a safe way and understand the hazards involved. Children shall not play with the appliance. Cleaning and user maintenance shall not be made by children without supervision.
- The unit must be connected only to a supply circuit that is protected by a ground-fault circuit interrupter (GFCI). This GFCI should be tested on a routine basis. To test the GFCI, push the test button. The GFCI should interrupt power. Push the reset button. Power should be restored. If the GFCI fails to operate in this manner, the GFCI is defective. If the GFCI interrupts power to the power unit without the test button being pushed, a ground current may be flowing, indicating the possibility of an electric shock. Do not use the power unit. Disconnect the power unit and contact the manufacturer for assistance.
- Use only the original battery charger.
- The battery charger must be supplied through a residual current device (RCD) having a rated residual operating current not exceeding 30mA.
- The power cord is not user-replaceable. If the power cord is damaged, stop using the battery charger and contact the service center for repair. Do not use extension cord to connect the battery charger to electric supply; provide a properly located outlet.
- DO NOT USE the robotic pool cleaner and/or its battery / power pack in case of mechanical damage to the robotic pool cleaner and/or its battery.
- To avoid the risk of fire and burns, DO NOT open, crush, heat, or burn the battery case.
- Keep hands and fingers away from impeller motor area and driving belt mechanism to avoid injury.
- Position the battery charger at least 3.5 m / 11.48 ft from pool edge during operation.
- For continuous protection against possible electric shock, place the battery charger at least 11 cm / 4.33 in above ground.
- When lifting the robotic pool cleaner, take care to prevent back injury.
- Do not use the robotic pool cleaner if you have added liquid flocculant or any other clarifier to the pool water. These substances obstruct and damage the robot's filters.
- The Lithium-Ion battery in this product is non-replaceable. It should be recycled at certified battery electronics recyclers that accept batteries. Batteries should NOT be discarded in the trash or put in municipal recycling bins. Do not disassemble the battery.
- The pump must not be used when people are in the water.
- Switch off the pump from the supply mains before carrying out user maintenance such as cleaning the filter.
- Only use the supply unit provided with this appliance.
1.2 FCC/IC Statement
This device complies with Part 15 of the FCC Rules / Innovation, Science and Economic Development Canada's licence-exempt RSS(s). Operation is subject to the following two conditions: (1) this device may not cause harmful interference. (2) this device must accept any interference received, including interference that may cause undesired operation. Changes or modifications not expressly approved by the party responsible for compliance could void the user's authority to operate the equipment.
This equipment has been tested and found to comply with the limits for a Class B digital device, pursuant to part 15 of the FCC Rules. These limits are designed to provide reasonable protection against harmful interference in a residential installation. This equipment generates uses and can radiate radio frequency energy and, if not installed and used in accordance with the instructions, may cause harmful interference to radio communications. However, there is no guarantee that interference will not occur in a particular installation. If this equipment does cause harmful interference to radio or television reception, which can be determined by turning the equipment off and on, the user is encouraged to try to correct the interference by one or more of the following measures:
- Reorient or relocate the receiving antenna.
- Increase the separation between the equipment and receiver.
- Connect the equipment into an outlet on a circuit different from that to
which the receiver is connected.
- Consult the dealer or an experienced radio/TV technician for help.
1.3 MPE Reminding
To satisfy FCC / IC RF exposure requirements, a separation distance of 20 cm / 7.87 in or more should be maintained between the antenna of this device and persons during device operation.
To ensure compliance, operations at closer than this distance is not recommended.
1.4 IMPORTANT SAFETY INSTRUCTIONS
When installing and using this electrical equipment, basic safety precautions should always be followed including the following:
- READ AND FOLLOW ALL INSTRUCTIONS - (For all units) WARNING - To reduce the risk of injury, do not permit children to use this product unless they are closely supervised at all times.
a) Prevent unintentional starting. Ensure the switch is in the off-position before connecting to battery pack, picking up or carrying the appliance. Carrying the appliance with your finger on the switch or energizing appliance that have the switch on invites accidents.
b) Recharge only with the charger specified by the manufacturer. A charger that is suitable for one type of battery pack may create a risk of fire when used with another battery pack.
c) Use appliances only with specifically designated battery packs. Use of any other battery packs may create a risk of injury and fire.
d) When battery pack is not in use, keep it away from other metal objects, like paper clips, coins, keys, nails, screws or other small metal objects, that can make a connection from one terminal to another. Shorting the battery terminals together may cause burns or a fire.
e) Under abusive conditions, liquid may be ejected from the battery; avoid contact. If contact accidentally occurs, flush with water. If liquid contacts eyes, additionally seek medical help. Liquid ejected from the battery may cause irritation or burns. (This advice is considered correct for conventional NiMh, NiCd, lead acid and lithium-ion cell types. If this advice is incorrect for a cell design that differs from these, then the correct advice may be substituted.)
f) Do not use a battery pack or appliance that is damaged or modified. Damaged or modified batteries may exhibit unpredictable behavior resulting in fire, explosion or risk of injury.
g) Do not expose a battery pack or appliance to fire or excessive temperature. Exposure to fire or temperature above 130^ C may cause explosion. The temperature of 130^ C can be replaced by the temperature of 265^ F.
h) Follow all charging instructions and do not charge the battery pack or appliance outside of the temperature range specified in the instructions. Charging improperly or at temperatures outside of the specified range may damage the battery and increase the risk of fire.
i) Have servicing performed by a qualified repair person using only identical replacement parts. This will ensure that the safety of the product is maintained.
j) Do not modify or attempt to repair the appliance or the battery pack (as applicable) except as indicated in the instructions for use and care.
k) Do not expose the appliance or battery to excessive temperatures.
l) Be aware of the risk of terminals of the battery-operated appliance or battery being short circuited by metal objects.
m) The button cell battery on the MCU must not be replaced by the consumer.
1.5 Correct Disposal of this Product
This marking indicates that this product should not be disposed of with other household waste throughout the EU. To prevent possible harm to the environment or human health from uncontrolled waste disposal, recycle it responsibly to promote the sustainable reuse of material resources. To recycle your used device, please use the return and collection systems or contact the retailer where the product was purchased. They can safely recycle this product.
The remote surveillance is for the absolute private use of non-public, private owned places for the pure self-protection and single control intended only. Please be aware of the local data protection based legal obligations in case of use. No surveillance of public places, especially with clandestine intent and/or on the part of the employer without justified reasons. Such not justified use is in the risk and responsibility of the user only.
1.6 Symbols and Decals
 | Before charging, read the instructions. |
 | Class II |
 | Class III |
 | Direct current |
 | Alternating current |
 | IP classification |
 | Water Temp Max: 35 °C/95 °F |
 | Maximum working depth 2.5m |
 | WARNING -It is not permitted to dispose of this product as normal household waste. Ensure that the product is recycled in accordance with local legal requirements. |
1.7 Water Conditions for Robot Use
| Chlorine Max 4 PPM | |
| PH 7.0-7.8 | |
| Temperature 5-35°C (42.8-95 °F) | |
| Salt Maximum = 5000 PPM | |
| Water Depth 0.5-2.5 m (1.64-8.20 ft) | |
| Ingress Protection IP68 for robotic pool cleaner |
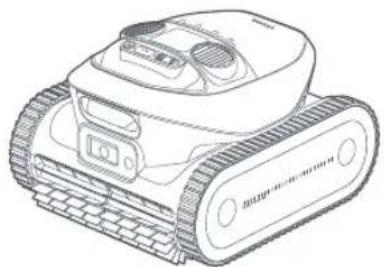
2. Product Introduction
2.1 What's in the Box
natural_image
Line drawing of a tracked robot with visible sensor array and control panel (no text or symbols)Robot
Magnetic Charger
Retrieval Hook
Remote
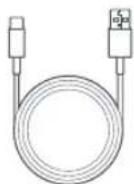
Charging cable (for Remote)
User Manual and Quick Start Guide
Note: The illustrations provided in this document are for demonstration purposes only.
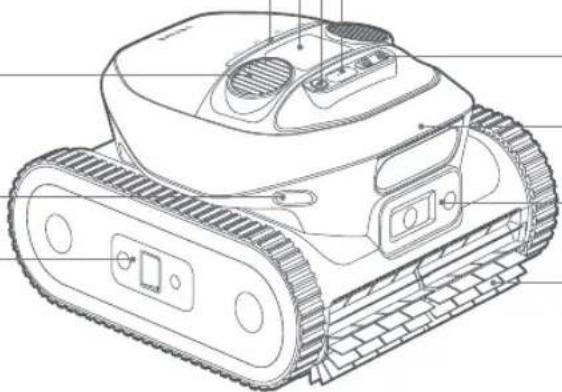
2.2 Structure
Light Communication Receiver
Power Button
LED Indicator
Mode Button
Water Outlet × 2
Magnetic Charging Port
Handle
Infrared Sensor
Sensor Fusion Module
Sensor Fusion Module
Front Roller Brushes
natural_image
Line drawing of a tracked robot with visible mechanical components and sensor placements (no text or symbols)Filter Basket Cover
Track Wheel × 2
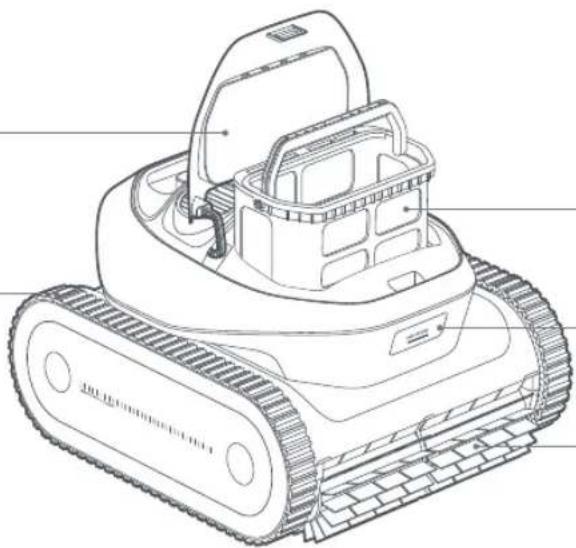
natural_image
Line drawing of a tracked robot with visible mechanical components and no text or symbolsFilter Basket
Press-to-Open Switch
Rear Roller Brushes
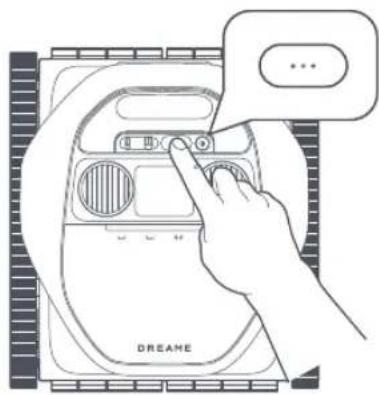
2.3 Controls on the Robot
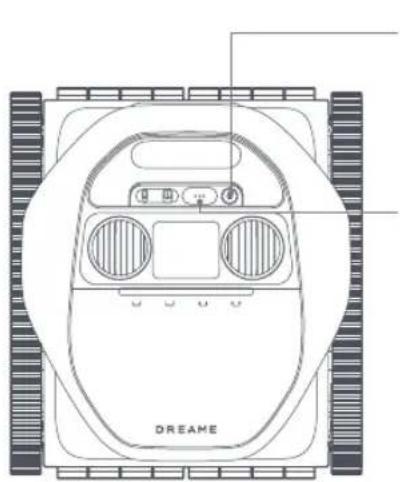
natural_image
Top-down schematic of a DREAM robot with visible control panel and sensor racks (no text or symbols)
Power
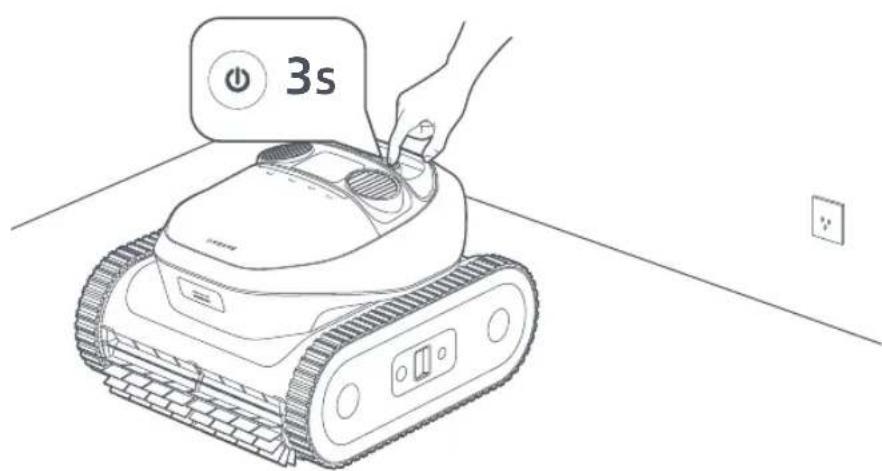
- To turn the robot on or off, press and hold for 3 seconds. The LED indicator will blink blue to show that the action was successful.
Mode
- Press to choose a cleaning mode from: Standard, Floor only, Walls only, or Waterline only. The indicator light above the cleaning mode will illuminate when the mode is selected.
| Standard Floor only Walls only Waterline only | |||
- To enable the Bluetooth pairing mode, press and hold ⬆ for 3 seconds. A blinking blue light indicates that the robot is in Bluetooth pairing mode.
- To factory reset the robot, hold ⬆ and then press Ⓤ twice. The indicator light will blink white.
2.4 Status LED
| Light Effect Robot Status | ||
| Operation | Blue (From the center to sides) Powered on. | |
| Blue (From sides to the center) Powered off. | ||
| Breathing Blue (Slow) In standby mode underwater. | ||
| Blue (From left to right, then from right to left) | Performing tasks underwater. | |
| Solid Blue | The cleaning mode is selected.Selected via the app: The entire light strip illuminates.Selected through the mode button: The light illuminates above the corresponding icon. | |
| Orange Low battery level. | ||
| Blinking purple The cleaning task is paused by the remote. | ||
| Purple (From left to right, then from right to left) | Performing tasks underwater (Initiated by the remote). | |
| Charging | Blinking Green | The robot is charging. The light strip indicates the charging progress. |
| Solid Green The battery is fully charged. | ||
| Solid Red Overheating protection is triggered. | ||
| Error Solid Red An error has occurred. | ||
| Connection Blinking | Blue (Rapid) In Bluetooth pairing mode. | |
| Firmware Update | Colourful Flowing Light Performing OTA updates. | |
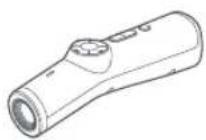
2.5 Remote
The robot comes with a remote that makes it easy to start or pause cleaning, guide the robot to a specific location, or retrieve it from the pool. It communicates with the robot underwater using light signals.
Specifications
| Remote Control Light Communication Receiver | |
| IP protection / IPX8 | |
| Operation Temperature -10~50°C -20~55°C | |
| Run Time 1.5 hrs / | |
| Charging Time 5 hrs / | |
| Warranty Period 2 years 2 years |
2.5.1 Controls on the Remote
| Button Robot Status | |
 | Press and hold to move the robot forward. |
 | Press and hold to move the robot backward. |
 | Press and hold to rotate the robot counterclockwise. |
 | Press and hold to rotate the robot clockwise. |
| [3H07] | Press to instruct the robot to climb to the waterline and wait for retrieval. |
 | Press to pause or resume the current task. |
 | Press and hold for 1 second to power on the remote, and for 3 seconds to power it off. |
 | Press to start a spot cleaning task. |
2.5.2 Indicator Light on the Remote
| Color Meaning | ||
| Operation | Orange Low battery | level (below 30%). |
| Green Battery level is sufficient. | ||
| Blinking Red | Overheating protection is triggered. The buttons are temporarily disabled and will resume function once it cools down. | |
| Charging | Blinking Orange / Green | Charging; color depends on the battery level. |
| Solid Green Fully charged. | ||
Notes:
- The remote will turn off automatically after 10 minutes of inactivity.
- When the battery is low, connect the remote to the charger and plug it into a power outlet.
natural_image
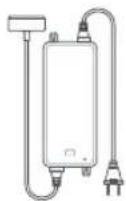
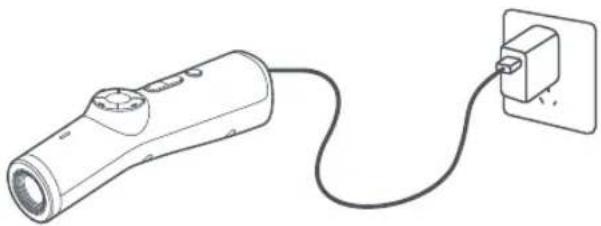
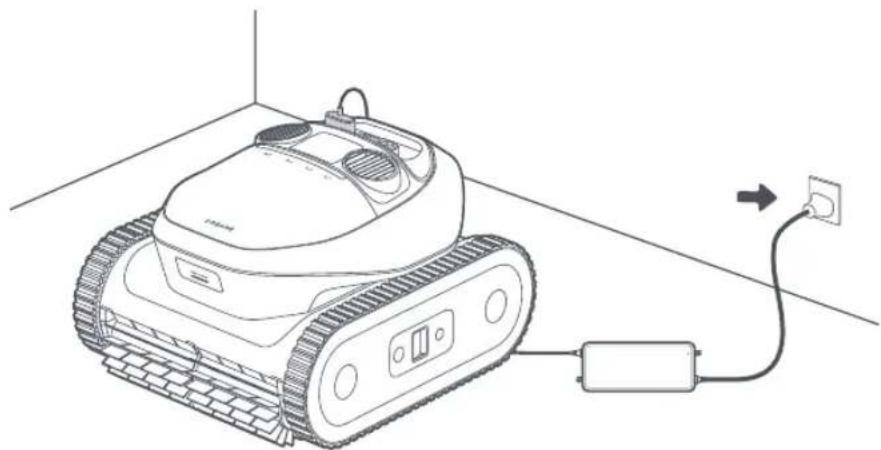
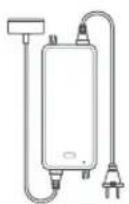
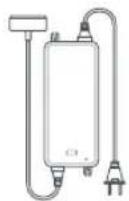
Line drawing of a handheld device connected to an electrical outlet (no text or symbols)3. Preparations for First Time Use
3.1 Charging
CAUTION:
- Do not charge the robot in direct sunlight. - Before charging, ensure there is no residual water on the magnetic charging port. If so, wipe the magnetic charging port dry.
Connect the magnetic charging connector to the robot's charging port and plug the charger into an electrical outlet.
natural_image
Line drawing of a tracked robot connected to a power outlet via cable (no text or symbols)② Fully charge the battery, then disconnect the charger. Press and hold Ⓞ for 3 seconds to turn on the robot.
Note: The LED indicator blinks while charging and turns solid green once fully charged.
3.2 Install the Dreamehome App
Scan the QR code below to download the Dreamehome app, or search for "Dreamehome" in the App Store or Google Play. After installation is complete, please create an account and log in.


Before setting up the network, please check the following:
- Ensure the robot is turned on.
- Ensure that both your mobile device and the robot are within the same Wi-Fi network coverage range with a strong signal.
- Ensure the current Wi-Fi network is the single-band network of 2.4 GHz frequency or the dual-band network of 2.4/5 GHz frequency.
- Ensure the Bluetooth function on your mobile device is enabled.
- Bring the phone close to the robot (within 1m).
3.3 Get Your Robot Online
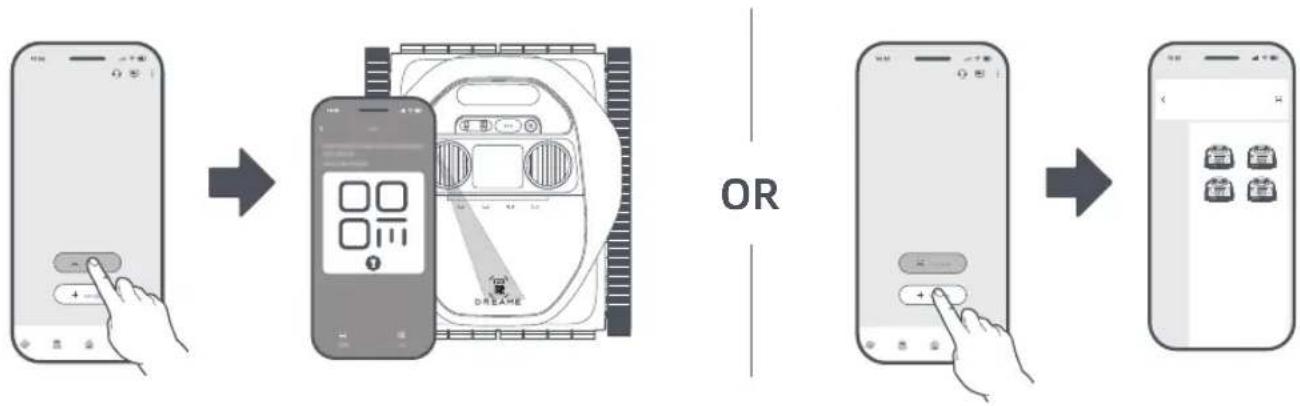
① Open Dreamehome app.
② You can add your robot in one of the following methods:
a. Scan QR code to connect: Navigate to Device and tap Scan QR code to connect. Scan the QR code located either on the robot's top cover or inside it. Follow the onscreen instructions to complete the connection.
b. Add manually: Go to Device and tap Add. Select your robot model. Follow the onscreen instructions to complete the connection.
flowchart
graph LR
    A["手机"] --> B["手机操作界面"]
    B --> C["电脑屏幕和键盘"]
    C --> D["屏幕控制面板"]
    D --> E["屏幕显示状态栏"]
Note: Press and hold on the robot for 5 seconds to activate Bluetooth pairing mode. The indicator light will blink blue when the robot is ready to pair.
How to unbind the robot?
The robot is automatically bound to the Dreamehome account once pairing is successful. Each device can only be bound to one account. It cannot be bound to another account at the same time.
To pair the robot with a new account, you need to unbind it first. To unbind it:
- Open the Dreamehome app. Go to 📋.
- If you have multiple robots bound to your Dreamehome account, swipe left or right to access the page of the robot you want to edit.
- Tap : in the upper right corner.
- Select Delete.
How to log out of your Dreamehome account or delete it?
To log out or delete your account:
-
Open the Dreamehome app. Go to 📊 > Account.
-
Select Log Out or Delete Account.
How to share your robot?
To share your robot with family or friends:
-
Open the Dreamehome app and go to 🏠.
-
If you have multiple robots bound to your Dreamehome account, swipe left or right to access the page of the robot you want to share.
-
Tap : in the upper right corner.
-
Select Device Sharing.
Note: Dreame development team will continuously conduct OTA (Over-the-Air) updates and maintenance on the firmware and app. Please check for update notifications or enable the Auto-update function to keep the firmware and app up-to-date and enjoy more features.
4. Operations
WARNING: Do not interfere with the robot during underwater operation.
CAUTION:
- Ensure that no humans or pets are in the pool. Remove any objects from the pool to prevent interference with the robot's operation and to avoid potential damage to the robot.
- Please turn off the pool circulation or heating system before cleaning.
IMPORTANT: Ensure the robot is fully charged before use.
4.1 Select Cleaning Mode
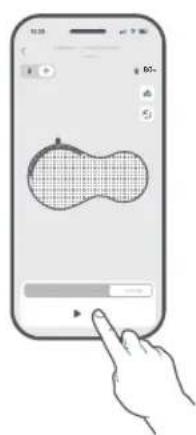
4.1.1 Select via the App
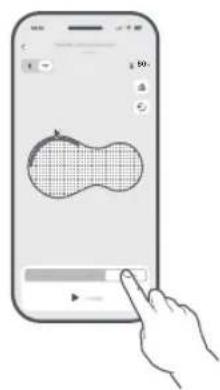
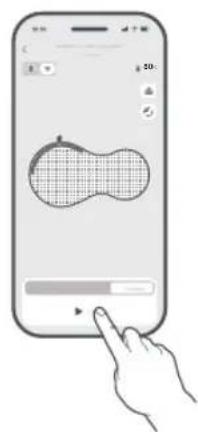
With the Dreamehome app, you can access tailored cleaning solutions, adjust parameters based on your specific needs, and view detailed information of the cleaning session.
Note: App control is not available during a cleaning cycle due to lack of network connections.
① Navigate to the Device page.
② Choose a cleaning mode.
③ Customize your settings.
④ Tap Start. Wait until the entire light strip turns solid blue before proceeding.
natural_image
Illustration of a hand interacting with a smartphone displaying a stylized abstract shape (no text or symbols)| Cleaning Mode Coverage | |
| Zone Cleaning | Zone cleaning may not be available depending on your pool's layout. After the initial mapping, the robot may automatically divide the pool into separate zones. You can choose one or more zones to be cleaned. |
| Custom Cleaning | You can customise the cleaning area, select one or more of the four available cleaning modes, and fine-tune settings for each. |
| For complex pool layouts, the robot will automatically switch to Flexible Path Cleaning for optimal cleaning efficiency. You can also select this mode in the app if S-shaped cleaning is not effective. | |
4.1.2 Select through the Mode Button
The robot can be operated for pool cleaning without a network connection. Set up your cleaning task by pressing the buttons directly on the robot—no complicated steps required—before you submerge it.
① Press and hold ④ for 3 seconds to turn on the robot.
② Select a cleaning mode by pressing on the robot. The indicator light will illuminate above the corresponding icon.
Note: If no mode is selected, the robot will run in Standard mode by default.
| Cleaning Mode Coverage | |
| Standard | Clean the pool floor first, followed by the walls and waterline. |
| Walls Only Clean the pool walls once. | |
| Floor Only Clean the pool floor once. | |
| Waterline Only Clean the waterline once. | |
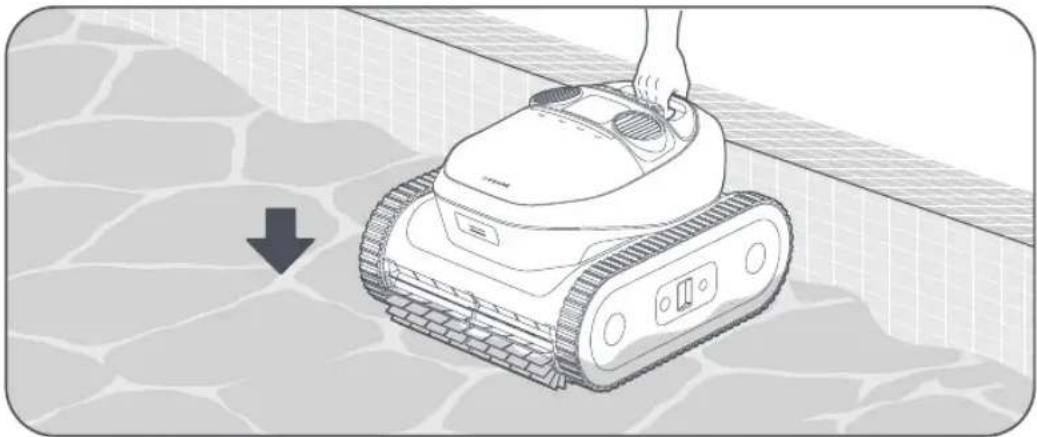
4.2 Start Cleaning
① Submerge the robot in the pool.
Notes:
- The robot will automatically turn off after 10 minutes of inactivity when not in the water.
- The pump motor and track wheels will activate only after the robot lands on the pool floor.
- When placing the robot in the water, keep it at least 20 cm / 6.87 in away from the pool wall to prevent damage.
natural_image
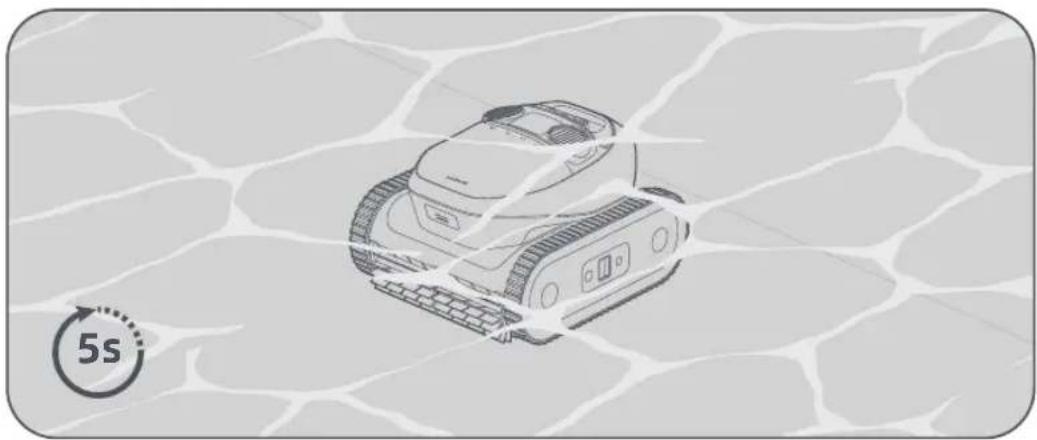
Illustration of a robotic lawn mower on a tiled floor, with a hand adjusting the blade (no text or symbols)② After the robot lands stably on the pool floor, it will perform sensor calibration for 5 seconds. The cleaning cycle will begin as soon as the robot completes the calibration.
Notes:
- If the initial calibration is unsuccessful, the robot will retry.
- Network connections aren't available while the robot is underwater.
natural_image
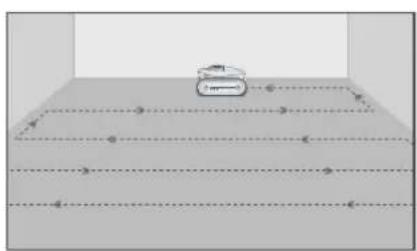
Illustration of a tracked robot on a cracked ground surface, with a 5-second speed indicator (no text or symbols on the robot itself)Before cleaning, the robot needs to navigate the pool to locate itself. Once it reaches the pool floor, it will autonomously explore the area, identifying the pool's edges to complete the initial mapping.
Note: The robot can save up to 3 maps. After maps are saved, you can switch or delete them from Map Management.
4.3 Cleaning Path
natural_image
Diagram showing a device positioned at the top of a rectangular platform with dotted lines indicating horizontal and vertical paths (no text or symbols)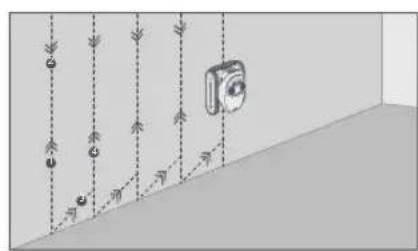
natural_image
Diagram showing a wall with dashed lines and icons, including a camera and leaf symbols (no text or labels)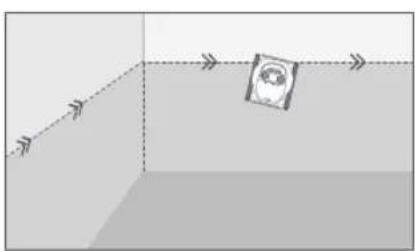
natural_image
Diagram showing a camera positioned at the camera edge of a wall, with directional arrows indicating motion (no text or symbols)Clean Pool Floor Clean Pool Wall Clean Waterline
4.4 Retrieve
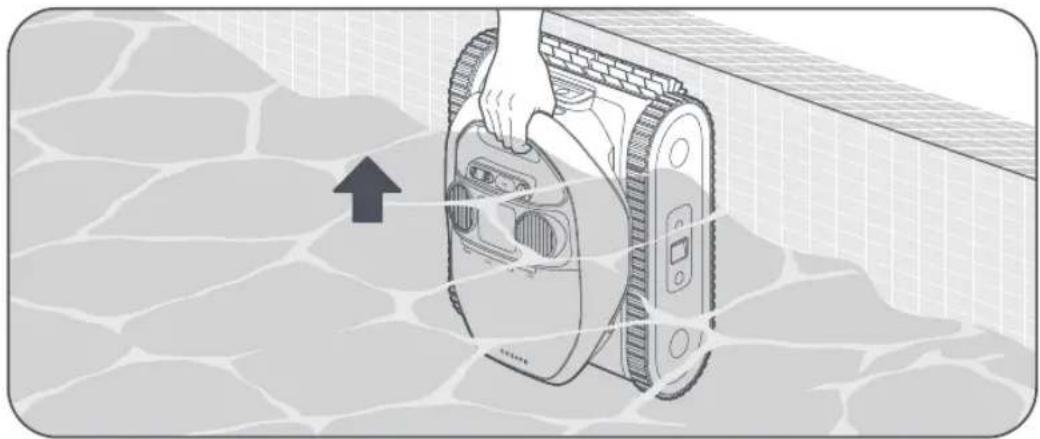
Important:
- Please be careful when lifting the robot out of the pool, as it becomes heavier when filled with water.
- After each use, please drain any remaining water from the robot and ensure it is completely dry.
When the robot is waiting at the waterline:
① Grab the robot by the handle and remove it from water.
② The water contained in the robot will be released automatically to make the robot lighter for easier retrieval. If you do not remove the robot within 5 minutes, it will return to the floor near the wall and enter Eco mode.
Notes:
- The robot will automatically climb up the wall and wait at the waterline for 5 minutes when the battery is low, an error occurs, or the cleaning cycle is complete.
- Based on the pool's layout and mapping, the app may display retrieval areas for you to choose from.
- In Eco mode, you can use the remote to wake up the robot and bring it back to the pool wall for retrieval.
natural_image
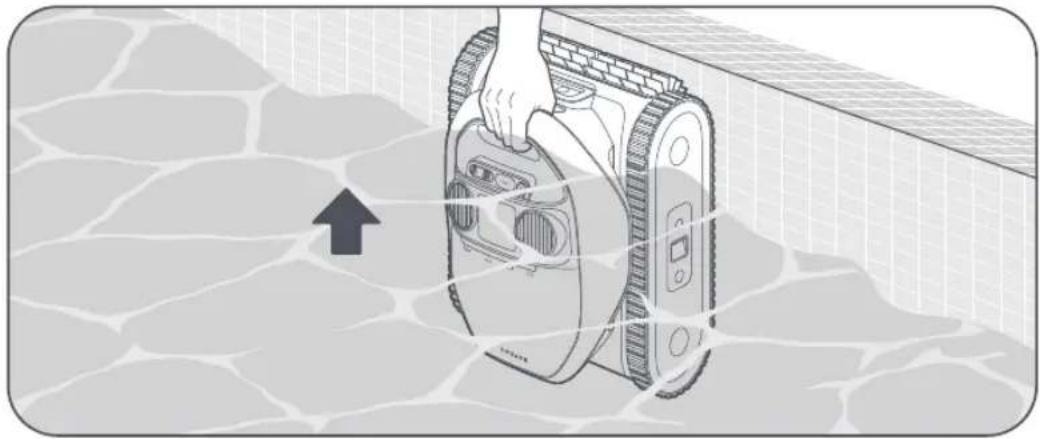
Illustration of a hand holding a device with an arrow pointing upward, set against a cracked wall background (no text or symbols)When the robot is waiting on the pool floor:
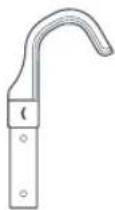
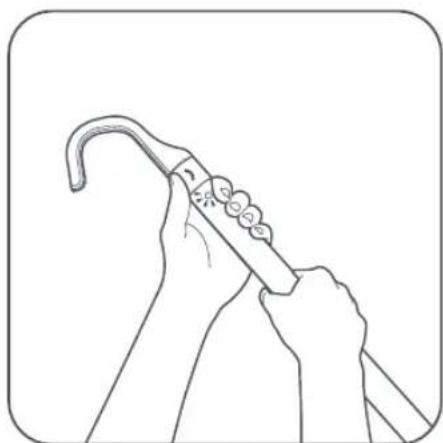
1 Attach the hook to a standard pool cleaning pole (not included).
② Secure the hook onto the robot handle and bring the robot to the waterline.
natural_image
Line drawing of hands holding a curved object with decorative elements (no text or symbols)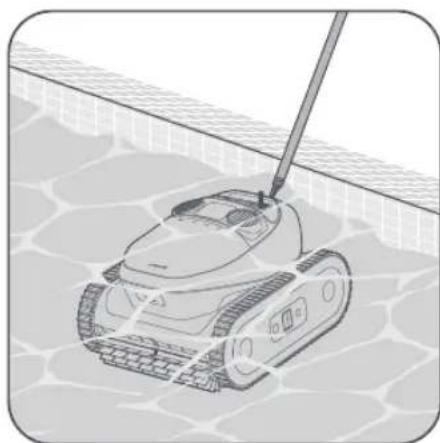
natural_image
Illustration of a tracked military vehicle on a paved surface (no text or symbols)Note: The robot will wait near the wall and turn off automatically when the battery level is low.
3 Pull up the robot by the handle and hold it vertically to allow any remaining water to drain.
natural_image
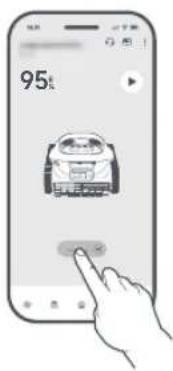
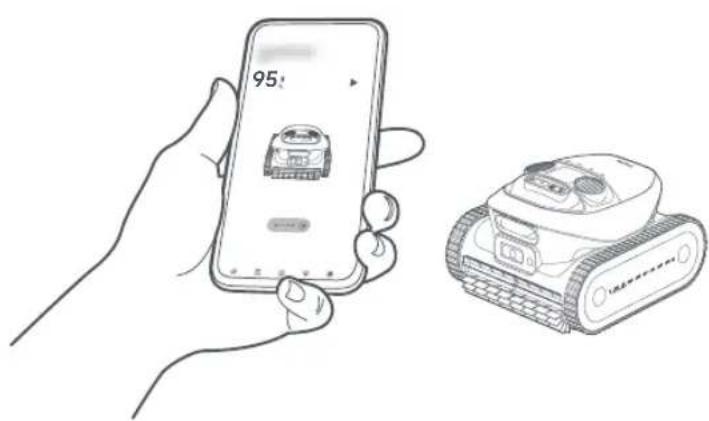
Illustration of a hand holding a device with arrows indicating motion or force, set against a brick wall background (no text or symbols)4.5 Data Synchronization Upon Surfacing
When the robot is out of the water and resumes network connections, it will initiate data transmission with the app. This allows you to access detailed information about the cleaning session, including the duration, area covered and any issues encountered.
Notes:
- Ensure that both the robot and your phone are in a Wi-Fi environment with a strong signal to enable successful data transmission between the robot and your mobile device.
- Please be aware that the data of the cleaning cycle may be subject to inaccuracies depending on the pool's complexity.
natural_image
Illustration of a hand holding a smartphone displaying a 95% app icon next to a robot (no text or symbols on the robot or phone)4.6 Underwater Remote Control
Important:
- Strong sunlight may disrupt the remote's signal.
• The remote has a maximum range of 7 m from the robot.
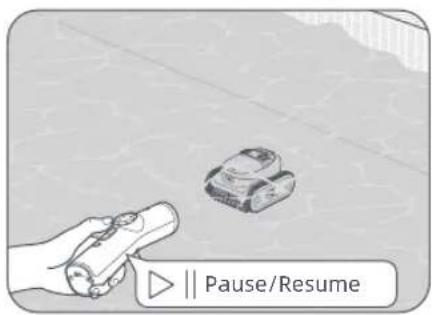
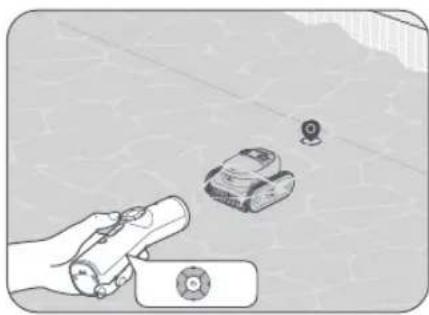
4.6.1 Guide the Robot
① Point the remote at the robot, then press ▷ I to stop the current cleaning cycle. The indicator light will blink purple.
② Press and hold the arrow button to guide it to the desired location.
③ Release the arrow button to stop the robot's movement.
Notes:
- If you press while the robot is on the pool wall, it will first move to the pool floor and wait for the next command.
- When using the remote to direct the robot, ensure you continuously point it at the robot.
natural_image
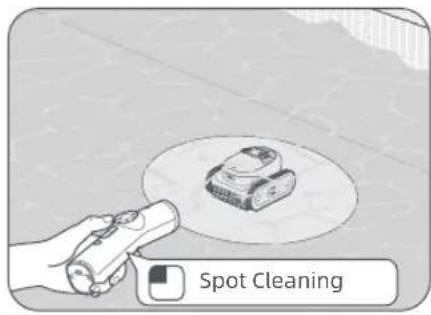
Illustration of a hand holding a remote control device next to a small vehicle and a location pin (no text or symbols)4.6.2 Spot Cleaning
① Direct the robot to the specific location you want it to clean.
② Press and the robot will begin cleaning the immediate area surrounding it. The indicator light will blink purple from left to right and from right to left.
Note: In Spot Cleaning mode, pressing ▷ will stop the task and it cannot be resumed.
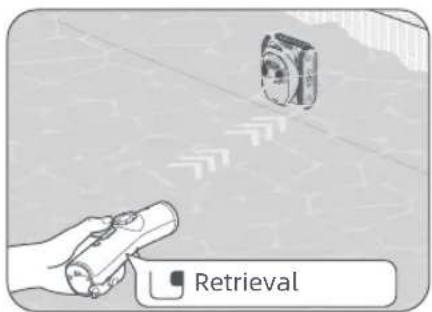
4.6.3 Retrieve
Press the 📁 button, and the robot will climb up the wall and wait at the waterline for 5 minutes.
Notes:
- If you do not remove the robot within 5 minutes, it will return to the floor.
- In Retrieval mode, pressing ▷ II will stop the task and it cannot be resumed.
5. Cleaning and Maintenance
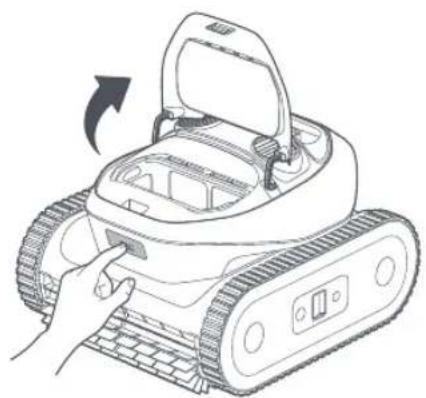
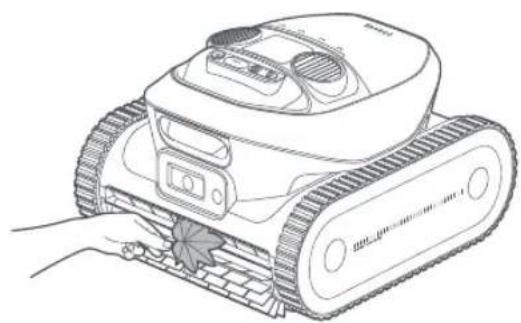
5.1 Clean the Filter Basket
After each use, it is recommended to rinse the filter basket to prevent clogging.
1 Push the filter basket button located at the front of the robot to open the filter basket cover.
natural_image
Line drawing of a robotic device with a hand pressing a button, showing no text or symbols.3 Open the latch to release the bottom lid of the filter basket. Empty all debris such as hair, twigs or sand.
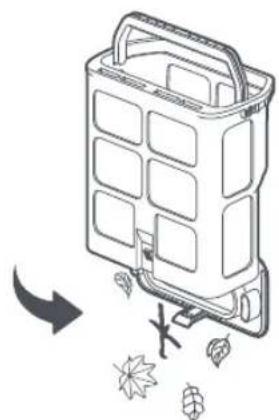
natural_image
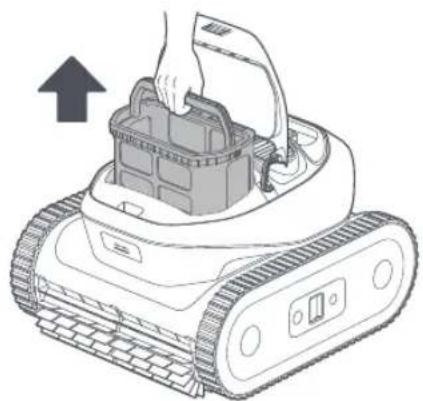
Diagram of a multi-layer battery pack with leafy ends and a downward arrow indicating flow or change (no text or symbols)5 Put the filter basket back into the robot.
natural_image
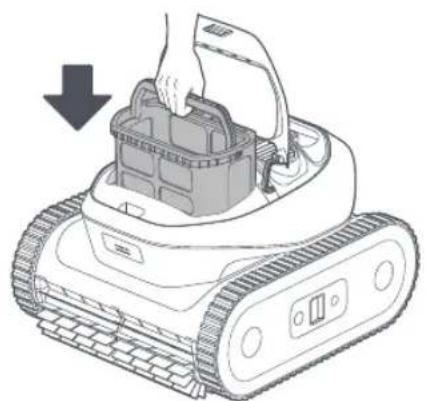
Illustration of a robotic device with a hand inserting a component into a housing (no text or symbols visible)② Take out the filter basket by the handle.
natural_image
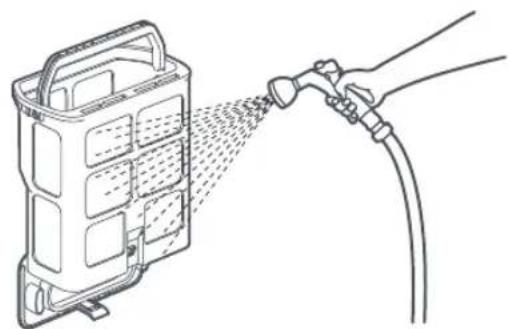
Illustration of a robotic device with a hand inserting a component into it, showing no text or symbols.④ Rinse the filter basket thoroughly with a hose.
natural_image
Diagram showing a hand pouring liquid from a container onto a hose, with no text or symbols present.6 Close the filter cover.
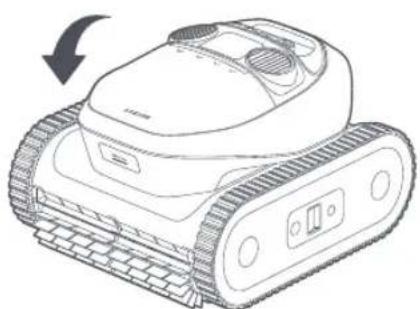
natural_image
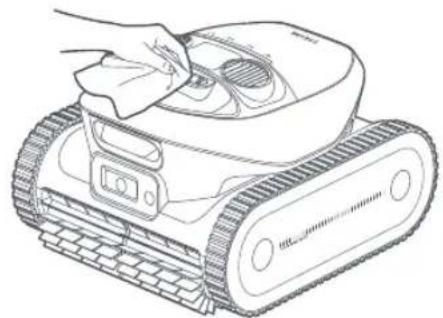
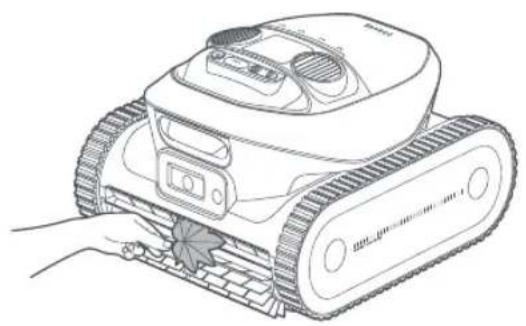
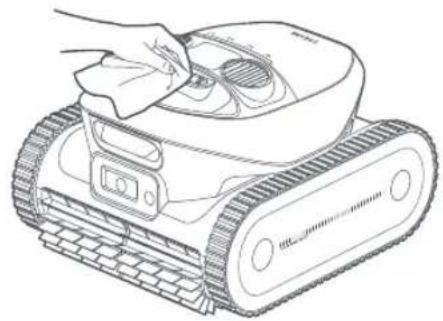
Line drawing of a tracked robot with a curved arrow indicating rotational motion (no text or symbols)5.2 Clean the Water Outlets and Roller Brushes
CAUTION: Please turn off the robot before cleaning to prevent injury.
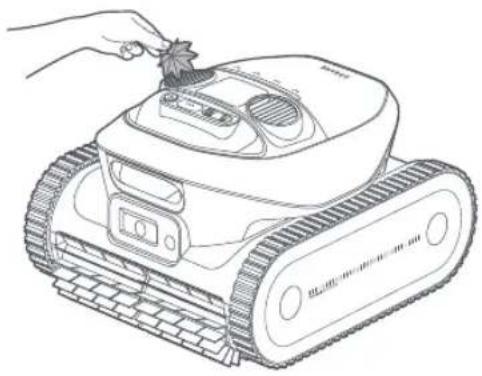
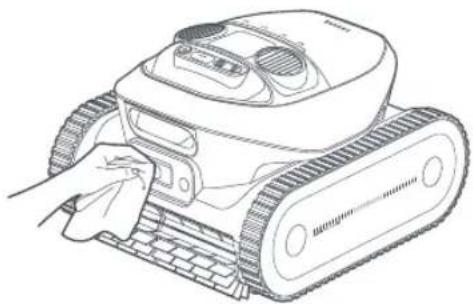
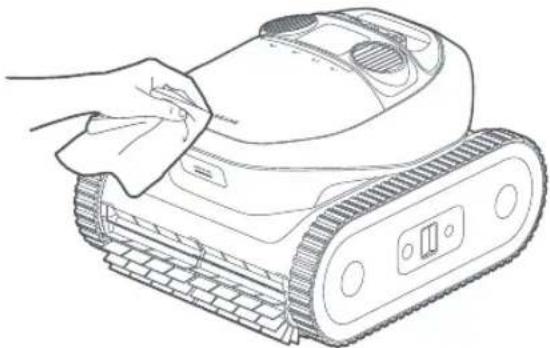
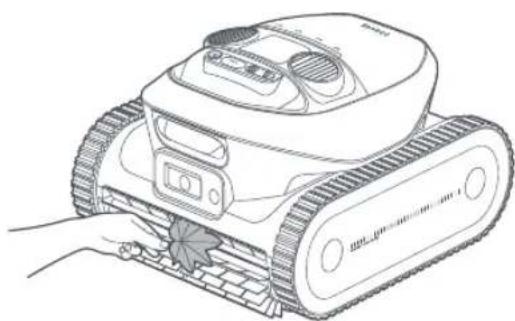
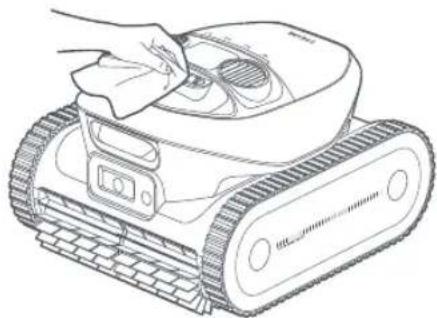
After each use, ensure that the water outlets and roller brushes are free from hair, dirt, and other debris. If necessary, rinse them with a hose. Wipe the magnetic charging port and sensors dry after cleaning.
natural_image
Line drawing of a robotic tracked robot with a hand holding a small object (no text or symbols)Water Outlets

natural_image
Line drawing of a robotic lawn mower with a hand adjusting the blade (no text or symbols)Roller Brushes

natural_image
Line drawing of a robotic device with a hand cleaning it (no text or symbols)Magnetic Charging Port
natural_image
Line drawing of a robotic rover with a hand cleaning the surface (no text or symbols)Sensor Fusion Module
It is recommended to regularly check the condition of the filter basket and the roller brushes, and replace them as needed to ensure optimal cleaning performance. If replacements are necessary, please reach out to the after-sales team for assistance.
6. Winter Storage and Transport
① Remove the robot from the pool and drain all water.
② Turn off the robot and disconnect it from the power source before storage. It is recommended to store the robot with a battery level of 80 -100%.
③ Store the robot in a place with an ambient temperature between -20 °C (-4 °F) and 55 °C (131 °F). Ensure the following conditions are met:
- Store the robot indoors in a cool, dry location, protected from direct sunlight, rain, or frost.
- Keep the robot away from extreme temperatures, open flames, and areas accessible to children.
- Protect it from dust if stored for an extended period.
- Before using the robot again, please charge the battery fully.
natural_image
Line drawing of a robotic device with a hand cleaning it, showing no text or symbols7. Troubleshooting
| Issues Causes | Solutions | |
| The robot fails to connect to the app. | 1. The robot is operating underwater.2. There is an issue with the robot's Wi-Fi or Bluetooth connection. | 1. Ensure the robot is not submerged in water.2. Ensure that the Wi-Fi router is functioning correctly.3. If the issue persists, please contact after-sales service. |
| The robot fails to move along the boundary of the pool floor. | Sensors may be blocked by debris or malfunctioning. | 1. Clean all sensors thoroughly and try again.2. If the issue persists, contact after-sales service. |
| The robot fails to stick closely to the pool wall while cleaning the waterline. | The filter basket may be clogged with debris. | Clean the filter basket thoroughly before trying again. |
| The robot fails to move in an S-shaped pattern while cleaning the pool floor. | 1. Sensors may be blocked by debris or malfunctioning.2. The filter basket may be clogged with debris.3. The roller brushes may be entangled or clogged with debris.4. The robot may switch to Flexible Path Cleaning automatically if the pool shape is too complex. | 1. Clean all sensors promptly.2. Clean the filter basket promptly.3. Ensure the roller brushes are free from tangles and debris, then try again. |
| The robot is unable to move or is moving slowly on the pool floor. | 1. Sensors may be blocked by dirt or malfunctioning.2. The filter basket may be clogged with dirt or debris.3. Debris may be obstructing the drive gears. | 1. Clean all sensors thoroughly.2. Ensure the roller brushes are free from tangles and debris.3. Try to move the track wheels forward or backward to remove any obstructions between the drive gears. |
| The pool map is not displayed in the app. | 1. The robot was unable to map the pool.2. The robot may be stuck during mapping. | 1. The pool shape is not yet supported.2. Recreate the pool map, then start the cleaning cycle. |
| Charging fails. | 1. Excess water residue on the magnetic charging port.2. The magnetic charger may be damaged. | 1. Dry the charging port thoroughly before attempting to charge again.2. If the issue persists, please contact after-sales service. |
| The cleaning results are not as good as expected. | 1. The filter basket is full or clogged with debris.2. Residual debris inside the filter basket compartment is reducing suction power.3. The suction power of the current cleaning mode may be insufficient. | 1. Promptly clean the filter basket.2. Use a pressure washer to clean the filter basket compartment and remove any debris.3. Increase the suction power to a stronger setting and restart the cleaning process. |
| The robot can't climb up the pool wall. | 1. The filter basket is full or clogged with debris.2. The curvature of the wall is too steep, causing the robot to become stranded. | 1. Promptly clean the filter basket.2. The robot is not designed to navigate pool walls with excessive curvature. |
| The LED indicator on the robot blinks red when it sinks to the pool floor. | 1. There may be an issue with the sensors.2. There may be a malfunction in the drive motor. | 1. Place the robot on a flat, even surface and restart it. Wait for 30 seconds before submerging the robot again and trying once more.2. If the issue persists, please contact after-sales service. |
| The robot is stuck. | The robot is stuck on the pool floor and unable to escape. | Manually retrieve the robot and restart the cleaning cycle. |
| The robot does not respond to the remote. | 1. Strong sunlight and water conditions can interfere with the remote's communication with the robot.2. The robot's battery may be too low to respond to commands from the remote.3. The battery in the remote might be low. | 1. Keep the distance between the remote and the robot within 7 m during operation.2. Retrieve the robot from the pool by the hook, charge it, and try again.3. Charge the remote with the designated charging cable. |
8. Specifications
| Product Name Robotic Pool Cleaner | |
| Brand Dreame | |
| Model PIXZ4110 | |
| Dimensions (W×L×H) 470.2 × 423.8 × 281.2 mm (1.54 × 1.39 × 0.923 ft) | |
| Weight 12.1 kg (26.68 lbs) | |
| Pool Type In-Ground & Above-Ground | |
| Cleaning Coverage Floor, Walls, Waterline | |
| Working Voltage 21.6 Vdc | |
| Charger Model EU: GM95-252300-2DG CH: GM95-252300-SDG | |
| Charger Input 100-240 V | ~ 50/60 Hz |
| Charger Output 25.2 V | == 3 A |
| Operation Frequency 2400-2483.5 MHz | |
| Battery | Lithium-ion battery |
| G2415-6S3P-MMEV | |
| 9600 mAh | |
| Charge Temperature | 0°C ~40°C (32 °F ~104 °F ) |
| Storage Temperature | -20°C~45°C (-4°F~113°F) RH<=75% |
| Maximum Pool Area | 200 m2 (2152.78 sq.ft) |
| Brush Type | Active Front and Rear TPU Brushes |
| Motor Type | Brushless Pump Motor x2/Brushless Drive Motor x2 |
| Maximum Suction Power | 30 m2/h |
| Run Time | 3-5 hrs |
| Charging Time | 4-5 hrs |
| Filter Basket Capacity | 4.5 L |
| Cleaning Mode | Floor/Wall/Waterline/Standard |
| Remote Control | Yes |
* The above statistics are from Dreame Laboratory and may vary depending on the operating conditions.
| Standards | Frequency band |
| Bluetooth | 2402 - 2480 MHz |
| WiFi (20MHz) | 2412 - 2472 MHz |
| WiFi (40MHz) | 2422 - 2462 MHz |
Instructions originales
1.6 Symbols and Decals
natural_image
Line drawing of a tracked robot with visible sensor array and control panel (no text or symbols)Robot
Chargeur magnétique
natural_image
Line drawing of a tracked robot with visible sensor and control buttons (no text or labels)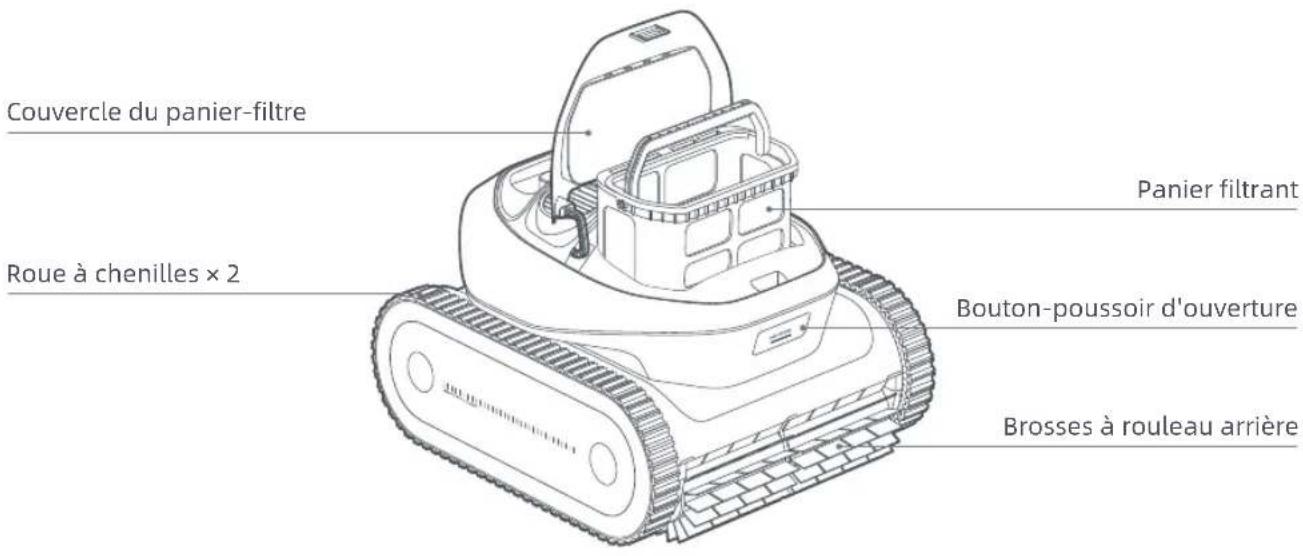
natural_image
Top-down schematic of a DREAM robot with visible control panel and sensor racks (no text or symbols)
Alimentation
natural_image
Line drawing of a handheld device connected to an electrical outlet (no text or symbols)natural_image
Line drawing of a tracked robot connected to a power outlet via cable (no text or symbols)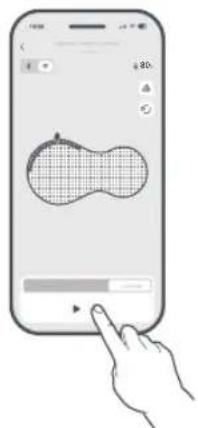
natural_image
Illustration of a hand interacting with a smartphone displaying a simple abstract shape (no text or symbols)natural_image
Illustration of a robotic lawn mower on a tiled floor, with a hand adjusting the blade (no text or symbols)natural_image
Illustration of a tracked robot on a cracked ground surface, with a 5-second speed indicator (no text or symbols on the robot itself)natural_image
Diagram of a device positioned on a rectangular platform with dotted lines indicating horizontal and vertical measurements (no text or symbols)natural_image
Diagram showing wall-mounted sensors and a camera mounted on a floor, with no visible text or symbols.natural_image
Diagram showing a 3D cube with dashed lines and arrows indicating direction, no text or symbols presentnatural_image
Illustration of a robotic device with a hand adjusting its body, showing mechanical components and a directional arrow (no text or symbols)natural_image
Line drawing of hands holding a curved object with decorative elements (no text or symbols)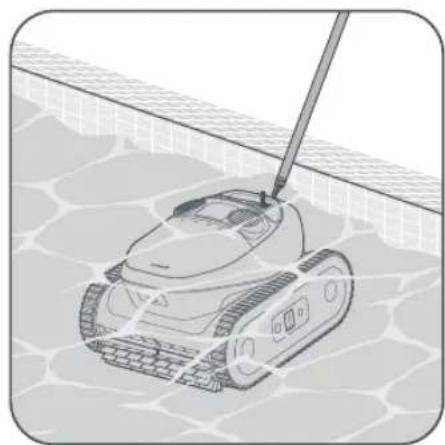
natural_image
Illustration of a tracked robot on a paved surface with a long pole (no text or symbols)natural_image
Illustration of a hand holding a device with an arrow pointing to it, set against a cracked wall background (no text or symbols)natural_image
Line drawing of a hand holding a smartphone displaying a 95-degree navigation app, next to a robotic device (no text or symbols on the robot or background)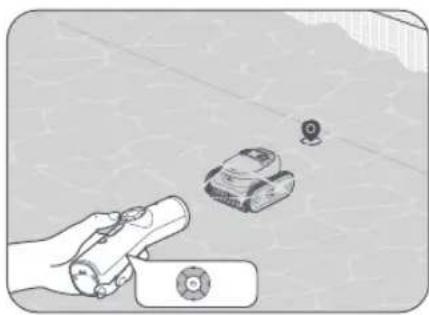
natural_image
Illustration of a hand holding a remote control device next to a small vehicle and a location pin (no text or symbols)natural_image
Line drawing of a robotic device with a hand pressing a button, showing no text or symbols.natural_image
Diagram of a multi-tiered storage unit with leafy contents and a directional arrow indicating flow (no text or symbols)natural_image
Illustration of a robotic device with a hand inserting a component into a housing, showing mechanical components and a downward arrow (no text or symbols)natural_image
Illustration of a robotic device with a hand inserting a component into it, showing no text or symbols.natural_image
Diagram showing a hand pouring liquid from a container onto a hose, with no text or symbols present.natural_image
Line drawing of a tracked robot with a curved arrow indicating rotation (no text or symbols)natural_image
Line drawing of a tracked robot with a hand holding a small object, no text or symbols presentSorties d'eau

natural_image
Line drawing of a robotic lawn mower with a hand adjusting the blade (no text or symbols)Brosses à rouleau
natural_image
Line drawing of a robotic device with a hand cleaning it (no text or symbols)natural_image
Line drawing of a robotic rover with a hand cleaning the surface (no text or symbols)natural_image
Line drawing of a robotic device with a hand cleaning it, showing no text or symbolsnatural_image
Line drawing of a tracked robot with visible sensor array and control panel (no text or symbols)Roboter
natural_image
Line drawing of a tracked robot with visible mechanical components and sensor placements (no text or labels)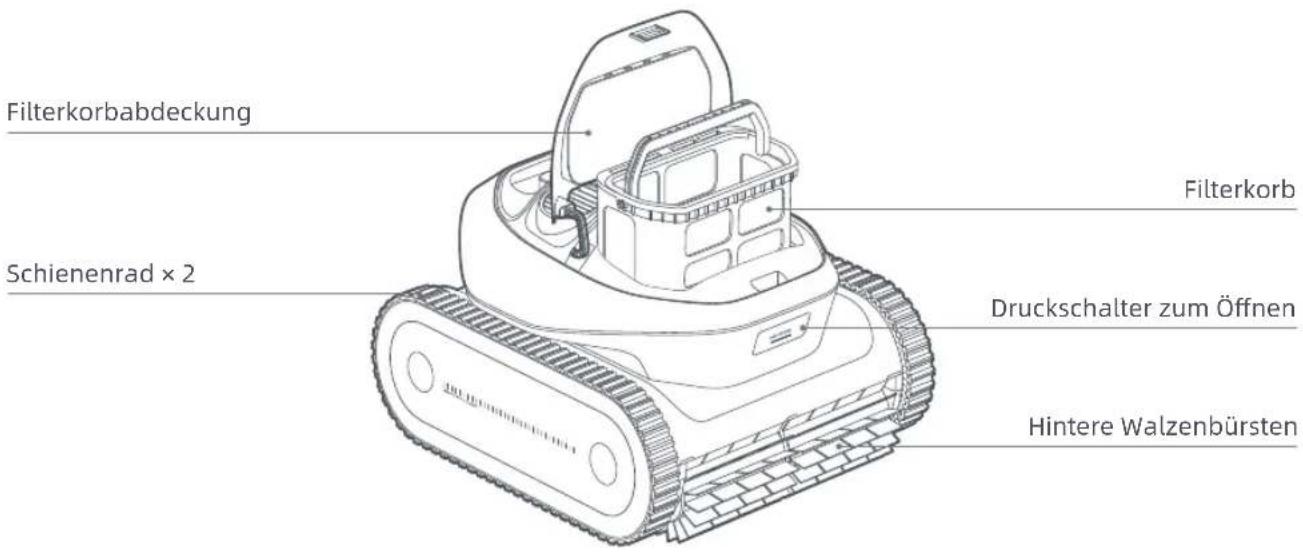
natural_image
Line drawing of a remote control device connected to an electrical outlet (no text or symbols)natural_image
Line drawing of a tracked robot connected to a power outlet via cable (no text or symbols)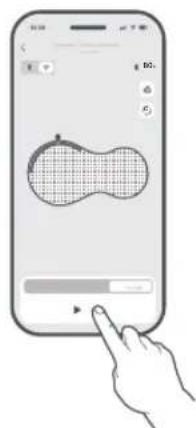
natural_image
Illustration of a hand interacting with a smartphone displaying a simple abstract shape (no text or symbols)natural_image
Illustration of a robotic lawn mower on a paved surface, with a hand adjusting the gear and a downward arrow indicating motion (no text or symbols present)natural_image
Illustration of a tracked robot on a cracked ground surface, with a 5-second speed indicator (no text or symbols on the robot itself)natural_image
Diagram showing a vehicle on a road with dashed lane markings (no text or symbols)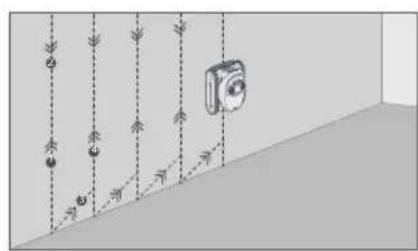
natural_image
Diagram showing a wall with numbered annotations and a camera, no readable text or symbols present.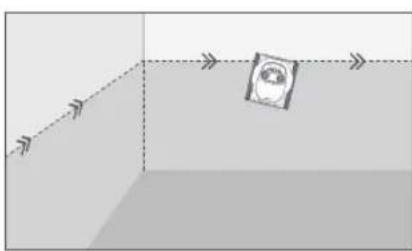
natural_image
3D diagram showing a wall with dashed lines and a circular object on a horizontal surface (no text or symbols)Poolboden reinigen Poolwand reinigen Wasserlinie reinigen
4.4 Abrufen
Wichtig:
natural_image
Illustration of a hand holding a device with an arrow pointing to it, set against a cracked wall background (no text or symbols)natural_image
Line drawing of hands holding a curved object with decorative elements (no text or symbols)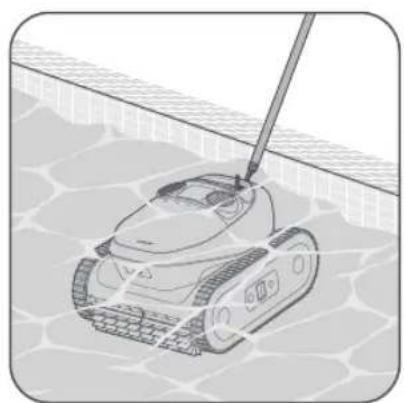
natural_image
Illustration of a tracked robot with a stick inserted, positioned on a paved surface (no text or symbols)natural_image
Illustration of a hand holding a device with an arrow pointing upward, set against a cracked wall background (no text or symbols)natural_image
Illustration of a hand holding a remote control device next to a small robot and a location pin, on a paved surface (no text or symbols)natural_image
Line drawing of a robotic device with a hand pressing a button, showing no text or symbols.natural_image
Diagram of a battery pack with arrows indicating flow or movement, no text or symbols presentnatural_image
Illustration of a robotic device with a hand inserting a component into a housing (no text or symbols visible)natural_image
Illustration of a robotic device with a hand inserting a component into it, showing no text or symbols.natural_image
Diagram showing a hand pouring liquid from a container onto a hose, with no text or symbols present.natural_image
Line drawing of a tracked robot with a curved arrow indicating rotation (no text or symbols)natural_image
Line drawing of a tracked robot with a hand holding a small object, no text or symbols presentWasserauslässe
natural_image
Line drawing of a robotic lawn mower with a hand adjusting the blade (no text or symbols)Walzenbürsten

natural_image
Line drawing of a robotic device with a hand cleaning it (no text or symbols)natural_image
Line drawing of a robotic rover with a hand cleaning the surface (no text or symbols)Sensor-Fusionsmodul
natural_image
Line drawing of a robotic device with a hand cleaning it, no text or symbols presentnatural_image
Line drawing of a tracked robot with visible sensor array and control panel (no text or symbols)Robot
natural_image
Line drawing of a tracked robot with visible control panel and sensor array (no text or labels)
natural_image
Line drawing of a handheld device connected to an electrical outlet (no text or symbols)natural_image
Line drawing of a tracked robot connected to a power outlet via cable (no text or symbols)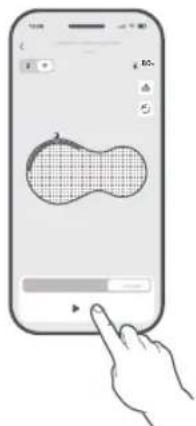
natural_image
Line drawing of a hand interacting with a DREAM air conditioner unit (no text or symbols on the device itself)natural_image
Illustration of a robotic lawn mower on a tiled floor, with a hand adjusting the blade (no text or symbols)natural_image
Illustration of a tracked robot on a cracked ground surface, with a 5-second speed indicator (no text or symbols on the robot itself)natural_image
Diagram of a robot navigating a dotted path on a rectangular platform (no text or symbols)natural_image
Diagram showing wall-mounted sensors and a camera mounted on a floor, with no visible text or symbols.natural_image
Diagram showing a wall with dashed lines and a central circular object, no text or symbols presentnatural_image
Illustration of a hand holding a device next to a brick wall, with an arrow pointing upward (no text or symbols)natural_image
Line drawing of hands holding a curved object with decorative elements (no text or symbols)
natural_image
Illustration of a tracked robot with a lever on a paved surface (no text or symbols)natural_image
Illustration of a hand holding a portable device with a circular cable, placed on cracked ground (no text or symbols)natural_image
Illustration of a hand holding a smartphone displaying a 95% app, next to a robotic robot (no text or symbols on the robot or background)4.6 Controllo subacqueo
Importante:
natural_image
Illustration of a hand holding a remote control next to a small robot on a paved surface (no text or symbols)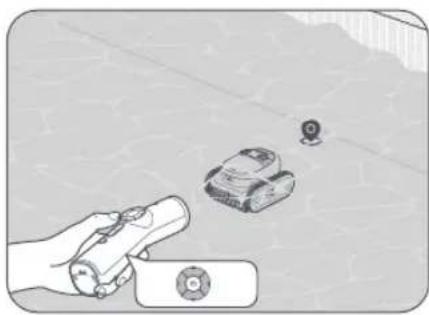
natural_image
Illustration of a hand holding a remote control device and a small robot on a paved surface (no text or symbols)natural_image
Illustration of a hand holding a controller next to a small object, labeled 'Pulizia localizzata' (no other text or symbols)4.6.3 Recupero
natural_image
Line drawing of a robotic device with a hand pressing a button, showing no text or symbols.natural_image
Diagram of a multi-layer battery pack with leafy ends and a downward arrow indicating flow or change (no text or symbols)natural_image
Illustration of a robotic device with a hand inserting a component into a housing (no text or symbols visible)natural_image
Illustration of a robotic device with a hand inserting a component into its body (no text or symbols visible)natural_image
Diagram showing a hand spraying water from a container onto a hose (no text or symbols present)natural_image
Line drawing of a tracked robot with a curved arrow indicating rotational motion (no text or symbols)natural_image
Line drawing of a robotic rover with a hand holding a small object (no text or symbols)Uscite dell'acqua
natural_image
Line drawing of a robotic lawn mower with a hand adjusting the blade (no text or symbols)Spazzole a rullo
natural_image
Line drawing of a robotic tracked robot with a hand cleaning the interior (no text or symbols)natural_image
Line drawing of a robotic rover with cleaning tool, no text or symbols presentnatural_image
Line drawing of a robotic device with a hand cleaning it (no text or symbols)natural_image
Line drawing of a tracked robot with visible sensor array and control panel (no text or symbols)Robot
Cargador magnético
natural_image
Line drawing of a tracked robot with visible sensor and control buttons (no text or labels)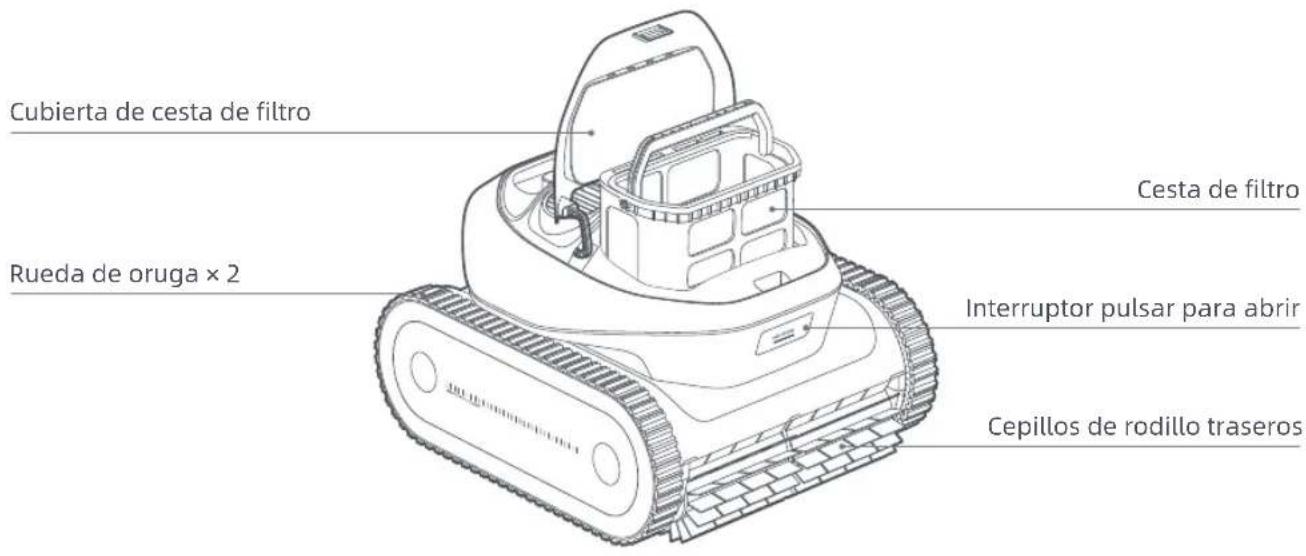
natural_image
Line drawing of a remote control device connected to an electrical outlet (no text or symbols)natural_image
Line drawing of a tracked robot connected to a power outlet via cable (no text or symbols)Download on the App Store
Get it on Google Play
natural_image
Illustration of a robotic lawn mower on a tiled floor, with a hand adjusting the blade (no text or symbols)natural_image
Illustration of a tracked robot on a cracked ground surface, with a 5-second speed indicator (no text or symbols on the robot itself)natural_image
Simple line drawing of a printer placed on a surface with dotted lines indicating horizontal and vertical measurements (no text or symbols)natural_image
Diagram showing a wall with vertical dashed lines and a camera, no text or symbols present
natural_image
Diagram showing a wall with dashed lines and a circular object on a horizontal surface, no text or symbols present.natural_image
Illustration of a hand holding a device next to a brick wall, with an upward arrow indicating motion or change (no text or symbols present)natural_image
Line drawing of hands holding a curved object with decorative elements (no text or symbols)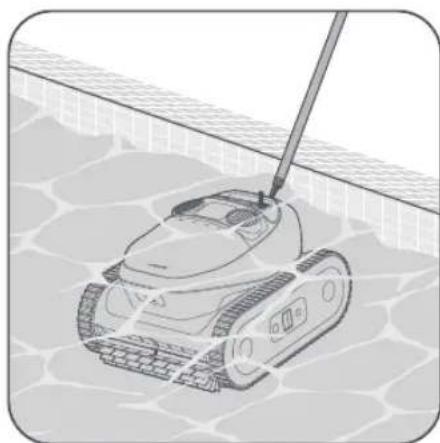
natural_image
Illustration of a tank with a lever above its side, positioned on a paved surface (no text or symbols)natural_image
Illustration of a hand holding a device with an arrow pointing to it, set against a cracked wall background (no text or symbols)natural_image
Illustration of a hand holding a smartphone displaying a 95% app, next to a cartoon robot (no text or symbols on the robot or background)4.6 Control remoto subacuático
Importante:
natural_image
Illustration of a hand holding a remote control device with a small object nearby (no text or symbols)natural_image
Illustration of a hand holding a remote control next to a small robotic device labeled 'Limpieza' (no other text or symbols)4.6.3 Recuperación
natural_image
Line drawing of a robotic device with a hand pressing a button, showing no text or symbols.natural_image
Illustration of a robotic device with a hand inserting a component into it, showing no text or symbols.natural_image
Diagram of a multi-layer battery pack with leafy ends and a downward arrow indicating flow or change (no text or symbols)natural_image
Diagram showing a hand pouring liquid from a container onto a hose, with no text or symbols present.natural_image
Illustration of a robotic device with a hand inserting a component into a housing, showing mechanical components and a downward arrow (no text or symbols)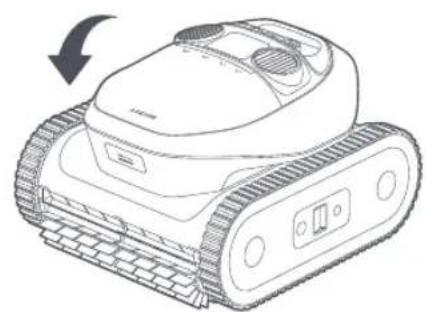
natural_image
Line drawing of a tracked robot with a curved arrow indicating rotation (no text or symbols)natural_image
Line drawing of a tracked robot with a hand adjusting its handle (no text or symbols)Salidas de agua
natural_image
Line drawing of a tracked robotic device with a hand operating it (no text or symbols)Cepillos de rodillo
natural_image
Line drawing of a robotic device with a hand cleaning it (no text or symbols)natural_image
Line drawing of a robotic rover with cleaning tool (no text or symbols)natural_image
Line drawing of a robotic device with a hand cleaning it, showing no text or symbols
- Robotic Pool Cleaner
- DECLARATION OF CONFORMITY
- Original Instructions
- Safety Instructions
- Safety Regulations
- FCC/IC Statement
- MPE Reminding
- IMPORTANT SAFETY INSTRUCTIONS
- Correct Disposal of this Product
- Symbols and Decals
- Water Conditions for Robot Use
- Product Introduction
- What's in the Box
- Structure
- Controls on the Robot
- Power
- Mode
- Status LED
- Remote
- Controls on the Remote
- Indicator Light on the Remote
- Notes:
- Preparations for First Time Use
- Charging
- CAUTION:
- Install the Dreamehome App
- Before setting up the network, please check the following:
- Get Your Robot Online
- How to unbind the robot?
- How to log out of your Dreamehome account or delete it?
- How to share your robot?
- Operations
- Select Cleaning Mode
- Select via the App
- Select through the Mode Button
- Start Cleaning
- Cleaning Path
- Retrieve
- Important:
- When the robot is waiting at the waterline:
- When the robot is waiting on the pool floor:
- Data Synchronization Upon Surfacing
- Underwater Remote Control
- Guide the Robot
- Spot Cleaning
- Retrieve
- Cleaning and Maintenance
- Clean the Filter Basket
- Clean the Water Outlets and Roller Brushes
- Winter Storage and Transport
- Troubleshooting
- Specifications
- Instructions originales
- Alimentation
- Abrufen
- Wichtig:
- Controllo subacqueo
- Importante:
- Recupero
- Control remoto subacuático
- Recuperación
Brand : DREAME
Model : Z1 Pro
Category : Robot vacuum