
KHE 56 - Hammer METABO - Free user manual and instructions
Find the device manual for free KHE 56 METABO in PDF.

| Product type | Hammer drill and chisel |
| Brand | Metabo |
| Model | KHE 56 |
| Power supply | Mains (alternating current) |
| Tool holding system | SDS-max |
| Operating modes | Drilling (KHE 56), chiseling |
| Impact force adjustment | Yes (switch for optional reduction) |
| Depth stop | Yes (for KHE 56) |
| Auxiliary handle | Yes, adjustable (clamp or front mounting) |
| Anti-vibration system | Integrated Metabo VibraTech (MVT) |
| Electrical protection | Protection class II |
| Sound level | Above 80 dB(A) - wear ear protection |
| Chisel position | 12 adjustable positions |
| Brush maintenance indicator | Yes (lights up before complete wear) |
| Continuous operation | Yes (continuous run button) |
| Motor cleaning | Compressed air through ventilation slots |
| Tool lubrication | Metabo special grease (ref. 6.31800) |
| Recommended application pressure | Moderate - high pressure does not increase performance |
| Intended use | Drilling and chiseling in concrete, brick, stone and similar materials |
| Recommended accessories | Metabo original accessories only |
Frequently Asked Questions - KHE 56 METABO
User questions about KHE 56 METABO
0 question about this device. Answer the ones you know or ask your own.
Ask a new question about this device
Download the instructions for your Hammer in PDF format for free! Find your manual KHE 56 - METABO and take your electronic device back in hand. On this page are published all the documents necessary for the use of your device. KHE 56 by METABO.
USER MANUAL KHE 56 METABO
natural_image
Exterior view of a Metabo HSR8088 dual-rach mobile drill press (no text or symbols visible on the device body)
Original instructions
1. Declaration of Conformity
On our own responsibility, we hereby declare that this drilling and chisel hammer, identified by type and serial number *1), meets all relevant requirements of directives *2) and standards *3). Technical documents for *4) - see Page 3..
MHE 56: 2000/14/EC: Procedure for assessing conformity as per Appendix VI. (Testing centre: VDE Testing and Certification Institute, Merianstr. 28, 63069 Offenbach, Germany).
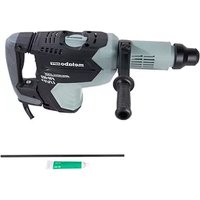
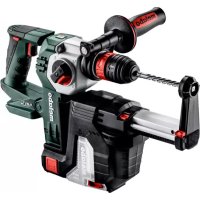
2. Specified Use
The KHE 56 is designed for hammer drilling and chiselling in concrete, bricks, stone and similar materials when used in combination with appropriate accessories.
The MHE 56 is designed for chiselling in concrete, bricks, stone and similar materials when used in combination with appropriate accessories.
The user bears sole responsibility for damage caused by improper use.
Generally accepted accident prevention regulations and the enclosed safety information must be observed.
3. General Safety Instructions

WARNING Read all safety warnings and instructions. Failure to follow all safety
warnings and instructions may result in electric shock, fire and/or serious injury.
Keep all safety instructions and information for future reference.

Before using this power tool, carefully read through and familiarise yourself with all the enclosed safety information (red booklet)
and the instructions. Keep all enclosed documentation for future reference, and pass on your power tool only together with this documentation.
4. Special Safety Instructions

For your own protection and for the protection of your power tool pay attention to all parts of the text that are marked with this symbol!
Wear ear protectors. Exposure to noise can cause loss of hearing.
Use the additional handles supplied with the tool. Loss of control can lead to injuries.
Hold the power tool by insulated gripping surfaces when performing an operation where the cutting accessory may contact hidden wiring or its own cord. Cutting accessory contacting a "live" wire may make exposed metal parts of the power tool "live" and shock the operator.
Pull the plug out of the plug socket before any adjustments or servicing are performed.
Always work with the additional handle correctly installed.
Always hold the machine with both hands using the handles provided, stand securely and concentrate.
Always wear protective goggles, gloves, a dust mask and sturdy shoes when working with this tool.
Ensure that the spot where you wish to work is free of power cables, gas lines or water pipes (e.g. using a metal detector).
Always work with the tool attached correctly. Pull on the tool to check that it is seated correctly. (It must be possible to move the tool a few centimetres in an axial direction.)
When working above ground level, make sure that the area underneath is free.
Do not touch the tool or parts close to the tool immediately after stopping work because they may still be extremely hot and could cause skin burns.
Always lay the power cable away from the back of the machine.
A damaged or cracked additional handle must be replaced. Never operate a machine with a defective additional handle.
Reduce dust exposure:

Some of the dust created using this power tool may contain chemicals known to cause
cancer, allergic reaction, respiratory disease, birth defects or other reproductive harm. Some examples of these chemicals are: Lead from lead-based paints, crystalline silica from bricks and cement and other masonry products, arsenic and chromium from chemically-treated lumber, hard wood like oak or beech, metals, asbestos.
The risk from exposure to such substance will depends on how long you or bystanders are being exposed.
Do not let particles enter the body.
To reduce your exposure to these substances: work in a well ventilated area, and work with approved safety equipment, such as dust masks that are specially designed to filter out microscopic particles.
Observe the relevant guidelines for your material, staff, application and place of application (e.g. occupational health and safety regulations, disposal).
Collect the generated particles at the source, avoid deposits in the surrounding area.
Use suitable accessories for special work. In this way, fewer particles enter the environment in an uncontrolled manner.
Use a suitable extraction unit.
Reduce dust exposure with the following measures:
- Do not direct the escaping particles and the exhaust air stream at yourself or nearby persons or on dust deposits.
- Use an extraction unit and/or air purifiers.
ENGLISHen
- Ensure good ventilation of the workplace and keep clean using a vacuum cleaner. Sweeping or blowing stirs up dust.
- Vacuum or wash the protective clothing. Do not blow, beat or brush.
5. Overview
See page 2.
1 Clamping knob *
2 Bow handle *
3 Additional handle *
4 Additional handle holder *
5 Clamp lever for dept
6 Depth stop *
7 Tool lock
8 Switch button
9 Thread for additional handle
10 Metabo VibraTech (MVT): integrated damping system
11 Locking button for continuous activation
12 Trigger switch
13 Carbon brush service indicator (lamp signal for pending carbon brush change)
14 Operating indicator (light signal for mains power supply)
15 Switch for optional impact reduction when working on soft materials
* equipment-specific
6. Commissioning
Before plugging in, check to see that the rated mains voltage and mains frequency, as stated on the rating label, match with your power supply.
Australia: Always use a residual current device (RCD) protected supply with a rated residual current of 30 mA or less.
Always use an extension cable with a minimum diameter of 1.5 mm^2 . The extension cable must be suitable for the machine power rating (see Technical Specifications). If using a roll of cable, always roll up the cable completely.
6.1 Assembly of the bow handle or additional handle
For safety reasons, always use the bow handle (2) or additional handle (3) supplied.
MHE 56:
Release the clamping ring by turning the clamping knob (1) anticlockwise. Adjust the bow handle (2) to the required position and angle. Tighten the clamping knob.
KHE 56:
Option 1
Open the clamping ring by turning the additional handle (3) anticlockwise. Secure the additional handle at the required angle. Tighten the additional handle.
Option 2
Upright working position for reduced stress on the back when working on floors:
The additional handle (3) can also be attached to the motor housing. Unscrew the additional handle from the handle holder (4), insert in one of the threads (9) (on the left and right of the motor housing) by hand and tighten.
7. Use
7.1 Adjusting the depth stop (only for KHE 56)
Press and hold the clamp lever (5). Set the depth h stop (6) to the required drilling depth and release the clamp lever.
7.2 Attaching and removing tools
Before fitting tools, clean shank and apply special grease enclosed with tool (accessories order no. 6.31800)! Use only SDS-max tools.
Attaching tools:
Turn tool and insert until it engages. The tool is automatically locked.
Pull on the tool to check that it is seated correctly. (It must be possible to move the tool a few centimetres in an axial direction.)
Removing the tool:
Pull tool lock (7) backwards in direction indicated by arrow (a) and remove tool (b).
7.3 Setting the operating mode
Turn the switch button (8) to select the desired operating mode.
Hammer drilling (only for KHE 56)
Chiselling
When a chisel is fitted, only operate the machine in the chiselling operating mode T.
7.4 Adjusting the chisel position
The chisel can be secured in 12 different positions.
- Insert the chisel.
- Turn the switch button (8) to position .0
- Turn the chisel to the required position.
- Turn the switch button (8) to position .
- Turn the chisel until it engages.
When a chisel is fitted, only operate the machine in the chiselling operating mode T.
7.5 Adjusting the impact force
Slide the switch (15) to adjust the impact force (and speed) setting.
Reduced impact force, reduced speed
High impact force, high speed
The correct setting depends on the task in hand. Example: set the switch to "reduced impact force" when working on soft, brittle material or trying to minimise break-off.
Set the switch to "high impact force" when working on harder materials.
7.6 Switching On and Off Instantaneous activation:
To start the machine, press the trigger switch (12).
Release the trigger (12) to switch off.
Continuous operation:
For continuous operation, the trigger switch (12) can be locked using the lock button (11).
Press and release the trigger (12) again to switch off.

In continuous operation, the machine continues running if it is forced out of your
hands. Therefore, always hold the machine with both hands using the handles provided, stand in a safe position and concentrate.
7.7 Metabo VibraTech (MVT)
For reduced vibrations and less stress on the hands.
Always apply a moderate amount of pressure to the handle when pushing down the machine and do not force. Vibrations are reduced most effectively at the central position (10).
8. Cleaning, Maintenance
Motor cleaning: blow out the machine thoroughly at regular intervals through the air slots with compressed air.
9. Tips and Tricks
Only moderate pressure is required when working with the machine. Applying excessive pressure does not increase your working performance and may decrease the service life of your machine.
KHE 56: in the case of deep bores, pull the drill bit out of the bore from time to time in order to remove dust.
10. Troubleshooting
Carbon brush service indicator (13) lights up: the carbon brushes are almost completely worn (remaining operating time approx. 30 hours). If the brushes are completely worn, the machine switches off automatically. Have an authorised service centre replace the brushes.
Electromagnetic disturbances:
In individual cases, the speed may fluctuate temporarily if the machine is exposed to extreme external electromagnetic disturbances.
11. Accessories
Use only genuine Metabo accessories.
Use only accessories which fulfil the requirements and specifications listed in these operating instructions.
See page 4.
A Extensive drill bit and chisel assortment for a wide range of applications.
B Special grease (for lubricating the tool shanks)
For a complete range of accessories, see www.metabo.com or the catalogue.
12. Repairs
Repairs to electrical tools must be carried out by qualified electricians ONLY!
Contact your local Metabo representative if you have Metabo power tools requiring repairs. For addresses see www.metabo.com.
You can download a list of spare parts from www.metabo.com.
13. Environmental Protection
Observe national regulations on environmentally compatible disposal and on the recycling of disused machines, packaging and accessories.

Only for EU countries: Never dispose of power tools in your household waste! In accordance with European Directive 2002/
96/EC on waste electrical and electronic equipment and its implementation in national legal systems, used power tools must be collected separately and handed in for environmentally compatible recycling.
14. Technical Specifications
Explanatory notes on the specifications on page 3. Changes due to technological progress reserved.
P_1 =Nominal power input
P_2 =Power output
n_1 =No-load speed
D_1 =Max. drilling diameter in concrete with impact masonry bits
D_2 =Max. drilling diameter in concrete with impact core cutters
D_3 =Max. drilling diameter in concrete with milling cutter
s_max = Maximum impact rate
W = Single impact energy
C = N u m b e r
m = Weight without mains cable
Measured values determined in conformity with EN 60745.
□ Machine in protection class II
\~ AC Power
The technical specifications quoted are subject to tolerances (in compliance with the relevant valid standards).
Emission values
These values make it possible to assess the emissions from the power tool and to compare different power tools. Depending on the operating
ENGLISHen
conditions, the condition of the power tool or the accessories, the actual load may be higher or lower. For assessment purposes, please allow for breaks and periods when the load is lower. Based on the adjusted estimates, arrange protective measures for the user e.g. organisational measures.
Vibration total value (vector sum of three directions) determined in accordance with EN 60745:
a_h, HD =Vibration emission value (hammer drilling into concrete)
a_h, Cheq = Vibration emission value (chiselling)
K_h,HD / Cheq = Uncertainty (vibration)
Typical A-effective perceived sound levels:
L_pA =Sound pressure level
L_WA = Acoustic power level
K_pA , K_WA= Uncertainty (noise level)
L_pA(M) = recorded sonic pressure peak in accordance with 2000/14/EG on the ear of the user
L_WA(M) = Measured acoustic power level as per 2000/14/EC
L_WA(G) =Guaranteed acoustic power level as per 2000/14/EC
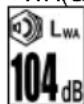
During operation the noise level can exceed 80 dB(A).

Wear ear protectors!
L_pA =äänenpainetaso
L_WA = tehotaso
Servicevarsel for kullbørster (13) lyser:


- Original instructions
- Declaration of Conformity
- Specified Use
- General Safety Instructions
- Special Safety Instructions
- Reduce dust exposure:
- ENGLISHen
- Overview
- Commissioning
- Assembly of the bow handle or additional handle
- Use
- Switching On and Off Instantaneous activation:
- Continuous operation:
- Metabo VibraTech (MVT)
- Cleaning, Maintenance
- Tips and Tricks
- Troubleshooting
- Electromagnetic disturbances:
- Accessories
- Repairs
- Environmental Protection
- Technical Specifications
- Emission values
Brand : METABO
Model : KHE 56
Category : Hammer