
Easy Fry & Grill Precision EY5058 - Deep fryer TEFAL - Free user manual and instructions
Find the device manual for free Easy Fry & Grill Precision EY5058 TEFAL in PDF.

| Product type | Hot air fryer with grill function |
| Brand | Tefal |
| Model | Easy Fry & Grill Precision EY5058 |
| Capacity | Approximately 3.5 L (max fries quantity: 800 g) |
| Dimensions (L x D x H) | Approximately 30 x 30 x 35 cm |
| Weight | Approximately 5.5 kg |
| Power | 220-240 V, 50/60 Hz, approximately 1500-1800 W |
| Display | Digital touch screen |
| Temperature range | 80 °C to 200 °C |
| Timer | 1 to 60 minutes (cooking), 1 to 4 hours (dehydration) |
| Automatic cooking modes | Fries, nuggets/croquettes, roast chicken, pizza, meat, fish, vegetables, desserts |
| Additional functions | Grill, dehydration, keep warm |
| Included accessories | Non-stick coated pot, removable grid, grill plate |
| Viewing window | Yes (depending on version, removable external glass) |
| Care and cleaning | Pot and grid dishwasher safe; external glass hand washable; do not use metal utensils |
| Safety | Automatic shut-off at end of cooking, cool-touch handle, non-slip feet, minimum ventilation space 15 cm |
| Warranty | 2 years (depending on country) |
| Repairability | Spare parts available through Tefal after-sales service |
Frequently Asked Questions - Easy Fry & Grill Precision EY5058 TEFAL
User questions about Easy Fry & Grill Precision EY5058 TEFAL
0 question about this device. Answer the ones you know or ask your own.
Ask a new question about this device
Download the instructions for your Deep fryer in PDF format for free! Find your manual Easy Fry & Grill Precision EY5058 - TEFAL and take your electronic device back in hand. On this page are published all the documents necessary for the use of your device. Easy Fry & Grill Precision EY5058 by TEFAL.
USER MANUAL Easy Fry & Grill Precision EY5058 TEFAL
EASY FRY & GRILL DIGITAL
*depending on model
2
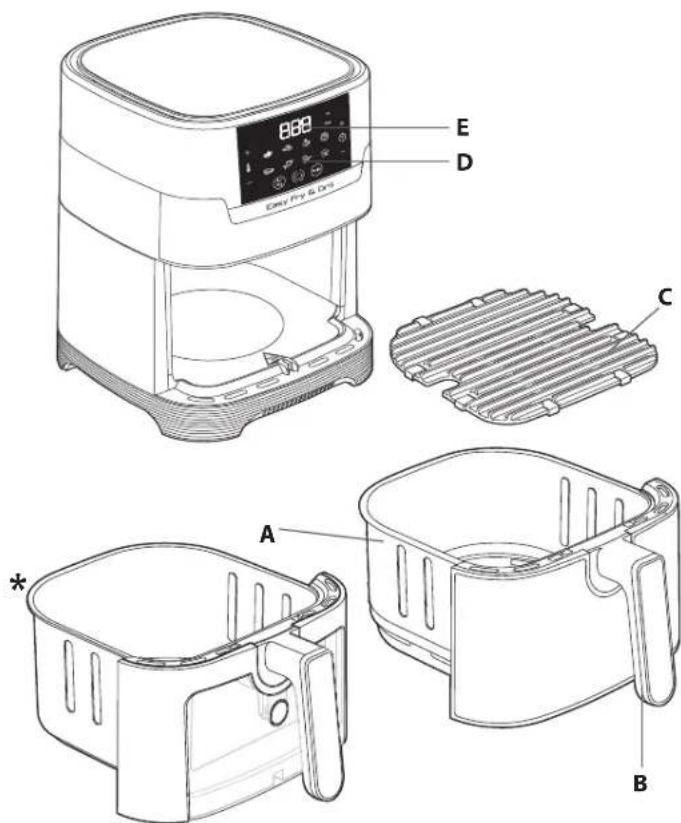
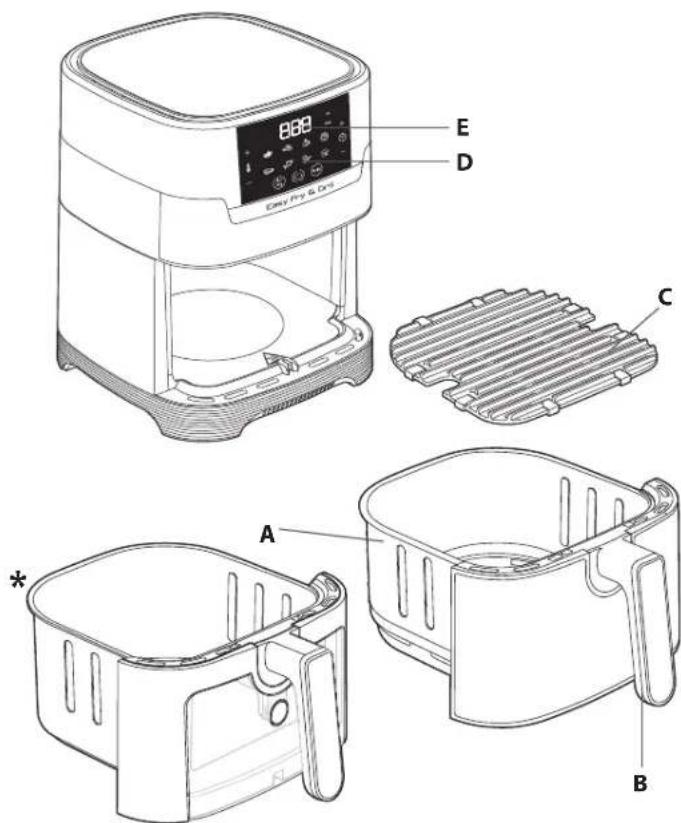
DESCRIPTION
A. Bowl
B. Bowl handle
C. Removable die-cast grill grid
D. Digital touchscreen panel
E. Time/temperature display
AUTOMATIC COOKING MODES
-
Fries
-
Nuggets
-
Roasted chicken
-
Pizza
-
Meat
-
Fish
-
Vegetables
-
Dessert
BEFORE FIRST USE
Read the safety instructions and manual first and keep them in a safe place.
-
Remove all packaging material and any stickers from the appliance.
-
Do not remove silicon pads off the grid.
-
Thoroughly clean the bowl and the removable grill grid with hot water, some washing-up liquid and a non-abrasive sponge.
Note: the bowl and the grid are dishwasher safe.
Warning: For the model with the window, it is important to remove the outer glass and wash it by hand to preserve the original appearance and the transparency of the glass. The other parts are dishwasher safe.
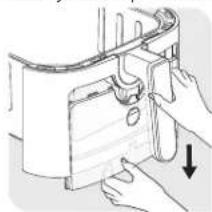
To ensure optimal preservation of the appliance, follow this cleaning procedure for the model with window:
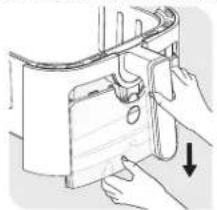
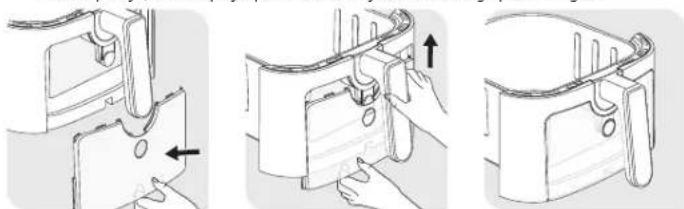
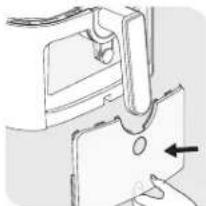
- Press the button located under the handle of the bowl
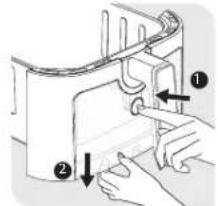
- Slide the outer window down. Hand wash with hot water, some washing-up liquid and a non-abrasive sponge

natural_image
Illustration of hands operating a mechanical device with a downward arrow indicating motion (no text or symbols)
natural_image
Technical line drawing of a mechanical component with an arrow indicating direction (no text or symbols)3
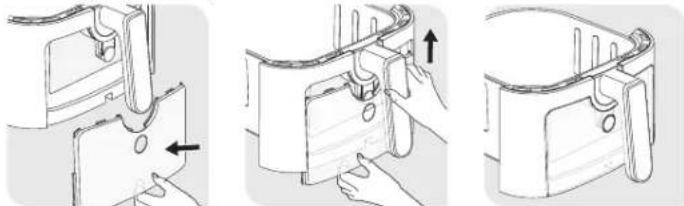
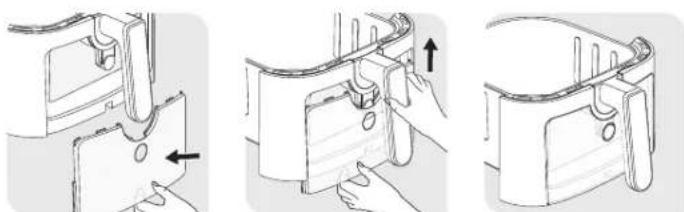
- Put the rest of the bowl in the dishwasher
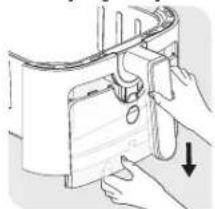
- After washing and thoroughly drying the outer window, place it back on the appliance by sliding it upwards into place.
natural_image
Three-step diagram showing a mechanical assembly process with arrows indicating direction (no text or symbols)- Wipe the inside and outside of the appliance with a damp cloth. The appliance works by producing hot air. Do not fill the bowl (A) with oil or frying fat.
PREPARING FOR USE
- Place the appliance on a flat, stable, heat-resistant work surface away from water splashes.
- Insert the grid at the bottom of the bowl, up to the stop.
- Do not fill the bowl with oil or any other liquid.
Do not put anything on top of the appliance. This disrupts the airflow and affects the hot air frying result.
IMPORTANT: To prevent the appliance from overheating, do not place it in a corner or below a wall cupboard. A gap of at least 15cm should be left around the appliance to allow air to circulate.
USING THE APPLIANCE
The appliance can cook a large range of recipes. Cooking times for the main types of food are given in the section 'Cooking Guide'. Online recipes help you get to know the appliance.
1. Connect the power supply cord to an electrical socket.
2. Place the food in the bowl.
Note: Never fill the bowl beyond the MAX level mark or exceed the maximum amount indicated in the table (see into section 'Cooking Guide'), as this could affect the quality of the end result.
- Slide the bowl back into the appliance.
- To begin cooking, you can select between the automatic cooking mode and the manual settings.
a. If choosing automatic cooking mode:
- Select the desired cooking mode by pressing the icon corresponding on the touchscreen panel (these modes are described in detail in the "Cooking guide" section).
- Confirm the cooking mode by pressing the ⏻ button. This will launch the cooking process.
- Cooking starts. The selected temperature and remaining cooking time will alternate on the on-screen display.
4
b. If choosing manual settings:
- Adjust the temperature ① with the ④ and buttons on the digital screen. The thermostat varies from 80-200°C.
- Then set the desired cooking time ⚙️ by pressing ⓣ and buttons. The timer can be set for between 1 and 60 minutes.
-
Press the Start button to begin cooking with the selected temperature and time settings. Cooking starts. The selected temperature and remaining cooking time will alternate on the screen display.
-
Excess oil from the food is collected in the bottom of the bowl.
-
Some food will require shaking halfway through the cooking time (see section 'Cooking Guide'). To shake the food, pull the bowl out of the appliance by the handle and shake it. Then slide the bowl back into the appliance, the appliance restarts automatically.
- When you hear the timer sound, the cooking time set has finished. Pull the bowl out of the appliance and place it on a heat-resistant surface.
- Check if the food is ready.
If the food is not ready yet, simply slide the bowl back into the appliance and set the timer for a few extra minutes.
- When the food is cooked, take out the bowl. To remove food, use a pair of tongs to lift the food out of the bowl.
Caution: The bowl should never be turn up side down with the grid.
Caution: After hot air frying, the bowl, the grid and the food are very hot. Do not touch the bowl during use and for some time after use, as it gets very hot. Only hold the bowl by the handle.
Depending on the type of food cooked in the appliance, be careful as steam may escape from the bowl.
- When a batch of food is ready, the appliance is instantly ready for preparing another batch of food.
USING THE GRILL PLATE
- Place the grill grid in the bowl of the appliance.
- Press ⚙, then press Ⓤ on the screen to select the Grill mode.
- Start the Grill mode by pressing ⚙. Do not place any food in the basket. This will launch the preheating phase (timing :15 minutes).
- When you hear the timer sound, the preheating phase has finished and the temperature has reached 200°C.
- Do not take the bowl out during the pre-heating phase otherwise the timer will revert back to 0 and the timer will start again.
- The product goes into keep warm mode at 200°C for 10 minutes.
- Take the bowl out the appliance and place it on a heat-resistant surface.
Caution: the bowl and the grill grid are very hot. Use a pair of tongs to place the food on the grill plate.
- Wait until the preheating phase has completed then place the food on the grill plate and put back the bowl into the appliance.
5
-
Select the required cooking time by pressing + and - buttons (see section 'Cooking guide').
-
Press the Start button ⚙ to launch the cooking. The temperature and remaining cooking time will alternate on the on-screen display.
Note: the pieces of meat required to turn them at half cooking.
Excess oil from the food is collected in the bottom of the bowl.
-
When you hear the timer sound, the cooking has finished. Take the bowl out the appliance and place it on a heat-resistant surface.
-
Check if the food is ready. If the food is not ready yet, put it back on the appliance and set the timer for a few extra minutes at 200^ C with manual setting (see section "Cooking guides").
-
When the food is cooked, take out the bowl. To remove food, use a pair of tongs to lift the food out the bowl.
Caution: the bowl should never be turn up side down with the grid.
Caution: After hot frying, the bowl, the grid and the food are very hot. Do not touch
the bowl during use and for some time after use, as it gets very hot. Only hold the
bowl by the handle.
DEHYDRATION
-
Place the grid in the bowl of the appliance.
-
Press ⏻, then adjust the temperature ⏻ by pressing + and - button to 80°C on the digital screen.
-
Then set the desired cooking time Ⓤ by pressing + and - button. You can set the timing from 1 hour to 4 hours.
-
Press the Start button ⏻ to launch the dehydration process. The selected temperature and remaining cooking time will alternate on the screen display.
-
When you hear the timer sound, the cooking has finished. Take the bowl out the appliance and place it on a heat-resistant surface.
-
Check if the food is ready. If the food is not ready yet, put it back on the appliance and set the timer for a few extra minutes.
-
When the food is cooked, take out the bowl. To remove food, use a pair of tongs to lift the food out the bowl.
Caution: the bowl should never be turn up side down with the grid.
Caution: After hot frying, the bowl, the grid and the food are very hot. Do not touch
the bowl during use and for some time after use, as it gets very hot. Only hold the bowl by the handle.
COOKING GUIDE
The table below helps you to select the basic settings for the food you want to prepare.
Note: The cooking times below are only a guide and may vary according to the variety and batch of potatoes used. For other food the size, shape and brand may affect results.
Therefore, you may need to adjust the cooking time slightly.
| MENU | i | |||||
| Potatoes & fries | ||||||
| Frozen chips (10 mm x 10 mm standard thickness) | 300 - 800 g | 15 - 25 min | 180°C | |||
| Homemade Fries (8 x 8 mm) | 300 - 800 g | 22 - 27 min | 180°C | Add 1 tbsp of oil | ||
| Frozen potato wedges | 300 - 800 g | 22 - 27 min | 180°C | Add 1 tbsp of oil | ||
| Meat & Poultry | ||||||
| Steak 100 - 500 g | 6 - 10 min | 180°C | ||||
| Chicken breast fillets (boneless) | 100 - 500 g | 12 - 19 min | 180°C | |||
| Chicken (whole) | 1000 g 60 min | 200°C | ||||
| Fish | ||||||
| Salmon fillet 350 g | 15 - 17 min | 140°C | ||||
| Prawns | 12 pieces 4 min | 170°C | ||||
| Snacks | ||||||
| Frozen chicken nuggets | 100 - 600 g | 7 - 15 min | 200°C | |||
| Frozen chicken wings | 300 g 16 - 20 min | 200°C | ||||
| Frozen cheese sticks | 125 g (5 pieces) | 7 - 9 min | 180°C | |||
| Frozen onion rings | 200 g (10 pieces) | 8 - 10 min | 200°C | |||
| Pizza | 400 g 7 min | 190°C | ||||
| Vegetables 300 - 700 g | 16 - 20 min | 200°C | ||||
| Baking | ||||||
| Muffins | 7 pieces 15 - 18 min | 180°C | Use a baking tin/oven dish** | |||
| Cake | 300 g 30 min | 160°C | ||||
| Dehydration | ||||||
| Sliced apples | 1-2 pieces 4 h | 80°C | ||||
* Shake halfway through cooking.
**place the cake tin/oven dish in the bowl.
6
7
| i | ||||||
| Grill | ||||||
| 15 min | ||||||
| Meat 250 g | 200°C | P:heating: 15 min Cooking: 6-8 min | You can add oil, aromatic herbs and salt for better taste. At mid-cooking, you can return the food. | |||
| Sausages 400 g | 200°C | P:heating: 15 min Cooking: 10-12 min | You can add oil, aromatic herbs and salt for better taste. At mid-cooking, you can return the food. | |||
| Vegetables 300 g | 200°C | P:heating: 15 min Cooking: 10 min | ||||
| Fish fillet 200 g | 200°C | P:heating: 15 min Cooking: 3-5 min | ||||
IMPORTANT: To avoid damaging your appliance, never exceed the maximum quantities of ingredients and liquids indicated in the instruction manual and in the recipes. When you use mixtures that rise (such as with cake, quiche or muffins) the oven dish should not be filled more than halfway.
TIPS
- Smaller food usually requires a slightly shorter cooking time than larger size foods.
- Shaking food halfway through the cooking time improves the end result and can help prevent uneven cooking.
- To make your fresh potatoes extra crispy, try adding a small amount of oil before cooking and shake to evenly cover. We recommend 14ml of oil. Do not add oil to frozen potatoes.
• Snacks that can be cooked in an oven can also be cooked in the appliance. - The optimal recommended quantity for cooking fries is 700 grams.
- Use ready made puff and shortcrust pastry to make filled snacks quickly and easily.
- Place an oven dish in the appliance's bowl if you want to bake a cake or quiche or if you want to fry delicate ingredients or filled ingredients. You can use an oven dish in silicon, stainless steel, aluminium, terracotta.
- You can also use the appliance to reheat food. To reheat food, set the temperature to 160°C for up to 10 minutes. Cooking time could be adjusted depending on food quantity in order to fully reheat the food.
MAKING HOME-MADE CHIPS
If you want to make home-made chips, follow the steps below.
- Choose a variety of potato recommended for making chips. Peel the potatoes and cut them into equal thickness chips.
- Soak the potato chips in cold water for at least 30 minutes, drain them and dry them with a clean, highly absorbent tea towel. Then pat with paper kitchen towel. The chips must be thoroughly dry before cooking.
- Pour 1 tablespoon of oil (vegetable, sunflower or olive) in a dry bowl, put the chips on top and mix until they are coated with oil.
8
- Remove the chips from the bowl with your fingers or a kitchen utensil so that any excess oil stays behind in the bowl. Place the chips in the bowl.
Note: Do not tip the container of oil coated chips directly into the bowl in one go, otherwise excess oil will end up at the bottom of the bowl. - Fry the chips according to the instructions in the section Cooking guide.
CLEANING
Clean the appliance after every use.
The bowl and the grid have a non-stick coating. Do not use metal kitchen utensils or abrasive cleaning materials to clean them, as this may damage the nonstick coating.
-
Remove the mains plug from the wall socket and let the appliance cool down. Note: Remove the bowl to let the appliance cool down more quickly.
-
Wipe the outside of the appliance with a damp cloth.
-
Clean the bowl and grid with hot water, some washing-up liquid and a non-abrasive sponge. You can use a degreasing liquid to remove any remaining dirt.
Note: the bowl and the grid are dishwasher safe.
Warning: For the model with the window, it is important to remove the outer glass and wash it by hand to preserve the original appearance and the transparency of the glass. The other parts are dishwasher safe.
To ensure optimal preservation of the product, follow the cleaning procedure for the model with window:
- Press the button located under the handle of the bowl
- Slide the outer window down. Wash it by hand
- Put the rest of the bowl in the dishwasher
- After washing, put the outer window back on the appliance by sliding it upwards.
Tip: If food debris/residue is stuck at the bottom of the bowl and the grid, fill them with hot water and some washing-up liquid. Let the bowl and the grid soak for approximately 10 minutes. Then rinse clean and dry.
- Wipe inside of the appliance with hot water and a damp cloth.
- Clean the heating element with a dry, cleaning brush to remove any food residues.
- Do not immerse the appliance in water or any other liquid.
STORAGE
- Unplug the appliance and let it cool down.
- Make sure all parts are clean and dry.
GUARANTEE AND SERVICE
If you need service or information or if you have a problem, please visit the brand website or contact the brand Consumer Care Centre in your country. You can find the phone number in the worldwide guarantee leaflet. If there is no Consumer Care Centre in your country, go to your local dealer.
TROUBLESHOOTING
If you encounter problems with the appliance, visit the brand website (see cover page on this document) for a list of frequently asked questions or contact the Consumer Care Centre in your country.
9
en
*selon modèle
10
DESCRIPTION
A. Cuve
natural_image
Illustration of hands installing or adjusting a mechanical component with an arrow indicating downward motion (no text or symbols present)
natural_image
Pure mechanical diagram showing a lever mechanism with an arrow indicating direction (no text or symbols)11
natural_image
Three-step diagram showing a mechanical assembly with arrows indicating direction (no text or symbols)natural_image
Line drawing of hands operating a mechanical device with a downward arrow indicating motion (no text or symbols)
natural_image
Technical line drawing of a mechanical component with an arrow indicating direction (no text or symbols)19
natural_image
Three-step diagram showing a mechanical assembly with arrows indicating direction (no text or symbols)natural_image
Illustration of hands operating a device with a downward arrow indicating action (no text or symbols present)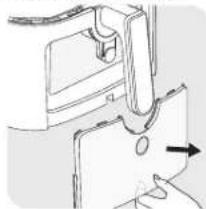
natural_image
Technical line drawing of a mechanical component with an arrow indicating a force or movement (no text or symbols present)Doe de rest van de frituurmand in de vaatwasser.
28
natural_image
Technical line drawing of a mechanical component with an arrow indicating direction (no text or symbols)
natural_image
Line drawing of hands operating a device with an upward arrow indicating motion (no text or symbols)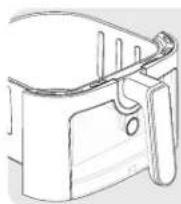
The image is too blurry to recognize any text content.
natural_image
Illustration of hands operating a mechanical device with a downward arrow indicating motion (no text or symbols)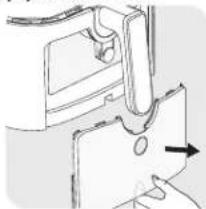
natural_image
Pure mechanical diagram showing a lever mechanism with an arrow indicating direction (no text or symbols)37
natural_image
Three-step line drawing showing a mechanical assembly process with arrows indicating direction (no text or symbols)natural_image
Illustration of hands operating a device with a downward arrow indicating action (no text or symbols present)
natural_image
Mechanical assembly diagram showing a clamping mechanism with a hand pressing a component (no text or symbols visible)46
natural_image
Mechanical assembly diagram showing a bracket and mounting hole with an arrow indicating direction (no text or symbols)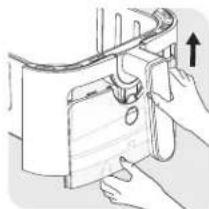
natural_image
Illustration of hands installing or adjusting a mechanical component with an arrow indicating upward motion (no text or symbols present)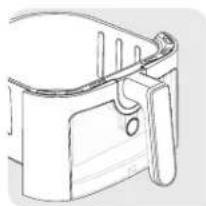
natural_image
Line drawing of a mechanical component with no visible text or symbolsnatural_image
Line drawing of hands operating a mechanical device with a downward arrow indicating motion (no text or symbols)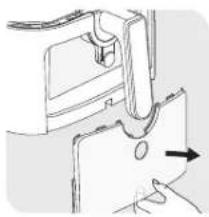
natural_image
Diagram of a sewing machine needle and handle mechanism (no text or symbols)natural_image
Three-step diagram showing hand positioning of a mechanical component, with arrows indicating movement direction (no text or symbols)natural_image
Illustration of hands operating a mechanical device with a downward arrow indicating motion (no text or symbols present)
natural_image
Technical line drawing of a mechanical component with an arrow indicating direction (no text or symbols)64
natural_image
Technical line drawing of a mechanical component with an arrow indicating direction (no text or symbols)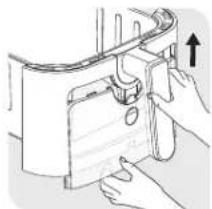
natural_image
Illustration of hands installing or adjusting a mechanical component with an upward arrow (no text or symbols)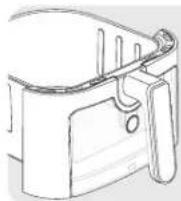
*Modele bağlıdır
72
AÇIKLAMA
A. Hazne
B. Hazne kolu
-
Kizartma
-
Tavuk nugget
-
Tavuk
-
Pizza
-
Et
-
Balık
-
Sebze
-
Tathi
İLK KULLANIMDAN ÖNCE
natural_image
Illustration of hands operating a mechanical device with a downward arrow indicating motion (no text or symbols present)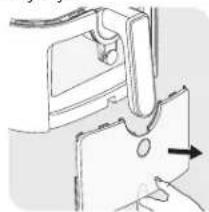
natural_image
Pure mechanical diagram showing a lever mechanism with an arrow indicating direction (no text or symbols)73
natural_image
Three-step diagram showing a mechanical assembly with arrows indicating direction of movement (no text or symbols)natural_image
Illustration of hands operating a mechanical device with a downward arrow indicating motion (no text or symbols present)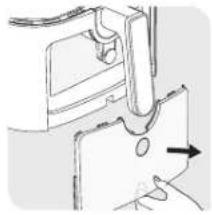
natural_image
Pure mechanical diagram showing a lever mechanism with an arrow indicating direction (no text or symbols)82
natural_image
Mechanical assembly diagram showing a clamping mechanism with an arrow indicating force direction (no text or symbols present)
natural_image
Illustration of hands operating a device with an upward arrow indicating motion (no text or symbols present)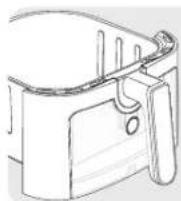
- Gurnite spoljni prozor nadole. Ručno ga operite
natural_image
Illustration of hands installing or adjusting a mechanical component with a downward arrow (no text or symbols)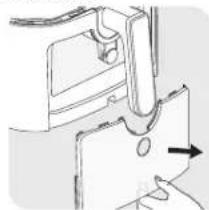
natural_image
Pure mechanical diagram showing a hand pressing a component with an arrow indicating force (no text or symbols)91
- Stavite ostatak činije u mašinu za pranje sudova
- Nakon pranja, vratite spoljni prozor na uređaj tako što ćete ga povući nagore.
natural_image
Three-step diagram showing a mechanical assembly with arrows indicating direction of movement (no text or symbols)- Obrišite unutrašnjost i spoljašnjost uređaja vlažnom krpom. Uređaj radi tako što proizvodi vreo vazduh. Nemojte puniti fioku uljem ili mašću za prženje.
PRIPREMA ZA KORIŠĆENJE
*Zavisno od modela
98
OPIS
A. Posuda
B. Drška na posuda
C. Odvojiva rešetka
D. Digitalni displej osjetljiv na dodir
E. Prikaz vremena/temperature
AUTOMATSKI NAČINI KUHANJA
-
Krompirići
-
Meso
-
Pileći medaljoni
-
Riba
-
Pečena piletina
-
Povrće
-
Pizza
-
Desert
PRIJE PRVE UPOTREBE
natural_image
Illustration of hands operating a mechanical device with a downward arrow indicating motion (no text or symbols present)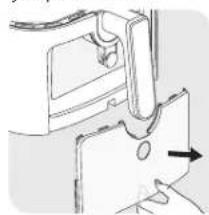
natural_image
Pure mechanical diagram showing a lever mechanism with an arrow indicating direction (no text or symbols)99
- Ostatak posude stavite u mašinu za posuđe
- Nakon pranja vratite vanjski prozorčić na aparat tako što ćete ga povući prema gore.

natural_image
Three-step diagram showing a mechanical assembly process with arrows indicating direction (no text or symbols)- Vanjski i unutarnji dio aparata obrišite vlažnom krpom. Aparat radi tako da proizvodi vrući zrak. Ladicu nemojte puniti uljem ili masnoćom za prženje.
PRIPREMA ZA UPOTREBU
- Aparat stavite na ravnu i stabilnu radnu površinu otpornu na toplotu, dalje od prskanja vode.
- Ubacite rešetku na dno posude, do kraja.
- Ladicu nemojte puniti uljem niti bilo kojom drugom tečnosti.
natural_image
Illustration of hands installing or adjusting a mechanical component with an arrow indicating downward motion (no text or symbols present)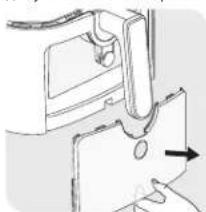
natural_image
Diagram of a hand pressing a piece of paper into a container with an arrow indicating motion (no text or symbols present)107
natural_image
Three-step diagram showing a mechanical assembly process with arrows indicating direction (no text or symbols)- Zunanje okence potisnite navzdol. Operite ga ročno.
natural_image
Illustration of hands operating a mechanical device with a downward arrow indicating motion (no text or symbols present)
natural_image
Pure mechanical diagram showing a lever and pivot mechanism without any text or symbols116
- Posodo operite v pomivalnem stroju.
- Nato zunanje okence namestite nazaj na napravo tako, da ga potisnete navzgor.
natural_image
Mechanical assembly diagram showing a hand pressing a piece of dough into a housing (no text or symbols visible)
natural_image
Illustration of hands installing or adjusting a mechanical component with an upward arrow (no text or symbols)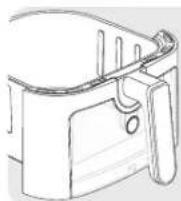
UPORABA REŠETKE ZA ŽAR
natural_image
Illustration of hands operating a mechanical device with a downward arrow indicating motion (no text or symbols present)
natural_image
Pure mechanical diagram showing a hand pressing a component with an arrow indicating direction (no text or symbols)natural_image
Technical line drawing of a mechanical component with an arrow indicating direction (no text or symbols)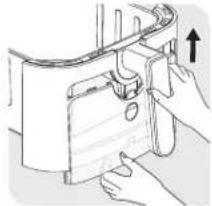
natural_image
Illustration of hands operating a kitchen appliance with a directional arrow (no text or symbols)
natural_image
Illustration of hands operating a mechanical device with a downward arrow indicating motion (no text or symbols)
natural_image
Pure mechanical assembly diagram without any text, numbers, or symbolsnatural_image
Three-step diagram showing a mechanical assembly process with arrows indicating direction (no text or symbols)natural_image
Illustration of hands operating a mechanical device with a downward arrow indicating motion (no text or symbols present)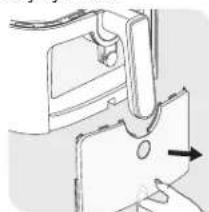
natural_image
Technical line drawing of a mechanical component with an arrow indicating direction (no text or symbols)natural_image
Three-step diagram showing a mechanical assembly process with arrows indicating direction (no text or symbols)natural_image
Two-step diagram showing hand positioning of a mechanical component with arrows indicating direction (no text or symbols)- Stavite ostatak posude u perilicu posuda.
- Nakon pranja vanjski prozor vratite u uređaj tako da ga umetnete prema gore.
149
natural_image
Three-step diagram showing a mechanical assembly process with arrows indicating direction (no text or symbols)natural_image
Illustration of hands installing or adjusting a mechanical component with a downward arrow (no text or symbols)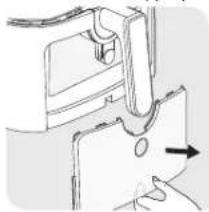
natural_image
Technical line drawing of a sewing machine component with an arrow indicating assembly direction (no text or symbols)natural_image
Three-step diagram showing mechanical assembly steps with arrows indicating direction (no text or symbols)natural_image
Illustration of hands operating a kitchen appliance with a downward arrow indicating motion (no text or symbols)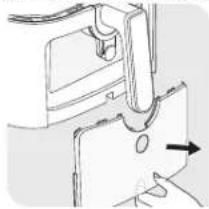
natural_image
Mechanical assembly diagram showing a clamping mechanism with no visible text or symbols166
natural_image
Technical line drawing of a mechanical component with an arrow indicating direction (no text or symbols)
natural_image
Illustration of hands installing or adjusting a mechanical component with an upward arrow (no text or symbols)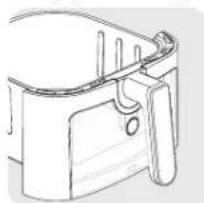
natural_image
Line drawing of a mechanical component with no visible text or symbols*Улгіге байланысты
СИПАТТАМАСЫ
A. тартпа
В. Тартпа туткары
С. бар алынбалы тор
natural_image
Illustration of hands operating a mechanical device with a downward arrow indicating motion (no text or symbols)
natural_image
Diagram of a mechanical component with an arrow indicating direction (no text or symbols present)natural_image
Three-step line drawing showing a mechanical assembly process with arrows indicating direction (no text or symbols)natural_image
Illustration of hands installing or adjusting a mechanical component with an arrow indicating downward motion (no text or symbols present)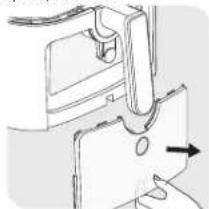
natural_image
Technical line drawing of a mechanical component with an arrow indicating direction (no text or symbols)natural_image
Diagram of a mechanical component with an arrow indicating direction (no text or symbols present)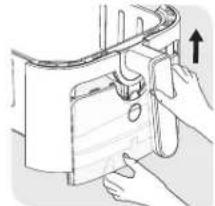
natural_image
Line drawing of hands operating a kitchen appliance with a handle and button (no text or symbols)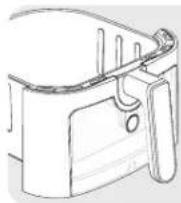
natural_image
Illustration of hands operating a kitchen appliance with a downward arrow indicating motion (no text or symbols)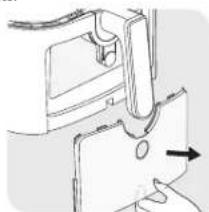
natural_image
Technical line drawing of a mechanical component with an arrow indicating direction (no text or symbols)natural_image
Pure mechanical assembly diagram without any text, numbers, or symbols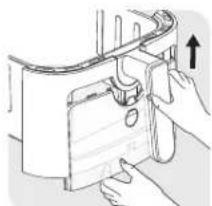
natural_image
Illustration of hands operating a mechanical device with a handle and lever (no text or symbols)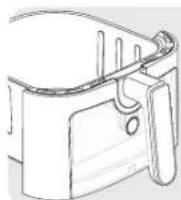
- Bidiet ârêjo logu uz leju. Nomazgâjiet ar rokâm.
natural_image
Illustration of hands operating a device with a downward arrow indicating motion (no text or symbols)
natural_image
Diagram of a hand inserting a component into a device (no text or symbols visible)natural_image
Technical line drawing of a mechanical component with an arrow indicating direction (no text or symbols)
natural_image
Illustration of hands installing or adjusting a mechanical component with an arrow indicating upward motion (no text or symbols present)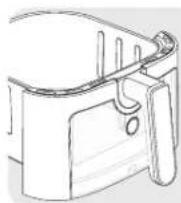
GRILA PLĀTNES LIETOŠANA
natural_image
Illustration of hands holding a mechanical component with an arrow indicating downward motion (no text or symbols)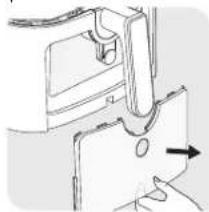
natural_image
Technical line drawing of a mechanical component with an arrow indicating direction (no text or symbols)208
natural_image
Mechanical assembly diagram showing a clamping mechanism with an arrow indicating direction (no text or symbols present)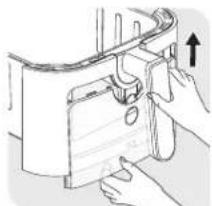
natural_image
Illustration of hands operating a mechanical device with an arrow indicating upward motion (no text or symbols present)
natural_image
Illustration of hands operating a mechanical device with an upward arrow indicating motion (no text or symbols present)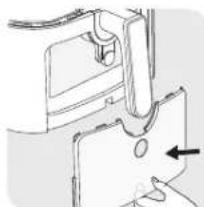
natural_image
Technical line drawing of a mechanical component with an arrow indicating direction (no text or symbols)natural_image
Technical line drawing of a mechanical component with an arrow indicating direction (no text or symbols)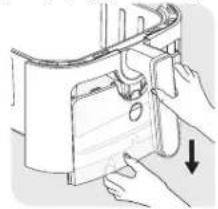
natural_image
Illustration of hands operating a device with a downward arrow indicating action (no text or symbols present)natural_image
Technical drawing of a mechanical component with ribbed texture and mounting holes (no text or symbols)
natural_image
Line drawing of a 3D mechanical component with labeled section A (no text or symbols beyond label)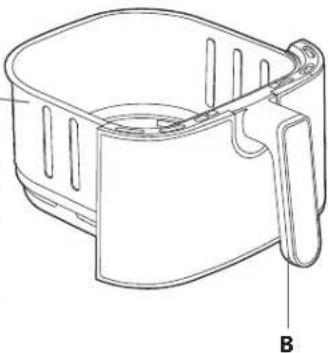
natural_image
Technical line drawing of a mechanical component with labeled part B (no text or symbols beyond label)* حسب الطراز
223

- EASY FRY & GRILL DIGITAL
- DESCRIPTION
- AUTOMATIC COOKING MODES
- BEFORE FIRST USE
- PREPARING FOR USE
- USING THE APPLIANCE
- USING THE GRILL PLATE
- DEHYDRATION
- COOKING GUIDE
- TIPS
- MAKING HOME-MADE CHIPS
- CLEANING
- STORAGE
- GUARANTEE AND SERVICE
- TROUBLESHOOTING
- The image is too blurry to recognize any text content.
- AÇIKLAMA
- İLK KULLANIMDAN ÖNCE
- PRIPREMA ZA KORIŠĆENJE
- OPIS
- AUTOMATSKI NAČINI KUHANJA
- PRIJE PRVE UPOTREBE
- PRIPREMA ZA UPOTREBU
- UPORABA REŠETKE ZA ŽAR
- СИПАТТАМАСЫ
- GRILA PLĀTNES LIETOŠANA
Brand : TEFAL
Model : Easy Fry & Grill Precision EY5058
Category : Deep fryer