SS-5685 - Coffee machine Sogo - Free user manual and instructions
Find the device manual for free SS-5685 Sogo in PDF.


User questions about SS-5685 Sogo
0 question about this device. Answer the ones you know or ask your own.
Ask a new question about this device
Download the instructions for your Coffee machine in PDF format for free! Find your manual SS-5685 - Sogo and take your electronic device back in hand. On this page are published all the documents necessary for the use of your device. SS-5685 by Sogo.
USER MANUAL SS-5685 Sogo
natural_image
Exterior view of a modern SOGO coffee maker with control panel and side-mounted stand (no visible text or symbols)
CAFETERA ESPRESSO ESPRESSO COFFEE MAKER CAFETIÈRE ESPRESSO MÁQUINA DE CAFÉ ESPRESSO ESPRESSO KAFFEEMASCHINE MACCHINA PER CAFFÈ ESPRESSO
This instruction manual can also be downloaded from our web page www.sogo.es
IMPORTANT SAFEGUARDS:
Before using the electrical appliance, the following basic precautions should always be followed including the following:
- Read all instructions.
- Before using check that the voltage of wall outlet corresponds to rated voltage marked on the rating plate.
- This appliance has been incorporated with a grounded plug. Please ensure the wall outlet in your house is well earthed.
- To protect against fire, electric shock and injury to persons do not immerse cord, plug in water or other liquid.
- Remove plug from wall outlet before cleaning and when not in use. Allow appliance cool down completely before taking off, attaching components or before cleaning.
- Do not operate any appliance with a damaged cord or plug or after the appliance malfunctions, or is dropped or damaged in any manner, return appliance to the nearest authorized service facility for examination, repair or electrical or mechanical adjustment.
- The use of accessory attachments not recommended by the appliance manufacturer may result in fire, electric shock or injury to persons.
- Place appliance on flat surface or table, do not hang power cord over the edge of table
or counter.
-
Ensure power cord do not touch hot surface of appliance.
-
Do not place the coffee maker on hot surface or beside fire in order to avoid being damaged.
-
To disconnect, remove plug from wall outlet. Always hold the plug. But never pull the cord.
-
Do not use appliance for other than intended use and place it in a dry environment.
-
Close supervision is necessary when your appliance is being used near children.
-
Be careful not to get burned by the steam.
-
Do not touch the hot surface of appliance. Use handle or knobs.
-
Do not let the coffee maker operate without water.
-
Do not remove the metal funnel when appliance is brewing coffee or when releasing steam.
-
Connect plug to wall outlet before using and turn any switch off before plug is removed from wall outlet.
-
This appliance can be used by children aged from 8 years and above and persons with reduced physical, sensory or mental capabilities or lack of experience and knowledge if they have been given supervision or instruction concerning use of the appliance in a safe way and understand the hazards involved. Children shall not play with the appliance. Cleaning and user maintenance shall not be made by children
unless they are older than 8 and supervised.
-
Children should be supervised to ensure that they do not play with the appliance.
-
Operating or storing environment temperature shall be more than 0°C.
-
This appliance is intended to be used in household and similar applications such as:
– staff kitchen areas in shops, offices and other working environments;
– farm houses;
– by clients in hotels, motels and other residential type environments;
– bed and breakfast type environments.
-
Do not use outdoors.
-
Save these instructions.
-
If you do not use the product for a long time, you need to turn on the power and then release steam for 3 minutes before leaving this product.
-
If you cut off power during steam release, residual heat will make product continue to release steam for a length of time, the product will stop releasing steam immediately once you turn off steam knob.
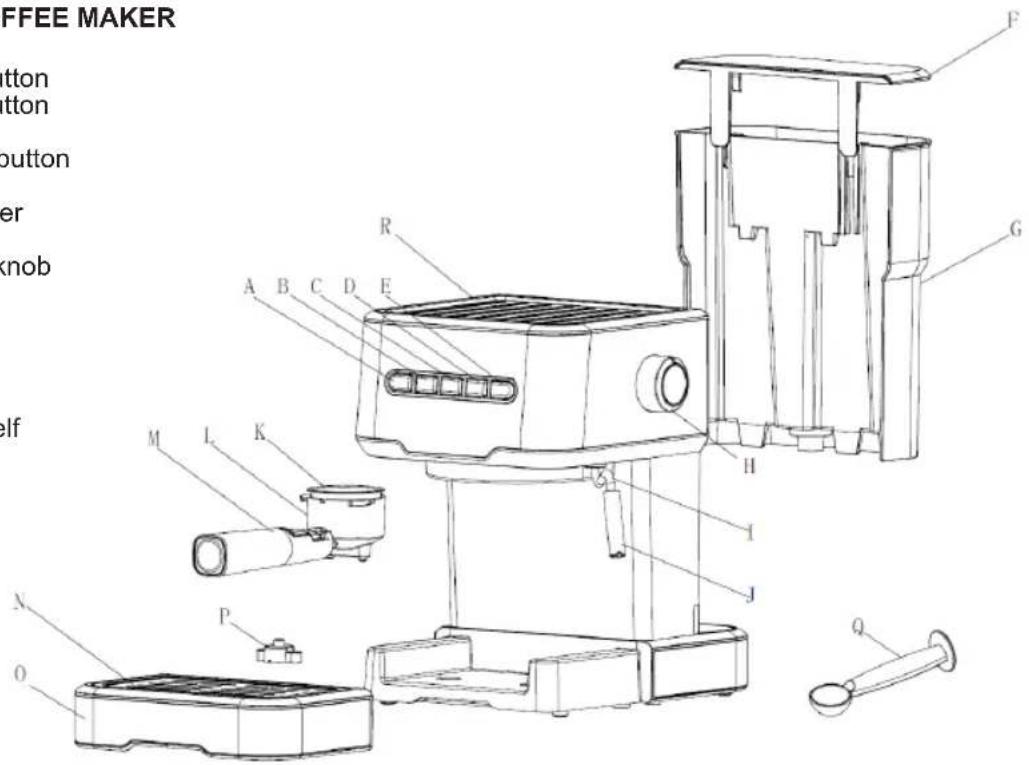
A. 1-cup coffee button
B. 2-cup coffee button
C. Power button
D. Manual coffee button
E. Steam button
F. Water tank cover
G. Water tank
H. Steam control knob
I. Steam wand
J. Froth device
K. Steel mesh
L. Metal funnel
M. Funnel handle
N. Removable shelf
O. Drip tray
P. Water float
Q. Coffee spoon
R. Top
text_image
OFFEE MAKER tton tton button er knob self A B C D E R G M L K H I J P O QBEFORE THE FIRST USE
To ensure the first cup of coffee tastes excellent, you should rinse the coffee maker with warm water as follows:
- Open water tank cover, fill water into water tank, water level should not exceed the "MAX" mark in water tank. Then replace the water tank cover.
Note: the appliance is supplied with a detachable water tank for easy cleaning, you can fill water tank with water first, and then attach water tank into the appliance.
-
Set steel mesh into metal funnel (no coffee in steel mesh), make sure the tube on the funnel aligns with groove in the appliance, then insert the funnel into the appliance from the "INSERT" position, and fix them into coffee maker firmly by turning it anticlockwise until it is at the "LOCK" position.
-
Place an jug on removable cup shelf. Make sure steam control knob is on the OFF position.
-
Connect into power source, press power button, power indicator is illuminated white, The indicators of 1- cup coffee button, 2-cup coffee button and manual coffee button flash, the machine begins preheating, after all indicators are solidly on, the preheating is completed
Note: if preheating is not completed yet, press 1-cup coffee button, 2-cup coffee button or manual coffee button, its indicator flashes quickly and the pump does not work, press this button again, its indicator returns to the preheating state.
- Press Manual coffee button, the unit will pump water for about 30s, pour out water in the cup then clean them thoroughly, now the appliance is ready for making coffee.
Note: There may be noise when pumping water for the first time, it is normal that the appliance is releasing the air inside. After about 20s, the noise will disappear.
PREHEATING
To make a cup of good hot Espresso coffee, we recommend you should preheat the appliance before making coffee, including metal funnel, steel mesh and cup, so that the coffee flavour can not be influenced by cold parts.
-
Remove detachable water tank and open water tank cover to fill it with desired water, the water level should not exceed the "MAX" mark in the tank. Then replace water tank
-
Set steel mesh into metal funnel, make sure the tube on the funnel aligns with groove in the appliance, then insert the funnel into the appliance from the "INSERT" position, and fix them into coffee maker firmly by turning it anticlockwise until it is at the "LOCK" position.
-
Place an espresso cup on removable cup shelf.
- Then connect appliance to power supply. Make sure steam control knob is on the OFF position.
- Press power button, power indicator is illuminated white, The indicators of 1-cup coffee button, 2-cup coffee button and manual coffee button flash, the machine begins preheating, after all indicators are solidly on, it means that preheating is completed, press Manual coffee button, the machine pumps water, when there is water flowing out, press this coffee button again to stop pumping water immediately. The purpose of this step is to pump the water of water tank into boiler.
- When coffee button indicator is illuminated, it indicates the preheating is finished.
MAKE ESPRESSO
- Remove funnel by turning it clockwise. Add ground coffee into steel mesh with measuring spoon, a spoon of ground coffee powder can make about a cup of top-grade coffee, then press ground coffee powder tightly with the tamper.
- Set steel mesh into metal funnel, make sure the tube on the funnel aligns with groove in the appliance, then insert the funnel into the appliance from the "INSERT" position, and fix them into coffee maker firmly by turning it anticlockwise until it is at the "LOCK" position.
- Place a cup on removable cup shelf.
- After preheating is completed, press 1-cup or 2-cup coffee button, the product will start brewing, working time for 1-cup coffee is 15 seconds and 25 seconds for 2-cup coffee. if you want to get the amount of coffee you like, press manual coffee button once, when your desired quantity of coffee is reached, press this button again to stop, for manual coffee button, working time is Max 90s, unit will automatically stop working if no any operation within 90s.
- At the time corresponding coffee button indicator is to be illuminated, if it is extinguished, wait for a moment, once it is illuminated again, press corresponding coffee button, wait for a moment, there will be coffee flowing out.
- Press Coffee button when desired coffee is obtained or the colour of coffee changes weak obviously, coffee maker stops working, if coffee button indicator is extinguished, wait for a moment, coffee button indicator will be illuminated again, you can continue to make coffee.
- Press and hold 1-cup button for 3 seconds, 1-cup button flashes, entering setting mode, press 1-cup button again to start dispensing coffee, when the specified time is reached, press 1 cup button to complete setting which can be memorized by the unit. Working duration for 1-cup coffee can be set up to 45s, if working duration for 1-cup coffee is set, working duration for 2-cup coffee will be automatically updated to 2 times of that for 1-cup coffee; Working duration for 2-cup coffee can be set up to 90s, if working duration for 2cup coffee is set, working duration for 1-cup coffee will be automatically updated to half of that for 2-cup coffee
WARNING: Do not leave the coffee maker unattended during making coffee, as you need operate manually sometimes! - After finish making coffee, take metal funnel out by turning it clockwise, then pour coffee residue out with steel mesh pressed by press bar.
- Let them cool down completely, then rinse under running water.
MAKE FROTHED MILK
You get a cup of cappuccino when you top up a cup of espresso with frothed milk.
Method:
- Press Steam button, Coffee button indicator will be extinguished, wait until Steam button indicator is illuminated.
Note: During operation, Steam button indicator will cycle on and off to maintain desired temperature. - Fill a jug with about 100 ml of milk for each cappuccino to be prepared, you are recommended to use whole milk at refrigerator temperature (not hot!).
Note: In choosing the size of jug, it is recommended the diameter is not less than 70 ± 5 mm, and bear in mind that the milk increases in volume by 2 times, make sure the height of jug is enough. - Turn steam control knob slowly anti-clockwise, steam will come out from frothing nozzle
Note: Never turn steam control button rapidly, as the steam will accumulate rapidly within short time which may increase a potential risk of explosion. - Insert frothing nozzle into the milk about two centimetre, froth milk in the way of moving vessel round up and down.
- When the required result is reached, turn steam control knob to OFF position.
Note: Clean steam outlet with wet sponge immediately after steam stops producing, but care not to hurt! Note: If you want to make coffee immediately after making steam, coffee indicator will flash for alarming upon pressing coffee button, at this time you should turn steam control knob to the ON position to pump hot water in order to let unit cool down.
AUTOMATIC POWER OFF FUNCTION
If there is no any operation within 25 minutes, the unit will power off automatically.
TIPS TO MAKE SPECIALITY COFFEES
Using your “Aroma Express”, Coffee Maker, you can make at home at your convenience various types of popular espresso coffees which you may drink at your local coffee shop.
HOW TO MAKE A CUP OF CAPPUCCINO
Cappuccino is an Italian origin coffee served in medium sized cup of 160-180ml. A cappuccino is the coffee which contains equal parts of espresso, steamed milk and milk froth.
In order to make cappuccino at home first prepare the espresso coffee and frothed milk with the help of your own “Aroma Express”, coffeemaker as suggested in process “MAKE FROTHING MILK” and “MAKE ESPRESSO COFFEE”.
To make the best tested cappuccino it is advisable to fill the 1/3 bottom part of cup with steamed milk. Pour in the 1/3 part of espresso coffee on the top of the steamed milk.
Note: Pour in the coffee carefully with the help of a spoon to avoid that it shouldn't get mixed with the steamed milk.
On the top of the espresso coffee put the milk froth with the help of spoon and then sprinkle the little amount of cocoa powder on to the top of milk froth.
The correct layering of milk, coffee and milk froth gives you the best taste and texture.
HOW TO MAKE A CUP OF CAFFE LATTE
The caffe latte is an American origin coffee served in long size cup of 240-250ml. It is being known as big brother of cappuccino made with 1/3 part single or double shot of espresso and rest 2/3 part is steamed milk with small layer of frothed milk.
In order to make the caffe latte at home first prepare the espresso coffee and frothed milk with the help of your own “Aroma Express”, coffeemaker as suggested in process “MAKE FROTHING MILK” and “MAKE ESPRESSO COFFEE”.
To make the best caffe latte it is advisable to layer the espresso coffee and milk perfectly.
Fill the 1/3 bottom part of cup with double shot of espresso coffee.
Pour in the 2/3 part of steamed milk on the top of the espresso coffee with the help of spoon in order to prevent the milk get mixed with the coffee. On the top of the steamed milk make a thin layer of milk foam. And thus, you have ready your own caffe latte.
HOW TO MAKE CUP OF FLAT WHITE
The flat white is an Australian and New Zealand origin coffee served in medium sized cup of 150-180ml. This is the drink of those coffee lovers who like strong flavour of coffee, with the espresso dominating the taste and milk added to stabilize the taste
In order to make the flat white at home first prepare the espresso coffee and frothed milk with the help of your own “Aroma Express”, coffeemaker as suggested in process “MAKE FROTHING MILK” and “MAKE ESPRESSO COFFEE”.
To make the flat white fill the 1/3 bottom part of the cup with the doble shot espresso coffee.
Pour in the 2/3 part of steamed milk on the top of coffee.
Note: The steamed milk must have micro foam layer but not the stiff foam layer which is used to make latte or cappuccino.
HOW TO MAKE LATTE MACCHIATO
The latte macchiato is known for coffee with three distinctive layers like of milk, espresso and milk foam. The normal serving size as like caffe latte 240-250ml and the only big difference between caffe latte and macchiato is pouring the order of espresso coffee and milk in the cup.
In order to make the caffe macchiatto at home first prepare the espresso coffee and frothed milk with the help of your own “Aroma Express”, coffeemaker as suggested in process “MAKE FROTHING MILK” and “MAKE ESPRESSO COFFEE”.
To make the latte macchiato pour the 2/3 part of the steamed milk at the bottom part of the cup.
Add the 1/3 part of espresso coffee on the top of the steamed milk.
Note: always use the spoon in order to prevent the mixing of milk with the coffee. Put on the small layer of milk foam on the top of the coffee. And this way you have ready latte macchiato.
CLEANING AND MAINTENANCE:
-
Turn off coffee maker and let the coffee maker cool down completely before cleaning.
-
Clean housing of coffee maker with moisture-proof sponge often and clean water tank, drip tray and removable cup shelf regularly then dry them.
Note: Do not clean with alcohol or solvent cleanser. Never immerse the housing in water for cleaning.
-
Detach metal funnel by turning it clockwise, get rid of coffee residue inside, then clean it with cleanser, but at last rinse with clear water.
-
Clean all the attachments in the water and dry them thoroughly.
-
After the machine works for 500 cycles (including coffee, steam and other functions), all the indicators quickly flash 5 times at the same time once preheating is completed, reminding you of descaling, if you do not descale, this will happen every time when you use the machine; in standby state, at the same time press and hold Manual coffee button and 2-cup coffee button for 3s, and the two indicators quickly flash 3 times, reminding you of cancelling descaling, and the number of working cycles returns to zero.
CLEANING MINERAL DEPOSITS
-
To make sure your coffee maker operates efficiently, internal piping is clean and the flavor of coffee is optimal, you should clean away the mineral deposits left every 2-3 months.
-
Fill water tank with water and descaler to the MAX level (the proportion of water and descaler is 4:1, the detail refers to the instruction of descaler. Please use "household descaler", you can use the citric acid (obtainable from chemist's or drug stores) instead of the descaler (the one hundred parts of water and three parts of citric acid).
-
According to the preheating program, put the metal funnel (without coffee powder in it) and jug in place. Brew water as per "PREHEATING".
-
Press Power button, power indicator will be illuminated, press Coffee button, make sure steam control knob is in the Off position, when there is water flowing out, press Coffee button to stop pumping, and wait for a moment, the coffee maker begins to preheat
-
When Coffee button indicator is illuminated, it shows preheating is finished. Press Coffee button and make two cups of coffee (about 2Oz). press Coffee button to stop pumping.
-
Press Steam button, Coffee button indicator will be extinguished, wait until Steam button indicator is illuminated. Make steam for 2min by turning steam control knob, then turn steam control knob to the OFF position to stop making steam. Press Power button to turn off the unit immediately, make the descaler deposit inside the unit at least 15 minutes.
-
Press Power button to restart unit, wait until Coffee button indicator will be illuminated, then press Coffee button to brew until no descaler is left.
-
Brew with tap water in the MAX level, repeat steps 4-6 for 3 times, then brew until no water is left in water tank.
TROUBLE SHOOTING
| Symptom Cause Corrections | ||
| The metal parts in the tank have rust. | Descaler is not recommended type. It may corrode the metal parts in the tank. | Use the descaler recommended by manufacturer. |
| Water leaks from the bottom of coffee maker. | There is much water in the drip tray. | Please clean the drip tray. |
| The coffee maker is malfunction. Please contact with the authorized service facility for repairing. | ||
| Water leaks out of outer side of filter. | There is some coffee powder on filter edge. | Get rid of them. |
| Acid (vinegar) taste exists in Espresso coffee. | No clean correctly after cleaning mineral deposits. | Clean coffee maker per the content in “before the first use” for several times. |
| Coffee powder is stored in a hot, wet place for a long time. The coffee powder turns bad. | Please use fresh coffee powder, or store unused coffee powder in a cool, dry place. After opening a package of coffee powder, reseal it tightly and store it in a refrigerator to maintain its freshness. | |
| Coffee maker cannot work any more. | Power outlet is not plugged well. Plug the power cord into a wall outlet correctly, if the appliance still does not work, please contact with the authorized service facility for repairing. | |
| Steam cannot froth. | The steam indicator is not illuminated. | Only after the steam indicator is illuminated, the steam can be used to froth. |
| The container is too big or the shape not fits. | Use high and narrow container. | |
| You have used skimmed milk Use whole milk or half-skimmed milk | ||
DECLARATION OF CONFORMITY
This device complies with Low Voltage Directive 2014/35/EC, Electromagnetic Compatibility Directive 2014/30/EU, Directive 2015/863/EU on the restriction of the use of certain hazardous substances in electrical and electronic equipment and Directive 2009/125/EC on the eco-design requirements applicable to energy-related products.
DÉCLARATION DE CONFORMITÉ
This symbol means that in case you wish to dispose of the product once its working life has ended, take it to an authorised waste agent for the selective collection of waste electrical and electronic equipment (WEEE).

Imported by:
Sanysan Appliances S.L, NIF: B98753056, C/ Barcas 2, 2 46002 Valencia, Spain Product made in P.R.C. – Designed by SOGO based on the European Quality Standards Customer Service: www.sogosat.com / sogosat@sogosat.com / 0034 902 222 161