FX-HDR2200 - Pressure washer Fuxtec - Free user manual and instructions
Find the device manual for free FX-HDR2200 Fuxtec in PDF.

| Product type | High pressure cleaner |
| Brand | Fuxtec |
| Model | FX-HDR2200 |
| Power | 2200 Watts |
| Voltage | 220-240 V ~ 50/60 Hz |
| Working pressure | 120 bar |
| Max. allowed pressure | 170 bar |
| Flow rate | 6.5 L/min |
| Max flow rate | 7.5 L/min |
| Max. supply pressure | 1.2 MPa |
| Max. supply temperature | 50°C |
| Sound pressure level | 74.6 dB(A) |
| Guaranteed sound power level | 96 dB(A) |
| Vibrations (pressure) | ≤2.5 m/s² |
| Weight | 11.4 kg |
| Protection class | II (double insulation) |
| Electrical protection | Earth leakage circuit breaker max. 30 mA |
| Usage | Cold water only |
| Lubrication system | Sealed, no oil change |
| Package contents | Water adapter, filter, HP hose, clip, cleaner, cable holder, hose reel, gun holder, gun, adjustable nozzle, cleaning pin |
| Warranty | 2 years |
Frequently Asked Questions - FX-HDR2200 Fuxtec
User questions about FX-HDR2200 Fuxtec
0 question about this device. Answer the ones you know or ask your own.
Ask a new question about this device
Download the instructions for your Pressure washer in PDF format for free! Find your manual FX-HDR2200 - Fuxtec and take your electronic device back in hand. On this page are published all the documents necessary for the use of your device. FX-HDR2200 by Fuxtec.
USER MANUAL FX-HDR2200 Fuxtec
natural_image
Technical line drawing of a Fuxtec water heater with visible components and branding (no text or symbols beyond branding)
natural_image
Orange icon of a person reading a book (no text or symbols)
Inhalt
DEUTSCHE VERSION....8
ENGLISH VERSION 22
VERSION FRANCAISE 37
ENGLISH VERSION....22
- Introduction and security 22
- Safety instructions for the high-pressure cleaner 23
- Important notes before commissioning.... 24
- Safety symbols | Symbols on the product.... 26
- Product 27
- Assembly.... 28
- Service 30
- Maintenance and storage.... 33
- Cleaning tips 33
- Troubelshooting 34
- Specifications.... 35
- Warranty.... 35
- Disposal 35
- Customer service 36
VERSION FRANCAISE 37
natural_image
Technical line drawing of a water heater with mounting bracket and control panel (no text or symbols)Schritt 3
natural_image
Technical line drawings of two different firearm components labeled H and J (no text or symbols beyond labels)Schritt 4
natural_image
Technical line drawing of a mechanical device with no visible text or symbolsSchritt 5
natural_image
Technical line drawing of a mechanical device with three connectors and a small component (no text or symbols)7. Bedienung
natural_image
Diagram showing two mechanical components with a cylindrical component being inserted, no text or symbols presentSchlauchtrommel
natural_image
Technical line drawing of a vehicle rear view showing front, side, and side views (no text or symbols)natural_image
Line drawing of a mechanical component with cylindrical ends and a connecting rod (no text or symbols)Before using the appliance for the first time, carefully read the original operating instructions and the enclosed safety instructions. Follow the instructions conscientiously. Keep both documents safe so that you can use them again later or pass them on to future owners.
Never allow children or anyone unfamiliar with these instructions to use the device. Children should be supervised to ensure that they do not play with the device.
Intended use
The device is intended for private households indoors and outdoors. It is suitable for cleaning machines, vehicles, buildings, tools, facades, terraces, garden tools and similar objects with the help of a high-pressure water jet. Use the device only for these intended tasks.
The appliance must be used in accordance with the descriptions and safety instructions given in this instruction manual. Any other use is not in accordance with its intended purpose. Incorrect use will void the warranty and disclaim any responsibility on the part of the manufacturer. The user is liable for any damage to third parties and their property. Only operate the device in the technical condition prescribed and delivered by the manufacturer. Unauthorized modifications to the device exclude liability of the manufacturer for resulting damage.
Important safety tips
- Never point the high-pressure nozzle at people or animals.
- Never drink alcohol or drugs while operating the pressure washer.
- Never operate the pressure washer while standing in water.
- Never touch the power plug with wet hands.
- Never leave electrical connections in water.
- Never operate the pressure washer without the water being turned on.
- Never use hot water with this pressure washer.
17. Safety instructions for the high-pressure cleaner
Using the pressure washer
THIS DEVICE IS INTENDED FOR USE WITH COLD WATER ONLY! DO NOT USE HOT WATER IN THIS PRESSURE WASHER.
- Only operate the pressure washer at the pressure intended for the cleaner. Never run the pressure washer without a water supply. Operating the device without a water supply will cause irreparable damage to the device.
- Make sure the water used is clean, free of sand, and free of corrosive chemicals. The use of contaminated water significantly shortens the life of the pressure washer.
- CAUTION – The pressure washer can be used for various applications, such as cleaning cars, patios, decks, garages, etc., where high pressure is required to remove dirt and debris. A jet of water that is too strong can damage the surface if not used properly! See the "Cleaning Tips" section for more details. Always test the spray jet in an open area first.
- NEVER move the device by pulling on the high-pressure water hose. Use the handle attached to the device.
- Always hold the high-pressure gun and lance with both hands. Hold the high-pressure gun/trigger with one hand while supporting the lance with the other hand.
- When applying detergents, the pressure washer uses the detergent at low pressure. After the
detergent has been applied, rinse it off the work area using the adjustable nozzle.
18. Important notes before commissioning
Read these safety instructions and the original operating instructions carefully before using the pressure washer for the first time. Act accordingly and keep both documents for later use or for future owners. In addition to the operating instructions, the general safety and accident prevention regulations must be observed. In addition, pay attention to the warning and information signs attached to the device to ensure safe operation.
Danger levels
DANGER: Immediate danger that can cause serious injury or death.
WARNING: Potentially dangerous situation that may result in serious injury or death.
CAUTION: Possible dangerous situation that may result in minor injury.
CAUTION: Possible dangerous situation that may result in property damage.
Personal protective equipment
CAUTION: Wear appropriate protective clothing and goggles to protect yourself from splashing back water or dirt. High-pressure cleaners can produce aerosols that can be harmful to health. If necessary, use a surface cleaner to minimise aerosol emissions and wear an FFP2 class respirator if aerosols cannot be avoided.
General safety instructions
DANGER: Keep packaging films away from children (risk of suffocation).
WARNING: Use the device only as intended. Pay attention to third parties, especially children, while working.
Persons with limited abilities may only operate the device under supervision or after thorough instruction.
Children are not allowed to operate the device and should be supervised so that they do not play with it.
CAUTION: Never modify or circumvent the safety devices of the device.
Electrical safety
DANGER: Only connect the appliance to grounded power sources, use only alternating current and make sure that the voltage of the power source corresponds to the voltage indicated on the nameplate. The device should be operated via a residual current circuit breaker (max. 30 mA).
WARNING: Make sure the power line is not damaged. If it is damaged, it must be replaced by a qualified electrician. Only use suitable extension cords outdoors.
Use of extension cords
Using an extension cord with this product is NOT RECOMMENDED. If you still need to use an extension cord, only use those that are intended for outdoor use. These cables are marked with the label "SUITABLE FOR USE WITH OUTDOOR UNITS, STORE INDOORS WHEN NOT IN USE". Only use extension cords with an electrical rating that is at least equal to the rated power of the product. Check the extension cord before use. DO NOT USE DAMAGED EXTENSION CORDS! Do not pull the cord to remove it from the socket – always pull the plug. Keep the cord away from heat and sharp edges. Always unplug the extension cord from the power outlet before disconnecting the product from the extension cord.
WARNING: To reduce the risk of electric shock, keep all compounds dry and away from the ground. Do not touch the plug with wet hands.
Do not use the appliance if the power cord or important parts of the appliance are damaged, e.g. safety devices, high-pressure hoses, trigger gun.
If an extension cord is used, the plug and socket must be waterproof.
WARNING: Unsuitable extension cords can be dangerous.
Unplug the appliance from the socket when the appliance is being cleaned or serviced, parts are being replaced, or the appliance is being converted for another function.
Operation of the pressure washer
DANGER: Do not use the pressure washer in hazardous areas. Never suck in flammable or dangerous liquids such as gasoline or solvents, and keep a distance of at least 30 cm when cleaning vehicle tires to avoid damage.
WARNING: Keep the high-pressure jet away from people, animals, and electrical equipment. Only use accessories recommended by the manufacturer.
CAUTION: Never operate the high-pressure cleaner on the drinking water network without a water connection adapter. Never leave the device unattended during operation.
Operation with cleaning agents
WARNING: Incorrect use of cleaning agents can cause serious injury or poisoning. Keep these out of the reach of children and use only the recommended products.
Maintenance and care
WARNING: Unplug before performing any maintenance.
CAUTION: Have repairs carried out only by authorized personnel. Do not use aggressive cleaning agents such as acetone or undiluted acids.
Transport and storage
CAUTION: When transporting, be aware of the weight of the device and store it safely.
19. Safety symbols | Symbols on the product

General hazard warning: Indicates precautions or safety instructions. Can also be used in conjunction with other icons or images.
Read this instruction manual carefully before using the product and store it in a safe place for later use.
Do not expose to rain or use in damp places.
Always pay attention to eye protection
Use in humid conditions and failure to comply with safety regulations may result in electric shock.
To reduce the risk of injury from recoil, hold the spray lance securely with both hands when the machine is on.
Do not direct the high-pressure jet at people, animals, active electrical equipment, or the device itself.
The appliance must not be connected directly to the public drinking water network.
To reduce the risk of injury, never direct the water jet at people or pets, and do not hold any body parts in the stream. Do not hold on to hoses or connectors.
CE mark
The product complies with the requirements and regulations of the European Community.
This device complies with protection class II and does not require a grounding connection. It is protected from electrical hazards by double or reinforced insulation.
20. Product
Scope of delivery
After opening the box, please remove all parts and check them against the following list of included components:

A. Water connection adapter
B. Filter
C. High Pressure Hose
D. Hose clip
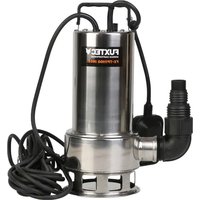
E. Pressure washer
F. Cable support
G. Hose reel
H. Holder for the high-pressure gun
J. High-pressure gun
K. Adjustable nozzle
N. Cleaning Pin
Due to transport and packaging, some accessories may be delivered in disassembled condition. Please follow the installation instructions.
The machine is always equipped with a handle for transport.
21. Assembly
Step 1
Attach the high-pressure hose (C) to the gun (H). Insert it and connect it tightly with a quick coupling to avoid leakage. If the parts are connected correctly, you cannot simply separate the two components by pulling straight out of the gun (E). Press the trigger lock button, then you can pull out the high-pressure hose.
Step 2
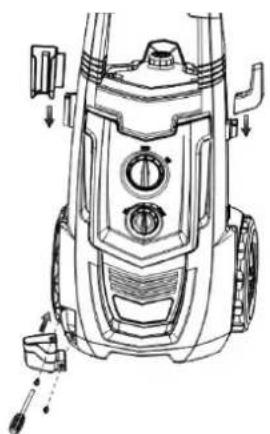
Assemble the gun hook and cable holder. Screw the gun holder firmly to the main housing as shown in the image below. The screws are packed together with the main housing. Please check and make sure they are present when unpacking.
natural_image
Technical line drawing of a water heater with mounting bracket and control panel (no text or symbols)Step 3
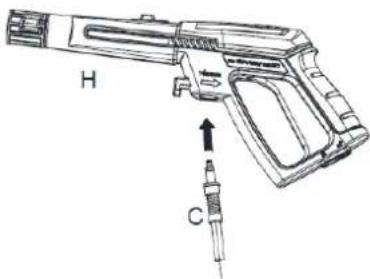
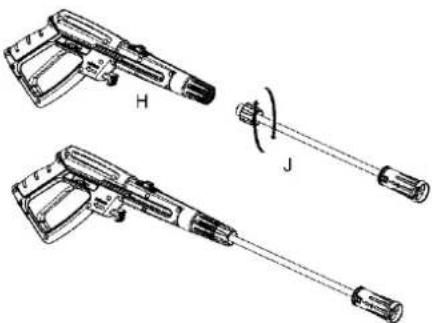
Insert the adjustable spray nozzle (J) into the gun (H). Push the adjustable nozzle (J) in and turn it clockwise onto the gun (H) until it is hand-tight and locked. If the parts are connected properly, you can't separate the two components simply by pulling out the adjustable nozzle. All accessories must be inserted into the gun (H) for proper use.
natural_image
Technical line drawings of two different handheld devices labeled H and J, showing mechanical components without any text or symbols.Step 4
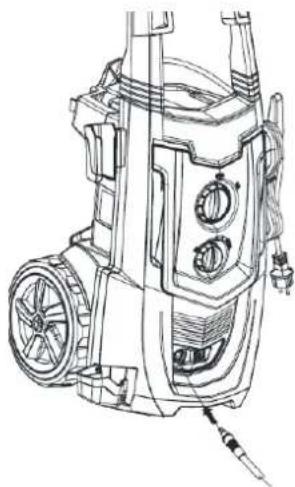
Attach the high-pressure hose (C) to the water outlet of the pressure washer. Plug it in and connect it tightly to the quick hitch to prevent leakage. If the parts are connected properly, you can't separate the two components simply by pulling them out of the water outlet. Press the "button" in the direction of the arrow, then you can pull out the high-pressure hose.
natural_image
Technical line drawing of a mechanical device with wheels and control panel (no text or symbols)Step 5
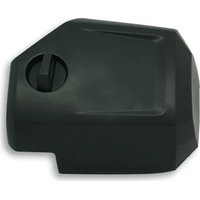
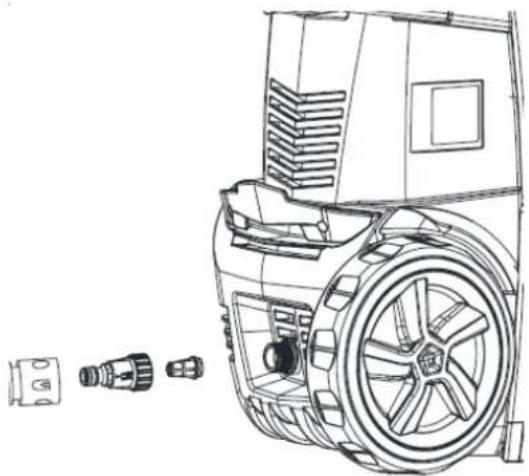
Attach the hose connection to the pressure washer. Before attaching the connector to the connector, remove the plastic cap that was placed on the connector of the pressure washer before shipping. This plastic cap can be disposed of after removal. After both components have been installed, attach the garden hose to the pressure washer with the screw connection. Then connect the garden hose to the tap.
natural_image
Technical line drawing of a mechanical device with three small components (no text or symbols)22. Service
ATTENTION: THIS DEVICE IS ONLY INTENDED FOR USE WITH COLD WATER! DO NOT USE HOT WATER IN THIS PRESSURE WASHER!
Commissioning
After connecting the pressure washer to your cold water supply, proceed as follows:
- Make sure the ON/OFF switch is in the OFF position.
- Connect the garden hose to the inlet port.
- Attach the hose to the gun according to step 1 of the installation instructions.
- Insert the adjustable spray nozzle into the gun according to step 3 of the installation instructions.
- Connect the high-pressure hose to the high-pressure outlet according to step 4 of the assembly instructions.
- Connect the garden hose to the inlet connection of the pressure washer according to step 5 of the installation instructions.
- Open the valve of the water supply completely.
Before turning on the device, press the trigger of the gun to bleed the remaining air from the pump and hose. - Start the pressure washer by setting the ON/OFF switch to the ON position and pulling the trigger. Note: The motor does not run continuously, but only when the trigger is pressed.
WARNING! The device starts spraying as soon as the trigger is pressed. When the device is switched off after use, there is still high pressure in the hose and in the device. Point the gun in a safe direction and relieve the excess pressure. NEVER direct the high-pressure water jet at people or animals.
Automatic on/off
The pressure washer is equipped with an automatic on/off switch. The pressure washer only runs when the power switch is in the ON position and the trigger on the gun is pressed. When you release the trigger to stop spraying, the motor of the pressure washer will automatically shut off. Simply press the trigger again to continue cleaning. To stop using the pressure washer, release the trigger and switch the machine to the OFF position. The device should be turned off completely when not in use or left unattended.
Bleeding the gun
It is very important to bleed the gun before using the pressure washer. Follow the "assembly instructions" to assemble the pressure washer. To bleed the gun, simply connect the garden hose to the pressure washer and press the trigger before turning on the power. This makes it possible to remove the air trapped in the gun and pressure washer before use. Press and hold the trigger for about a minute to release excess air from the unit. During this process, water flows through the gun at low pressure. For more tips on venting, see the "Instruction Manual" section.
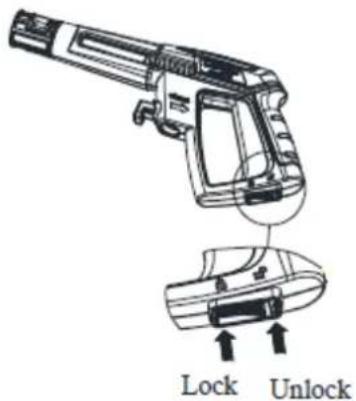
Safety Lock of the Pistol
This pressure washer is equipped with a safety lock for the gun trigger. When the pressure washer is not in use, use the safety lock to prevent accidental triggering of the high-pressure jet.
Adjustable spray nozzle
The adjustable nozzle allows you to use different spray patterns, from a wide fan jet (Diagram 1) to a direct jet (Diagram 2). When using the pressure washer to clean wooden decks, facades, vehicles, etc., always start with the fan jet and keep a distance of at least 90 cm to avoid damage to the surface of the material to be cleaned. Always start spraying in a test area that is free of people and objects.
Warning: High-pressure jets can be dangerous if used improperly. The beam must not be directed at people, electrical equipment or the device itself.
Do not direct the jet at yourself or others to clean clothes or shoes.
natural_image
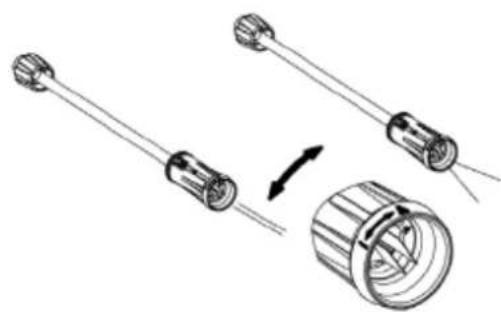
Diagram showing two mechanical components with arrows indicating motion, one being inserted into a cylindrical housing (no text or symbols present)Water hose reel
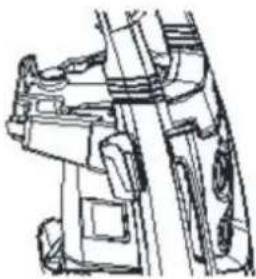
You can wrap the water hose around this water hose reel and fix it firmly with a special clip provided by the manufacturer when the pressure washer is not in use for a long time.
natural_image
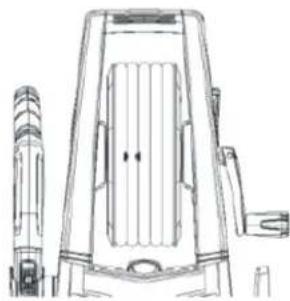
Technical line drawing of a vehicle door frame with side-mounted sensors (no text or symbols)Cleaning Pen Instructions
If the nozzle is clogged, this can cause the pump to build up pressure and the device to work unevenly. You can clean the nozzle by inserting a needle into the tip to remove debris.
For the adjustable nozzle, you can regularly lubricate the nozzle collar (from high pressure to low pressure) with waterproof grease to maintain function.
natural_image
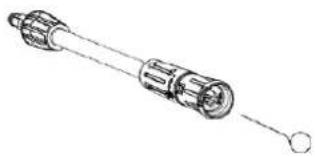
Technical line drawing of a mechanical component with cylindrical and linear features (no text or symbols)Use of detergents
The pressure washer only dispenses detergent at low pressure. Use the adjustable spray nozzle to rinse clean after applying the detergent.
Biodegradable cleaning products are specially formulated to protect the environment and your pressure washer. These cleaners do not clog the filter and protect the internal parts of the pressure washer for a longer life.
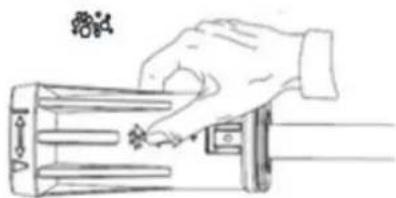
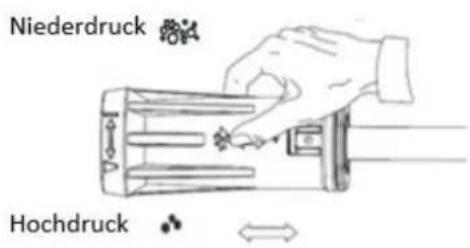
The integrated detergent dispenser allows you to apply various liquid detergents to the work surface. The detergent is only used at low pressure. Place the adjustable nozzle on the gun and slide it to the end of the "low pressure" setting to allow the pressure washer to operate in low pressure mode (see Figure A). Remove the lid of the detergent container and fill in only liquid detergent (see Figure B). Do not add water to the container. The pressure washer automatically mixes water and detergent.
If you need to adjust the dosage of the detergent, you can turn the knob to the left to lower the dosage and to the right to increase it, depending on your specific cleaning needs (see Figure C).
Once the detergent has been applied to the work surface, pull the nozzle to the end of the "High Pressure" setting and rinse the detergent off with the High Pressure jet (see Figure A). In high-pressure mode, the pressure washer does not dispense any detergent.
Figure A
Figure B
Figure C
Low
natural_image
Hand placing a small object into a device (no text or symbols visible)High pressure
natural_image
Technical line drawing of a mechanical assembly (no text or symbols)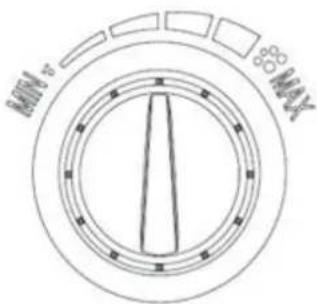
WARNING: NEVER use products that contain bleach, chlorine, or other corrosives, including solvent-based liquids (e.g., gasoline, oils, etc.), tri-sodium phosphate products, ammonia, or acid-based detergents. These chemicals damage the device and can damage the surface to be cleaned. Always read the label.
23. Maintenance and storage
Switching off the pressure washer
Once you have finished using the pressure washer, follow the steps below to turn off the device:
- Switch the pressure washer to the "OFF" position and unplug it from the power outlet.
- Turn off the water supply.
Before disconnecting the high-pressure water hose, point at the high-pressure gun in a safe direction and discharge the high-pressure water. - Disconnect the high-pressure water hose from the high-pressure cleaner and the high-pressure gun.
- Disconnect the garden hose from the pressure washer.
- Remove the quick coupling connector from the garden hose and attach it to the connection point of the connector installed on the pressure washer for storage.
- Remove excess water from the pump by tilting the unit on both sides to drain any remaining water from the inlet and outlet ports.
- Remove the water filter at the inlet and rinse with water to remove any dirt or debris. Replace the filter after cleaning.
- Drain the detergent tank and rinse with running water.
- Wipe off any remaining water from all parts and connections.
- Secure the safety lock on the high-pressure gun.
- Store the pressure washer, parts and accessories in a place where the temperature is above 0°C.
Winter storage and long-term storage
Follow all of the shutdown procedures above and add the following steps:
After disconnecting the water supply and before disconnecting the high-pressure water hose, turn on the pressure washer for 2-3 seconds until the remaining water in the pump drains out. Turn off the device IMMEDIATELY. Continued use of the pressure washer without a connected water supply will cause serious damage to the device!
Always store pressure washer, parts and accessories in a place where the temperature is above 0^ C.
Maintenance
WARNING: Failure to follow these storage instructions will result in damage to the assembly.
This pressure washer is equipped with a closed lubrication system, so no oil change is required. Check all hoses and accessories for damage before use.
Check the inlet filter regularly for deposits. Clean this filter regularly for optimal performance.
24. Cleaning tips
WARNING: ALWAYS TEST THE SPRAY JET IN AN AREA THAT IS FREE OF PEOPLE AND OBJECTS BEFORE SPRAYING ON THE DESIRED CLEANING SURFACE.
Wooden and vinyl terraces
Rinse the patio and surrounding area with fresh water. If you are using detergent, fill the detergent tank and apply the detergent to the area to be cleaned at low pressure. For best results, divide the work area into smaller sections and clean each section one at a time. Leave the detergent on the surface for a few minutes and then rinse off at high pressure. DO NOT ALLOW THE DETERGENT TO DRY. Always clean from left to right and top to bottom for best results. Rinse with the fan spray at high pressure, keeping the tip of the spray nozzle at least 15-23 cm away from the cleaning surface. Keep a greater distance from the
cleaning surface if you are using a direct jet. Attention: For softer woods, increase the distance to the cleaning surface.
Terraces, stone and brick
Rinse the area to be cleaned and the surrounding area with fresh water. If you are using detergent, fill the detergent tank and apply the detergent at low pressure. Rinse at high pressure with the fan spray in a swiveling motion, keeping the tip of the spray nozzle at least 7-15 cm away from the cleaning surface. Keep a greater distance from the cleaning surface if you are using a direct jet.
Cars, bicycles, motorcycles
Rinse the area to be cleaned and the surrounding area with fresh water. If you are using detergent, fill the detergent tank and apply the detergent to the area to be cleaned at low pressure. For best results, clean one side at a time. Allow the detergent to sit on the surface for a few minutes, but do not let it dry. Rinse at high pressure with the fan spray in a swiveling motion, holding the tip of the spray nozzle at least 20 cm away from the cleaning surface. Keep a greater distance from the cleaning surface if you are using a direct jet. Wipe the surface dry for a glossy finish.
Grills, electrical appliances and garden tools
Rinse the area to be cleaned and the surrounding area with fresh water. If you are using detergent, fill the detergent tank and apply the detergent at low pressure. Allow the detergent to sit on the surface for a few minutes, but do not let it dry. Rinse with the fan spray at high pressure, keeping the tip of the spray nozzle at least 2.5-7.5 cm away from the cleaning surface. Keep a greater distance from the cleaning surface if you are using a direct jet.
25. Troubelshooting
The pressure washer does not start when the switch is set to "I."
| Possible cause: | Solution: |
| Electrical sockets are defectiveVoltage is insufficientPower cord is not plugged in | Check plugs, sockets and fusesMake sure the voltage is enoughPlug in the power cord |
The pump does not reach the necessary pressure or the pressure fluctuates
| Possible cause: | Solution: |
| Water inlet filter is cloggedPump draws airSuction valves are clogged or wornDiameter of the garden hose is too smallWater supply is limitedWater supply is inadequate | Remove and clean the filterTighten the connectors and bleed the systemClean or replace the valvesUse a 3/4-inch diameter garden hose.Check the hose for kinks or leaksOpen the water source completely |
The pressure washer does not hold the pressure or loses pressure
| Possible cause: | Solution: |
| Excessive air in the water pipe or pump | Turn off the unit and water supply, bleed the system, and hold the trigger |
The pressure washer is louder than normal
| Possible cause: | Solution: |
| The supply is blockedValves are worn, dirty or cloggedFilter is dirty | Check the feed valvesClean or replace the valvesClean or replace the filter |
The engine stops running during operation
| Possible cause: | Solution: |
| Mains voltage is lower than recommended | Check if the voltage is sufficient |
26. Specifications
| Model | FX-HDRP2200 |
| Rated power | 2200 Watt |
| Rated voltage | 220 ~ 240 V / 50/60 Hz |
| Engine | Carbon brush motor |
| Rated pressure | 120bar |
| Max. permissible pressure | 170bar |
| Rated flow | 6,5L/min |
| Flow maximum | 7,5L/min |
| Inlet pressure (max.) | 1,2 MPa |
| Inlet temperature (max.) | 50°C |
| Sound pressure level (K=3dB(A)): LpA | 75 dB |
| Sound power level measured: LwA | 89 dB |
| Sound Power Level Guaranteed: LwA | 96 dB |
| Hand-arm vibration value (K=1.5 m/s ^2 ) | ≤2,5m/s ^2 |
| Weight | 11,4 kg |
27. Warranty
We adhere to the legal warranty provisions for all our products. The warranty covers a period of two years from the date of purchase and secures your rights in the event of defects in materials or workmanship.
28. Disposal
This appliance must not be disposed of with household waste. Electrical and electronic equipment must be collected separately and disposed of in an environmentally friendly manner in accordance with the provisions of the Electrical and Electronic Equipment Act and the EU Directive 2012/19/EU (WEEE Directive). Please dispose of the device at an approved collection
point for old devices. Proper disposal helps to protect the environment and avoid negative effects on human health. For more information on returning and disposing of old equipment, please contact your local waste disposal point or the retailer where you purchased the product. In countries outside the European Union, different regulations may apply to the disposal of waste electrical and electronic
Manual_FX-HDR2200_Int24_rev01
equipment.
The packaging material is made from recycled materials. Dispose of the packaging material in accordance with the applicable regulations.
29. Customer service
If you have any questions about warranty, repair or spare parts, please contact:
FUXTEC GmbH
Kappstraße 69
71083 Herrenberg
Deutschland
Telefon: +49 70329560888
E-Mail: info@fuxtec.com
VERSION FRANCAISE
natural_image
Technical line drawing of a water heater with mounting brackets and control panel (no text or symbols)Étape 3
natural_image
Technical line drawings of three different firearm components (no text or symbols)Étape 4
natural_image
Technical line drawing of a mechanical device with wheels and control panel (no text or symbols)Étape 5
natural_image
Technical line drawing of a mechanical device with three connectors and a small component (no text or symbols)36. Utilisation
ATTENTION : CET APPAREIL EST UNIQUEMENT DESTINÉ À ÊTRE UTILISÉ AVEC DE L'EAU FROIDE ! N'UTILISEZ PAS D'EAU CHAUDE DANS CE NETTOYEUR HAUTE PRESSION !
Mise en service
natural_image
Diagram showing two mechanical components with arrows indicating motion, no text or symbols presentDévidoir de tuyau
natural_image
Technical line drawing of a vehicle rear view showing front, side, and side views (no text or symbols)natural_image
Line drawing of a mechanical component with cylindrical ends and a connecting rod (no text or symbols)Figure A Illustration Figure C
natural_image
Technical line drawing of a mechanical assembly (no text or symbols)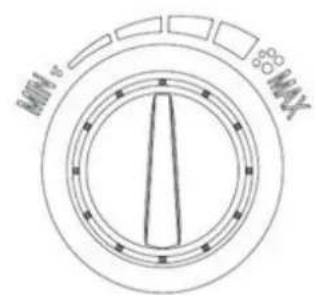
natural_image
Line drawing of a laboratory gas collection apparatus with no text or symbols
natural_image
Technical line drawing of a water heater with mounting brackets and control buttons (no text or symbols)Passo 3
natural_image
Technical line drawings of three different firearm components (no text or symbols)Passo 4
natural_image
Technical line drawing of a mechanical device with wheels and control panel (no text or symbols)Passo 5
natural_image
Technical line drawing of a mechanical device with three connectors and a small component (no text or symbols)51. Operazione
Ugello regolabile
natural_image
Diagram showing two mechanical components with arrows indicating assembly or transformation (no text or symbols)Avvolgitubo
natural_image
Technical line drawing of a mechanical component with no visible text or symbolsnatural_image
Technical line drawing of a mechanical component with cylindrical and linear features (no text or symbols)Uso di detergenti
natural_image
Technical line drawing of a water heater component with mounting brackets and adjustment arrows (no text or symbols)Paso 3
natural_image
Technical line drawings of three different firearm components (no text or symbols)Paso 4
natural_image
Technical line drawing of a mechanical device with wheels and internal components (no text or symbols)Paso 5
natural_image
Technical line drawing of a mechanical device with three connectors and a small component (no text or symbols)66. Operación
natural_image
Diagram showing two mechanical components with arrows indicating motion, no text or symbols presentEnrollador de manguera
natural_image
Technical line drawing of a mechanical component with no visible text or symbolsnatural_image
Technical line drawing of a mechanical component with cylindrical and linear features (no text or symbols)natural_image
Technical line drawing of a water heater with mounting brackets and control buttons (no text or symbols)Passo 3
natural_image
Technical line drawings of three different firearm components (no text or symbols)Passo 4
natural_image
Technical line drawing of a mechanical device with wheels and internal components (no text or symbols)Passo 5
natural_image
Technical line drawing of a mechanical device with three connectors and a small component (no text or symbols)81. Funcionamento
ATENÇÃO: ESTE APARELHO DESTINA-SE A SER UTILIZADO APENAS COM ÁGUA FRIA! NÃO UTILIZAR ÁGUA QUENTE NESTA MÁQUINA DE LAVAR A PRESSÃO!
natural_image
Diagram showing two mechanical components with arrows indicating motion, no text or symbols presentEnrolador de mangueira
natural_image
Technical line drawing of a mechanical component with no visible text or symbolsnatural_image
Technical line drawing of a mechanical component with cylindrical and linear features (no text or symbols)natural_image
Technical line drawing of a water heater with mounting brackets and control buttons (no text or symbols)Stap 3
natural_image
Technical line drawings of three different firearm components (no text or symbols)Stap 4
natural_image
Technical line drawing of a mechanical device with wheels and internal components (no text or symbols)Stap 5
natural_image
Technical line drawing of a mechanical device with three connectors and a small component (no text or symbols)96. Operatie
LET OP: DIT APPARAAT IS ALLEEN BEDOELD VOOR GEBRUIK MET KOUD WATER! GEBRUIK GEEN HEET WATER IN DEZE HOGEDRUKREINIGER!
Inbedrijfstelling
natural_image
Diagram showing two mechanical components with arrows indicating motion, no text or symbols presentSlanghaspel
natural_image
Technical line drawing of a mechanical component with no visible text or symbolsnatural_image
Technical line drawing of a mechanical component with cylindrical and linear features (no text or symbols)natural_image
Technical line drawing of a mechanical assembly (no text or symbols)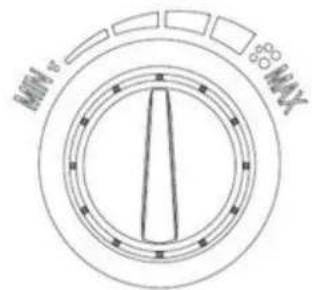
natural_image
Technical line drawing of a water heater with mounting brackets and control buttons (no text or symbols)Steg 3
natural_image
Technical line drawings of three different firearm components (no text or symbols)Steg 4
natural_image
Technical line drawing of a mechanical device with wheels and internal components (no text or symbols)Steg 5
natural_image
Technical line drawing of a mechanical device with three connectors and a small component (no text or symbols)111. Drift
⚠️ WARNING: DENNA APPARAT ÄR ENDAST AVSEDD ATT ANVÄNDAS MED KALLT VATTEN! ANVÄND INTE VARMVATTEN I DENNA HÖGTRYCKSTVÄTT!
Driftsättning
natural_image
Diagram showing two cylindrical components with a separate cylindrical component being inserted, illustrating mechanical assembly (no text or symbols)Slangvinda
natural_image
Technical line drawing of a vehicle rear view showing front, side, and side views (no text or symbols)natural_image
Line drawing of a mechanical component with cylindrical and linear features, no text or symbols presentE-postadress: info@fuxtec.com
POLSKA WERSJA JEZYKOWA
natural_image
Technical line drawing of a water heater with mounting bracket and control panel (no text or symbols)Krok 3
natural_image
Technical line drawings of three different firearm components (no text or symbols)Krok 4
natural_image
Technical line drawing of a mechanical device with wheels and internal components (no text or symbols)Krok 5
natural_image
Technical line drawing of a mechanical device with three connectors and a small component (no text or symbols)126. Działanie
⚠ UWAGA: TO URZĄDZENIE JEST PRZEZNACZONE DO UŻYTKU WYŁĄCZNIE Z ZIMNĄ WODĄ! NIE UŻYWAĆ GORĄCEJ WODY W TEJ MYJCE CIŚNIENIOWEJ!
Uruchomienie
natural_image
Technical illustration of a mechanical component with two shafts and a cylindrical housing, showing assembly or assembly motion (no text or symbols)Bęben na wąż
natural_image
Technical line drawing of a vehicle rear view showing front, side, and side views (no text or symbols)natural_image
Technical line drawing of a mechanical component with cylindrical and linear features (no text or symbols)www.fuxtec.com | info@fuxtec.com
www.FUXTEC.com