
PerfectSurface 2120 Rotate - Sander CECOTEC - Free user manual and instructions
Find the device manual for free PerfectSurface 2120 Rotate CECOTEC in PDF.

| Product type | Cordless orbital sander |
| Brand | Cecotec |
| Model | PerfectSurface 2120 Rotate (ref. 00178) |
| Power supply | Rechargeable Li-ion battery with mains charger 100-240 V~, 50/60 Hz |
| No-load speed (rotation) | 13 000 min⁻¹ |
| Oscillation speed | 26 000 min⁻¹ |
| Weight (without accessories) | 1.1 kg |
| Protection class | II (double insulation) |
| Protection rating | IPX0 |
| Sound pressure level (LpA) | 76 dB(A) (KpA=3 dB) |
| Sound power level (LWA) | 87 dB(A) (KWA=3 dB) |
| Vibrations (ah) | 9 m/s² (K=1.5 m/s²) |
| Pad type | Sanding pad with hook and loop (Velcro) |
| Dust container | Integrated, removable and emptiable |
| Included accessories | Battery, charger, 12 spare abrasive papers, vacuum cleaner adapter, instruction manual |
| Main functions | Orbital sanding, integrated dust extraction or via external vacuum, quick change of abrasive paper |
| Maintenance and cleaning | Clean with a dry cloth, empty the dust container regularly, do not immerse in water |
| Safety | Double insulation, automatic shut-off in case of overload, use PPE (goggles, mask, gloves, hearing protection) |
| Spare parts and repairability | Battery, charger, abrasive papers, dust container, sanding pad. Repairs by Cecotec after-sales service only |
| Warranty | Compliant with current regulations, contact Cecotec after-sales service at +34 963 21 07 28 |
Frequently Asked Questions - PerfectSurface 2120 Rotate CECOTEC
User questions about PerfectSurface 2120 Rotate CECOTEC
0 question about this device. Answer the ones you know or ask your own.
Ask a new question about this device
Download the instructions for your Sander in PDF format for free! Find your manual PerfectSurface 2120 Rotate - CECOTEC and take your electronic device back in hand. On this page are published all the documents necessary for the use of your device. PerfectSurface 2120 Rotate by CECOTEC.
USER MANUAL PerfectSurface 2120 Rotate CECOTEC
natural_image
Exterior view of a modern electric vacuum cleaner (no visible text or symbols)Safety instructions 17
-
Parts and components 151
-
Before use 151
-
Assembly 152
-
Operation 155
-
Cleaning and maintenance 156
-
Troubleshooting 157
-
Technical specifications 158
-
Disposal of old electrical and electronic appliances 159
-
Technical support and warranty 159
-
Copyright 159
-
Declaration of conformity 159
SOMMAIRE
Read these instructions thoroughly before using the appliance. Keep this instruction manual for future reference or new users.
- WARNING: read all safety warnings, instructions, figures and specifications supplied with this power tool. Failure to follow all instructions listed below may result in electric shock, fire and/or serious injury.
- WARNING: read all safety warnings and instructions marked with the symbol.
- Keep all safety warnings and instructions for future reference.
1) Work area safety
a) Keep the work area clean and well illuminated.
b) Do not operate power tools in explosive environments, such as in the presence of flammable liquids, gases or dust. Power tools create sparks that can light dust or fumes.
c) Keep children and bystanders away while operating a power tool. Distractions can make you lose control of the tool.
2) Electric safety
a) The power tools plugs must match the socket. Never modify the plug. Do not use adapter plugs with earthed power tools. The unmodified plugs and the suitable sockets reduce the risk of electric shock.
b) Avoid body contact with earthed surfaces, like pipes, radiators, stoves and refrigerators. There is a higher risk of electric shock if your body is in touch with the ground.
c) Do not expose power tools to rain or wet conditions. The water inlet in a power tool increases the risk of electric shock.
3) Personal safety
a) Stay alert and use common sense when using a power tool. Do not use power tools if you are tired or under the influence of drugs, alcohol or medication. A lack of attention while operating power tools can result in serious personal injury.
b) Use personal protective equipment. Always wear eye protection. Protective gear, like dust mask, non-slip safety footwear, helmet or hearing protection, used under the appropriate conditions, will reduce the risk of injuries.
c) Avoid unintentional start-up. Make sure the switch is in Off position before connecting the tool to a power source and/or battery, or before picking it up or transporting it. Carrying power tools with your finger on the switch or plugging in power tools with the switch in the On position will result in injuries.
d) Remove any spanners or wrenches before switching on the power tool. Leaving a spanner or wrench in a rotary piece of the tool may cause injuries.
e) Do not exert too much force when using the tool. Keep your feet firmly on the ground and maintain your balance at all times. This will provide better control of the electric tool in unexpected situations.
f) Wear appropriate clothes. Do not wear loose clothing or jewellery. Keep hair and clothing away from moving parts. Loose clothing, jewellery or long hair can get caught in moving parts.
g) If adapters are provided for the connection of dust extraction and collection, ensure that they are connected and used correctly. Dust vacuuming can reduce dust-related risks.
h) The confidence gained from frequent use of tools should not be a reason for ignoring general security principles. A careless action can cause serious injury in a fraction of a second.
4) Use and care of electric tools
a) Do not force the power tool. Use the appropriate power tool for the project. The proper electric tool will make your work better and safer using the speed for which it was designed.
b) Do not use the power tool if the switch does not switch it on and off. Any electric tool that cannot be controlled with a switch is dangerous and must be repaired.
c) Disconnect the plug from the power source and/or remove the battery pack, if detachable, from the power tool before making any adjustments, changing accessories or storing it. These preventive safety measures reduce the risk of the power tool starting up accidentally.
d) Store idle electric tools out of the reach of children and do not allow people unfamiliar with the power tool or these instructions to operate the power tool. Power tools are dangerous in the hands of inexperienced users.
e) Maintenance of power tools and accessories. Check if the moving parts are misaligned or stuck, if there are broken pieces or any other condition that may affect operating of the electric tool. If damaged, have the power tool repaired before use. Many accidents are caused by poorly maintained power tools.
f) Keep cutting tools sharp and clean. Cutting tools properly maintained and with sharp cutting edges are less likely to jam and are easier to handle.
g) Use the electric tool, accessories and drill bits, etc. according to these instructions, taking into account work conditions and the work to be carried out. Use of the power tool for operations other than those intended could result in a hazardous situation.
h) Keep handles and gripping surfaces dry, clean and free of oil and grease. Slippery gripping surfaces do not allow safe handling and control of the tool in unexpected situations.
5) Use and care of the batteries
a) Only recharge with the charger specified by the manufacturer. A charger suitable for one type of battery may create a fire hazard if used with another type of battery.
b) Use the power tool only with specifically designated battery packs. Use of any other type of battery may create a risk of injury and fire.
c) When the battery is not in use, keep it away from other metal objects, such as paper clips, coins, keys, nails, screws or other small metal objects, which can establish a connection from one terminal to another. A short circuit between the battery terminals can cause burns or fire.
d) Under harsh conditions, liquid may leak from the battery; avoid touching it. In case of accidental contact, rinse the affected part with water. If the liquid comes into contact with eyes, seek medical assistance immediately. Liquid leaking from the battery can cause skin irritation and burns.
e) Do not use a damaged or modified battery or tool. Damaged or modified batteries can show unpredictable behaviours leading to fire, explosion or risk of injury.
f) Do not expose a battery or tool to fire or excessive temperatures. Exposition to fire and high temperatures over 130 °C could cause an explosion.
g) Follow all charging instructions and do not charge the battery or the tool outside the temperature range specified in the instructions. Improper charging or charging at temperatures outside the specified range may damage the battery and increase the risk of fire.
6) Service
a) Have your power tool serviced by a qualified technician using only identical replacement parts. This ensures that the power tool remains safe.
b) Never repair damaged batteries. Battery maintenance must only be carried out by the manufacturer or authorised technician.
7) Charging safety
- Children aged from 8 years and above and people with reduced physical, sensory or mental capabilities or lack of experience and knowledge can use the charger if they have been given supervision or instruction concerning use of the power tool in a safe way and understand the hazards involved.
- Children must not play with the power tool or the power cable.
- Cleaning and maintenance tasks must not be carried out by unsupervised children.
- The power cable of this charger is not replaceable. Discard the charger if the power cable is damaged.
8) Use and handling of the charger
- Connect the charger only if the voltage of the socket matches the information on the rating plate.
- Connect the charger only to an easily accessible socket so that you can quickly disconnect it from the mains in the event of a malfunction.
- Always allow sufficient ventilation when charging the battery; gases may be released.
- Do not charge non-rechargeable batteries.
- Keep the charger away from humidity.
- Never use the charger in environments where explosive or flammable materials are present. There is a risk of fire and explosion.
- Do not place objects on top of the charger and do not cover it.
- Keep the charger away from heat sources.
- Regularly check the charger for damage.
- Repair damaged chargers properly before reusing them.
- The charger must not be disassembled. Repairs must only be carried out by an authorised technician.
- Do not use the charger if it has been subjected to shocks or falls.
- Always unplug the charger from the power supply after use.
- Unplug the charger from the power supply before cleaning, servicing, storing and transporting, and allow it to cool completely.
9) General precautions
- Hold the electric tool by the insulated gripping surfaces when performing an operation in which the tool may come into contact with exposed wiring. The tool must
not come into contact with live wires. This may result in electric shock.
- Keep the power tool and its accessories away from hot surfaces.
- Do not allow untrained people use the power tool and its accessories.
- People with physical or mental disabilities must not use power tools or accessories without supervision.
- Children must not play with, clean or try to repair the power tool and its accessories.
- Allow the tool to cool down completely after use before touching it.
- Always wait until all moving parts have stopped after working with the tool.
SPECIFIC SAFETY RULES
⚠ Warning! Some particles from sanding, sawing, grinding, drilling and other activities contain chemicals that cause cancer, birth defects and other reproductive problems. Some examples of these chemicals are:
- lead in lead-based paints,
- crystalline silica in bricks, cement and other masonry products,
- arsenic and chromium in chemically treated wood (CCA). The risk of being exposed to these chemicals varies according to the frequency with which this type of work is carried out. In order to reduce exposure to these chemicals, it is recommended to work in well-ventilated areas and to use approved safety equipment, such as dust masks specially designed to filter out microscopic particles.
- Avoid prolonged contact with dust from sanding, sawing, graining, drilling and similar activities. Wear protective
clothing and wash exposed areas with soap and water. Allowing dust to enter your mouth, eyes or come into contact with your skin can cause absorption of harmful chemicals.
⚠ Warning! Use of this tool may generate or disperse dust particles, which can cause permanent and serious respiratory or other injuries. Always wear appropriate respiratory protection for dust exposure. Keep particles away from the face and body.
⚠ WARNING! Wear appropriate hearing protection during use. Under certain conditions and with prolonged use, the noise generated by this appliance may promote hearing loss.
- Always wear appropriate respiratory and eye protection.
- Clean your tool periodically.
- Before using the tool on metal or metal-containing parts, be sure to remove the dust collection tank.
- Wear gloves when working with metal parts.
- SANDING OF LEAD-BASED PAINTS. Sanding of lead-based paints is NOT RECOMMENDED due to the difficulty in controlling contaminated dust. The greatest danger of lead poisoning is for children and pregnant women. Since it is difficult to identify whether or not paint contains lead without a chemical analysis, we recommend that you consider the following precautions when sanding any type of paint:
Personal safety
- Do not allow children or pregnant women in the work area when sanding paint until you have finished cleaning up.
- The use of dust masks is recommended for all people entering the work area. The filter should be replaced daily or when the user has difficulty breathing.
- Note: only masks suitable for working with dust and paint fumes should be used. Common paint masks do
not offer this protection. Visit your local tool retailer for the appropriate mask.
- DO NOT EAT, DRINK OR SMOKE in the work area to avoid ingesting contaminated paint particles. Users must wash and clean themselves BEFORE eating, drinking or smoking. Eating, drinking and smoking items should not be left in the work area where dust will settle on them.
Environmental safety
- Paint must be removed in such a way as to minimise the amount of dust generated.
- Areas where paint is being removed should be sealed with 4 mm thick plastic sheeting.
- Sanding must be done in such a way as to reduce paint run-off outside the working area.
Cleaning and waste
- All surfaces in the work area must be thoroughly vacuumed and cleaned daily for the duration of the sanding project. The contents of the dust collection tank must be emptied frequently.
- The plastic sheets must be collected and disposed of with any paint residue. They should be deposited in sealed receptacles and disposed of through normal waste collection procedures. During cleaning, children and pregnant women should be kept away from the immediate work area.
- All toys, washable furniture and utensils used by children should be washed thoroughly before reuse.
| Symbol Meaning | |
 | Warning |
 | Warning, flammable material |
 | Information |
 | For indoor use only |
 | Class II tool |
 | Wear a protective mask |
 | DC Voltage |
 | Refer to the instruction manual/brochure |
 | Wear protective gloves |
 | Wear eye protection |
 | Use hearing protection |
INSTRUCTIONS DE SÉCURITÉ
CONSIGNES GÉNÉRALES DE SÉCURITÉ POUR LES OUTILS ÉLECTRIQUES
- Power switch
- Handle
- Ventilation slots
- Dust extraction port
- Sanding pad
- Dust collection tank
- Adapter
- Battery release button
NOTE:
The graphics in this manual are schematic representations and may not exactly match the device.
2. BEFORE USE
- This appliance is packaged in a way as to protect it during transport. Take the appliance out of its box and remove all packaging materials. You can keep the original box and other packaging elements in a safe place to prevent damage to the device if you need to transport it in the future. In case the original packaging is disposed of, make sure all packaging materials are recycled accordingly.
- Make sure all parts and components are included and in good conditions. If there is any piece missing or in bad conditions, contact the official Cecotec Technical Support Service immediately.
- Do not remove the serial number of the appliance in order to keep a correct traceability of it in case of assistance.
Box content
- Sander
- Dust collection tank
- Battery
- Charger
- Includes 12 back-up sanding discs
- Vacuum cleaner adapter
- Instruction manual
ENGLISH
3. ASSEMBLY
Assembly instructions
WARNING: unplug the tool from the mains before making any adjustments or performing any maintenance or repair operations, otherwise an electric shock may be produced.
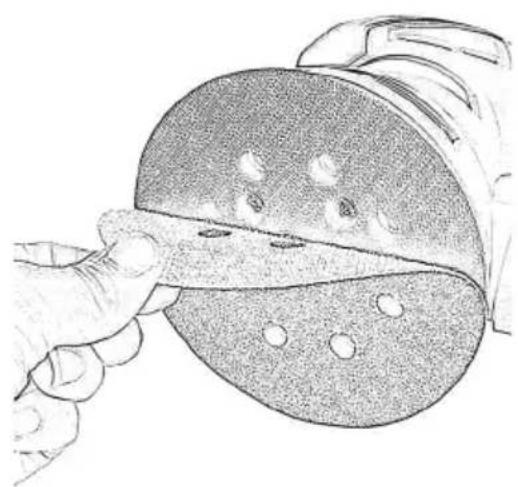
3.1 Fitting/removing sanding sheets
Fig. 2
Note:
- Clean the sanding pad before fitting the sanding sheet.
- Only use sanding sheets of the correct size. If the sheet you use is larger than the pad, it could tear and cause injury.
- The pad is fitted with Velcro so that you can quickly attach the sanding sheet.
- The sanding sheet is divided into two parts which can be replaced individually depending on wear.
- For optimum sanding results, only use sanding sheets of the correct grammage.
3.1.1 Fitting the sanding sheet
Place both parts of the sanding sheet on the pad and apply even pressure on them. Make sure that they are aligned and that the holes match the holes in the pad.
3.1.2 Removing the sanding sheet
Remove the sanding sheet from the pad.
Note:
Do not use the tool unless both sides of the sheet are in place.
3.2 Fitting/removing/emptying the dust collection tank
Fig. 3
3.2.1 Fitting the dust collection tank
- Before fitting the tank, make sure that it is tightly closed.
- Insert the tank as far as it will go into the dust extraction port.
- To fix the tank securely, turn it clockwise.
3.2.2 Removing the dust collection tank
- To release the tank, turn it counterclockwise.
- Remove the tank.
3.2.3 Emptying the dust collection tank
- Press the tab on the tank to remove the cover.
- To empty the tank, simply shake it.
- Then, replace the cover.
Note: empty the dust collection tank regularly to ensure optimum suction.
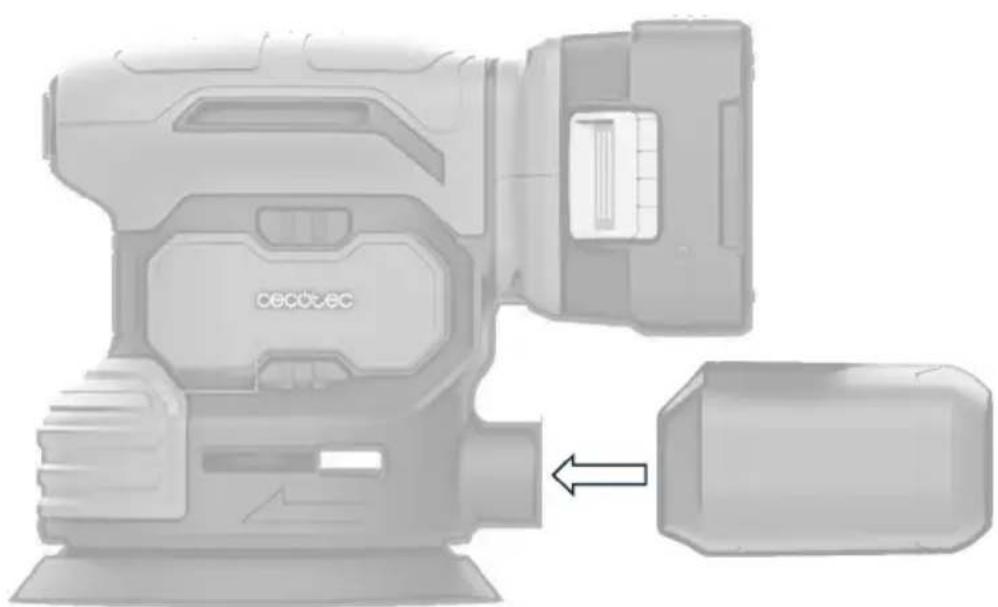
3.3 Connecting/disconnecting the external vacuum cleaner
Fig. 4
- Insert the adapter into the dust extraction port and push it in as far as it will go.
- Connect the hose of the vacuum cleaner to be used to the adapter. Make sure that the vacuum cleaner you use is suitable for vacuuming up sanding debris.
Note:
- Use a suitable vacuum cleaner. Normal household vacuum cleaners are not designed to vacuum up sanding debris.
- If required, you can connect the vacuum cleaner hose directly to the tool, without using the adapter.

WARNINGS:
- Risk of fire. Accumulated dust from sanding surface coatings (polyurethane, linseed oil, etc.) can ignite spontaneously and cause a fire. To reduce the risk, strictly follow the instructions in the sander and coating manufacturer's manual.
- Risk of fire. Do not use a vacuum cleaner when sanding wood with nails or metal surfaces, as sparks may occur. Wear safety goggles and a dust mask. Due to the risk of fire, do not use the sander to sand magnesium surfaces. Do not use the tool for sanding wet surfaces.
3.4 Charging the battery
Warning
Battery may damage due to improper charging.
-
To charge the battery correctly, you must first remove the battery and then insert the charger connector into the charging connector on the removable battery.
NOTE: make sure the connector is firmly in place to ensure a good connection. -
Once connected, plug the charger power supply into the mains socket.
-
When the charger is plugged in, an indicator light will light up in red to indicate that the battery is charging.
Once the battery is fully charged, the indicator light on the charger will be green.
ENGLISH
- Once charged, disconnect the charger from the mains socket first and then remove the charger connector from the battery.
- Insert the charged battery back into the tool. Make sure it is correctly aligned and clicks into place until you hear a click.
NOTE:
- Allow the battery to fully charge before disconnecting it from the charger.
- To extend the battery life, avoid leaving it connected to the charger for extended periods once it is fully charged and store it in a cool, dry place when not in use.
- Only use the supplied charger to recharge your tool. The use of any other charger may damage the tool or create dangerous conditions.
- Only use a charger when charging the battery.
- Never attempt to open the charger or the tool. Neither the tool nor the battery contain user serviceable parts inside. Contact the official Cecotec Technical Support Service.
- Always replace the battery with a new (or freshly charged) battery when the performance of the tool begins to decrease. Intense heat is extremely damaging to batteries; the more heat generated, the faster the battery loses power. A battery that gets too hot may have a short service life.
- Never over-discharge the battery by repeated use of the tool after the performance of the tool has decreased. Do not attempt to discharge the battery by continuously pressing the power switch. When battery performance begins to decrease, stop the tool and recharge the battery for optimum performance.
- Charge the battery at room temperature between 50^ F - 104^ F ( 10^ to 40^ C). Store the tool and battery where temperatures do not exceed 120^ F ( 49^ C). This is important to prevent serious damage to the battery cells. The battery should be recharged when the tool starts to operate slowly. When not in use, keep the battery away from other metal objects such as paper clips, coins, keys, nails, screws or other metal objects that can make a connection between one terminal and another. Short-circuiting the battery terminals may cause sparks, burns or fire.
3.4.1 Fitting or removing the battery
- Insert the battery by placing it on the guide and gently push it into the battery holder until it clicks.
- To remove the battery from the tool itself, press the battery release button and remove the battery.
NOTE:
- Always insert the battery all the way in.
- When it is fully engaged, you will hear a click.
- If the battery is not fully inserted and is loose, it could accidentally fall out and cause injury.
- Do not use force when inserting the battery. If the battery does not slide in easily, this means that it is not being inserted correctly.

WARNING: before carrying out any maintenance or repair work on the tool, make sure that the tool is switched off and the battery is removed.
4. OPERATION
- Before using the sander, read the safety instructions carefully and get familiar with all its functions.

WARNINGS:
- Switch off the sander when handling parts or accessories, adjusting settings, cleaning or when you have finished using it. This will prevent accidental starting, which could cause injury.
- Secure the workpiece correctly to prevent it from moving. We recommend that you use a tool designed for this purpose, such as a vise, for instance.
- Do not allow the sander or the workpiece to get too hot. Overheating increases the risk of fire.
- Please note that when working on it, the workpiece may become hot. Therefore, avoid touching it until it is completely cool, otherwise you may burn yourself. Do not use refrigerants or similar products.
Switching off/on the sander
Note:
- Make sure that the supply voltage matches the rated voltage indicated on the sander's marking.
- Only use sanding sheet that is in good condition.
-
Do not use the same sanding sheet to work on different materials (e.g. metal and then wood).
-
Plug the power cable into the power supply.
- To switch it on, turn the power switch to the on position "I".
- To switch it off, turn the power switch to the off position "0".
Sanding
- Once switched on, move the sanding sheet over the workpiece you wish to work on. Keep the power cable at the back of the tool and prevent it from coming into contact with the sanding sheet.
ENGLISH
- When sanding, do not exert too much pressure on the handle. Also, try to work uniformly. By following these recommendations, you will avoid damage to the tool and premature wear of the sanding sheet.
- Polish the corners and edges with the top or side of the sanding sheet.
- When you have finished sanding, remove the tool from the workpiece and switch it off.
- Clean the sanding pad before fitting the sanding sheet.
- Empty the dust collection tank and vacuum cleaner regularly to ensure optimum suction.
Selecting the right sanding sheet
| Grammage Use | ||
| P 60 P | 80 Sanding rough wood surfaces. | |
| P 120 P | 180 Sanding flat surfaces. | |
| P 240 Sanding primed and painted surfaces. | ||
Practical advice
- Always hold the tool with both hands.
- Do not exert excessive pressure on the tool. Check the condition of the sanding sheet periodically. Replace it when necessary.
- Always sand in the direction of the wood grain.
- Always switch the sander on before contacting the work surface and do not switch it off until it has been lifted off the work surface.
- Whenever possible, clamp the workpiece to a workbench or other similar firm surface.
- When sanding new coats of paint before applying another coat, use extra fine grit. On other surfaces, start with a medium grit. In both cases, gradually change to a fine grit for a smooth finish.
5. CLEANING AND MAINTENANCE

WARNINGS:
- Unplug the tool from the mains before making any adjustments or performing any maintenance or repair operations, otherwise an electric shock may be produced.
- Repair and maintenance operations not indicated in this manual must be carried out by qualified personnel. Only use original parts.
- The following cleaning and maintenance tasks must be carried out regularly.
Cleaning
Warning:
- Do not spray the appliance with water or immerse it in water, otherwise you may suffer an electric shock.
- Keep the ventilation slots, tool body and handle clean.
- Only use a cloth or brush to clean the sander.
- Do not use cleaning products or solvents. Otherwise, it could get damaged.
- Clean the sanding sheet with a vacuum cleaner or simply shake it off.
Storage
- Keep the tool in a cool, dry place and out of reach of children.
- Empty the dust collection tank before storing the tool.
6. TROUBLESHOOTING
| Problem Possible | cause Possible solution | |
| The sander does not start | It is not correctly connected to the mains. The main circuit breaker has tripped. | Check the socket, power cable, plug and circuit breaker. Repair of any of these items must be carried out by a qualified electrician. |
| The power switch does not work properly. | Contact the official Cecotec Technical Support Service. | |
| The motor is faulty. | ||
| The tool stops working | There is a loose internal contact. | Contact the official Cecotec Technical Support Service. |
| The power switch is broken. | ||
| The motor slows down and stops | The tool is not suitable for sanding the workpiece you are working on. | Reduce the pressure exerted on the sander. |
| Do not use the tool to sand that part. | ||
| The tool does not sand properly | The sanding sheet you are using is not suitable for the workpiece you are working on. | Use suitable sanding sheet. |
| The sanding sheet is worn. Replace the sanding sheet. | ||
ENGLISH
| The sandingsheet (11/13)wears tooquickly | The sanding sheet you are usingis not suitable for the workpieceyou are working on. | Use suitable sanding sheet. |
| It is exerting too much pressure. | Reduce the pressure exerted. |
7. TECHNICAL SPECIFICATIONS
| Product reference 00178 | |
| Appliance PerfectSurface 2120 Rotate | |
| Input nominal voltage (U) 100-240 V~, 50/60 Hz | |
| Idling speed (n0) 13000 min-1 | |
| Oscillation speed (n) 26000 min-1 | |
| Weight (without accessories) approx. 1.1 kg | |
| Protection II | |
| Protection category IPX0 | |
| Noise pressure level (LpA) 76 dB(A) | KpA= 3 dB |
| Noise power level (LWA) 87 dB(A) | KWA = 3 dB |
| Vibration (ah) 9 m/s2 | K= 1.5 m/s2 |
- The specified total vibration value and the specified noise emission value have been measured according to a standardised test method and can be used to compare one power tool with another.
- The specified total vibration value and the specified noise emission value can also be used for a provisional assessment of the load.
Technical specifications may change without prior notification to improve product quality.
Made in China | Designed in Spain
8. DISPOSAL OF OLD ELECTRICAL AND ELECTRONIC APPLIANCES

This symbol indicates that, according to the applicable regulations, the product and/or batteries must be disposed of separately from household waste. When this product reaches the end of its shelf life, you should dispose of the cells/batteries/accumulators and take them to a collection point designated by the local authorities.
Consumers must contact their local authorities or retailer for information concerning the correct disposal of old appliances and/or their batteries.
Compliance with the above guidelines will help protecting the environment.
9. TECHNICAL SUPPORT AND WARRANTY
Cecotec shall be liable to the end user or consumer for any lack of conformity that exists at the time of delivery of the product under the terms, conditions, and deadlines established by the applicable regulations.
It is recommended that repairs be carried out by qualified personnel.
If at any moment you detect any problem with your product or have any doubt, do not hesitate to contact the official Cecotec Technical Support Service at +34 96 321 07 28.
10. COPYRIGHT
The intellectual property rights over the texts in this manual belong to CECOTEC INNOVACIONES, S.L. All rights reserved. The contents of this publication may not, in whole or in part, be reproduced, stored in a retrieval system, transmitted, or distributed by any means (electronic, mechanical, photocopying, recording or similar) without the prior authorization of CECOTEC INNOVACIONES, S.L.
11. DECLARATION OF CONFORMITY
MANUFACTURER: CECOTEC INNOVACIONES S.L
ADDRESS: Av. Reyes Católicos, N°60, 46910, Alfafar, Valencia (Spain).
DESCRIPTION: Sander
PRODUCT IDENTIFICATION: 00178 PerfectSurface 2120 Rotate
FUNCTION: Battery-powered manual sander
MODEL: 00178
ENGLISH
It certifies the appliance described has been designed, manufactured and tested and complies with all applicable provisions.
EU DIRECTIVES IMPLEMENTED:
Directive 2006/42/CE on machinery.
Directive 2014/30/EU on the harmonisation of the laws of the Member States relating to electromagnetic compatibility.
Directive 2011/65/EU and delegated directive 2015/863 on the restriction of the use of certain hazardous substances in electrical and electronic equipment.
APPLICABLE HARMONISED NORMS:
EN 62841-1:2015 + A11:2022
EN 62841-2-4:2014
EN IEC 55014-1:2021
EN IEC 55014-2:2021
1. PIÈCES ET COMPOSANTS
Img. 1
6. PROBLEEMOPLOSSING
Fig./Img./Abb./Afb./Rys.1
natural_image
Illustration of a hand cutting a slice of bread with a knife (no text or symbols)Fig./Img./Abb./Afb./Rys.2
natural_image
Illustration of a CECU-EC video camera with an arrow pointing to a rectangular device (no text or symbols on the device itself)Fig./Img./Abb./Afb./Rys. 3

natural_image
Mechanical assembly diagram showing a cylindrical component being processed into two long cylindrical parts (no text or symbols visible)Fig./Img./Abb./Afb./Rys. 4
www.cecotec.es

- SOMMAIRE
- 1) Work area safety
- 2) Electric safety
- 3) Personal safety
- 4) Use and care of electric tools
- 5) Use and care of the batteries
- 6) Service
- 7) Charging safety
- 8) Use and handling of the charger
- 9) General precautions
- SPECIFIC SAFETY RULES
- Personal safety
- Environmental safety
- Cleaning and waste
- INSTRUCTIONS DE SÉCURITÉ
- CONSIGNES GÉNÉRALES DE SÉCURITÉ POUR LES OUTILS ÉLECTRIQUES
- NOTE:
- BEFORE USE
- Box content
- ENGLISH
- ASSEMBLY
- Assembly instructions
- Fitting/removing sanding sheets
- Fitting the sanding sheet
- Removing the sanding sheet
- Fitting/removing/emptying the dust collection tank
- Fitting the dust collection tank
- Removing the dust collection tank
- Emptying the dust collection tank
- Connecting/disconnecting the external vacuum cleaner
- Fig. 4
- WARNINGS:
- Charging the battery
- Warning
- Fitting or removing the battery
- OPERATION
- Switching off/on the sander
- Sanding
- Selecting the right sanding sheet
- Practical advice
- CLEANING AND MAINTENANCE
- Cleaning
- Warning:
- Storage
- TROUBLESHOOTING
- TECHNICAL SPECIFICATIONS
- DISPOSAL OF OLD ELECTRICAL AND ELECTRONIC APPLIANCES
- TECHNICAL SUPPORT AND WARRANTY
- COPYRIGHT
- DECLARATION OF CONFORMITY
- PIÈCES ET COMPOSANTS
- PROBLEEMOPLOSSING
Brand : CECOTEC
Model : PerfectSurface 2120 Rotate
Category : Sander