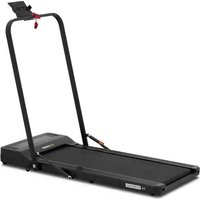
GR-MG73 - Treadmills Gymrex - Free user manual and instructions
Find the device manual for free GR-MG73 Gymrex in PDF.


User questions about GR-MG73 Gymrex
0 question about this device. Answer the ones you know or ask your own.
Ask a new question about this device
Download the instructions for your Treadmills in PDF format for free! Find your manual GR-MG73 - Gymrex and take your electronic device back in hand. On this page are published all the documents necessary for the use of your device. GR-MG73 by Gymrex.
USER MANUAL GR-MG73 Gymrex
natural_image
Diagram showing a vehicle being lifted by an angle, with no text or symbols presentnatural_image
Close-up of a black mechanical lever with orange clamping bracket (no text or symbols visible)natural_image
Technical line drawing of a mechanical assembly with no visible text or symbolsnatural_image
Close-up of a black automotive seatbelt with red tassel, no visible text or symbolstext_image
Diagram illustrating a robotic arm motion with labeled components and directional arrows indicating movement.natural_image
Illustration of a hand pressing down on a curved object with directional arrows indicating motion (no text or symbols)natural_image
Two identical mechanical component diagrams showing a roller or guide mechanism with rotational arrows (no text or symbols)| Parameter description | Parameter value |
| Product name | Walking pad |
| Model | GR-MG73 |
| Supply voltage [VAC] / Frequency [Hz] | 230/50 |
| Power rating [W] | 735 |
| Protection class | I |
| Accuracy class | C (minimum measurement accuracy) |
| Application class | H (private home use) |
| Maximum working load (kg) | 120 |
| Dimensions, folded down [mm] | 1270x570x110 |
| Dimensions, deployed [mm] | 1450x620x1000 |
| Weight [kg] | 25 |
| Maximum speed [kmh] | 8 |
| Tread belt size [mm] | 1000x400 |
| Display type | LED |
| Available work modes | 6 |
| Motor speed [rpm] | 5500 |
| IP code | IP20 |
| Motor brush service life [h] | 500 to 800 |
| Winding insulation class | E |
| Power cord length [mm] | 145 |
| Emergency key cable length [mm] | 75 |
1. General overview
This manual is intended to assist you in safe and reliable use. The product is designed and manufactured strictly according to technical specifications using the latest technology and components, and maintaining the highest quality standards.
READ THE MANUAL CAREFULLY AND UNDERSTAND IT BEFORE USE.
To ensure long and reliable operation of the product, operate and maintain it correctly and strictly in compliance with this manual. The technical data and specifications in this
manual are up-to-date. The manufacturer reserves the right to modifications for the purpose of quality improvement.
Explanation of symbols
| CE | The product meets the requirements of relevant safety standards. |
 | Read the manual before use. |
 | Recyclable product. |
 | CAUTION! or WARNING! or REMEMBER! indicates a specific instruction (general warning sign). |
 | CAUTION! Risk of electric shock! |
 | CAUTION! Rotating parts! |
 | For indoor use only. |
 | Do not walk onto a moving tread belt. |
 | Keep fingers and objects away from moving parts. |

CAUTION! The figures in this manual are illustrative only and may vary in some details from the actual appearance of the product.
The original version of the manual is in German language. Other language versions are translations from German.
2. Operating safety

CAUTION! Read all safety warnings and all instructions. Failure to follow the warnings and instructions may result in electric shock, fire and/or serious injury or death.
The term “appliance” or “product” in the warnings and instructions refers to the walking pad.
2.1. Electrical safety
a) The appliance power cord plug must fit into the mains outlet. Do not modify the plug in any way. Original power cord plugs and matching mains outlets reduce the risk of electric shock.
b) Avoid touching earthed objects, like piping, radiators, heaters, and refrigerators. There is an increased risk of electric shock if your body is earthed and touching the appliance exposed to direct rain, a wet floor or while operating in a humid environment. If water penetrates into the appliance, there is an increased risk of damage to the appliance and electric shock.
c) Do not use the power cord in any unintended way. Never use it to carry the appliance or to unplug it from the mains outlet. Keep the power cord away from sources of heat, oil, sharp edges or moving parts. Damaged or tangled cords increase the risk of electric shock.
d) If you cannot avoid using the appliance in a wet environment, use a residual current device (RCD) to connect the appliance to electrical mains. Using an RCD reduces the risk of electric shock.
e) Do not use the appliance if the power cord is damaged or shows evidence of wear. Have a damaged power cord replaced by a qualified electrician or the manufacturer's technical service.
f) To avoid electric shock, do not immerse the power cable, its plug or the appliance itself in water or other liquid. Do not use the appliance on wet surfaces.
g) CAUTION – DANGER TO LIFE! When cleaning or using the appliance, never immerse it in water or other liquids.
2.2. Workplace safety
a) Keep the workplace tidy and well lit. Disorder or poor lighting can lead to accidents. Be careful, watch what you are doing and use common sense when working with the appliance.
b) If in doubt as to whether the appliance is working, contact the manufacturer's technical service.
c) Repairs to the appliance shall only be carried out by the manufacturer's service. Do not attempt to repair the product on your own!
d) In the event of ignition or a fire, use dry powder or CO2 extinguishers only to suppress the fire of the appliance if live with electrical voltage.
e) Use the appliance in a well-ventilated room.
f) In the event of a hazard to health or life, an emergency, or a failure, stop the appliance by operating the EMERGENCY STOP DEVICE!
g) Check the condition of the safety warning stickers regularly. Replace them if they are illegible.
h) Keep this manual for future reference. If the product is to be handed over to a third party, hand it over with this user manual.
i) Keep packaging components and small installation parts out of the reach of children.
j) Keep the appliance away from children and animals. Keep children away from this product if unattended by an adult. Children less than 8 years old may not use this appliance.
k) When operating this appliance together with other appliances, follow each of their user manuals.
2.3. Personal safety
a) Do not operate the product if you are tired, ill or under the influence of alcohol, drugs or medication which might significantly impair your ability to operate the product.
b) The product may only be operated by persons who are physically fit, capable of handling the product and who have been adequately trained, who have read these instructions and have received training in health and safety.
c) The product is not intended to be used by individuals (including children) with reduced mental, sensory or intellectual capacity or lack of experience and/or knowledge, unless they are supervised by an individual responsible for their safety or have been given instructions by the responsible individual on how to operate the machine.
d) Be careful and use common sense when operating the product. Even a brief moment of distraction during operation may lead to serious injury.
e) To prevent accidental operation, make sure the product is turned off before connecting it to mains power.
f) Do not overestimate your capabilities. Maintain proper body balance at all times during operation. This allows for better control of the product in unexpected situations.
g) Do not wear loose clothes or it can caught by moving parts.
h) Remove all adjusting tools or wrenches before turning the appliance on. A tool or key left in a rotating part of the product may cause injury.
i) The appliance is not a toy. Children must be supervised to ensure that they do not play with it.
2.4. Safe use of the product
a) Do not use the appliance if the power switch does not function properly (does not switch on or off). Appliances which cannot be controlled with their power switches are dangerous, shall not be operated and must be repaired.
b) Unplug the appliance from the mains before adjustment, cleaning or maintenance. This safety precaution reduces the risk of accidental operation.
c) Keep unused appliances out of the reach of children and anyone unfamiliar with the appliance or this manual. Appliances are dangerous in the hands of inexperienced users.
d) Keep the product in good working order. Before each use, check for generally evident damage and damage to any of the moving parts (inspect for cracks in parts and components or any other condition that may affect the safe operation of the product). If damaged, have the product repaired before use.
e) Keep the product out of the reach of children.
f) The product shall be repaired and maintained by qualified personnel using original spare parts only. This will ensure safe operation of the product.
g) To ensure the designed operational integrity of the product, do not remove the factory-installed covers or loosen any bolts.
h) When transporting and handling the machine from storage to the place of use, follow the health and safety regulations for manual handling that apply in the country of operation of the machine.
i) Avoid stopping the appliance with heavy loads. This can cause overheating of the drive elements and result in damage to the appliance.
j) Do not touch moving parts or accessories unless the appliance has been disconnected from the power supply.
k) Do not move, handle or turn the appliance in operation.
I) Do not leave the appliance unattended when powered on.
m) Clean the appliance regularly to prevent permanent deposits of dirt.
n) The appliance is not a toy. Cleaning and maintenance shall not be performed by children without adult supervision.
o) Never attempt to tamper with the product to change its parameters or structure.
p) Keep the appliance away from sources of fire and heat.
q) Do not overload the product.
r) Exceeding the maximum user weight limit may cause damage to the product.
s) Before exercising with this product, consult a physician for any contraindications.
t) Always do a warm-up before using this product and make sure that the walking pad is not damaged in any way affecting safe operation; inspect for all wear of the walking components. If any component requires replacement, do not operate the product until all defective components are replaced.
u) If any disturbing symptoms are experienced during exercise, like chest pain, dizziness, shortness of breath, etc., immediately stop your workout and consult a physician.
v) Place the appliance on a sound, dry, and flat surface. Keep at least 0.6 m of clearance around the product.
w) Do not use the appliance within one hour before or after any meal, or adverse effects could be experienced.
x) Only one individual may use this product at the same time.
y) Pregnant mothers are discouraged from using this product.
z) Do not step off or on the walking pad with its tread belt in motion.
aa) Do not place or keep any objects on the tread belt.
bb) Do not place this product on thick carpets. Otherwise correct circulation of air below the product will be obstructed.
cc) Do not attempt to use this product without consulting a physician in prior if you:
• have any medical contraindications or feel unwell;
• have a serious disorder;
• have any of the following disorders: arterial hypertension, cardiac disorders, cerebral atherosclerosis, or cerebral phlebothrombosis;
- suffer from osteoporosis;
• have a heart pacemaker or any other medical device implanted.
dd) Do not attempt to start this product if it has not been properly deployed.
ee) Do not attempt to exercise with this product without the emergency key.
ff) Do not strain yourself beyond your limits while exercising. Excessive physical effort may result in an accident while operating this appliance and cause a harm to health.
gg) Do not step at the very front or rear end of the tread belt before or during the exercise.
hh) Do not rest your full body weight against the handrail.

CAUTION!
Although the appliance has been designed to be safe and has been provided with adequate safeguards, and despite the use of additional safety measures, there is still a low, residual risk of accident or injury during its
operation. Caution and common sense are advised when using the product.
3. Rules of use
This product is intended for physical exercise/training of lower body muscles by simulated walking or running.
The product is intended for private home use only!
The product is not intended for any medical or therapeutic treatment or application.
The user is responsible for any damage caused by non-intended use.
3.1. Appliance overview
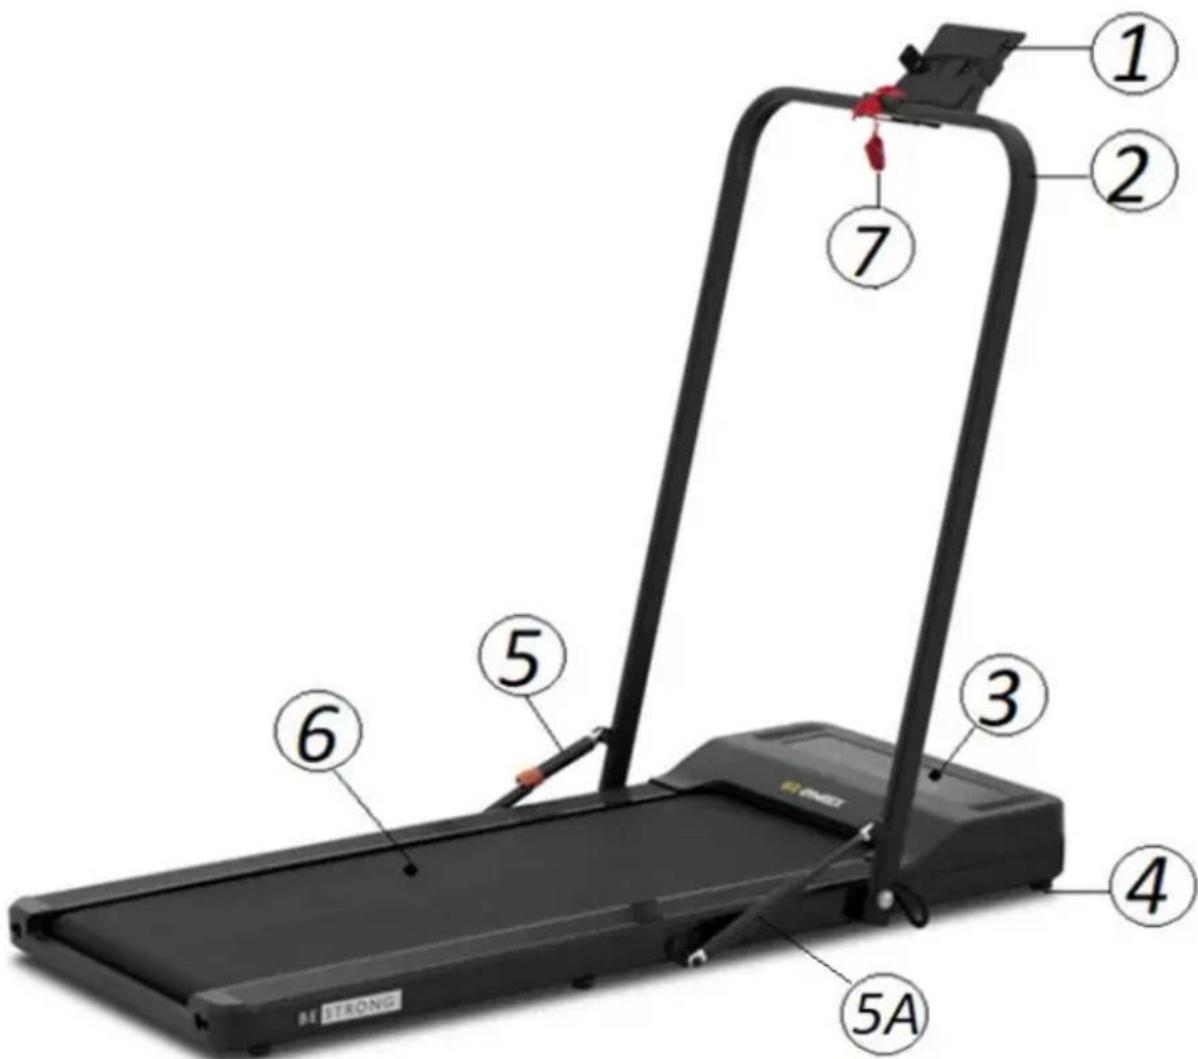
text_image
1 2 7 3 4 5A 5 6 STRONG-
Storage cradle (e.g. for a tablet)
-
Handrail
- Display
- Foot
- Folding jack
5A. Extension jack - Tread belt
- Emergency key
3.1.1. DISPLAY
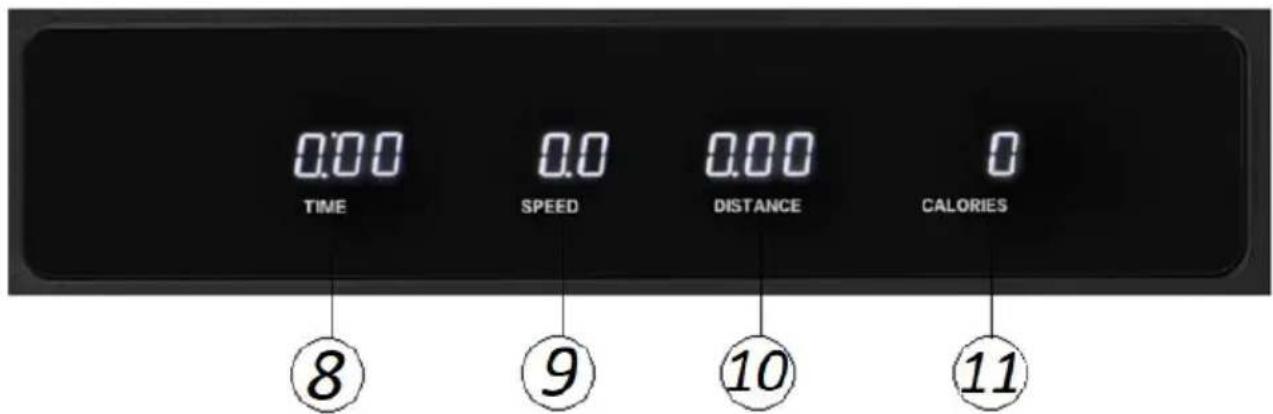
text_image
0:00 TIME 0.0 SPEED 0.00 DISTANCE 0 CALORIES ⑧ ⑨ ⑩ ⑪- Time display
- Speed display
- Distance display
- Burnt calorie display
3.1.2. Remote control wristband
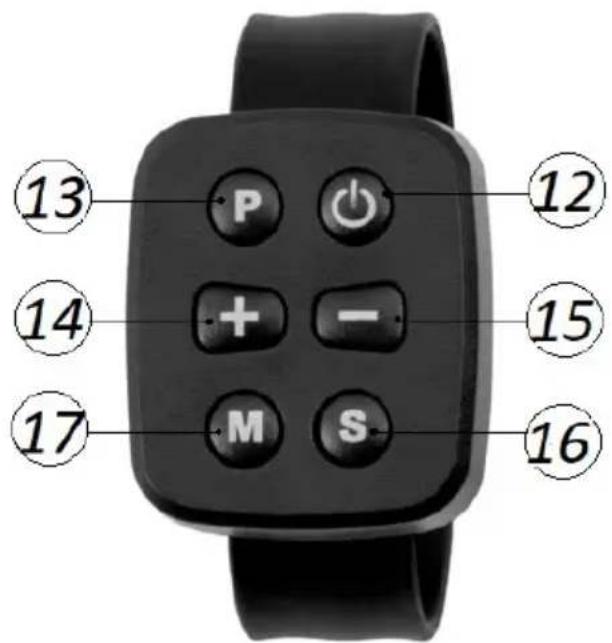
text_image
13 P 12 14 + - 15 17 M S 16-
Tread belt start/stop button
-
P - speed program selector (1 to 6)
- Increase the value
- Reduce the value
- S - slow stop
-
M – cycles between these settings:
-
Time [8] – time setting (minutes : seconds)
- Speed [9] – speed setting (kmh)
- Distance [10] – distance setting (km)
- Calories [11] – calorie to burn setting
3.2. Preparations for operation
POSITIONING THE APPLIANCE
The maximum ambient temperature and relative humidity limits not to be exceeded are +40°C and 85% RH, respectively. Position the appliance where good air circulation is ensured. Keep the appliance away from any hot surfaces. Always operate the appliance on a level, firm, clean, fireproof, and dry surface and out of the reach of children and individuals with reduced mental, sensory and intellectual capacities. Position the appliance where the mains plug can be reached at any time. Make sure that the mains power ratings match the data on the rating plate!
Keep at least 0.6 m of clearance over and around the appliance, except for the appliance rear plane which requires 2 m of clearance during operation.
3.3. Operating the appliance
- Lift the handrail [2] up to deploy the appliance.
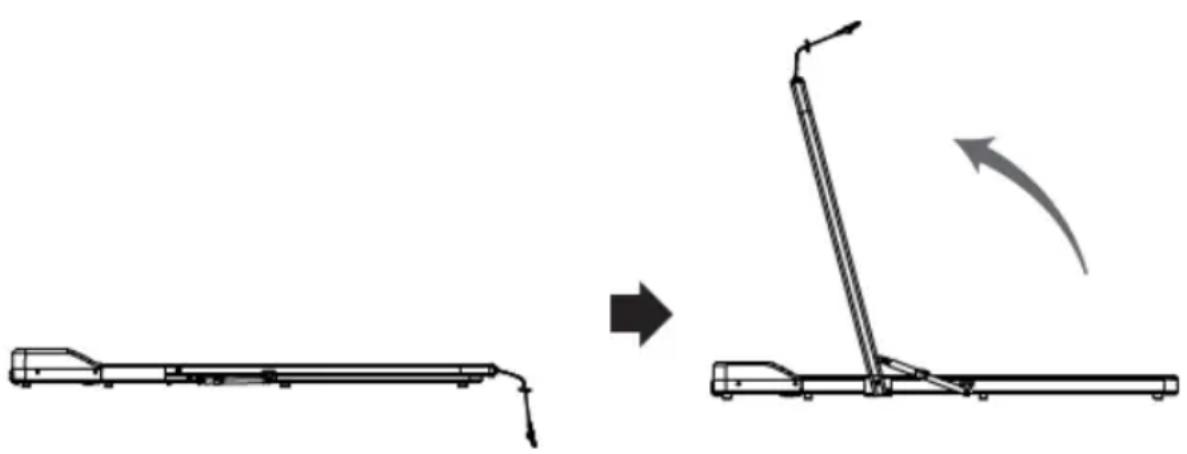
natural_image
Diagram showing a mechanical device before and after assembly, with no visible text or symbolsThe extension piece will come out of the extension jack [5A] when unfolding. Secure the handrail in its upward position by applying the clamp over the joint in the middle of the jack [5].
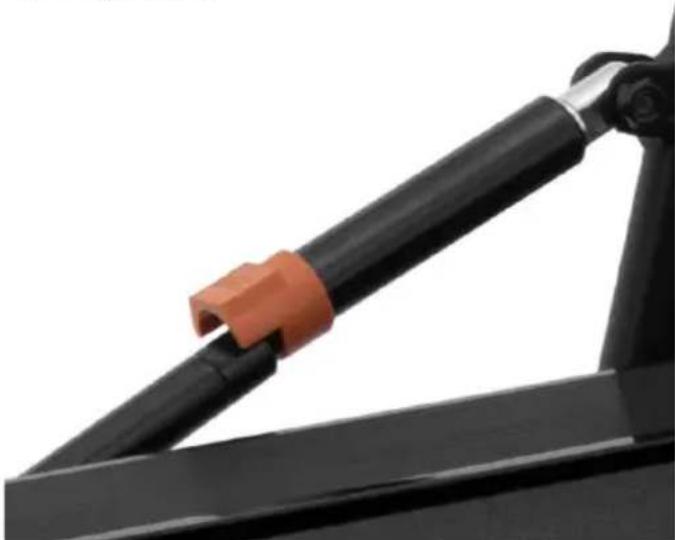
natural_image
Close-up of a black mechanical lever with orange grip, mounted on a black frame (no text or symbols visible)- Install the storage cradle [1] on top of the handrail [2] by aligning the cradle holes with the handrail holes. Use the Allen key to tighten the included bolts (2 pcs.) in the aligned holes.
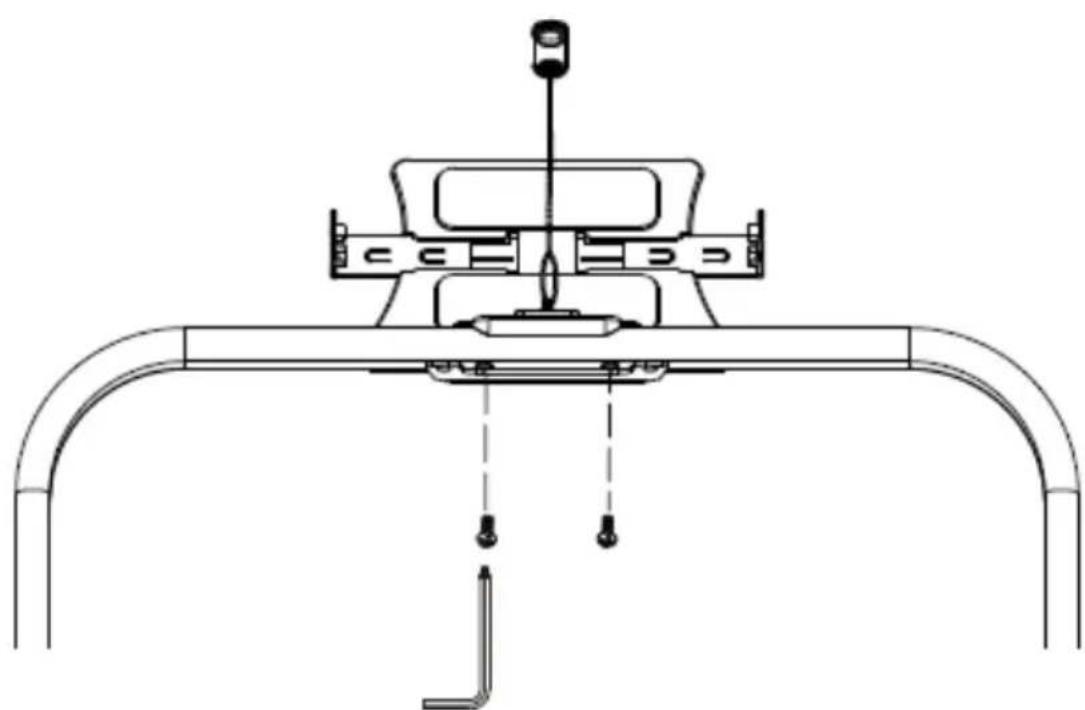
natural_image
Technical line drawing of a mechanical assembly with no visible text or symbols-
Take the power cord. Plug the 3-pin connector into the receptacle at the base of the appliance. Plug the mains connector on the other end of the power cord into a mains outlet.
-
Set the power switch (I/O) in front of the appliance to "I" – this will turn on the appliance. The display will read "0" for every setting.
-
Insert the emergency key [7]. Clip the emergency key cable to your garment. If you fall, slip, or trip, the cable will pull out the emergency key, isolating electrical power from the product, which will stop immediately.
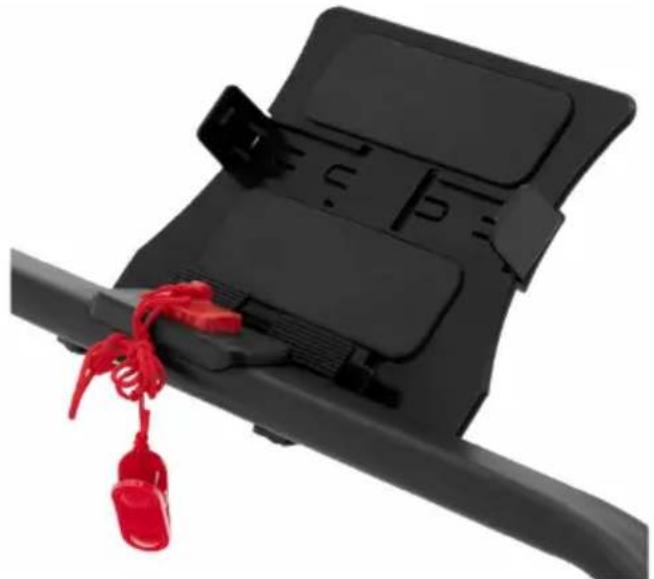
natural_image
Close-up of a black automotive seat cover with red tassel, no visible text or symbols-
Put on the remote control wristband.
-
Enter the desired setting values for time, distance, and calories to burn:
-
Select the setting with the M button [17] (the speed is not selectable here)
- Input the setting value: pressing the "+" button [14] increases the value, pressing the "-" button [15] reduces the value
Default settings:
| Time | Default value30 minutes | Setting range5 to 99 minutes |
| Distance | 1 km | 0.5 to 65 km (in 0.5 km increments) |
| Calories | 50 | 10 to 995 (in 5 calorie increments) |
- Set the speed:
(a) Select one of the predefined training programs:
- Press the P button [13] repeatedly to cycle to one of the 6 training programs.
-
The default time setting for every program is 30 minutes – once a program is selected, the display [8] begins flashing “30 minutes”. Operate the buttons [14] and [15] to extend or reduce the program time.
-
Once you have pressed the P button, you cannot modify any other setting than time.
- To change the setting values and leave the training program, press the M button. The display [8] reads 30 minutes, while the displays [9], [10], and [11] are reset to zero and you can enter the settings again.
Each training program comprises twenty 1.5-minute long intervals, e.g. the product will change the speed every 1.5 minutes.
Speed per interval (every 1.5 minutes)
| P1 | 1 | 2 | 3 | 4 | 5 | 4 | 3 | 2 | 1 | 2 | 3 | 4 | 5 | 4 | 3 | 2 | 1 | 2 | 3 | 2 |
| P2 | 2 | 2 | 3 | 3 | 4 | 4 | 5 | 5 | 6 | 6 | 5 | 5 | 4 | 4 | 3 | 3 | 2 | 2 | 3 | 3 |
| P3 | 1 | 2 | 3 | 2 | 3 | 4 | 3 | 4 | 5 | 4 | 5 | 6 | 5 | 4 | 5 | 4 | 3 | 4 | 3 | 2 |
| P4 | 2 | 3 | 3 | 4 | 3 | 4 | 4 | 5 | 4 | 5 | 5 | 6 | 5 | 6 | 6 | 5 | 4 | 3 | 2 | 1 |
| P5 | 2 | 2 | 3 | 4 | 5 | 6 | 6 | 5 | 4 | 3 | 3 | 2 | 3 | 4 | 4 | 5 | 6 | 5 | 4 | 3 |
| P6 | 1 | 2 | 3 | 3 | 3 | 4 | 5 | 6 | 6 | 6 | 5 | 4 | 3 | 2 | 2 | 2 | 3 | 4 | 3 | 2 |
(b) Manual speed setting:
- Press the button [12]. The walking pad will count down 3 seconds and start moving with the set speed of 8 km/h.
- Operate the buttons [14] and [15] to adjust the speed.
-
The walking pad will begin counting the training time, distance covered, and calories burnt from zero.
-
Having made the settings and/or set the training program, press the button [12] to start the walking pad's tread belt in 3 seconds. The product will beep to warn of starting the tread belt movement.
CAUTION! Be extremely careful when starting the tread belt and your training.
- Press the S button [16] to end the training. The product will begin to decelerate to stop, the speed will begin to slow down, and it will be shown on the display.
- Step off the walking pad only when the tread belt is at full stop.
-
Set the power switch (I/O) to "O" – this will turn off the appliance. Unplug the power cord from the mains.
-
If the product will not be used for a long time, fold it down by pressing the folding jack [5] with your foot. This will collapse the folding jack [5] and the extension jack [5A] will slide in to allow the handrail to be lowered and folded down.
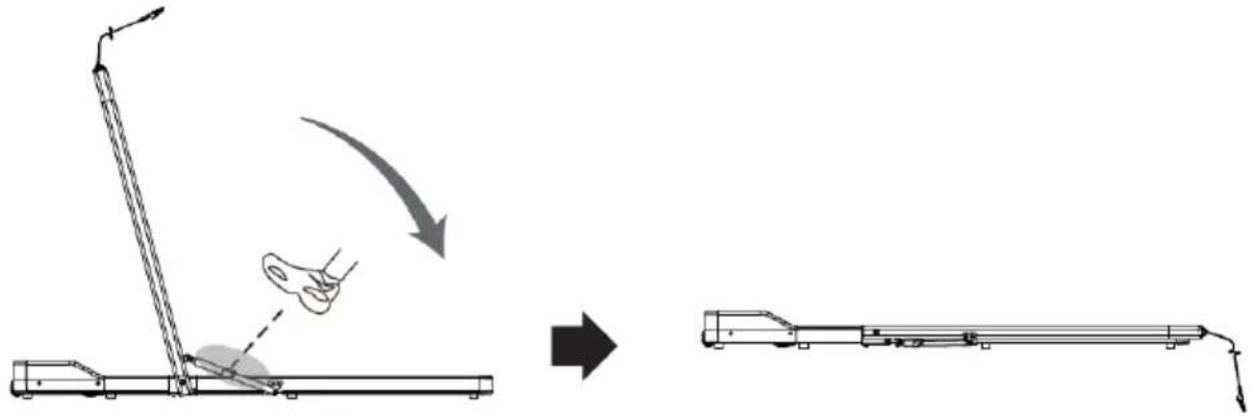
text_image
Diagram illustrating the process of a device with a hand operating a lever, showing before and after states.3.4. Cleaning and maintenance
a) Before cleaning, adjustment or replacement of accessories, and when the appliance is not in use, unplug the power cord from the mains and wait for the rotating parts come to a stop.
b) Use non-corrosive agents only for cleaning the surfaces.
c) After each cleaning, dry all components well before the appliance is used again.
d) Store the appliance in a dry and cool place, protected from moisture and direct sunlight.
e) Do not spray the appliance with a stream of water and do not immerse it in water.
f) Ensure that water will not enter through the ventilation ports in the housing. Do not expose the display or the power (I/O) switch to any moisture.
g) Clean the ventilation ports with a brush and compressed air.
h) Regularly inspect the condition of the appliance for all defects.
i) Fold down the handrail every time after training. Clean with a soft cloth with some warm water and soap.
j) Do not clean with any sharp and/or metal implements (e.g. a wire brush or a metal scraper) as these may damage the surface of the appliance.
k) Do not clean the unit with acidic substances, medical products, thinners, fuel, oil or other chemicals as they may damage it.
I) If the product will not be used for a long time, remove the emergency key and fold the walking pad down.
3.4.1. LUBRICATION
Proper performance of this product requires that after the first 25 hours of operation (or 2 to 3 months, whichever comes first), relubricate the inner side of the tread belt. Repeat this every 50 hours of operation (or 5 to 8 months, whichever comes first).
- Use one hand to lift one of the side edges of the tread belt.
- Wipe the surface below with your finger.
- If the surface is smooth and oily, no relubrication is required.
- If the surface is dry, apply several drops of the lubricant to the centreline of the lifted inner side of the tread belt.
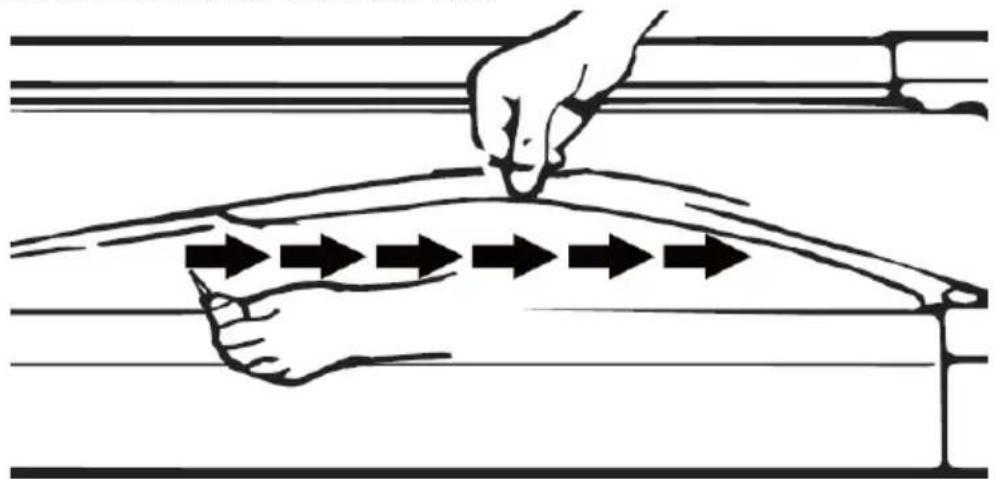
natural_image
Diagram showing hand positioning a curved object on a surface with arrows indicating direction (no text or symbols)- Run any program for 3 to 5 minutes to distribute the lubricant under the tread belt.
CAUTION! Do not apply the lubricant to the surface below the tread belt. If any drops fall there from the inner side of the tread belt, wipe them off.
3.5. Adjusting the tread belt tracking
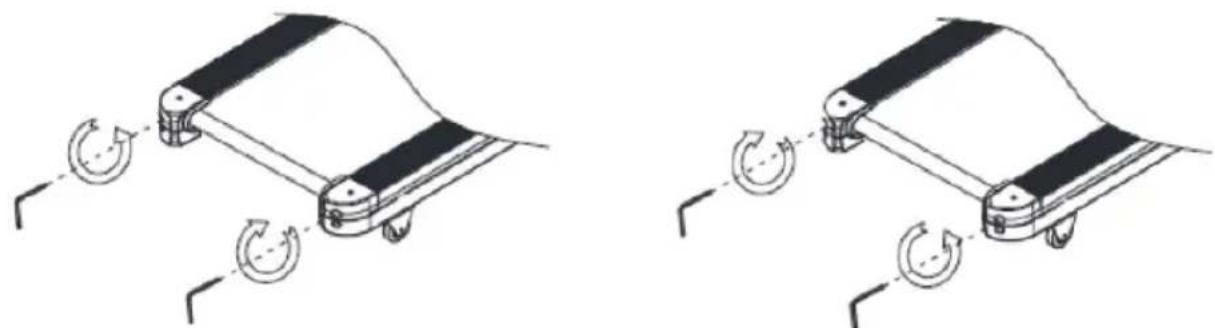
- After some time of operation, the tread belt may track to either side.
- To readjust the tracking and tension of the tread belt, retighten the bolts in the opposite holes at the end of the base (using the Allen key).
natural_image
Two identical diagrams showing a mechanical component with circular arrows indicating rotation, no text or symbols present.CAUTION! The tread belt must not be allowed to rub against either edge of the walking pad. It may damage or tear up the tread belt.
DISPOSAL OF WASTE APPLIANCES
At the end of its service life, this product must not be disposed of with mixed household waste; return it to a collector/recycler of waste electrical and electronic equipment. This is shown by the symbol placed on the product, the user manual or the packaging. The materials used in the appliance can be reused according to their classification identifications. By reuse, recycling or applying other forms of use of waste appliances, you make a significant contribution to the protection of our environment.
Local administration will provide you with the information about the nearest disposal locations for the appliance.
3.6. Troubleshooting
| Problem | Possible cause | Remedy |
| The walking pad will not start. | 1. The appliance is not plugged into mains power.2. The emergency key has not been properly engaged.3. The circuit breaker of the power line tripped or was turned off. | 1. Plug the power cord into a mains outlet.2. Reinsert the emergency key properly into its receptacle.3. Turn on the circuit breaker, wait 5 minutes, and restart the product.If the walking pad will not start, contact a qualified electrician or the manufacturer's service. |
| The tread belt tracks to either side. | Poor tension of the tread belt. | Readjust the tracking and tension of the tread belt (see 3.6. Adjusting the tread belt tracking). |
| The tread belt is noisy under load. | 1. The tread belt needs to be lubricated.2. Overtension of the tread belt. | 1. Relubricate the tread belt (see 3.4.1. Lubrication).2. Readjust the tracking and tension of the tread belt (see 3.6. Adjusting the tread belt tracking). |
| The tread belt does not run true. | The tension is not uniform between the sides. | Readjust the tracking and tension of the tread belt (see3.6. Adjusting the tread belt tracking). |
Dane techniczne
natural_image
Diagram showing a vehicle being lifted by an angle, with no text or symbols present.natural_image
Close-up of a black mechanical component with orange clamps, no visible text or symbolsnatural_image
Technical line drawing of a mechanical assembly with no visible text or symbolsnatural_image
Close-up of a black automotive seat cover with red tassels hanging from the side (no text or symbols visible)text_image
Diagram illustrating the process of a robotic device with motion arrows and component placementnatural_image
Two identical line drawings of a mechanical device with circular arrows indicating rotation, no text or symbols present.natural_image
Diagram showing a mechanical device before and after assembly, with no visible text or symbolsnatural_image
Close-up of a black mechanical lever with orange clamping band (no text or symbols visible)natural_image
Technical line drawing of a mechanical assembly with no visible text or symbolsnatural_image
Close-up of a black automotive seat cover with red tassels hanging from the side (no text or symbols visible)text_image
Diagram illustrating a robotic arm operation with hand placement and motion arrows, showing step-by-step assembly.natural_image
Diagram showing hand positioning a curved object on a surface with arrows indicating direction (no text or symbols)natural_image
Two identical line drawings of a mechanical device with circular arrows indicating rotation or motion (no text or symbols)natural_image
Diagram showing a mechanical assembly before and after motion, with no visible text or symbolsnatural_image
Close-up of a black mechanical component with orange clamps, no visible text or symbolsnatural_image
Technical line drawing of a mechanical assembly with no visible text or symbolsnatural_image
Close-up of a black automotive seat cover with red tassels hanging from the side (no text or symbols visible)text_image
Diagram illustrating a mechanical assembly process with labeled components and directional arrows indicating motion or transformation.natural_image
Diagram showing hand positioning a curved object with arrows indicating direction, no text or symbols presentnatural_image
Two identical line drawings of a mechanical device with circular arrows indicating rotation, no text or symbols present.natural_image
Diagram showing a vehicle being lifted by an angle, with no text or symbols present.natural_image
Close-up of a black mechanical device with orange connectors, no visible text or symbolsnatural_image
Technical line drawing of a mechanical assembly with no visible text or symbolsnatural_image
Close-up of a black automotive seat cover with red tassels hanging from the side (no text or symbols visible)text_image
Diagram illustrating a robotic arm tool interacting with a device, showing motion and assembly steps.natural_image
Diagram showing hand positioning a curved object on a surface with arrows indicating direction (no text or symbols)natural_image
Two identical line drawings of a mechanical device with circular arrows indicating rotation, no text or symbols present.natural_image
Diagram showing a mechanical device before and after assembly, with no visible text or symbolsnatural_image
Close-up of a black mechanical component with orange clamps, no visible text or symbolsnatural_image
Technical line drawing of a mechanical assembly with no visible text or symbolsnatural_image
Close-up of a black automotive seat cover with red tassels hanging from the side (no text or symbols visible)natural_image
Diagram showing a robotic arm with motion capture, before and after assembly (no text or symbols)natural_image
Diagram showing hand positioning a curved object on a surface with arrows indicating direction (no text or symbols)natural_image
Two identical line drawings of a mechanical device with circular arrows indicating rotation, no text or symbols present.natural_image
Diagram showing a mechanical assembly before and after motion, with no visible text or symbolsnatural_image
Close-up of a black mechanical component with an orange clamp, no visible text or symbolsnatural_image
Technical line drawing of a mechanical assembly with no visible text or symbolsnatural_image
Close-up of a black automotive seat cover with red tassels hanging from the side (no text or symbols visible)text_image
Diagram illustrating a mechanical device operation with labeled components and directional arrows indicating motion.natural_image
Diagram showing hand positioning a curved object on a surface with arrows indicating direction (no text or symbols)natural_image
Two identical line drawings of a mechanical component with circular arrows indicating rotation, no text or symbols present.natural_image
Diagram showing a mechanical assembly before and after motion, with no visible text or symbolsnatural_image
Close-up of a black mechanical component with an orange clamp, no visible text or symbolsnatural_image
Technical line drawing of a mechanical assembly with no visible text or symbolsnatural_image
Close-up of a black automotive seat cover with red tassels hanging from the side (no text or symbols visible)text_image
Diagram illustrating the step-by-step assembly of a device with a hand operating the blade, showing motion before and after assembly.natural_image
Diagram showing hand positioning a curved object on a surface with arrows indicating direction (no text or symbols)natural_image
Two identical line drawings of a mechanical device with rotating circular components, no text or symbols present.For the disposal of the device please consider and act according to the national and local rules and regulations.
CONTACT
expondo Polska sp. z o.o. sp. k.