
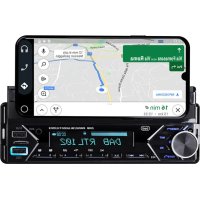
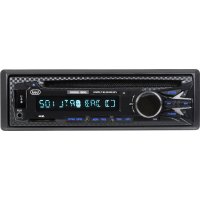
SCD 5602 BT - Car radio Trevi - Free user manual and instructions
Find the device manual for free SCD 5602 BT Trevi in PDF.

| Product type | Car stereo with USB player, AUX input, Bluetooth, and smartphone holder |
| Brand | Trevi |
| Model | SCD 5602 BT |
| Power supply | 12 V DC (vehicle battery) |
| Maximum power | 4 x 10 W (4 channels) |
| Speaker impedance | 4 ohms |
| Radio bands | FM 87.5-108 MHz, AM 522-1620 kHz |
| Bluetooth | Version not specified, hands-free profile and audio streaming (A2DP) |
| Audio inputs | USB (audio playback), AUX 3.5 mm, Bluetooth connection |
| Smartphone holder | Removable holder with 90° rotation |
| Display | Digital display (adjustable color) |
| Remote control | Included (volume, mute buttons, etc.) |
| Audio functions | Preset equalizer (Classic, Rock, Pop, Flat, Jazz, OFF), bass/treble adjustment, balance/fader, loudness, DSP |
| Radio functions | RDS (AF, TA, PTY, REG, EON), auto/manual search, 18 presets (6 per band), auto store |
| USB playback | MP3, functions Forward/Rewind, Intro, Repeat, Random, Track search |
| USB charging | Dedicated USB port for fast charging (not audio) |
| Hands-free | Calls via Bluetooth, built-in microphone, call reject/end, auto redial |
| Smartphone app | SMART BT iPlug (radio control, settings, themes) |
| Dimensions (approx.) | Standard 1 DIN (178 x 50 mm, variable depth) |
| Weight (approx.) | Approximately 0.5 kg |
| Maintenance | Clean with a slightly damp soft cloth, avoid solvents |
| Safety | Do not expose to water, use only in car, dispose via separate collection |
| Repairability | Contact authorized TREVI service center for malfunctions |
Frequently Asked Questions - SCD 5602 BT Trevi
User questions about SCD 5602 BT Trevi
0 question about this device. Answer the ones you know or ask your own.
Ask a new question about this device
Download the instructions for your Car radio in PDF format for free! Find your manual SCD 5602 BT - Trevi and take your electronic device back in hand. On this page are published all the documents necessary for the use of your device. SCD 5602 BT by Trevi.
USER MANUAL SCD 5602 BT Trevi
CON INGRESSO AUX-IN E USB
Manuale d'uso e collegamento
RDS SYSTEM CAR-STEREO
PLAYER WITH AUX-IN - USB
Instruction manual
RADIO LECTEUR RDS
AVEC AUX-IN - USB
Mode d'emploi
RADIO REPRODUCTOR RDS
CON ENTRADA AUX-IN - USB
- Free
- Free
- Free
- Memory (permanent supply)
- Auto antenna OUTPUT
- Free
- Main supply (positive)
- Ground (negative)
B LOUDSPEAKERS
-
- Rear right
-
- Rear right
-
- Front right
-
- Front right
-
- Front left
-
- Front left
-
- Rear left
-
- Rear left
CONNESSIONE AUDIO WIRELESS (MODALITÀ HANDS-FREE)
IOS

Android
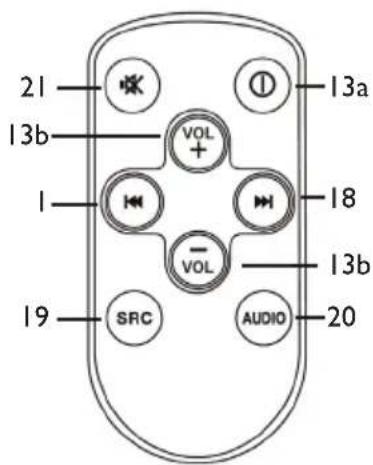
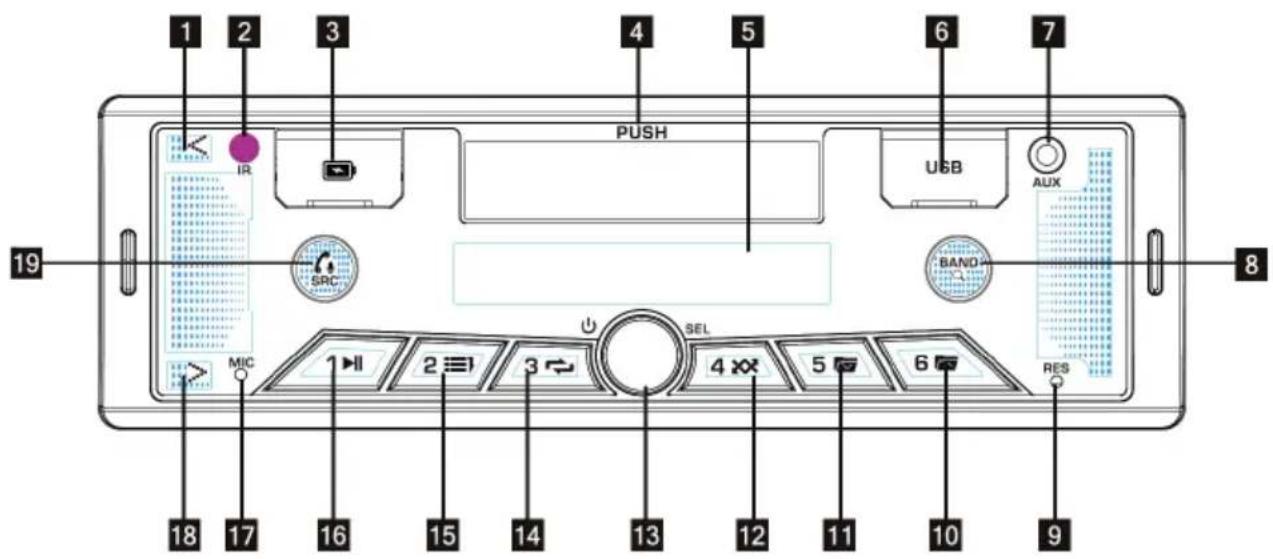
I. I<< button, tuning, previous track
2. Remote control sensor
3. Fast charging USB socket (no audio functions)
4 Removable smartphone holder
5. Display
6. USB input for audio file playback
7. AUX input
8. BAND button, frequency band selection / scanning and storing radio frequencies / TRACK SEARCH selection in MP3 player mode
9. RESET button, resets the car radio.
10. 6/+10 button, memory 6/skip to the next tenth song.
11. 5/-10 button, memory 5/skip to the tenth previous song.
12. 4/RDM button, memory 4/random play
13. Volume control, on/off button, user options access.
13a. Remote control on/off button
13b. Volume adjustment remote control buttons
14. 3/RPT button, memory 3/track repeat function.
15. 2/INT button, memory 2/playback of the first 10 seconds of a song.
16. I/PAU button, memory I/play/pause.
17. Microphone
18. >>I button, tuning, next track.
19. SRC button, source selection, opening/closing telephone conversation.
20. EQ button, selection of one of the preset audio dynamics.
21. MUTE button, immediate silencing of the car radio.
SAFETY PRECAUTIONS
- Do not turn on the loudspeaker during the meal period and volume adjustment.
• If the liquid penetrates the internal parts of the appliance, you must immediately take the appliance to the nearest authorized TREVI assistance centre. - The appliance must not be attached to stilicide or water spray and no oggetto pieno of liquid must be attached to its appliance.
• I will retain this manual for future reference.
CURE AND MAINTENANCE
For the polishing if consiglia l'use of a morbid panno, leggermente inumidito. Avoid solvents or abrasive substances. IMPORTANT
This device is designed for non-professional domestic use. The good construction of this appliance is guaranteed for a long time and perfect functioning. If you need to present any inconvenience, it will be opportune to consult the nearest TREVI Authorized Assistance Center.
HOW TO USE THE SMARTPHONE SUPPORT
- Press the smartphone holder (4) to unlock it (if you click) and remove it completely.
- Paste it at 90° verso l'alto ed aprire le due verso l'alto e verso il basso.
- Insert the telephone by increasing the upper compartment and pulling it upwards until it is possible to insert the telephone further into the lower compartment. Check the correctness and status of the smartphone.
- It is possible to route the support in the fine and anti-clockwise directions at a 90^ angle.
• If you want the support to slide the smartphone, you can use it, put the support in asse with the right place and click on it.
SWITCHING ON / OFF
I. Press the button (13) to turn on the appliance.
- Long press the button (13) to turn off the appliance.
NOTE: in the event of general malfunctions, to return to correct operation, turn off the car radio for a few seconds and turn it back on using the button (13); If the problem persists, reset the car radio by pressing the RESET button (9) with a thin pin.
SOURCE SELECTION
Press the SRC button (19) in sequence to select the RADIO, USB, AUX, BT sources (USB available only if a memory device is present).
AUDIO CONTROLS
VOLUME ADJUSTMENT
Rotate the Volume Control (13) clockwise/counterclockwise to increase/decrease the volume.
Press the MUTE button (21) on the remote control to immediately silence the car radio; press it again to resume listening.
BASS/TREBLE TONE ADJUSTMENT
- Press the selection button (13) once to select the bass tone adjustment.
- The bass tone level indication "BAS" appears on the display.
- Rotate the selection button (13) clockwise/anticlockwise to increase/decrease the bass level.
- Press the selection button (13) twice to select the treble adjustment.
- The treble level indication "TRE" appears on the display.
- Rotate the selection button (13) clockwise/anticlockwise to increase/decrease the treble level.
- Press the selection button (13) three times to select the channel balance.
- The writing "BAL" appears on the display.
- Rotate the selection button (13) clockwise/counterclockwise to balance the audio on the right/left channel
- Press the selection button (13) four times to select the fader adjustment.
- The writing "FAD" appears on the display.
- Rotate the selection button (13) clockwise/anticlockwise to adjust the audio on the rear/front speakers.
ADDITIONAL SETTINGS
LOUDNESS
Press the selection button (13) five times to activate/deactivate the LOUD function (bass enhancement).
DEFAULT EQUALIZER
Press the AUDIO button (20) on the remote control or the selection button (13) six times to choose your favorite preset equalization. It is possible to choose between CLAS, ROCK, POP, FLAT, JAZZ, OFF (no equalization).
Note: by selecting a preset equalization it is not possible to adjust the treble/bass tone values.
DSP
Press the selection button (13) seven times to set the digital audio processor; when the writing DSP is shown on the display, rotate the selection button and press the selection button (13) to select the frequency to be set or the gain/cut. Select DSP RST to bring the processor to factory settings, DSP EXIT to exit the DSP settings.
AUTO
Press the selection button (13) eight times to set the color of the car radio front lighting; it is possible to select blue, green, red, yellow, purple, cyan, white, auto (automatic color variation).
STEREO/MONO (available in radio mode by pressing the selection button (13) 9 times)
STEREO: sets to listen to the radio in stereo.
MONO: sets to listen to the radio in mono.
DX/LOCAL (available in Radio mode by pressing the selection button (13) 10 times)
DX: during the automatic search for radio stations, all stations will be received, even the noisy ones. This option is set at the factory.
LOCAL: during the automatic radio station search, only the stations with the strongest signal will be received.
CLOCK
Press the function button (13) several times to access the clock setting menu; when the time appears on the display, press and hold the function button (13), the number of hours will begin to flash, rotate the selection button, press it to move on to selecting the minutes, rotate to set the minutes, finally press it to confirm.
RADIO
AUTOMATIC TUNING
I. Press the BAND(8) button to select the frequency band (FMI/FM2/FM3/AMI/AM2) you want to listen to.
2. Press the >>1 (18) button to automatically tune to the next station.
3. Press the I<< button (I) to automatically tune to the previous station.
4. If the TA function is activated, only the stations that broadcast traffic bulletins will be tuned in.
5. If the PTY function is activated, only stations broadcasting the specified program type will be tuned in.
MANUAL TUNING
- Press the BAND(8) button to select the frequency band (FM1/FM2/FM3/AM1/AM2) you want to listen to.
- Press and hold the >>I (18) or I<< (1) button until the display shows the word MANUAL, press the >>I (18) or I<< (1) button to advance or move the tuning back 0.05MHz to FM. Wait a few seconds to return to automatic tuning (AUTO appears on the display).
STATION STORAGE
- Tune in to the desired station as described above.
- Press and hold a memory key 1 to 6 for a few seconds.
- Repeat step 2 to store all other stations in all bands.
AUTOMATIC STORAGE OF STATIONS
This device is equipped with a self-storage system that searches and stores the stations with the best signal.
Press and hold the BAND(8) button. The unit will automatically search for and store the stations with the strongest signal.
RDS (RADIO DATA SYSTEM)
The RDS system provides for the transmission, of European broadcasts that have been adopted, of a series of information comprising:
The name of the emitter, the eventual frequency alternative, the type of broadcast program (classical music, jazz, rock, culture), etc.
This device is provided with a series of options to activate or deactivate by following the following procedure:
While listening to the radio, press the selected button (13) and select the desired option.
AF
Activate/disable the AF (Alternative Frequencies) function, alternative frequencies. The AF indicator will appear on the display. The appliance receives the list of the alternative frequencies of the emitters and automatically tunes your quella to the best signals.
When the signal of the station is signaled that if it is monitoring the signal, the AF indicator will start to light, the appliance controls the list of the alternative frequency transmission of the station and if it is tuned to the signal that is better.
T.A.
Activate/disable the TA (Traffic Announcement) function, notify traffic. The TA indicator will appear on the display. Se la stazione que si stazione che li transmette (SEEK TA).
PTY
This function allows you to select the desired program type, for example, rock music, pop music, news, etc. The radio will only be tuned to the stations that have transmitted the type of program selected.
REG
In case of active AF function, some stations may issue programs that vary their frequency, second from the zone. When the REG function is active, it is possible to continue to follow this regional program.
EON
While you are in a station, the radio monitors all the range of the data from a particular code that characterizes the traffic transmission; It is possible to select the function from the DX station or from the LOCAL signal strength.
TA SEEK
Imposse the automatic reception of a station that transmits in TA mode (TA SEEK) after the signaling process acoustic warning (ALARM).
USB
- Insert a USB device into the USB input (6).
- The riproduzione will start automatically and your display will show the number of the riprodotta track.
NOTE: The car radio may not support any external devices with USB port, as this is due to the incompatibility of the processors.
PREV/NEXT TRACK/FOLDER
- Press the button >>I (18) to jump to next track.
- Press the button I<< (1) to return to the start of the current traction, press it again to pass all the preceding tracks.
FAST SEARCH
- long push on >>I (18) to move forward quickly.
- Long push the taste I<< (1) to retreat quickly.
ADVANCE FUNCTIONS
- Press the 2/INT button (15) to read it in sequence and first 10 seconds after the start (INTRO). Press it again to return to normal power (OFF).
- Press the 3/RPT (14) button to activate the automatic reproduction of the tracks (RPT ONE), the tracks present on the folder (RPT FOD) or the entire tracks (RPT ALL).
- Press the 4/RDM (12) button to activate the button in the casual sequence of the tracks (RDM ON). Press it again to return it to the production in the sequence of the tracks.
TRACK SEARCH
- Press the BAND (8). The display will show the TRK SCH script.
- Route the selected item (13) to set the desired number, press it to confirm.
- The selected track will automatically appear.
CHARGING VIA USB SOCKET (FAST USB CHARGE)
The USB socket (3) of the car radio allows you to quickly charge external devices such as smartphones or MP3 players. Insert a USB cable into the socket (3) and the other end of the cable to an external device. Charging will start automatically. Note: This jack has no audio playback functions.
AUX IN
- Press the SRC button (19) in sequence to move to the AUX IN source.
- Connect any unit equipped with an audio output to the AUX input (7).
- Operate the outdoor unit by your controls.
WIRELESS AUDIO CONNECTION (HANDS-FREE MODE)
It is possible to make calls from your mobile phone in HANDS-FREE mode (in free mode) thanks to compatibility with the international Bluetooth® wireless system.
- When making a call, speak in a loud and clear voice.
- For optimal conditions before making or receiving a call, close the car windows.
- The voice may be reproduced in a distorted manner in case there are telephone range problems.
- The use of the HANDS-FREE function depends on the partial/total compatibility of the mobile phone.
- Make sure that the Bluetooth® connection is available on your mobile phone.
CONNECTION
- Press the SRC button (19) in sequence to move to the BT source (NOT PAIR) and activate the wireless function of the mobile phone. Search for audio accessories/devices.
- From your mobile phone, select the CAR BT device that corresponds to your car radio.
- If prompted, enter the 4-digit code "0000".
- Now the connection is established, the words LINKED BT ON will appear on the car radio display.
RECEIVING/REJECTING/ENDING A CALL
- When you receive a call, listening to the currently playing source will be stopped and the call sound will be heard.
- Press the SRC/ button (19) to start the conversation or long press it to reject.
- The audio of the conversation will be audible from the car's audio system.
- During the conversation the car radio functions will be interrupted.
- Press the SRC/ button (19) again to end the conversation.
- Once the conversation is over, listening to the source being played will automatically resume from where it was interrupted.
AUTOMATIC RESTART
- With the car radio turned off in stand-by mode, if a call from the paired device is received, the car radio will automatically turn on to take advantage of the HANDS-FREE function.
- At the end of the call the car radio will automatically return to stand-by mode.
AUDIO FILE PLAYBACK
Through the wireless audio connection you can play audio files in your mobile phone.
Note: The car stereo only plays audio files with mobile phones compatible with the A2DP protocol.
Consult the manual of your mobile phone.
Start music playback from your phone; while listening to music tracks from a smartphone, the following operations are possible:
- Press the 1/>II(16) button to stop playback momentarily. Press it again to resume playback.
- Press the >>I (18) button while listening to move to the next track.
- Press the I<< (1) button while listening to return to the beginning of the current track.
Press it repeatedly to skip to previous tracks.
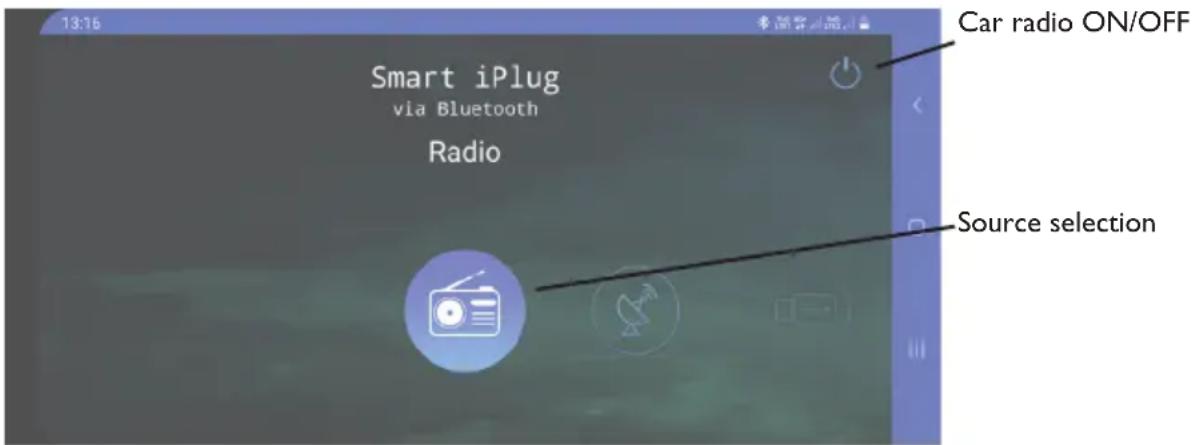
USE WITH SMART BT IPLUG APP
Download and install the app from the following QR codes:

IOS

Android
Alternatively, search for the SMART BT IPLUG app in the main app stores.
After installing the app, connect the smartphone via BT to the car stereo; After connecting BT, launch the app.
On the first screen you will be asked which source to select for playback:
FM RADIO MANAGEMENT SCREEN:
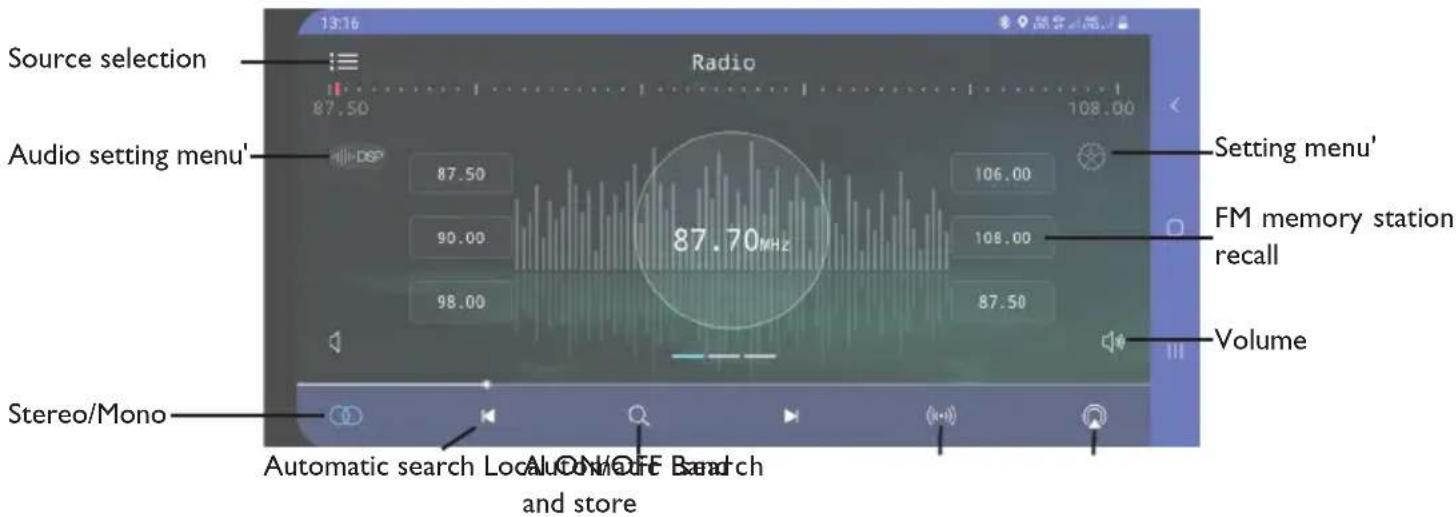
By accessing the settings menu you can set:
Theme: it is possible to select different graphic themes for the app
Date and time: it is possible to set the date and time
RGB: it is possible to set the color of the car radio display
Language: you can set the language of the app
Manual: you can download the app manual
Touch: it is possible to activate the phone's vibration upon app commands
About: you can view information about the app
For all further information, you can view the manual provided by the developer or the page dedicated to the app on the various stores.
For support requests regarding the app, please contact the developer.
Trevi is not responsible for any problems or damage caused by the use of the app.
Please remember that the use of a smartphone while driving is prohibited and heavily penalized.
TECHNICAL CHARACTERISTICS
GENERAL
Power: 12V
Max absorption:....10A
Maximum power: 10W x 4 channels
Speaker impedance: 4 ohm
Frequency band: FM 87.5MHz - 108MHz AM 522 KHz - 1620 KHz
Max wireless transmission power: 0.8mW
Wireless transmission frequency: 2.4GHz
NOTE
TREVI pursues a policy of continuous product improvement. For this reason, the technical characteristics must be modified without prior notice.

PRECAUTIONS FOR CORRECT DISPOSAL OF THE PRODUCT
The symbol shown on the equipment indicates that waste must be disposed of in “separate collection” and so the product must not be disposed of together with urban waste.
The user must take the product to special “separate waste collection centres” provided by local government, or deliver it to the retailer against the purchase of a new product.
Separate collection of waste and subsequent treatment, recycling and disposal operations promotes the production of equipment with recycled materials and limits negative effects on the environment and on health caused by improper handling of waste.
Illegal disposal of the product leads to the enforcement of administrative penalties.
LIMITATIONS OF USE

The product has restrictions:
Not intended for installation and use on M and N type vehicles
COMMANDES
DESCRIPTION DES COMMANDES D'UNITÉ
MISE EN MARCHE/ARRÊT
IOS

Android
RECOMMANDATIONS POUR L'ÉLIMINATION CORRECTE DU PRODUIT
IOS

Android
IOS

Android
https://www.trevi.it/dms/zidi/TREVI/DOCSCD5602BT.pdf
Simplified EU Declaration Of Conformity
Hereby Trevi Spa declares that the radio equipment type SCD 5602 BT
is in compliance with Directive 2014/53/EU.
The full text of the EU declaration of conformity is available at the following internet address
https://www.trevi.it/dms/zidi/TREVI/DOCSCD5602BT.pdf


- CON INGRESSO AUX-IN E USB
- RDS SYSTEM CAR-STEREO
- PLAYER WITH AUX-IN - USB
- RADIO LECTEUR RDS
- AVEC AUX-IN - USB
- RADIO REPRODUCTOR RDS
- CON ENTRADA AUX-IN - USB
- B LOUDSPEAKERS
- CONNESSIONE AUDIO WIRELESS (MODALITÀ HANDS-FREE)
- SAFETY PRECAUTIONS
- CURE AND MAINTENANCE
- HOW TO USE THE SMARTPHONE SUPPORT
- SWITCHING ON / OFF
- SOURCE SELECTION
- AUDIO CONTROLS
- VOLUME ADJUSTMENT
- BASS/TREBLE TONE ADJUSTMENT
- ADDITIONAL SETTINGS
- LOUDNESS
- DEFAULT EQUALIZER
- DSP
- AUTO
- CLOCK
- RADIO
- AUTOMATIC TUNING
- MANUAL TUNING
- STATION STORAGE
- AUTOMATIC STORAGE OF STATIONS
- RDS (RADIO DATA SYSTEM)
- AF
- T.A.
- PTY
- REG
- EON
- TA SEEK
- USB
- PREV/NEXT TRACK/FOLDER
- FAST SEARCH
- ADVANCE FUNCTIONS
- TRACK SEARCH
- CHARGING VIA USB SOCKET (FAST USB CHARGE)
- AUX IN
- WIRELESS AUDIO CONNECTION (HANDS-FREE MODE)
- CONNECTION
- RECEIVING/REJECTING/ENDING A CALL
- AUTOMATIC RESTART
- AUDIO FILE PLAYBACK
- USE WITH SMART BT IPLUG APP
- TECHNICAL CHARACTERISTICS
- GENERAL
- NOTE
- PRECAUTIONS FOR CORRECT DISPOSAL OF THE PRODUCT
- LIMITATIONS OF USE
- COMMANDES
- DESCRIPTION DES COMMANDES D'UNITÉ
- MISE EN MARCHE/ARRÊT
- RECOMMANDATIONS POUR L'ÉLIMINATION CORRECTE DU PRODUIT
- Simplified EU Declaration Of Conformity
Brand : Trevi
Model : SCD 5602 BT
Category : Car radio