
MDV 6350 BT - Car radio Trevi - Free user manual and instructions
Find the device manual for free MDV 6350 BT Trevi in PDF.


| Product Type | Car Stereo with Bluetooth |
| Brand | Trevi |
| Model | MDV 6350 BT |
| Form Factor | 1-DIN |
| Display | LCD with white backlight |
| Radio Bands | FM (87.5-108 MHz), AM (530-1710 kHz) |
| RDS | Yes |
| Bluetooth | Yes, for hands-free calling and audio streaming |
| USB Port | Front USB (compatible with MP3, WMA) |
| AUX Input | 3.5 mm front AUX |
| Audio Output Power | 4 x 50 Watts (max) |
| Preset Equalizer | Multiple presets (Rock, Pop, Classic, Flat, etc.) |
| Front Panel | Detachable for theft protection |
| Power Supply | 12V DC (negative ground) |
| Dimensions (W x H x D) | 178 x 50 x 100 mm (approx.) |
| Weight | 0.5 kg (approx.) |
| Maintenance | Clean with a soft dry cloth; avoid liquids |
| Safety | Disconnect vehicle battery before installation |
| Spare Parts | Fuse (10A mini blade), wiring harness (consult dealer) |
Frequently Asked Questions - MDV 6350 BT Trevi
User questions about MDV 6350 BT Trevi
0 question about this device. Answer the ones you know or ask your own.
Ask a new question about this device
Download the instructions for your Car radio in PDF format for free! Find your manual MDV 6350 BT - Trevi and take your electronic device back in hand. On this page are published all the documents necessary for the use of your device. MDV 6350 BT by Trevi.
USER MANUAL MDV 6350 BT Trevi
CAR VIDEO SYSTEM WITH SINTO RDS, BLUETHOOT, USB/SD CARD IN AND 7" TOUCH SCREEN DISPLAY
Instruction manual

PANNELLO FRONTALE


Nota:
APERTURA E CHIUSURA SCHERMO LCD 7"
natural_image
Black and white photo of a microphone with two speakers, displayed in a home control interface (no readable text or symbols on the device itself)FUNZIONE AV IN
natural_image
Black and white photo of a mechanical device with two connectors, displayed in a digital interface (no readable text or symbols on the device itself)natural_image
Black and white digital music player interface showing a musical note with ripple effect (no text or symbols)• Vertical Adjustable Panel
• 7.0 Inch Touch Screen Monitor
• Multi-subtitle/audio Languages Function
- Multi-angle Function
- Parental Control
- Remote Control
SAFETY INFORMATION ....16
INSTALLATION....17
THE PLAYER....19
ELECTRICAL CONNECTION ....21
OPERATION 22
BASIC OPERATION 22
Use This Product Safely
This set has been designed and manufactured to assure personal safety. Improper use can result in electric shock or fire hazard. The safeguards incorporated in this unit protect you if you observe the following procedures for installation, use and servicing. This unit doesn't contain any parts that can be repaired by the user.
When Driving
Keep the volume level low enough to be aware of road and traffic conditions.
When Car Washing
Do not expose the product to water or excessive moisture. This could cause electrical shorts, fire or other damage.
When Parked
Parking in direct sunlight can produce very high temperatures inside your vehicle. Give the interior a chance to cool down before starting playback.
Use the Proper Power Supply
This product is designed to operate with a 12 volt DC
Use Authorized Service Centers
Do not attempt to disassemble or adjust this precision product. Please refer to the Service Center list included with this product for service assistance.
For Installation
The unit should be installed in a horizontal position with the front end up at a convenient angle, but not more than 30^0 .
INSTALLATION
Notes:
- Choose the mounting location where the unit will not interfere with the normal driving function of the driver.
- Before finally installing the unit, connect the wiring temporarily and make sure it is all connected up properly and the unit and the system work properly.
- Use only the parts included with the unit to ensure proper installation. The use of unauthorized parts can cause malfunctions.
- Consult with your nearest dealer if installation requires the drilling of holes or other modifications of the vehicle.
- Install the unit where it does not get in the driver's way and cannot injure the passenger if there is an emergency stop.
- If installation angel exceeds 30^ from horizontal, the unit might not give its optimum performance.

- Avoid installing the unit where it would be subject to high temperature, such as from direct sunlight, or from hot air, from the heater, or where it would be subject to dust, dirt or excessive vibration.
DIN FRONT/REAR-MOUNT
This unit can be properly installed either from "Front"(conventional DIN
Front-mount) or "Rear"(DIN Rear-mount installation, utilizing threaded screw holes at the sides of the unit chassis). For details,
refer to the following illustrated installation methods.
Installation Opening
This unit can be installed in any dashboard having an opening as shown below:
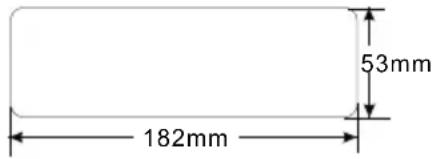
ATTENTIONS OF INSTALLATION
- This player should be installed by professional technician.
- please read the instruction and operation of equipment carefully before installing.
- Make sure to connect other wires before power connection.
- To avoid short circuit. Please make sure all the exposed wire are insulating.
- Please fix all the wires after installation.
- Please make connection to the player accordingly to this instruction manual. Wrong connection may cause damage.
- This player only fit for 12V DC device and please make sure your car belongs to this kind of cathode grounding electrical system.
- Please connect the wires rightly. Wrong connection will cause malfunction or damage the electrical sys
INSTALLATION
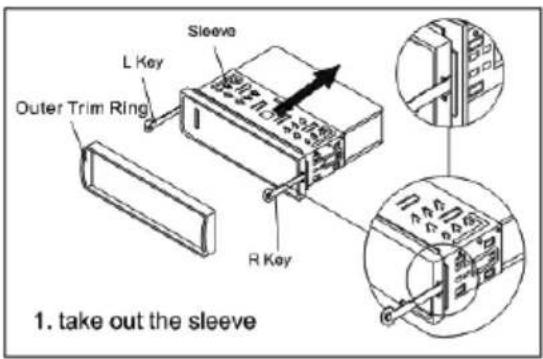

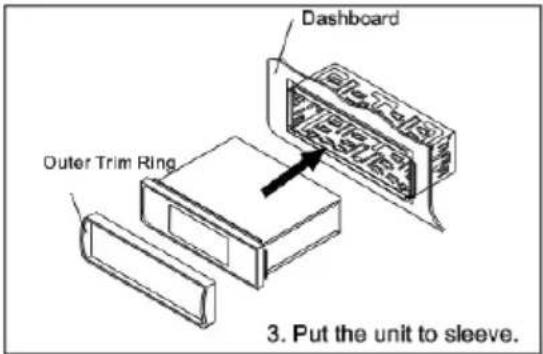


THE PLAYER

THE PLAYER
- AUX IN
- DISP
- ✉ (USB Interface)
- ▶/II
- OPEN
- ▶▶ (SEEK UP) button
- LCD Display
- (SEEK DOWN) button
- ↓ Button
- ↑ Button
- BAND
- MODE
- IR
- PUSH/SEL/VOL
- ▲ (Release button)
- PWR / MUTE
- 7 INCH TFT TOUCH SCREEN
- Media SD slot
- Reset Button
MONITOR
ELECTRICAL CONNECTION

OPERATION
Shortly press PWR button on the front panel or on the remote control to turn the player on.
When the unit is on, press and hold PWR button on the front panel or shortly press PWR button on the remote control will turn the unit off.
OPEN/CLOSE THE MONITOR
Press OPEN button on the front panel the monitor will draw out automatically.
When the monitor draws out to a certain location, it will turn upward automatically and stop at vertical position.

natural_image
Simple line drawing of a rectangular object with a curved arrow indicating rotation or movement (no text or symbols)
natural_image
Line drawing of a rectangular electronic component or panel with mounting base (no text or symbols)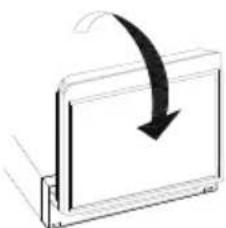
natural_image
Simple line drawing of a rectangular object with a curved arrow indicating rotation or direction (no text or symbols)When the monitor turns downward to horizontal position, it will draw in.
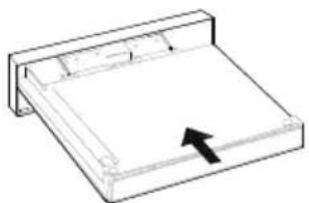
natural_image
Simple line drawing of a rectangular object with a black arrow pointing to its side (no text or symbols)Press the ↑↓key on the front panel, you can adjust the view angle of the monitor.
When the monitor draws at vertical position, the LCD screen will display the radio menu, press return button to switch to main menu.

Click the correspond icon to select the different function Radio, USB, SD, CARD, EQ,AUX, AV IN ,BT,SETUP, it will enter into the radio mode automatically. In any mode, press and hold PWR button for 2 seconds will turn off the unit.
RADIO OPERATION

interface as followed:
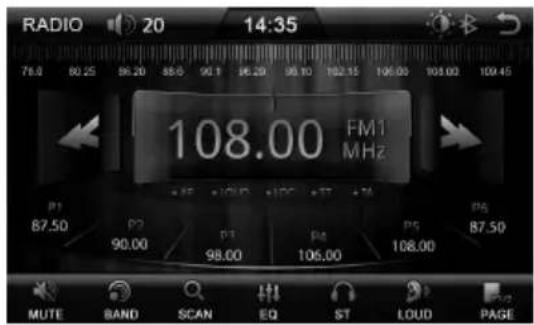
OPERATION

---Shut down the display of the LCD. When it shutting down, tap anywhere of the LCD, it will wake up.

---Mute on/off

---Radio band switch

---Short press for overview, and
long press for auto scanning and storage.

---EQ settings

---ST /Mono switch

---Loud on/off

---LOC setting

--- TA on/off
--- AF on/off

---PTY on/off

--- setting item page up/down

--Radio frequency tuning.
Short pressing is tuning step up or down
Long press is manual seeking up or down

Back to the menu

: Screen brightness adjust (high - um - low).
USB/SD OPERATION
Insert USB or SD card, the unit will play it automatically.
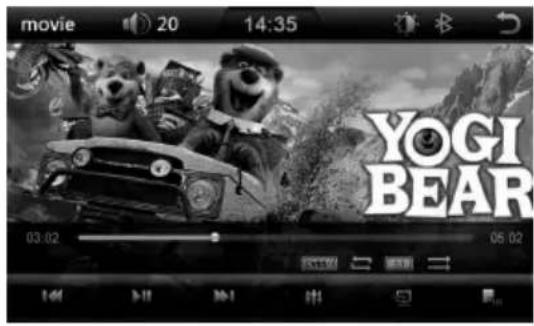


---Previous
---Play/pause
---Next

---EQ settings

---LCD display mode
control(Normal/4:3/16:9)

--- setting item page up/down

---Random on/off

---Repeat function
OPERATION
---Sub-title on/off

---Language switch
---Loud on/off
--Click this icon, to display the image on an additional screen (RCA)
EQ OPERATION

Tap Icon will enter the EQ interface as followed:

In this page, you can set the default volume, treble, bass, fader, and balance value, also with loud on/off, sub-woofer on/off
AUX O PER ATI ON
There is a stereo Aux-in on the front panel of the unit. When you connect the Aux-in into the jacks,

Tap 📄 icon to enter Aux-in mode, you can enjoy the audio from Aux-in input. Audio settings:

natural_image
Black and white photo of a microphone with two speakers, displayed in a home control interface (no readable text or symbols on the device itself)AV IN OPERATION

icon to enter AV-in mode, you can enjoy the audio from AV-in input. Audio settings :
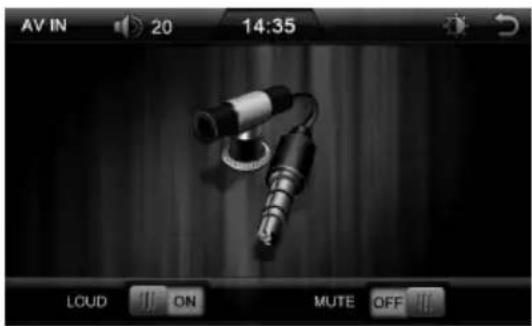
natural_image
Black and white photo of two audio/video equipment with sound control buttons (no readable text or symbols)If no video in it will appear a caution.
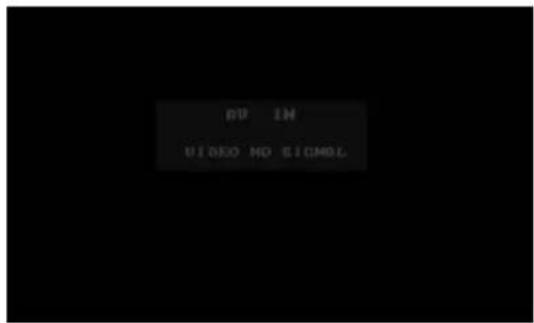
If the parking wire is not connecting, the LCD will show: warning, please stop watch video player
BT OPERATION
Before using the BT function, please pair the BT device firstly, the default password is 0000.
OPERATION
1) Turn on the Bluetooth mode of the mobile phone;
2) Select the item of Finding the Bluetooth Device and enter it. After finishing the finding, it will show the name of the Bluetooth Device if finding a Bluetooth Device. Select it and enter it, then it will show a interface that ask you to input a password, input the password 0000 and then enter it. Then it will tell you pair OK.
3) For some mobile phones, they can automatically connect with the BT device of the car audio system after pairing is ok; for some mobile phones, they need to select the paired BT device and press the CONNECTION button. When connection is ok, the LCD of the car audio system will show LINK OK.

Tap 📋 Icon will enter the BT interface as followed:


Tap, will display the dialed in/missed/dialed out phone number.


Tap, will enter the music A2DP mode.

natural_image
Black and white digital music player interface showing a musical note with ripple effect (no text or symbols)
SETTINGS OPERATION

Tap can will enter the setting
interface.
Move the Up or down cursor to select the item you want to change, then tap the content on the right to enable or disable the function.
Audio settings:

OPERATION
Time and date settings:

Default setting:

You must press the default password 8888 before entering.
General settings:
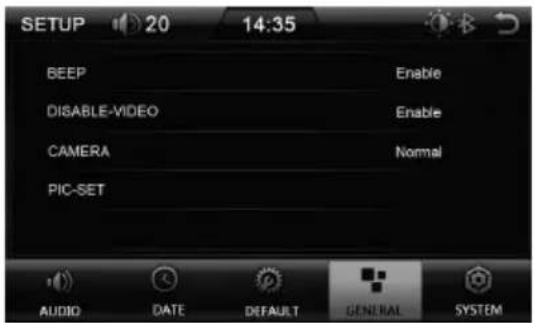
In this page, you can set the Beep on/off, video enable/disable, camera video in mode and picture display parameters. System settings:

You can set the system language as you wanted.
REMOTE CONTROL
flowchart
graph TD
    A["1"] --> B["POW"]
    C["2"] --> D["BAND"]
    E["3"] --> F["ENTER SETUP"]
    G["4"] --> F
    H["5"] --> F
    I["6"] --> J["EQ"]
    K["7"] --> L["SEL"]
    M["8"] --> N["INT"]
    O["9"] --> P["II"]
    Q["10"] --> R["RPT"]
    S["11"] --> T["RDM"]
    U["12"] --> V["PREV"]
    W["1"] --> X["NEXT"]
    Y["2"] --> Z["3"]
    AA["5"] --> AB["6"]
    AC["9/TA"] --> AD["0"]
    AE["AMS"] --> AF["VOL+"]
    AG["MUTE"] --> AH["LOUD"]
    AI["ST"] --> AJ["VOL-"]
    AK["LOC"] --> AL["10-"]
    AM["10+"] --> AN["10-"]
    AO["FWD"] --> AP["REV"]
    AQ["SCAN"] --> AR["7/AF"]
    AS["ZOOM"] --> AT["8/PTY"]
    AU["25"] --> AV["24"]
    AW["23"] --> AX["23"]
    AY["22"] --> AZ["22"]
    BA["21"] --> BB["21"]
    BC["20"] --> BD["20"]
    BE["19"] --> BF["19"]
    BG["18"] --> BH["18"]
    BI["17"] --> BJ["17"]
    BK["16"] --> BL["16"]
    BM["15"] --> BN["15"]
REMOTE CONTROL
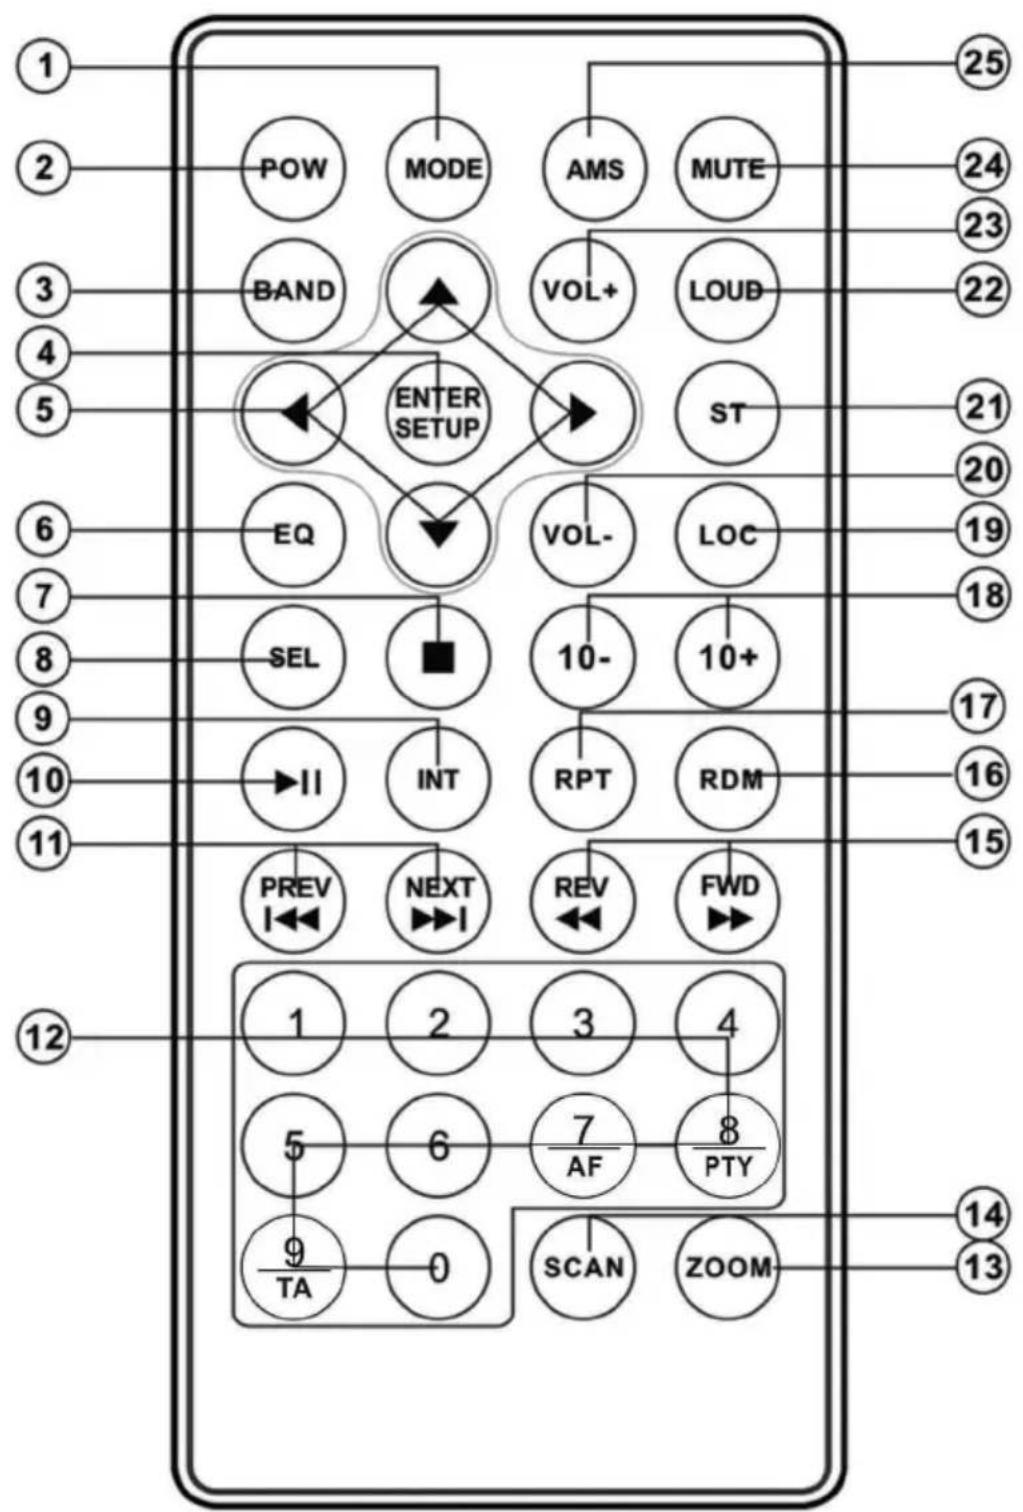
| 1. MODE | Press to change the source. |
| 2. POWER | Press it to turn the unit ON or OFF |
| 3. BAND: | To select FM1, FM2, FM3, radio bands. |
| 4. ENTER/SETUP | Long press to return to previous menu, short press to enter next menu; |
| 5. ◀/▶, ▲/▼ | In case of MENU mode, ◀/▶, ▲/▼ buttons serves as cursor buttons to select item left/right, ahead/back. |
| 6. EQ | Press it to select desired audio equalization |
| 7. ■ | Stop |
| 8. SEL | Access the Bass, Treble, Balance and Fader setting |
| 9. INT | Press INT to INTRO each file. Press again to stop intro function. |
| 10.▶II | Press to pause the playing. Press it again to resume to play |
| 11. ◀◀/▶◀ | Press ▶◀ to skip to the next track & press ◀◀ to skip back one track in navigation mode. |
| 12. 0-9 | Inputs the corresponding number.TA :Turn on/off the TA function.(for RDS version)AF :Tum on/off the AF function.(for RDS version)PTY: Program selection and searching |
| 13. ZOOM | Allows the picture to be increased in size. |
| 14. SCAN | Scanning Button |
| 15. ◀◀/▶▶ | In MP3 mode. Press ◀◀/▶▶ to search forward rapidly & to search reverse rapidly. In radio mode, use ◀◀/▶▶ for manual tuning. |
| 16 RDM | Press it to play all tracks in random order |
| 17.RPT | Repeat play. |
| 18.10+/10- | Digital selecting button, cooperatively used with numeric buttons to choose LOCAL or DISTANCE setting. |
| 19. LOC: | |
| 20. VOL- | decrease (-) the volume level. |
| 21. ST: | In radio mode press the button to set the reception between MONO and STEREO mode |
| 22. LOUD | Press and hold to turn on/off Loudness function. |
| 23. VOL+ | decrease (+) the volume level. |
| 24. MUTE | Press to mute the sound. Press it again to recover the sound. |
| 25. AMS | In radio mode, press it to activate Automatic Memory Storing/Program Scanning function. |
PERFORMANCE
| FM MP3/WMA | ||
| Tuning range | EUR:87.5~108.0MHz --- | |
| Sensitivity | 4uV(S/N=30dB) --- | |
| S/N ratio | 50 dB 60 dB | |
| Stereo separation | >25 dB 50dB | |
| Freq. Response | 40Hz~12KHz 20Hz~16KHz | |
| Bluetooth Version | 2.1 |

Precautions for correct disposal of the product.
The symbol shown on the equipment indicates that waste must be disposed of in “separate collection” and so the product must not be disposed of together with urban waste.
The user must take the product to special “separate waste collection centres” provided by local government, or deliver it to the retailer against the purchase of a new product.
Separate collection of waste and subsequent treatment, recycling and disposal operations promotes the production of equipment with recycled materials and limits negative effects on the environment and on health caused by improper handling of waste.
Illegal disposal of the product leads to the enforcement of administrative penalties.


- PANNELLO FRONTALE
- Nota:
- APERTURA E CHIUSURA SCHERMO LCD 7"
- FUNZIONE AV IN
- SAFETY INFORMATION ....16
- INSTALLATION....17
- THE PLAYER....19
- ELECTRICAL CONNECTION ....21
- OPERATION 22
- Use This Product Safely
- When Driving
- When Car Washing
- When Parked
- Use the Proper Power Supply
- Use Authorized Service Centers
- For Installation
- INSTALLATION
- Notes:
- DIN FRONT/REAR-MOUNT
- Installation Opening
- ATTENTIONS OF INSTALLATION
- THE PLAYER
- MONITOR
- ELECTRICAL CONNECTION
- OPERATION
- OPEN/CLOSE THE MONITOR
- RADIO OPERATION
- USB/SD OPERATION
- EQ OPERATION
- AUX O PER ATI ON
- AV IN OPERATION
- BT OPERATION
- SETTINGS OPERATION
- REMOTE CONTROL
- Precautions for correct disposal of the product.
Brand : Trevi
Model : MDV 6350 BT
Category : Car radio