
XCD 5790 DAB - Car radio Trevi - Free user manual and instructions
Find the device manual for free XCD 5790 DAB Trevi in PDF.
| Product Type | Car stereo with DVD/MP4/CD player |
| Brand | Trevi |
| Model | XCD 5790 DAB |
| Power supply | 12 V DC, 10 A max |
| Output power | 45 W x 4 channels |
| Speaker impedance | 4 ohms per channel |
| FM band | 87.5 - 108 MHz |
| DAB band | 174 - 240 MHz |
| Bluetooth | Yes, power 0.8 mW, frequency 2.4 GHz |
| Disc compatibility | DVD, MP4, CD, CD-R, RW, MP3 |
| Inputs | USB, AUX |
| Main functions | FM/DAB radio, CD/DVD player, USB, AUX, hands-free Bluetooth, equalizer, clock |
| Maintenance and cleaning | Use a soft, slightly damp cloth. Avoid solvents or abrasives. |
| Safety | Do not expose to water, do not look into the laser, keep volume at reasonable levels |
| Spare parts and repairability | Contact the nearest TREVI authorized service center |
Frequently Asked Questions - XCD 5790 DAB Trevi
User questions about XCD 5790 DAB Trevi
0 question about this device. Answer the ones you know or ask your own.
Ask a new question about this device
Download the instructions for your Car radio in PDF format for free! Find your manual XCD 5790 DAB - Trevi and take your electronic device back in hand. On this page are published all the documents necessary for the use of your device. XCD 5790 DAB by Trevi.
USER MANUAL XCD 5790 DAB Trevi
RADIO RIPRODUTTORE DAB/DVD/CD/BT CON INGRESSO AUX-IN, SD/USB
Manuale d'uso e collegamento
DAB
DVD/CD
BLUETOOTH
SD/USB
AUX-IN
SYSTEM CAR-STEREO DAB/DVD/CD/BT PLAYER WITH AUX-IN - CD/USB
Instruction manual
RADIO LECTEUR DAB/DVD/CD/BT AVEC AUX-IN - SD/USB
Mode d'emploi
EN If you will not find your language on the instruction manual, please go on our website www.trevi.it to find it
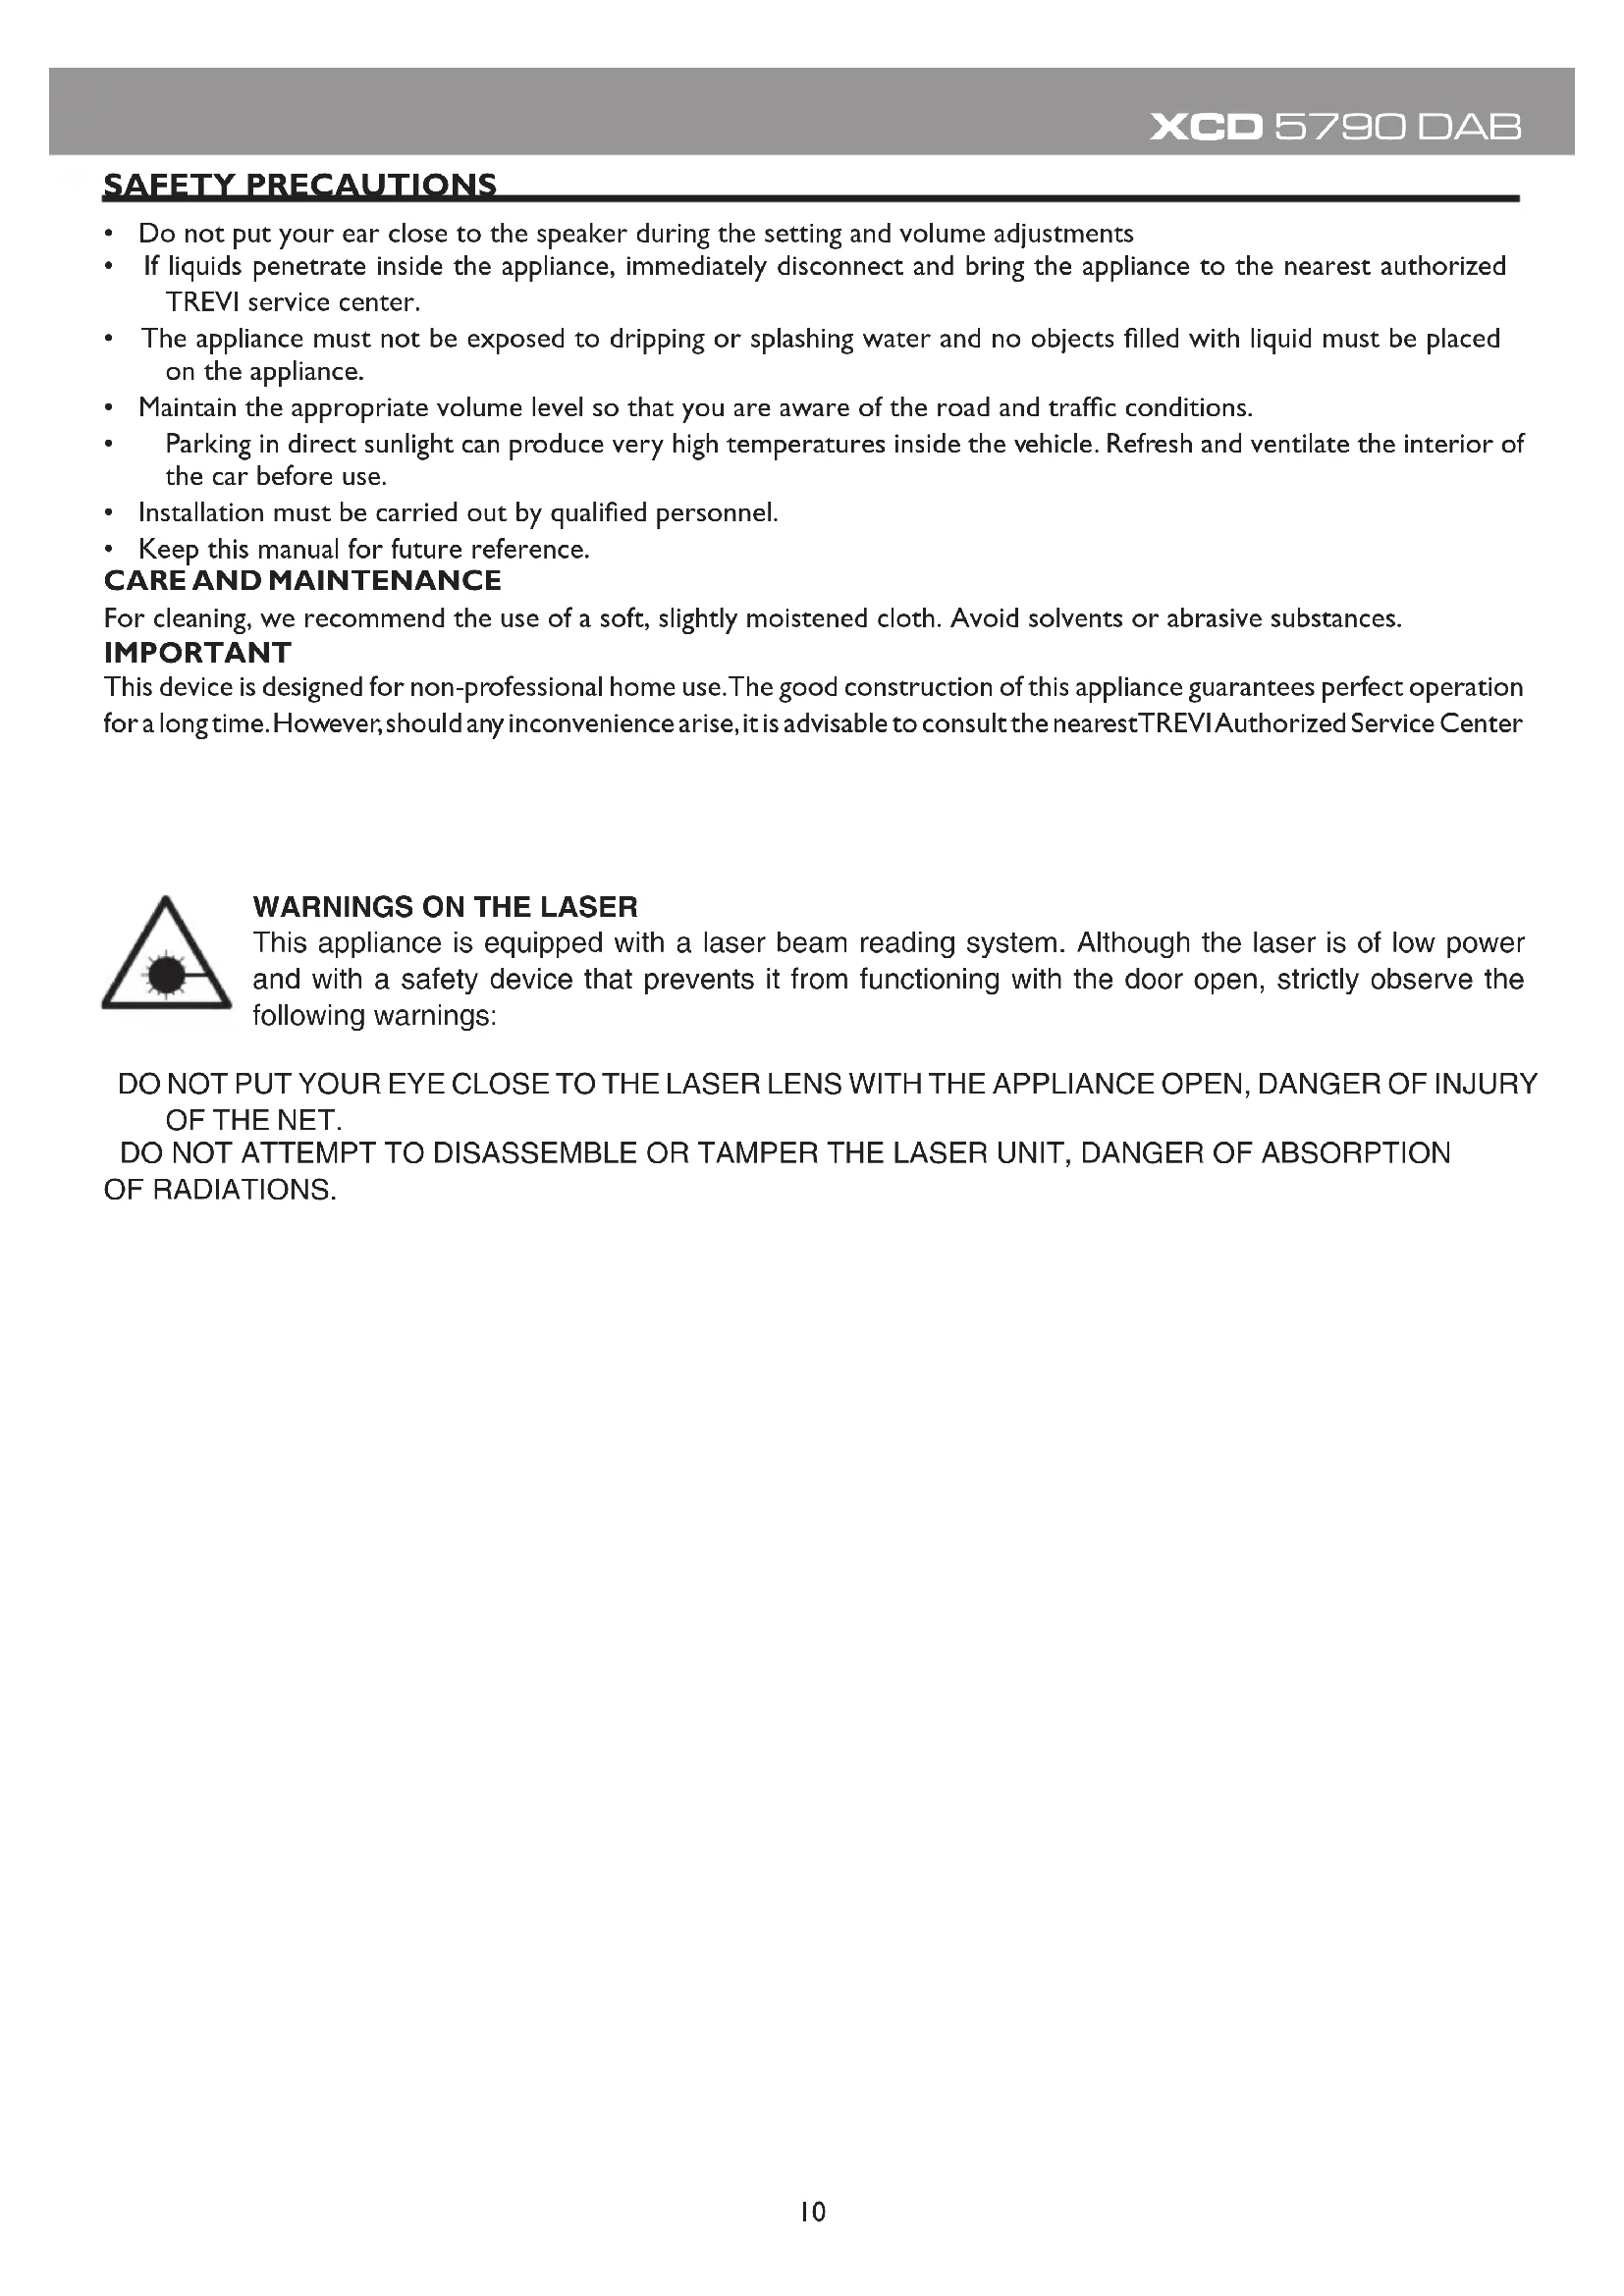
Please remove the two CD Mechanism Trans Screws prior to installation or CD's will not play.
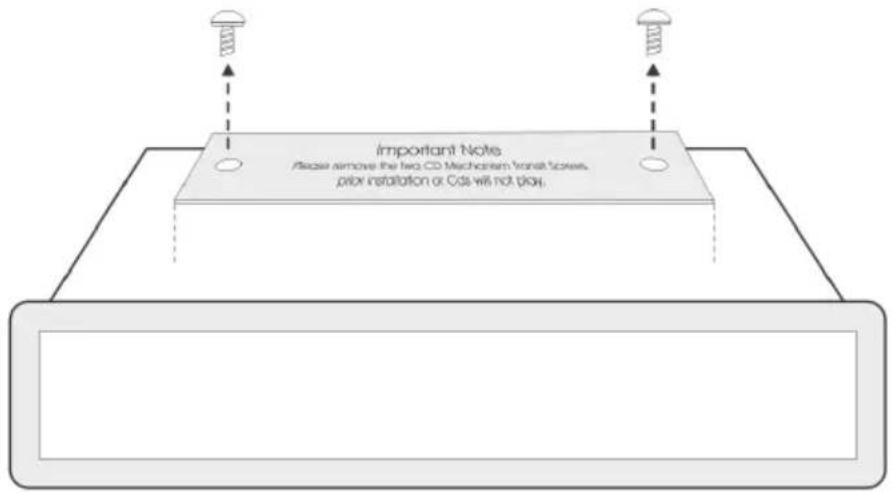
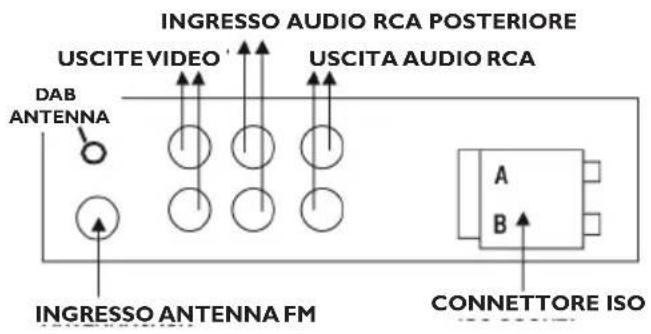
CONNESSIONI - WIRES CONNECTION
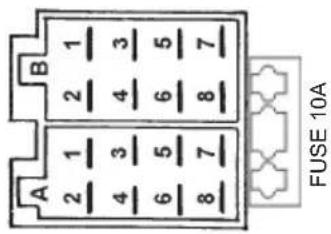
A ALIMENTAZIONE
I. Free
2. Free
3. Free
4. Memory (permanent supply)
5. Auto antenna OUTPUT
6. Free
7. Main supply (positive)
8. Ground (negative)
B LOUDSPEAKERS
I. + Rear right
2. - Rear right
3. + Front right
4. - Front right
5. + Front left
6. - Front left
7. + Rear left
8. - Rear left
CONNESSIONE TRAMITE BLUETOOTH (MODALITÀ HANDS-FREE)
- Do not put your ear close to the speaker during the setting and volume adjustments
- If liquids penetrate inside the appliance, immediately disconnect and bring the appliance to the nearest authorized TREVI service center.
- The appliance must not be exposed to dripping or splashing water and no objects filled with liquid must be placed on the appliance.
- Maintain the appropriate volume level so that you are aware of the road and traffic conditions.
- Parking in direct sunlight can produce very high temperatures inside the vehicle. Refresh and ventilate the interior of the car before use.
• Installation must be carried out by qualified personnel. - Keep this manual for future reference.
CARE AND MAINTENANCE
For cleaning, we recommend the use of a soft, slightly moistened cloth. Avoid solvents or abrasive substances.
IMPORTANT
This device is designed for non-professional home use. The good construction of this appliance guarantees perfect operation for a long time. However, should any inconvenience arise, it is advisable to consult the nearest TREVI Authorized Service Center

WARNINGS ON THE LASER
This appliance is equipped with a laser beam reading system. Although the laser is of low power and with a safety device that prevents it from functioning with the door open, strictly observe the following warnings:
DO NOT PUT YOUR EYE CLOSE TO THE LASER LENS WITH THE APPLIANCE OPEN, DANGER OF INJURY OF THE NET.
DO NOT ATTEMPT TO DISASSEMBLE OR TAMPER THE LASER UNIT, DANGER OF ABSORPTION OF RADIATIONS.
DESCRIPTION OF UNITS COMMANDS
I. POWER button, on / off.
2. Volume control / SEL key, Volume control and tones / access user options.
3. CD AUDIO / MP3 CD compartment.
4 Display.
5. USB input.
6. EJECT button, CD eject.
7. >> I key, tuning, next track.
8. I << key, tuning, previous track.
9. CLK button, show / set the clock
-
I / PAU key, start / pause / restore playback.
-
2 / INT button, playback of the first 10 seconds of a track.
-
3 / RPT key, track repetition function.
-
4 / RDM key, random play
-
Key 5.
-
Key 6.
-
Radio station buttons stored from 1 to 6.
-
AUX input.
-
MODE key, RADIO / CD / USB / AUX / BT mode, closing telephone conversation.
-
BAND button, selection of frequency band F1, F2, F3 / scan and memorization of radio frequencies / selection TRACK SEARCH in MP3 player mode / opening of telephone conversation.
REMOTE CONTROL
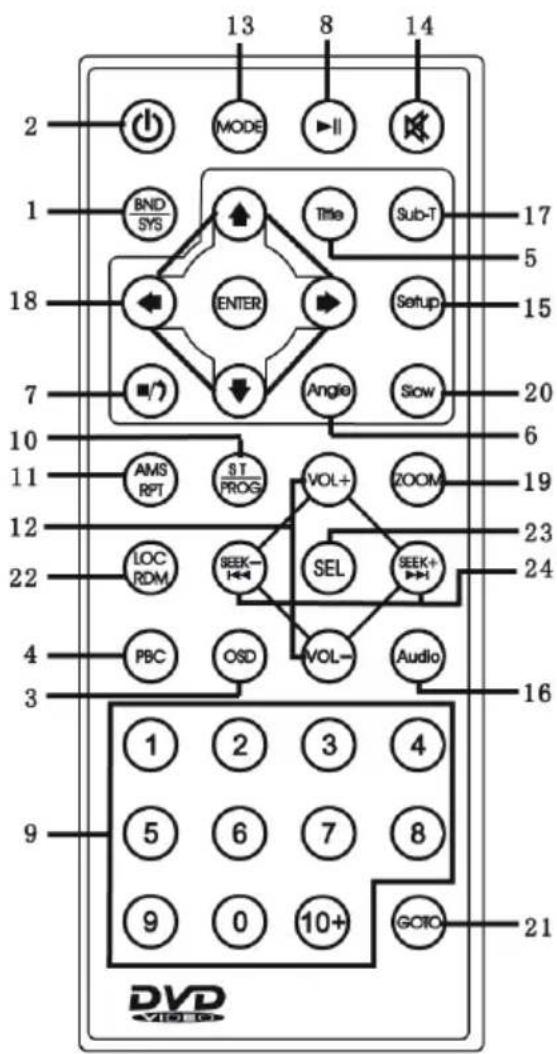
I. BAND / SYS button, selects the type of video output signal (PAL, NTSC, AUTO)
2. POWER button, power off / on
3. OSD button, by pressing it several times, information on the disc or track being played appears on the display.
4 PBC button, activates / deactivates the disc menu
5. TITLE button, selection of the title to be played
6. ANGLE button, multi-angle view (if available)
7. STOP key, stop playback
8. PLAY / PAUSE key, activates / pauses playback
9. Numeric keys
10. ST / PROG key, activates the programmed reading of the tracks
II. AMS / RPT button
12. VOL- / VOL + button, volume adjustment
13. MODE key, selection of the operating mode
14. MUTE button, immediate audio muting
15. SETUP key, to activate the DVD player settings menu
16. AUDIO key, allows the selection of the various audio channels (if available)
17. SUBTITLE button, activate subtitles (if available)
18. Cursor movement keys
19. ZOOM button, activates the video resizing function
20. SLOW button, slow playback
21. GOTO button, direct selection of the title to be played
22. LOC / RDM key
23. SEL button
24. PREV / NEXT button
ON/OFF
I. Press the POWER button (I) to switch the appliance on.
2. Press the POWER button (I) to switch off the appliance.
CLOCK ADJUSTMENT
I. Press the POWER button (I) to switch the appliance on.
2. Long press the CLK button (9) until the display shows the flashing time.
3. Turn the Volume Control (2) clockwise / counterclockwise to adjust the current time. Press the CLK button (9) to confirm.
4. Turn the Volume Control (2) clockwise / counterclockwise to adjust the current minutes. Press the CLK button (9) to confirm.
SOURCE SELECTION
Press the MODE key (18) in sequence to select the RADIO, DISC, USB, AUX, BT sources.
AUDIO CONTROLS
VOLUME ADJUSTMENT
Turn the Volume Control (2) clockwise / counterclockwise to increase / decrease the volume.
LOW / HIGH TONE ADJUSTMENT
I. Press the SEL (2) button once to select the bass setting.
2. The "BASS" low tone level indication appears on the display.
3. Turn the Volume Control (2) clockwise / counterclockwise to increase / decrease the low tone level.
4. Press the SEL key (2) twice to select the high tone adjustment.
5. The "TRE" high tone level indication appears on the display.
6. Turn the Volume Control (2) clockwise / counterclockwise to increase / decrease the treble level.
I. Press the SEL key (2) three times to select the channel balance.
2. "BAL" appears on the display.
3. Turn the Volume Control (2) clockwise / counterclockwise to balance the sound on the left / right channel
4. Press the SEL key (2) four times to select the fader setting.
5. "FAD" appears on the display.
6. Turn the Volume Control (2) clockwise / counterclockwise to adjust the sound on the rear / front speakers.
ADDITIONAL SETTINGS
EQUALIZER
- Press the SEL key (2) five times to select the preset equalization. It is possible to choose between CLASS, ROCK, POP, FLAT, OFF (no equalization).
Note: Selecting a preset equalization can not adjust the high / low tone values.
LOUDNESS
- Press the SEL key (2) six times to activate / deactivate the LOUD function (bass boost).
DX / LOCAL (available in Radio mode)
DX: during the automatic search for radio stations, all stations will be received, even those that are disturbed.
LOCAL: during the automatic search for radio stations, only the stations with the strongest signal will be received.
STEREO / MONO (available in radio mode)
STEREO: set to listen to the radio in stereo.
MONO: set to listen to the radio in mono.
RADIO
AUTOMATIC TUNING
I. Press the BAND button (19) to select the frequency band (FMI / FM2 / FM3) you want to listen to.
2. Press the >> I (7) button to automatically tune to the next station.
3. Press the I << (8) button to automatically tune to the previous station.
4. If the TA function is activated, only stations that broadcast traffic reports will be tuned.
5. If the PTY function is activated, only stations that transmit the specified program type will be tuned.
MANUAL TUNING
I. Press the BAND button (19) to select the frequency band (FMI / FM2 / FM3) you want to listen to.
2. Hold down the >> I (7) or I << (8) key for a long time until the display shows MANUAL, press the >> I (7) or I << (8) key to advance or recede the tuning of 0.05MHz into FM. Wait a few seconds to return to automatic tuning (AUTO appears on the display).
STORAGE
I. Tune to the desired station as described above.
2. Press and hold a desired memory key 1 to 6 (16).
3. Repeat step 2 to store all other stations in all bands.
AUTO SCAN FUNCTION
This device is equipped with a self-storing system that searches and stores the 6 strongest stations.
I. Press the BAND button (19) to select the frequency band (FMI / FM2 / FM3) to be automatically memorized.
2. Press and hold the BAND button (19). The unit will automatically search and memorize stations with the strongest signal.
RADIO DAB
I. Press the MODE button (18) to select the DAB source.
2. Long press the BAND button (19) to automatically scan the radio stations present, press briefly to display information on the radio station being listened to.
3. After automatically searching for radio stations, 6 stations are automatically stored in the number buttons. Press the number buttons to select and play the corresponding stored stations. Long press one of the buttons to store the station being listened to in the desired memory.
4. Press the >> | (7) or | << (8) button to go to the next or previous radio station.
I. Insert the disc in the compartment (3).
2. Playback will start automatically and the track number will be shown on the display.
3. Press the I / PAU button (10) to stop playback temporarily. Press it again to resume playback.
SKIP TRACE / FOLDER
I. Press the >> I (7) key while listening to go to the next track.
2. Press the I << (8) button while listening to return to the beginning of the current track. Press it repeatedly to go to previous tracks.
3. On MP3 CDs, press the 5 or 6 (14 or 15) keys to move back or forward 10 tracks.
4. On MP3 CDs, press and hold the 5 or 6 (14 or 15) keys to move to the previous or next folder.
QUICK SEARCH
I. Press and hold the >> I (7) key while listening to the track to fast forward.
2. Press and hold the I << (8) key while listening to the track to quickly reverse.
3. Press the I / PAU (10) button to resume playback.
ADVANCED FUNCTIONS
I. Press the INT (11) key to listen in sequence the first 10 seconds of each track on the disc (INTRO). Press it again to return to normal listening (OFF).
2. Press the RPT button (12) to activate the automatic repetition of the track being listened to (RPT ONE) or of all the tracks (RPT ALL). Press it again to deactivate the repetition (RPT OFF).
3. Press the RDM button (13) to activate random playback of tracks on the disc (RANDOM). Press it again to return to the tracks in sequence.
DVD OPERATION
- Refer to the CD reading instructions for disc insertion and basic functions.
- For the advanced functions of the DVD player, see the instructions of the remote control.
Further options are available in the DVD player menu by pressing the SETUP key (15).
In particular, it is possible to set:
- Parental control (rating)
- Return to initial settings (default)
- Display and image settings
USB INPUT
I. Insert a USB device / MP3 player into the USB input (5).
2. Playback will start automatically and the track number will be shown on the display.
3. For the playback functions, refer to the chapter "CD OPERATION".
NOTE: The XCD 5770 USB car stereo may not support some external devices with a USB port, this is due to the incompatibility of the processors.
INPUT AUX IN
I. Press the MODE key (18) in sequence to move to the AUX source.
2. Connect any unit with audio output to the AUX input (17).
3. Command the outdoor unit from its commands.
BLUETOOTH (HANDS-FREE MODE)
You can make calls from your mobile phone in HANDS-FREE mode (in free mode) thanks to compatibility with the international Bluetooth wireless system.
- When making a call, speak loud and clear.
- To have an optimal condition before making or receiving a call, close the car windows.
- The voice can be reproduced in a distorted way if there are problems with the telephone field.
- Use of the HANDS-FREE function depends on the partial / total compatibility of the mobile phone.
- Make sure that the Bluetooth connection is available on your mobile phone.
CONNECTION
I. Press the MODE key (18) in sequence to switch to the BT source and activate the Bluetooth function of the mobile phone. Search for accessories / audio devices.
2. From the mobile phone select the CAR KIT device that corresponds to the car radio.
3. If required, enter the 4-digit code "0000".
4. Now the connection is established, the word LINKED will appear on the car radio display.
RECEIVING / REJECTING / TERMINATION OF A CALL
I. When you receive a call, listening to the playback source will stop and you will hear the ringing sound.
2. Press the button (19) to start the conversation or press the button (18) to reject it.
- The audio of the conversation will be audible from the car's audio system.
- During the call the car radio functions will be interrupted.
3. Press the button (18) to end the conversation.
- At the end of the conversation, listening to the source being played will automatically be resumed from where it was interrupted.
AUTOMATIC ON
I. When the radio is switched off in stand-by mode, if a call is received from the paired Bluetooth device, the car radio will automatically switch on in order to use the HANDS-FREE function.
2. At the end of the call the car radio will automatically go back to stand-by mode.
AUDIO FILE REPRODUCTION
Through the Bluetooth connection it is possible to play the audio files in the mobile phone.
Note: the car stereo only plays audio files with A2DP compatible mobile phones.
Consult the manual of your mobile phone.
When listening to music from smartphone, the following operations are possible:
I. Press the I / PAU button (10) to stop playback temporarily. Press it again to resume playback.
-
Press the >> I (7) key while listening to go to the next track.
-
Press the I << (8) button while listening to return to the beginning of the current track.
Press it repeatedly to go to previous tracks.
TECHNICAL FEATURES
GENERAL
Power supply: 12V
Absorption max 10A
Maximum output power: 45W x 4 channels
Speaker impedance: 4 ohms per channel
Frequency band: FM 87.5MHz - 108MHz DAB 174 - 240 MHz
Max transmission power Bluetooth: 0.8mW
Bluetooth transmission frequency: 2.4GHz
CD compatibility: DVD/MP4/CD/CD-R/RW/MP3
PRÉCAUTIONS DE SÉCURITÉ
PRECAUTIONS FOR CORRECT DISPOSAL OF THE PRODUCT
The symbol shown on the equipment indicates that waste must be disposed of in “separate collection” and so the product must not be disposed of together with urban waste.
The user must take the product to special “separate waste collection centres” provided by local government, or deliver it to the retailer against the purchase of a new product.
Separate collection of waste and subsequent treatment, recycling and disposal operations promotes the production of equipment with recycled materials and limits negative effects on the environment and on health caused by improper handling of waste.
Illegal disposal of the product leads to the enforcement of administrative penalties.

RECOMMANDATIONS POUR L'ÉLIMINATION CORRECTE DU PRODUIT
Simplified EU Declaration Of Conformity
Hereby Trevi Spa declares that the radio equipment type XCD 5790 DAB
is in compliance with Directive 2014/53/EU.
The full text of the EU declaration of conformity is available at the following internet address
https://www.trevi.it/dms/zidi/TREVI/DOCXCD5790DAB.pdf


- CONNESSIONI - WIRES CONNECTION
- A ALIMENTAZIONE
- B LOUDSPEAKERS
- CONNESSIONE TRAMITE BLUETOOTH (MODALITÀ HANDS-FREE)
- CARE AND MAINTENANCE
- IMPORTANT
- WARNINGS ON THE LASER
- DESCRIPTION OF UNITS COMMANDS
- REMOTE CONTROL
- ON/OFF
- CLOCK ADJUSTMENT
- SOURCE SELECTION
- AUDIO CONTROLS
- VOLUME ADJUSTMENT
- LOW / HIGH TONE ADJUSTMENT
- ADDITIONAL SETTINGS
- EQUALIZER
- LOUDNESS
- DX / LOCAL (available in Radio mode)
- STEREO / MONO (available in radio mode)
- RADIO
- AUTOMATIC TUNING
- MANUAL TUNING
- STORAGE
- AUTO SCAN FUNCTION
- RADIO DAB
- SKIP TRACE / FOLDER
- QUICK SEARCH
- ADVANCED FUNCTIONS
- DVD OPERATION
- USB INPUT
- INPUT AUX IN
- BLUETOOTH (HANDS-FREE MODE)
- CONNECTION
- RECEIVING / REJECTING / TERMINATION OF A CALL
- AUTOMATIC ON
- AUDIO FILE REPRODUCTION
- TECHNICAL FEATURES
- GENERAL
- PRÉCAUTIONS DE SÉCURITÉ
- PRECAUTIONS FOR CORRECT DISPOSAL OF THE PRODUCT
- RECOMMANDATIONS POUR L'ÉLIMINATION CORRECTE DU PRODUIT
- Simplified EU Declaration Of Conformity
Brand : Trevi
Model : XCD 5790 DAB
Category : Car radio