
MDV 6210 BT - Car radio Trevi - Free user manual and instructions
Find the device manual for free MDV 6210 BT Trevi in PDF.


| Product Type | Car Stereo with DVD/MP3/USB/SD/Bluetooth |
| Brand | Trevi |
| Model | MDV 6210 BT |
| Dimensions (W x H x D) | 178 x 50 x 230 mm |
| Weight | 2.6 kg |
| Power Supply | DC 12V (10.8~16V), negative ground |
| Max Current Consumption | 15 A |
| Max Power Output | 4 x 40 W |
| Load Impedance | 4 - 8 Ω |
| Display | 7" TFT LCD touch screen, tiltable |
| Radio Bands | FM (87.5-108 MHz), MW (522-1620 kHz) |
| RDS Functions | AF, TA, PTY, EON, REG |
| Playable Media | DVD, VCD, CD, MP3, JPEG (disc), USB, SD/MMC |
| Bluetooth | Hands-free calling, A2DP audio streaming, pairing code 1234 |
| Video Output | 1.0 Vp-p / 75 Ω (RCA) |
| Audio Output | 1.5 Vrms / 10 kΩ (RCA) |
| Remote Control | Included, uses CR2025 lithium battery |
| Detachable Front Panel | Yes, with anti-theft LED indicator |
| Audio Settings | Bass, Treble, Subwoofer, Balance, Fader, Loudness, EQ presets (Pop, Classic, Rock) |
| Languages | OSD: English, Italian, French, Spanish, Portuguese, Japanese, Korean, Russian, Thai |
| Safety Features | Auto video switch when reversing (with camera), parking brake interlock for video |
| Spare Parts Included | Mounting bracket, trim ring, removal keys, remote control, wiring harness, AV cable |
Frequently Asked Questions - MDV 6210 BT Trevi
User questions about MDV 6210 BT Trevi
0 question about this device. Answer the ones you know or ask your own.
Ask a new question about this device
Download the instructions for your Car radio in PDF format for free! Find your manual MDV 6210 BT - Trevi and take your electronic device back in hand. On this page are published all the documents necessary for the use of your device. MDV 6210 BT by Trevi.
USER MANUAL MDV 6210 BT Trevi
APERTURA E CHIUSURA SCHERMO LCD 7"
SINTONIA
RICERCA VELOCE TRACCE
VISUALIZZAZIONE (DISPLAY)
Distorsione....0.5% (Mono)
MW
In radio mode, press to turn the TA function on /off.
- PTY
In radio mode, press once to turn the PTY function on and then press it repeatedly to select a program type.
-
LCD display
-
REL
Press this button to open the front panel.
- VOL/SEL
Adjust the volume by turning the knob clockwise or counterclockwise. Press this button briefly to display the menu.
You can choose one of the following settings: L-front/R-front/L-rear/R -rear/ Bass / Treble / Subwoof / TILT / Volume. Rotate the button to adjust to the desired setting.
- IR window
To receive the infrared signal from the remote control.
- POWER/MUTE
Press the button to turn on the unit.
Press and hold the button for Is to turn off the unit. When the unit is switched on, press the button to shut off the sound output.
Press it again to resume previous sound level.
8.
In radio mode, press one of these buttons to seek a station manually.
Hold down one of the buttons to seek a station automatically.
In DVD/USB/CARD mode press the buttons to select the previous or next file.
Hold down the button for 2s to fast forward or fast backward.
- DISC Loading Slot
10.BAND/
In radio mode, press this button to select the band available.
In play mode, press this button to pause or resume playback.
11.SRC
Press this button to select one of the following sources.
12.AV IN
Connect the AV cable (supplied) to your external AV device, then press the SRC button to switch to AVI mode.
13.SD slot
Insert an SD/MMC card, the unit will play the files from SD/MMC card automatically.
NOTE: Once the SD/MMC card could not eject after pressing, just pull it out manually.
- DISP/AF
Hold down the button to display the current time, sources of front and rear displays and medias (Disc, USB, SD) available.
In radio mode, press to turn the AF function on /off.
15.OPEN
Press to open or close the TFT display.
16.
Press the button to eject a disc when it is loaded into the unit.
Press and hold this button to force ejecting a disc when the system becomes frozen accidentally.
- USB port
Insert USB device, the unit will play the files from USB automatically.
- Anti-theft led indicator
It will flash when the detachable control panel is removed.
- RESET
Using a sharp object such as a pencil to reset the unit.
-
TFT display
-
TILT/A/V
Press ∧ button to adjust the angle of TFT display.
- MENU
In DVD mode, press the button to display the DVD SETUP menu. Press and hold to display the SYSTEM SETUP menu. In other modes, press the button to display the SYSTEM SETUP menu.
REMOTE CONTROL

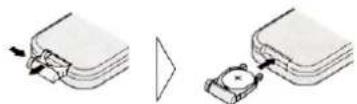
Installing the battery
Slide the tray out on the back of the remote control and insert the battery with the plus (+)and minus(-)poles pointing in the proper direction.
Use and care of the remote control
Point the remote control in the direction of the front panel to operate to use it.
Notes:
Using batteries improperly can cause them to explode.
Take note of the following points:
* Keep the battery out of the reach of children. Should the battery be swallowed, immediately consult a doctor.
* Use one CR2025(3V)lithium battery.
* Remove the battery if the remote control is not to be used for a month or longer.
* Do not short-circuit, disassemble or heat batteries.
* Do not dispose of batteries into fire or flames.
* Dispose of spent batteries properly.
* Do not let the remote control fall onto the floor, where it may become jammed under the brake or accelerator pedals.
Press this button to turn on the unit, press and hold it again to turn off the unit. In unit on, press this button to turn on/off MUTE function.
2.ST/AUDIO
In radio mode, press to select stereo or mono reception; In DVD mode, press to change the audio language.
3.LOC/SUB-T
In radio mode, press to select local stations or distant stations;
Press to change the subtitle language in DVD playback mode.
4. 0-9 Number Button
Press the button to select track, chapter, or preset stations. In radio mode, press TA/AF/PTY buttons to function corresponding item.
- [I<</>I][<<>>] ▲/▼/◄/►/ENTER/►||
In radio mode,
press I<</>I to recall a preset station; press << >> to search stations automatically and press and hold << >> to search stations manually.
In playback mode,
press I<< / >>I to select previous song or next song and press and hold I<< / >>I to play fast forward or fast rewind; press << >> button to play fast forward or fast rewind; press >ll to pause playing and press again to resume playing.
6.OSD
Press the button to display title elapsed, title remain, chapter elapsed, chapter remain, display off.
7. A-B/PROG
In DVD/VCD/CD mode, press the button to set the program order.
In DVD/VCD/CD mode, press and hold the button to play the selected A-B section.
In playback mode, press the button to replay.
In bluetooth mode, press this button to function as what does on the mobile.
9.VOL+/VOL-, SEL
Press the button to increase or decrease volume level. Press repeatedly to switch the sound characteristics.
VOL+/- on the remote control or rotating SEL button on the unit to select ON or OFF.
10.RDM/#
In playback mode, press the button to play tracks at random order.
In bluetooth mode, press this button to function as what does on the mobile.
II. TITLE/EON
In DVD mode, repeatedly press the button to select different titles.
In VCD mode, press this button to function PBC on/off. In MP3 mode, press to see ID3 Tag information.
In radio mode, press and hold this button to turn EON on or off.
12.
Press the button to stop the playback.
13.ZOOM/REG
In DVD mode, press the button to increase or decrease the picture in size.
In radio mode, press and hold this button to turn REG on or off.
14.SETUP
In playback mode, press to display system setting picture, the user can select some relative constant parameters. In other mode, press this button to switch system setup page.
15.Ⅱ> (Slow forward or slow reward)
In playback mode, press the button to select slow forward or slow reward.
16.MENU
Press the button to return to the root menu of the disc in DVD playback mode.
17.CLEAR
Press the button to activate CLEAR function, it can clear the erroneous number what you import.
18.LOUD
Press the button to activate LOUD function.
19.EQ
Press the button to select the corresponding preset modes to adjust the sound quality.
20.AMS/INTRO
In radio mode, press to scan each stored station, long press to store the station into the memory.
In bluetooth mode, press this button to function as what does on the mobile.
21.BAND/P/N
In radio mode, press to select bands.
In DVD, VCD mode, press the button to select PAL, AUTO or NTSC system.
In bluetooth mode, press this button to function as what does on the mobile.
22.GOTO
In DVD/VCD/CD mode, press to set the playback time. In MP3 mode, press this button to select the desired track by number buttons on the remote control.
23.ANGLE
Press to change the viewing angle in DVD playback mode.
24.MODE
Press the button to select your desired mode.
INSTALLATION
Notes
Before finally installing the unit, connect the wiring temporarily, making sure that all connections are correct and the unit and the system are properly working.
Use only the parts included with unit to ensure proper installation. The use of unauthorized parts can cause malfunctions and can void the guarantee.
Consult with your nearest dealer if installation requires the drilling of holes or other modifications of the vehicle.
Install the unit where it does not get in the driver's way and cannot injure the passenger if there is a sudden stop.
The semiconductor laser will be damaged if it overheats, so don't install the unit in high temperature environment
-- for instance, near a heater outlet.
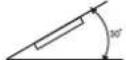
If installation angle exceeds 30° from horizontal, the unit might not give its optimum performance.
The cords must not cover up the area shown in the figure below. This is necessary to allow the amplifies to radiate freely.

Install the unit
I. Install the mounting bracket into the dashboard of the car. And adjust the mounting bracket to horizontal
2. Fix the mounting bracket into place by pressing its tags outwards
3.Slide the main unit slowly inside the mounting bracket until the tags on either sides of the bracket lock into the respective holes on the sides of the main unit.
4. Install the removable trim ring.

natural_image
Diagram showing a device interacting with a textured block, labeled 'Picture 1' (no text or symbols on the diagram itself)
natural_image
Diagram of a mechanical component with a close-up inset showing a tool interacting with it (no text or symbols present)
natural_image
Diagram showing two rectangular blocks with a curved arrow pointing from one to the other (no text or symbols)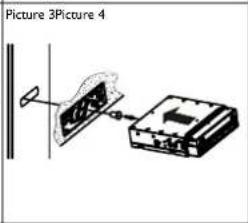
Detach the unit
- Detach the removable trim ring
- Insert the keys supplied to the unit at both sides of the unit (shown as illustrated) until they click. Pulling the keys makes it possible to remove the unit from the dashboard.
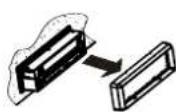
Picture 1


Picture 2
BASIC OPERATION
I. Reset the Unit
When operating the unit for the first time or after replacing the car battery, you must reset the unit.
Remove the guard against theft front panel at first, then press RESET button with a pointed object, (such as a ball-point pen) to set the unit to initial status.
This function can only be operated by the head unit.
2.Turning the Unit On/Off
Press PWR button to turn on the unit. In unit ON, when insert a disc, the unit will automatically star t playing.
Long pressing it to turn off the unit completely.
Pressing PWR button on the head unit also performs the same operation.
3.Volume Control
Press VOL+ button on the remote control to increase the sound level and press VOL- button on the remote control to decrease the sound level.
Rotating(VOL+ or VOL-) on the head unit or touching the VOL-/VOL+ on the TFT panel also performs the same operation.
- Setting the Sound Characteristics
Repeatedly press SEL button to select the desired mode in the following order:

Note:
After selecting the desired mode, you can adjust the current level by pressing VOL buttons on the remote control.
* If you dont adjust VOL button in 3 seconds after selecting the desired mode, the unit will automatically return to the current mode being displayed.
5.Turning Loudness On/Off
Short press LOUD button on the remote control to activate loud function.
Press it again to shut down LOUD function.
6.EQ Setting
While listening to music, you can select the corresponding preset (popular/classic /rock) modes, you can adjust the sound texture more precisely by using EQ button on the remote control.
Repeatedly pressing EQ button to choose the following modes in turn:

SYSTEM MENU
The user can operate by touch screen directly.
Radio Operation

I. SOURCE MENU
To display the SOURCE MENU.
$$ 2 / 9. > 1 < $$
Touch once: to seek a station automatically downwards/upwards.
Touch and hold: to seek a station manually downwards/upwards.
- station preset button
Touch once: to select the preset station.
Touch and hold: to store the current station into the preset station position.
4.BAND
To switch bands.
5.AMS
Touch once: to browse preset stations.
Touch and hold: to search and store stations automatically.
6.LOC
To select strong or weak stations reception mode.
7. SETUP
To enter system setup page.
8. VOLUME
Press + button to increase the volume and press - button to decrease the volume.
RDS Operation
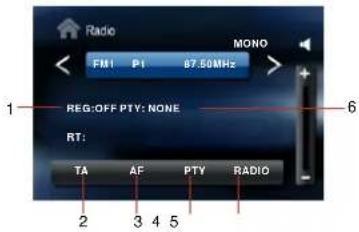
1. REG
To turn on or off the REG function.
2.TA
to turn on /off TA function
3.AF
to turn on /off AF function
4.PTY
to switch program type
5.RADIO
To switch to radio operation page.
6.PTY
To switch the RDS program type.
REG(Regional)
ON:active the REG function,the unit automatically keeps receiving the related RDS station.
OFF:deactive the REG function
SYSTEM MENU
Multi-- Player Operation
In DVD mode, the touching screen display as following after touching at random position.

1.PLAY
To start the playback.
2.PAUSE
To pause the playback.
3.STOP
To stop playing, touch twice to stop completely.
4. MENU
To display the DVD SETUP screen.
5.PREV/NEXT
To select previous/next tracks.
NOTE: Touch on the left middle position twice to display the TITLE MENU selection screen, touch the right middle position twice to display the ROOT MENU selection screen, touch the right top position to display the number keyboard.
You can select chapter(track) by tapping the touchable screen or the RC.
SETUP OPERATION
TOUCH ON THE TOP LEFT POSITION TO ENTER SOURCE INTERFACE.
The unit will return to the previous mode if no operation is performed in 5 seconds.

Touch on SETUP button on the above fig.. The user can start the system setting.
I. SETUP
Touch on the ⚙ SETUP button and the screen will display as following:

Fig.1.1
TIME MODE
Set the time display mode(12H/24H).
TOUCH SCREEN
To calibrate the touch screen.
RADIO REGION
To select the right region as per the user locates.
Tapping on ▼ button to turn to next page shown as fig.2.
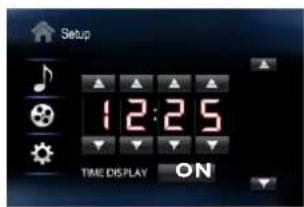
Fig.1.2
In FIG.2
TIME ADJUSTMENT
To adjust the time by tapping ▲▼ button;
TIME DISPLAY
ON: To display the time
OFF: To turn off the time display mode.
SETUP OPERATION
2.Audio
Touch on the 🎨 AUDIO button and the screen will display as following:
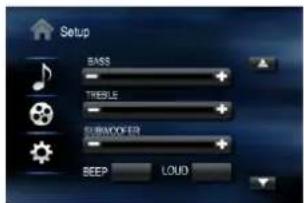
Fig.2.1
In FIG.1, the user can adjust the value of BASS, TREBLE and SUB WOOFER by tapping on +/ - on the touch screen or press on +/- button on the remote control or on the front panel.
Tapping on ▲ button to turn to previous page shown as fig.2.

Fig.2.1
In FIG.1, the user can turn on/off the BEEP and LOUD function by tapping ON or OFF button.
Tapping on ▼ button to turn to next page shown as fig.3.
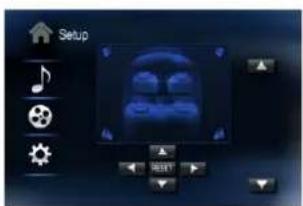
Fig.2.2
In FIG.2, the user can adjust the sound output effect leftwards or rightwards by tapping◀▶ button; the sound output effect front wards or rearwards by tapping▲▼ button.
Touch on RESET button to reset the setting to the defaulted mode.
3.Video
Press on the 📋 VIDEO button and the screen will display as following:

In this setting, the user can adjust the value of CONTRAST, BRIGHTNESS AND COLOR by tapping on the items at the left/right end of each value bar.
According to the specific condition, the user can adjust the light effect on screen by tapping BRIGHT, NORMAL and SOFT modes.
RADIO OPERATION
Selecting the radio mode, the screen displays as the following:

I.Band Selector
In radio mode, repeatedly press BAND button on the remote control to select a band in the following order:

*Pressing BAND on the touchable screen or on the panel also performs the same operation.
2. Tuning
2.1 Automatic Tuning
There are three ways to tune in a station downwards automatically as below:
press << button on the remote control; press << button on the panel; touch on < button on the touch screen.
There are three ways to tune in a station upwards automatically as below:
press >> button on the remote control; press >> button on the panel; touch on > button on the touch screen.
2.1 Manual Tuning
There are three ways to tune in a station downwards manually as below:
press and hold button on the remote control; press and hold button on the panel; touch and hold < button on the touch screen.
There are three ways to tune in a station upwards manually as below:
press and hold▶ button on the remote control; press and hold▶ button on the panel; touch and hold on > button on the touch screen.
3. Recalling a preset station
A total of 30 preset stations (18-FM, 12-MW) are available in memory.
Press << />> button on the remote control OR press AMS button to recall a preset station.
The display shows the preset number and frequency of the stored station, touch one of these to select a corresponding station.
Note: Press any one of the station preset buttons on the remote control also to select the preset stations.
4. Store stations
4.1 Auto store
It is a function for storing up to 6 stations.
Follow the two steps:
Select the desired band;
hold down AMS button, the stations with good reception are stored automatically.
4.2 Manual store
To turn in a station to be stored in the preset memory, press and hold any one of the preset buttons (1-6) to store on. *If a new station will be stored in a preset memory which already has a station, the current station will be cleared and replaced by the new station.
5.DX/LOC Selector
In radio mode, press LOC button on the remote control to select strong or weak station reception.
5.1 LOC
When LOC displays on the touch screen, only strong signal stations will be tuned.
5.2 DX
When there is no LOC displays on the touch screen, both strong and weak stations can be received.
Note: The initial mode is DX mode.
6. MO/ST Selector
In FM of radio mode, you can press ST button on the remote control to select Mono mode or Stereo mode.
7. EXACT STATION SELECTION
7.1 Press number buttons(1-6) on the remote control to select the six preset stations.
7.2 To select the exact station, press GOTO button on the remote control then enter the exact frequency numbers.
The RDS allows you to receive a variety of information such as traffic information, station names, and to automatically retune to a stronger transmitter that is broadcasting the same programme.
Tips
The RDS digital data includes the followings:
PI Programme Identification
PS Programme Service Name
AF List of Alternative Frequencies
TP Traffic Programme
TA Traffic Announcement
PTY Programme Type
EON Enhanced Other Networks
Turn on/off the AF function
* Press AF button to switch on/off AF function.
*The tuner will search for a station with RDS information
* The tuner will retune frequencies when ever the reception signals getting worse.
Receiving Traffic information
I. Press the TA button to switch on TA mode.
- The unit search for traffic information station automatically. When a traffic information station is tuned in, the TP mark display on touchable screen. If you do not want to listen to the traffic information being received, press TA button to skip that traffic information message.
The TA function will remain in the ON position. And the unit will be back to previous mode.
- Press it again to switch off TA mode.
* Traffic information is heard only when it is being broadcast. In other mode, Traffic announcement can interrupt the source sound output when broadcast. After broadcasted, the unit will automatically return to the original source play before the traffic information broadcast began.
PTY(Programme Type)Tuning
The PTY function allows you to search for stations with a particular Program Type. Touching Page1 button on the radio display screen to switch to the RDS screen.
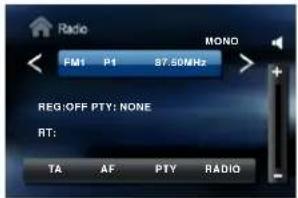
I. Press PTY button on touchable screen or on the remote control to select a programme type. After selecting the programme type for 3 seconds, the unit will search for a station in the selected programme type.
*If the PTY station is found, the tuner will be stop searching. *If the PTY station is not found, 'No Pty will be display on the screen.
All types for your selection are listed in table as below:
| NEWS | ROCK MUSIC | PHONE IN |
| CURRENT AFFAIR | M.O.R. MUSIC | TRAVEL |
| INFORMATION | LIGHT CLASSIC | LEISURE |
| SPORTS | SERIOUS CLASSIC | JAZZ MUSIC |
| EDUCATION | OTHER MUSIC | COUNTRY |
| DRAMA | WEATHER | NATIONAL |
| CULTURE | FINANCE | OLDIES |
| SCIENCE | CHILDREN | FOLK |
| VARIED | SOCIAL AFFAIR | DOCUMENTARY |
| POP MUSIC | RELIGION | TEST → ALARM |
An emergency broadcasting(ALARM) will broadcast automatically and produce the beep sound when it is received. The sound output through other source will be muted.
(I) Insert a disc into the disc loading slot, the unit will play automatically
* You can eject a disc by press ▲ button.
(2) Use the VOL+/VOL- to adjust the sound level.
Rotating (VOL+ or VOL-) on the head unit or touch VOL-/VOL+ button on the TFT panel performs the same operation.
- Skip backward/forward/F.F/F.REW
To skip back or forward to another track or chapter, press |◀◀ or ▶▶.
Press ◀◀ or ▶▶ to perform fast reward or fast forwards. Repeatedly press the button to switch in follows order:

*Pressing |◀◀/◀ /▶ /▶▶| button on the head unit performs the skip reward/forward operation.
*Long pressing |◀◀/◀ /▶ /▶▶| button on the head unit performs the fast reward/forward operation.
- Stop the playback
Press ■ button to set the unit in pre-stop status, then press ENTER button to play the current chapter or track, press stop button twice to stop playing completely, then press ENTER button to play the beginning of disc.
4.Pause the Playback
Press ▶II button to suspend the playback, press it again to return to normal playback.
*Pressing ▶ button on the head unit performs the same operation.
- Playing Tracks in Random Order
During VCD/CD playback, when pressing RDM button,
"RANDOM will appear on the display, the unit plays any track at random and the number selection is unavailable. Press it again to return to normal playing.
6.Repeat Playing
In playback mode, press RPT on the remote control to perform replaying function when you need to repeat the chapter you like.
*The initial repeating mode is all
During DVD playback, the replay option change in following order:

During VCD/CD playback, the replay option change in following order:
$$ \text { TRACK } \longrightarrow \text { OFF } $$
- Slow motion playback
In VCD mode, press ||▶ to slow forward.
There are 4 speeds each press decreases the speed until the minimum speed is reached.

In DVD mode, press ▶ to slow forward or slow reward

*This function is operated by using the remote control.
- Increase the size of the picture
Press ZOOM to increase the picture in size.
There are 6 sizes, Each press increases the size until the maximum size is reached.

*This function is operated by using the remote control.
- On-screen display
In DVD mode, press to display Title Elapsed, Title Remain, Chapter Elapsed, Chapter Remain, Display Off. In VCD/CD mode, press to display Single Elapsed, Single Remain, Total Elapsed, Total Remain, Display Off.
This function is operated by using the remote control.
* This function can only be operated by the remote control.
10.Programmed playback
In DVD/VCD/CD mode, press the PROG button and the program menu will be displayed. Press the number buttons to select the track number. Use the direction buttons to move the cursor to START and press ENTER to start programmed playback. Move the cursor to EXIT and press ENTER to exit the programmed playback. Move the cursor to REW and press ENTER to go to the last page; move the cursor to NEXT and press ENTER to go to the next page. During this process, press PROG to cancel the programmed playback.
* This function can only be operated by the remote control.
II. Changing the subtitle language(Multi-subtitle)
With DVDs featuring multi-subtitle data. You can press SUB-T to switch between subtitle languages during playback. Options selection is as follows:
— Subtitles 02 — Subtitles OFF Subtitle 01
This function is operated by the remote control. Notes:
*This function only operates with DVDs featuring multi-subtitle.
- Changing the audio language
Can be done by pressing the AUDIO button to switch between languages and audio systems during playback.
Selection options switch as follows:
Audio 01 —— Audio 02
This function is operated by using the remote control. Notes:
This function only operates with DVDs featuring multi-audio recordings.
- Selecting different title (DVD mode)
On a DVD disc, you can press TITLE on the remote control to return the root menu of the disc, and you can select different chapters or titles upward or downward by using ▼ or ▲.
*This function is operated by using the remote control.
14.Selecting root menu(DVD mode)
For DVD disc, you can press MENU to select different root menus, and then press [▲][▼][◀][▶] [ENTER] buttons to enter the sub-menus. Press[▲][▼][◀][▶] buttons, and the number buttons, and then ENTER button to select and enter what you desire.
- SETUP MENU
In DVD/VCD/CDmode, press SETUP, the screen will display the system setting picture, the user can select some relative constant parameters.
The user can also set them as needed by moving the cursor and using [▲][▼][◀]▶] buttons, and then press ENTER to validate the actions.
This function is operated by using the remote control. Notes:
*The selections are the preferred options that will be chosen if they are available on a disc. If the disc that is inserted does not have the preferred option then the discs own preference will be used.
*Regarding SETUP MENU, please refer to the following pages for more details.
*Some functions may vary depending on the types of models or formats of the disc.
- Auto switch to video
When driving a car, in DVD/SD/USB and video active mode, TFT display Attention: Cannot use this function When driving " Just braking car, the TFT can switch to video automatically.
-
Auto switch to video when revering the car When reversing, the unit can switch to reversing video display automatically so you can see behind of the vehicle if cameras have been set up, and the sound will be shut off.
-
Selecting an acoustic output mode In VCD mode, press the AUDIO button on the remote control repeatedly to select an audio mode in the following order:

- Changing the viewing angle(Multi-angle) With DVDs featuring multi-angle (scenes shot from multiple angles) recordings, press the ANGLE button to switch between viewing angles during playback. The viewing angle changes in the following order: ANGLE1-ANGLE2-ANGLE3
Note:
* This function is operated by using the remote control.
* This function is only available with DVDs featuring multi-angle recordings.
* The symbol on a DVD packaging indicates that it features multi-angle scenes. The number in the symbol indicates the number of angles from which scenes were shot.
* The ANGLE button does not function during fast forward/fast rewind or pause.
SYSTEM SETUP
When you press SETUP button on the remote control or press MENU button on the panel, the setup menu will be displayed. It include General Setting, Audio Setup, Video Setup, Preference Setup, Password Setup and Exit Setup menu.
- Within the setup menu, you can use [▼][◀][▶][▲] buttons on the remote control to move the cursor, and then press the ENTER/PLAY button to make your selection. Press [◀] can return to the previous menu.
- To exit setup menu, you can select the EXIT SETUP item in sub-menu or press SETUP button or press MENU button on the panel. *Touching the item on the screen also preform same operation.
I. GENERAL SETUP PAGE
Setup TV screen format, video type and all DVD functions.
I.I TV DISPLAY
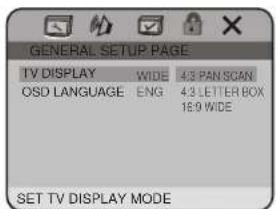
The TV Display which select the different ratio of display format and the screen of TV. There are various types of display on screen for different matches between Disc and TV. Note:
- No matter which display format is selected, a picture recorded in standard 4:3 format always displays in the 4:3 aspect ratio.
● The display format of DVD titles may vary; please refer to the information that accompanies your specific DVD title. - If the DVD title is recorded in 16:9 wide display format while the TV is a standard 4:3 screen, horizontal compression of the image will result.
- Some DVD titles may be recorded in special formats. In such cases, the DVD titles will always appear on the screen in their original format, regardless of which TV display format you select.
SYSTEM SETUP
1.2 OSD LANGUAGE
On Screen Display(OSD)Language:Users can select the whole setup menu and on-screen display language.

2. AUDIO SETUP PAGE
User can select digital audio setup or dolby digital setup.

2. I DOLBY DIGITAL SETUP PAGE
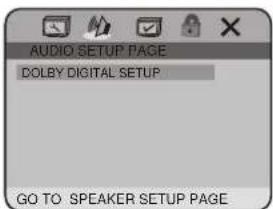
2.1.1 DUAL MONO

Users can switch the binaural mode among STEREO, L-MONO,R-MONO and MIX-MONO.
2.1.2 DYNAMIC:
Select the provided option to change the Dynamic range setting.
3. PREFERENCE SETUP PAGE
3.1 AUDIO
AUDIO: Sets the preferred audio language as the default when playing DVD. (IF DVD support these languages)

3.2 SUBTITLE
SUBTITLE: Sets the preferred subtitle language as the default when playing DVD.(If DVD support these languages)

3.3 DISC MENU
DISC MENU: Sets the preferred menu language as the default when playing DVD.
(If DVD support these languages.)
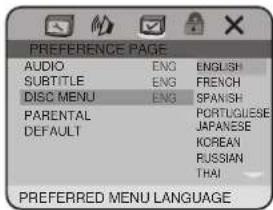
3.4 PARENTAL
PARENTAL: The parental control function works in conjunction with the different censorship classes assigned to DVDs.
These classes help to control the types of DVDs that the family watches.
There are up to 8 censorship classes for DVDs. Note:
- The PARENTAL is changeable when 5.1 PASS WORD MODE set to OFF.
- After setting the level of parental control. Please set the password as ON to perform the lock of changing.
SYSTEM SETUP

3.5 DEFAULT
DEFAULT: Resets to all the manufacturer's original settings for this DVD player Press ENTER to perform the reset.

4. PASSWORD SETUP PAGE
4.1 PASSWORD MODE
PASSWORD MODE: Sets the function operation to be ON for locking the parental function, and OFF for changing the parental level.
There will be old password confirmation when ON/OFF
- interchange. The initial password is 136900.


4.2 PASSWORD CHANGE
PASSWORD CHANGE: you can change the password, please type 6 numerals as new password.
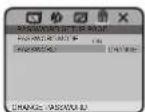

*Touching the inputting position where password, the screen will display the number button, and user can input the password by touching number button
5. EXIT SETUP MENU

SETTING THE TV SCREEN SIZE
Multi-aspect ratio suit to different TV screen size.
| Picture format on Disc | TV Screen Size | ||
| 4:3 | 16:9 | ||
| Pan Scan | Letter-box | WideScreen | |
| 4:3 | |||
| 16:9 | |||
Function supported by DVD discs
There are many functions available on DVD discs and the functions vary per player and per manufacturer.

Regional code and signal system

DTS surround

Number of languages

Subtitle languages

Picture proportion modes

Parent lock

Angles for viewing

Closed Caption
MP3 OPERATION
Playing a disc, an SD/MMC card or a USB device containing MP3 files
Connect a USB device or press OPEN button to release the front panel, insert a disc into the disc slot or SD/MMC card into the card slot. The unit will automatically switch on when a disc, card or USB device is inserted. The screen will display as follow:

During MP3 playback, press the ▶▶ | or ◀◀ button on the RC or on the panel or touch on ▶ | / ◀◀ button on the screen to select the next/previous track.
Repeat playing
When playing MP3 files, press the RPT button repeatedly on the remote control to select repeat mode: REPEAT ONE, OFF.
While in REPEAT ONE mode, it will play one track repeatedly. The defaulted mode is REPEAT ALL mode, the unit will play all tracks repeatedly.
The number buttons
Selecting any track directly by using Number button(0-9). For example, if you want to play the 23th track, just press button 2 and then press button 3 and the corresponding track will be played.
Note:
* This function can be operated using the remote control or touch top right corner of screen to be functioned.
* If you make a mistake, press CLEAR button to clear.
Stop playing
When playing MP3 files, press ■ button on the remote control OR on the bottom of the screen to stop playback.
PAUSING PLAYING
When playing MP3 files, press▶ on the remote control or on the bottom of the screen to pause playing and press again to resume playing.
SKIP FORWARD/BACKWARD PLAY
Press◀◀ or ▶▶ on the remote control or press and hold ▶▶◀ | or ◀◀◀ on the panel to performed fast rewind or fast forward.

ISO FILE OPERATION
when playing the media with folders, the unit will play the first track in the first folder automatically.
Press the ▶◀ ▶▶ on the remote control or ▶ / ▶ buttons on the screen to move the cursor to current folder then press ENTER button on the remote control to be back to folder list.
Note: The unit will play the tracks in next folder after playing the previous folder.
Eject a disc
Press ▲ button on the unit or on the remote control to eject a disc.
DVB-T OPERATION
This equipment will serve you with the available received channels supplied by the mobile signals. Press SRC button on the panel or MODE button on the remote control or touch on the left top of the screen then select TV mode. Touch at random area to start the operation.
MAIN MENU

1.
To display the channel list
2.
To be back to previous interface
3.
To adjust the volume control
4
To display the main menu
5.
To select the channels
SEARCH AUTOMATICALLY:


The unit can receive and store the channels according to the strength of the signal received after finishing searching the channel, all the searched station will be displayed and touch button to save it.
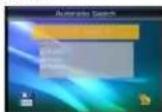
Touch
to be back to previous menu.
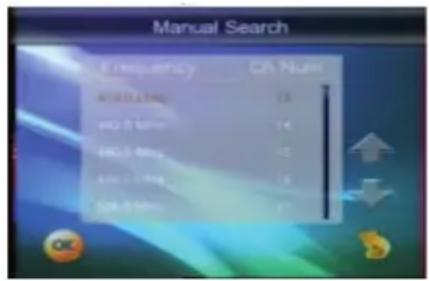
Search manually:

Touch ↑↓ button to switch frequency and touch OK button to confirm it.
DISPLAY SETUP
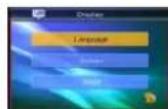

Language
To switch the languages of the channels and touch OK button to select.
Screen
To adjust the ratio and format of the screen.
OSD
To setup the background of the screen.
SYSTEM SETUP

Country: To select the country or area.
*The preset channels will be cleared if the setup is changed.
Version: To display the version info.
Reset Default: To reset the setting.
*All the preset setting will be cleared.

When a channel is searched, touch button to display the channel list.
Press >>1/1<< buttons on the remote control or touch ↓↑ button to select channels and touch button to watch the selected channels.
Touch← /→ button to switch modes between
TV and radio and touch 📄 button to confirm the selection.
BLUETOOTH OPERATION
Select the BLUETOOTH mode
To select the BLUETOOTH mode, the users can make it done by the following ways:
I. Press on SRC/NAV button on the front panel to switch to BLUETOOTH mode;
2. Press on SRC button on the remote control to switch to BLUETOOTH mode;
3. Tap on the BLUETOOTH ICON at the MAIN MENU on the screen.
HANDS-FREE PHONE
The unit is compatible with Bluetooth international standard wireless communication technology. You can place a hands-free call by using a Bluetooth compatible with the mobile phone.
*When you place a call, speak loudly and clearly.
*Shut the windows before calling.
*It is normal that some unnatural voice may be heard during your calling which may be caused by the conditions of the signals or the one who uses the mobile phone.
*Due to some special mobile phone, you may not be able to use a hands-free phone.
CONNECTING
Selecting B T mode

Searching for device by using mobile phone.

The connection is successful.
The TFT displays CONNECT.

Selectting bluetooth device by mobile phone. Input a pass code:1234
*The Bluetooth setting is required for a mobile phone. Read the Owner's Manual of the mobile phone.
*After paired, the unit can connect with the mobile phone automatically. in valid range)
* If the mobile phone and the device are disconnected accidentally, the screen will display Disconnect, just press LINK button on the screen to reconnect(refer to Bluetooth setup).
NOTE
*Press / button on the remote control also performs dial(receiving) a call or hang up a call function
*The incoming call will interrupt the sound output through other source, and switch to the hands-free phone screen automatically when it is received. After the call is ended, the unit will be back to the previous mode.
* The hands-free phone sounds output through the built-in speakers. When calling, press Audio Transfer button on the screen to switch the mode to receive a call by using mobile phone, and press it again to return to hands-free mode.
BLUETOOTH OPERATION
I. MAIN PAGE
After selecting the bluetooth mode, MAIN PAGE will display as FIG.1. The user can dial up in this mode, rput the number required by pressing number button on the remote control or on the screen other press ↕ button on or on the screen to dial up.
The telephone number you dialed is appeared on the DISPLAY COLUMN.
FIG.1
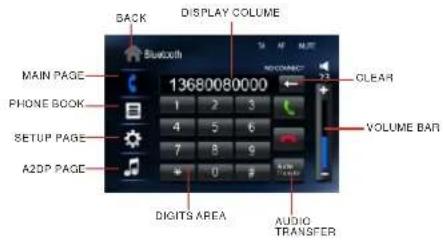
2. PHONE BOOK
Tap on PHONE BOOK button on the screen shown above, the screen will display as following FIG.2.
There are three item: DIALED CALLS, RECEIVED CALLS and MISSED CALLS.
A maximum of 15 numbers can be stored in each call history. A maximum of 5 numbers will be displayed in each page.
Tap on ▲ button to turn to previous/next page.(FIG.3)
You can place a call by selecting a number from a list of each item.
FIG.2

FIG.3

Receiving a Call
when a call is coming, the received call sound rings, and the coming call number is shown in the display.
Press ↕ button on the screen to starts the call.
End a Call or reject a call
Press button on the screen or on the remote control to end or reject the call.
BLUETOOTH OPERATION
3. SETUP PAGE
Tap on SETUP PAGE button on the screen shown in FIG.1, the screen will display as following FIG.4.
FIG.4

3.1 AUTO-ANSWER
ON: Tap on this button then the coming call will be answer automatically.
OFF: Tap on this button then the coming call will not be answered automatically.
3.2 CONNECT
AUTO: Tap on this button then the unit and the device will be reconnected automatically.
MANUAL: Tap on this button then the unit and the device will be reconnected manually.
3.3 PAIR
Tap on this button to pair up the unit and the device.
3.4 RESET
Tap on this button to reset the bluetooth setup.
4. BLUETOOTH AUDIO FUNCTION
Tap on A2DP PAGE button on the screen shown in FIG.1, the screen will display as following FIG.5.
Audio information of a bluetooth, compatible with mobile phone, portable player, etc., is transferred by wireless technology.
FIG.5


Play/pause

▶ Previous/next track

Stop playback
Refer to CONNECT details to connect bluetooth audio devices.
NOTE
*Video playback is not supported.
*Using remote control also performs the same operation.
SPECIFICATION
GENERAL
power requirement ---- DC/12V(10.8\~16V)
grounding system----negative type
max: current consumption 15 ADC
max: power output 4X40W
load impedance 44-8(Ω)
dimensions----178X230X50MM
weight----2.6KG
DVD PLAYER
S/N ratio more than 70dB(1kHz)
dynamic range----more than 70dB(1kHz)
distortion----less than 0.2%
video output 1.0Vp-p+0.2V/75Ω
audio output (RCA) 1.5Vrms+0.3V 10K Ω
FMTUNER
frequency range 87.5\~108.0MHz
usable sensitivity 10dB
S/N ratio 55dB(mono)
distortion 0.5%(mono)
stereo separation ---- 30dB(1kHz)
MW TUNER
frequency range 522\~1620kHz
usable sensitivity 30dB
signal-to-noise ratio 50dB
NOTE:
Due to continuous product improvement, specifications and design are subject to change without prior notice.

- APERTURA E CHIUSURA SCHERMO LCD 7"
- SINTONIA
- RICERCA VELOCE TRACCE
- VISUALIZZAZIONE (DISPLAY)
- MW
- REMOTE CONTROL
- Installing the battery
- Use and care of the remote control
- Notes:
- 2.ST/AUDIO
- 3.LOC/SUB-T
- 0-9 Number Button
- 6.OSD
- A-B/PROG
- INSTALLATION
- BASIC OPERATION
- Note:
- SYSTEM MENU
- SOURCE MENU
- 4.BAND
- 5.AMS
- 6.LOC
- SETUP
- VOLUME
- REG
- 2.TA
- 3.AF
- 4.PTY
- 5.RADIO
- 6.PTY
- REG(Regional)
- Multi-- Player Operation
- 1.PLAY
- 2.PAUSE
- 3.STOP
- MENU
- 5.PREV/NEXT
- SETUP OPERATION
- SETUP
- TIME MODE
- TOUCH SCREEN
- RADIO REGION
- In FIG.2
- TIME DISPLAY
- 2.Audio
- 3.Video
- RADIO OPERATION
- I.Band Selector
- Tuning
- Automatic Tuning
- Manual Tuning
- Recalling a preset station
- Store stations
- Auto store
- Manual store
- 5.DX/LOC Selector
- LOC
- DX
- MO/ST Selector
- EXACT STATION SELECTION
- Turn on/off the AF function
- Receiving Traffic information
- SYSTEM SETUP
- GENERAL SETUP PAGE
- OSD LANGUAGE
- AUDIO SETUP PAGE
- I DOLBY DIGITAL SETUP PAGE
- DUAL MONO
- DYNAMIC:
- PREFERENCE SETUP PAGE
- AUDIO
- SUBTITLE
- DISC MENU
- PARENTAL
- DEFAULT
- PASSWORD SETUP PAGE
- PASSWORD MODE
- PASSWORD CHANGE
- EXIT SETUP MENU
- SETTING THE TV SCREEN SIZE
- MP3 OPERATION
- Playing a disc, an SD/MMC card or a USB device containing MP3 files
- Repeat playing
- The number buttons
- Stop playing
- PAUSING PLAYING
- SKIP FORWARD/BACKWARD PLAY
- ISO FILE OPERATION
- Eject a disc
- DVB-T OPERATION
- MAIN MENU
- SEARCH AUTOMATICALLY:
- DISPLAY SETUP
- Language
- Screen
- OSD
- BLUETOOTH OPERATION
- Select the BLUETOOTH mode
- HANDS-FREE PHONE
- CONNECTING
- NOTE
- MAIN PAGE
- PHONE BOOK
- Receiving a Call
- End a Call or reject a call
- SETUP PAGE
- AUTO-ANSWER
- CONNECT
- PAIR
- RESET
- BLUETOOTH AUDIO FUNCTION
- SPECIFICATION
- GENERAL
- DVD PLAYER
- FMTUNER
- MW TUNER
Brand : Trevi
Model : MDV 6210 BT
Category : Car radio