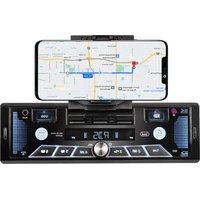
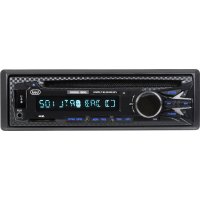
SCD 5753 DAB - Car stereo Trevi - Free user manual and instructions
Find the device manual for free SCD 5753 DAB Trevi in PDF.
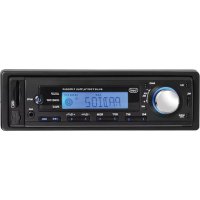
| Product type | Car radio |
| Brand | Trevi |
| Model | SCD 5753 DAB |
| Dimensions (W x H) | 182 mm x 53 mm |
| Power supply | 12 V DC |
| Output power | 40 W x 4 channels |
| Speaker impedance | 4 ohms per channel |
| Frequency bands | FM: 87.5-108 MHz; AM: 522-1620 kHz; DAB: 174-240 MHz |
| Display | Backlit LCD screen |
| Remote control | Included, CR2025 battery |
| DAB antenna | Windscreen antenna included |
| Bluetooth functions | Hands-free, A2DP audio streaming |
| Audio inputs | USB (playback), MicroSD slot, front AUX input |
| Smartphone holder | Integrated articulated holder (screen up to 7 inches) |
| Dedicated app | SMART BT IPLUG (iOS/Android) |
| Fast USB charging | Dedicated USB port (charging only) |
| Equalization | Presets: Jazz, Classical, Rock, Pop, Flat, User |
| RDS function | AF, TA, PTY, REG, EON |
| Maintenance and cleaning | Soft slightly damp cloth, no solvents |
| Installation | By qualified personnel, fixing with release levers |
| Safety | Do not obstruct view, do not interfere with airbags |
Frequently Asked Questions - SCD 5753 DAB Trevi
User questions about SCD 5753 DAB Trevi
0 question about this device. Answer the ones you know or ask your own.
Ask a new question about this device
Download the instructions for your Car stereo in PDF format for free! Find your manual SCD 5753 DAB - Trevi and take your electronic device back in hand. On this page are published all the documents necessary for the use of your device. SCD 5753 DAB by Trevi.
USER MANUAL SCD 5753 DAB Trevi
RADIO RIPRODUTTORE DAB/FM/BT CON IN-GRESSO AUX-IN, MicroSD/USB
Manuale d'uso e collegamento
DAB
FM
BLUETOOTH
MicroSD/USB
AUX-IN
SYSTEM CAR-STEREO DAB/FM/BT PLAYER WITH AUX-IN - MicroSD/USB
Instruction manual
RADIO LECTEUR DAB/FM/BT AVEC AUX-IN - MicroSD/USB
Mode d'emploi
RADIO-DAB/FM/BT -SPIELER EINZUG AUX-IN, MicroSD/USB
EN If you will not find your language on the instruction manual, please go on our website www.trevi.it to find it
natural_image
Technical line drawing of a mechanical assembly with a tool inserted, showing internal components and a separate curved component (no text or symbols)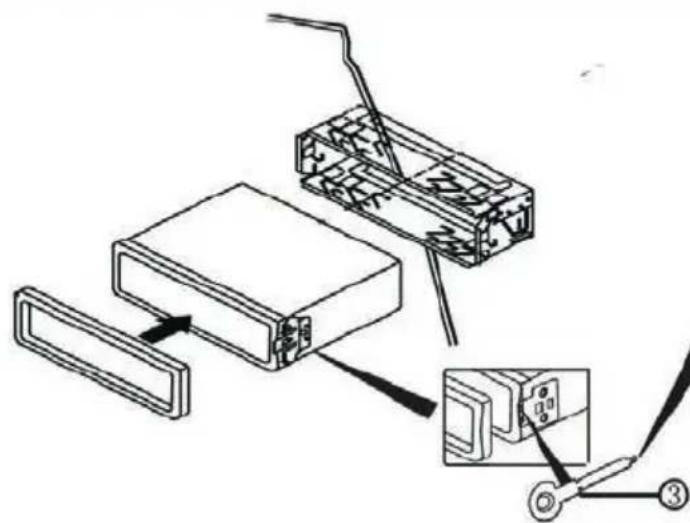
text_image
Technical diagram showing assembly steps of a device with labeled components and connection pointsCONNESSIONE TRAMITE BLUETOOTH (MODALITÀ HANDS-FREE)
text_image
QR code image containing encoded data, no visible human-readable textIOS

text_image
QR code image containing encoded data, no visible human-readable textAndroid
- Do not put your ear close to the speaker during the setting and volume adjustments
- If liquids penetrate inside the appliance, immediately disconnect and bring the appliance to the nearest authorized TREVI service center.
- The appliance must not be exposed to dripping or splashing water and no objects filled with liquid must be placed on the appliance.
- Maintain the appropriate volume level so that you are aware of the road and traffic conditions.
- Parking in direct sunlight can produce very high temperatures inside the vehicle. Refresh and ventilate the interior of the car before use.
• Installation must be carried out by qualified personnel. - Keep this manual for future reference.
CARE AND MAINTENANCE
For cleaning, we recommend the use of a soft, slightly moistened cloth. Avoid solvents or abrasive substances.
IMPORTANT
This device is designed for non-professional home use. The good construction of this appliance guarantees perfect operation for a long time. However, should any inconvenience arise, it is advisable to consult the nearest TREVI Authorized Service Center
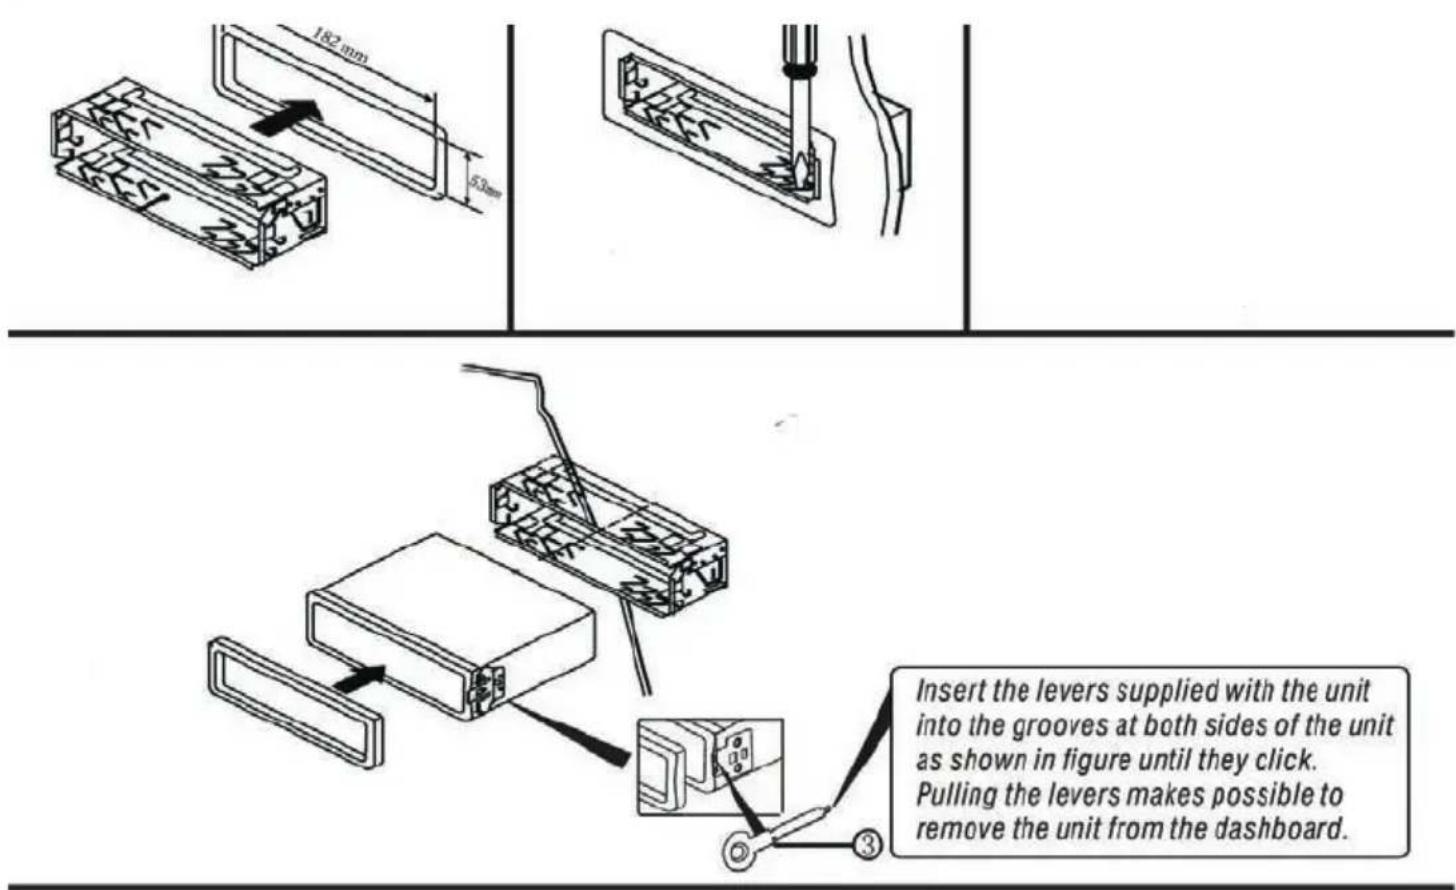
INSTALLATION EXAMPLE
text_image
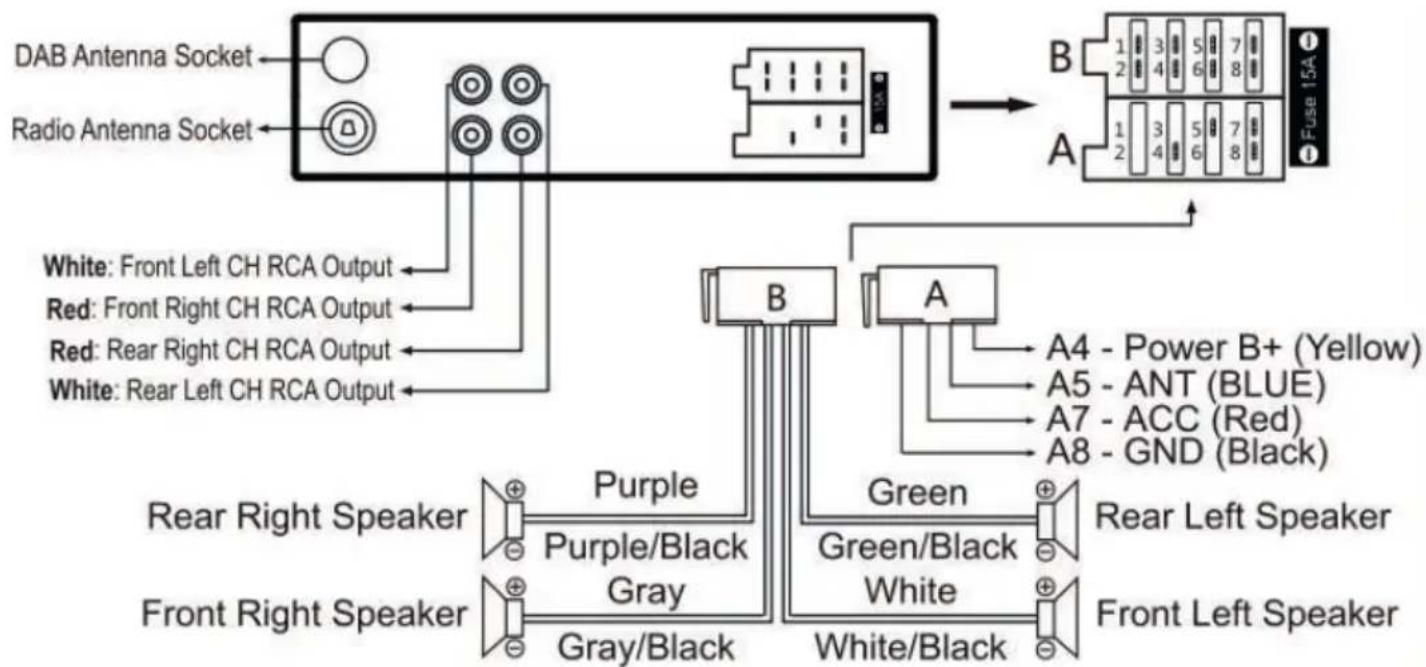
182 mm 53 mm Insert the levers supplied with the unit into the grooves at both sides of the unit as shown in figure until they click. Pulling the levers makes possible to remove the unit from the dashboard.WIRE CONNECTIONS
flowchart
graph TD
    A["DAB Antenna Socket"] --> B["Radio Antenna Socket"]
    B --> C["White: Front Left CH RCA Output"]
    B --> D["Red: Front Right CH RCA Output"]
    B --> E["Red: Rear Right CH RCA Output"]
    B --> F["White: Rear Left CH RCA Output"]
    G["FUSE 15A"] --> H["A"]
    H --> I["B"]
    H --> J["A"]
    I --> K["A4 - Power B+ (Yellow)"]
    I --> L["A5 - ANT (BLUE)"]
    I --> M["A7 - ACC (Red)"]
    I --> N["A8 - GND (Black)"]
    O["Rear Right Speaker"] --> P["Purple"]
    O --> Q["Purple/Black"]
    O --> R["Gray"]
    O --> S["Gray/Black"]
    T["Rear Left Speaker"] --> U["Green"]
    T --> V["Green/Black"]
    T --> W["White"]
    T --> X["White/Black"]
    Y["Front Right Speaker"] --> Z["+"]
    Y --> AA["+"]
    Y --> AB["+"]
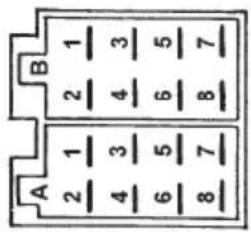
A POWER SUPPLY
| 1. | Free |
| 2. | Free |
| 3. | Free |
| 4. | Memory (permanent supply) |
| 5. | Auto antenna OUTPUT |
| 6. | Free |
| 7. | Main supply (positive) |
| 8. | Ground (negative) |
B SPEAKERS
| 1. | + Rear right |
| 2. | - Rear right |
| 3. | + Front right |
| 4. | - Front right |
| 5. | + Front left |
| 6. | - Front left |
| 7. | + Rear left |
| 8. | - Rear left |
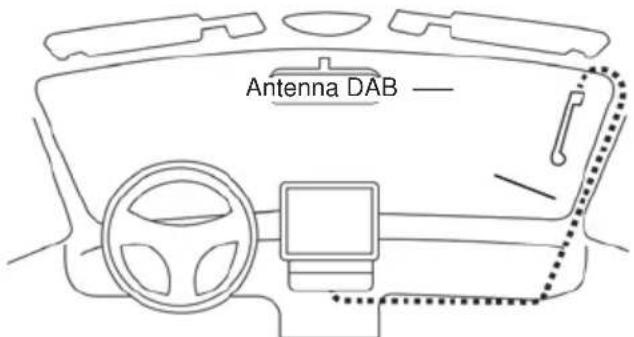
INSTALLATION OF DAB ANTENNA
For this operation, contact a professional installer.
I. The DAB antenna supplied requires installation on the front windscreen in a vertical position (see figure).
2. Clean the glass where you want to attach the antenna.
3. Carefully remove the protective film from the adhesive on the antenna and place it in the chosen location. The antenna must be positioned so that the ground contact can be spread on the metal body of the car (it is not necessary to remove the paint).
4. Position the cable (length 3 m) inside the car dashboard until you reach the position of the radio. Connect the cable with golden connector to the DAB antenna input on the rear of the car radio and secure it by screwing the connector. If a second thinner black cable is present, it must be connected to the main power supply + 12V (key).
text_image
Antenna DAB —Caution:
- Do not install the antenna in a position that obstructs the driver's view.
- Do not place the cable and the antenna where they could interfere with the proper functioning of the AirBag or other safety devices or where they could impede the driving of the vehicle.
- The use on shielded glass reduces the antenna performance.
CONTROLS
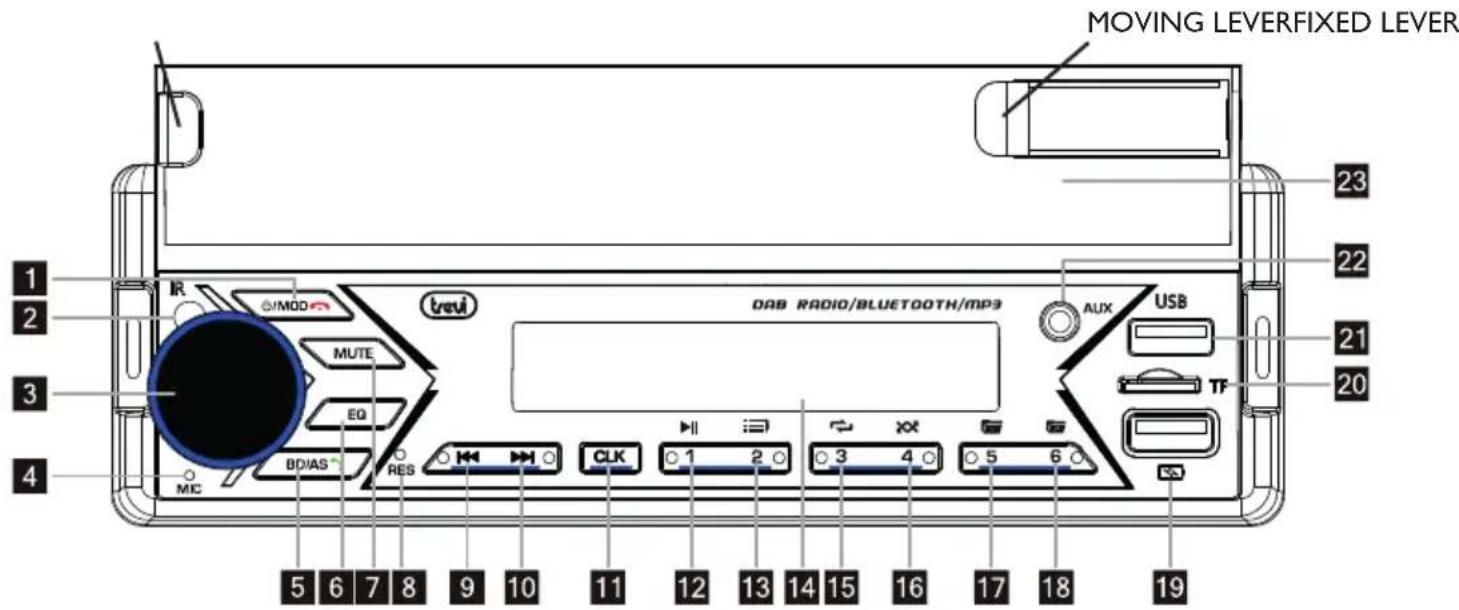
text_image
MOVING LEVERFIXED LEVER 23 22 21 20 DAB RADIO/BLUETOOTH/MP3 AUX USB TF 23 22 21 20 1 2 3 4 5 6 7 8 9 10 11 12 13 14 15 16 17 18 19 trevi MOD MUTE EQ BDIAS RES MIC CLK 0 1 2 3 4 5 6DESCRIPTION OF UNIT COMMANDS
I. POWER/MOD key, on/off.
2. Remote control receiver
3. Volume control/SEL key, Volume and tone control / user options access.
4 Microphone
5. BD/AS button, band switch/auto search
6. EQ key, audio equalization variation
7. MUTE button, muting the car radio
8. RES button, restores the radio
9. I<< key, tuning, previous track.
10. >>| key, tuning, next track.
II. CLK key, show/set the clock
12. I/▶/II key, start/pause/resume playback.
13. 2/INT key, playback of the first 10 seconds of a track.
14. Displays
15. 3/RPT key, track repeat function.
16. 4/RDM key, random play
17. 5/-10 key
18. 6/+10 key
19. USB fast charge socket (socket for fast charging of devices only)
20. MicroSD card input
21. USB input.
22. AUX input
23. Smartphone holder
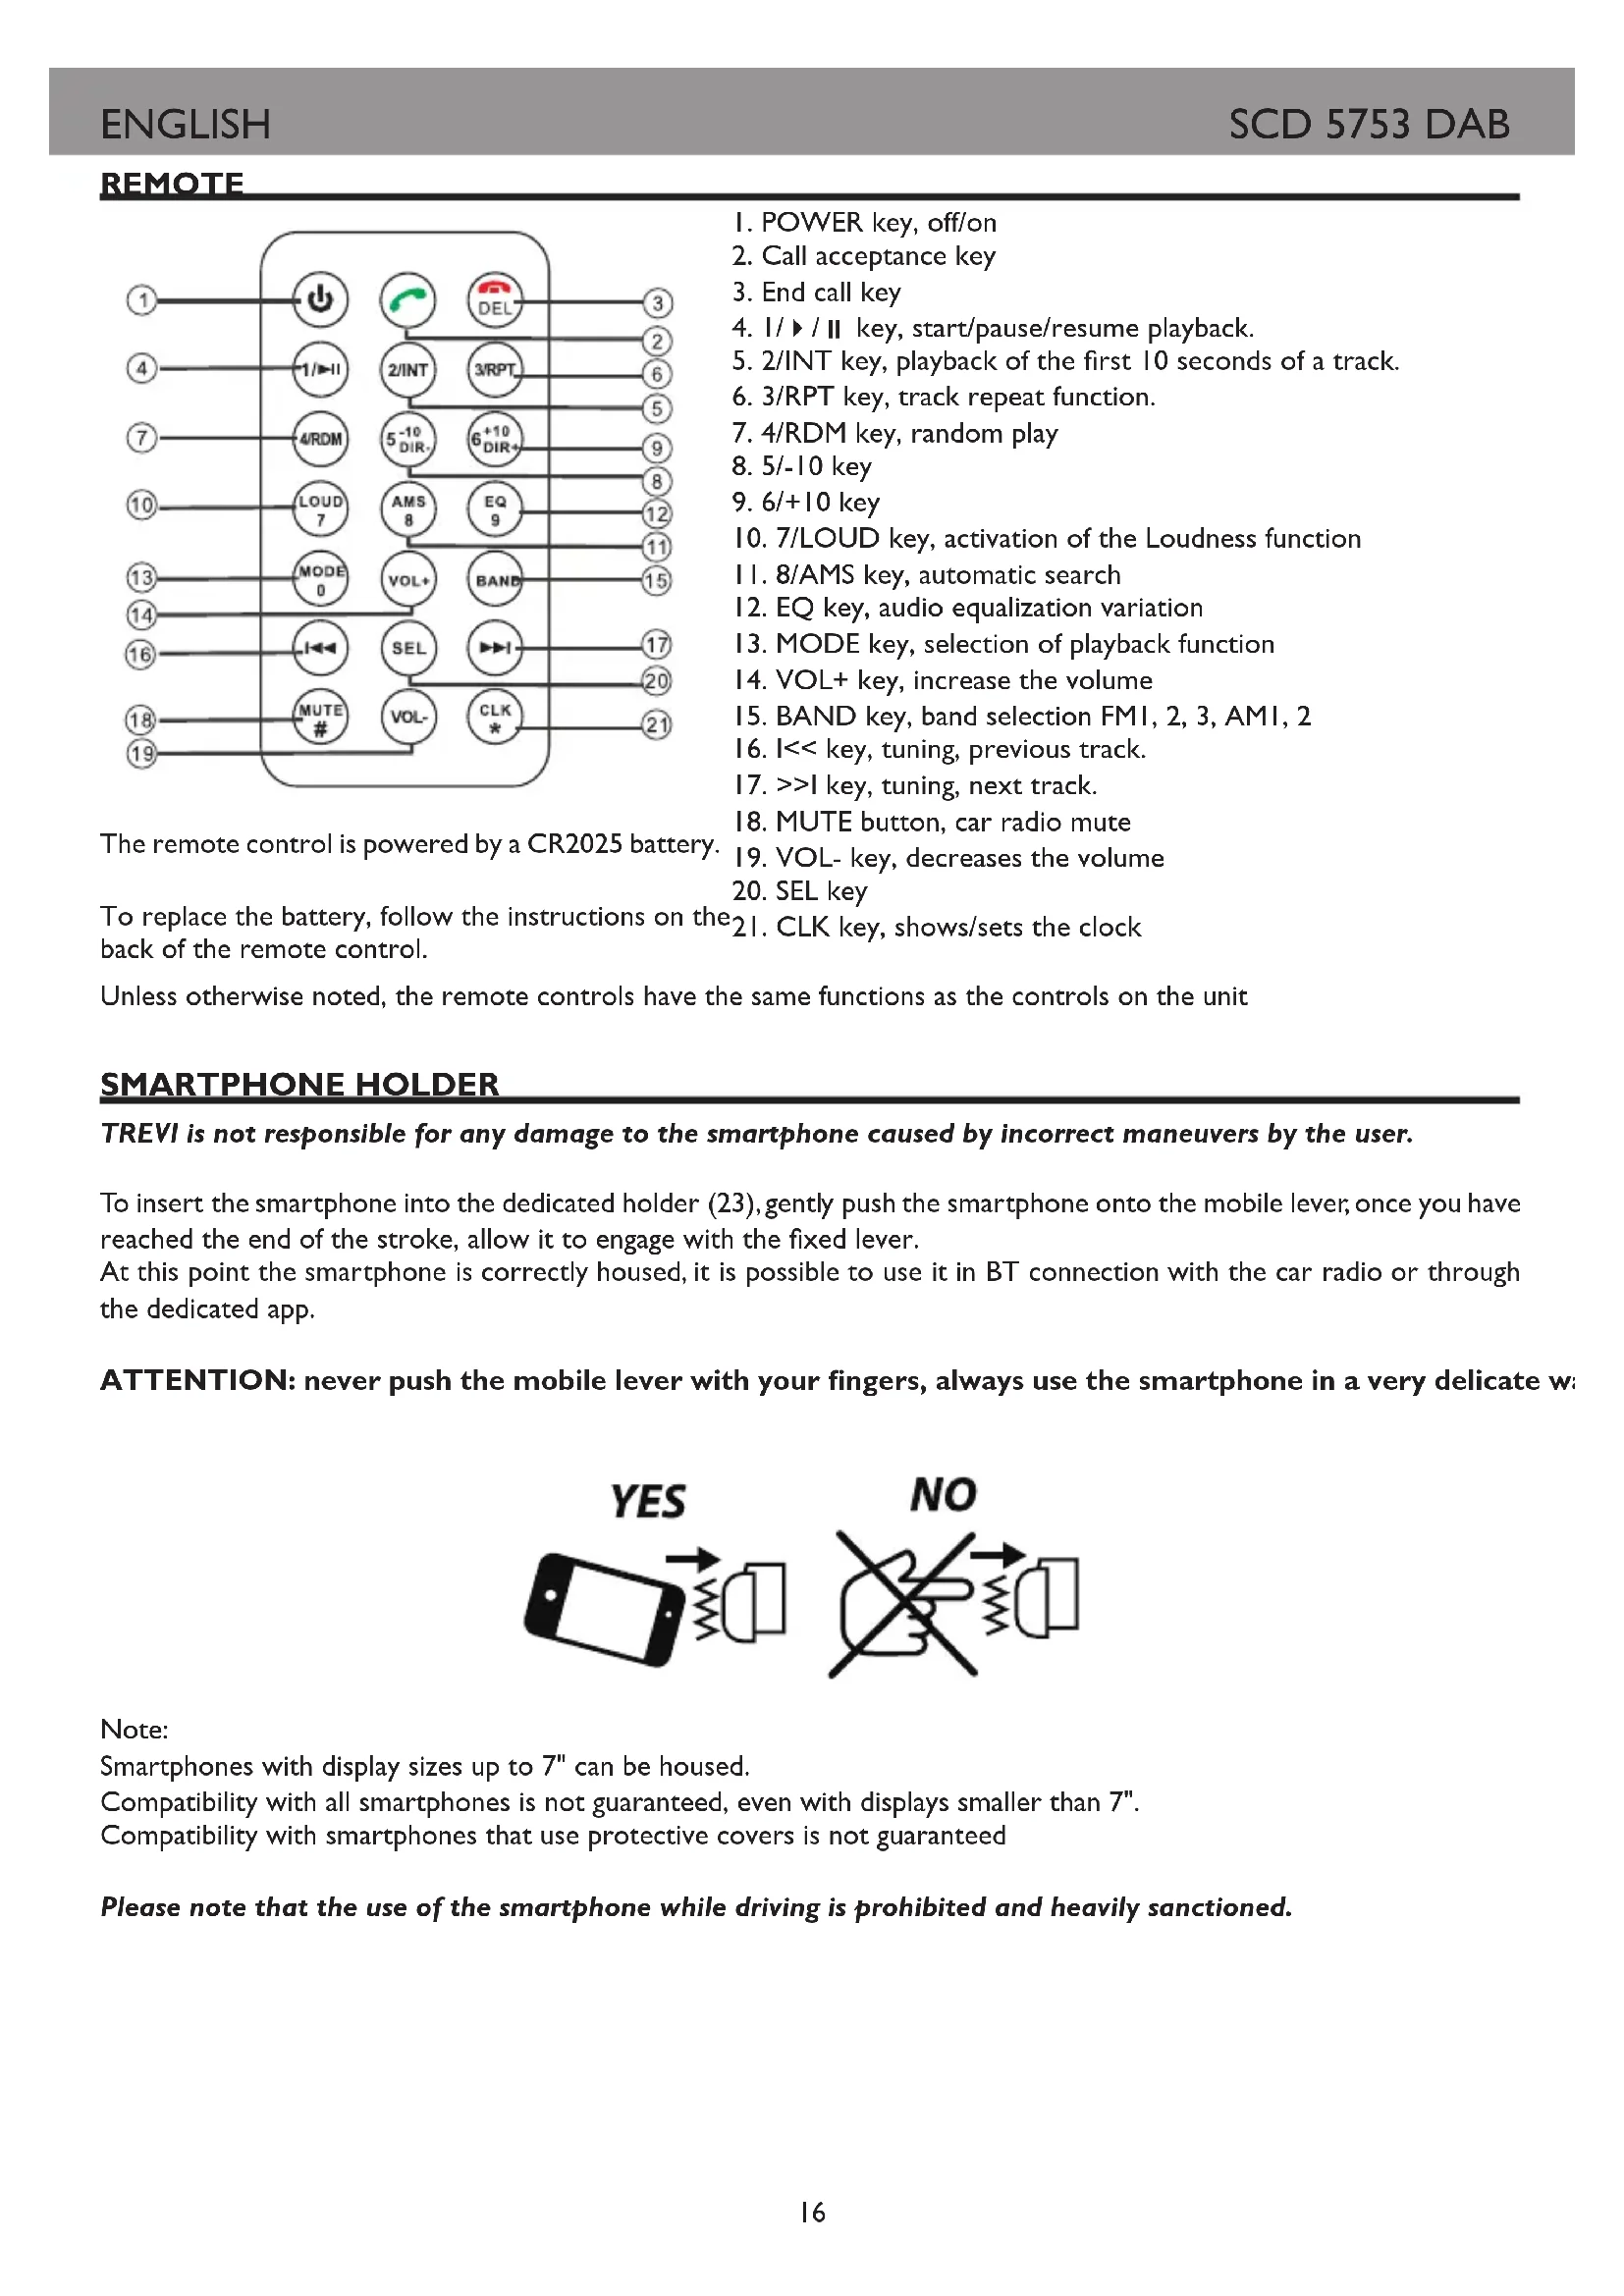
REMOTE
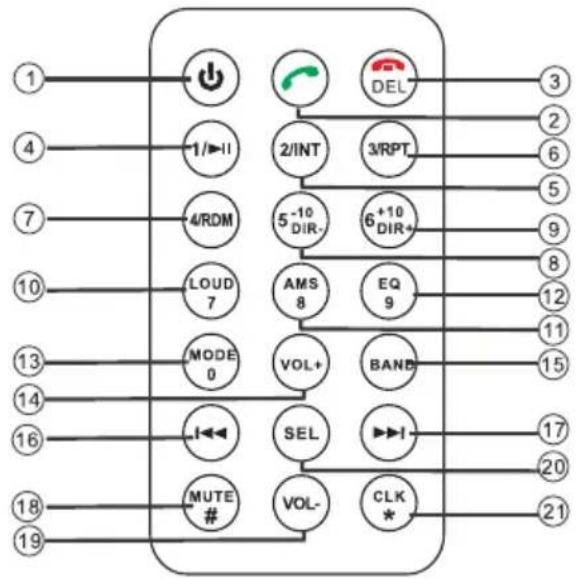
flowchart
graph TD
    A["1"] --> B["+"]
    C["4"] --> D["1/▶II"]
    E["7"] --> F["4/RDM"]
    G["10"] --> H["LOUD 7"]
    I["13"] --> J["MODE 0"]
    K["14"] --> L["I◀"]
    M["16"] --> N["MUTE #"]
    O["18"] --> P["VOL-"]
    Q["19"] --> R["SEL"]
    S["2/INT"] --> T["2/INT"]
    U["5-10 DIR-"] --> V["5-10 DIR-"]
    W["AMS 8"] --> X["AMS 8"]
    Y["BAND"] --> Z["BAND"]
    AA["EQ 9"] --> AB["EQ 9"]
    AC["DEL"] --> AD["DEL"]
    AE["3RPT"] --> AF["3/RPT"]
    AG["6+10 DIR+"] --> AH["6+10 DIR+"]
    AI["15"] --> AJ["BAND"]
    AK["17"] --> AL["I◀"]
    AM["20"] --> AN["MUTE #"]
    AO["21"] --> AP["CLK *"]
The remote control is powered by a CR2025 battery.
I. POWER key, off/on
2. Call acceptance key
3. End call key
4. I/▶/II key, start/pause/resume playback.
5. 2/INT key, playback of the first 10 seconds of a track.
6. 3/RPT key, track repeat function.
7. 4/RDM key, random play
8. 5/-10 key
9. 6/+10 key
10. 7/LOUD key, activation of the Loudness function
II. 8/AMS key, automatic search
12. EQ key, audio equalization variation
13. MODE key, selection of playback function
14. VOL+ key, increase the volume
15. BAND key, band selection FMI, 2, 3, AMI, 2
16. I<< key, tuning, previous track.
17. >>I key, tuning, next track.
18. MUTE button, car radio mute
19. VOL- key, decreases the volume
20. SEL key
21. CLK key, shows/sets the clock
To replace the battery, follow the instructions on the 21. CLK key, shows/sets the clock back of the remote control.
Unless otherwise noted, the remote controls have the same functions as the controls on the unit
SMARTPHONE HOLDER
TREVI is not responsible for any damage to the smartphone caused by incorrect maneuvers by the user.
To insert the smartphone into the dedicated holder (23), gently push the smartphone onto the mobile lever, once you have reached the end of the stroke, allow it to engage with the fixed lever.
At this point the smartphone is correctly housed, it is possible to use it in BT connection with the car radio or through the dedicated app.
ATTENTION: never push the mobile lever with your fingers, always use the smartphone in a very delicate w
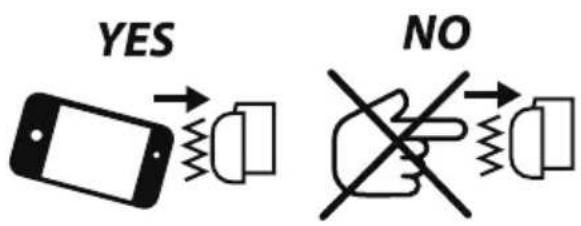
text_image
YES NONote:
Smartphones with display sizes up to 7" can be housed.
Compatibility with all smartphones is not guaranteed, even with displays smaller than 7".
Compatibility with smartphones that use protective covers is not guaranteed
Please note that the use of the smartphone while driving is prohibited and heavily sanctioned.
Unless otherwise noted, the remote controls have the same functions as the controls on the unit
ON / OFF
I. Press the POWER button (1) to turn on the device.
2. Long press the POWER button (I) to switch off the device.
NOTE: in the event of general malfunctions, to return to correct operation, press the RESET(8) button and turn on the car radio using the POWER(1) button.
CLOCK ADJUSTMENT
I. Press the POWER button (I) to turn on the device.
2. Long press the CLK button (11) until the display shows the flashing hour.
3. Turn the Volume control (3) clockwise/counterclockwise to adjust the current time. Press the CLK(11) key to confirm.
4. Turn the Volume Control (3) clockwise/counterclockwise to adjust the current minute. Press the CLK(II) key to confirm
5. Wait a few seconds, the car radio will automatically exit the clock setting menu.
6. To view the clock, press the CLK(11) key.
SOURCE SELECT
Press the MODE key (I) in sequence to select the RADIO, DAB, SD, USB, AUX, BT sources.
NOTE: some sources are only available if a memory device is inserted.
AUDIO CONTROLS
VOLUME ADJUSTMENT, MUTE FUNCTION AND EQ FUNCTION
I. Rotate the Volume Control (3) clockwise/counterclockwise to increase/decrease the volume.
2. Press the MUTE(7) button to immediately silence the car radio; press it again to resume normal listening.
3. Press the EQ(6) button to select your favorite preset equalization. It is possible to choose between JAZZ, CLASS, ROCK, POP, FLAT, USER (no equalization).
BASS/TREBLE TONE ADJUSTMENT
I. Press the SEL button (3) once to select bass adjustment.
2. The bass level indication "BASS" appears on the display.
3. Rotate the Volume control (3) clockwise/counterclockwise to increase/decrease the bass level.
4. Press the SEL button (3) twice to select treble adjustment.
5. The treble level indication "TREBLE" appears on the display.
6. Rotate the Volume Control (3) clockwise/counterclockwise to increase/decrease the treble level.
I. Press the SEL key (3) three times to select the channel balance.
2. "BALANCE" appears on the display.
3. Rotate the Volume Control (3) clockwise/counterclockwise to balance the audio on the right/left channel
4. Press the SEL key (3) four times to select the fader setting.
5. "FADER" appears on the display.
6. Rotate the Volume Control (3) clockwise/counterclockwise to adjust the sound on the rear/front speakers.
ADDITIONAL SETTINGS
LOUDNESS
- Press the SEL key (3) five times to activate/deactivate the LOUD function (bass enhancement).
DEFAULT EQUALIZER
- Press the SEL key (3) six times to select your preferred preset equalization. It is possible to choose between JAZZ, CLASS, ROCK, POP, FLAT, OFF (no equalization).
Note: selecting a preset equalization it is not possible to adjust the treble/bass values.
STEREO/MONO (Press the SEL key (3) seven times, available in radio mode)
- STEREO: set to listen to the radio in stereo.
- MONO: set listening to the radio in mono.
I. Press the BAND(5) button to select the frequency band (FMI/FM2/FM3/AMI/AM2) you want to listen to.
2. Press the >>I button (10) to automatically tune to the next station.
3. Press the I<< (9) button to automatically tune to the previous station.
MANUAL TUNING
I. Press the BAND(5) button to select the frequency band (FMI/FM2/FM3/AMI/AM2) you want to listen to.
2. Long press the >>I (10) or I<< (9) key until the display shows MANUAL, press the >>I (10) or I<< (9) key to advance or roll back the tuning by 0.05MHz in FM. Wait a few seconds to return to automatic tuning (AUTO appears on the display).
STORING STATIONS
I. Tune to the desired station as described above.
2. Press and hold a desired memory key from 1 to 6 (16).
3. Repeat step 2 to store all other stations in all bands.
AUTOMATIC STORING OF STATIONS
This unit is equipped with an auto memorization system which searches for and stores the strongest stations.
I. Long press the BAND(5) key. The unit will automatically seek and store the stations with the strongest signal.
RDS (RADIO DATA SYSTEM)
The RDS system provides for the transmission, by the European broadcasters that have adopted it, of a series of information including:
The name of the station, any alternative frequencies on which it can be received, the start of a traffic bulletin, the type of program being broadcast (classical, jazz, rock, culture), etc.
This appliance is equipped with a series of options that can be activated or deactivated as desired by the user using the following procedure:
I. Press and hold the selection key (3).
2. Press the selection key (3) repeatedly to select the available options.
3. Rotate the Volume control (3) to choose the desired option.
AF
Activates/deactivates the AF (Alternative Frequencies) function, alternative frequencies. The AF indicator will appear on the display.
The appliance receives the list of alternative frequencies from the station and automatically tunes in to the one with the best signal.
When the signal of the station being listened to deteriorates, the AF indicator will start flashing, the unit checks the list of alternative frequencies transmitted by the station and re-tunes to the one with the best signal.
TA
Activates/deactivates the TA (TrafficAnnouncement) function, traffic announcements. The TA indicator will appear on the display. If the station you are receiving does not broadcast bulletins, the unit will automatically search for a station that broadcasts them (SEEK TA).
PTY
This function allows you to select the type of program you want, for example, rock music, pop music, news, etc. The radio will only tune to stations broadcasting the selected program type.
REG
When searching for a station using AF (alternative frequency), the REG (Regional) function limits the selection to stations broadcasting regional programmes.
EON
If the station being played does not broadcast traffic information, or the signal is weak when TA is turned on, the system will automatically search for another station broadcasting traffic information. When this function is working, "EON" is displayed on the screen. Once the current traffic information broadcast is finished, the system will return to the previous station.
TA SEEK
Allows you to search for stations broadcasting traffic information
PI MUTE
When in a coverage area where two broadcasters with different Program Identification (PI) codes use the same AF (alternative frequency):
PI SOUND: The radio tunes in for a few seconds to the new station and then returns to the previous station.
PI MUTE: The new station is muted.
MASK ALL
MASK DPI: Alternative frequencies with a different Program Identification (PI) code are not considered.
MASK ALL: Alternative frequencies with a different Program Identification (PI) code and alternative frequencies with higher signal strength but no RDS information are ignored.
RETUNE
If you lose your traffic identifier:
RETUNE S: If no traffic information code is received, the search starts automatically after 30 seconds.
RETUNE L: If no traffic information code is received, the search starts automatically after 90 seconds.
AUTO COLOR
Allows choice of display color (Auto: automatic color change)
FREQ
Allows you to select the geographical area of operation (default: EURO)
TALK
This function allows you to select the speakerphone volume when receiving a call.
VER
This feature shows the installed software version.
DAB RADIO
I. Press the MODE(I) button to select the DAB source.
2. Press and hold the BAND(5) key to automatically scan the radio stations present, press briefly to display information on the radio station being listened to.
3. After searching for radio stations, 6 stations are automatically stored in the number buttons. Press the number buttons to select and play the corresponding stored stations. Long press one of the keys to memorize the station being listened to in the desired memory.
4. Press the >>1 (10) or I<< (9) key to switch to the next or previous radio station.
MICROSD/USB INPUT
Unless otherwise noted, the remote controls have the same functions as the controls on the unit
I. Insert a microSD memory card into the slot (20) with the electrical contacts facing up or a USB memory stick into the input socket (21).
2. Playback will start automatically and the number of the track being played will be shown on the display.
3. Press the I/PAU(12) key to momentarily stop playback. Press it again to resume playback.
NOTE: Your car stereo may not support some external devices with USB socket, this is due to processor incompatibility.
JUMP TRACK
I. Press the >>1 (10) button while listening to go to the next track.
2. Press the I<< (9) button during playback to return to the beginning of the current track. Press it repeatedly to skip to previous tracks.
3. Press the +10 / -10 keys to skip to the tenth track after or before the one currently playing.
FAST SEARCH
I. Press and hold the >>1 (10) button while listening to the track to fast forward.
2. Press and hold the I<< (9) button while listening to the track to rewind quickly.
3. Press the I/PAU(12) key to resume playback.
ADVANCED FEATURES
I. Press the INT button (13) to listen in sequence to the first 10 seconds of each track on the disc (INTRO). Press it again to return to normal listening (OFF).
2. Press the RPT key (15) to activate automatic repetition of the track being listened to (REPEAT ONE), of the folder (REPEAT FOD) or of all the tracks (REPEAT ALL).
3. Press the RDM button (16) to activate random sequence listening of the tracks on the disc (RANDOM ON). Press it again to return to sequential playback of tracks.
SEARCH BY TRACK
I. Press the BAND button (5). The display will show TRK with the track number.
2. Rotate the SEL/Volume control button (3) to set the desired track and press the SEL/Volume control button (3) to confirm.
3. The selected track will automatically play.
AUX-IN INPUT
I. Press the MODE key (I) in sequence to go to the AUX IN source.
2. Connect any unit equipped with an audio output to the AUX input (22) on the front of the car radio.
3. Control the outdoor unit by your commands.
CONNECTION VIA BLUETOOTH (HANDS-FREE MODE)
It is possible to make calls from your mobile phone in HANDS-FREE mode (in free mode) thanks to the compatibility with the international Bluetooth wireless system.
- When making a call, speak loud and clear.
- To have an optimal condition before making or receiving a call, close the car windows.
- Voice may be reproduced distorted in case of telephone field problems.
- The use of the HANDS-FREE function depends on the partial/total compatibility of the mobile phone.
- Make sure that the Bluetooth connection is available in your mobile phone.
CONNECTION
I. Press the MODE key (I) in sequence to go to the BT source (NOT PAIRED) and activate the Bluetooth function of the mobile phone. Search for audio accessories/devices.
2. From the mobile phone, select the CAR BT device that corresponds to the car stereo.
3. If prompted, enter the 4-digit code "0000".
4. Now the connection is established, the words LINKED / BLUETOOTH will appear on the car radio display.
RECEIVING/REJECTING/TERMINATING A CALL
I. When you receive a call, listening to the playing source will stop and you will hear the ringing sound.
2. Press the key (5) to start the conversation or press the key (1) to reject it.
- The audio of the conversation will be audible from the car audio system.
- During the conversation the radio functions will be interrupted.
3. Press the key (I) to end the conversation.
- Once the conversation is over, listening to the source being reproduced will automatically resume from where it left off.
LAST NUMBER DIALED
I. In Bluetooth mode, press the key (5) to redial the last called number in the log.
I. In Bluetooth mode, long press the key (5) to disconnect the BT from the paired device.
BLUETOOTH UNPAIRING
AUTOMATIC RESTART
I. With the car radio switched off in stand-by mode, if a call is received from the paired Bluetooth device, the car radio will switch on automatically to use the HANDS-FREE function.
2. At the end of the call, the car radio will automatically return to stand-by mode.
AUDIO FILE PLAYBACK
Through the Bluetooth connection it is possible to play the audio files present in the mobile phone.
Note: The car stereo only plays audio files with mobile phones compatible with the A2DP protocol.
Consult the manual of your mobile phone.
While listening to music from your smartphone, the following operations are possible:
I. Press the I/PAU(12) key to momentarily stop playback. Press it again to resume playback.
2. Press the >>1 (10) button while listening to go to the next track.
3. Press the I<< (7) button during playback to return to the beginning of the current track. Press it repeatedly to skip to previous tracks.
FAST CHARGE PLUG
A device can be recharged from the USB Fast Charge socket (19).
I. Insert the power cable into the device and the other end of the cable into the USB Fast Charge socket (19). Charging will start automatically.
In the case of recharging a smartphone, it is possible to place it in the support (23) during the recharging phase.
Note: this socket does not have memory device reading functions, use the USB input socket (21) for this purpose.
APP SMART BT IPLUG
Download and install the app from the following QR codes:

text_image
QR code image containing encoded data, no visible human-readable textIOS

text_image
QR code image containing encoded data, no visible human-readable textAndroid
Alternatively, search for the SMART BT IPLUG app in the main app stores.
After installing the app, connect your smartphone via BT to your car stereo; after making BT connection, launch the app. On the first screen you will be asked which source to select for playback:
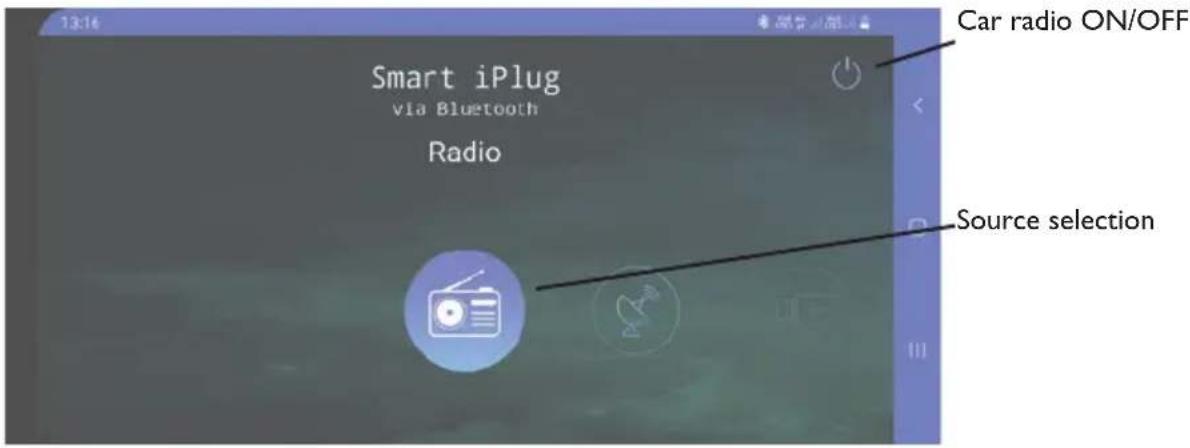
text_image
13:16 Smart iPlug via Bluetooth Radio Car radio ON/OFF Source selectionFM Radio management screen:
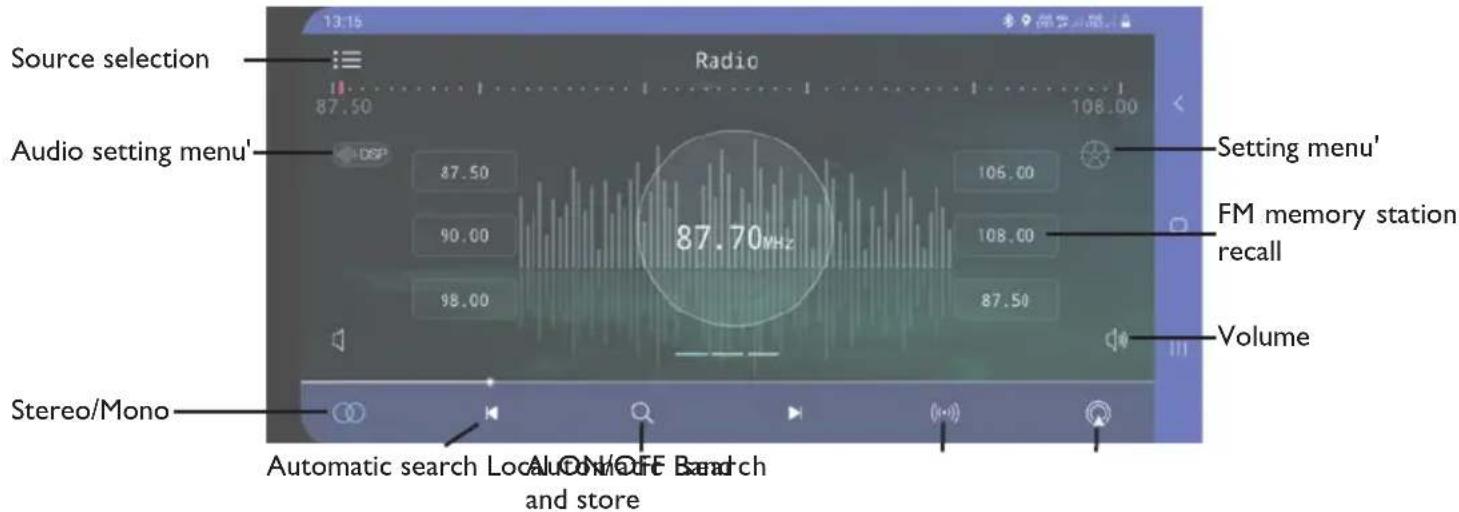
text_image
Source selection Radio 87.50 108.00 Audio setting menu' DSP 87.50 105.00 90.00 108.00 98.00 87.50 87.70MHz Setting menu' FM memory station recall Volume Stereo/Mono Automatic search Local On/OFF Band and storeDAB Radio Management Screen:
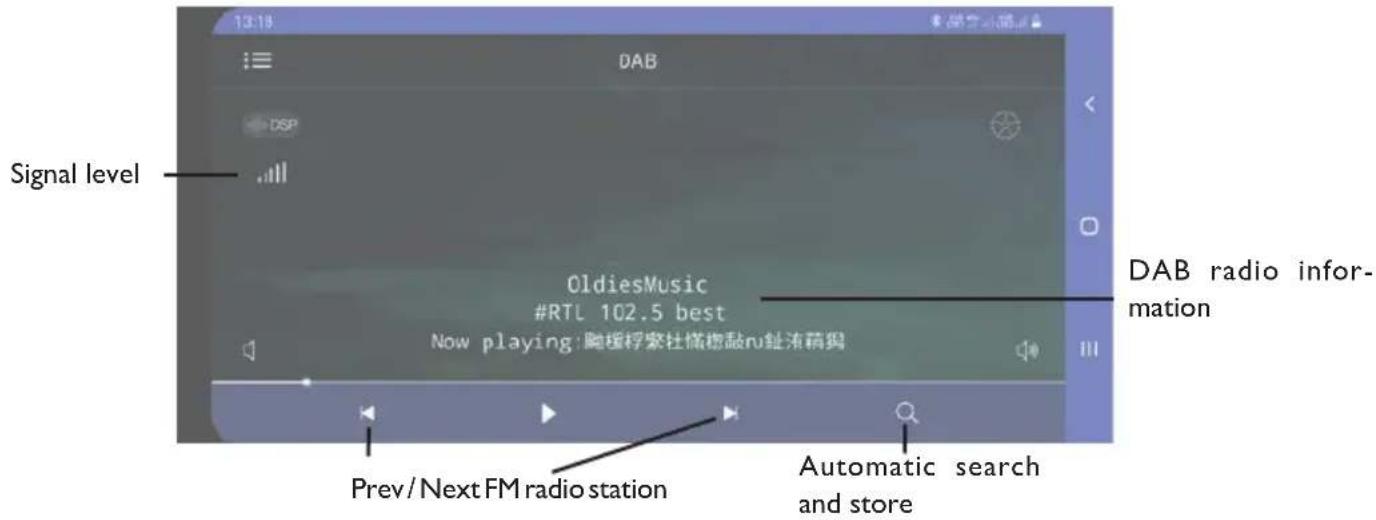
text_image
Signal level DAB DSP OldiesMusic #RTL 102.5 best Now playing: 胸援桴索杜楠橙敲nu趾流萌玛 DAB radio information Prev/Next FM radio station Automatic search and storeBy accessing the settings menu it is possible to set:
Theme: it is possible to select different graphic themes for the app
Date and Time: You can set the date and time
RGB: it is possible to set the color of the car radio display
Language: it is possible to set the language of the app
Manual: you can download the manual of the app
Touch: it is possible to activate the vibration of the phone with the commands of the app
About: it is possible to view information about the app
For all further information, it is possible to view the manual provided by the developer or the page dedicated to the app on the various stores.
For app-related support inquiries, please contact the developer.
Trevi is not responsible for any problems or damages caused by the use of the app.
Please note that the use of the smartphone while driving is prohibited and heavily sanctioned.
TECHNICAL FEATURES
Power supply: 12V
Max absorption 10A
Maximum output power: 40W x 4 channels
Speaker Impedance: 4 ohms per channel
Frequency band: FM 87.5MHz - 108MHz
AM 522KHz - 1620KHz DAB 174 - 240 MHz
Maximum Bluetooth transmission power: 0.8mW
Bluetooth transmission frequency: 2.4GHz
Remote control battery: CR 2025
NOTE
TREVI pursues a policy of continuous product improvement. For this reason, the technical characteristics are subject to change without notice.
PRÉCAUTIONS DE SÉCURITÉ
text_image
Technical diagram showing assembly steps of a device with labeled components and connection pointsnatural_image
Pure electrical circuit lines without any symbolsCONNECTEUR ISO
text_image
A 2 1 2 1 4 3 4 3 6 5 6 5 8 7 8 7 BA ALIMENTATION
text_image
QR code image containing encoded data, no visible human-readable textIOS

text_image
QR code image containing encoded data, no visible human-readable textAndroid
natural_image
Pure electrical circuit lines without any symbolsISO-ANSCHLUSS

text_image
A 2 1 2 1 4 3 4 3 6 5 6 5 8 7 8 7 BA ENERGIEVERSORGUNG
text_image
Antenna DABVorsicht:
RDS (RADIODATENSYSTEM)
text_image
QR code image containing encoded data, no visible human-readable textIOS

text_image
QR code image containing encoded data, no visible human-readable textAndroid
natural_image
Technical line drawing of a mechanical assembly with a tool inserted, showing internal components and alignment (no text or symbols)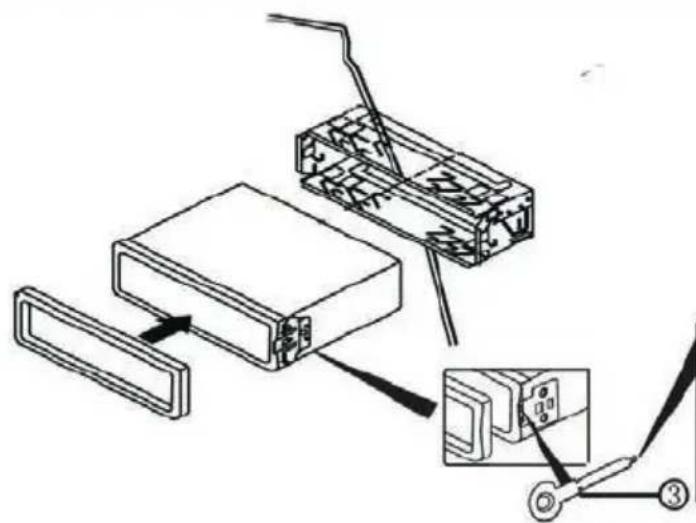
text_image
Technical diagram showing assembly of a device with labeled parts and connection pointsnatural_image
Pure electrical circuit lines without any symbolsCONECTOR ISO

text_image
A 2 1 2 1 4 3 4 3 6 5 6 5 8 7 8 7 BA ALIMENTACIÓN
text_image
QR code image containing encoded data, no visible human-readable textIOS

text_image
QR code image containing encoded data, no visible human-readable textAndroid
PRECAUTIONS FOR CORRECT DISPOSAL OF THE PRODUCT
The symbol shown on the equipment indicates that waste must be disposed of in “separate collection” and so the product must not be disposed of together with urban waste.
The user must take the product to special “separate waste collection centres” provided by local government, or deliver it to the retailer against the purchase of a new product.
Separate collection of waste and subsequent treatment, recycling and disposal operations promotes the production of equipment with recycled materials and limits negative effects on the environment and on health caused by improper handling of waste.
Illegal disposal of the product leads to the enforcement of administrative penalties.

RECOMMANDATIONS POUR L'ÉLIMINATION CORRECTE DU PRODUIT
Simplified EU Declaration Of Conformity
Hereby Trevi Spa declares that the radio equipment type SCD 5753 DAB
is in compliance with Directive 2014/53/EU.
The full text of the EU declaration of conformity is available at the following internet address
https://www.trevi.it/dms/zidi/TREVI/DOCSCD5753DAB.pdf