UNI_MW_04 - Washing machine Uniprodo - Free user manual and instructions
Find the device manual for free UNI_MW_04 Uniprodo in PDF.

| Product Type | Semi-automatic mini washing machine |
| Brand | Uniprodo |
| Model | UNI_MW_04 |
| Rated voltage / Frequency | 230 V / 50 Hz |
| Rated power - Wash | 190 W |
| Rated power - Spin | 135 W |
| Protection class | 1 |
| Protection rating (IP) | IPX4 |
| Revolutions - Wash | 298 rpm |
| Revolutions - Spin | 1462 rpm |
| Dimensions (W x D x H) | 575 x 385 x 600 mm |
| Weight | ~9.8 kg |
| Washing capacity | 2 kg |
| Spinning capacity | 1.5 kg |
| Washing compartment dimensions | 260 x 295 mm |
| Spinning compartment dimensions | 190 x 330 mm |
| Main functions | Wash, drain, spin |
| Washing modes | Normal, Gentle |
| Spin timer | 1, 3, 5 minutes |
| Loading type | Top loading |
| Cleaning and maintenance | Regularly clean the overflow filter, descale, use a soft damp cloth |
| Safety | Protection against electric shock, automatic shutdown in case of overload |
| Intended use | Washing and spinning small amounts of fabric |
Frequently Asked Questions - UNI_MW_04 Uniprodo
User questions about UNI_MW_04 Uniprodo
0 question about this device. Answer the ones you know or ask your own.
Ask a new question about this device
Download the instructions for your Washing machine in PDF format for free! Find your manual UNI_MW_04 - Uniprodo and take your electronic device back in hand. On this page are published all the documents necessary for the use of your device. UNI_MW_04 by Uniprodo.
USER MANUAL UNI_MW_04 Uniprodo
MINI WASHING MACHINE
| DE | Produktname | MINI WASCHMASCHINE |
| EN | Product name | MINI WASHING MACHINE |
| PL | Nazwa produktu | MINIPRALKA |
| CZ | Název výrobku | MINI PRAČKA |
| FR | Nom du produit | MINI-MACHINE A LAVER |
| IT | Nome del prodotto | MINI LAVATRICE |
| ES | Nombre del producto | MINI LAVADORA |
| HU | Termék neve | MINI MOSÓGÉP |
| DA | Produktnavn | MINI VASKEMASKINE |
| FI | Tuotteen nimi | MINI PESUKONE |
| NL | Productnaam | MINI-WASMACHINE |
| NO | Produktnavn | MINI VASKEMASKIN |
| SE | Produktnamn | MINI TVÄTTMASKIN |
| PT | Nome do produto | MINI MÁQUINA DE LAVAR |
| SK | Názov produktu | MINI PRÁČKA |
| DE | Modell | UNI_MW_04 |
| EN | Product model | |
| PL | Model produktu | |
| CZ | Model výrobku | |
| FR | Modèle | |
| IT | Modello | |
| ES | Modelo | |
| HU | Modell | |
| DA | Model | |
| FI | Tuotteen malli | |
| NL | Productmodel | |
| NO | Produktmodell | |
| SE | Produktmodell | |
| PT | Modelo do produto | |
| SK | Model | |
| DE | Hersteller | expondo Polska sp. z o.o. sp. k. |
| EN | Manufacturer | |
| PL | Producent | |
| CZ | Výrobce | |
| FR | Fabricant | |
| IT | Produttore | |
| ES | Fabricante | |
| HU | Termelő | |
| DA | Producent | |
| FI | Valmistaja | |
| NL | Producent | |
| NO | Produsent | |
| SE | Tillverkare | |
| PT | Fabricante | |
| SK | Výrobca | |
| DE | Anschrift des Herstellers | ul. Nowy Kisielin – Innowacyjna 7, 66-002 Zielona Góra | Poland, EU |
| EN | Manufacturer Address | |
| PL | Adres producenta | |
| CZ | Adresa výrobce | |
| FR | Adresse du fabricant | |
| IT | Indirizzo del produttore | |
| ES | Dirección del fabricante | |
| HU | A gyártó címe | |
| DA | Producentens adresse | |
| FI | Valmistajan osoite | |
| NL | Adres producent | |
| NO | Produsentens adresse | |
| SE | Tillverkarens adress | |
| PT | Endereço do fabricante | |
| SK | Adresa výrobcu |

natural_image
Diagram showing a container with liquid and a lid, containing abstract shapes (no text or symbols)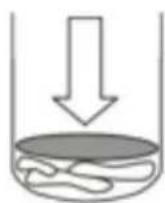
natural_image
Simple line drawing of a hand holding a tool, no text or symbols presentnatural_image
Simple line drawing of a hand holding an object with an upward arrow, no text or symbols presentThis User Manual has been translated for your convenience using machine translation. Reasonable efforts have been made to provide an accurate translation; however, no automated translation is perfect nor is it intended to replace human translators. The official User Manual is the English version. Any discrepancies or differences created in the translation are not binding and have no legal effect for compliance or enforcement purposes. If any questions arise related to the accuracy of the information contained in the User Manual, please refer to the English version of those contents which is the official version.
Technical data
| Parameter description | Parameter value | |
| Product name | Mini washing machine | |
| Model | UNI_MW_04 | |
| Rated voltage [V~] / Frequency [Hz] | 230 / 50 | |
| Rated power [W] | Laundry washer | 190 |
| Spinn dryer | 135 | |
| Protection class | 1 | |
| Protection rating [IP] | IPX4 | |
| Revolutions [rpm] | Washing | 298 |
| Drying | 1462 | |
| Dimensions [Width x Depth x Height; mm] | 575 x 385 x 600 | |
| Weight [kg] | ~9.8 | |
| Capacity [kg] | Laundry washer | 2 |
| Spinn dryer | 1.5 | |
| Washing compartment dimensions [mm] | 260 x 295 | |
| Dryer compartment dimensions [mm] | 190 x 330 | |
1. General description
The user manual is designed to assist in the safe and trouble-free use of the device. The product is designed and manufactured in accordance with strict technical guidelines, using state-of-the-art technologies and components. Additionally, it is produced in compliance with the most stringent quality standards.
DO NOT USE THE DEVICE UNLESS YOU HAVE THOROUGHLY READ AND UNDERSTOOD THIS USER MANUAL.
To increase the product life of the device and to ensure trouble-free operation, use it in accordance with this user manual and regularly perform maintenance tasks. The technical data and specifications in this user manual are up to date. The manufacturer reserves the right to make changes associated with quality improvement. The device is designed to reduce noise emission risks to a minimum, taking into account technological progress and noise reduction opportunities.
Legend
 | The product satisfies the relevant safety standards. |
 | Read instructions before use. |
 | The product must be recycled. |
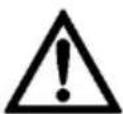
 | WARNING! or CAUTION! or REMEMBER! Applicable to the given situation.(general warning sign) |
 | ATTENTION! Electric shock warning! |
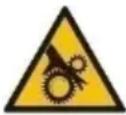 | ATTENTION! Rotating parts, entanglement hazard! |
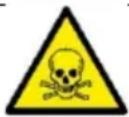 | WARNING! Toxic substances, danger of poisoning! |

Only use indoors.
PLEASE NOTE! Drawings in this manual are for illustration purposes only and in some details may differ from the actual product.
2. Usage safety
ATTENTION! Read all safety warnings and all instructions. Failure to follow the warnings and instructions may result in electric shock, fire and/or serious injury or even death.
The terms "device" or "product" are used in the warnings and instructions to refer to the:
Mini washing machine.
2.1. Electrical safety
a) The plug must fit the socket. Do not modify the plug in any way. Using original plugs and matching sockets reduces the risk of electric shock.
b) Use the cable only for its designated use. Never use it to carry the device or to pull the plug out of a socket. Keep the cable away from heat sources, oil, sharp edges or moving parts. Damaged or tangled cables increase the risk of electric shock.
c) Do not use the device if the power cord is damaged or shows obvious signs of wear. A damaged power cord should be replaced by a qualified electrician on the manufacturer's service centre.
d) To avoid electric shock, do not immerse the cord, plug or device in water or other liquids. Do not use the device on wet surfaces.
e) Do not use in very humid environments or in the direct vicinity of water tanks.
f) Before the first use, please check whether the main voltage type and current comply with the indicated data on the type plate.
2.2. Safety in the workplace
a) Make sure the workplace is clean and well lit. A messy or poorly lit workplace may lead to accidents. Try to think ahead, observe what is going on and use common sense when working with the device.
b) Do not use the device in a potentially explosive environment, for example in the presence of flammable liquids, gases or dust. The device generates sparks which may ignite dust or fumes.
c) If you discover damage or irregular operation, immediately switch the device off and report it to a supervisor without delay.
d) If there are any doubts as to the correct operation of the device, contact the manufacturer's support service.
e) Only the manufacturer's service point may repair the device. Do not attempt any repairs independently!
f) In case of fire, use a powder or carbon dioxide (CO2) fire extinguisher (one intended for use on live electrical devices) to put it out.
g) Children or unauthorised persons are forbidden to enter a work station. A distraction may result in loss of control over the device.
h) Use the device in a well-ventilated space.
i) Please keep this manual available for future reference. If this device is passed on to a third party, the manual must be passed on with it.
j) Keep packaging elements and small assembly parts in a place not available to children.
k) Keep the device away from children and animals.
I) If this device is used together with another equipment, the remaining instructions for use shall also be followed.
2.3. Personal safety
a) Do not use the device when tired, ill or under the influence of alcohol, narcotics or medication which can significantly impair the ability to operate the device.
b) The machine may be operated by physically fit persons who are able to handle the machine, are properly trained, who have reviewed this operating manual and have received training in occupational health and safety.
c) The machine is not designed to be handled by persons (including children) with limited mental and sensory functions or persons lacking relevant experience and/or knowledge unless they are supervised by a person responsible for their safety or they have received instruction on how to operate the machine.
d) When working with the device, use common sense and stay alert. Temporary loss of concentration while using the device may lead to serious injuries.
e) To prevent the device from accidentally switching on, make sure the switch is on the OFF position before connecting to a power source.
f) The device is not a toy. Children must be supervised to ensure that they do not play with the device.
g) Do not put your hands or other items inside the device while it is in use!
2.4. Safe device use
a) Do not overload the device. Use the appropriate tools for the given task. A correctly-selected device will perform the task for which it was designed better and in a safer manner.
b) Do not use the device if the "ON/OFF" switch does not function properly (does not switch the device on and off). Devices which cannot be switched on and off using the ON/OFF switch are hazardous, should not be operated and must be repaired.
c) Make sure the plug is disconnected from the socket before attempting any adjustments, accessory replacements or before putting the device aside. Such precautions will reduce the risk of accidentally activating the device.
d) When not in use, store in a safe place, away from children and people not familiar with the device who have not read the user manual. The device may pose a hazard in the hands of inexperienced users.
e) Keep the device in perfect technical condition. Before each use check for general damage, especially check moving components for cracked parts or elements, and for any other conditions which may impact the safe operation of the device. If damage is discovered, hand over the device for repair before use.
f) Keep the device out of the reach of children.
g) Device repair or maintenance should be carried out by qualified persons, only using original spare parts. This will ensure safe use.
h) To ensure the operational integrity of the device, do not remove factory-fitted guards and do not loosen any screws.
i) Avoid situations where the device stops working during use due to excessive loading. This may result in overheating of the drive elements and damage to the device.
j) Do not touch articulated parts or accessories unless the device has been disconnected from the power source.
k) It is prohibited to move, adjust, tilt or rotate the device while in operation.
I) Do not leave this appliance unattended while it is in use.
m) Clean the device regularly to prevent stubborn grime from accumulating.
n) Before each use ensure the nozzle is correctly installed in the device and that the hose is correctly attached and undamaged.
o) The device is not a toy. Cleaning and maintenance may not be carried out by children without supervision by an adult person.
p) Do not run the device when empty.
q) Do not allow the device to operate dry (without water).
r) It is forbidden to interfere with the structure of the device in order to change its parameters or construction.
s) Keep the device away from sources of fire and heat.
t) Do not cover the ventilation openings!
u) The device should be descaled regularly.
v) Do not wash clothes contaminated with gasoline, paint, corrosive substances or acid-base chemicals.
w) Before putting clothes into the wash, remove large, loose dirt such as soil, sand, fibres, etc.

ATTENTION! Despite the safe design of the device and its protective features, and despite the use of additional elements protecting the operator, there is still a slight risk of accident or injury when using the device. Stay alert and use common sense when using the device.
3. Use guidelines
The semiautomatic product is intended as a help in washing and drying small amount of fabrics or similar materials. Its compact design and simple function makes it easier portable and temporary applicable in various places.
The user is liable for any damage resulting from unintended use of the device.
3.1. Device description
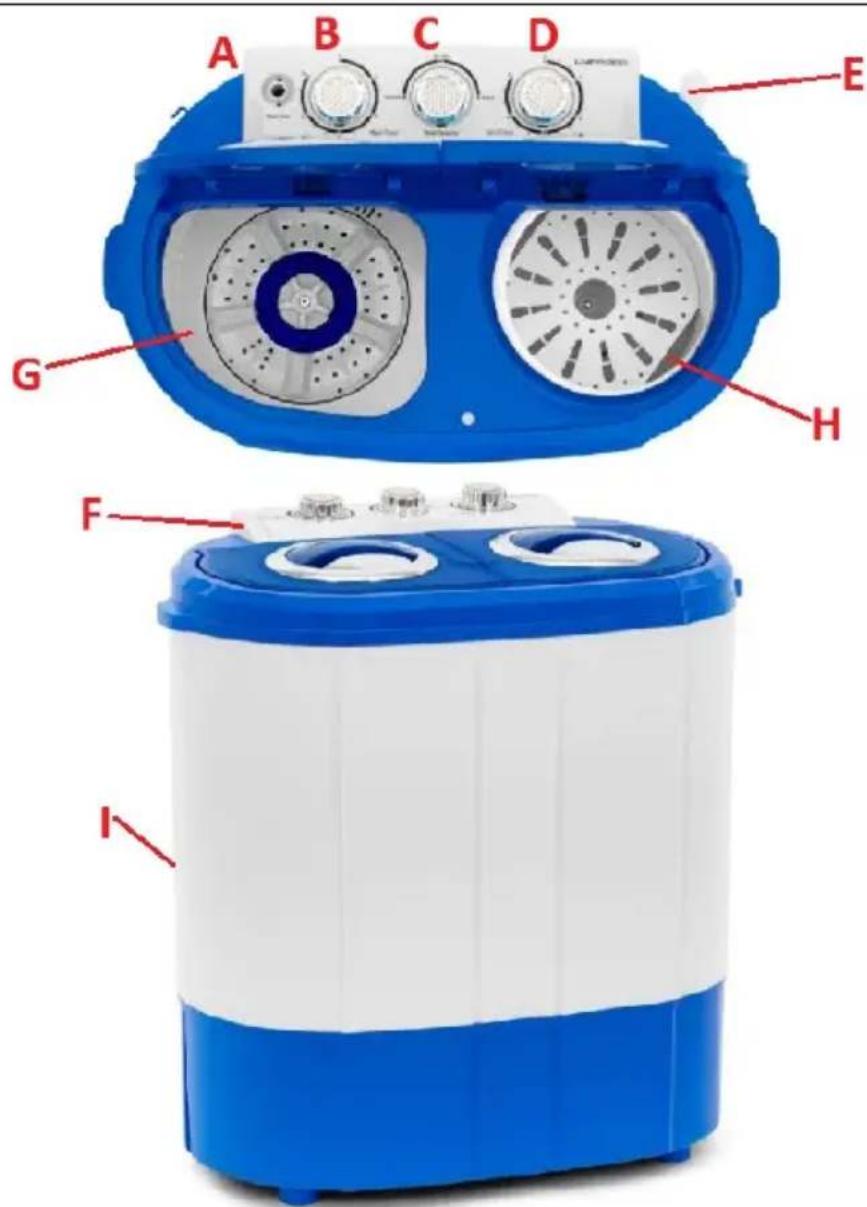
A. Fresh water inlet connector
B. Washing timer knob
C. Work mode knob
D. Drying timer knob
E. Gray water drain hose
F. Control panel
G. Washing compartment
H. Drying compartment
I. Power supply cord (rear of the housing):
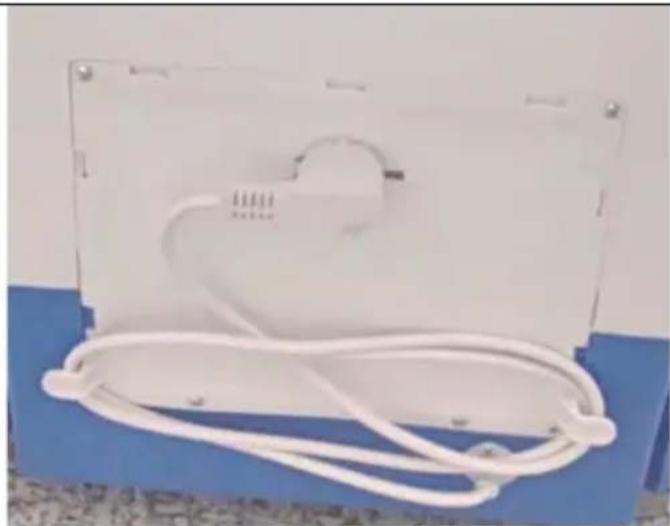
natural_image
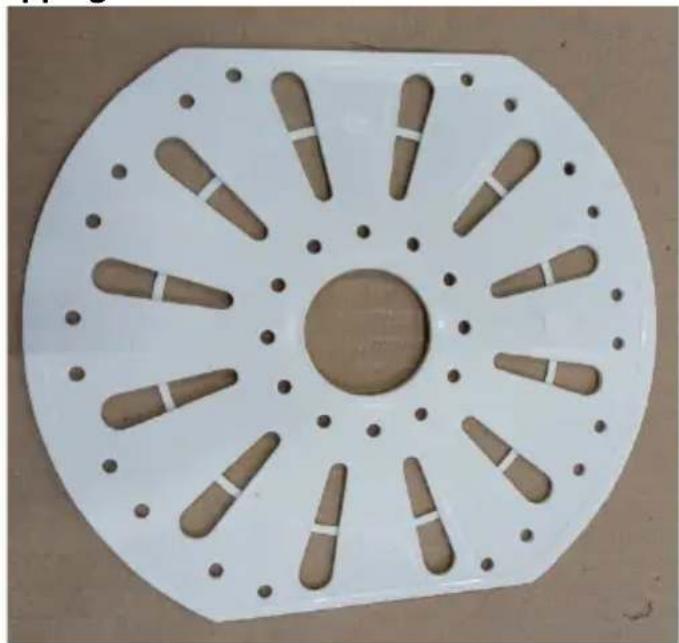
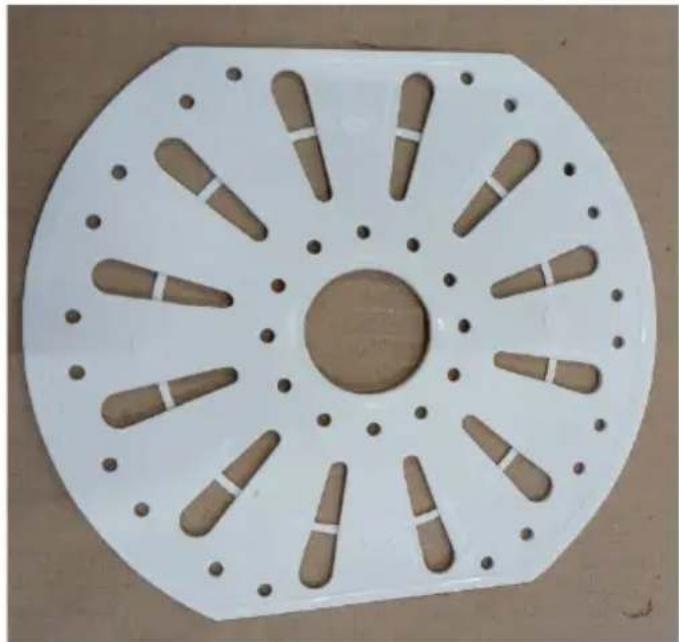
White electronic device with coiled cable and connector, mounted on a blue surface (no visible text or symbols)J. Spinner cap:
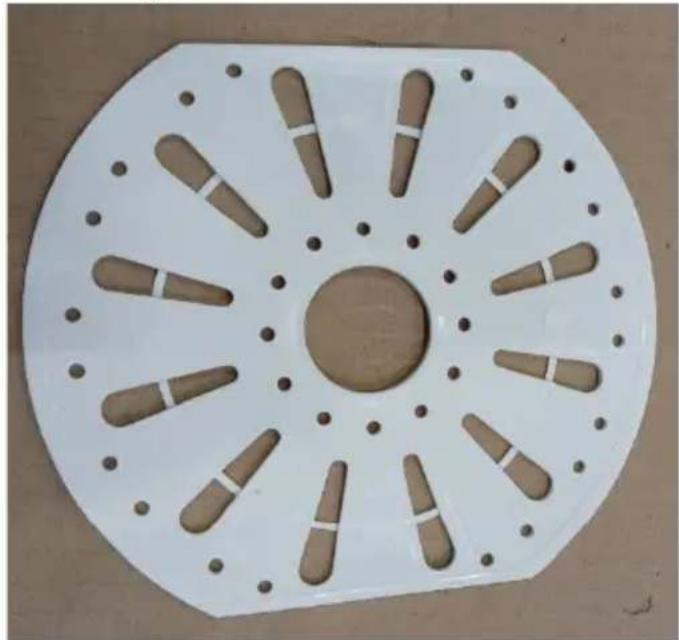
natural_image
Circular white plastic component with evenly spaced cylindrical indentations arranged radially around a central hole (no text or symbols)3.2. Preparing for use
APPLIANCE LOCATION
The temperature of environment must not be higher than 40^ C and the relative humidity should be less than 85%. Protect the machine from frost and negative temperatures! Ensure good ventilation in the room in which the device is being used, do not place it near heat generating equipment or in direct sunlight. Do not place it in bathrooms due to excessive moisture. There should be at least 10 cm distance between each side of the device and the wall or other objects. The device should always be used when positioned on an even, stable, clean, fireproof and dry surface, and be out of the reach of children and persons with limited mental and sensory functions. Position the device such that you always have access to the power plug. The power cord connected to the appliance must be properly grounded and correspond to the technical details on the product label.
3.3. Device use
3.3.1 Preparing for use
a) Set the drain hose to drainage position:
b) Plug the power cord to appropriate power supply socket.
c) Insert fresh water supply hose into a water inlet connector on the housing. Optionally connect the other end to a water tap (some special connector might be needed – not included with this product).
3.3.2 Washing
a) Fill fresh water and the detergent in the washing compartment – the level should be between the “L” (lowest) and “H” (highest) level mark inside the compartment. Start the washing machine for quick with work mode knob in “Gentle” position to dissolve the detergent in the water.
b) Open the washing compartment lid and put laundry in.
c) Close the lid than select washing duration and washing mode ("Gentle" or "Normal") according to the amount of the loaded laundry and the machine will start.
d) After finishing washing, drain the grey water.
e) Open the compartment lid and take they laundry out.
3.3.3 Water draining
NOTE: after each washing drain the grey water – the product is equipped with a drain pump that makes that process faster.
a) Turn the work mode dial to the "Drain" position, and the machine will drain the grey water fast.
CAUTION: turn the mode dial immediately to "Normal" position as soon as the grey water is completely drained from the washing compartment.
3.3.4 Removing detergent and Drying
a) Move laundry from the washing into the spin drying compartment and arrange it uniformly, without stacking them all on in the spinning drum.
b) Press down the laundry firmly with the spinner cap on the top of it:
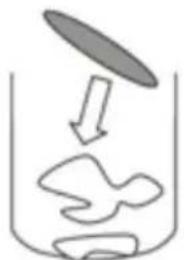
natural_image
Simple diagram showing a container with liquid and particles inside, no text or symbols present
c) Move the laundry from the drying compartment and place it in the washing compartment again.
d) Fill fresh water to the appropriate level (see the level marks inside the washing compartment) and close the lid.
e) Soak rinse the laundry by setting the washing timer knob up to 5 minutes and let it rinse.
f) Open the compartment lid and move laundry from the washing into the drying compartment again - arrange it uniformly, without stacking them all on in the dry spinning compartment.
g) Press down the laundry firmly with the spinner cap on the top of it and close the drying compartment lid.
h) Select the dry spinning duration time by setting the drying timer knob (1-3-5 minutes) appropriate to the laundry amount and the machine will start spine drying.
NOTE: an unbalanced spinning compartment load may cause abnormal vibrations or noise during work. In such case rearrange the laundry inside and continue the drying process.
3.4. Cleaning and maintenance
a) Unplug the mains plug and allow the device to cool completely before each cleaning, adjustment or replacement of accessories, or if the device is not being used.
• Wait for the rotating elements to stop.
b) Use only non-corrosive cleaners to clean the surface.
c) After cleaning the device, all parts should be dried completely before using it again.
d) Store the unit in a dry, cool place, free from moisture and direct exposure to sunlight.
e) Do not spray the device with a water jet or submerge it in water.
f) Do not allow water to get inside the device through vents in the housing of the device.
g) Clean the vents with a brush and compressed air.
h) Use a soft, damp cloth for cleaning.
i) Do not use sharp and/or metal objects for cleaning (e.g. a wire brush or a metal spatula) because they may damage the surface material of the appliance.
j) Do not clean the device with an acidic substance, agents of medical purposes, thinners, fuel, oils or other chemical substances because it may damage the device.
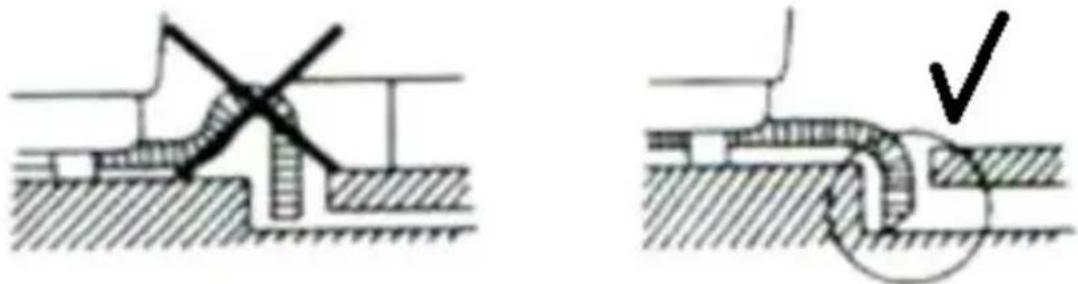
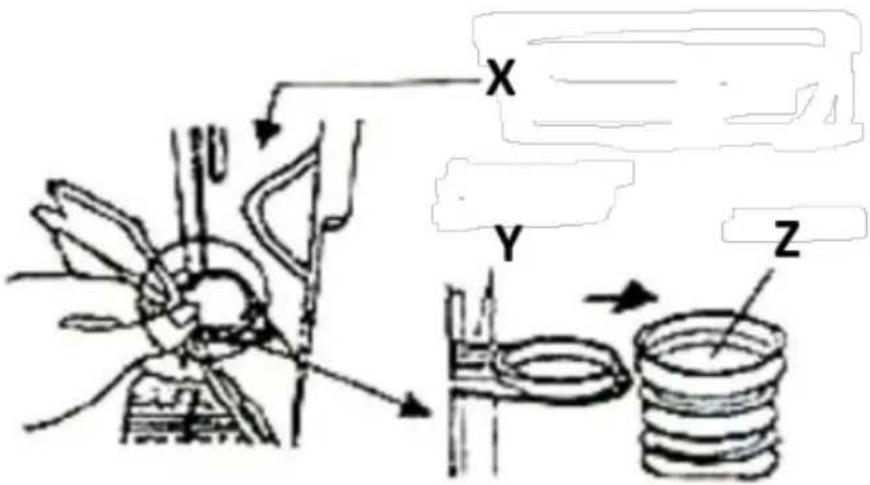
k) Clean the overflow filter regularly (at least twice a month):
- Pinch the flexible fastening claw (in the rear of the housing) and pull it gently away from the machine:

natural_image
Simple line drawing of a hand operating a tool on a device (no text or symbols)• Dismantle the top of the hose in the overflow filter:
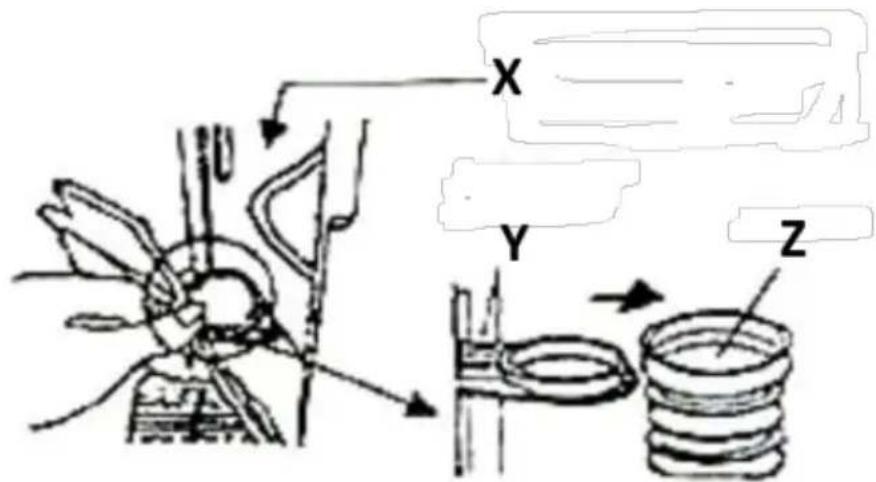
X – do not pull that bubble pipe
Y – water level adjuster
Z - bellows
- Clean the overflow filter completely under running water.
• Install the overflow filter
• Install the bellows
- Insert the tie plate of the bottom of valve cover
• Put the hook at the left top.
- Press the top the slot:
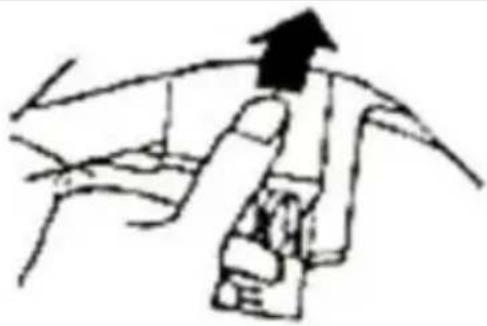
natural_image
Simple line drawing of a hand holding a device with an upward arrow (no text or symbols)DISPOSING OF USED DEVICES
Do not dispose of this device in municipal waste systems. Hand it over to an electric and electrical device recycling and collection point. Check the symbol on the product, instruction manual and packaging. The plastics used to construct the device can be recycled in accordance with their markings. By choosing to recycle you are making a significant contribution to the protection of our environment.
Contact local authorities for information on your local recycling facility.
3.5 Troubleshooting
| Problem | Possible cause: |
| Machine does not work. | · Isn’t the power cut? · Is the power supply cord connected to a power outlet? · Isn’t the pulsator tangled with something? |
| Unable to drain. | · Has the drain hose being lowered? · Isn’t the drain hose frozen? · Isn’t the drain hose blocked? · Aren’t there any clothes fallen outside the drying compartment? |
| Abnormal sound while washing. | · Aren’t there any loose items in the washing compartment? |
| Water in the washing compartment reduced. | · Is the bellows of the overflow filter being properly installed? |
| There is abnormal sound and vibration while spinning. | · Is the machine being placed on a flat and solid ground? · Is the spinner cap being placed in the spinning compartment? |
EN
- Are there any laundry fallen outside of the dry spinning compartment?
- Aren't there too many laundry in the drying compartment?
natural_image
White electronic device with coiled cable and connector, mounted on a blue surface (no visible text or symbols)natural_image
Circular white plastic component with evenly spaced cylindrical indentations arranged radially around a central hole (no text or symbols)natural_image
Cross-sectional diagram of a mechanical or structural assembly with no visible text or symbols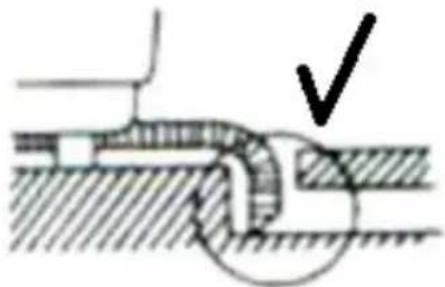
natural_image
Cross-sectional diagram of a mechanical joint or pipe assembly with hatched areas and a checkmark (no text or symbols)natural_image
Diagram showing a container with liquid and particles, no text or symbols present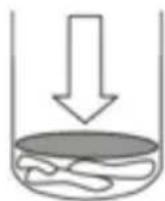
natural_image
Simple line drawing of a hand operating a device with a curved handle (no text or symbols)natural_image
Simple line drawing of a hand holding a curved object with an upward arrow (no text or symbols)UTYLIZACJA URZĄDZEŃ ZUŻYTYCH
natural_image
Technical diagram showing two mechanical joint configurations with cross-sectional views (no text or labels)natural_image
Diagram showing a container with liquid and particles, no text or symbols present
natural_image
Simple line drawing of a hand holding a tool, no text or symbols presentnatural_image
Simple line drawing of a hand holding a device with an upward arrow (no text or symbols)LIKVIDACE POUŽITÉ ZAŘÍZENÍ
natural_image
White electrical plug with coiled cable and connector, mounted on a blue base (no visible text or symbols)J. Bouchon fileur :

natural_image
Circular white plastic fan with evenly spaced cylindrical cutouts on its sides, no text or symbols visible.natural_image
Technical diagram showing two mechanical joint configurations with cross-sectional views (no text or labels)natural_image
Diagram showing a container with liquid and particles, no text or symbols present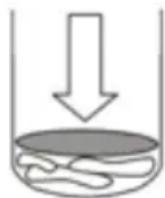
natural_image
Simple line drawing of a hand holding a tool, no text or symbols presentnatural_image
Simple line drawing of a hand gripping a curved object with an upward arrow (no text or symbols)ÉLIMINATION DES APPAREILS USAGÉS
natural_image
White electrical cable with coiled wires attached to a rectangular panel (no visible text or symbols)J. Tappo girevole:
natural_image
Circular white plastic fan with evenly spaced cylindrical cutouts on its sides, no text or symbols visible.natural_image
Cross-sectional diagram of a mechanical or structural component with hatched areas and a central diagonal line (no text or symbols)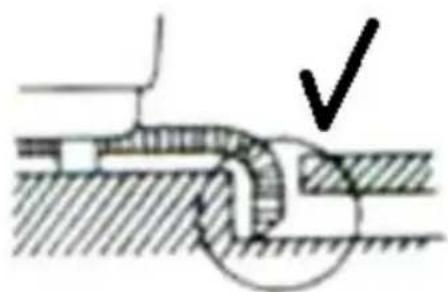
natural_image
Cross-sectional diagram of a mechanical joint or pipe connection (no text or symbols visible)natural_image
Simple diagram showing a container with liquid and an arrow pointing downward, containing abstract shapes (no text or symbols)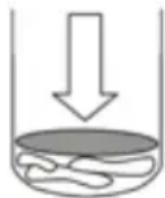
natural_image
Simple line drawing of a person using a tool on a device (no text or symbols)natural_image
Simple line drawing of a hand holding an object with an upward arrow, no text or symbols presentSMALTIMENTO DEI DISPOSITIVI USATI
natural_image
White electronic device with coiled cable and connector, mounted on a blue surface (no visible text or symbols)J. Tapa giratoria:

natural_image
Circular white plastic component with evenly spaced cylindrical indentations arranged radially around a central hole (no text or symbols)natural_image
Diagram showing a container with liquid and particles, no text or symbols present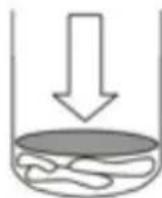
natural_image
Simple line drawing of a hand operating a tool on a device (no text or symbols)natural_image
Simple line drawing of a hand holding a curved object with an upward arrow (no text or symbols)natural_image
White electronic device with coiled cable and connector, mounted on a blue base (no visible text or symbols)J. Spinner sapka:

natural_image
Circular white plastic component with evenly spaced cylindrical indentations arranged radially around a central hole (no text or symbols visible)natural_image
Cross-sectional diagram of a mechanical or structural component with hatched areas and a central cross (no text or symbols)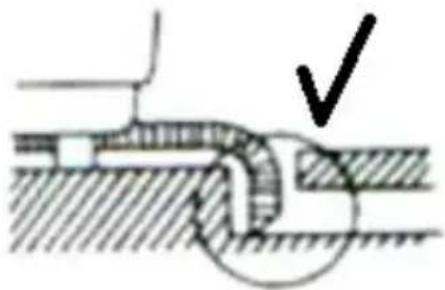
natural_image
Cross-sectional diagram of a mechanical joint or pipe connection (no text or symbols)natural_image
Simple diagram showing a container with liquid and particles inside, no text or symbols present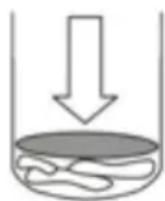
natural_image
Simple line drawing of a hand operating a device with a black handle (no text or symbols)natural_image
Simple line drawing of a hand holding a device with an upward arrow (no text or symbols)HASZNÁLT ESZKÖZÖK ÁRTALMATLANÍTÁSA
natural_image
White electronic device with coiled cable and connector, mounted on a blue surface (no visible text or symbols)J. Spinner-hætte:

natural_image
Circular white plastic component with evenly spaced cylindrical indentations arranged radially around a central hole (no text or symbols)APPARATETS PLACERING
natural_image
Cross-sectional diagram of a structural support system with hatched ground and structural elements (no text or labels)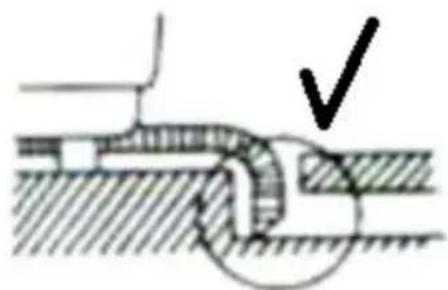
natural_image
Technical diagram showing a mechanical joint or pipe connection with hatched areas and a checkmark (no text or symbols present)b) Sæt netledningen i det relevante strømstik.
natural_image
Diagram showing a container with liquid and particles, no text or symbols present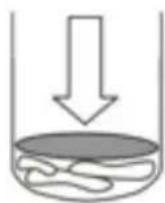
natural_image
Simple line drawing of a hand operating a tool on a mechanical component (no text or symbols)natural_image
Simple line drawing of a hand gripping a curved object with an upward arrow (no text or symbols)BORTSKAFFELSE AF BRUGTE ENHEDER
natural_image
White electronic device with coiled cable and connector, mounted on a blue surface (no visible text or symbols)J. Spinner cap:

natural_image
Circular white plastic component with evenly spaced cylindrical indentations arranged radially around a central hole (no text or symbols)natural_image
Diagram showing a container with liquid and particles, no text or symbols present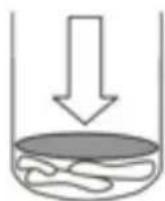
natural_image
Simple line drawing of a hand holding a tool, no text or symbols presentnatural_image
Simple line drawing of a hand holding a device with an upward arrow (no text or symbols)KÄYTETTYJEN LAITTEIDEN HÄVITTÄMINEN
PLAATS VAN HET APPARAAT
natural_image
Technical diagram showing two mechanical joint configurations with cross-sectional views (no text or labels)natural_image
Simple line drawing of a hand holding a tool, no text or symbols presentnatural_image
White electronic device with coiled cable and connector, mounted on a blue surface (no visible text or symbols)J. Spinner cap:

natural_image
Circular white plastic component with evenly spaced cylindrical indentations arranged radially around a central hole (no text or symbols)natural_image
Diagram showing a container with liquid and particles, no text or symbols present
natural_image
Simple line drawing of a hand holding a tool, no text or symbols presentnatural_image
Simple line drawing of a hand gripping a curved object with an upward arrow (no text or symbols)NO
KASSERING AV BRUKTE ENHETER
natural_image
White electronic device with coiled cable and connector, mounted on a blue surface (no visible text or symbols)J. Spinnerlock:

natural_image
Circular white plastic component with evenly spaced cylindrical indentations arranged radially around a central hole (no text or symbols)APPARATENS PLACERING
natural_image
Cross-sectional diagram of a mechanical or structural assembly with no visible text or symbols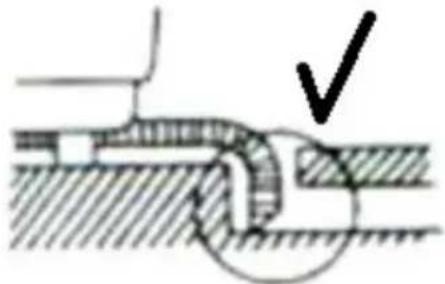
natural_image
Technical diagram showing a mechanical assembly with cross-section hatching and a checkmark (no text or symbols)natural_image
Diagram showing a container with liquid and particles, no text or symbols present
natural_image
Simple line drawing of a hand operating a device (no text or symbols)natural_image
Simple line drawing of a hand holding a curved object with an upward arrow (no text or symbols)KASSERING AV ANVÄNDA ENHETER
PT
natural_image
Cross-sectional diagram of a mechanical or structural assembly with no visible text or symbols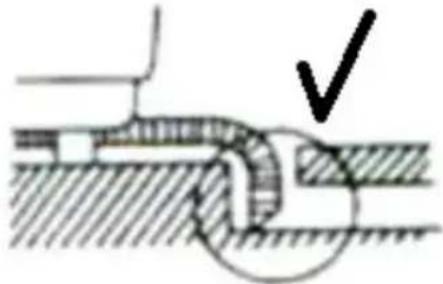
natural_image
Cross-sectional diagram of a mechanical joint or pipe fitting with hatched areas and a checkmark (no text or symbols)natural_image
Simple diagram showing a container with an open lid and a downward arrow pointing to a floating object (no text or symbols)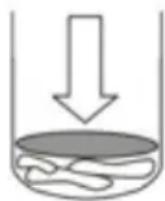
natural_image
Simple line drawing of a hand holding a tool, no text or symbols present- Desmonte a parte superior da mangueira no filtro de transbordamento:
natural_image
Simple line drawing of a hand gripping a curved object with an upward arrow (no text or symbols)A. Prípojka na prívod čerstvej vody
B. Gombík časovača prania
C. Gombík pracovného režimu
D. Gombík časovača sušenia
E. Sivá hadica na odtok vody
F. Ovládací panel
G. Umývacia priehradka
H. Sušiaca priehradka
natural_image
White plastic electrical outlet with coiled cable, mounted on blue plates (no visible text or symbols)J. Uzáver:
natural_image
Circular white plastic plate with evenly spaced cylindrical cutouts and a central hole, no text or symbols visible.natural_image
Cross-sectional diagram of a mechanical or structural component with hatched areas and a central diagonal line (no text or symbols)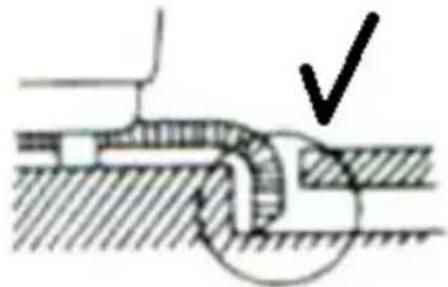
natural_image
Diagram showing a container with liquid and particles, no text or symbols present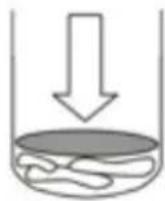
c) Presuňte bielizeň zo sušiaceho priestoru a znova ju vložte do pracieho priestoru.
natural_image
Simple line drawing of a hand holding a tool, no text or symbols presentX – net'ahajte za bublinkovú hadičku
natural_image
Simple line drawing of a hand holding a device with an upward arrow (no text or symbols)LIKVIDÁCIA POUŽITÝCH ZARIADENÍ
For the disposal of the device please consider and act according to the national and local rules and regulations.
CONTACT
expondo Polska sp. z o.o. sp. k.