
FMY 24 WCR - Wine cellar FRANKE - Free user manual and instructions
Find the device manual for free FMY 24 WCR FRANKE in PDF.

| Product type | Wine cellar |
| Brand | Franke |
| Model | FMY 24 WCR |
| Capacity | 24 bottles |
| Dimensions (H x W x D) | 840 x 595 x 575 mm (estimated) |
| Net weight | 35 kg (estimated) |
| Power supply | 220-240 V ~ 50 Hz |
| Rated power | 100 W (estimated) |
| Adjustable temperature range | 5 °C to 20 °C |
| Default set temperature | 15 °C |
| Refrigerant type | R600a (isobutane) |
| Shelves | 3 wooden shelves + bottom |
| Interior lighting | LED |
| Door | Glass |
| Noise level | ≤ 42 dB(A) (estimated) |
| Climate class | N-ST (16 °C to 38 °C) |
| Installation | Freestanding, ventilation space ≥ 50 mm |
| Adjustable feet | Yes |
| Temperature control | Manual via + and - buttons |
| Child safety | Yes (supervision required) |
| Cleaning and maintenance | Warm water and neutral detergent; do not use abrasive products |
| Spare parts | Contact Franke after-sales service |
| Repairability | Repairs reserved to a qualified technician |
Frequently Asked Questions - FMY 24 WCR FRANKE
User questions about FMY 24 WCR FRANKE
0 question about this device. Answer the ones you know or ask your own.
Ask a new question about this device
Download the instructions for your Wine cellar in PDF format for free! Find your manual FMY 24 WCR - FRANKE and take your electronic device back in hand. On this page are published all the documents necessary for the use of your device. FMY 24 WCR by FRANKE.
USER MANUAL FMY 24 WCR FRANKE
natural_image
Front view of a two-tiered storage unit with labeled 'FRANKE' (no other text or symbols)FMY 24 WCR
EN Installation and user manual
Wine cooler
EN Installation and user manual 5
Safety information....6
Installation....9
Overview....11
Operations....12
Cleaning and maintenance 12
Troubleshooting 13
Support 13
Before the installation and use of the appliance, carefully read the supplied instructions.
Always keep the instructions with the appliance for future reference.
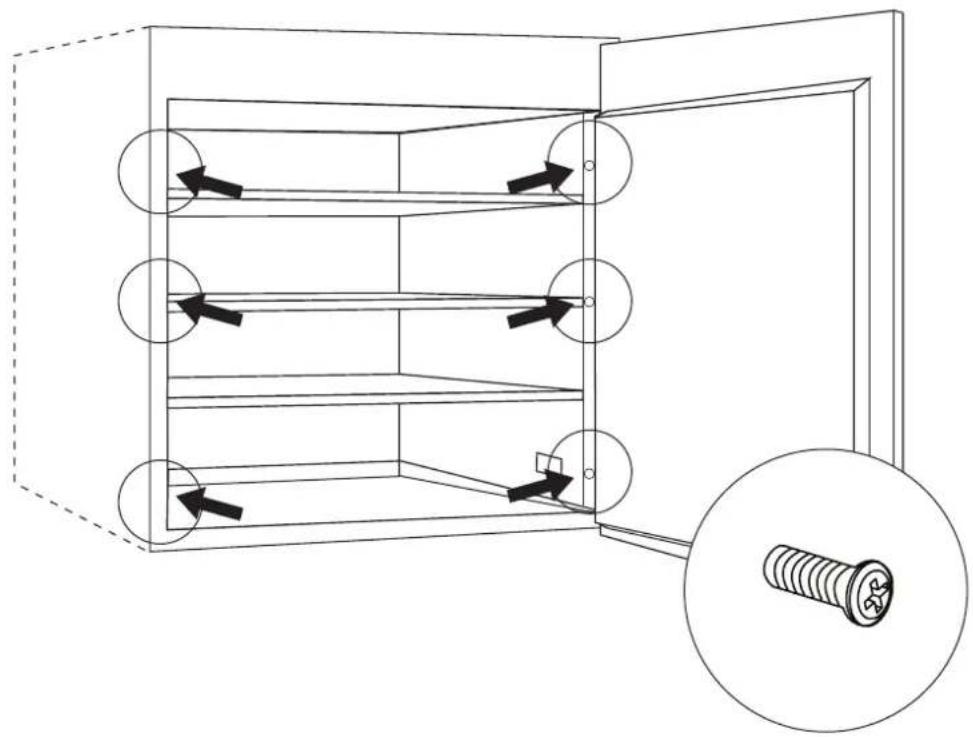
To prevent danger stemming from instability of the device, you must fasten it in place, following the assembly instructions strictly.
Whenever moving or transporting the device, keep it in a vertical position.
This appliance can be used by children aged from 8 years and above and persons with reduced physical, sensory or mental capabilities or lack of experience and knowledge if they have been given supervision or instruction concerning use of the appliance in a safe way and understand the hazards involved.
Children shall not play with the appliance.
⚠️ Cleaning and user maintenance shall be made by the user and not by children without supervision!
⚠️ Young children should be supervised to ensure that they do not play with the appliance.
This appliance may be used by children between 3 and 8 years of age and persons with very extensive and complex disabilities, if they have been properly instructed.
Children of less than 3 years of age should be kept away from the appliance unless continuously supervised.
Do not let children play with the appliance.
Children shall not carry out cleaning and user maintenance of the appliance without supervision.
⚠️ Keep all packaging away from children and dispose of it appropriately.
This refrigerating appliance is intended to be used at ambient temperatures ranging from 16 °C to 38 °C.
⚠️ Wait at least 4 hours before connecting the appliance to the power supply. This is to allow the oil to flow back in the compressor.
This appliance is not suitable for freezing foodstuffs.
There is no difference in consumption between the possible configuration of the shelves/basket.
WARNING: When positioning the appliance, ensure the supply cord is not trapped or damaged.
This appliance is intended to be used in household and similar applications.
WARNING: Do not locate multiple portable socket-outlet sor portable power supplies at the rear of the appliance.
After installing the device, ensure the power cable and socket are easy to reach. If it not possible to reach the power cable and socket, ensure that the plug is connected to a circuit breaker.
⚠️ Keep the ventilation openings on the casing of the device free.
Do not use mechanical devices, or any means not suggested by the manufacturer, to speed up defrosting.
Do not damage the coolant circuit.
⚠ Contact the after sales service to replace the LEDs.
Do not stare at operating lamp. It may be harmful to the eyes.
The cable must not be bent or crushed.
The cable must be checked on a routine basis and replaced only by authorised technicians.
The power supply cable is of a Y type. Contact the after sales service to replace it.
Do not use electrical equipment inside the wine compartments, unless they are of a kind suggested by the manufacturer.
Do not store explosive substances such as aerosol cans with a flammable propellant in this appliance.
The Manufacturer shall not be liable if any of the above rules are not complied with.
WARNING: Keep ventilation openings, in the appliance enclosure or in the built-in structure, clear of obstruction.
WARNING: Do not use mechanical devices or other means to accelerate the defrosting process, other than those recommended by the manufacturer.
WARNING: Do not damage the refrigerant circuit.
WARNING: Do not use electrical appliances inside the wine compartment of the appliance, unless they are of the type recommended by the manufacturer.
Do not store explosive substances such as aerosol cans with a flammable propellant in this appliance.
Risk of fire and electrical shock or fire.
Be careful not to cause damage to the refrigerant circuit. It contains isobutane (R600a), a natural gas with a high level of environmental compatibility. This gas is flammable.
⚠️ If damage occurs to the refrigerant circuit, make sure that there are no flame and sources of ignition in the room. Ventilate the room.
Do not let hot items to touch the plastic parts of the appliance.
Do not store flammable gas and liquid in the appliance.
Do not put flammable products or items that are wet with flammable products in, near or on the appliance.
Do not touch the compressor or the condenser. They are hot.
The device is a wine cooler. It is only intended for storing wine.
Only store wine in unopened bottles.
The wine cooler is not suitable for cooling foods.
Do not store any perishable food in the wine cooler.
The fridge is not intended to be brought into contact with food.
The fridge is not intended for the storage of medicines.
NOTE: Condensating moisture on glass doors.
When the ambient humidity is above 65 % in 25 °C ambient temperature, moisture will condense on the glass door.
Disposal
The symbol on the product or on the packaging indicates that the device must not be disposed of in the domestic waste.
This appliance is manufactured with recyclable or reusable materials. Dispose of it in accordance with local waste disposal regulations. For further information on the treatment, recovery and recycling of household electrical appliances, contact your local authority, the collection service for household waste or the store where you purchased the appliance. This appliance is marked in compliance with European Directive 2012/19/EU, Waste Electrical and Electronic Equipment (WEEE).
By ensuring this product is disposed of correctly, you will help prevent negative consequences for the environment and human health.
The symbol on the product or on the accompanying documentation indicates that it should not be treated as domestic waste but must be taken to an appropriate collection center for the recycling of electrical and electronic equipment.
Package information
Packaging materials of the product are manufactured from recyclable materials in accordance with our National Environment Regulations. Do not dispose of the packaging materials together with the domestic or other wastes. Take them to the packaging material collection points designated by the local authorities.
Energy saving tips
Do not open the door frequently or leave it open longer than absolutely necessary.
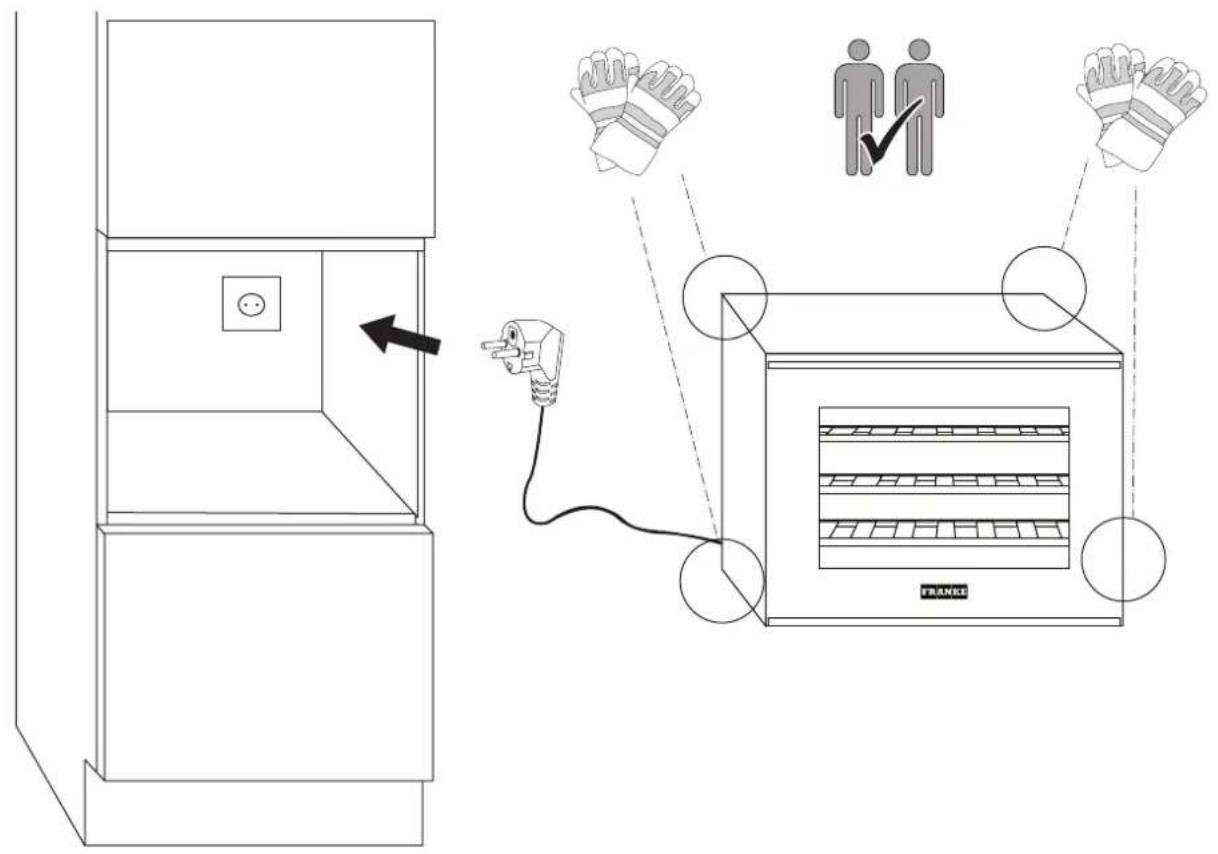
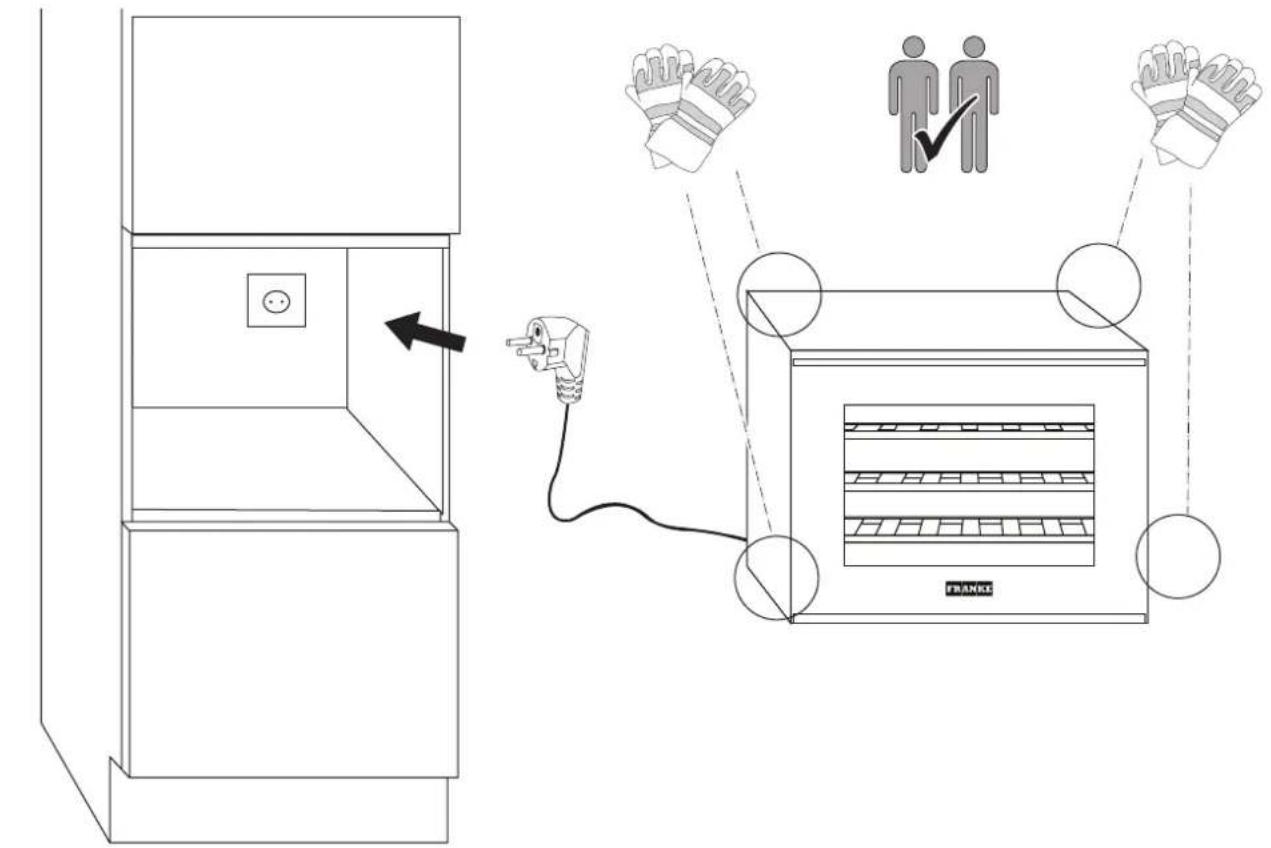
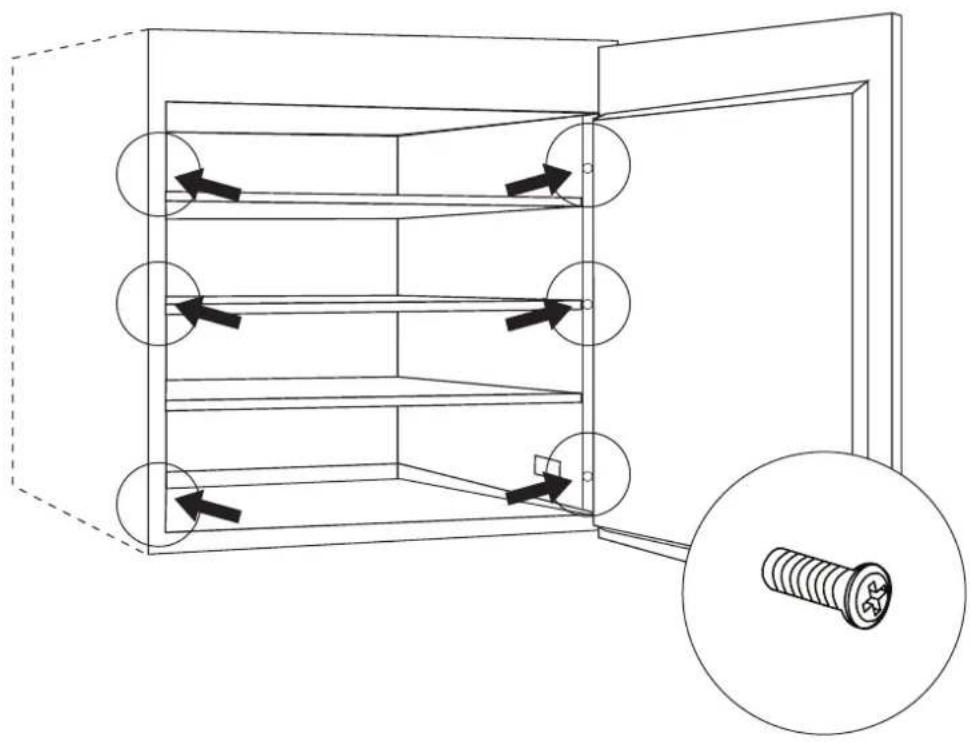
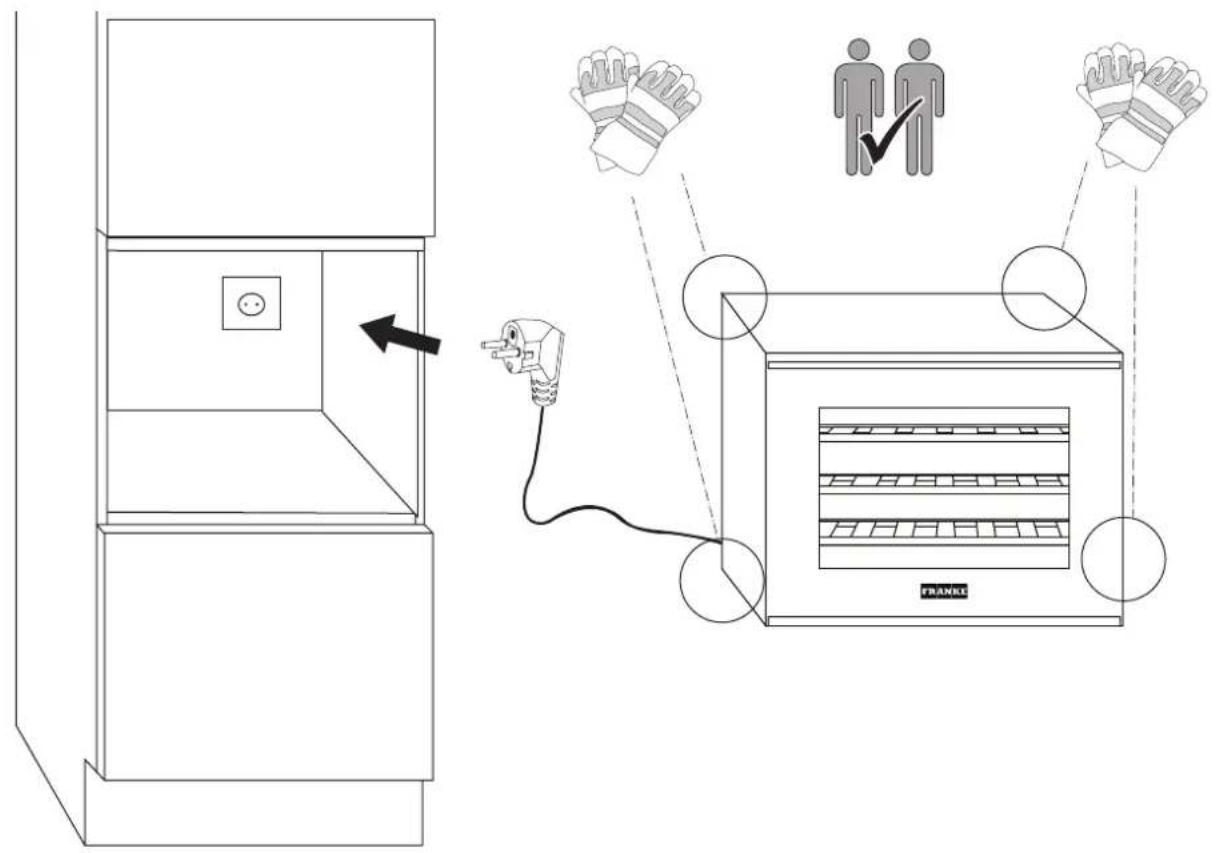
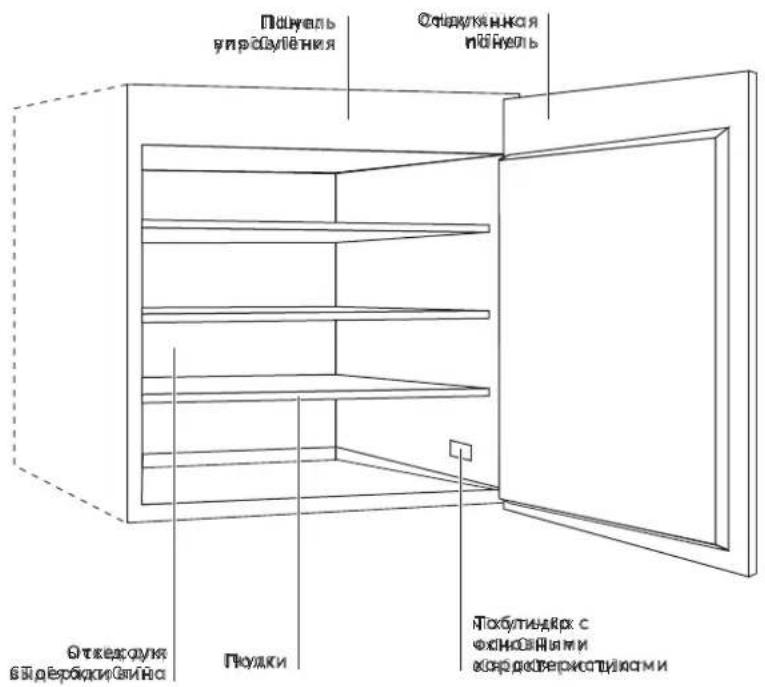
Installation
Positioning and connection
Installation, electrical connections and repairs must be carried out by a qualified technician.
Unpacking
Unpack the device immediately and make sure it has not been damaged during transport. Should it be damaged, do not connect, and get in touch with the Dealer.
Carefully remove the protections and the adhesives, open the door and make sure all the components are present.
Take out the power supply cable.
Positioning
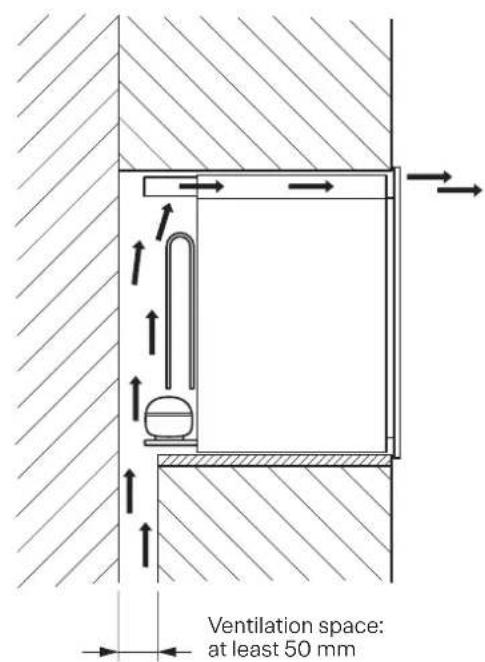
Position the device in a well ventilated area, not damp and free (avoid cabinets with closed walls).
Keep the device away from heat sources.
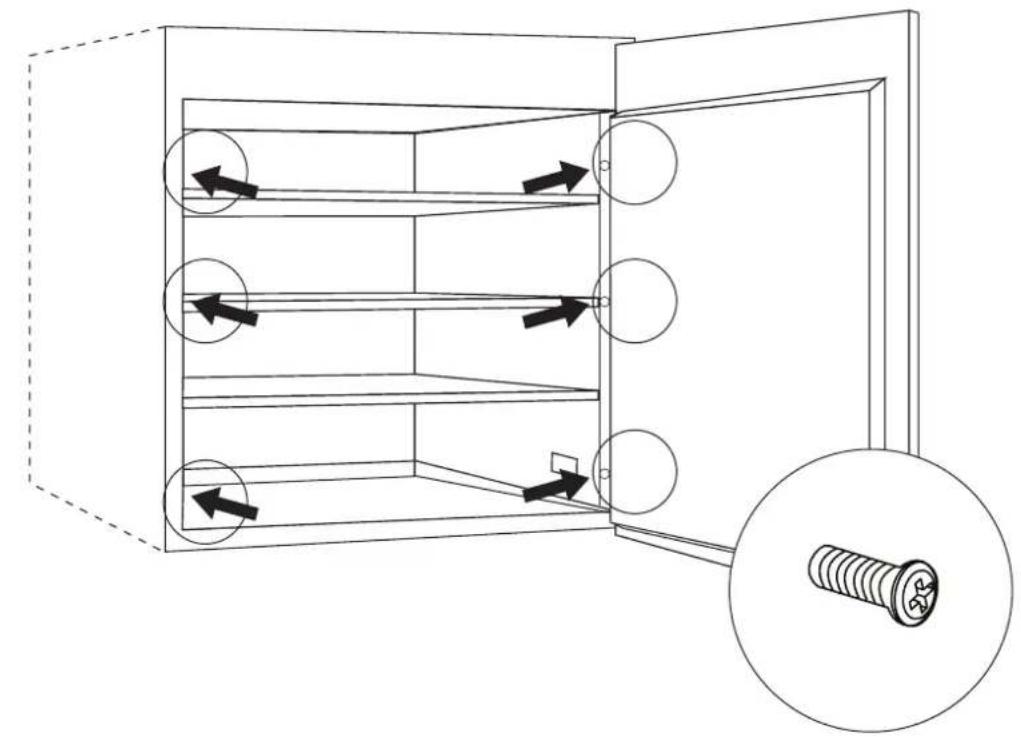
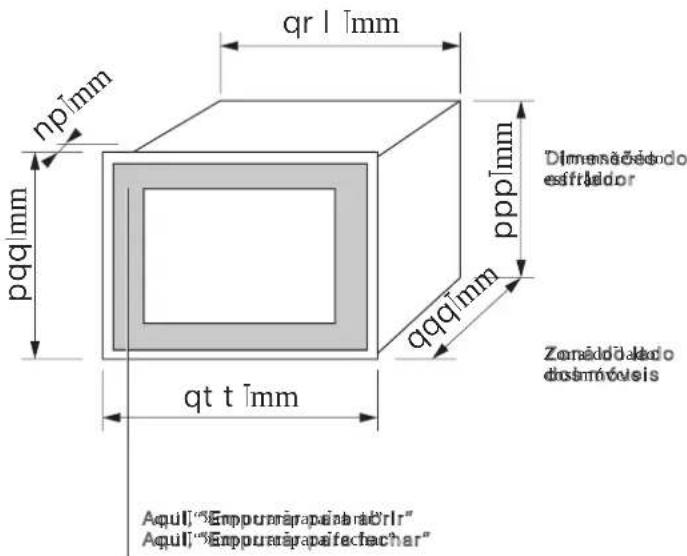
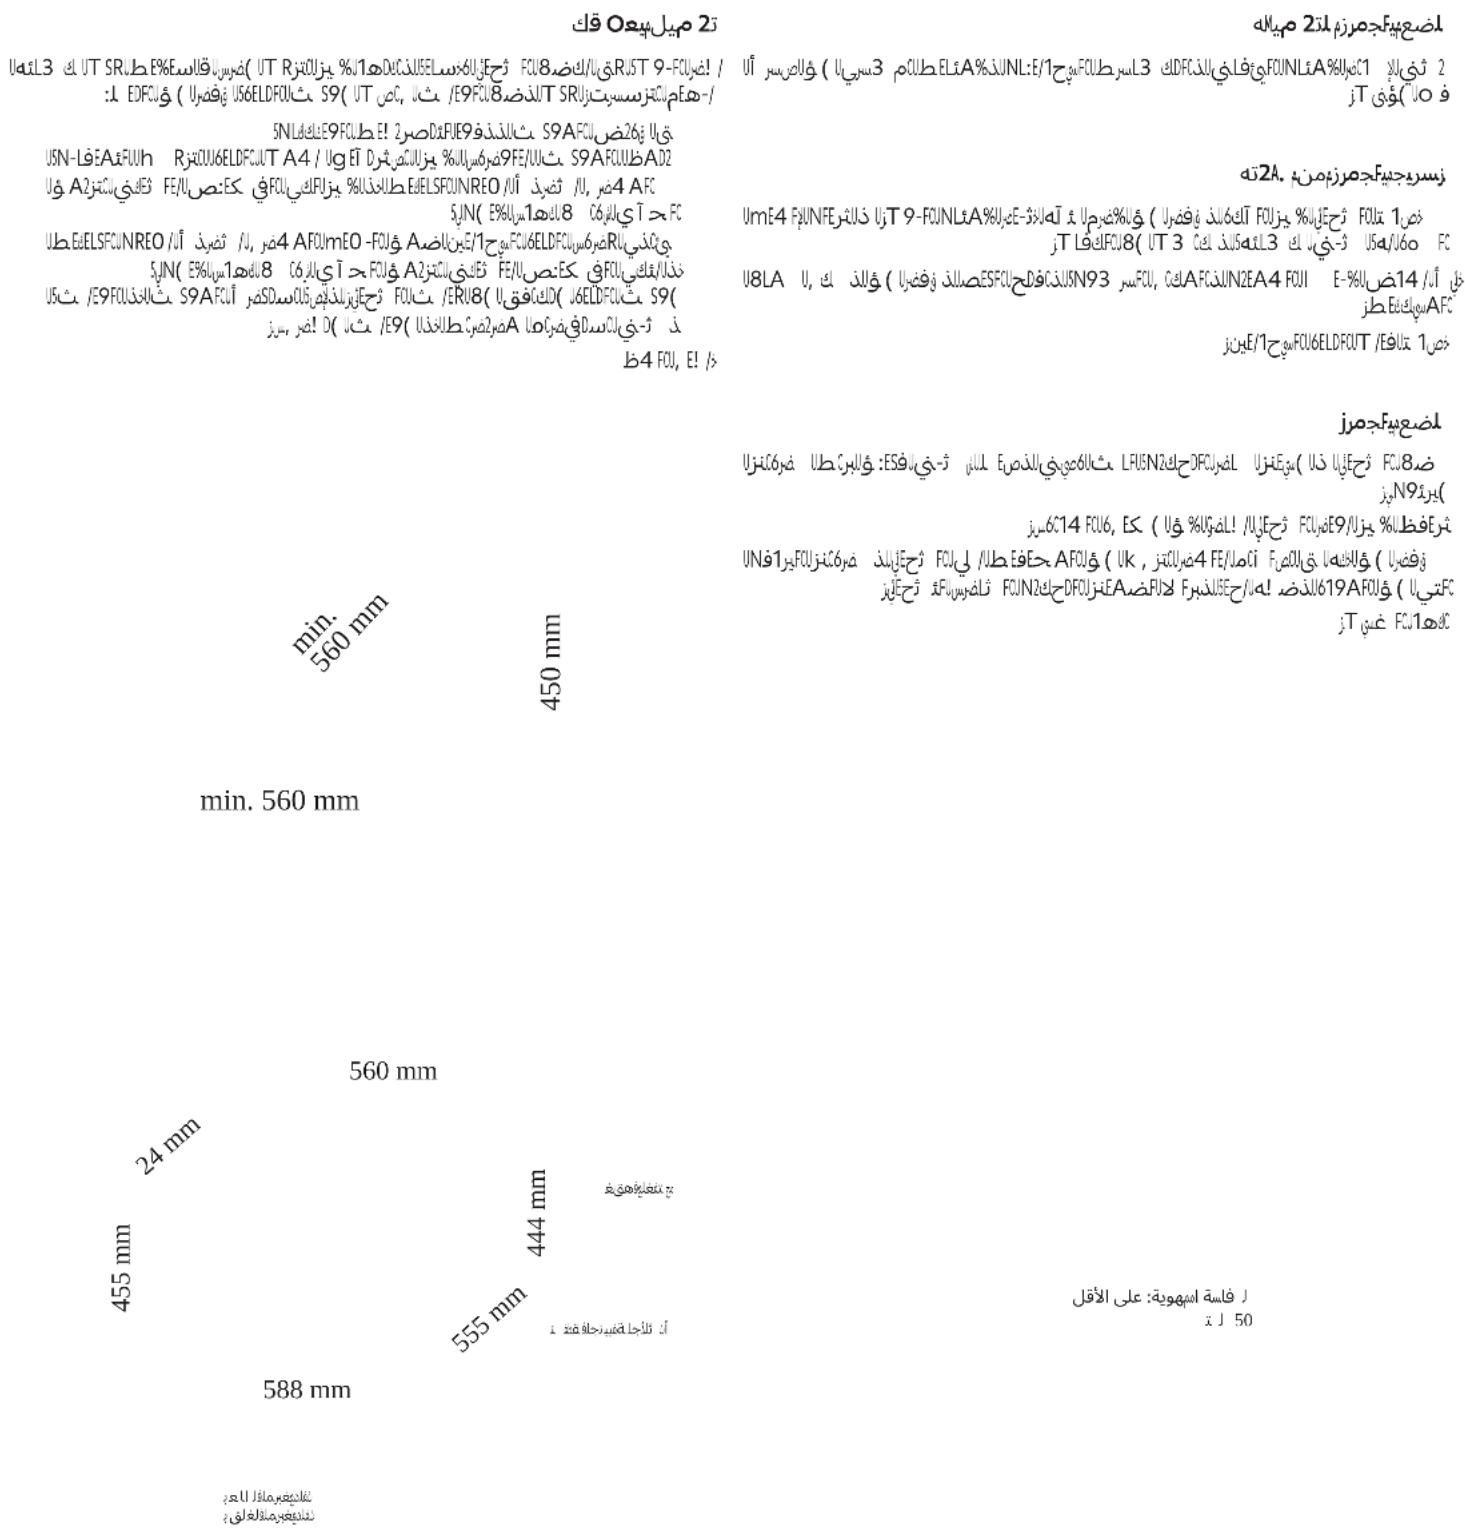
Make sure the minimum distances between the device and the walls of the room where it is placed are kept, in order to ensure perfect ventilation of the device.
See figure.
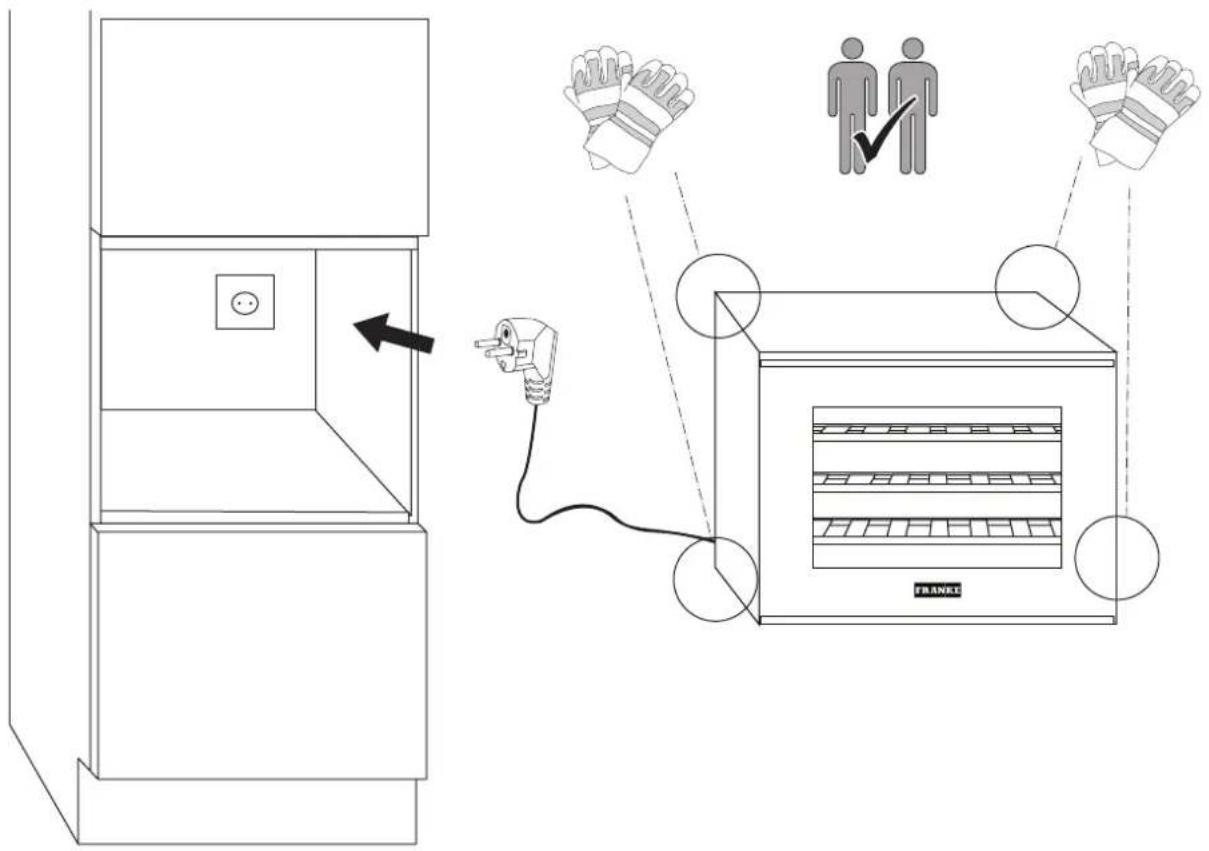
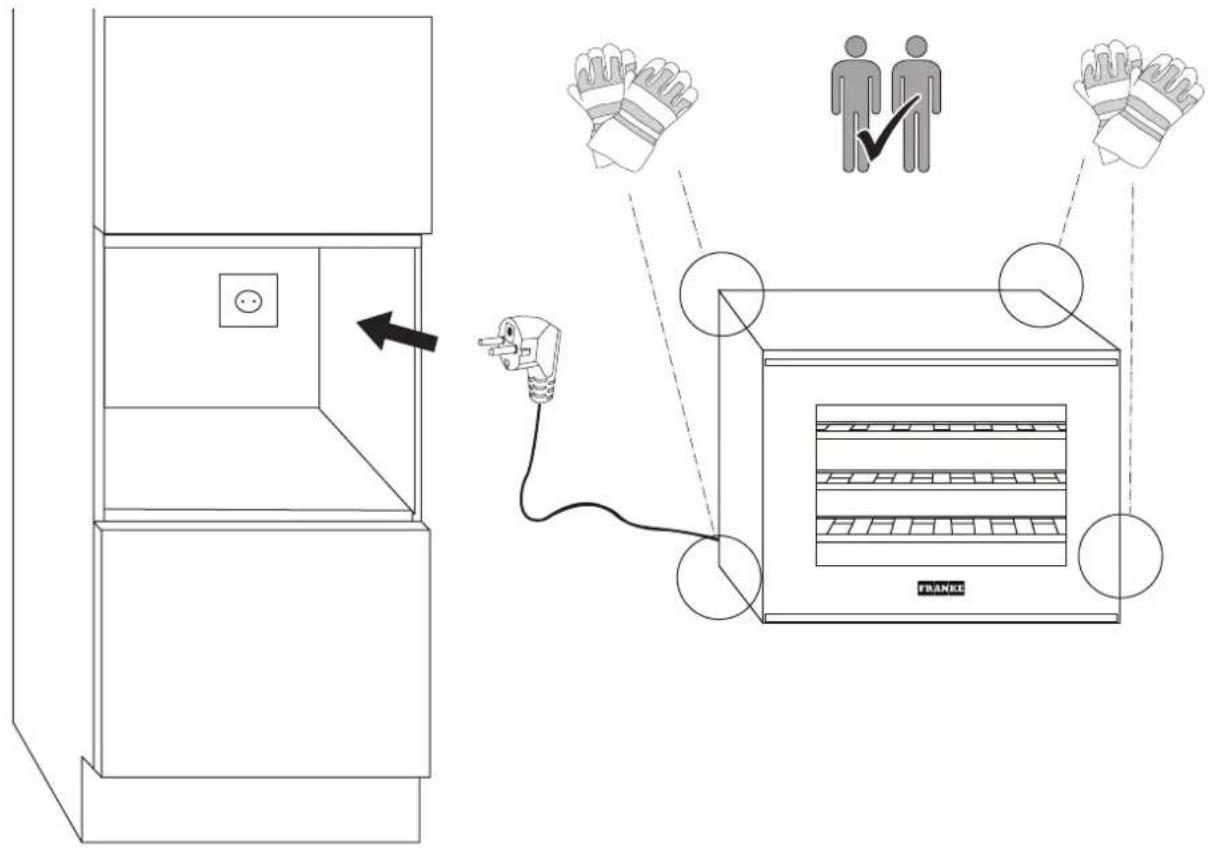
Wiring connection
After transport, stand the device vertically, and wait for at least 3 hours before connecting it to the wiring system. Before putting the plug into the power socket, make sure that:
- the socket is earthed and according to legal regulations;
- the socket is able to hold up to the maximum power load of the machine, indicated on the Data Sheet table or on the feature plate to the bottom right (see Overview);
- the power supply voltage falls within the range indicated on the Data Sheet table or on the feature plate to the bottom right (see Overview);
- the power socket is compatible with the plug of the device. Otherwise, replace the socket or the plug; do not use extensions or multiple sockets.
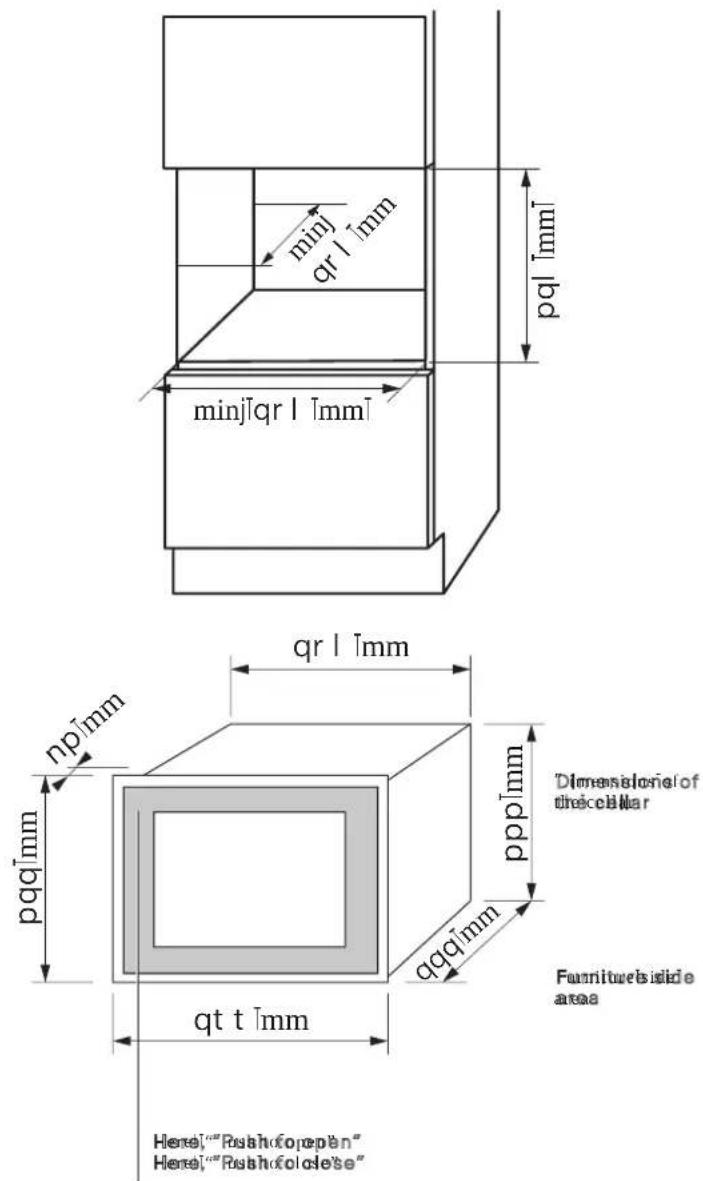
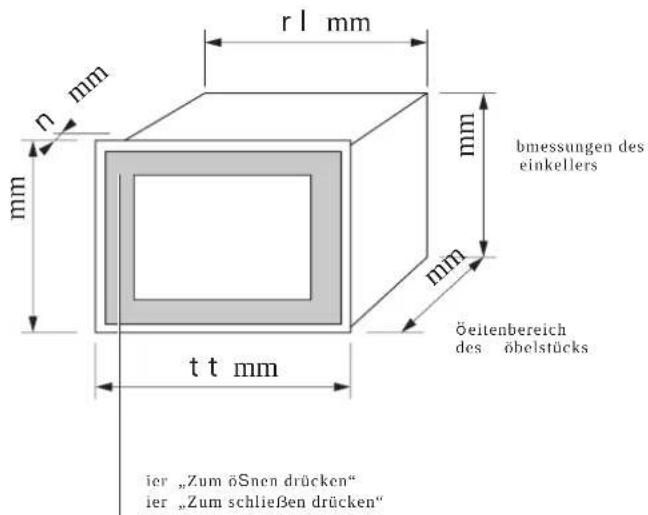
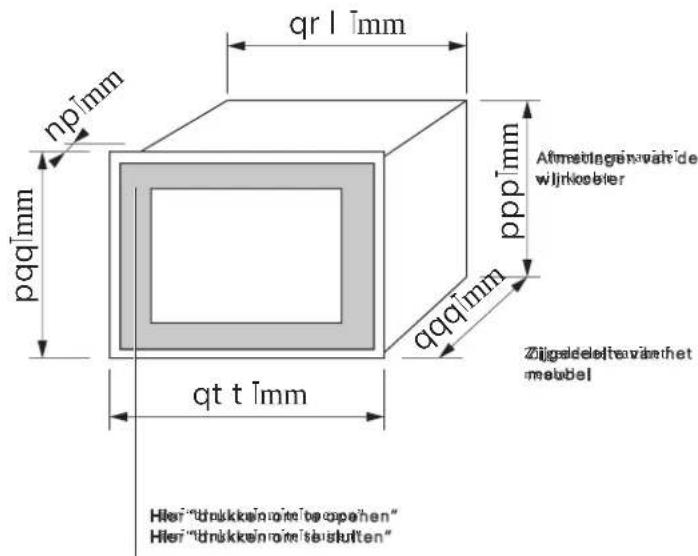
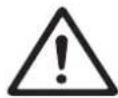
Dimensions of the compartment
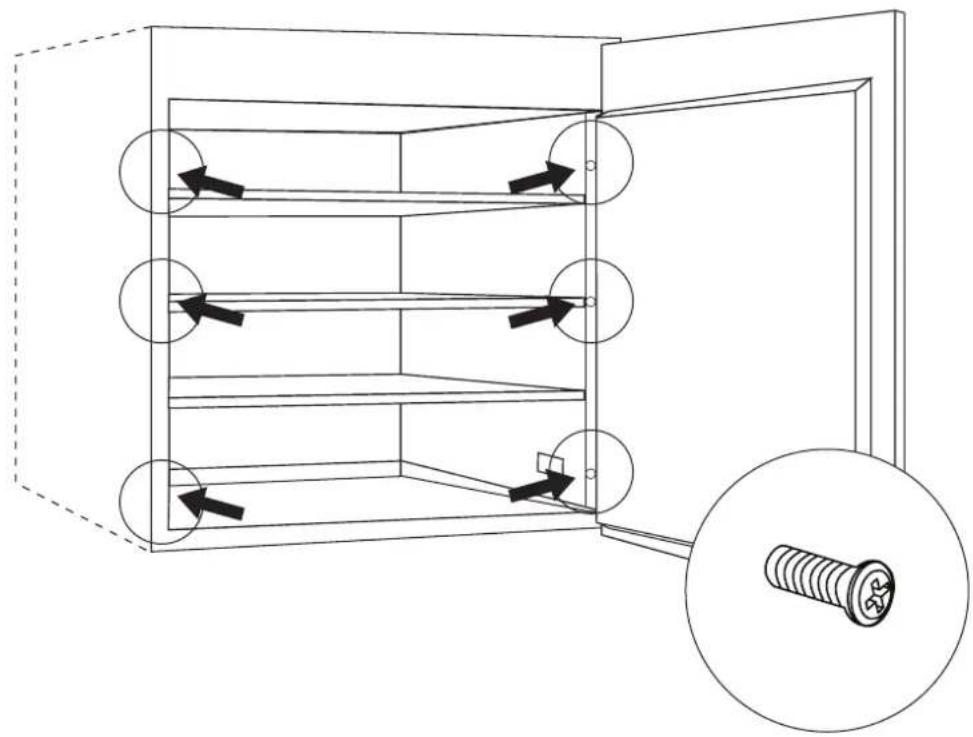
natural_image
Technical line drawing of a mechanical assembly with arrows indicating direction, showing internal components and a close-up of a bolt (no text or symbols)

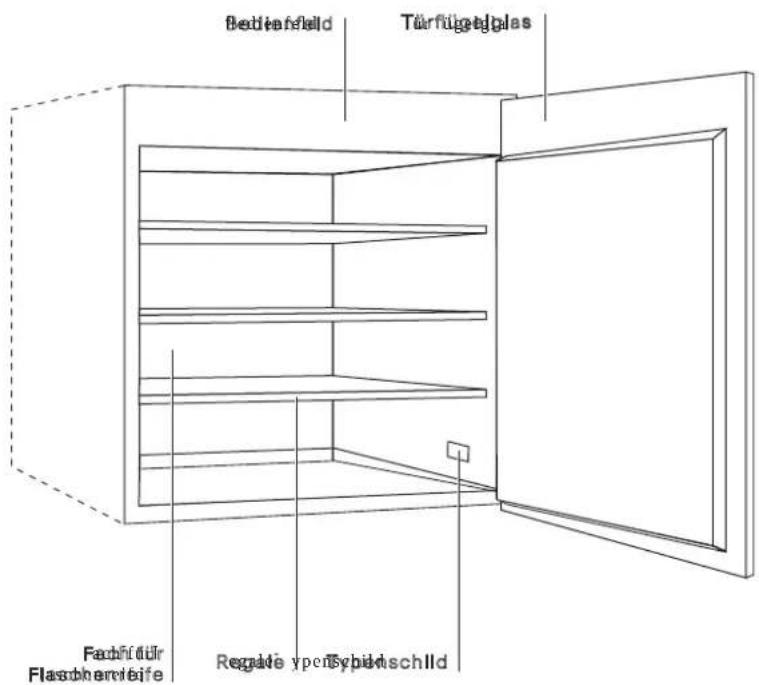
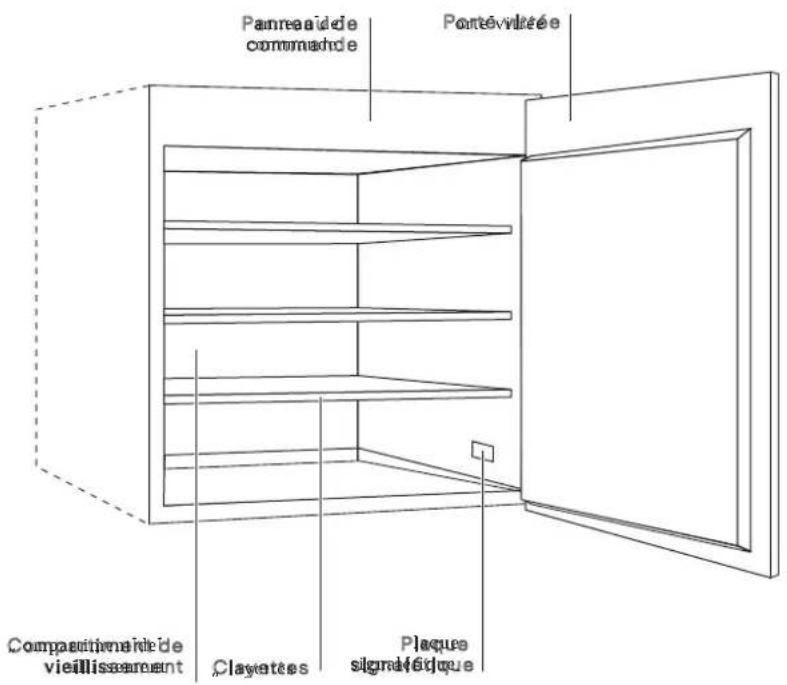
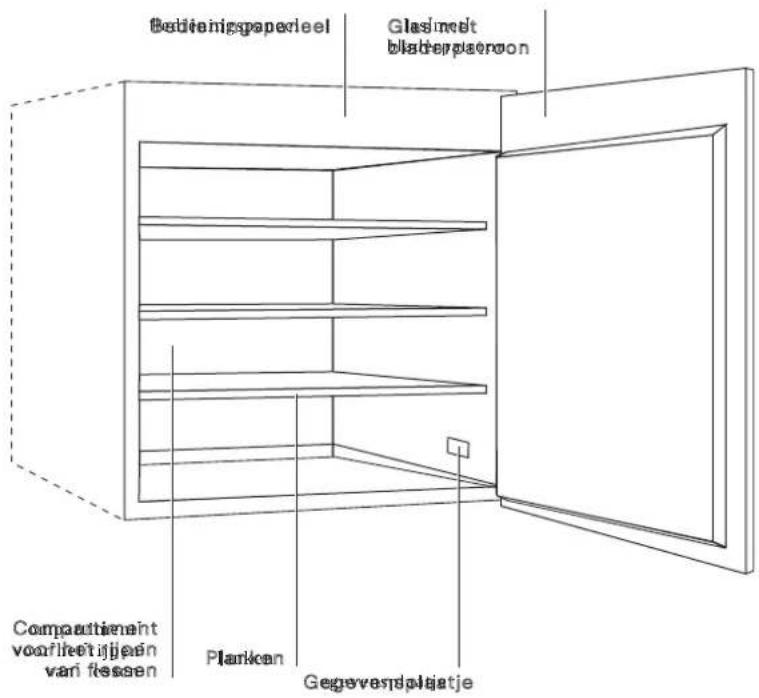
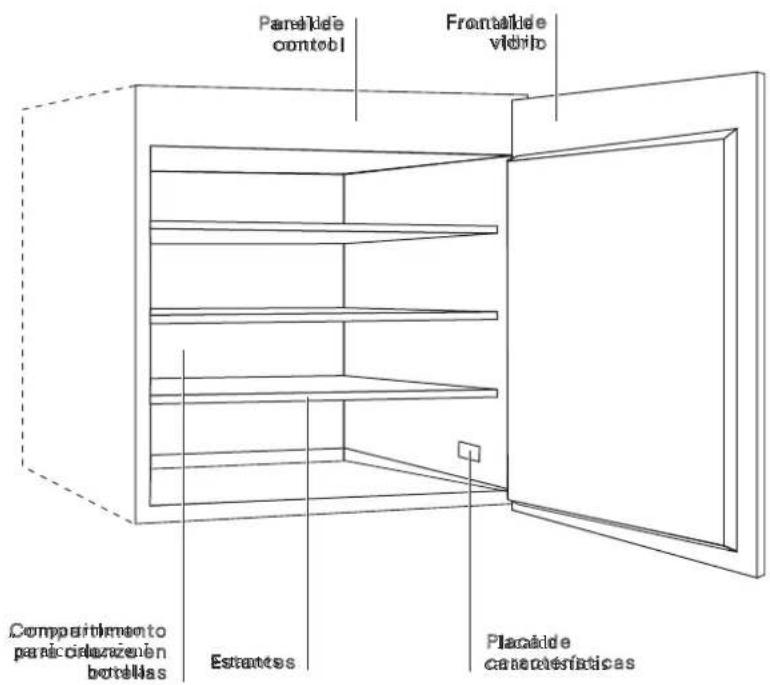
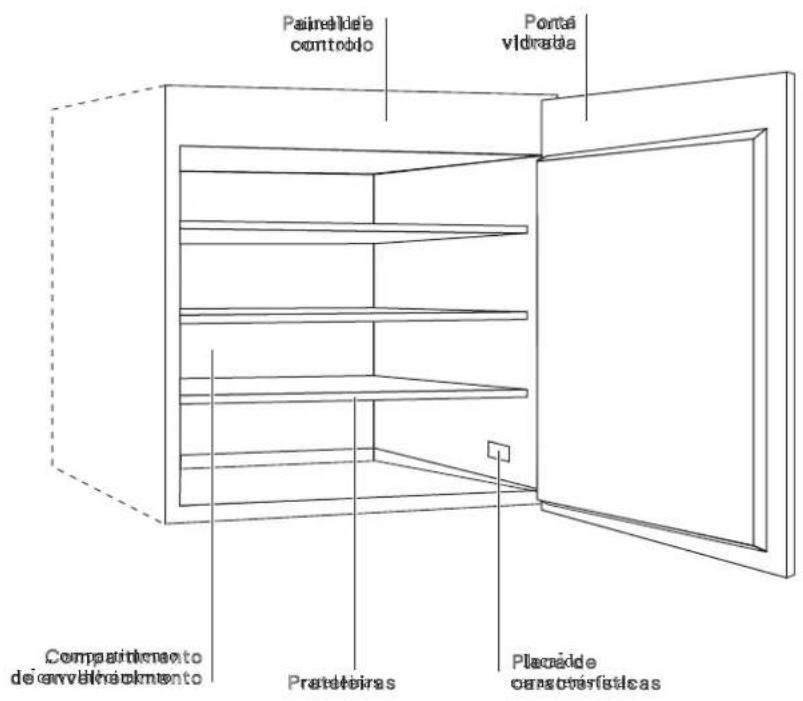
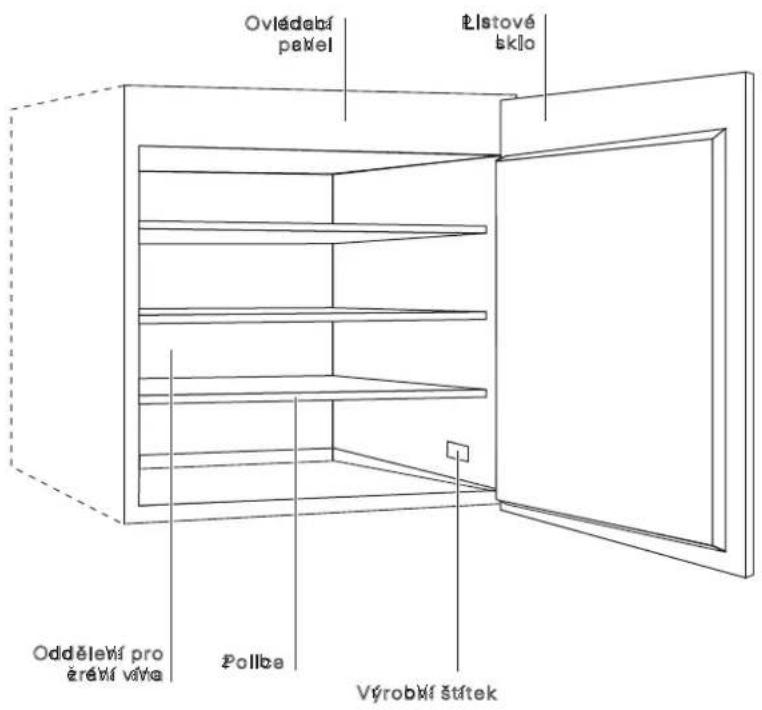
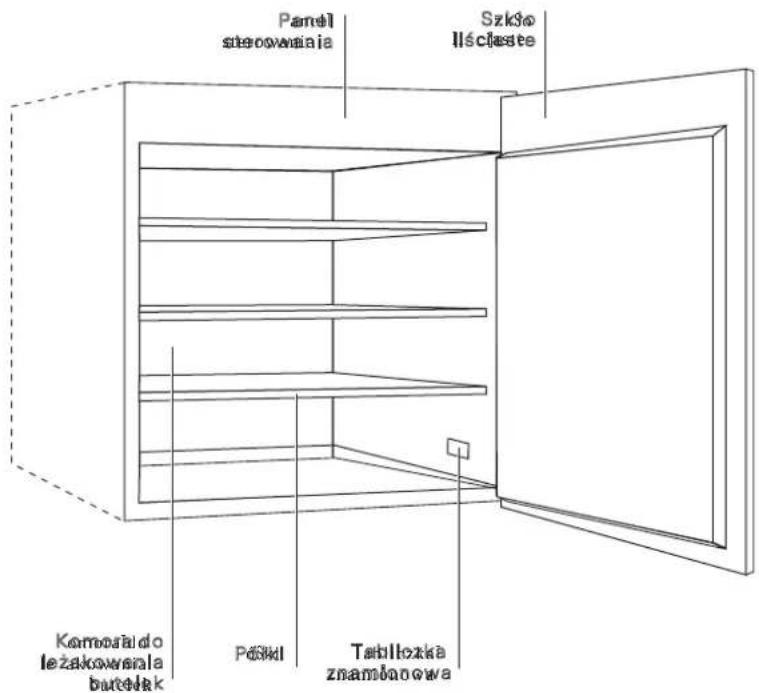
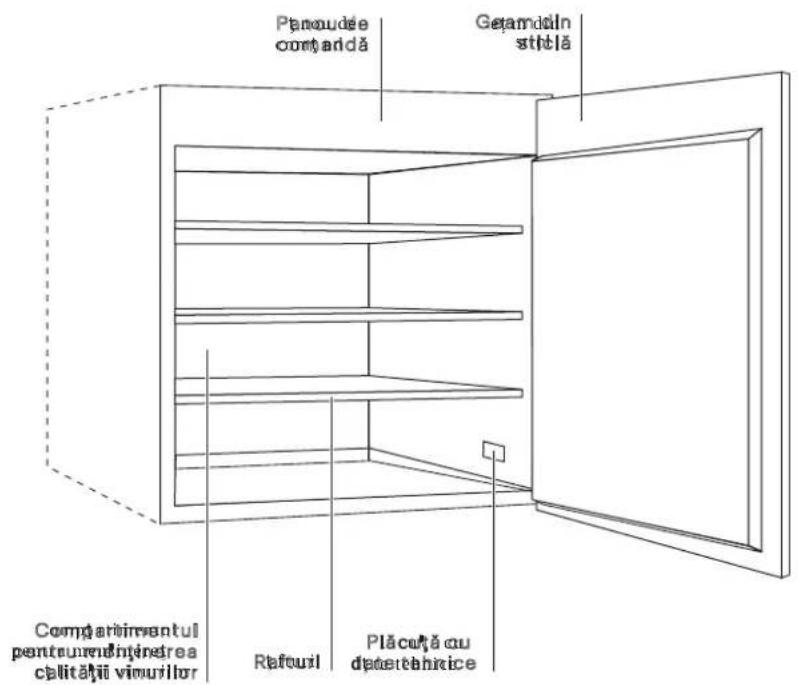
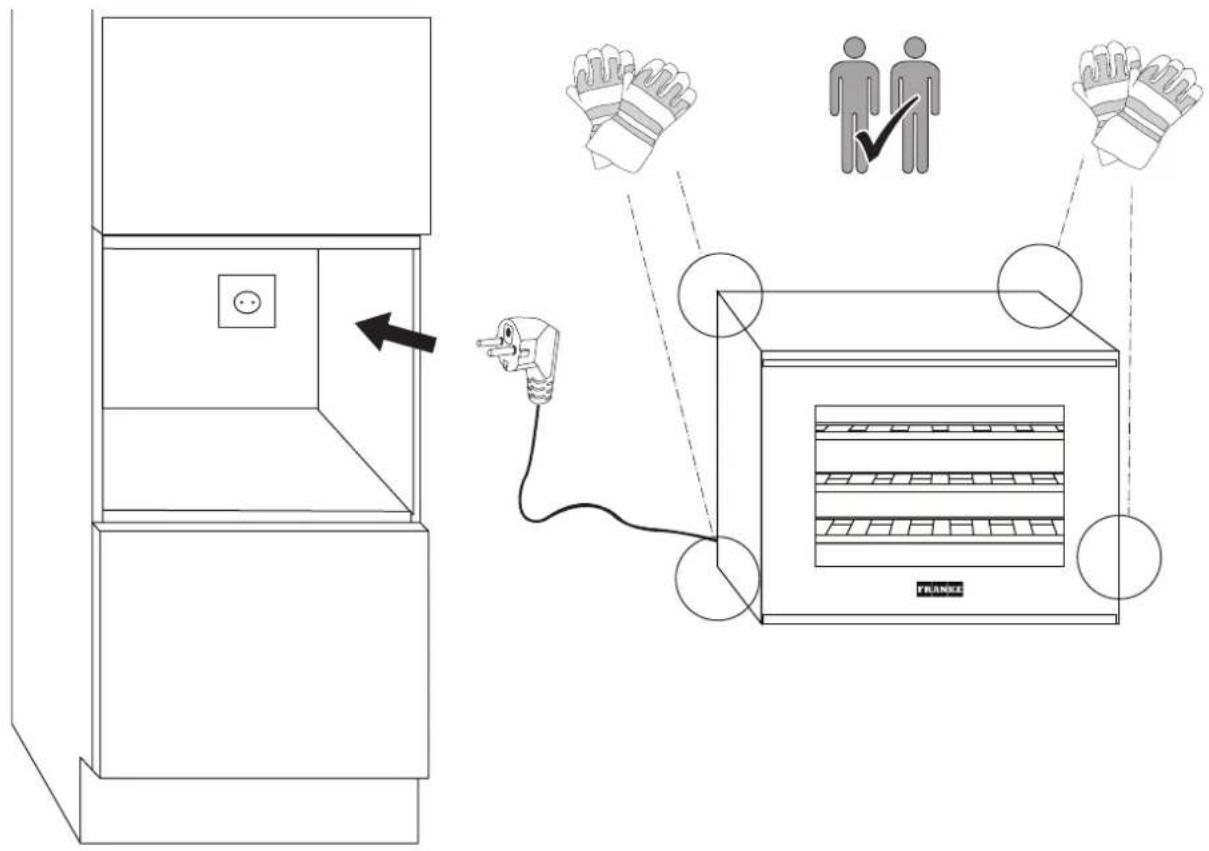
Overview
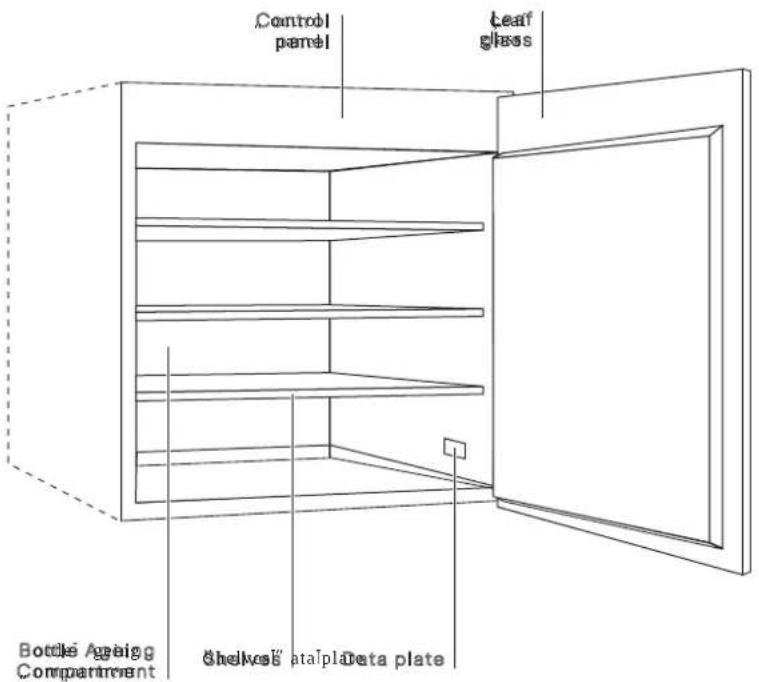
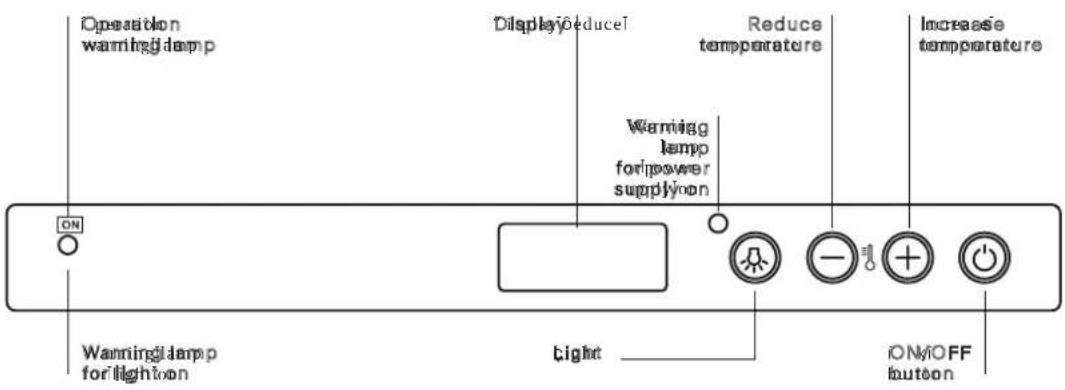
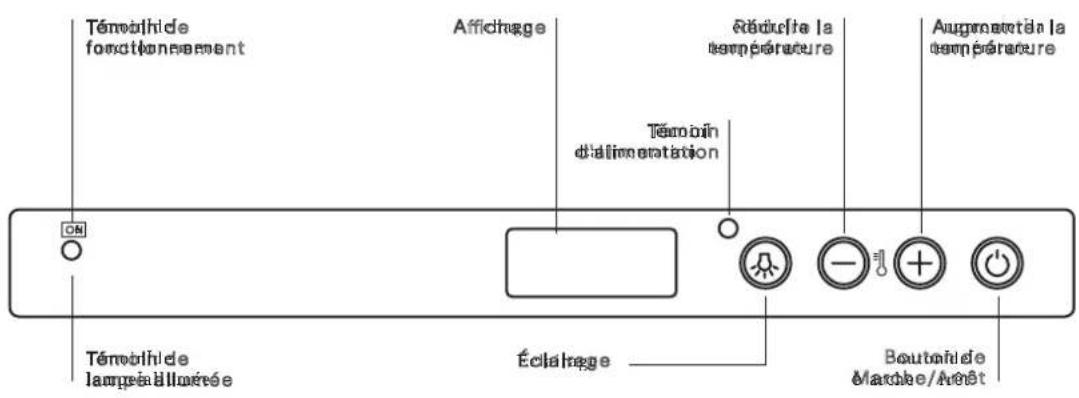
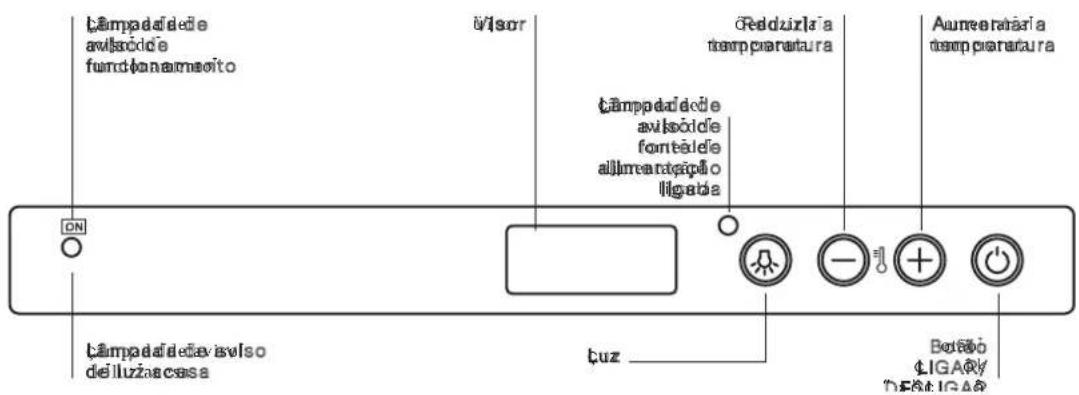
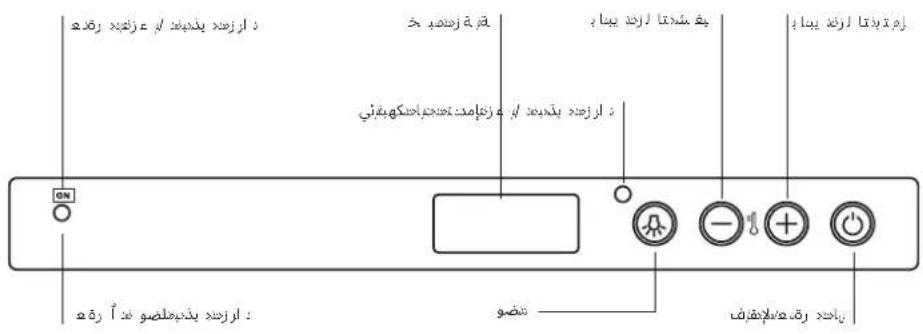
CONTROL PANEL
Operations
Bottle ageing compartment
The ageing compartment's main function is that of guaranteeing that your wines are preserved in optimal conditions.
The wine cellar's temperature was factory pre-set at 15^ , a temperature that is considered optimal for most wines.
Wine has a complex nature and it derives from a long and slow process. In order to best express its attributes, very specific conditions are necessary.
All wines are preserved at the same temperature, but, depending on their different characteristics, wines are served and tasted at very different temperatures.
Therefore, just as for manufacturers' wine cellars, for your new appliance, the absolute temperature value is not important for preserving your wine. Rather, the constant temperature through time is important. Wine preservation is ideal at any temperature, as long as that temperature does not vary.
Manual temperature control
Should you need to adjust the temperature inside the wine cellar, follow the instructions below:
- When you plug in your wine cellar, the display shows the temperature that has been set.
- Press the + button (see Control Panel) for one second. The temperature will begin to blink.
- Press the + or - buttons until you reach the desired temperature.
- Wait 5 seconds for the temperature to stop blinking.
- Wait until the wine cellar reaches its temperature before you place the wine bottles inside.
The inside light does not go on (or it goes off temporarily) when the inside temperature goes over 24^ C. This allows you to reach the pre-set temperature more quickly.
This appliance is intended to be used exclusively for the storage of wine.
The appliance is recommended to be used at 18^ C for the best maintaining of red wine, 8^ C for white wine or 12^ C as an average temperature for both red and white wine. The temperature may be adjusted for wine that requires particular maintaining temperature.
Normal operating sounds
The following sounds are normal during operation:
-A faint gurgling and bubbling sound from coils sound when refrigerant is pumped.
-A whirring and pulsating sound from the compressor when refrigerant is pumped.
-A sudden cracking noise from inside appliance caused by thermic dilatation (a natural and not dangerous physical phenomenon).
-A faint click noise from the temperature regulator when the compressor switches on or off.
Stocking the wine bottles
Standard 24-bottle stock
The 24-bottle stock (for standard, mixed, and renana bottles) is recommended for wines that need to be visible and easily removed.
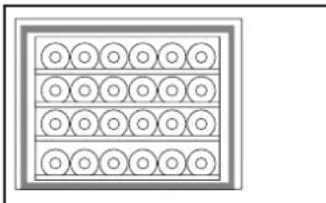
natural_image
Grid of circular patterns within a rectangular frame (no text or symbols)STANDARD
24 Bottles
(100% lying down)
3 shelves
Position each bottle into the slots on the 3 wooden shelves. 6 bottles can be placed on the bottom of the wine cooler. We suggest placing the longer bottles (Rhine wine type) at the cellar base. The base is suitable for hosting larger bottles.
Cleaning and maintenance
Regularly clean the inside and outside of the refrigerator using only warm water and a neutral detergent.
Subsequent to washing, rinse with clean water and dry thoroughly using a soft cloth.
Do not use the following: special glass and mirror cleaning products, liquid, powder, or spray detergents, alcohol, ammonia or abrasive products.
If you are not using the minibar, we suggest cleaning it well inside and leaving the door ajar to ventilate the interior.
Before maintenance, deactivate the appliance and disconnect the mains plug from the mains socket.
This appliance contains hydrocarbons in the cooling unit. Only a qualified person must do the maintenance and the recharging of the unit.
Regularly examine the drain of the appliance and if necessary, clean it. If the drain is blocked, defrosted water collects in the bottom of the appliance.
The interior of the wine cooler should be cleaned regularly to avoid odor.
Check the door gasket regularly to make sure there are no debris.
Please turn off the power before cleaning.
Clean the inside surfaces with a warm water and baking soda solution. The solution should be about 2 tablespoons of baking soda to a quart of water.
Rinse and dry thoroughly.
Troubleshooting
If you notice that your wine cooler is not working properly, check with the following list before you call your Service Centre.
Problem Possible causes/Solutions
| The compressor does not work | The plug is not plugged into the wall-outlet or not enough to make contact. Or, there could be a power failure in your home.The wall-outlet is not in working order. Plug the wine cellar into another wall-outlet to check. |
The compressor never stops Contact the Service Centre.
Any work that is done to the wine cellar should be performed by your authorized local Service Centre.
Short term faults, such as power failure, will not compromise the wines. It is only when working faults are left unsettled for a long time that the wine may suffer.
Support
In case of any operation problems, contact a Franke Technical Service Centre.
Never use the services of unauthorised technicians.
When contacting our Service Centre, please state the codes provided on your product's identification plate.
-the type of fault
- the appliance model (Art./Cod.)
-the serial number (S.N.)
This information is given on the data plate (see Overview).
You must also have proof of purchase if you are still within the warranty period.
Inhaltsverzeichnis
natural_image
Technical line drawing of a mechanical assembly with arrows indicating motion, showing internal components and a close-up of a screw (no text or symbols)

Übersicht
natural_image
Technical diagram of a multi-level mechanical assembly with arrows indicating direction, and an inset showing a screw (no text or symbols present)
Vue d'ensemble
PANNEAU DE COMMANDE
natural_image
Pure diagram of a grid of circles arranged in rows within a rectangular frame (no text or symbols)STANDARD
24 bouteilles
(toutes allongées)
3 clayettes
Problem CAUSES POSSIBLES/SOLUTIONS

natural_image
Diagram of a mechanical assembly with arrows indicating direction and a magnified inset showing a screw (no text or symbols present)
Overzicht
-het model (Art./Cod.)
-het serienummer (S.N.)
natural_image
Technical line drawing of a mechanical assembly with arrows indicating direction, showing internal components and a close-up of a bolt (no text or symbols)

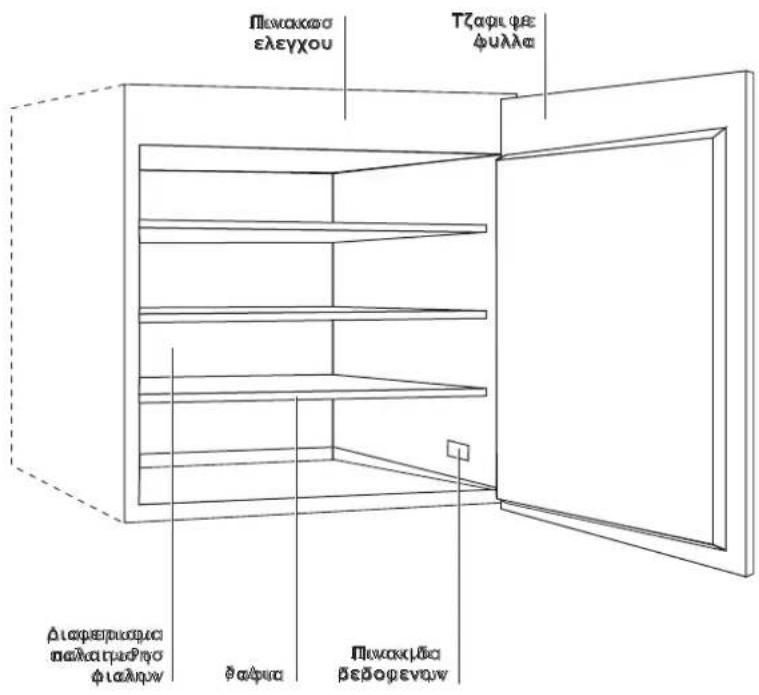
Panoramica

natural_image
Grid of circular patterns arranged in three rows and four columns, no text or symbols presentSTANDARD
24 bottiglie
(100% orizzontali)
3 ripiani
natural_image
Technical line drawing of a mechanical assembly with arrows indicating motion, showing internal components and a close-up of a screw (no text or symbols)

Información general
natural_image
Technical line drawing of a mechanical assembly with arrows indicating motion, showing internal components and a close-up of a bolt (no text or symbols)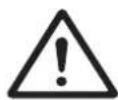
Vista geral
PAINEL DE CONTROLO
natural_image
Pure diagram of a grid of circles arranged in rows within a rectangular frame (no text or symbols)I A B I J P C O F C C S T G C C I S N A L E I J S N C C I S T G C Y B I T G C C S T 7 n C
ФАΛΜΛ2Υ≡ ΟΣΦ7CCΦ2I ΣΓΛ4CCΣP7CCΛTΓ5ΚΠ7C
1 20ФАУЛМЕ 5ГІ Г75
! 4Улсюлл 4ССІ А2ССУЛЗФАРОЛКЗЛССК ССУЛЗФЮВЛЛЗЛС ΣΓСІ 21 АЛ2КРСАЛ ФЗ4ЭЛСΣΓСІ ЛСА4 Улзг СУВІ Г5

natural_image
Technical line drawing of a mechanical assembly with arrows indicating motion, showing internal components and a close-up of a screw (no text or symbols)

natural_image
Technical diagram of a mechanical assembly with arrows indicating direction and a magnified inset showing a bolt (no text or symbols present)
Přehled
natural_image
Grid of identical circles arranged in three horizontal rows within a rectangular frame (no text or symbols)STANDARD
24 lahví
(100 % položeno)
3 police
natural_image
Technical line drawing of a mechanical assembly with arrows indicating motion, showing internal components and a close-up of a screw (no text or symbols)

Opis
natural_image
Technical line drawing of a mechanical assembly with arrows indicating motion, showing internal components and a close-up of a bolt (no text or symbols)
Prezentare generală
natural_image
Technical line drawing of a mechanical assembly with arrows indicating motion, showing internal components and a close-up of a bolt (no text or symbols)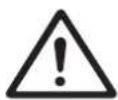
Prehl'ad
ї ☐шуП☐☐☐☐☐☐☐☐☐☐☐☐☐☐☐☐☐☐☐☐☐☐☐☐☐☐☐☐☐☐☐☐☐☐☐☐☐☐☐☐☐☐☐☐☐☐☐☐☐☐☐☐☐☐☐☐☐☐☐☐☐☐☐☐☐☐☐☐☐☐☐☐☐☐☐☐☐☐☐☐☐☐☐☐☐☐☐☐☐☐☐☐☐☐☐☐☐☐☐☐☑
ї ПЩП• Щишш5

в ї ПЩЄГПе-иш-ССІ ШИПО-ССЩШ-ОШС
n ☐ССі ПГеПЩиЛ☐☐СС☐☐☐☐☐☐☐☐☐☐☐☐☐☐☐☐☐☐☐☐☐☐☐☐☐☐☐☐☐☐☐☐☐☐☐☐☐☐☐☐☐☐☐☐☐☐☐☐☐☐☐☐☐☐☐☐☐☐☐☐☐☐☐☐☐☐☐☐☐☐☐☐☐☐☐☐☐☐☐☐☐☐☐☐☐☐☐☐☐☐☐☐☐☐☐☐☐☐☐☐☑ ☐C
ii ☐шуП☐По5

nɔc Πi̅ b̅s μc Πw̅b̅c wc
ПиЩо• шеишос ї шиПОС ☐☐☐єошс у☐ГС
ii ΠωοΠσεΓπщ' οζ

к щ□□ш□□сГ□со □щ□иєьшош□□□єо ш□сн□□
ї ☐☐☐☐☐☐☐☐☐☐☐☐☐☐☐☐☐☐☐☐☐☐☐☐☐☐☐☐☐☐☐☐☐☐☐☐☐☐☐☐☐☐☐☐☐☐☐☐☐☐☐☐☐☐☐☐☐☐☐☐☐☐☐☐☐☐☐☐☐☐☐☐☐☐☐☐☐☐☐☐☐☐☐☐☐☐☐☐☐☐☐☐☐☐☐☐☐☐☐☐☐☑ ☐☒ ☐☒ ☐☒ ☐☒ ☐☒ ☐☒ ☐☒ ☐☒ ☐☒ ☐☒ ☐☒ ☐☒ ☐☒ ☐☒ ☐☒ ☐☒ ☐☒ ☐☒ ☐☒ ☐☒ ☐☒ ☐☒ ☐☒ ☐☒ ☐☒ ☐☒ ☐☒ ☐☒ ☐☒ ☐☒ ☐☒ ☐☒ ☐☒ ☐☒
ї ☐шуП☐☐☐☐☐☐☐☐☐☐☐☐☐☐☐☐☐☐☐☐☐☐☐☐☐☐☐☐☐☐☐☐☐☐☐☐☐☐☐☐☐☐☐☐☐☐☐☐☐☐☐☐☐☐☐☐☐☐☐☐☐☐☐☐☐☐☐☐☐☐☐☐☐☐☐☐☐☐☐☐☐☐☐☐☐☐☐☐☐☐☐☐☐☐☐☐☐☐☐☐☑ ☐☒ ☐☒ ☐☒ ☐☒ ☐☒ ☐☒ ☐☒ ☐☒ ☐☒ ☐☒ ☐☒ ☐☒ ☐☒ ☐☒ ☐☒ ☐☒ ☐☒ ☐☒ ☐☒ ☐☒ ☐☒ ☐☒ ☐☒ ☐☒ ☐☒ ☐☒ ☐☒ ☐☒ ☐☒ ☐☒ ☐☒ ☐☒ ☐☒ ☐☒
! ☐☐☐☐☐☐☐☐☐☐☐☐☐☐☐☐☐☐☐☐☐☐☐☐☐☐☐☐☐☐☐☐☐☐☐☐☐☐☐☐☐☐☐☐☐☐☐☐☐☐☐☐☐☐☐☐☐☐☐☐☐☐☐☐☐☐☐☐☐☐☐☐☐☐☐☐☐☐☐☐☐☐☐☐☐☐☐☐☐☐☐☐☐☐☐☐☐☐☐☐☐☑ ☐☐☐☐☐☐☐☐☐☐☐☐☐☐☐☐☐☐☐☐☐☐☐☐☐☐☐☐☐☐☐☐☐☐☐☐☐☐☐☐☐☐☐☐☐☐☐☐☐☐☐ ☐☒—☒r ☐☒—☒r ☐☒—☒r ☐☒—☒r ☐☒—☒r ☐☒—☒r ☐☒—☒r ☐☒—☒r ☐☒—☒r ☐☒—☒r ☐☒—☒r ☐☒—☒r ☐☒—☒r ☐☒—☒r ☐☒—☒r ☐☒—☒r ☐☒—☒r ☐☒ —☒r ☐☒ —☒r ☐☒ —☒r ☐☒ —☒r ☐☒ —☒r ☐☒ —☒r ☐☒ —☒r ☐☒ —☒r ☐☒ —☒r ☐☒ —☒r ☐☒ —☒r ☐☒ —☒r ☐☒ —☒r ☐☒ —☒r ☐☒ —☒r ☐☒ —☒r ☐☒ —☒r ☑
⚠️ а□□ иш□□ссешиПсс□ ПщєьПссес и□□□□ї □□□□ии' °СУ□' ЩЬ□°5
natural_image
Technical line drawing of a mechanical assembly with arrows indicating direction, showing internal components and a close-up of a bolt (no text or symbols)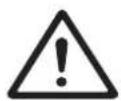

ùniPiCoSooOoOoOuP• i#s O#T Pi#oPiCoSooCrPeUoOuOuOuPiUeOoPoC i O#P#P• w##IeHnPcSooCoOoOuOuPiHnPoC O# P#oOoSooDrPucOuPiHnPoC v#Pu' CsiOuOuV—woOoPiOuOuPoC O# P#vOuOuOuEoOhPc
natural_image
Grid of circular patterns arranged in three horizontal rows and four vertical columns, enclosed in a rectangular frame (no text or symbols)kɔːkndkYɔnɛl
мФСИОО' ЩЬШ
WIIJUSSCE' OCPoOIIJUSSCvOCCSe—OCEuIII' LCC—Byr CCINKCOIUPNIOUC PII• I' OCCPUOIIGPOnCDeEeOOOOOCCNCCOIIUOc t woCCOII wObPoC I • OCCVIOcGEnIwOSeOOOseHn' LC -NiO5
n ☐ССПЬЛ☐☐☐☐☐☐☐☐☐☐☐☐☐☐☐☐☐☐☐☐☐☐☐☐☐☐☐☐☐☐☐☐☐☐☐☐☐☐☐☐☐☐☐☐☐☐☐☐☐☐☐☐☐☐☐☐☐☐☐☐☐☐☐☐☐☐☐☐☐☐☐☐☐☐☐☐☐☐☐☐☐☐☐☐☐☐☐☐☐☐☐☐☐☐☐☐☐☐☐☐☑ BПИ□□□□□□□□□□□□□□□□□□□□□□□□□□□□□□□□□□□□□□□□□□□□□□□□□□□□□□□□□□□□□□□□□□□□□□□□□□□□□□□□□□□□□□□□□□□□□□□□□□□□○
! ✘ЛССІ ☐Ш☐☐☐ЛС ЧСС°ПЩП☐ЩЄИШЬПОС ☐ЩИС еши☐5ССÜЛИССІ ☐ШГИ☐V☐ИШЛССЩШ—☐СС☐ЩИС Ги☐☐ІнДИИЦЕШИ☐5
natural_image
Technical line drawing of a mechanical assembly with arrows indicating motion, showing internal components and a close-up of a screw (no text or symbols)

natural_image
Repeating pattern of circular and rectangular shapes with no text or symbolsk□kndkY□
мФсі Щμ-ьш
ЕудННСР СЩО• ОУШН
ψζ ΠΨΨ I
ПЬЩОДЬСЬП• ИОСТ ЩИ—ЬЮСПСЕШ:О ПЬСИОФСОДЬЕЧРИШОСТ ПЦШИ ^ S ТСІ ЩИ—ПЬСОП• ИОСТ ПЬЩОДЬСЬИСПС ^ ПЦП ШЩЕИЛЬСУЩСЕШИП5
natural_image
Technical line drawing of a mechanical assembly with arrows indicating direction and a magnified inset showing a screw (no text or symbols)

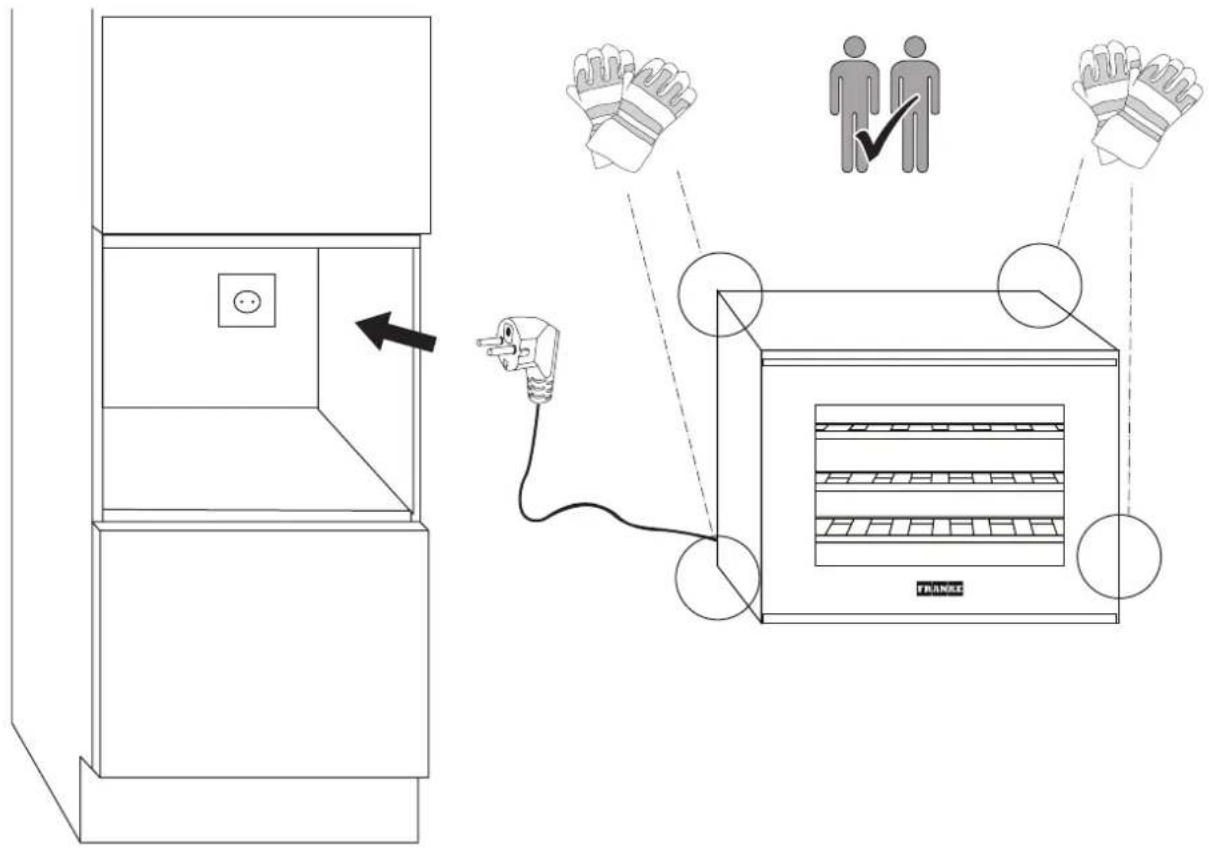
Genel bakış
:T Lgr DFOUyE-5UN2, ELD%OU) D! UNLFEDFOU3
^1 1A.FCU6C14 FOUN 6, RUT ^2 U1-U1-FCU6C14 FOUN 6, UNALRI (U1-U1-FCU6C14 FOUN 6, UTFUR8-UTS RCU6C14 FOUN 6, U. LS-FCU6C14 FOUN 6, U. E E - FOU8-UTS RCU6C14 FOUN 6, U. LS-FCU6C14 FOUN 6, U. E E
U60C14 FCUN 6, U60E D UE(صر-%%)BR(وَّ) O (فَرْصِيَ الْمُزْدَالِهُ)ESK AFOUT Lغز. ! D2 فَر UN%Sr/UE9S ح (UNمَعْضِAFCU6C14 FCUN 6, U60كَلَقُ) FU.LD2UprU°24UNLظَيْنَFC
/ WE RF _40 Nc 2F

natural_image
Technical line drawing of a mechanical assembly with arrows indicating motion, showing internal components and a close-up of a bolt (no text or symbols)

UfE: (UfE: FUC. UfE: UfE: UfE: UfE: UfE: UfE: UfE: UfE: UfE: UfE: UfE: UfE: UfE: UfE: UfE: UfE: UfE: UfE: UfE: UfE: UfE: UfE: UfE: UfE: UfE: UfE