
KBO 331 M A - Oven Koenic - Free user manual and instructions
Find the device manual for free KBO 331 M A Koenic in PDF.

| Product type | Built-in electric oven |
| Brand | Koenic |
| Model | KBO 331 M A |
| Power supply | 220-240 V~, 50-60 Hz |
| Nominal power | 3000 W |
| Cavity volume | 70 L |
| Maximum temperature | 250 °C |
| Energy class | A |
| Energy consumption (conventional) | 0.84 kWh/cycle |
| Energy consumption (fan-assisted) | 0.70 kWh/cycle |
| Cooking functions | Light, defrosting, bottom heat, conventional cooking, convection with fan, single grill, double grill, double grill with fan, fan-assisted cooking, eco |
| Bulb type | Halogen lamp resistant to 300 °C |
| Removable door | Yes, for easy cleaning |
| Telescopic runners | Yes (1 pair included) |
| Supplied accessories | 1 shallow baking tray, 1 deep roasting pan, 1 grid, 2 telescopic runners, 2 side supports, installation kit |
| Child safety | Key lock |
| Cleaning | Do not use steam cleaner; door and glass panels can be disassembled |
| Protection class | I |
| Installation | Built-in; minimum opening depth 590 mm (620 mm if plug at rear) |
Frequently Asked Questions - KBO 331 M A Koenic
User questions about KBO 331 M A Koenic
0 question about this device. Answer the ones you know or ask your own.
Ask a new question about this device
Download the instructions for your Oven in PDF format for free! Find your manual KBO 331 M A - Koenic and take your electronic device back in hand. On this page are published all the documents necessary for the use of your device. KBO 331 M A by Koenic.
USER MANUAL KBO 331 M A Koenic
-
Risk of burning! Do not touch the product's hot surfaces. Heat rises from the product during use. Caution! Hot surface!
-
Warning! The appliance and its accessible parts become hot during use. Care should be taken to avoid touching the heating elements. Children less than 8 years of age shall be kept away unless continuously supervised.
-
This product can be used by children aged from 8 years and above and persons with reduced physical, sensory or mental capabilities or lack of experience and knowledge if they are supervised or have received instruction concerning use of the appliance in a safe way and understand the hazards involved.
-
Children shall not play with the appliance.
-
Cleaning and user maintenance shall not be made by children unless they are older than 8 and supervised.
-
Keep the product and its cord out of reach of children aged less than 8 years.
-
If the supply cord is damaged it shall be replaced by the manufacturer or a workshop commissioned by the manufacturer or by a similarly qualified person in order to avoid hazards.
-
During use the appliance becomes hot. Care should be taken to avoid touching heating elements inside the oven.
-
Warning! Accessible parts may become hot during use. Young children should be kept away.
Safety instructions
- Do not use harsh abrasive cleaners or sharp metal scrapers to clean the oven door glass since they can scratch the surface, which may result in shattering of the glass.
- The product is not intended to be operated by means of an external timer or separate remote-control system
- Means for disconnection must be incorporated in the fixed wiring in accordance with the wiring rules.
- Do not use steam cleaners for cleaning!
- Follow the instructions in the chapter Cleaning and care.
- Warning! Ensure that the appliance is switched off before replacing the lamp to avoid the possibility of an electric shock.
- Slide the baking tray or the grate straight into the oven's slots. Make sure not to tilt it.
English
Safety instructions
- Read this user manual thoroughly before first use and pass it on with the product. Pay attention to the warnings on the product and in this user manual. It contains important information for your safety as well as for the use and maintenance of the equipment.
- Use the product only for its intended purpose and with recommended accessories and components. Improper use or wrong operation may lead to hazards.
- Never leave the product unsupervised while it is switched on.
- Never immerse electrical parts of the product in water during cleaning or operation. Never hold the product under running water.
- Do not under any circumstances attempt to repair the product yourself (e.g. damaged power cord, product has been dropped during installation, etc.). For servicing and repairs, please consult an authorized service agent.
- The mains voltage must match the information on the rating label of the product.
- Avoid damages to the power cord that may be caused by kinks or contact with sharp corners.
- Keep the power cord and power plug away from all heat sources such as ovens, hot plates and other heat-producing products/objects.
- Only unplug from the power socket by the plug itself. Do not pull on the cord.
-
Use this product in dry indoor areas only and never outdoors.
-
This product is not intended for commercial use. It is designed for household use only.
- Clean the product and all other accessories after each use.
- Important! Check to ensure that the product is in a serviceable condition before use. The product shall not be used if it shows any signs of damage or if it's suspected to be defect.
Congratulations!
Thank you for your purchase of a KOENIC product. Please read this manual carefully and keep it for future reference.
Intended use
This product is designed for heating and cooking and baking foods on a baking tray, cooking grate or in a suitable pan. This product is designed for household use only and not intended for commercial use. Any other use may result in damage to the product or injuries. The Imtron GmbH assumes no liability for damage to the product, for property damage or for personal injury due to careless or improper usage of the product, or usage of the product, which does not meet the manufacturer's specified purpose.
Before first time use
Carefully take the product and its accessories out of the original packaging. Retain the original packaging in case you would like to store the product away or transport it at a later date. If you choose to dispose of the original packaging, then do so according to the applicable legal regulations. Check the packaging contents for completeness and damages. Should the contents in the packaging not be complete or damaged, do not use the product. Return it to your retail outlet immediately. After unpacking, please refer to chapter Cleaning and care.
To remove any manufacturing residues and odors in the oven before first use, operate the built-in oven for 30 to 60 minutes at 250^ in convection mode with upper and lower heat. For settings follow chapter Operation. Make sure there is sufficient ventilation as a slight odor and some smoke may occur. This is harmless and will disappear shortly.
Content
1 x Baking tray (shallow)
1 x Grill tray (deep)
1 x Grill rack
2×Telescopic runner (1 pair)
2xSide rack
Installation kit
(2 screws with removable rubber cap)
Controls and components
A Oven function control
B Reminder button
Time button
D Display
E Stop button
F Start button
Oven temperature control
Door with handle
English
Installation
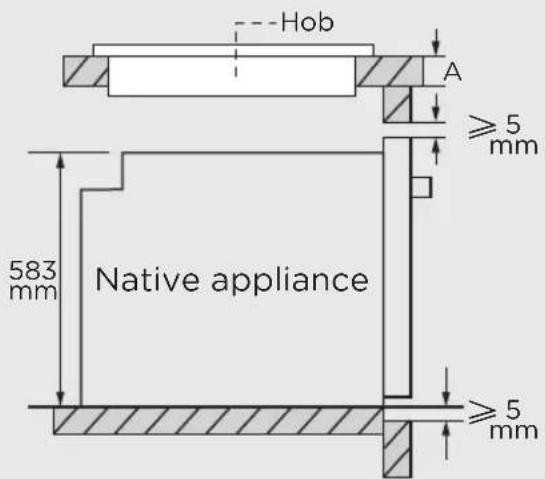
Dimensions and cutouts

Prepare the cupboard (A or B)
Consider the dimensions (mm) of the built-in oven and the necessary installation openings. Also note that there must be a corresponding recess on the back wall of the built-in cupboard.

Important:
- Reserve 5 mm for the door panel at the top and bottom respectively.
- Reserve 20 mm for the door panel on the left and right respectively.
- Reserve 20mm for the door panel in thickness.
Note:
- The thickness of the cupboard board is 20 mm.
- If the power socket is installed on the back of the appliance, the depth of the cupboard opening shall be increased from a minimum of 590 mm to 620 mm.
- If the product is installed under the hob, the minimum thickness of worktop A is shown below:
Hob type worktop A
Induction hob 37 mm
Full-surface induction hob 47 mm
Gas hob 30 mm
Electric hob 27 mm
20
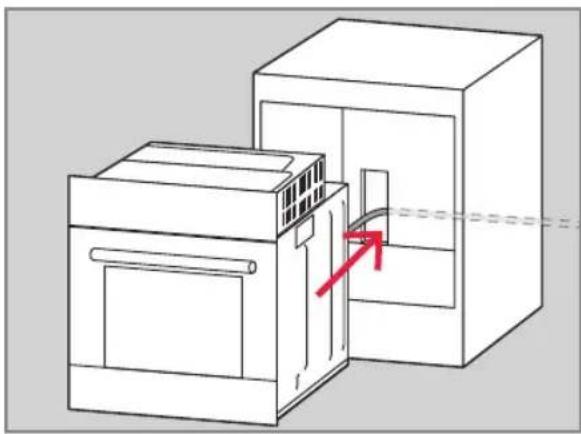
Installation of the oven
- Prepare the cabinet for the installation of the oven.
- At the back of one or both lateral cupboards, a hole of size 50 × 50 ~mm must be prepared for power cord and plug and a mains socket must be available.
- Connect the power plug to the mains.
- Slide the oven completely into the cupboard. Be careful not to kink, pinch, or twist the cables.
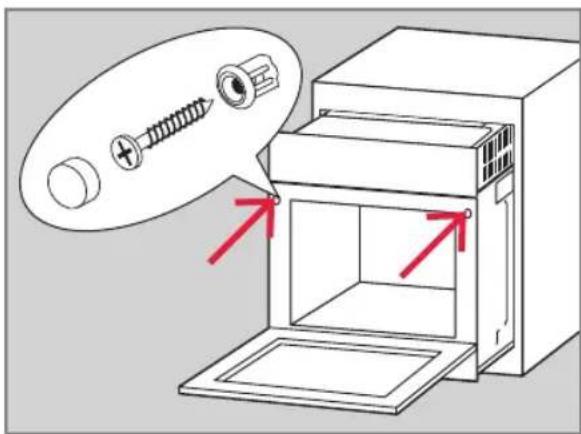
- With the oven door open, fasten the oven to the cabinet cupboard with the two screws through the holes on the left and right in the frame.
Oven
Oven functions
| Function | |
| Oven Lamp: Which enables the user to observe the progress of cooking without opening the door. The oven lamp will be turned on for all cooking functions. Except Eco function | |
| Defrost: The circulation of air at room temperature enables quicker thawing of frozen food, (without the use of any heat). It's a gentle but quick way to speed up the defrosting time and thawing of ready-made dishes and cream filled produce etc. | |
| Bottom heater: Heat is applied only by the bottom side of the oven. Use this option for browning the bottom side of the food. This function is suitable for slow cooking recipes or for warming up meals. | |
| Convection cooking: Heaters from the upper and the lower side uniformly heat the exposed food. Baking and roasting is possible only at single level. | |
| Convection with fan: The top heating element and the bottom heating element are working with the fan. The appliance to be cooked is evenly and quickly cooked all around. | |
| Grill-small: This cooking method is normal grilling, utilizing the inner part only of the top heating element, which directs heat downwards onto the food. | |
| Double grill: The inner heating element and the outer heating element in the top of the oven are working. Suitable for grilling larger quantities | |
| Double grill with fan (at the rear panel): The inner heating element and the outer heating element in the top of the oven are working with the fan. It is suitable for grilling large amount of meat. | |
| Convection: Warm air heated by the rear heater is evenly distributed throughout the oven very fast by means of the fan. This results in a faster and more economical cooking process. The convection allows food to be cooked simultaneously on different shelves. | |
| For energy-saving cooking: Cooking the selected ingredients in a gentle manner, and the heat comes from the top and the bottom. | |
Note:
When removing food from the oven, please ensure that the oven is switched off.
English
Operation Instructions
1. Clock setting
After connecting the unit to the power, the symbols "0:00" will be visible on the display.
- Press the hour figures will flash.
- Turn the temperature control to set the hour figures, (time should be within 0--23).
- Press the minutes will flash.
- Turn the temperature control to set the minutes setting, (time should be within 0--59).
- Press to finish the clock settings. : " will flash, and the time will be illuminated.
Note:
The clock is 24 hours. After power on, if not set, the clock will show "0:00".
Before using the oven, please complete the clock setting.
During the clock setting process, you can press key to cancel the current clock setting.
If you need to reset the clock, please follow the Clock setting steps in standby mode.
2. Function setting
- Turn the function control to set the cooking function you require. The related symbol lights up.
- Turn the temperature control to set the temperature.
- Press to confirm and start cooking.
- If step 2 is ignored, press to confirm the start of cooking and the default time is 9 hours, the default temperature will be displayed. The default temperature depends on the set function.
Note:
- The step width for the time setting is as follows: 0-0:30 min; 1 minute step; 0:30-9:00 hour; 5 minutes steps.
- The step width for the adjustment of temperature is 5^, and for the grill function it is 30^
- If you want to adjust the time and/or temperature during ongoing cooking, turn the function control to adjust the cooking time, then press to confirm. Turn the temperature control to adjust the temperature, the related indicator will light up. Then press to confirm.
- If not pressed in 3 seconds, the oven will revert back to the previous temperature to continue cooking.
3. Lamp setting
Turn on the lamp to better observe the cooking situation. If you need to turn off or turn on the lamp, you can follow these steps:
- Turn the function control to select light function
- Press the button to confirm.
4. Inquiring Function
In the following states, you can use the inquiring function.
-
During working state, if the clock was set, press the button to see the current time; if the reminder function was set, press the button to see the time of reminder.
-
In reminding state, if the clock was set, press the button to see the current time.
5. Child lock Function
To lock: press and simultaneously for 3 seconds, there will be a long beeping sound and will be illuminated.
Deactivate lock: press and simultaneously for 3 seconds, there will be a long beeping sound indicating the child-lock is deactivated and turns off.
6. Reminder function
This function will help to remind you to start cooking in a certain time from 0:00 to 23:59. Only when the oven is in standby mode and the clock is correctly set, the reminder can be set.
- Press the reminder setting button
- Turn the temperature control to set the hours of reminder (0-23 h).
- Press the reminder setting button again:
- Turn the temperature control to set the minutes of reminder (0-59 min).
- Press to confirm the setting. The time counts down and the symbol is on. You can cancel the reminder during setting by pressing the stop button; After the reminder has been set, you can cancel it by pressing the stop button twice. After the time has elapsed, the buzzer sounds and the symbol turns off.
7. Start/Pause/Cancel Function
If the cooking time has been set, press to start cooking. If the cooking is paused, press to resume cooking.
During cooking process, press once to pause the cooking. Press twice to cancel the cooking.
Note:
- The oven lamp will be on during cooking at all modes, except in eco program.
- If the cooking program has been set but the button is not pressed within 5 minutes, the current time will be displayed or turn back to standby state. The set program will be cancelled.
- The buzzer will sound once when buttons are effectively pressed, if not effectively pressed there will be no response.
- The buzzer will sound five times when the cooking has finished.
English
Notes on baking, cooking, and grilling in the oven
Note:
- In principle, you may use any heat-resistant cookware for your food.
- Use the accessories included in the delivery scope.
- Observe the recipe information regarding cooking time and any instructions on the food packaging.
Baking
- Use dark or black baking dishes. They use the heat of the oven more efficiently and therefore bake food more evenly.
We recommend preheating the oven to the desired temperature in order to achieve better baking results. - Use the residual heat of the baking operation. Turn the function switch and the temperature control to the Off position a few minutes before the end of the cooking/baking time. Your food will then cook using the residual heat kept in the oven.
- When finished baking, we recommend leaving the food for another approx. 5 minutes in the oven.
- Before removing cakes use a wooden stick to check if the cake is done. If done, no dough residue will stick to the wooden stick.
Cooking and grilling meat & fish
- Only cook meat of minimum 1 kg in the oven. Cook or roast servings of smaller sizes on the cooking zones.
We recommend using ovenproof cookware with heat-resistant handles for roasting. - When using the grate or grill rack for roasting, we recommend placing a baking sheet with some water on the lower guide rail.
- You should turn the roast at least once, for example after half of the cooking time has elapsed. During roasting, pour some of the roasting liquid or hot salty water over the roast once in a while; do not use any cold water.
Grilling
When grilling, the food will be cooked with the infrared beams of the heated grill element. To switch on the grill:
- Turn the oven switch to the position marked with the grill symbols.
- Preheat the oven for approx. 5 minutes (with the oven door closed).
- Insert the universal baking sheet with the food to be cooked into the desired guide rail. When using the grill rack for grilling, insert an empty baking sheet right below the grill rack for collecting dripping grease. That keeps the oven clean.
- Grill with the oven door closed.
Cleaning and care

Warning
- When cleaning, never use solvents or abrasive materials, hard brushes, metallic or sharp objects. Solvents are harmful to human health and can attack plastic parts, while abrasive cleaning mechanisms and tools may scratch the surface(s).
-
Switch off the oven and let it cool down completely before cleaning.
-
Do not use steam cleaners for cleaning!
- Clean the cavity with a damp cloth. Wipe the oven thoroughly so that no residues remain. Make sure that no water enters the product interior (e.g. through the circulation fan).
- Clean the exterior surfaces of the product with a slightly damp cloth and dry them well.
- Make sure that no water (e.g. at the switches) enters the product interior.
- Tip: Tenacious stains can be soaked for a long period before removing it. If necessary use fat-dissolving liquids for cleaning.
- Clean grate and baking tray with warm water and a mild detergent. Dry all parts thoroughly.
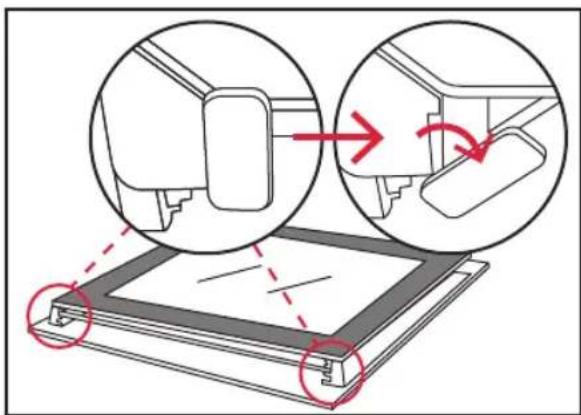
Removing the door for easier cleaning
In order to obtain easier access to the oven chamber for cleaning, it is possible to remove the door.
We recommend you to have someone to assist you during the removal of the door.
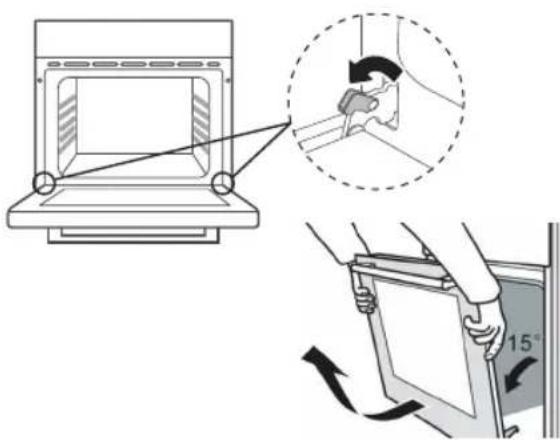
- Open the door completely.
- The door hinges have small latches. Lift the latches on both hinges.
- Lift the door slightly as if closing, and then with both hands supporting the door, pull it away from the oven.
- To place in the door, hold the door in an open position and insert the latches on both hinges back into place. Open and close the door to make sure that it has been fitted correctly.
English
Glass panes of the oven door
If residues have accumulated between the oven door glass panes due to vapours, you can disassemble the oven door if necessary to clean the inside of the glass panes.
The oven door consists of 3 glass panes with the inner and middle glass panes being removable.

Caution
Before disassembling the glass panes, remove the oven door and place it on a soft and stable and surface to avoid scratches. For cleaning the glass panes follow the warnings and instructions in chapter Cleaning and care.
- Turn the 2 brackets at the inner side of the bottom of the door so that the inner glass pane gets loosened.
- Lift the inner glass pane at its lower end and pull out of the upper bracket. Place the glass pane on a soft and stable surface. Do it the same way for the middle glass pane but for reassembling observe its position in the upper bracket.
- For cleaning the glass panes follow the instructions in chapter Cleaning and care.
- After cleaning and drying assemble both glass panes in reverse order, turn the 2 brackets at the bottom back to their previous locking positions and make sure the glass panes are securely fixed.

Bulb replacement

Warning
Ensure that the appliance is switched off before replacing the lamp to avoid the possibility of electric shock.

Caution
Before changing the interior light of the oven, the cavity and the bulb must be completely cooled down.
Take off the lamp cover and remove the defective bulb. Insert a new bulb of the same type (resistant to 300^ ) and screw the lamp cover. Please be sure to dismantle the related components according to the user manual for non-destructive maintenance purposes. Protect the parts to make the re-installed work can be favoring and avoid damage.
Technical data
Model: KBO 331M-A
Brand: KOENIC
Type of oven : Electric oven
Heat source : Electricity
Heating technologies : Electric heating tube
Rated voltage: 220 - 240 V\~, 50-60 Hz
Rated power : max. 3000 W
Protection class : I
Max. temperature: 250°C
Cavity volume : 70 L
Cavity bulb type : Halogen lamp
Energy consumption
Conventional heating (ECelecric cavity): 0.84 kWh/cycle
Circulating heat/ convection heat (ECelectric cavity): 0.70 kWh/cycle
Energy efficiency index (EEI cavity): 82.4
Energy efficiency index (EEI conventional) : 98.9
Energy efficiency index (EEI forced ventilation) : 82.4
Energy class : A
Electric heat source : Electricity
Volume : 70 L
Number of cavities : 1
- This is a an electric oven.
- ERP-testing was done according to EN 60350-2:2013 & EN 50564:2011.
- See website below for detailed technical information or ask your vendor for specification sheet. www.koenic-online.com.
English
Energy-saving
In order to reduce the total environmental impact (e.g. energy use) of the cooking process, please consider the following hints:
- Place the cookware in the middle of the cooking zone before switching on the product.
Always cover the cookware with a lid. - When boiling water, only boil the required quantity of water.
- Use the lowest possible temperature for cooking.
- If possible, only use dark, black-painted or enamel baking tins. They absorb heat especially well.
- Only preheat the oven if stated so in the recipe.
- Avoid opening the oven door too many times during preparation.
- When cooking for a long time, turn off the oven 10 minutes earlier and use the residual heat to complete cooking.
Troubleshooting
If there are any problems during operation, please refer to the following table. If the problems cannot be solved as indicated under Solution, please contact your sales agent.
| Problem Possible causes Solution | ||
| Device does not work. The power supply is disconnected. | Check the fuse of your domestic wiring system. | |
| The upper part of the food is too dark, and the lower part is too light. | Not enough lower heat. | Select the upper/lower heat function. • Use a deeper baking dish. • Reduce the oven temperature. • Insert the baking dish into the lowest guide rail. |
| The lower part of the food is too dark, and the upper part is too light. | Too much lower heat. | Select the upper/lower heat function. • Use a deeper baking dish. • Reduce the temperature. • Insert the baking dish into a higher guide rail. |
| The food is done on the outside but not on the inside. | Temperature too high. | Reduce the temperature and increase the cooking time. |
| The oven lamp does not work. | The lamp is loose or damaged. | • Tighten the lamp or replace it (see Bulb replacement). |
- Safety instructions
- English
- Congratulations!
- Intended use
- Before first time use
- Content
- Controls and components
- Installation
- Dimensions and cutouts
- Prepare the cupboard (A or B)
- Important:
- Note:
- Hob type worktop A
- Installation of the oven
- Oven
- Oven functions
- Operation Instructions
- Clock setting
- Function setting
- Lamp setting
- Inquiring Function
- Child lock Function
- Reminder function
- Start/Pause/Cancel Function
- Notes on baking, cooking, and grilling in the oven
- Baking
- Cooking and grilling meat & fish
- Grilling
- Cleaning and care
- Warning
- Removing the door for easier cleaning
- Glass panes of the oven door
- Caution
- Bulb replacement
- Technical data
- Energy consumption
- Energy-saving
- Troubleshooting
Brand : Koenic
Model : KBO 331 M A
Category : Oven