RCFW-220PRO - Choppers Royal Catering - Free user manual and instructions
Find the device manual for free RCFW-220PRO Royal Catering in PDF.
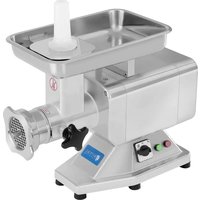


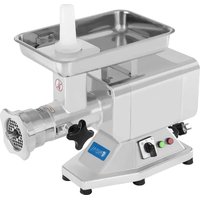
| Product type | Professional meat grinder |
| Brand | Royal Catering |
| Model | RCFW-220PRO |
| Dimensions (W x D x H) | 60.2 x 45.4 x 26.2 cm |
| Weight | 24 kg |
| Power supply | 230 V AC, 50 Hz |
| Power | 1100 W |
| Maximum output | 220 kg/h |
| Grille hole diameter | 8 mm and 5 mm |
| Housing material | Stainless steel and aluminum |
| Main functions | Grinding, forward/reverse, emergency stop |
| Integrated safety | Protection relay, emergency stop, overload protection |
| Cleaning and maintenance | Easy disassembly, clean parts with hot water (50°C) and neutral detergent |
| Available spare parts | Grilles, knives, worm screw, fixing nuts |
| Repairability | Reserved for specialist technician; after-sales service after warranty |
| Operating ambient temperature | 5 to 35 °C |
| Included accessories | Tray, pusher, grilles (8 mm, 5 mm), knife, worm screw |
| Warranty | Under conditions: no unauthorized opening, use of original accessories |
| Standards met | IEC/EN 60335-2-64, EN 12331 |
Frequently Asked Questions - RCFW-220PRO Royal Catering
User questions about RCFW-220PRO Royal Catering
0 question about this device. Answer the ones you know or ask your own.
Ask a new question about this device
Download the instructions for your Choppers in PDF format for free! Find your manual RCFW-220PRO - Royal Catering and take your electronic device back in hand. On this page are published all the documents necessary for the use of your device. RCFW-220PRO by Royal Catering.
USER MANUAL RCFW-220PRO Royal Catering

Contents | Content | Treść | Obsah | Contenu | Contenuto | Contenido
German 3
English 16
Polish 28
Czech 42
French 53
Italian 66
Spanish 79
Hungarian 92
OPERATING INSTRUCTIONS

PREFACE
I GENERAL INFORMATION
- ON 2. OFF 3. TURN OVER 4. Emergency stop (red) 5. Start button (green)
5.2 Assembly
Model RCFW 220EXPERT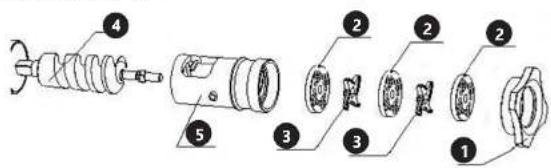
This instruction manual provides the customer with all necessary information about the appliance and the manufacturing standards applied, as well as all instructions for use and maintenance, so that the appliance can be used correctly and maintain its efficiency over time.
This instruction manual is intended for the end user and for service personnel.
INDEX
I INFORMATION ABOUT THE APPLIANCE
I.1 General Warnings
1.2 Safety Features Installed
1.3 Appliance Description
I.3.1 General Description
1.3.2 Constructive Characteristics
1.3.3 Appliance Elements
2 TECHNICAL DATA
2.1 Technical Characteristics
3 CONSIGNING THE APPLIANCE
3.1 Checking Packaging upon Consignment
3.2 Disposing of Packaging
4 INSTALLING THE APPLIANCE
4.1 Appliance Location
4.2 Wiring Diagrams RCFW 120PRO/RCFW 220PRO/RCFW 220EXPERT
4.3 Functional Check
5 USING THE APPLIANCE
5.1 Controls
5.2 Setting up the RCFW 120PRO/RCFW 220PRO/RCFW 220EXPERT FOR USE
5.3 Filling the Mincer (see fig 5)
6 REGULAR CLEANING
6.1 Generalities
6.2 Procedure to follow for Cleaning the Appliance
7 MAINTENANCE
7.1 Generalities
7.2 Foot Supports
7.3 Power Supply Cable
7.4 Push Button Label
7.5 Disk and Blade
8 SCRAPPING
8.1 Security
8.2 Customer Service
I INFORMATION ABOUT THE APPLIANCE
I.1 General Warnings
- The appliance must only be used by personnel who have carefully studied this manual and understood all the safety standards described herein.
- Although safety devices are installed on the appliance, avoid touching the moving parts with your hands and avoid touching the appliance with wet hands.
- Before cleaning or servicing the appliance, disconnect the electricity power supply.
- When cleaning or servicing the RCFW 120PRO/RCFW 220PRO/RCFW 220EXPERT (safety protections removed), take into consideration all possible hazards - Residual Risks.
- When cleaning or servicing the appliance, always concentrate on what you are doing and avoid any possible distractions.
- WARNING: The machine should be repaired by the manufacturer or agent if the machine faults.
- If the supply cord is damaged, it must be replaced by the manufacturer, its service agent, or similarly qualified persons in order to avoid a hazard.
- Check the electricity power cable on a regular basis (to avoid electrical hazards and twists in the cable, always completely unwind it); a worn or damaged cable causes a dangerous electrical hazard; avoid pressing the cable with weights or leaving it on heated or sharp cutting surfaces, and avoid pulling the cable to remove the plug from the socket.
- If the RCFW 120PRO/RCFW 220PRO/RCFW 220EXPERT has a presumed malfunction or does not work correctly, do not use it or repair it. Contact the "Service Centre".
- This appliance is designed only for mincing meat in the mincer. Do not use this appliance for frozen food or non-food products and do not insert any metallic objects into the mincer.
- Do not mince without using the pestle.
The manufacturer cannot be held responsible for the following situations:
- If the appliance or safety devices are tampered with by unauthorized personnel; • If non-original spare parts are used;
- If the instructions given in this manual are not carefully followed or respected;
- If unsuitable cleaning products (inflammable, corrosive or toxic) are used to clean the appliance.
1.2 Safety Features Installed
Safety features against electrical hazards conform to standards IEC/EN60335-2-64, whereas mechanical safety features conform to EN/IEC60335-2-64.
The RCFW 120PRO/RCFW 220PRO/RCFW 220EXPERT is fitted out with:
Relay in the command circuit for restarting the appliance if there is a power cut;
The RCFW 120PRO/RCFW 220PRO/RCFW 220EXPERT is fitted out with electrical and mechanical safety protections that conform to the standards in force. These protections are for when the appliance is working and when it is being cleaned or serviced. However, there are RESIDUAL RISKS that cannot be completely eliminated and are indicated by the wording CAUTION in this manual. These risks refer to the risk of being cut or injured when handling the blade on the RCFW 120PRO/RCFW 220PRO/RCFW 220EXPERT while cleaning.
1.3 Appliance Description
1.3.1 General Description
We have designed and manufactured the RCFW 120PRO/RCFW 220PRO/RCFW 220EXPERT guaranteeing:
- Maximum safety when using, cleaning, and servicing.
- Maximum hygiene thanks to a meticulous selection of materials that come into contact with food products, and thanks to the elimination of any sharp and rough edges that come into contact with the product. Cleaning is easy and thorough.
• The appliance can be easily stripped. - Robust and stable components and structure. • Maximum reduced noise level thanks to the geared transmission and oil bath. - Easy to handle.
1.3.2 Construction Characteristics
RCFW 120PRO/RCFW 220PRO/RCFW 220EXPERT is made from stainless steel and aluminum alloy for food appliances. These metals are ideal regarding hygiene; they are also acid and salt resistant and rust proof.
1.3.3 Components
Fig. 1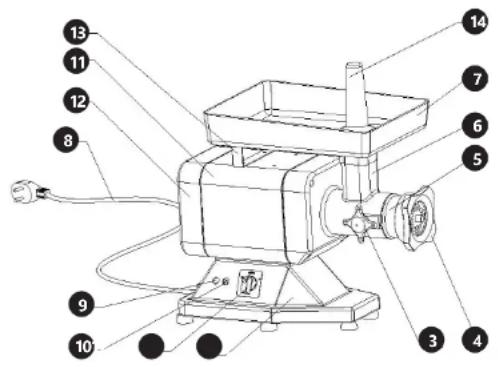
- 1. controls 2. base 3. knob 4. lock nut 5. mincer block 6. face cover 7. food tray 8. power cable 9. stop button switch 10. start button switch 11. body 12. heel cover 13. brace 14. pestle
2 TECHNICAL DETAILS 2.1 Technical Characteristics
Fig. 2
| Model RCFW 120PRO | RCFW 220PRO | RCFW 220EXPER | |
| Voltage (V) 230 | |||
| Power (W) 850 1100 | 1100 | ||
| Holes in disk (mm) 6/8 | 8/5 | 10/6/5 | |
| Production max. kg/h | 120 220 | 220 | |
| Weight kg | 23,5 | 24 | 23,7 |
CAUTION: The appliance is designed for the electrical specifications given on the plate applied to the rear of the appliance; before connecting to the electricity power supply, refer to chapter 4.2 Connecting to the Electricity Supply.
3 CONSIGNING THE APPLIANCE
3.1 Checking Packaging upon Consignment
When the goods are received, proceed with opening the packaging if there are no signs of damage. If when the goods are delivered there are signs of damage to the packaging, such as agent or courier, and within three days from the date indicated on the documents, draw up a detailed list and report of all damage to the goods. Do not turn the packed goods upside down! When transporting the package, make sure its four main points are firmly secured (maintain the goods parallel to the ground).
3.2 Disposing of Packing
The various items used for packaging (cardboard, plastic straps, polyurethane foam) should be conserved, so that the device can be sent back to the service center in best conditions in case of problem.
4 INSTALLING THE APPLIANCE 4.1 Appliance Location
The work surface where the RCFW 120PRO/RCFW 220PRO/RCFW 220EXPERT will be located must be suitable for the size of the appliance, please refer to the measurements given in FIG 2. The work surface must be level and dry and at a height of 80 cm from the ground with a temperature between 5°C and 35°C.
The power cord connected with the appliance must be reliable grounding.
4.3 Wiring Diagram
Fig. 3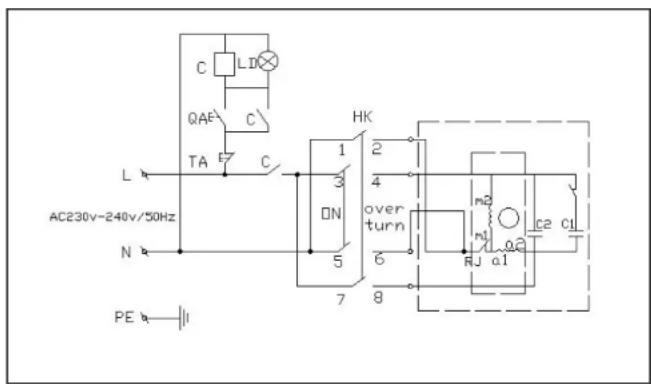
4.4 Functional Check
To check the appliance works correctly proceed as follows:
- Turn to the place of "on" and check that the screw feeder rotates anti-clockwise to the outlet opening of the RCFW 120PRO/RCFW 220PRO/RCFW 220EXPERT
- Turn to "off", The appliance stop work;
- If the appliance automatically stops. Press the reverse button "turn over" check the screw feeder changes direction and starts turning clockwise.
5 USING THE APPLIANCE
5.1 Controls
Fig. 4

- Start button „on“ 2. Stop button „off“ 3. Reverse button „turn over“
- Stop button (red) 5. Start button (green)
5.2 Setting up the RCFW 120PRO/RCFW 220PRO/RCFW 220EXPERT for use
N.B.: Before using the appliance, make sure all removable components are secured in position (see fig. 6).
- Mount the mincer outlet and lock it into position using the handle located on the side of the union;
- Mount the screw feeder, blade, and disk, then screw on the lock nut.
5.3 Filling the Mincer (see fig. 5)
When using the mincer, it is important to stand in the correct position. Do not position yourself so that any part of your body comes into direct contact with the mincer while working.
Fig. 5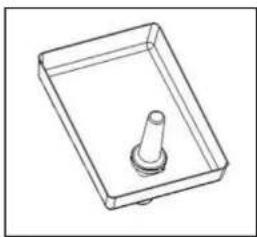
NB: The mincer must be filled while working. The procedure to follow is:
1. Place the food in the tray; 2. Start the mincer using the start button. 3. Raise the pestle; feed the meat into the tube; without forcing, use the pestle to push the meat into the opening. 4. If the meat is suitably cut beforehand, there should be no problems with the screw feeder; however, if there are problems, tighten the lock nut until the meat is cut to the desired size. 5. To make both the disk and blade last longer and maintain their sharpness over time: - When all the meat has been minced, turn off the appliance; - Blade and disk must always be coupled. 6. Do not tighten the lock nut excessively; 7. Press the stop button when you have finished using the appliance, then disassemble the appliance and thoroughly clean both the opening and all other components.
6 REGULAR CLEANING
6.1 Generalities
- The appliance must be cleaned at least once a day, or more often if necessary.
- Scrupulously clean all the various components of the RCFW 120PRO/RCFW 220PRO/RCFW 220EXPERT, whether they come into direct contact with the food product or not.
- Never clean the RCFW 120PRO/RCFW 220PRO/RCFW 220EXPERT with a pressurized water jet, industrial cleaners, brushes, or any other type of cleaning utensil that could damage the surface of the appliance.
- Before cleaning you must remove the electricity supply plug isolating the appliance from the main power circuit.
6.2 Procedure to Follow for Cleaning the Appliance (see fig. 6)
- Remove the pestle and food tray;
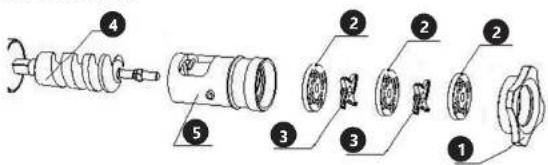
- Unscrew the lock nut and remove the disk. The blade and the screw feeder can be unscrewed (in the direction indicated by the arrow).
- Unscrew the knob and remove the mincer, always in the direction indicated by the arrow.
Now all the components can be washed (see fig. 7) using warm water (50°C) and a neutral detergent. To clean the main structure use a damp cloth, remembering to rinse frequently.
The disk mounted on the RCFW 120PRO/RCFW 220PRO/RCFW 220EXPERT should be brushed clean. Carefully clean the punched holes. Make sure all the components are completely dry before remounting them.
NB: To remount the RCFW 120PRO/RCFW 220PRO/RCFW 220EXPERT, follow the above diagrams:
- Mount the mincer block and block it in position using the knob;
- Insert the screw feeders into the mincer block, making sure they are positioned correctly;
- Mount the blade onto the square pin on the screw feeder and then mount the disk, maintaining the original coupling configuration;
- Once all the components have been mounted, secure by screwing the lock nut in place. FIG 6 - Removing components
Fig. 6
Models RCFW 120PRO and RCFW 220PRO: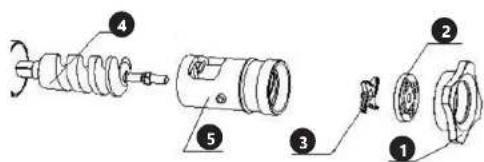
Model RCFW 220EXPERT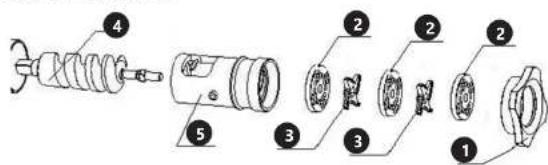
- Knob nut 2. disk 3. blade 4. screw feeder 5. mincer block
Fig. 7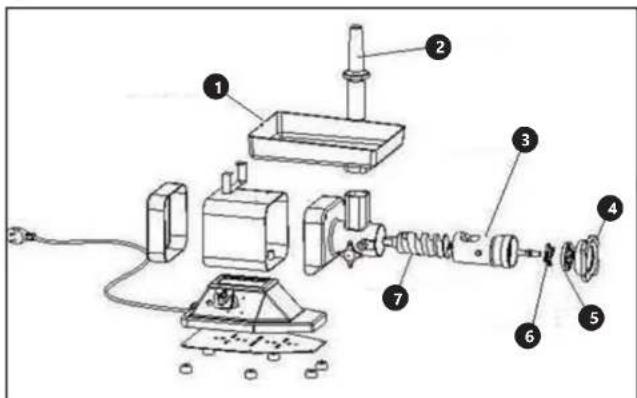
I - Food tray 2-Pestle 3 - Mincer block 4 - Lock nut 5 - Disc 6 - Blade 7 - Screw feeder
7 MAINTENANCE
7.1 Generalities
Before servicing the appliance you must disconnect the electricity supply plug isolating the appliance from the main power source.
7.2 Foot Supports
In time the foot supports can deteriorate causing instability. If this is the case replaces them.
7.3 Power Supply Cable
Periodically check wear in the power cable and if necessary contact the "SERVICE CENTRE" for a replacement.
7.4 Push Button Label
In time the label on the could become marked or even damaged.
7.5 Disk and Blade
Both the blade and disk can deteriorate in time. Exchange these parts if necessary.
8 SCRAPPING
8.1 Security
If the appliance for some reason is to be put out of service, make sure it can no longer be used: disconnect and remove all electrical connections.
8.2 Customer Service
Please contact your customer service and join following information:
- Invoice number and serial number (the latest is to be found on the technical plate on the device)
- If relevant, a picture of the damaged, broken or defective part
- It will be easier for your customer service clerk to determine the source of the problem if you make a detailed and precise description of the matter. Avoid formulations like “the device doesn’t work”, which may mean that it doesn’t slice properly or even not at all. Though, those two possibilities have a different causation!
The more detailed your information, the quicker the customer service will be able to answer your problem rapidly and efficiently!
| PROBLEM CAUSE / SOLUTION | |
| The result is not smooth enough Use the right disk or mince the meat again | |
| There is still food in the device, but nothing is coming out at the outlet opening. | The meat mincer is obstructed. See chapter “solving an obstruction” |
| The motor stops rotating during use | The overload security might have stopped the motor. See chapter “solving an obstruction” |
| The feeding screw is empty, but the motor still doesn’t work properly | Check the power supply of the deviceA piece of bone may block the blade.Stop the device and unmount the machine according to chapter “cleaning” to solve the problem.In case you cannot solve it, contact your customer service |
| The meat mincer often gets obstructed | Maybe you’re working to fast. Press the food with the pestle slowlier/lighterou may be use a very fine disk for too chunky pieces of meat. Start working with a rougher disk. |
| The feeding screw vibrates in the housing while working | The fixing screw on the side of the device is not tightened properly. Turn off the device and tighten the fixing screw by pressing with one hand on the mincing block towards the housing |
| Food is coming out of the device | Some connections are not tightened enough. Stop the device and unmounts it as explained in chapter “cleaning”, and remount it properly. |
Model RCFW 220EXPERT:
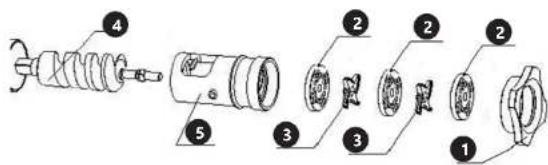


Model RCFW 220EXPERT
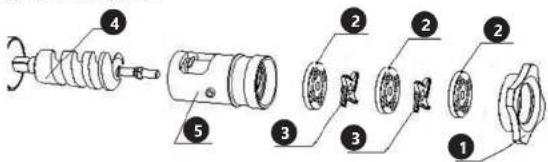
1 - Filling chamber
2 - Tamper
3 - Auger cover
I - Plate 2 - Pusher 3 - Auger housing 4 - Fixing nut 5 - Grid 6 - Knife 7 - Auger
7 MAINTENANCE
Model RCFW 220EXPERT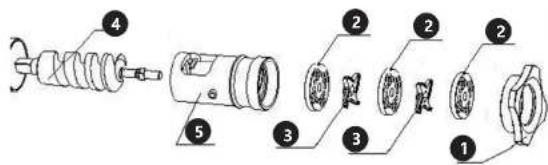
Model RCFW 220EXPERT:
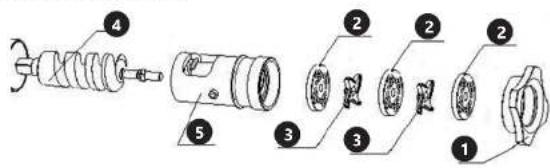
Model RCFW 220EXPERT
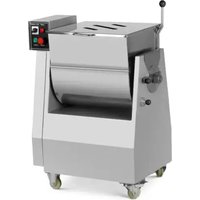
1 – Loading chamber

DE | EN | PL | FR | IT | ES | CZ

EU Declaration of Conformity | EU Declaration of Conformity | EU Declaration of Conformity | EU Declaration of Conformity | EU Declaration of Conformity | EU Declaration of Conformity | EU Declaration of Conformity. 2018/28-12/291
Place, Date / Place, Date / Place, Date / Place, Date / Place, Date / Place, Date / Place, Date

Signature / Signature / Signature / Signature / Signature / Signature / Signature
Piotr R. Gajos
Engineer for
Product Compliance Process
Innymer ds. Downy
cgodroxi produktion | Inginssur
Place, Date | Place, Date | Place, Date | Place, Date | Place, Date | Place, Date | Place, Date

Chenach, Sketchie, Poqai, Skotion, China, China, Japan
Piotr R. Gajos
Product Compliance Engineer |
Name: Evienne, State; Name: Junches, Japan
Cazome, Izote, Limo del requerable.
Austes, Aestes, Fusio, Iyman, Imani, and
nDoC
www.riskCE.pl
rev.29-05-2017

DE | EN | PL | FR | IT | ES | CZ

EG-Konformitätserklärung | EU Declaration of conformity | Deklaracja zgodności WE | Déclaration UE de conformité | Dichiarazione di conformità UE | Declaración UE de conformidad | Prohlásení o shodě ES, 2019/02-01/3
Hersteller (Name, Adresse) | Manufacturer (name, address) | Producent (nazwa, adres) | Fabricant (nom, adresse) | Produktore (sanaminazione, sede) | Fabricanta (nombre, direccion) | Wyrabor (mina, adresa): EXPONDO POLSKA SP. Z O.O. SP. K., ul. Nowy Kisielin-Innowacyjna 7, 66-002 Zielona Góra, Poland, EU
Mit weiter Verantwortung erklärt, dass | declare under his sole responsibility that the product | / pedrug odgovenedzialności deklaraje, ze | je declare et affirme que | sotto la mira exclusiva responsabilità, Dichiaro che | Bajo mi total responsabilidad, declara que | Na svil velučnou odprovědnost prohlasuj; 2a:
Name | name | name | denomination | none | nombre | jeerro Felschwolt | Meat Mincer | Maszynka do mięsa | Hachoir A Viande | Tritacame | Picadora De Carne | Nerezový mijnak na maso Modell | model | model | modele | modello | modelo | model: RCFW 220EXPERT

Piotr R. Gajos
Name: Hervance, Single / Clone, Junction, 100
For the disposal of the device please consider and act according to the national and local rules and regulations.
CONTACT
expondo Polska sp. z o.o. sp. k.
- PREFACE
- INDEX
- THE MANUFACTURER CANNOT BE HELD RESPONSIBLE FOR THE FOLLOWING SITUATIONS
- SAFETY FEATURES INSTALLED
- APPLIANCE DESCRIPTION
- GENERAL DESCRIPTION
- CONSTRUCTION CHARACTERISTICS
- COMPONENTS
- USING THE APPLIANCE
- N.B.: BEFORE USING THE APPLIANCE, MAKE SURE ALL REMOVABLE COMPONENTS ARE SECURED IN POSITION (SEE FIG. 6)
- REGULAR CLEANING
- NB: TO REMOUNT THE RCFW 120PRO/RCFW 220PRO/RCFW 220EXPERT, FOLLOW THE ABOVE DIAGRAMS
- MAINTENANCE
- GENERALITIES
- FOOT SUPPORTS
- POWER SUPPLY CABLE
- PUSH BUTTON LABEL
- DISK AND BLADE
- SCRAPPING
- SECURITY
- CUSTOMER SERVICE
- DE | EN | PL | FR | IT | ES | CZ
- CONTACT
Brand : Royal Catering
Model : RCFW-220PRO
Category : Choppers