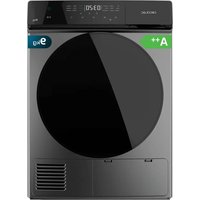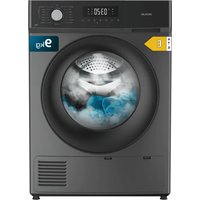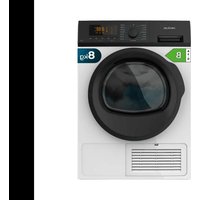
Bolero DressCode Dry 8200C B - Dryer CECOTEC - Free user manual and instructions
Find the device manual for free Bolero DressCode Dry 8200C B CECOTEC in PDF.


User questions about Bolero DressCode Dry 8200C B CECOTEC
0 question about this device. Answer the ones you know or ask your own.
Ask a new question about this device
Download the instructions for your Dryer in PDF format for free! Find your manual Bolero DressCode Dry 8200C B - CECOTEC and take your electronic device back in hand. On this page are published all the documents necessary for the use of your device. Bolero DressCode Dry 8200C B by CECOTEC.
USER MANUAL Bolero DressCode Dry 8200C B CECOTEC
natural_image
Front view of a Cocolac washing machine with digital display and side vent (no visible text or symbols on the main body)bolero
Safety instructions 15
-
Parts and components 126
-
Before use 126
-
Installation 127
-
Laundry preparation
-
Operation 130
-
Cleaning and maintenance 136
-
Troubleshooting 138
-
Technical specifications 140
-
Disposal of old electrical
and electronic appliances 141
-
Technical support and warranty 1/1
-
Copyright 141
SOMMAIRE
| Symbol | Type | Meaning |
| WARNING | Risk of serious injury or death | |
| RISK OF ELECTRIC SHOCK | Dangerous voltage | |
| FIRE | Warning: risk of fire/ flammable materials | |
| WARNING | Risk of injury or damage to property | |
| IMPORTANT/NOTE | Information on the correct operation of the system | |
| Read the instructions | ||
| Hot surface | ||
SAFETY INSTRUCTIONS
Read these instructions thoroughly before using the appliance. Keep this instruction manual for future reference or new users.
- This user manual contains information on safety and important instructions related to the use and maintenance of the device. Take all the time you need to read this user manual before using the device and keep it in case you need to check it in the future or for new users.
- Each dryer has been tested by a quality control before commercialisation, guaranteeing its conditions of use.
- The warnings contained in this instruction manual do not cover all possible risks that may occur. Caution and care must be exercised during installation, maintenance and operation of the dryer.
- Comply at all times with the advice and warnings contained in this manual.
- Children under 3 years old must stay away, unless they are supervised.
- This dryer is suitable for indoor domestic use only. In case of commercial use, the warranty will be void.
- Do not install nor store the dryer outdoors.
- Use this product only for clothes whose care label specifies they are suitable for dryer.
- Cecotec is not responsible for damage caused by incorrect transport or use.
- Do not allow floor coverings to obstruct ventilation openings.
- Installation and repair of the appliance must only be carried out by Cecotec or an authorised repair agent.
-
Cecotec is not liable for damage caused by repairs by unauthorised personnel.
⚠ WARNING: never spray or pour water inside the dryer to clean it. There is a risk of electric shock. -
Leave at least 3 cm of space between the side and rear panels of the product and above the product if the appliance is placed under a worktop.
- If assembly/disassembly of the installation under a worktop is necessary, this must be carried out by an authorised service technician.
- Before installation, check the product for visible damage. Never install nor operate a damaged product.
- Do not let any animal near the dryer.
- Fabric softeners or similar products should be used according to the manufacturer instructions.
- Remove all the objects from the pockets: lighters, matches, etc.
- The appliance should not be installed behind a lockable door, a sliding door or a hinged door on the opposite side of the dryer door in such a way as to prevent the dryer door from being fully opened.
⚠ WARNING: keep the ventilation openings in the housing of the appliance or in the built-in structure free of obstructions. - Before contacting the local authorised service provider for the installation of the dryer, check the information in the user manual to make sure that the electrical installation and water connection are available. If they are not, you can call a qualified electrician and plumber to make the necessary adjustments.
- The preparation of the dryer location is the responsibility of the customer, as well as the electrical and sewage installation. Before installation, check the dryer for any damage. If it is damaged, do not install it. Damaged products may be a risk for your health.
- Install the dryer on a flat and stable surface.
-
Run the dryer in an environment free from dust with good air ventilation.
-
You should not reduce the space between the dryer and the floor with objects like carpets, wood or cloths.
- Do not block the ventilation grids on the base of the dryer.
- Once the dryer is installed, the connections must remain intact. When installing the dryer, make sure that the rear surface is not resting on something (a tap, a socket, etc.).
- The operating temperature of the dryer ranges from 5 °C to 35 °C. When operating at temperatures outside this range, the operation may be adversely affected, and the appliance may be damaged.
- If the room temperature is below 0 °C, the dryer may be damaged by freezing.
- Be careful when transporting the appliance, as it is really heavy. Always wear safety gloves.
- Always install the appliance against a wall.
- The rear part of the appliance must be installed against a wall.
- If the appliance is placed on a stable surface, use a spirit level to check it is completely stable. If it is not stable enough, adjust the feet until it is firm. Repeat the same process every time you relocate the appliance.
- Do not place the dryer on the power cable.
- Do not place hot and heavy objects on top of the dryer.
- Use the provided hoses, do not reuse old hoses.
- Do not misuse it, do not stand, sit or place any heavy object on the door of the dryer.
- Do not attempt to open the door while the dryer is in operation as there is a risk of burns. Do not leave the door open, as it could cause accidents.
- The tumble dryer door can only be opened after the drying programme has been completed.
-
Do not force the controls.
-
The dryer must only be used for its intended purpose as described in this manual.
- Do not use the tumble dryer if any parts are missing or broken or if any protections or panel have been removed.
- This section contains safety instructions to help protect you against the risk of personal injury or property damage. Failure to follow these instructions will invalidate the guarantee.
- Read these instructions carefully before assembling or using the appliance, as they contain important information that will help you get the best out of your equipment.
- It is your responsibility to make sure every user is informed about the warnings and precautions stated in this instruction manual.
- The appliance should not be powered by an external switching device, such as a timer. It should not be connected to a circuit that is regularly switched on and off by some kind of drive.
- Always use an approved socket outlet that is capable of carrying a current greater than 10A.
- Do not touch the plug with your hands wet. Always pull the plug to disconnect the appliance, otherwise you may suffer an electric shock.
- Do not use the dryer with wet hands or wet bare feet.
- Connect the dryer to a grounded, fuse-protected outlet. The installation of an earthed socket must be carried out by a qualified electrician. Cecotec is not responsible for any damage or loss resulting from the use of the dryer without grounding as required by local regulations.
- The voltage and admitted fuse protection are indicated on the type label. (For the type label, see General information).
-
The voltage and frequency values indicated on the type label must be the same as those in your house.
-
Unplug the dryer if it will not be used for a considerable period of time and during installation, maintenance, cleaning and repair work. Otherwise, it could damage the dryer.
- The socket must be accessible at all times after the installation.
- For safety reasons, it is recommended to disconnect the plug after the programme has finished.
- Check the power cord regularly for visible damage.
A damaged cord/plug may cause a fire or electric shock. When damaged, they must be replaced. This should only be carried out by qualified personnel, Cecotec or the after-sales service, in order to avoid danger.
To prevent any risk of fire or electric shock, do not use extension leads, multi-socket adapters or adapters to connect the dryer to the mains.
When the dryer is in operation, do not unplug the power cable. When not in use, it is advisable to disconnect the plug, do not pull the power cable. Do not touch the power cable or plug with wet hands.
Children safety
- This appliance can be used by children aged 8 and above and people with reduced physical, sensory, or mental capabilities or lack of experience and knowledge, as long as they have been given supervision or instruction concerning the use of the appliance in a safe way and understand the hazards involved. Children must not play with the appliance. Cleaning and user maintenance of this appliance should not be carried out by children without supervision.
- Do not let unattended children come near the machine.
-
Children could get trapped inside the device, which could lead to death.
-
Do not allow children to touch the machine while it is running. The surface becomes extremely hot and could cause damage in the skin.
- Keep the packaging material out of the reach of children.
- If detergent or cleaning materials are swallowed or come into contact with your skin or eyes, poisoning and irritation may occur.
- Keep the cleaning material out of the reach of children. Electric products are dangerous for children.
- Keep children away from the machine while in use.
- To prevent children from interrupting the drying cycle, you can activate the child lock to prevent any changes to the programme in progress.
- Do not allow children to seat or climb on or inside the product.
Product safety
Due to the risk of fire, NEVER introduce in the dryer the following garments:
- Do not introduce unwashed clothes in the dryer.
- Garments that have been stained with substances such as cooking oil, acetone, alcohol, petrol, paraffin, stain removers, turpentine, waxes or wax removers should be washed with hot water and an extra amount of detergent before drying in the dryer.
- Cleaning cloths and mats containing residues of flammable cleaning agents, acetone, gases, petrol, gasoline, stain removers, turpentine, waxes, wax removers, dry cleaning solvents or chemicals.
- Garments with traces of hairspray, nail polish remover and similar substances.
-
Garments that have been used for cleaning with industrial chemicals (as in chemical cleaning).
-
Garments containing parts or accessories with any type of foam, sponge, rubber or rubber-like material, such as latex foam sponges, shower caps, waterproof fabrics, custom-made clothing and foam pillows.
- Garments with padding or damaged parts (pillows or jackets). Foam released from these garments could cause a fire during the drying process.
- Using the dryer in environments containing flour or coal dust may cause an explosion.
- Wet laundry may be dried in the tumble dryer only after dehydration, i.e. no water should drip onto the electrical parts and damage the tumble dryer causing a potential hazard.
- When the tumble dryer is in operation, do not use flammable sprays nearby. If a gas leak occurs, do not connect or disconnect the plug or switch on the appliance.
- Do not store cigarettes, lighters, dry ice or other flammable and/or explosive materials inside the tumble dryer.
ATTENTION: underwear with metal reinforcements should not be put in the dryer. Damage to the dryer may occur if the metal reinforcements become detached or lost during drying.
FIRE: R290 - Risk of fire and damage! This appliance contains environmentally friendly but flammable R290 refrigerant gas. Keep open flames and sources of fire away from the appliance.
- Refrigerant must be disposed of professionally, as it may cause eye injury or ignition. Make sure the refrigeration-circuit pipes are not damaged before disposing of them correctly. When disposing of the appliance, only dispose of
it at an authorised waste-disposal facility. Do not expose to flame.
Correct use
ATTENTION: never stop the dryer before the end of the drying cycle unless all items are quickly removed and spread out to dissipate the heat.
ATTENTION: make sure that no animals enter the dryer. Check the interior of the dryer before use.
ATTENTION: overheating of the laundry inside the dryer may occur if you cancel the programme or in case of an electrical failure during the operation of the dryer. This concentration of heat can cause combustion, so be sure to activate the ventilation programme to cool it down or quickly remove the laundry from the dryer to hang it out to dissipate the heat.
- Use the dryer only for domestic use and for drying fabrics labelled as suitable for drying. Any use other than that for which it is intended is prohibited.
- In case of commercial use, the warranty will be void.
- This appliance is intended for indoor use only and should be placed on a flat and stable surface.
- Do not lean or sit on the dryer door. The dryer could tip over.
- In order to maintain a temperature that does not damage the laundry (e.g. to prevent the laundry from burning), a cooling process is started after the drying process. The programme ends after it. Always remove the laundry immediately at the end of the programme.
ATTENTION: never use the dryer without the lint filter or with damaged lint filter.
- You must clean the lint filters after every use as indicated in the "Lint filter cleaning" section.
- The lint filters must be dried every time you clean them with water. Wet filters can cause a malfunction during the drying process.
- You should not allow lint to accumulate around the dryer (not applicable to those appliances for outdoor ventilation of the building).
IMPORTANT: you should not reduce the space between the dryer and the floor with objects such as carpets, wood or panelling, otherwise it will not be possible to ensure sufficient air inlet to the appliance.
- Do not install the dryer in rooms with a risk of freezing. Freezing temperatures adversely affect the performance of the dryer. Condensed water freezing in the pump and hose can cause damage.
ATTENTION: you cannot install a washing machine on the dryer. Pay attention to the following warnings to place the dryer on the washing machine.
ATTENTION: the dryer can only be placed on washing machines with the same or higher capacity.
- To use the dryer on top of a washing machine, you must place a fixing element between the two appliances (NOT INCLUDED). The fixing element must be placed by an authorised service provider.
- Place the products on a stable floor with this load capacity.
- Control panel
- Condensation water tank
- LInt filter
- Door
- Heat exchanger cover
- Heat exchanger
- Adjustable feet
NOTE:
The graphics in this manual are schematic representations and may not exactly match the device.
2. BEFORE USE
- This appliance is packaged in a way as to protect it during transport. Take the appliance out of its box and remove all packaging materials. You can keep the original box and other packaging elements in a safe place to prevent damage to the device if you need to transport it in the future. In case the original packaging is disposed of, make sure all packaging materials are recycled accordingly.
- Make sure all parts and components are included and in good conditions. If there is any piece missing or in bad conditions, contact the official Cecotec Technical Support Service immediately.
- Make sure that the electrical connections comply with the installation instructions.
- Remove the polystyrene protection parts and any other packaging material from the drum.
- Before using the dryer for the first time, it is recommended to put some damp cloths inside the drum and set a drying cycle of 30 minutes. This process will help to remove any dust or dirt that may be inside the dryer.
Box content
- Dryer
Drain hose - Instruction manual
3. INSTALLATION
- Do not place the dryer on the power cable.
- The electrical installation of this appliance must be carried out by a professional electrician or qualified technician.
- If the dryer has to be moved, transport it vertically.
- Remove all packaging before starting the dryer.
- Open the bag with the accessories and check that none are missing.
Warning:
This tumble dryer is not suitable for use as a built-in appliance.
Earthing
- This appliance must be earthed. In the event of a fault or power surge, the earth connection provides minimum protection in order to reduce the risk of electric shock. The plug on the power cord of the tumble dryer must be compatible with the earth connection. The plug must be inserted into a properly installed and earthed socket (in accordance with local regulations and standards).
- Some local regulations require a separate earth connection. In this case, an earthing cable, clamps and screws must be purchased separately.
Drain hose connection
Connect the drain hose to the water outlet. In this way, it will not be necessary to empty the condensation water tank manually.
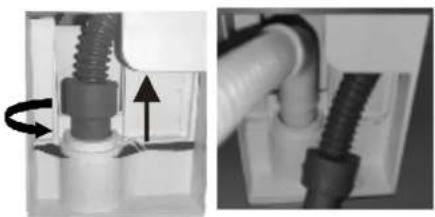
Drain hose replacement
Remove the drain hose in the direction of the arrows. Then connect both ends, one to the dryer and the other to the water supply. If you find it difficult, you can use pliers. Fig. 2
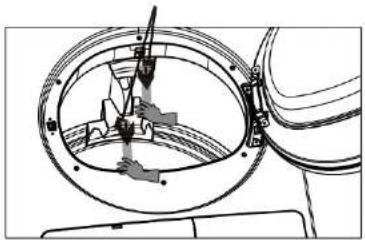
Removal of protective packaging for transport
Warning:
Before using the tumble dryer for the first time, remove all safety packaging from the drum.
Fig. 3
1. Open the door.
2. Remove the adhesive tapes on the top of the inside of the drum.
3. Remove the two pieces of polystyrene protection from the tumble dryer.
Level adjustment
If the dryer is not properly levelled, vibrations may occur.
- To check that the appliance is stable, stick it to a corner or wall and push it towards it slightly.
ENGLISHENGLISH
- If you notice that the appliance moves, it is not level, and you will need to readjust the feet. Do this using the adjustable screw as shown in figure 4.
Fig. 4 key 1. Adjustable screw
- Do not place objects that may reduce the space between the dryer and the floor, such as carpets or wood, as this may cause heat to build up and affect the proper functioning of the appliance.
ATTENTION: the hot air temperature emitted by the dryer can reach temperatures up to 60°C. Therefore, avoid installing it on floors that are not resistant to high temperatures.
Electric connection
The electrical installation of this appliance must be carried out by a professional electrician or qualified technician.
WARNING: this appliance must be connected to an earthed socket.
The manufacturer disclaims any liability in the event of non-compliance with this safety measure.
- Before starting the dryer, make sure that the mains voltage values correspond to those indicated on the rating plate of the appliance.
If for any reason it is necessary to replace the plug, proceed as described below. The wires of the power cable are colour coded as follows:
- Green/Yellow: ground
Blue:neutral
. Brown: phase connector
The green and yellow cable must be connected to the plug terminal marked with the letter E or with the earth symbol or of the same colour.
WARNING:
- Connecting a frayed or damaged power cable to a wall socket poses a serious health and safety hazard. There is a risk of electric shock.
- Be sure to recycle the cable properly.
- Permanent connection. In case of permanent connection, a residual current circuit breaker must be installed.
- The circuit breaker must not cut the yellow and green earth wire under any circumstances.
4. LAUNDRY PREPARATION
Practical tips on drying clothes
It is recommended not to dry particularly delicate fabrics such as net curtains, wool silk, garments with metal trim, nylon stockings, bulky materials such as anoraks, blankets, duvets, sleeping bags, down-filled quilts and any items made of foam rubber or similar materials.
- Close bed linen covers and pillowcases to prevent smaller items of clothing from getting rolled up inside them.
- Close zips, fasten brackets and hooks, fasten buttons on shirts, knot or tie fabric belts and apron strings, etc. To achieve uniform drying, sort the garments according to the type of fabric and the desired level of drying.
- Do not over-dry clothes, this will prevent creasing and save energy.
- It is recommended to separate dark clothes from lighter coloured or lint-loving clothes such as towels.
Spin the laundry thoroughly before drying.
- Garments that require less care, such as shirts, should be spun briefly before drying.
- Knitted fabrics, such as underwear or lingerie, may shrink slightly during the drying cycle. Do not over-dry this type of garment. When buying garments made from this type of fabric, be aware that they tend to shrink when tumble-dried, so it is advisable to choose one size larger.
- Starched garments can also be put in the dryer. To achieve the desired starched effect, select the Wool programme. To remove starch residues, wipe the inside of the drum after the drying cycle with a damp cloth and dry it thoroughly.
- To avoid the appearance of static electricity at the end of the drying cycle, use a suitable fabric softener when washing the laundry or a specific product for dryers.
- When the drying cycle is finished, remove the laundry from the dryer.
- If the laundry is still damp after drying, you can set the drying time or programme a post-drying cycle lasting at least 30 minutes. This will be necessary especially in the case of multi-layered garments, such as shirt collars, pockets, etc.
- Remove all metal objects from pockets (such as hairpins or clips, etc.).
- To prevent tangling or snagging of garments, close zips and duvet covers, tie drawstrings or ties on aprons, etc.
Before tumble drying, turn double-layered garments, such as quilted anoraks, inside out to prevent damage. In this way, they will dry better.
- Remove all the objects from the pockets such as lighters and matches.
Always follow the drying instructions on the garment labels.
Tumble dry
Normal drying
Delicate drying
Do not tumble dry
ENGLISHENGLISH
Maximum load capacity
Try to use the maximum recommended load capacity to save energy.
Practical advice
- Cotton and linen: fill the drum to the maximum but do not overload it.
- Synthetic fabrics: fill the drum only half full.
- Delicate fabrics and wool: fill the drum less than half full.
WARNING:
This appliance shall not be powered by external switching devices, such as transformers, or be connected to an electrical circuit that is constantly energised and de-energised by a mains utility.
Maximum recommended load capacities for each programme
| Laundry Dry load | weight (g) | Laundry Dry load weight (g) | |
| Bothrobes 1600 g Dresses | 265 g | ||
| Handkerchiefs 130 g Women's underwear | 130 g | ||
| Duvet covers 930 g | Work clothes | 800 g | |
| Bed sheets | 665 g | Shirts | 265 g |
| Pillowcases | 266 g | Pyjamas | 130 g |
| Cloth tablecloths | 330 g | Blouses | 665 g |
| Towels | 265 g | Men's underwear | 130 g |
| Tea towels | 130 g | ||
5. OPERATION
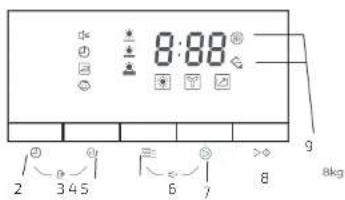
Control panel
Figure 5
- Programme knob
- Drying time button
- Child Lock button
- Drying level button
- Anti crease function button
-
Buzzer button
-
Delay start button
- Start/Pause button
- Indicator lights: Condensation water tank full/Cleaning of the lint filter
Daily use
Loading the dryer
- Open the door.
- Separate and unfold the laundry and put it in the dryer.
- Close the door.
- Make sure that no clothes are jammed between the door and the seal.
Selecting the drying programme
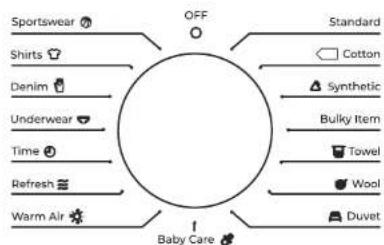
Fig. 6
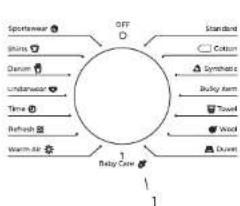
- Turn the programme knob to select the desired programme.
- The indicator light of the selected programme will light up.
- The programme will be cancelled if no button is pressed within 10 minutes.
Warning:
- Cotton : refers to the standard programme for cotton. This programme is suitable for drying normal wet cotton laundry and is the most efficient programme for this purpose from an energy consumption point of view.
- Some thicker and heavier garments (jeans, large towels, etc.) are more difficult to dry due to the characteristics of the fabric. If the laundry is still wet after the end of the programme, you can repeat the programme or adjust the drying time until the laundry is completely dry.
Humidity sensor
- You can select different programmes depending on the type of fabric of the laundry.
The dryer is equipped with a humidity sensor which detects the remaining moisture content of the load and therefore automatically adjusts the drying time. - This drying system is suitable for cotton, silk, synthetic and antibacterial fabrics.
Setting the drying time
- You can adjust the actual drying time of the programme according to your needs.
- To modify an ongoing programme, first cancel it by turning the programme knob to the OFF position ○.
- When the drying cycle is finished, turn the knob to the "OFF" position to switch off the tumble dryer before removing the laundry.
ENGLISHENGLISH
Additional functions
- Some additional functions are available depending on the selected programme.
- These functions must be selected after selecting the desired drying programme and before pressing the start/pause button.
For example, the "Bulky Item" programme can be combined with the buzzer and the anti-crease function. When the function buttons are pressed, the corresponding indicator light will light up. If you press them again, the indicator lights will switch off.
Activating/deactivating the beeping
NOTE:
- The first time you start the tumble dryer, the beeping is preset at the factory. - You will have to deactivate it manually.
-
The beeping can be activated or deactivated during the drying cycle.
-
To activate the beeping press and hold down the buttons for the anti-crease function and the delay start button.
-
The indicator light will light up.
-
When the buzzer function is activated, the dryer will beep in the following cases
- When opening the door during a drying cycle.
- When the condensation water tank is full.
Once the programme and the cooling cycle have been completed.
NOTE: If you wish to deactivate the buzzer function, press the above buttons again.
Selecting the drying level
- Before starting the programme, you can adjust the drying level.
- There are three levels or degrees of drying: (Intense High Normal)
This option is only available for the following drying programmes: Standard, Cotton, Synthetics, Bulky Item and Towel.
Selecting the anti-crease function
The anti-crease function is automatically activated at the end of the drying programme. However, you can also increase the duration of this function while the programme is paused or in standby mode.
Activating the delay start
- This function allows you to delay the start time of the programme by a maximum of 24 hours.
This function must be selected after selecting the desired drying programme and before pressing the start/pause button.
Each time the Ⓑ button is pressed, the time value will increase by 1 hour up to a maximum of 24 hours. The sequence is shown in figure 7.
NOTE: it can be selected in both cases, before and after selecting a function of the programmes (buzzer, anti crease).
- The countdown will start when you press the start/pause button ▷ and the corresponding indicator light will light up.
- The remaining cycle time will be shown on the display.
NOTE: the remaining time changes from hour to hour.
Display
The display shows the following information:
The duration of the selected programme (in hours and minutes). It is automatically calculated according to the maximum load allowed for each type of fabric and the desired level of drying.
- When the programme starts, the remaining drying time will appear on the display and will change every minute.
Delay start
The display shows the set delay start time of the programme.
- The countdown changes from hour to hour.
- To activate the delay start, press the start/pause button ▷◇. - If you want to check the selected programme, press the delay start button ▶ again. This will display the duration of the previously selected programme.
Wrong selection of functions
NOTE: not all buttons and their associated functions are available in all programmes.
- If you select an option that is not compatible with the selected programme, the control panel display will show "ErS" (error).
- If you have selected the wrong programme and try to select another programme while the drying cycle is in operation, the control panel display will show 'ErS' (error).
Start/pause button
After selecting the programme and drying functions, press the start/pause button to start the dryer.
- If the door is opened while the programme is in operation, you must first close the door and then press the start/pause button ▶ again to resume the programme from the point in which it was interrupted. In this case, the start/pause indicator light ▶ will flash to remind you to press the button again.
Indicator lights
The indicator lights correspond to the following functions.
ENGLISHENGLISH
- Drying This indicator light shows that the dryer is in the drying phase.
- Cooling This indicator light shows that the dryer is in the cooling phase. At the end of the drying cycle, an automatic cooling phase is activated for two minutes to dissipate the heat from the laundry.
- End of programme 📁. This indicator light lights up when the cooling phase is over.
- Anti crease 2. This indicator light lights up when the anti-crease function is selected.
- Lint filter 📋. This indicator light lights up after each drying cycle to remind you to clean the lint filter.
- Child lock ⚙️. This indicator light shows that the buttons on the dryer are locked.
- Buzzer. This indicator light lights up when the beeping is activated.
- Delay start. This indicator light lights up when the delay start function is selected.
- Type of drying. This indicator light lights up when the drying programme is selected according to the spin speed of the dryer.
- Condensation water tank full. This indicator light lights up after each drying cycle to remind you to empty the tank and also when the tank is full of condensed water.
Note: empty the condensation tank after each drying cycle to prevent the buzzer from beeping the next time you start the dryer.
End of programme
- All drying programmes end with a cooling phase lasting 10 minutes. If the laundry is not removed at the end of the drying cycle, the anti-crease function will be activated automatically (duration: maximum 30 minutes).
- If you still do not remove the laundry after the anti-crease phase is over, the dryer will stop automatically.
The dryer will beep (if the function is activated) and END will appear on the display. Switch off the dryer by turning the programme knob to the OFF position. All indicator lights will switch off.
Child lock function
- With the dryer on, press and hold the drying time and drying level buttons for several seconds to activate the child lock.
- When this function is activated, all panel controls are locked, with the exception of the "OFF" shutdown option.
- Press and hold the drying time and drying level buttons for several seconds to deactivate the child lock.
- The function shall be automatically deactivated in the following cases: When opening the door during a drying cycle.
When opening the heat exchange cover during a drying cycle.
When the condensation water tank is full.
NOTE: you can re-activate the child lock function when you restart the dryer.
Interrupting a programme
If it is necessary to interrupt the drying cycle before the end of the drying cycle, we recommend that you first set a cooling cycle by selecting the 'Refresh' programme Refresh ≈ and let it finish before removing the laundry from the dryer. This will help dissipate heat and prevent heat build-up inside the drum.
- To do this, first turn the programme knob to the "OFF" ○ position to stop the current cycle.
- Then, turn it to 'Refresh' Refresh ≈ and then press the start/pause button ▷◇.
Modifying the programme
- To modify an ongoing programme, first cancel it by turning the programme knob to the OFF position ○
- Select the new programme and press the start/pause button
Warning:
The dryer will enter standby mode in the following cases:
- After 10 minutes of inactivity, the appliance will enter standby mode and the display will show the '-' symbol.
- After 10 minutes of inactivity, the appliance will enter standby mode and the display will show the word "END".
Drying programmes
| Programme | Maximum load (kg) | Description |
| Standard Standard | 8 kg | For drying everyday garments and mixed fabrics.Different drying levels can be selected. |
| Cotton cotton | 8 kg | For drying cotton and similar garments.Different drying levels can be selected. |
| Synthetics Synthetic | 4 kg | For drying synthetic fabrics and similar.Different drying levels can be selected. |
| Bulky Item (bulky garments) Bulky Item | 2 kg | For drying bulky items such as sheets or bedspreads. Different drying levels can be selected. |
| Towels Towel | 4 kg | For drying towels and similar items. Different drying levels can be selected. |
| Wool Wool | 1 kg | For drying knitted jumpers or other hand-knitted garments. |
ENGLISHENGLISH
| Duvet 3.5 kg For drying feather-filled garments such as Duvet | drying feather-filled garments such as coats, cushions or duvets. |
| Baby Care 3 kg For drying baby clothes. | |
| Warm Air - For drying delicate fabrics such as silk, etc. The Warm Air | |
| Refresh - It allows to cool or ventilate clothes and Refresh ≈ | eliminate unpleasant odours through the emission of fresh air. The dryer operates according to the programmed time, regardless of the drying level. |
| Time (drying time) Time ⏻ | - For drying thick or multi-layered fabrics, especially plush. The dryer operates according to the programmed time, regardless of the drying level. Ideal, for loose garments or small loads of laundry. |
| Underwear 2 kg For drying underwear | drying underwear. |
| Denim (Jeans) 4 kg Denim 📋 | For drying denim clothes. |
| Shirts 2 kg For drying shirts. Shirts 📋 | |
| Sportswear Sportswear 📋 | 2 kg For drying sportswear. |
Note: for drying bathrobes and towels, the maximum load must not exceed 6 kg.
6. CLEANING AND MAINTENANCE
- Before cleaning the appliance or performing any maintenance task, make sure that it is unplugged from the mains.
- Do not clean the dryer by spraying water directly on it. Do not clean the dryer with benzene, thinner, alcohol or acetone. Otherwise, it may discolour, deform or damage the surface, and there is a risk of electric shock or fire. Before cleaning the inside of the tumble dryer, be sure to unplug the power cable.
- During the drying cycle, moisture may accumulate on the control panel or on the door.
Cleaning the control panel
- Clean it with a soft, wet cloth. Do not use abrasive cleaning agents.
- Do not spray cleaning solutions directly onto the panel.
- Do not use any detergents or pre-treatment products such as pre-wash sprays or stain removers as they may damage the finish of the control panel.
- Apply these products at a safe distance from the dryer and wipe off any overspray immediately.
Cleaning the stainless steel drum
- To clean the drum, use a damp cloth with a mild, non-abrasive cleaning agent suitable for stainless steel surfaces. Fig. 8
- Remove product residues and dry the drum with a clean cloth.
Cleaning the door
Regularly clean the inside of the door to remove lint. Thorough cleaning ensures that the dryer functions properly.
Cleaning the surface of the dryer
The dryer housing has a glossy finish. Clean it with a soft, wet cloth. Do not use abrasive cleaning agents.
Avoid contact with sharp objects as they may scratch or damage the finish.
Do not place heavy or sharp objects or detergents on top of the dryer. Store them in a separate cabinet or storage box.
WARNING: do not use the dryer without the filter in place.
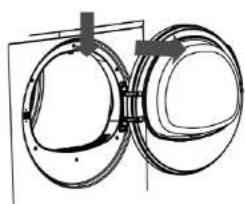
Cleaning the lint filter. Fig. 9
- Open the door.
- Remove the filter from its compartment by pulling it upwards and open it.
- Clean the filter and remove any build-up of lint or fibres by hand or with a soft cloth.
- Close the filter and put it back in its compartment.
- After prolonged use of the dryer, a layer of lint may form on the surface of the filter, causing it to become clogged. Wash the lint filter with lukewarm water to remove all those particles accumulated on the surface. Be sure to dry the lint filter thoroughly before reinstalling it.
- The lint filter must be cleaned frequently.
WARNING: always clean the lint filter and the inside surface of the door after each drying cycle.
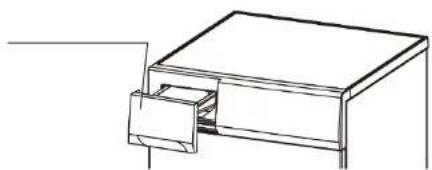
Emptying the condensation water tank
While the dryer is in operation, steam condenses, and water accumulates in the tank. After each drying cycle, it is recommended to empty the condensation water tank. If the tank is full,
ENGLISHENGLISH
the current drying programme will be automatically interrupted. The corresponding indicator light will light up and the dryer will beep. To resume the programme, you must first empty the condensation water tank.
- Remove the condensation water tank. Fig. 10
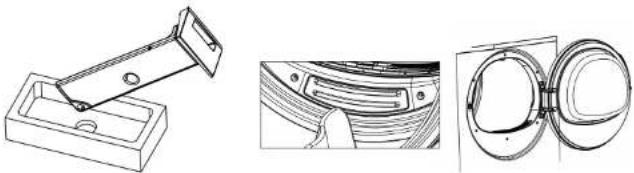
- Empty the accumulated waste water down the sink. Fig. 11
- Put the tank back in place.
- Press the start/pause button.
Cleaning the humidity sensor
During the drying cycle, this appliance detects the degree of humidity of the laundry. Depending on the residual moisture, the dryer changes the duration of the drying programme. After prolonged use, limescale residues may build up on the humidity sensor and must be removed regularly.
Open the door and clean the humidity sensor of the tumble dryer as shown in figure 12.
Cleaning the heat exchanger
The heat exchanger is one of the most important components of the tumble dryer to ensure optimal drying of the laundry and therefore requires special attention. It is recommended to clean the heat exchanger three to four times a year.
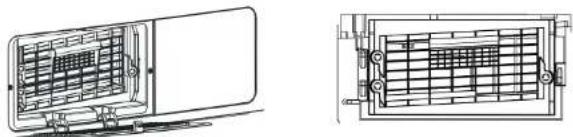
- Open the cover or cover plate on the bottom of the tumble dryer to gain access to the heat exchanger. Fig. 13
- Turn the three latches to unlock and remove the heat exchanger. Fig. 14
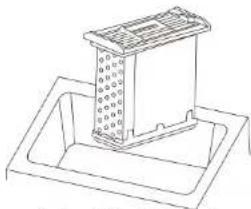
- Clean the heat exchanger by running it under the tap to remove any lint inside. Fig. 15
- Put the heat exchanger back in place according to the installation instructions.
7. TROUBLESHOOTING
- Some problems are due to lack of regular maintenance or neglect, which can easily be solved without calling a technician. Before contacting the official Cecotec Technical Support Service, please refer to the following section.
- When the dryer is switched on, the start/pause button may flash to indicate that the appliance is not working. Once the problem is solved, press the start/pause button again to restart the programme. If, after performing the following checks the problem persists, contact the official Cecotec Technical Support Service.
Problem Possible causes Solutions
| The dryer does not work | The plug is not plugged in. The door is open.Make sure that you have pressed the start/pause button . | Plug the power cord into the outlet.Close the door.Press the start/pause button again. |
| The laundry does not dry properly | The selected programme is not the right one. The filter is clogged.The laundry load is inadequate.Deposits have formed on the humidity sensor. | Select a different drying programme the next time you start the dryer (see section "Drying programmes").Clean the lint filter.Observe the maximum recommended load capacity. Clean the surface of the humidity sensor. |
| The light inside the drum does not switch on (depending on the model) | The light bulb has blown. | Replace the light bulb. |
| The drying cycle is interrupted or terminated shortly after the start of the programme. "END" appears on the display | Not enough laundry has been loaded or the laundry is too dry for the selected programme. | Increase the drying level (e.g. from intense to high). |
| The drying cycle takes too long | The dryer is overloaded with laundry. | Do not overload the dryer. |
Note: if you are unable to identify or solve the problem, contact the official Cecotec Technical Support Service. When you do so, the Technical Support Service will ask you to indicate the model, serial number and date of purchase of the appliance, as this information will facilitate the identification of the problem.
In the event of contacting a professional technician to repair the fault, whether it is one of those mentioned above, or caused by incorrect use or installation, the cost of the service will be paid by the user, even if the appliance is under warranty.
ENGLISHENGLISH
8. TECHNICAL SPECIFICATIONS
Product reference: 02159
Product: Bolero DressCode Dry 8200C B
| Product reference: 02159 | |
| Name: Bolero DressCode Dry 8200C B | |
| Rated voltage 220~240 V | |
| Rated frequency 50 Hz | |
| Load capacity (max.) 8 kg | |
| Full power 2500 W | |
| Power (on) (W) 0.36 | |
| Power (off) (W) 0.36 | |
| Full load power consumption (kWh) 4.73 | |
| Programme duration at full load (min) 150 | |
| Degree of waterproofing IPX4 | |
| Dimensions (W x D x H) (mm) | 595 X 630 X 850 |
IMPORTANT: the values stated have been obtained in a laboratory environment in accordance with the relevant regulations. These values may vary depending on the environmental conditions and the use of the dryer.
ATTENTION:
^a (This information is subject to regulatory changes).
- Refrigerant: risk of fire/risk of poisoning/risk of damage to property and equipment. The appliance contains refrigerant which, although environmentally friendly, is flammable R290. If not disposed of property, it may cause fire or poisoning. Dispose of the appliance correctly and do not damage the cooling circuit pipes.
- Refrigerant type: R290
- Amount of gas: 150 g
- ODP (ozone depletion potential): 0
- GWP (global warming potential): 3
- Risk of explosion or fire. Remove lighters and matches from pockets.
- Do not place the dryer near open fires or fire ignition sources.
Technical specifications may change without prior notification to improve product quality. Made in China | Designed in Spain
9. DISPOSAL OF OLD ELECTRICAL AND ELECTRONIC APPLIANCES

This symbol indicates that, according to the applicable regulations, the product and/or batteries must be disposed of separately from household waste. When this product reaches the end of its shelf life, you should dispose of the cells/batteries/accumulators and take them to a collection point designated by the local authorities.
Consumers must contact their local authorities or retailer for information concerning the correct disposal of old appliances and/or their batteries.
Compliance with the above guidelines will help protecting the environment.
10. TECHNICAL SUPPORT AND WARRANTY
Cecotec shall be liable to the end user or consumer for any lack of conformity that exists at the time of delivery of the product under the terms, conditions, and deadlines established by the applicable regulations.
It is recommended that repairs be carried out by qualified personnel.
If at any moment you detect any problem with your product or have any doubt, do not hesitate to contact the official Cecotec Technical Support Service at +34 963 210 728.
11. COPYRIGHT
The intellectual property rights over the texts in this manual belong to CECOTEC INNOVACIONES, S.L. All rights reserved. The contents of this publication may not, in whole or in part, be reproduced, stored in a retrieval system, transmitted, or distributed by any means (electronic, mechanical, photocopying, recording or similar) without the prior authorization of CECOTEC INNOVACIONES, S.L.
FRANÇAISFRANÇAIS
1. PIÈCES ET COMPOSANTS
Image 1
7. PROBLEEMOPLOSSING
text_image
Diagram of a front-loading washing machine with numbered parts for identificationFig./Img./Abb./Afo./Rys.1
natural_image
Close-up of two mechanical components: a valve assembly and a pipe fitting, both with arrows indicating direction (no text or symbols visible)Fig./Img./Abb./Afb./Rys.2
natural_image
Technical line drawing of a mechanical assembly with no visible text or symbolsFig./Img./Abb./Afb./Rys.3
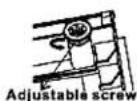
Fig./Img./Abb./Afb./Rys.4
flowchart
graph TD
    A["Sportswear"] --> B["Off"]
    C["Shirts"] --> B
    D["Denum"] --> B
    E["Underwear"] --> B
    F["Time"] --> B
    G["Refresh"] --> B
    H["Warm air"] --> B
    I["Baby Care"] --> B
    J["Standard"] --> K["Cotton"]
    L["Custom"] --> M["Demethyls"]
    N["Bulky item"] --> O["Towel"]
    P["Wood"] --> Q["Duvet"]
text_image
8:88 2 345 6 8 8kgFig./Img./Abb./Afb./Rys.5
flowchart
graph TD
    A["Off"] --> B["Sportswear"]
    A --> C["Shirts"]
    A --> D["Denim"]
    A --> E["Underwear"]
    A --> F["Time"]
    A --> G["Refresh"]
    A --> H["Warm Air"]
    A --> I["Standard"]
    A --> J["Cotton"]
    A --> K["Synthetic"]
    A --> L["Bulky Item"]
    A --> M["Towel"]
    A --> N["Wool"]
    A --> O["Duvet"]
    P["Baby Care"] --> Q["Off"]
Fig./Img./Abb./Afb./Rys.6

Fig./Img./Abb./Afb./Rys.7
natural_image
Pure mechanical diagram showing two circular components with internal features and a bracket (no text or symbols)
text_image
Filter caseFig./Img./Abb./Afb./Rys. 8 Fig./Img./Abb./Afb./Rys. 9
natural_image
Simple line drawing of a cabinet or drawer with an open drawer (no text or symbols)Fig./Img./Abb./Afo./Rys. 10
natural_image
Technical line drawings of a mechanical bracket, front view, and side view of a car door (no text or symbols)Fig./Img./Abb./Afb./Rys.11 Fig./Img./Abb./Afb./Rys.12
natural_image
Technical line drawings of a mechanical enclosure and its internal grid structure (no text or symbols)Fig./Img./Abb./Afo./Rys.13 Fig./Img./Abb./Afb./Rys.14
natural_image
Line drawing of a mechanical component with a grid-like structure and base plate (no text or symbols)Fig./Img./Abb./Afb./Rys.15
www.cecotec.es