
MD 19911 - Coffee machine MEDION - Free user manual and instructions
Find the device manual for free MD 19911 MEDION in PDF.

| Product type | Drip coffee maker with built-in grinder |
| Brand | MEDION |
| Model | MD 19911 |
| Power supply | 220-240 V, 50 Hz, 850-1000 W |
| Water tank capacity | approx. 1 L (8 cups) |
| Bean hopper capacity | approx. 200 g |
| Usable coffee types | Roasted coffee beans or ground coffee |
| Timer function | Programmable up to 24 hours |
| Grind adjustment | Rotary for fine to coarse grind |
| Strength adjustment | 3 levels: light, medium strong, strong |
| Anti-drip system | Allows serving coffee before brewing is complete (30 seconds max) |
| Thermal carafe | Included, capacity matches machine |
| Permanent filter | Included, reusable |
| Maintenance | Manual cleaning of parts; descaling recommended every 3-4 weeks with citric acid-based descaler |
| Safety | Automatic shut-off after brewing, overheating protection, hot surface warning, anti-drip system |
| After-sales service | Hotline (France: 02 43 16 60 30, Switzerland: 0848-33 33 32, Belgium: 02-200 61 98) |
| Compliance | CE, EMC directives, low voltage, ErP, RoHS |
Frequently Asked Questions - MD 19911 MEDION
User questions about MD 19911 MEDION
0 question about this device. Answer the ones you know or ask your own.
Ask a new question about this device
Download the instructions for your Coffee machine in PDF format for free! Find your manual MD 19911 - MEDION and take your electronic device back in hand. On this page are published all the documents necessary for the use of your device. MD 19911 by MEDION.
USER MANUAL MD 19911 MEDION
natural_image
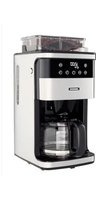
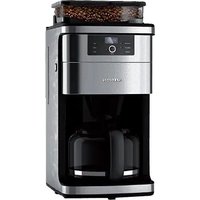
Two modern kitchen daisers with digital display, one black and one white, shown against a plain background (no text or symbols visible on the devices themselves).Coff ee machine with grinder
MEDION MD 19911
Inhaltsverzeichnis
DE
Abb. Teileübersicht
natural_image
Two symbolic icons: a recycling symbol with arrows and a trash bin with a person collecting trash (no text or symbols present)VERPACKUNG
natural_image
Two symbolic icons: a recycling symbol with arrows and a trash bin with a person (no text or symbols present)EMBALLAGE
natural_image
Two symbolic icons: a recycling symbol with arrows and a trash bin with a person (no text or symbols present)VERPAKKING
natural_image
Two symbolic icons: a recycling symbol with arrows and a trash bin with a person (no text or symbols present)EMBALAJE
natural_image
Two symbolic icons: a recycling symbol with arrows and a trash bin with a person (no text or symbols present)IMBALLAGGIO
1–7: plastiche/20–22: carta e cartone/80–98: materiali compositi

(Solo per la Francia)
1. Information about this user manual .... 118
1.1. Explanation of symbols ......118
FR
2. Proper use
3. Safety instructions NL
3.1. General information
3.2. Setting up the appliance ....122
3.3. Using the appliance 123
4. Package contents
5. Appliance overview
6. Before first use.... 127
6.1. Rinsing process....127
6.2. Setting the time....127
7. Operating the coffee machine....127
7.1. Brewing process with coffee beans....129
7.2. Brewing process with coffee powder 129
7.3. Drip stop function....130
7.4. Thermal jug 130
7.5. Using the timer 131
8. Tips for tasty coffee 131
9. Cleaning and descaling the appliance....132
9.1. Allowing the grinder to run empty....133
9.2. Descaling the appliance 134
10. Troubleshooting 134
11. Storing/transporting 135
12. Disposal....136
13. Technical specifications .... 137
14. EU declaration of conformity.... 137
15. Service information.... 137
16. Legal Notice....138
1. Information about this user manual

Thank you for choosing our product. We hope you enjoy using this appliance.
Read the safety instructions carefully before using the appliance for the first time. Note the warnings on the appliance and in the user manual.
Always keep the user manual close to hand. If you sell the appliance or give it away, please ensure that you also pass on this user manual. It is an essential component of the product.
1.1. Explanation of symbols
If a block of text is marked with one of the warning symbols listed below, the hazard described in that text must be avoided to prevent the potential consequences described there from occurring.

DANGER!
Warning: risk of fatal injury!

WARNING!
Warning: risk of possible fatal injury and/or serious irreversible injuries!
WARNING!
Warning: risk of electric shock!
WARNING!
Warning: danger due to hot surfaces!
WARNING!
Warning of risk of injury due to moving parts!

CAUTION!
Warning: risk of minor and/or moderate injuries!

NOTICE!
Follow these instruc- tions to prevent damage to the appliance!

More detailed information about using the appliance!

Follow the instructions in the user manual!

CE labelling
Products that feature this symbol meet the requirements of the EU directives.

Indoor use
Devices with this symbol are intended exclusively for use indoors.

Symbol for alternating current (AC)
2. Proper use
The appliance is suitable both for making coffee and for grinding coffee beans.
This appliance is designed for use in private households and similar household applications, such as
– in kitchens for staff in retail outlets, offices and other commercial areas
– on agricultural estates
– by customers in hotels, motels and other accommodation facilities
– in bed-and-breakfast establishments.
Please note that we shall not be liable in cases of improper use:
■ Do not modify the appliance without our consent and do not use any auxiliary equipment that we have not approved or supplied.
■ Only use replacement parts or accessories that we have supplied or approved.
■ Comply with all the information in this user manual, especially the safety instructions. Any other use is considered improper and can cause personal injury or property damage.
3. Safety instructions
■ Store the appliance and accessories out of the reach of younger children.
This appliance can be used by children of the age of 8 and older and by persons with reduced physical, sensory or mental abilities or by those without experience and/or knowledge, if they are supervised or have been instructed in the safe use of the appliance and have understood the dangers that result from it.
■ Children must not be allowed to play with the appliance.
■ Cleaning and user maintenance must not be carried out by children, unless they are aged 8 or over and are supervised.
■ Children under the age of 8 should be kept away from the appliance and the connection cable.
■ Never leave the appliance unattended during operation.
3.1. General information
WARNING!
Risk of electric shock/short circuit!
There is a risk of electric shock/short circuit from live parts.
■ Only connect the appliance to a properly installed and easily accessible socket that is close to where you are using the appliance. The local mains voltage must correspond to the technical specifications for the appliance.
■ The power socket must be easily accessible so you can unplug the appliance from the mains quickly if necessary.
■ Always hold the plug to pull it out and never pull the cable.
■ Do not allow the mains cable to come into contact with hot objects or surfaces (e.g. cooker hob).
■ Check the appliance and the mains cable for damage before using the appliance for the first time and after each use.
■ Do not use if the appliance or the mains cable is visibly damaged or if the appliance has been dropped.
■ Contact our Service team without delay if the appliance has been damaged during transport.
■ Do not, under any circumstances, make any unauthorised modifications to the appliance or try to open and/or repair a component yourself.
If there is damage to the mains connection cable on this appliance, it must be replaced by the manufacturer, its customer service department or another suitably qualified person. This is necessary to avoid hazards.
■ Never open the housing or slide objects into the ventilation slots.
■ Completely unwind the mains cable.
■ Do not kink or crush the mains cable.
■ Unplug the appliance from the socket:
■ Completely unwind the mains cable. ■ Do not kink or crush the mains cable. ■ Unplug the appliance from the socket:
- when you are cleaning or maintaining the appliance
- when you are assembling or disassembling the appliance
- if the appliance is damp or wet
- if you are no longer using the appliance
- when the appliance is unattended
– during thunderstorms.
■ The appliance must not be submerged in water or other liquids, nor exposed to running water or used in damp environments, as this may result in an electric shock.
■ Do not let the appliance come into contact with water or other liquids. Keep the appliance, the mains cable and the mains plug away from wash basins, sinks or similar.
■ Do not place any objects filled with liquid (e.g. vases or drinks) on or near the appliance.
■ Do not operate the appliance on wet surfaces.
■ Never touch the appliance or the mains cable/mains plug with damp or wet hands.
■ Use the appliance indoors only.
■ Do not expose the appliance to extreme conditions. Avoid:
– high humidity or wet conditions
– extremely high or low temperatures
- direct sunlight
- naked flames.
3.2. Setting up the appliance
■ Place the appliance on a stable, level surface.
- Never place the appliance on the edge of a table – it could tip over and fall.
■ Do not allow the mains cable to hang over the edge of the worktop.
■ Ensure that the mains cable does not become a tripping hazard and do not use an extension cord.
Chemical additives in furniture coatings may corrode the material of the appliance feet and cause residue on the furniture surface.
■ If necessary, place the appliance on an underlay that is insensitive to heat and water.

WARNING!
Risk of fire!
The appliance will become hot during operation. Flammable items in the immediate vicinity of the appliance could catch fire.
■ Do not position the appliance over a hotplate or other heat-generating appliances (grill, deep fat fryer); this applies even if an extraction fan is installed above it.
■ Leave a little space between this appliance and other appliances or the wall to allow air to circulate freely.
■ Do not cover the appliance during operation.
■ Never operate the appliance underneath or in the vicinity of highly flammable items such as curtains, drapes, paper etc.
3.3. Using the appliance
■ Do not operate the appliance with an external timer or a separate remote control system.
■ Never reach into the grinder when the filter compartment is open or the appliance is running.
■ Switch off the power socket and pull out the mains plug after each use, before cleaning and maintenance and during periods when the appliance is left unattended.
■ Do not use unroasted beans or blends with green coffee. These can damage the appliance.
■ Do not fill the bean container with coffee powder.
■ Do not put any food other than roasted coffee beans in the bean container.
■ Do not fill the water container with any liquid other than cold drinking water (except for descaling; see below).
■ Do not fill the thermal jug with any liquids other than water or coffee. Mineral water or other carbonated liquids must not be used.
■ The thermal jug is not suitable for the microwave and must not be preheated in the oven or on the hob.
■ Do not use the thermal jug to keep dairy products or baby food warm (risk of bacterial growth).
■ Do not leave any unused water in the water container. Immediately remove any remaining water in order to avoid the formation of limescale or algae.
- Please note the special instructions for cleaning and descaling the appliance (see “9. Cleaning and descaling the appliance” on page 132).
4. Package contents

DANGER!
Risk of choking and suffocation!
There is a risk of choking and suffocation due to swallowing or inhaling small parts or plastic wrap.
- Keep all packaging materials used (plastic bags, pieces of polystyrene etc.) out of the reach of children.
■ Do not allow children to play with the packaging material.
Please check your purchase to ensure that all items are included and in perfect condition. If anything is missing or damaged, contact us within 14 days of purchase.
The following items are supplied with your product:
- Coffee machine
- Filter holder
- Permanent filter
• Thermal jug with brew lid - Measuring spoon
- Short manual
5. Appliance overview
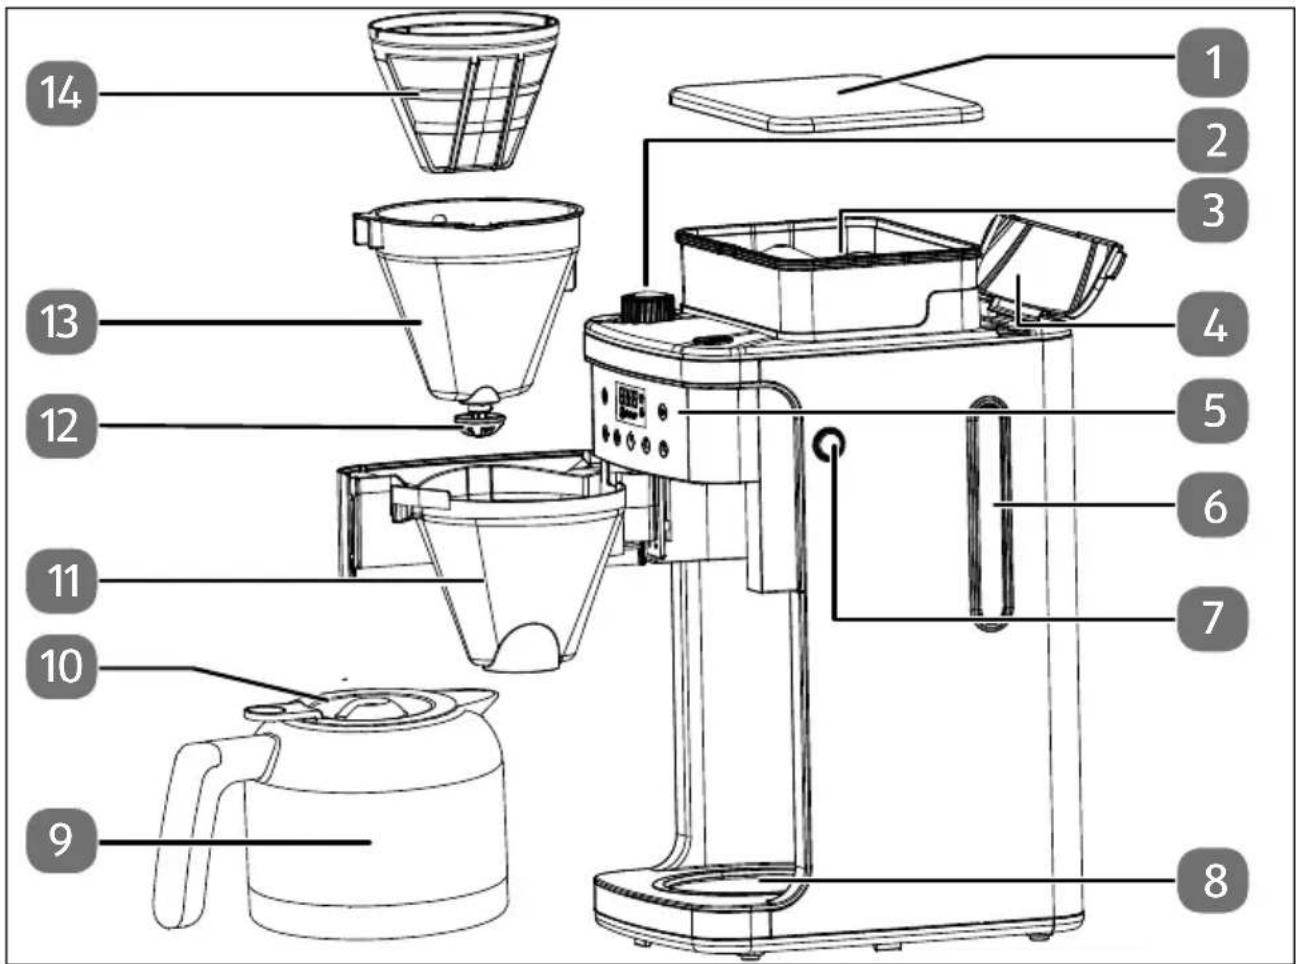
Fig. Parts overview
- Lid of the bean container
- Grinder setting dial
- Bean container
- Hinged lid of water container
- Control panel/display panel
- Water level indicator
- Button to open the filter compartment
- Base plate
- Thermal jug
- Brew lid
- Filter holder
- Drip protection
- Filter
- Permanent filter

The appliance's type plate is on the bottom of the appliance, not shown.
flowchart
graph TD
    A["151"] --> B["三"]
    C["88:88"] --> D["18:00"]
    E["18:00"] --> F["钟"]
    G["19"] --> H["+/-"]
    I["23"] --> J["开关"]
    K["212"] --> L["时钟"]
    M["520"] --> N["+/-"]
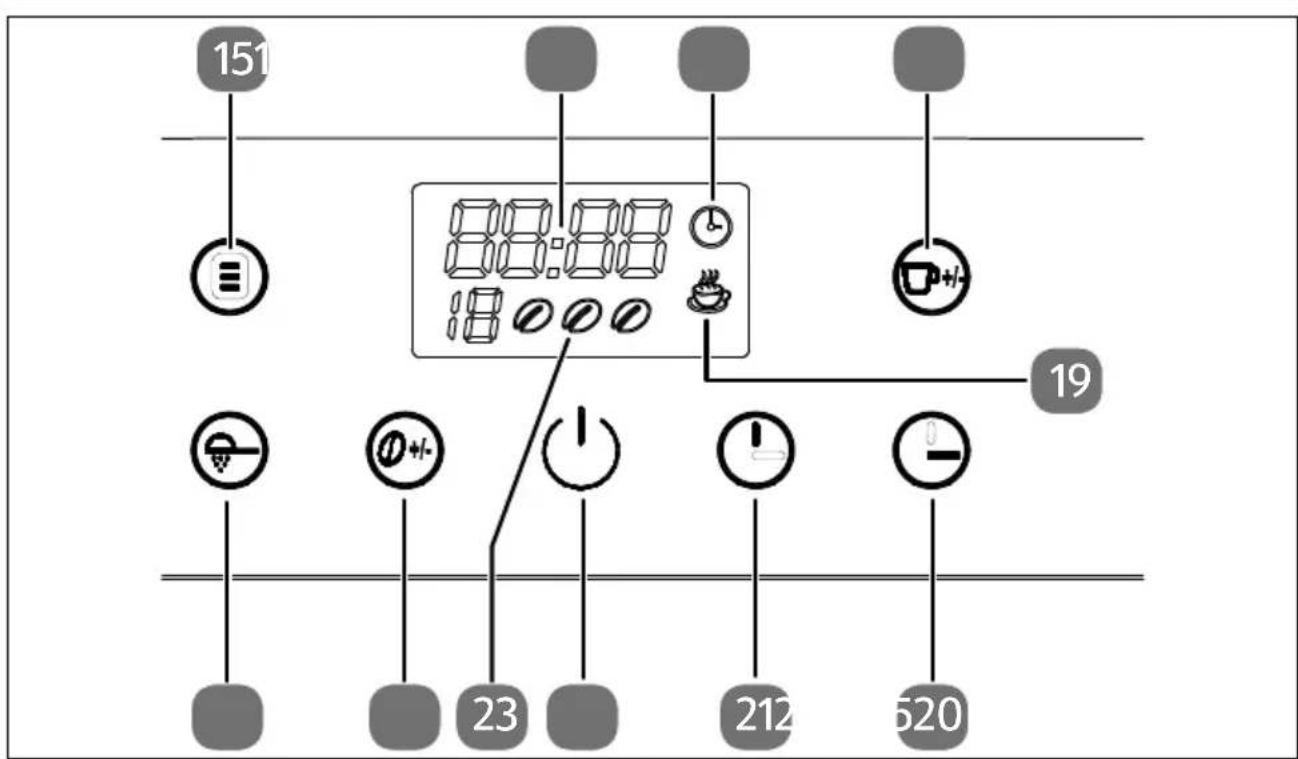
Fig. Control panel
- button: timer function (start coffee machine at a predefined time)
- Digital display
- symbol: timer function switched on
- Newton: adjust the required amount of coffee/number of cups during grinding
- symbol: coffee is brewed
- button: set minutes
- button: set hours
- button: turn on the coffee machine/start the brewing process
- symbol coffee strength
- Ⓞ button: set coffee strength
- ⏻ button: turn the grinder on and off
6. Before first use
▶ Remove all packaging materials.
Before first use, rinse the thermal jug (9), the brew lid (10), the permanent filter (14) and the filter (13) thoroughly.
▶ Connect the coffee machine to a socket.
6.1. Rinsing process
Clean the coffee machine by running three brewing processes using only tap water, without coffee or disposable or permanent filters (14):
▶ Press the button to switch on the coffee machine.
▶ Press the button to switch off the grinder.
▶ Press the button to start the brewing process.
For hygienic reasons, throw away the water after the rinsing process.
6.2. Setting the time
After first connecting to the power supply, the time flashes in the display panel (12:00).
▶ Press the (hours) and (minutes) buttons to set the time.
As soon as one of the two has been pressed, the time display stops flashing and the time is set.
7. Operating the coffee machine

CAUTION!
Risk of injury!
There is a risk of scalding due to hot surfaces and rising steam.
■ Steam rises during the coffee-making process. Do not reach into the steam.
■ Some parts (brew lid, filter holder, drip protection, filter, permanent filter, water outlet) become hot during operation. Even after switching off, these parts remain very hot for some time. Therefore, during operation, only touch the handles provided for this purpose.
■ If the water container lid is opened during the brewing process, scalding may occur.

NOTICE!
Risk of damage to the appliance!
Material damage due to improper use
■ Only pour cold drinking water into the water container.
■ Do not add any other liquids except water to the water container (except when descaling: see Page 134).
■ Do not fill the thermal jug with any liquids other than water or coffee.
■ Do not leave any unused water in the water container. Immediately remove any remaining water in order to avoid the formation of limescale or algae.
■ Do not use permanent filters and paper filters at the same time.
▶ Open the lid of the water container and use the scale on the water container to fill the container with the required amount of cold water for the desired number of cups.

Fill the water container only according to the amount of coffee you need, as all the water you add will be used for preparing the coffee.
Remove the thermal jug (9) from the coffee machine and press the button to open the filter compartment (7).
Place the filter (13) with the recess into the filter holder (11). The filter can only be inserted into the filter holder in one direction.
Insert a paper coffee filter (size 1x4) or the supplied permanent filter (14) into the filter (13). Make sure that the paper coffee filter is correctly placed in the filter.
▶ Fold the paper filter at the seams if necessary.
▶ Close the filter compartment again.
Place the thermal jug (9) in the centre of the base plate (8) and make sure that the drip protection valve (11) on the filter (12) is pushed upwards.
7.1. Brewing process with coff ee beans
▶ Open the lid of the bean container.
Place the coffee beans (approx. 200 g) into the bean container and then put the lid back on.

Do not put too many beans in the bean container to prevent the beans from becoming damp. Therefore, do not stuff in the beans.
▶ Press the button to switch on the coffee machine.
▶ Turn the GRINDER SETTING dial (2) to set the grind level (turn left: fine, turn right: coarse).

TIP: Set a fine grind for a light roast; a coarse grind is optimal for a dark roast. The type of roast is usually mentioned on the coffee packaging.
▶ Set the amount of coffee needed for the number of cups (2, 4, 6, 8 cups) by repeatedly pressing the button. If you do not set the number of cups, the amount of coffee from the previous brewing process will be used.
▶ Press the Ⓞ button repeatedly to set the coffee strength:
- Strong coffee
- Medium-strength coffee
- Ⓞ Mild coffee
▶ Press the button to start the brewing process.
The button lights up. The grinder starts and fills the coffee filter with ground coffee powder.
The brewing process then starts. The symbol is shown in the display panel.
At the end of the brewing process, the display goes out in the display panel and three acoustic signals sound.
7.2. Brewing process with coffee powder
▶ Press the button to switch on the coffee machine.
▶ Press the ⏻ button to switch off the grinder. The ⏻ symbol lights up red when the grinder is deactivated.
▶ Add the appropriate amount of coffee powder to the filter. One heaped teaspoon per cup or one level measuring spoon is recommended.
▶ Close the filter compartment again.
▶ Repeatedly press the Ⓞ button to adjust the amount of water used and therefore the coffee strength:
- Strong coffee
- Medium-strength coffee
- Ⓞ Mild coffee
▶ Press the button to start the brewing process.
The ⏻ button lights up. The symbol is shown in the display panel and the brewing process starts.
At the end of the brewing process, the 🤨 display goes out in the display panel and three acoustic signals sound.
The coffee machine switches off automatically. If you want to de-energise the appliance completely, unplug the mains plug from the socket.
7.3. Drip stop function
The drip stop function allows you to serve the finished coffee during the brewing process.
Remove the thermal jug (9) from the base plate (8). The flow of coffee from the filter into the thermal jug is interrupted, and the coffee is backed up in the filter.
Place the thermal jug back under the filter within 30 seconds. Otherwise, there is a risk that the filter will overflow.
The strength of the coffee removed in the middle of the brewing process may differ from the strength of the coffee after the full brewing process.
7.4. Thermal jug

CAUTION!
Risk of injury!
There is a risk of scalding due to hot surfaces.
■ Never drink directly from the thermal jug and do not reach into it. Always close the jug with the lid. The coffee can be served without removing the lid.
■ Do not leave the thermal jug unattended near children.

For technical reasons, the closure is not hermetically sealed so that it cannot get stuck closed. Therefore, when the thermal jug is full, only hold it vertically.
▶ Always fill the thermal jug completely to retain the heat for longer. When the jug is only partly filled or storing a residual quantity, the heat retention time is significantly shorter.
- Rinse the thermal jug with hot water before use so that the coffee stays hot for longer.
7.5. Using the timer

To use the timer, the time must have been set.
▶ Press the button until the time starts flashing.
▶ Use the ⏻ and ⏻ buttons to set a time at which the brewing process should start. A delay time of up to 24 hours can be set.
To turn the timer on, press the ⓘ button until the time symbol ⏻ appears in the display panel.
The coffee machine starts the brewing process at the set time.
▶ To turn off the set timer, briefly press the ⏻ button until the time symbol in the display panel goes out.
8. Tips for tasty coffee
A clean coffee machine is an absolute must for making tasty coffee. Clean the coffee machine regularly as described in section "9. Cleaning and descaling the appliance" on page 132.
▶ Always use fresh, cold water in the coffee machine.
▶ Store unused coffee powder in a cool, dry place. Re-seal opened packets of coffee powder and store them in the fridge to keep them fresh.
For the best-tasting coffee, buy whole coffee beans and grind them just before brewing.
Do not re-use the coffee powder again, as this will severely affect the taste of the coffee. Reheating coffee is not recommended, as the coffee tastes best immediately after brewing.
- Clean the coffee machine if it becomes oily due to excessive extraction. Small oil droplets on the surface of the brewed black coffee are due to the extraction of oil from the coffee powder.
▶ Oiliness can occur more frequently when heavily roasted coffee varieties are used.
9. Cleaning and descaling the appliance
DANGER!
Risk of electric shock/short circuit!
There is a risk of electric shock/short circuit from live parts.
■ Remove the plug from the socket before you start cleaning the appliance
■ Never immerse the appliance in water or other liquids.
CAUTION!
Hot surface!
There is a risk of scalding due to hot surfaces and rising steam.
■ Allow the appliance to cool down before cleaning.

NOTICE!
Possibility of damage to the appliance!
There is a risk of damage to the appliance if it is used improperly.
■ Never use acidic, abrasive or granular, acetic-acid-, soda- or solvent-based cleaning agents. These may damage the appliance surfaces or the printing on it.
■ Do not clean the coffee machine and the thermal jug in the dishwasher.
▶ Wait until the appliance has completely cooled down.
Do not use hard brushes or abrasive cleaning agents to clean the thermal jug (9). Clean the thermal jug and the brew lid (10) with water and a little washing-up liquid if necessary. The thermal jug and the brew lid should never be immersed in water.
▶ Press the button to open the filter compartment (7).
Remove the used disposable filter or permanent filter (14) using the handle from the filter (13). Hold the filter insert by the handle and remove it from the filter holder (11).
▶ Dispose of the coffee grounds from the permanent filter or the disposable filter with coffee grounds in household waste.
- Rinse the filter insert and the permanent filter under running water.
- Clean the outside of the coffee machine with a damp cloth and, if necessary, a little mild washing-up liquid.
▶ Clean the thermal jug (9) by hand with water and some washing-up liquid.
▶ Wipe the base plate (8) using a damp cloth.
9.1. Allowing the grinder to run empty
If you do not use the coffee machine or store it for a long period of time, the grinder must be emptied, as remaining beans left in the grinder may become mouldy.
Remove the thermal jug (9) and filter (13) and make sure the water container is empty.
▶ Tilt the machine so that the remaining beans can fall out of the top of the bean container.
Place the coffee machine back upright and plug in the mains plug.
▶ Open the filter compartment.
WARNING!
Risk of injury!
Rotating parts. There is a risk of injury due to crushing.
■ Never reach into the grinder when the filter compartment is open or the appliance is running.
▶ If necessary, place a small bowl on the base plate.
▶ Start a brewing process for coffee beans, but without adding water and beans.
As soon as no remaining beans fall down from the grinder, press the ⏻ button to stop the brewing process.

WARNING!
Risk of fire! Risk of damage!
There is a risk of overheating, which may lead to damage to the appliance or to a fire.
■ Do not let the brewing process run "dry" for more than 1 minute.
▶ After completing the process, unplug the mains plug.
9.2. Descaling the appliance
Why does the build-up of limescale damage the coffee machine?
If a machine is only rarely descaled, larger deposits can be removed, but they often clog the flow system. We therefore recommend that you descale your coffee machine regularly. Depending on the water hardness and usage behaviour, this may be required every 3-4 weeks. Please note that repair due to the build-up of limescale and the resulting damage are not covered by the warranty.
How can I tell if my filter coffee machine has a build-up of limescale?
- Extended cycle time and reduced amount of coffee in the water filling
- Increased steam generation and noise during the brewing process
- Altered taste
Which descaler should be used for coffee machines?
Household vinegar and mineral-acid-based descalers are not suitable, as they usually do not sufficiently remove limescale deposits and damage seals and hoses.
For gentle and thorough cleaning, we recommend citric-acid-based descalers.
How do I descale my coffee machine?
Fill the water container and add the descaler according to the manufacturer's instructions.
▶ Turn on the coffee machine. Press the button to switch off the grinder. The symbol lights up red when the grinder is deactivated.
▶ Press the button to start the brewing process.
▶ Repeat the process 2 – 3 times using only clear tap water to rinse out the descaling solution completely.
10. Troubleshooting
| Fault/fault code Cause Solution | |
| The appliance is not working. | The power supply is inter-rupted. |
| The water container is empty. |
| Fault/fault code Cause Solution | ||
| The coffee is too weak. | The selected number of cups does not correspond to the amount of water. | ▸ Increase the amount of coffee; see the dosing instructions in section “7.2. Brewing process with coffee powder” on page 129. |
| The grind level is set too coarse. | ▸ Adjust the grind level to be more fine. | |
| The coffee isn’t hot enough. | The appliance may have a build-up of limescale. | ▸ Descale the appliance. |
| No coffee is going into the thermal jug. | The thermal jug (9) is not correctly placed under the coffee outlet. | ▸ Place the thermal jug in the centre of the base plate (8), so that the drip protection valve (12) is pushed upwards. |
11. Storing/transporting
When you are not using the appliance, pull out the mains plug, clean the appliance and store it in a dry, dust-free and frost-free environment that is not exposed to direct sunlight.
▶ Do not store the appliance within the reach of children.
▶ To avoid damage during transport, we recommend that you use the original packaging.
12. Disposal


PACKAGING
Your appliance has been packaged to protect it from damage in transit. The packaging is made of materials that can be recycled in an environmentally friendly manner.

Observe the following labels on the packaging materials regarding waste separation with the abbreviations (a) and numbers (b):
1–7: plastics/20–22: paper and cardboard/80–98: composite materials

(France only)
The “Triman” symbol tells the consumer that the product can be recycled, is covered by an extended system of manufacturer’s responsibility and must be sorted by material type in France.
APPLIANCE
All old appliances marked with the symbol shown must not be disposed of in normal household waste.
In accordance with Directive 2012/19/EU, the appliance must be properly disposed of at the end of its service life.
This involves separating the materials in the appliance for the purpose of recycling as well as minimising the environmental impact and negative effects on human health.
Take old appliances to an electrical scrap collection point or a recycling centre.
Contact your local waste disposal company or your local authority for more information on this subject.
13. Technical specifications
| Model: MD 19911 | |
| Distributor: MEDION AG | Am Zehnthof 7745307 EssenGermany |
Power supply 220–240 V
\~ 50 Hz
Output 850–1000 W
Filling quantity of water Approx. 1 l / approx. 8 cups
Coffee bean capacity Approx. 200 g
14. EU declaration of conformity

MEDION AG hereby declares that this appliance complies with the fundamental requirements and the other relevant provisions of:
• EMC Directive 2014/30/EU
• Low Voltage Directive 2014/35/EU
• ErP Directive 2009/125/EC
• RoHS Directive 2011/65/EU
15. Service information
Please contact our Customer Service team if your device ever stops working the way you want or expect it to. There are several ways for you to contact us:
- In our Service-Community, you can meet other users, as well as our staff, and you can exchange your experiences and pass on your knowledge there.
You will find our Service-Community at community.medion.com.
• Alternatively, use our contact form at www.medion.com/contact.
- You can also contact our Service team via our hotline or by post.
| Opening times Hotline number UK | |
| Mon – Fri: 08.00 – 20.00Sat – Sun: 10.00 – 16.00 | 0333 3213106 |
| Service address | |
| MEDION Electronics Ltd.120 Faraday Park, Faraday Road, DorcanSwindon SN3 5JF, WiltshireUnited Kingdom | |

You can download this and many other sets of operating instructions from our service portal at www.medionservice.com.
We have stopped providing printed copies of our warranty terms and conditions as part of our commitment to sustainability, but you can access the warranty terms and conditions on our service portal.
You can also scan the QR code on the side of the screen, to download the operating instructions onto your mobile device from the service portal.
16. Legal Notice
Copyright © 2024
Date: 07. February 2024
All rights reserved.
These operating instructions are protected by copyright.
Mechanical, electronic and any other forms of reproduction are prohibited without the written permission of the manufacturer.
Copyright is owned by the company:
MEDION AG
Am Zehnthof 77
45307 Essen
Germany
Please note that you cannot use the address above for returns. Please always contact our Customer Service team first.


- Inhaltsverzeichnis
- VERPACKUNG
- EMBALLAGE
- VERPAKKING
- EMBALAJE
- IMBALLAGGIO
- Information about this user manual .... 118
- Proper use
- Safety instructions NL
- Package contents
- Appliance overview
- Before first use.... 127
- Operating the coffee machine....127
- Tips for tasty coffee 131
- Cleaning and descaling the appliance....132
- Troubleshooting 134
- Storing/transporting 135
- Disposal....136
- Technical specifications .... 137
- EU declaration of conformity.... 137
- Service information.... 137
- Legal Notice....138
- Information about this user manual
- Explanation of symbols
- DANGER!
- WARNING!
- CAUTION!
- NOTICE!
- CE labelling
- Indoor use
- Safety instructions
- General information
- Risk of electric shock/short circuit!
- Setting up the appliance
- Risk of fire!
- Using the appliance
- Risk of choking and suffocation!
- Before first use
- Rinsing process
- Setting the time
- Operating the coffee machine
- Risk of injury!
- Risk of damage to the appliance!
- Brewing process with coff ee beans
- Brewing process with coffee powder
- Drip stop function
- Thermal jug
- Using the timer
- Tips for tasty coffee
- Cleaning and descaling the appliance
- Hot surface!
- Possibility of damage to the appliance!
- Allowing the grinder to run empty
- Risk of fire! Risk of damage!
- Descaling the appliance
- Why does the build-up of limescale damage the coffee machine?
- How can I tell if my filter coffee machine has a build-up of limescale?
- Which descaler should be used for coffee machines?
- How do I descale my coffee machine?
- Troubleshooting
- Storing/transporting
- Disposal
- PACKAGING
- APPLIANCE
- Technical specifications
- EU declaration of conformity
- Service information
- Legal Notice
Brand : MEDION
Model : MD 19911
Category : Coffee machine