MD 17024 - Coffee machine MEDION - Free user manual and instructions
Find the device manual for free MD 17024 MEDION in PDF.
| Product Type | Filter Coffee Maker |
| Brand | Medion |
| Model | MD 17024 |
| Power Supply | 220-240 V ~ 50/60 Hz |
| Power Consumption | 900 W |
| Water Tank Capacity | 1.2 L |
| Number of Cups | Approximately 8 cups |
| Main Functions | Filter coffee brewing, auto shut-off after 40 min, anti-drip system, hot plate |
| Anti-Drip System | Yes, allows serving coffee before percolation ends |
| Auto Shut-Off | Yes, after 40 minutes |
| Carafe | Glass with lid, dishwasher safe |
| Permanent Filter | Included, reusable |
| Supplied Accessories | Measuring spoon, permanent filter, glass carafe |
| Cleaning | Damp cloth, do not immerse; regular descaling recommended |
| Descaling | With vinegar or commercial descaling product |
| Safety | Auto shut-off, do not immerse, use on stable surface |
| Warranty | 24 months (commercial warranty) |
| After-Sales Service | Medion, phone and online portal |
Frequently Asked Questions - MD 17024 MEDION
User questions about MD 17024 MEDION
0 question about this device. Answer the ones you know or ask your own.
Ask a new question about this device
Download the instructions for your Coffee machine in PDF format for free! Find your manual MD 17024 - MEDION and take your electronic device back in hand. On this page are published all the documents necessary for the use of your device. MD 17024 by MEDION.
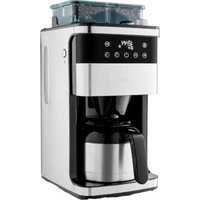
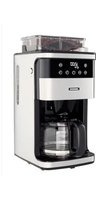
USER MANUAL MD 17024 MEDION
natural_image
Black and white photo of a MEDION coffee maker with clear glass lid and control panel (no visible text or symbols on device)Kaffeemaschine
Cafetière
Macchina da caffè
Coffee Machine
MEDION®
MD 17024
Inhaltsverzeichnis
www.medion.com/conformity.
10. Impressum
Copyright © 2016
La percolation commence.
natural_image
Symbol of a trash bin crossed with no visible text or labelsMacchina
- About these instructions.... 52
1.1. Symbols and signal words used in these instructions ....52
-
Package contents
-
Proper use 53
-
Safety information ...... EN
4.1. Setting up....55
4.2. Mains connection ....55
4.3. Faults 56
4.4. Handling the appliance safely 56
4.5. Cleaning the appliance ....58
-
Appliance overview 59
-
Initial operation and use.... 60
6.1. Rinsing 60
6.2. Using the coffee machine ....60
6.3. End of the brewing process 61
6.4. Switching off the device 61
6.5. Cleaning and descaling ....61
- Disposal
- Technical data
- Conformity information
- Legal notice....63
- General Warranty Conditions 63
11.1. General information....63
11.2. Special warranty conditions for repair on site or replacement on site65
- Service Address.... 65
DE
FR
IT
EN
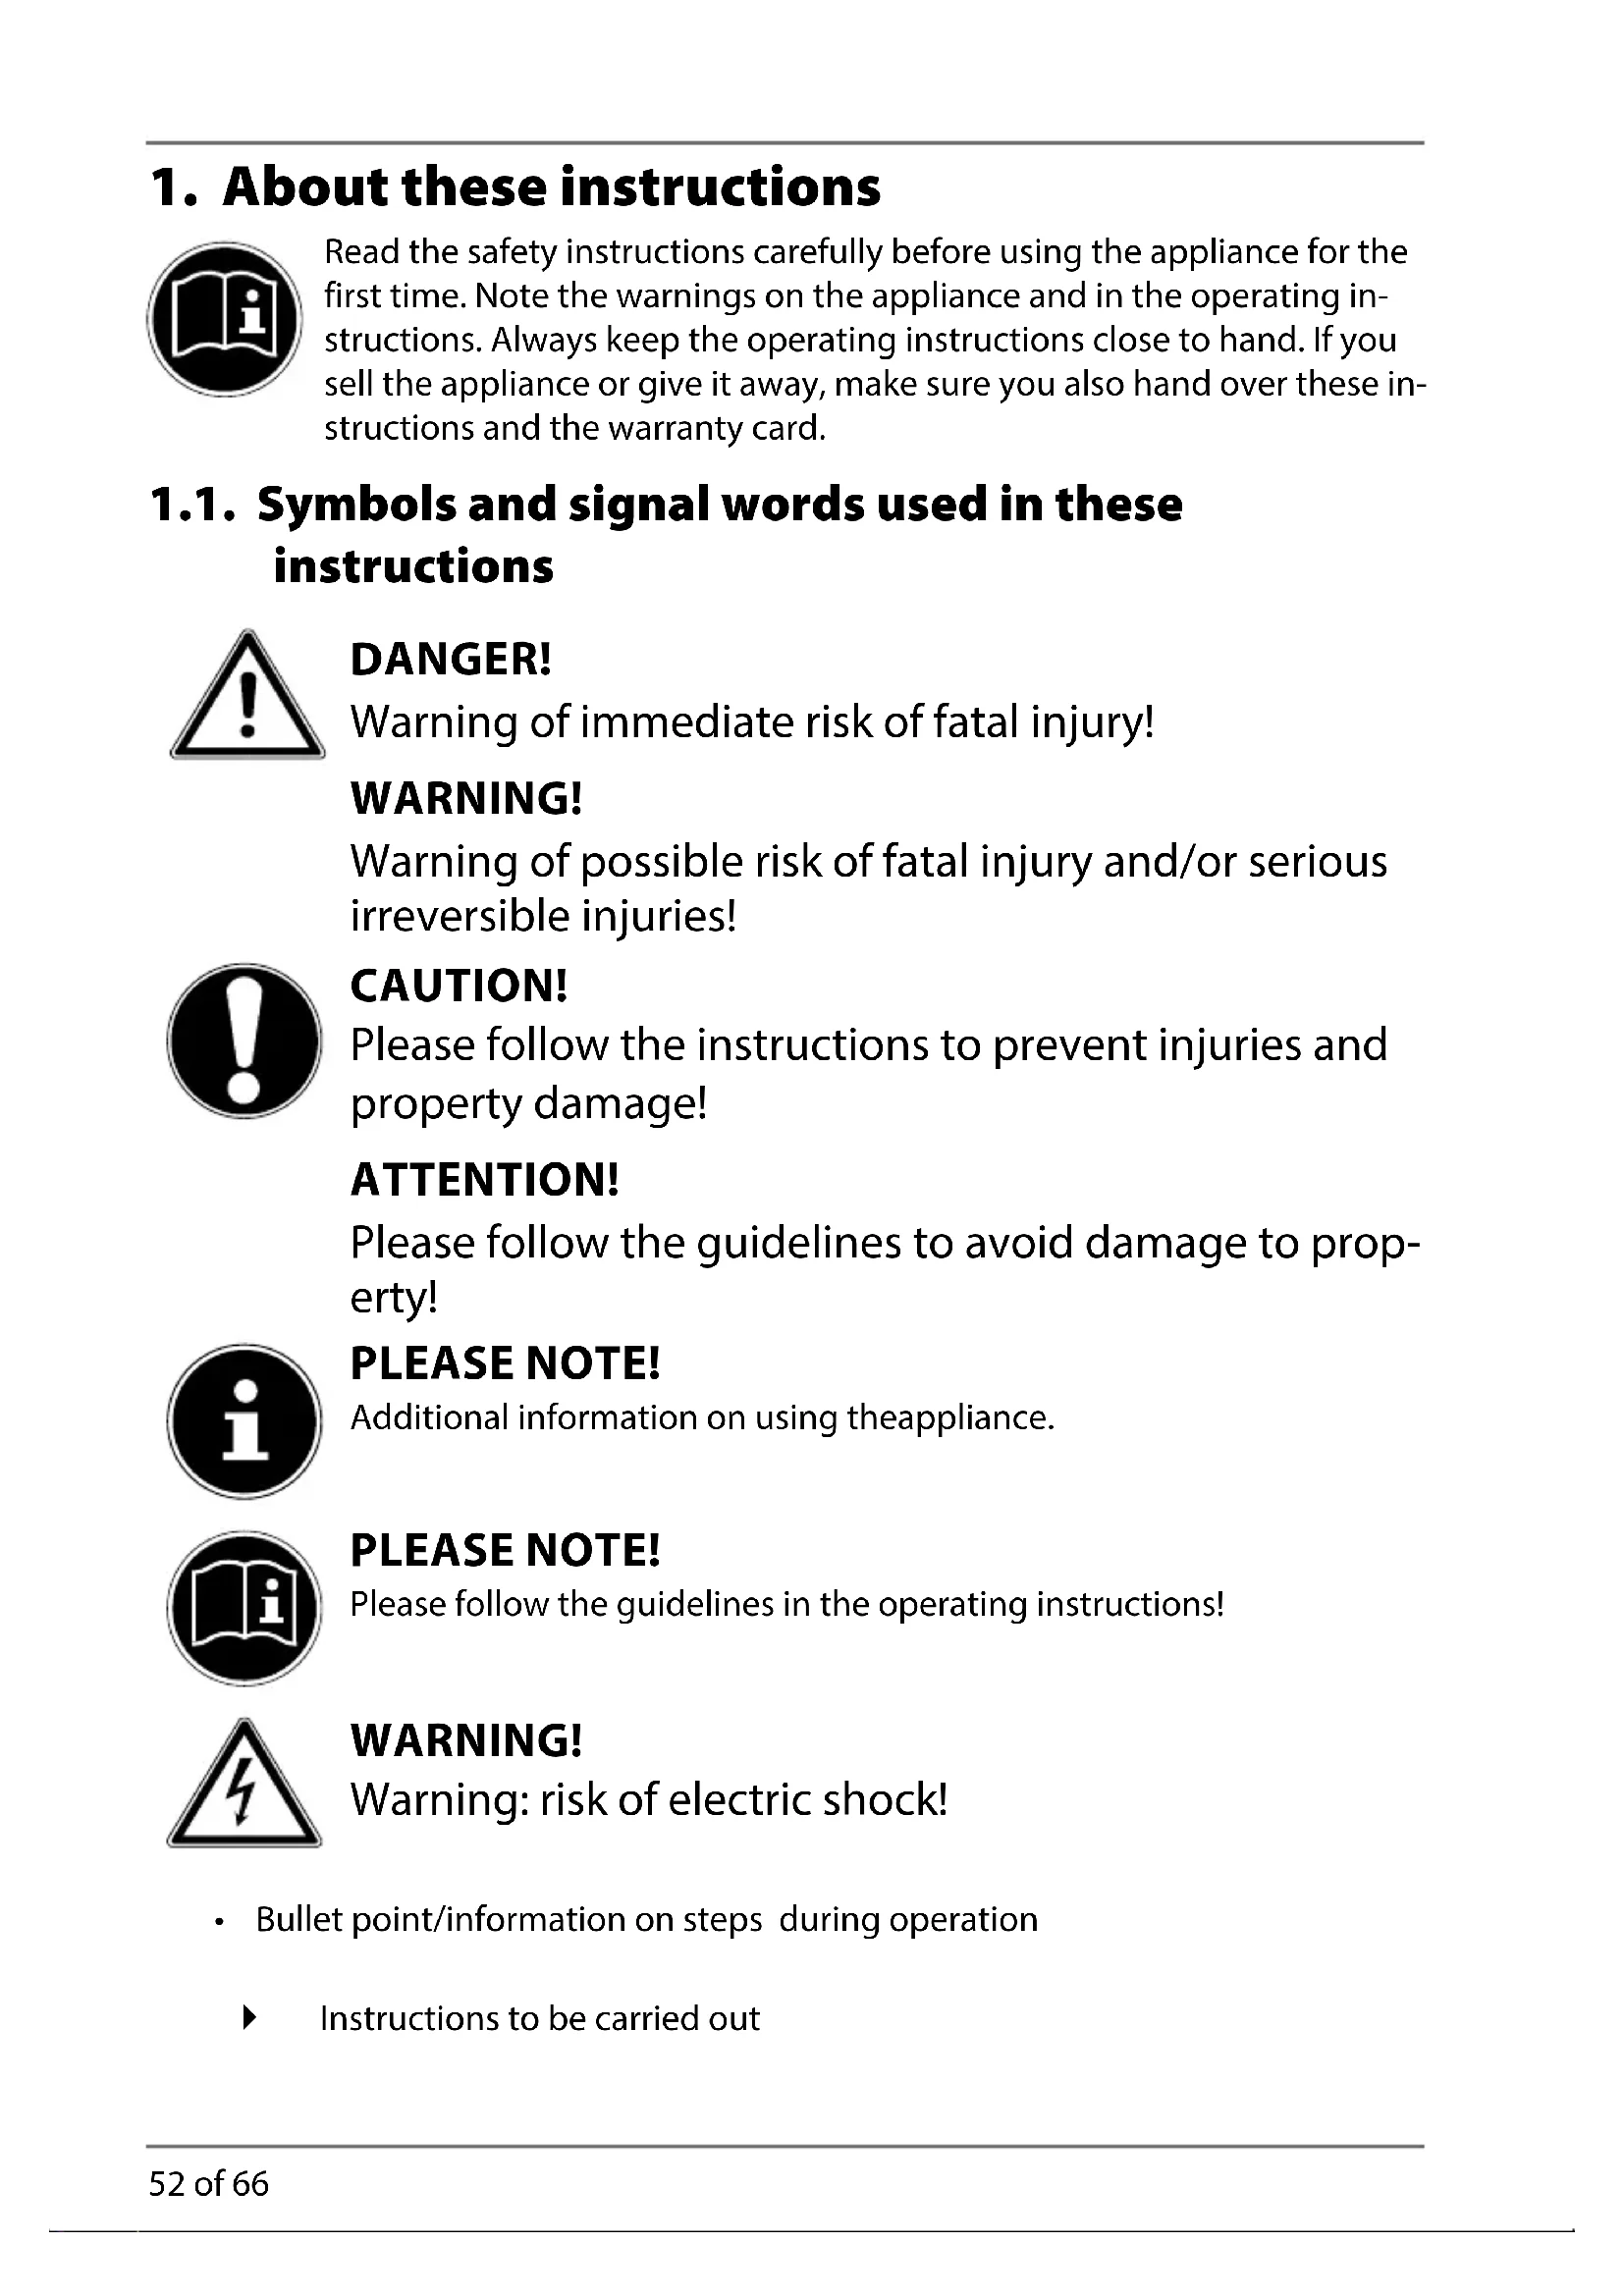
1. About these instructions

Read the safety instructions carefully before using the appliance for the first time. Note the warnings on the appliance and in the operating instructions. Always keep the operating instructions close to hand. If you sell the appliance or give it away, make sure you also hand over these instructions and the warranty card.
1.1. Symbols and signal words used in these instructions

DANGER!
Warning of immediate risk of fatal injury!
WARNING!
Warning of possible risk of fatal injury and/or serious irreversible injuries!

CAUTION!
Please follow the instructions to prevent injuries and property damage!
ATTENTION!
Please follow the guidelines to avoid damage to property!

PLEASE NOTE!
Additional information on using the appliance.

PLEASE NOTE!
Please follow the guidelines in the operating instructions!
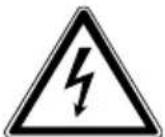
WARNING!
Warning: risk of electric shock!
- Bullet point/information on steps during operation
▶ Instructions to be carried out
2. Package contents

WARNING!
Risk of suffocation
There is a risk of suffocation if plastic packaging or small parts are inhaled or swallowed.
▶ Keep the packaging out of reach of children.
When unpacking, ensure that the following parts are included:
- Coffee machine
- Permanent filter
- Coffee measure
- Glass jug with lid
- Operating instructions and warranty card
3. Proper use
The appliance is intended for preparation of coffee.
This appliance is intended to be used in private households and similar household applications, such as:
-in kitchens for employees in shops, offices and other commercial areas;
-on agricultural estates;
– by customers in hotels, motels and other residential facilities;
-in bed & breakfast accommodation.
The appliance is not suitable for commercial or industrial use.
Please note that we shall not be liable in cases of improper use:
- Do not modify the appliance without our consent and do not use any auxiliary equipment which we have not approved or supplied.
- Use only spare parts and accessories that we have supplied or approved.
- Heed all the information in these operating instructions, especially the safety information. Any other use is deemed improper and can cause personal injury or property damage.
- Do not expose the appliance to extreme conditions. The following should be avoided:
–High levels of humidity or moisture
-Extremely high or low temperatures
-Direct sunlight
-Naked flames
4. Safety information

WARNING!
Risk of injury for children or persons with limited physical, sensory or mental capabilities (for example partially disabled people or older persons with limited physical and mental capabilities) or no knowledge and experience (older children, for example).
- Keep the appliance and its accessories out of the reach of children.
This appliance may be used by children over the age of 8 and by persons with reduced physical, sensory or mental abilities or by those without experience and/or knowledge, if they are supervised or have been instructed in the safe use of the appliance and have understood the dangers that result from it. Children must not play with the appliance. Cleaning and user maintenance must not be carried out by children, unless they are aged 8 or over and are supervised.
Children younger than 8 should be kept away from the appliance and the power cord.
▶ Keep all used packaging materials (bags and pieces of polystyrene, etc.) out of the reach of children.
4.1. Setting up

WARNING! Risk of fire/short circuit
There is a risk of short circuit or fire if the appliance is set up incorrectly.
Place the appliance on a heat-resistant, sturdy, level surface.
▶ Avoid the use of extension cables in order to prevent tripping.
▶ Never place the appliance on the edge of a table – it could tip over and fall.
The casing becomes hot during use. Therefore, only touch the appliance during operation using the buttons and handles provided for this purpose.
▶ Do not position the appliance over a hotplate or other heat-generating appliances (grill, deep fat fryer); this applies even if an extraction fan is installed above it.
▶ Never set up the device near to a sink.
Leave a little space between this appliance and other appliances or the wall to allow the air to circulate freely. Do not cover the appliance during operation.
▶ Do not use the appliance outdoors.
4.2. Mains connection
▶ Only connect the appliance to a properly installed 220–240 V \~, 50/60 Hz safety socket that is located close to the place where you have set up the appliance. The socket must be freely accessible so that you can unplug the appliance from the mains quickly if necessary.
▶ Ensure that the mains cable has been completely unwound during operation.
- Disconnect the appliance's plug from the socket after each use, before each time you clean it, when the appliance is unsupervised or if there is a fault.
▶ Always remove the mains cable from the socket by grasping
the plug – do not pull the cable itself.
▶ Do not kink or crush the mains cable.
4.3. Faults

DANGER!
Risk of electric shock.
There is a risk of electric shock due to live parts.
If the plug, mains cable or appliance is damaged, immediately remove the plug from the socket.
▶ Never try to open and/or repair an appliance component yourself. There is a risk of electric shock.
▶ A damaged mains cable may only be replaced by an authorised specialist workshop or technical customer services to avoid any risks.
In the event of a fault, contact our Service Centre or another suitable specialist workshop.
4.4. Handling the appliance safely

WARNING!
Risk of fire/short circuit.
There is a risk of short circuit or fire if the appliance is set up incorrectly.
▶ Do not leave the appliance unattended during operation.
▶ Do not pour water into the water tank while the appliance is still hot. Allow the appliance to cool down between two brewing processes.
▶ Do not place the glass jug onto a hot plate, above a naked flame or in the microwave.
▶ Do not leave the empty glass jug standing on the hot warming plate.

DANGER! Risk of electric shock.
There is a risk of electric shock due to live parts.
▶ Do not use the appliance under any circumstances if there is visible damage to the appliance, the mains cable or the plug.
▶ Never immerse the appliance in liquids!

CAUTION! Risk of injury.
There is a risk of scalding due to the hot surfaces and the steam rising from the kettle.
During use, only touch the glass jug, filter lid and appliance using the handles provided for this purpose.
▶ Do not reach into or over hot steam.

ATTENTION! Risk of damage.
Damage to the appliance caused by improper handling.
▶ Only pour cold water into the water tank.
Do not add any other liquids except water to the water tank (except when descaling: see below).
▶ Do not pour any liquids other than water or coffee into the glass jug.
Do not leave any unused water in the water tank. Immediately remove any remaining water in order to avoid the formation of limescale or algae.
4.5. Cleaning the appliance
▶ Allow the coffee machine to cool down completely.

DANGER! Risk of electric shock.
There is a risk of electric shock due to live parts.
The plug must be disconnected from the mains socket before cleaning (pull on the plug, not on the cable).
▶ Never immerse the coffee machine in water or other liquids!

ATTENTION! Risk of damage.
Damage to the appliance caused by improper handling.
▶ Clean the appliance using only a damp cloth and a mild soap solution that cannot damage the surface of the appliance.
▶ Follow the special instructions inside the appliance for descaling.
5. Appliance overview
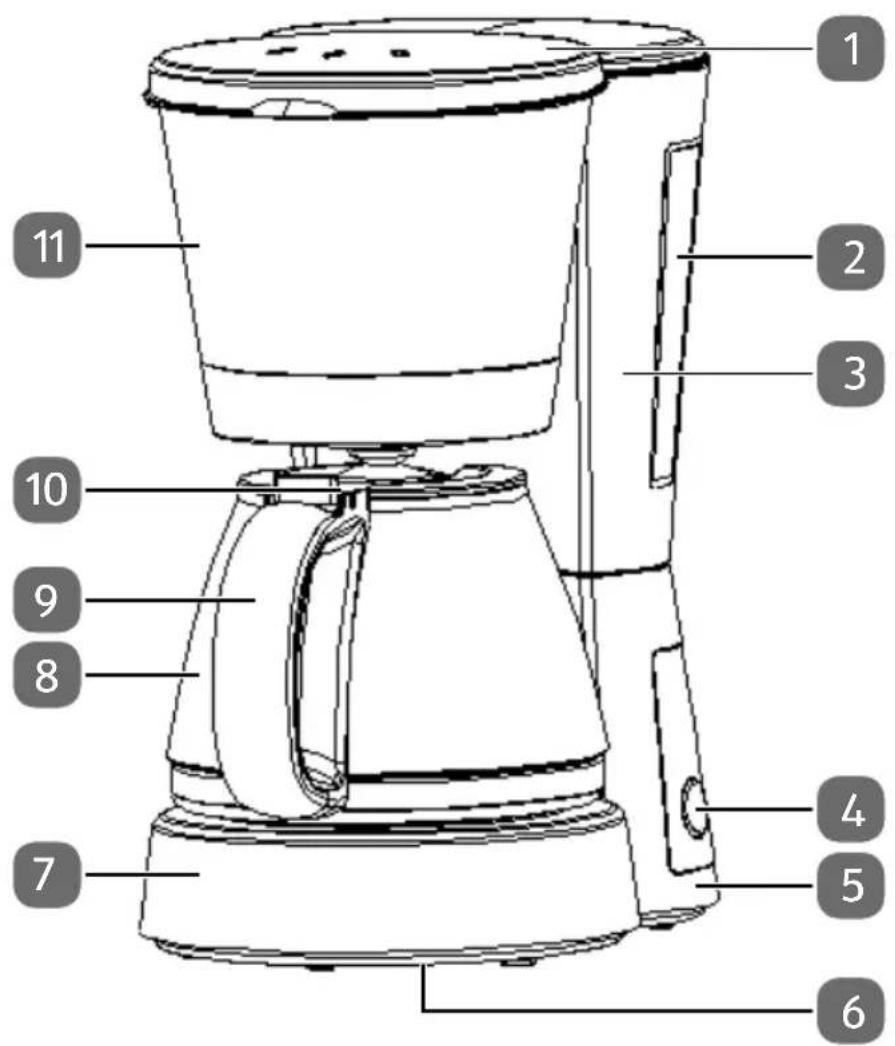
1) Folding filter tank lid with steam outlet
2) Water level gauge
3) Water tank
4) On/off switch
5) Mains cable (on the back, not shown)
6) Name plate (on the underside of the appliance, not shown)
7) Base plate with heating element
8) Glass jug
9) Handle
10) Folding lid on glass jug
11) Filter holder and permanent filter
6. Initial operation and use
Rinse out the glass jug and filter thoroughly before using for the first time.
Connect the coffee machine to a 220–240 V \~, 50/60 Hz mains socket.
6.1. Rinsing
Clean the coffee machine by carrying out three brewing processes using only water, without any coffee or filter / permanent filter.
The filter holder has a handle for removal. The handle of the filter insert can be conveniently pulled out from the front of the filter holder.
▶ Allow the coffee machine to cool down for approx. 5 minutes after every brewing process.
6.2. Using the coff ee machine
▶ Open the lid and pour in the required volume of cold water for the desired number of cups using the scale on the water tank.
Remove the glass jug from the heating plate and place the filter insert into the filter holder with the gap in the direction of the water spout. Fold down the handle.
The filter insert can only be inserted into the filter holder in one direction.
Place a paper coffee filter (size 1x4) or the permanent filter into the filter holder. Ensure that the filter is positioned evenly in the filter insert.
▶ Add the corresponding amount of coffee powder to the filter. The recommended amount is 1 heaped teaspoon or the coffee measure included per cup.
▶ Close the lid until it clicks audibly into place.
▶ Position the glass jug in the middle of the warming plate and ensure that the jug is positioned precisely underneath the filter holder.
▶ Press the button.
The button ⏻ now lights up.
The brewing process begins.
6.2.1. Drip stop function
The drip stop function enables you to serve the coffee that is ready while the brewing process is still in progress.
Carefully remove the glass jug from the warming plate. The flow of coffee from the filter into the jug will be interrupted; the coffee will now accumulate in the filter.
Place the glass jug under the filter again within 30 seconds. Otherwise there is a risk that the filter will overflow.
The strength of the coffee that is taken in the middle of the brewing process may differ from the strength of the coffee after the complete brewing process.
6.3. End of the brewing process
You can let the coffee stand for a while in the glass jug on the warming plate. However, please note that the flavour of the coffee will deteriorate after it has stood on the warming plate for a long period of time.
Do not leave an empty glass jug standing on the hot warming plate.

PLEASE NOTE
The appliance switches off automatically after 40 minutes.
6.4. Switching off the device
You can let the coffee stand for a while in the glass jug on the warming plate. However, please note that the flavour of the coffee will deteriorate after it has stood on the warming plate for a long period of time.
When the glass jug is empty, press the button to switch off the appliance.
The LED on the button goes out.
▶ Do not leave the empty glass jug standing on the hot warming plate.
Disconnect the plug from the socket if you do not want any electrical power to go to the appliance or if you do not plan to use it for a long time.
6.5. Cleaning and descaling
Allow the coffee machine to cool down before cleaning and disconnect it from the mains plug. Remove the glass jug and, if necessary, both filters from the appliance.
Only clean the outside of the coffee machine using a damp cloth and, if necessary, some mild washing-up liquid. In particular, remove any coffee stains from the warming plate.
▶ You can wash the glass jug in a dishwasher. If you wash the jug by hand, do not use any abrasive items or products that could damage the glass!
The filter insert and permanent filter can be cleaned by hand.
6.5.1. Descaling
The coffee machine has to be descaled regularly so that the useful life of the appliance is extended and the brewing process does not take longer than necessary. The time interval depends on the hardness of the water and the frequency with which the appliance is used. The machine should be descaled at the latest when the brewing process has become significantly longer. We recommend an environmentally friendly descaling process using vinegar:
▶ Measure out eight cups of water with two cups of vinegar.
▶ Add the solution to the water tank, close the lid of the filter holder and place the jug underneath.
▶ Allow the solution to run through the coffee machine, if necessary a number of times. Intensify the effect of cleaning by switching off the appliance for around 15 minutes after half of the solution has run through and then add the rest of
the solution.
▶ Rinse the glass jug and the filter holder thoroughly afterwards.
▶ Finally, fill the coffee machine with fresh water a number of times and run the machine.
If you want to use a commercial descaler (chemical product), observe the instructions provided by the manufacturer of the product.
Do not let chemical descaling products drip onto the casing or warming plate!
7. Disposal

Packaging
The product has been packaged to protect it from damage in transit.
Packaging is raw material and can be re-used or added to the recycling system.
natural_image
Symbol of a trash bin crossed out by two diagonal lines, with no text or labels present.Appliance
Old appliances should not be disposed of with the normal household rubbish.
In accordance with Directive 2012/19/EU, the appliance must be properly disposed of at the end of its service life.
This involves separating the materials in the appliance for the purpose
of recycling and avoiding any impact on the environment.
Take old appliances to a collection point for electrical scrap or a recycling centre.
Contact your local waste disposal company or your local authority for more information on this subject.
8. Technical data
Mains voltage 220-240 V \~ 50/60 Hz
Output
900
W
Filling capacity water tank ca. 1.2 l
(corresponds to approx. 8 cups/1 l of coffee)
Subject to technical modifications!
9. Conformity information

Medion AG hereby declares that the product MD 17024 conforms to the following European requirements:
• EMC Directive 2014/30/EU
• Low Voltage Directive 2014/35/EU
• Ecodesign Directive 2009/125/EC
• RoHS Directive 2011/65/EU
Full declarations of conformity are available at www.medion.com/conformity.
10. Legal notice
Copyright © 2016
Last revised: 20/05/2016
All rights reserved.
These operating instructions are protected by copyright.
Mechanical, electronic and any other forms of reproduction are prohibited without the written permission of the manufacturer.
Copyright is owned by the company:
Medion AG
Am Zehnthof 77
45307 Essen
Germany
These operating instructions can be reordered via the Service Hotline and are also available for download from the Service web page www.medionservice.de.
You can also scan the QR code above to download the instructions onto your mobile device from the service website.

11. General Warranty Conditions
11.1. General information
The warranty period is 24 months and begins on the day the product is purchased. The warranty covers all types of material and product damage that could occur during normal use.
Please keep your original proof of purchase in a safe place. The warranty provider reserves the right to refuse to confirm the status of the warranty or to carry out a repair under warranty if a valid proof of purchase cannot be produced.
If it is necessary to return your device for repair, please ensure that it is suitably packaged for transportation. Unless otherwise specified, you shall bear the costs for sending the device and the transport risk. The warranty provider does not assume any liability for additional materials sent with the product that do not belong to the original package contents supplied with the product.
Please enclose as much information as possible about the fault when sending the device to the warranty provider. In order to make a valid claim under warranty and before returning the device, please contact the Service Hotline operated by the warranty provider or the Service Portal. They will provide you with information on how to proceed further.
This warranty has no effect on your statutory warranty rights and is subject to the laws of the country in which the first purchase of the product was made by the end customer.
11.1.1. Scope
In the event of a fault on your product that is covered by this warranty, the warranty
provider guarantees to repair or replace the product. The decision about whether to repair or replace the device is taken by the warranty provider. Therefore, the warranty provider can at its own discretion decide to replace a device submitted for repair under warranty with a refurbished device of the same quality.
No warranty is provided for batteries or rechargeable batteries or for consumable materials i.e. parts which have to be replaced at regular intervals during the normal use of the product e.g. video projector lamps.
A pixel error (permanently coloured, light or dark point in an image) is not generally considered a fault. Please refer to the information provided in the manual for this product for the precise number of permissible defects in the image.
The warranty provider gives no warranty for burnt-in images on plasma or LCD devices that result from the improper use of the device. Please refer to the information provided in the manual for this product for precise instructions on operating your plasma or LCD device.
The warranty does not cover errors relating to the playback of data media that have been created in an incompatible format or as a result of using unsuitable software. If it is discovered during the repair that the fault concerned is not covered under warranty, the warranty provider reserves the right to invoice the customer for the costs already incurred in the form of a flat-rate handling charge, as well as to charge the customer for the materials and labour required for the repair after submitting a cost estimate. You will be informed in advance as the customer about these repair charges; you are responsible for accepting or rejecting the repair process.
11.1.2. Exclusions
Malfunctions and damage to the device caused by external influences, accidental damage, improper use, changes made to the product, modifications, upgrades, the use of third-party parts, neglect, viruses or software faults, improper transport, improper packaging or loss during the return of the product are not covered by the warranty issued by the warranty provider.
The warranty will be invalidated if the fault to the device is caused by maintenance or repair carried out by someone other than a service partner authorized by the warranty provider. The warranty will also be invalidated if labels or serial numbers on the device or a component of the device have been modified or made illegible.
11.1.3. Service Hotline
Before sending the device to the warranty provider, you must contact us via the Service Hotline or the Service Portal. This ensures that you receive further information on how to make a valid claim under warranty.
The use of the hotline may be subject to a charge.
The Service Hotline should under no circumstances be considered a substitute for user training for software and hardware or reading the manual, nor does it provide support for third-party products.
11.2. Special warranty conditions for repair on site or replacement on site
If there is an entitlement to on-site repair or replacement, the specific warranty terms and conditions for on-site repair or replacement shall apply to your product.
The following provisions must be ensured by you for carrying out repairs or replacements on site:
- Personnel from the warranty provider who arrive at your premises for the above-mentioned purpose must have unrestricted, safe and immediate access to the devices.
- Telecommunication facilities required by these personnel for the proper execution of your order, for testing and diagnostic purposes or for remedying faults must be provided by you at your own expense.
- You shall be personally responsible for restoring your own application software after completion of the service by the warranty provider.
- You shall be personally responsible for configuring and connecting any existing external devices after completion of the service by the warranty provider.
- The free cancellation period for repairs or replacements on site is at least 48 hours, thereafter we shall invoice you for any costs resulting from a late or missing cancellation.
12. Service Address

0333
3213106

01793
715716
(costs:
local)
Mo - Fr: 08:00 - 20:00
Sa - Su: 10:00 - 16:00

www.medion.co.uk
@ Please use the contact form at www.medion.com/contact