Axkid ONE 2 - Car seat COSATTO - Free user manual and instructions
Find the device manual for free Axkid ONE 2 COSATTO in PDF.

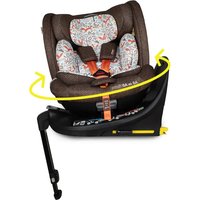
| Product type | Rear-facing car seat |
| Brand | Cosatto |
| Model | Axkid ONE 2 |
| Use | Rear-facing only |
| Approval | i-Size (EU Regulation No. 129) |
| Child's height | 61 to 125 cm |
| Maximum child weight | 23 kg |
| Installation | ISOFIX + support leg + anti-rebound bar |
| Safety | 5-point harness, ASIP (side protection), support leg audible indicator |
| Adjustments | Headrest, recline, seat depth |
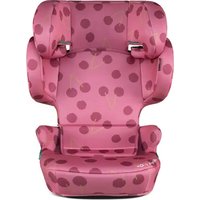
| Cover | Machine washable at 30°C (short cycle), do not tumble dry |
| Power | CR1632 battery for audible indicator |
| Warranty | 24 months from date of purchase |
| Manufacturer | Axkid |
| Spare parts | Original Axkid textile covers, CR1632 battery |
| Maintenance | Clean plastic parts with mild detergent and water; do not use solvents |
| Recycling | Recyclable according to local legislation; remove battery before recycling |
| Package contents | Seat, support leg, ASIP cushion, inserts (according to age) |
Frequently Asked Questions - Axkid ONE 2 COSATTO
User questions about Axkid ONE 2 COSATTO
0 question about this device. Answer the ones you know or ask your own.
Ask a new question about this device
Download the instructions for your Car seat in PDF format for free! Find your manual Axkid ONE 2 - COSATTO and take your electronic device back in hand. On this page are published all the documents necessary for the use of your device. Axkid ONE 2 by COSATTO.
USER MANUAL Axkid ONE 2 COSATTO
natural_image
Simple line drawing of a seatbelt icon (no text or symbols)UN regulation no. 129
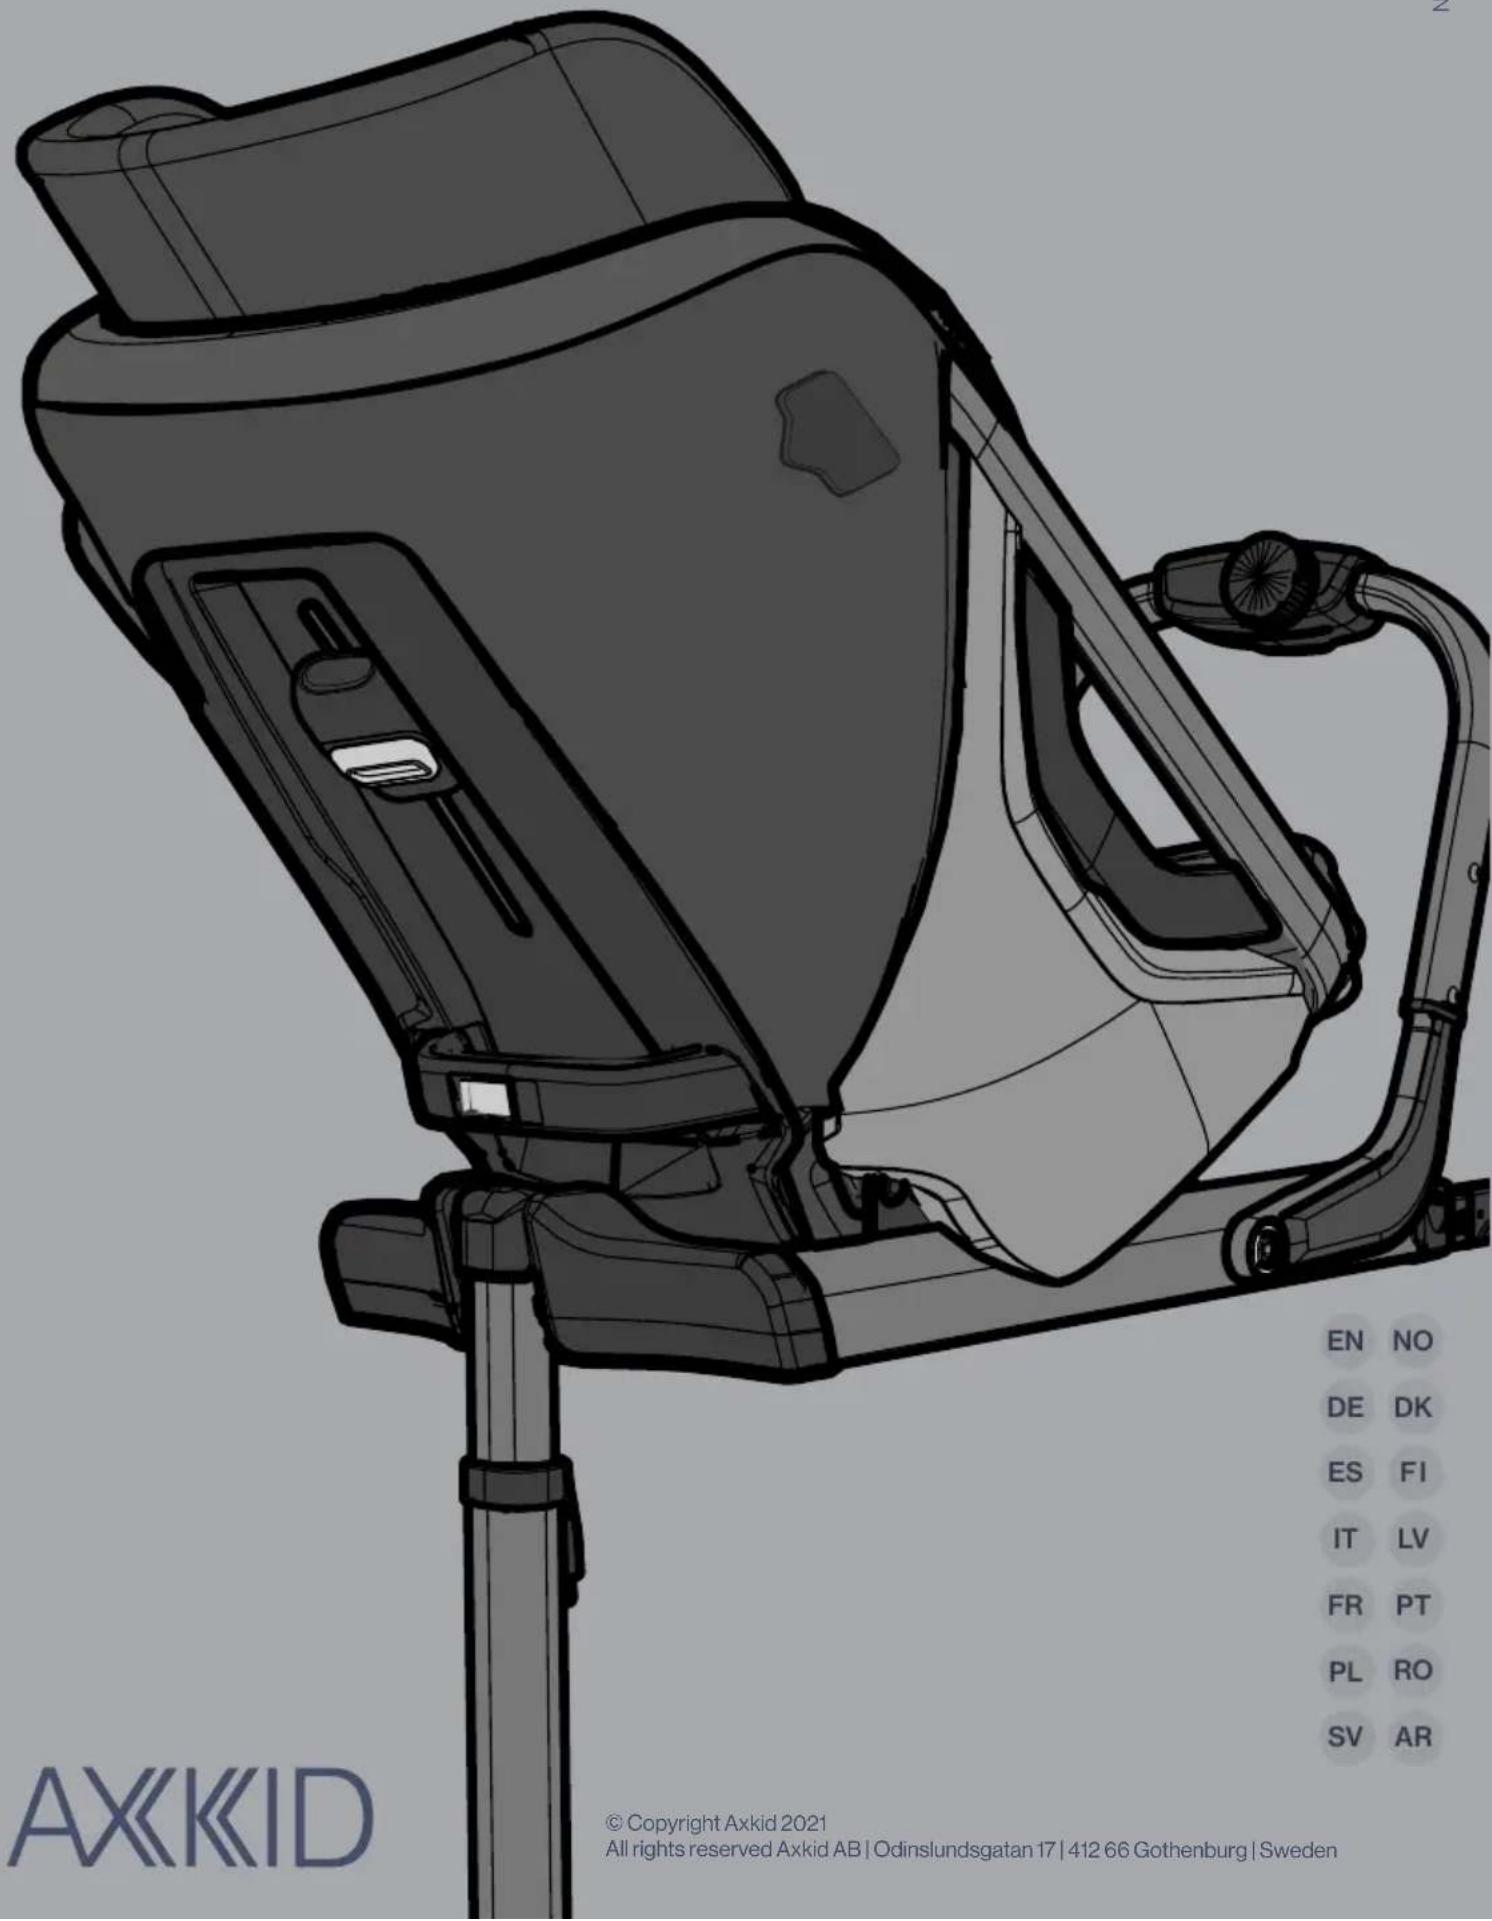
Instruction Manual
Axkid One+2 car seat 0-23kg,40-125cm
Axkid One 2 car seat 0-23kg,61-125cm
natural_image
Diagram of a car interior showing a car head and seat with rotational motion arrows, no text or symbols present.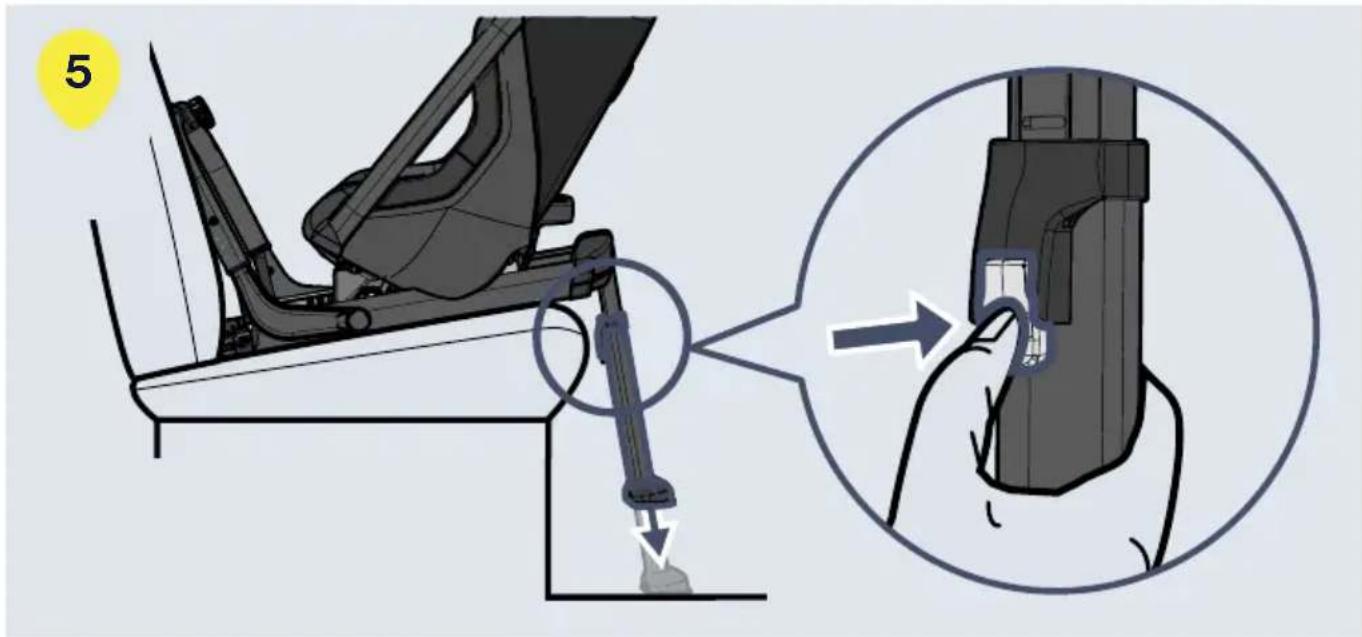
10
natural_image
Illustration of a person's arm holding a car interior panel (no text or symbols visible)

natural_image
Diagram showing a car seat assembly with directional arrows indicating movement or force (no text or symbols present)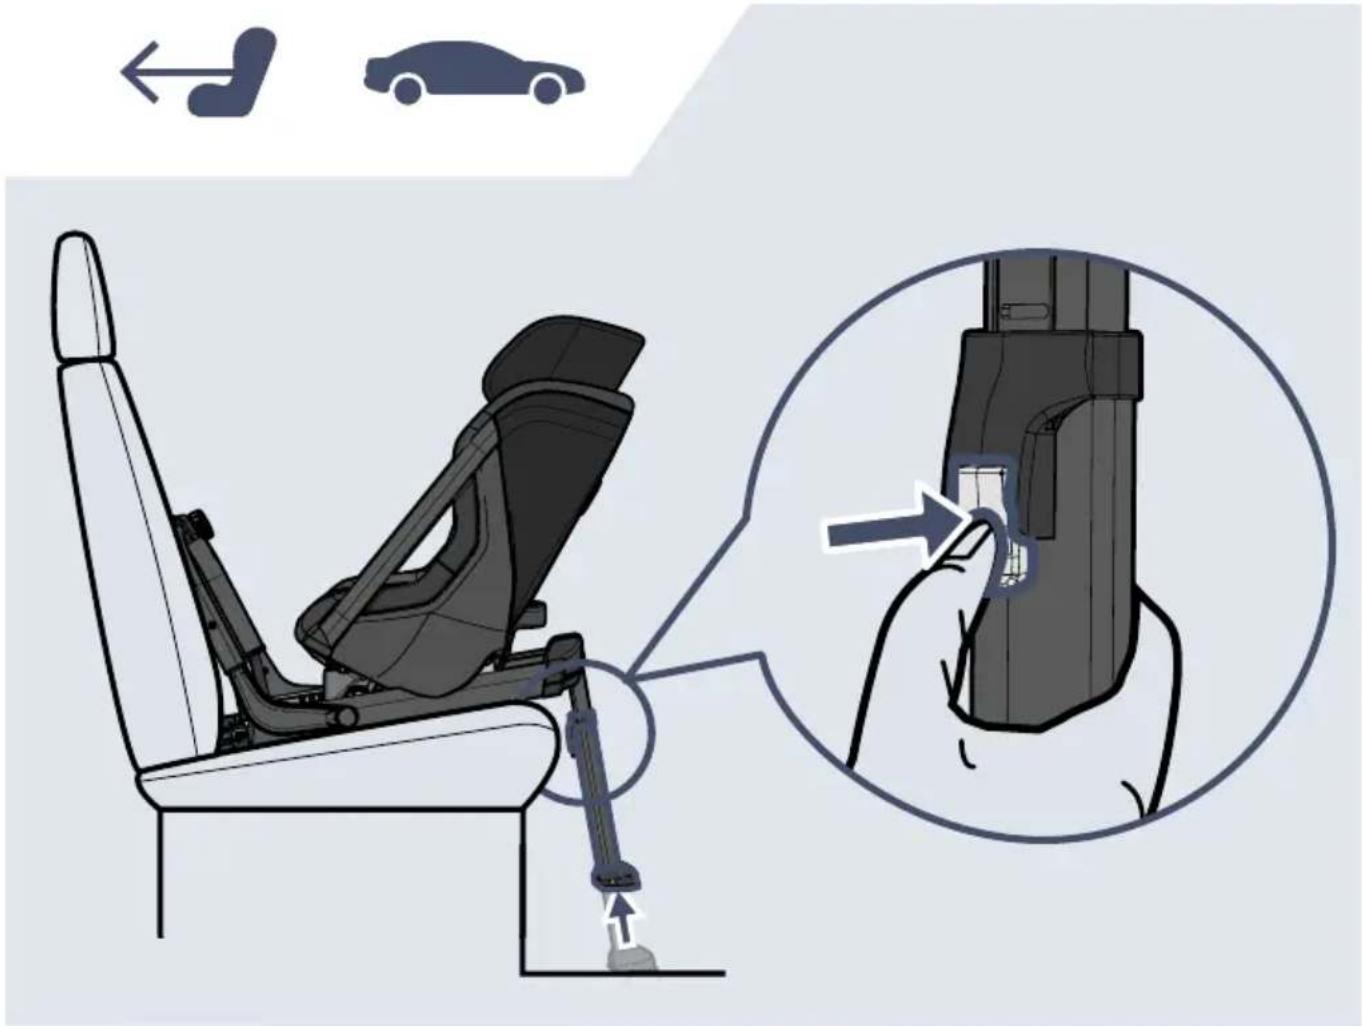
natural_image
Illustration of a person using a car steering wheel assembly, showing mechanical components and motion arrows (no text or symbols)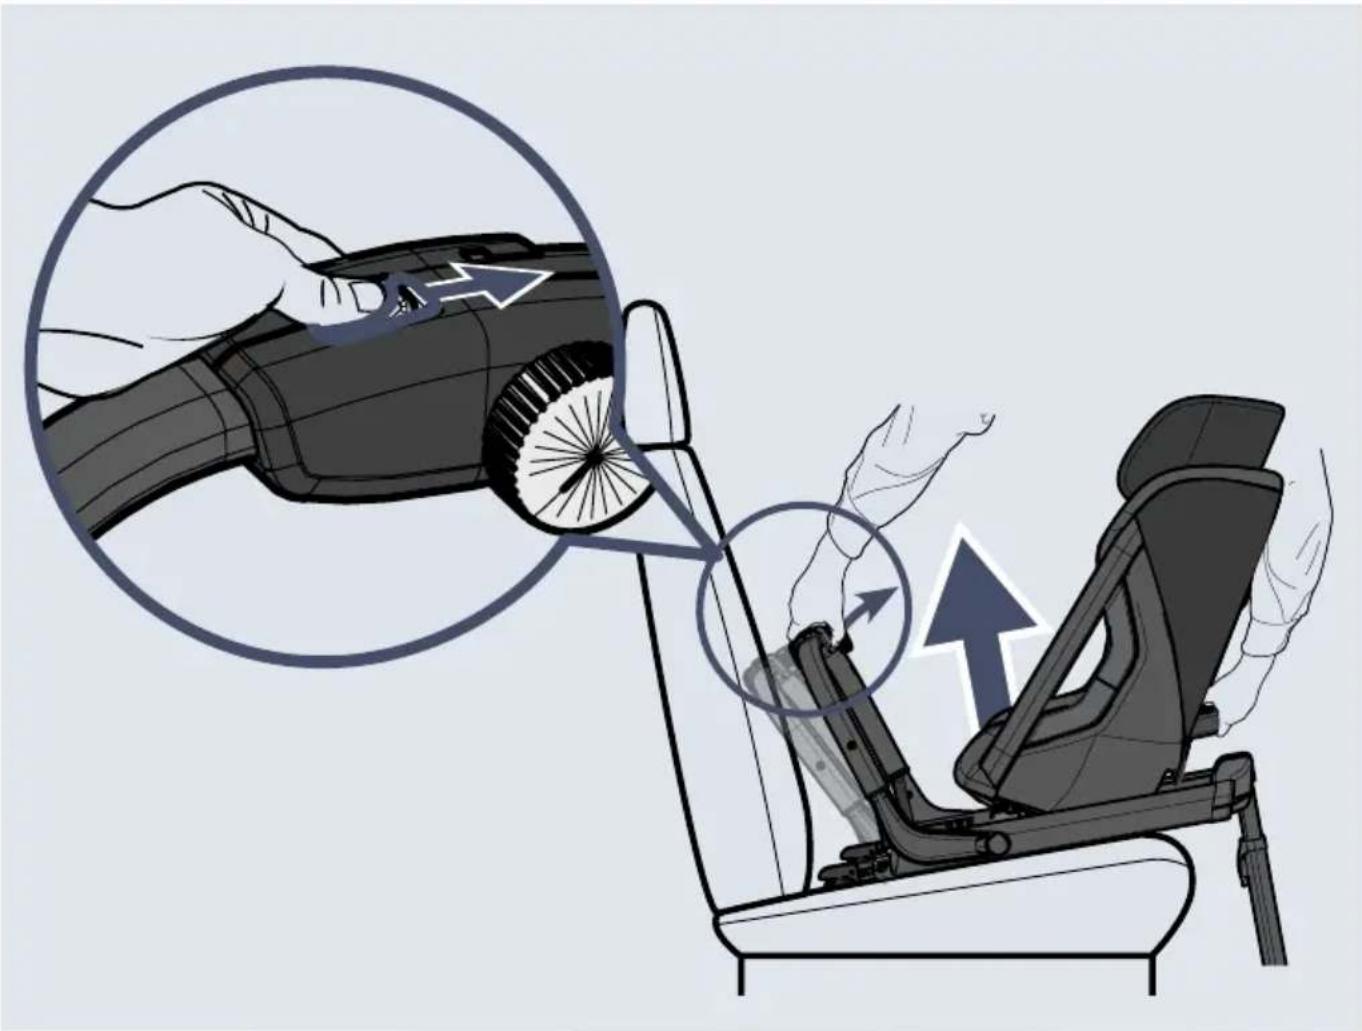
Sverige/Norge
Axkid AB
www.axkid.com
info@axkid.com
Tel: (+46) 511 760 620
UK/Ireland
Axkid Ltd
www.axkid.com
salesuk@axkid.com
Tel: (+46) 511 760 620
France
Axkid AB
www.axkid.com
info@axkid.com
Tel (+33) 06 07 01 87 73
Deutschland
Axkid GmbH
www.axkid.com
kundenservice@axkid.com
Tel: +(49) 60-99 84 89 05
España/Portugal
Independent Marketing
www.infobebe.es
info@infobebe.es
(+34) 952 561 000
Polsce
Junior Andrzej Kwapinski
Horbaczewskiego 4-6
54-130 Wroclaw Dh Astra Sklep
Poland Tel: +(48) 713 549 723
Czech Republic
Domecek pro deti
www.domecekprodeti.cz
info@domecekprodeti.cz
(+42) 0727 981 815
România
SC Baby Car seats
www.axkid.ro
maria@axkid.ro
(+40) 0747 35 47 47
New Zealand
Clicksafe
www.clicksafe.co.nz/axkid
axkid@clicksafe.co.nz
Tel: (+64) 212 504 215
Suomi
Lastentarvike
www.lastentarvike.fi
info@lastentarvike.fi
(+358) 09 852 05 100
Malaysia
SafenSound
www.safensound.com.my
may@safensound.com.my
(+60) 358 70 22 84
Greece
Serbia
LETO shop
www.letoshop.gr
christos@letoship.gr
(+30) 211 102 67 30
Eesti
GreenHansa OÜ
www.beebipood.ee
riho@beebipood.ee
(+372) 5300 8000
Latvia
Muki
www.muki.lv
jurgis@muki.lv
(+371) 292 828 98
Lietuva
Kotryna Group
www.kotrynagroup.com
kotryna@kotryna.lt
(+370) 521 322 54
South Africa
Quality Imports SA & #Carseatfullstop
www.qualityimportssa.co.za
qualityimportssa@gmail.com
(+27) 11 789 7119
Ísland
Leiftur
www.leiftur.is
kristmann@leiftur.is
(+354) 821 25 37
EN 12-21
DE 22-31
ES 32-41
IT 42-51
FR 52-61
PL 62-71
SV 72-81
NO 82-91
DK 92-101
FI 102-111
LV 112-121
PT 122-131
RO 132-141
AR 142-151
Thank you for choosing Axkid One
Read this instruction manual before installing Axkid One car seat in your vehicle. For more information and installation videos visit www.axkid.com.
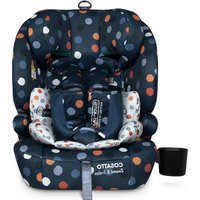
Axkid One 2 car seat is a rear-facing car seat approved for children with a height between 61-125 cm or with a maximum weight of 23 kg. Axkid One+ 2 car seat is a rear-facing car seat approved for children with a height between 40-125 cm or with a maximum weight of 23 kg.
This is an i-Size Enhanced Child Restraint System. It is approved according to UN Regulation No. 129, for use in, i-Size compatible vehicle seating positions as indicated by vehicle manufacturers in the vehicle user's manual. If in doubt, consult either the Enhanced Child Restraint System manufacturer (www.axkid.com) or the retailer.
Important information
To maximize your child's safety, it is important that you keep following in mind:
- Always follow the instructions in this manual. An incorrect installation may seriously affect the safety for your child. If in doubt, contact your retailer who can demonstrate a correct installation.
- Keep this instruction manual for future reference. If manual is lost, you can find it online at www.axkid.com
- Do not use Axkid One car seat in a seating position where an active frontal airbag is fitted. If you still wish to install Axkid One car seat in this location the airbag must be switched off according to the vehicle manufacturers instructions.
- Should you have an accident, no matter how small, your car seat should always be replaced. It may have damage that is nonvisual and could seriously affect the safety of your child. For this reason, Axkid does not recommend purchasing secondhand car seats.
- If Axkid One car seat has been exposed to direct sunlight, make sure the car seat is not too hot before installing your child.
- Never leave your child unattended in the vehicle.
- Ensure that any luggage or loose objects are secured in your vehicle as they may cause injuries to passengers in the event of an accident.
- Ensure that Axkid One car seat is installed in a way where no parts become trapped by movable seats, car doors, etc.
- Axkid One car seat may only be installed rear-facing.
- Always make sure that the harness is adjusted to correctly fit your child's body. The harness is adjusted by moving the head support.
- Make sure that the child's back is pushed against the car seat when restraining your child with the harness.
- Always make sure that the harness is firmly tightened against your child and that the buckle is completely locked, you should not be able to pinch the straps.
• Make sure there is no twist in the harness. - Always make sure the support-leg is in its correct position and have contact with the vehicle floor. Check that the indicator on top of the support-leg is green and that you don't hear any beeping sound from the support-leg foot.
- Do not attempt to disassemble nor modify any part of Axkid One car seat. The warranty and the safety performance of Axkid One car seat could be affected if doing so.
- Never use Axkid One car seat without the seat textile cover. The seat textile cover is a safety feature and may only be replaced with an Axkid original seat textile cover.
- Read the vehicle handbook to find which seating positions is suitable for this seat.
- Axkid recommends to always use a seat protection to protect your vehicle seat from scratches and dirt.
- If any doubts, contact the retailer where the car seat was purchased or contact info@axkid.com
Table of content
Parts 14
Allowed and disallowed positioning of Axkid One car seat 16
Installing Axkid One car seat in the vehicle 17
Restraining your child in Axkid One car seat 18
Seat adjustments 19
Adjusting Axkid One car seat 19
Removing Axkid One car seat from the vehicle 20
Care and maintenance 20
Warranty 21
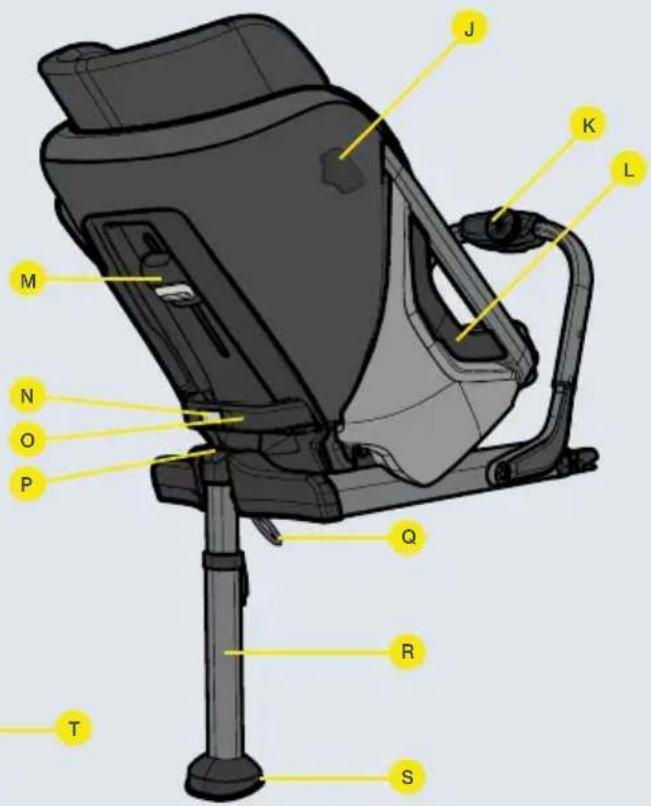
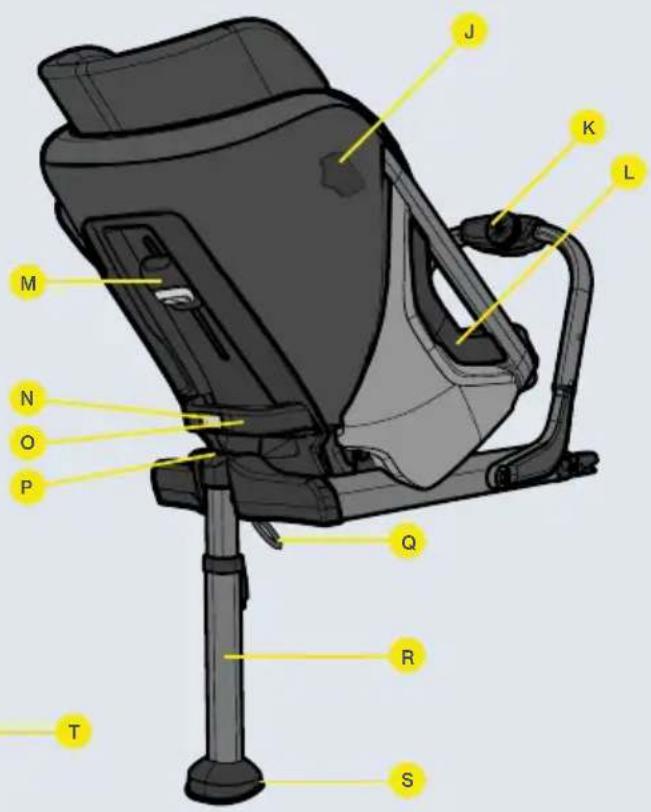
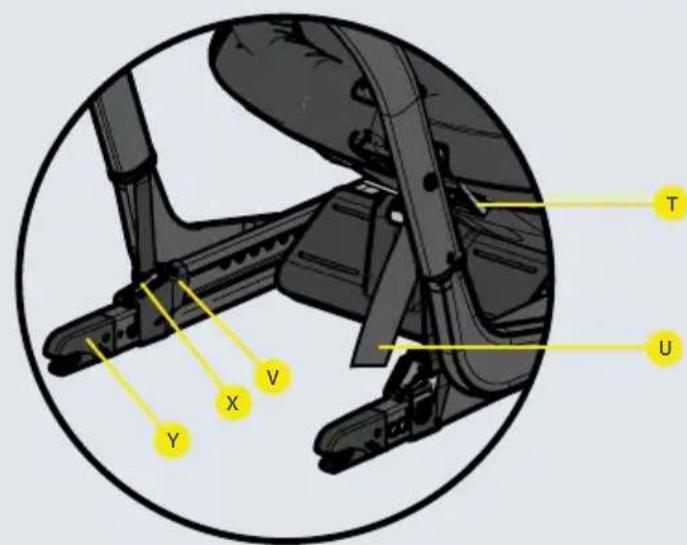
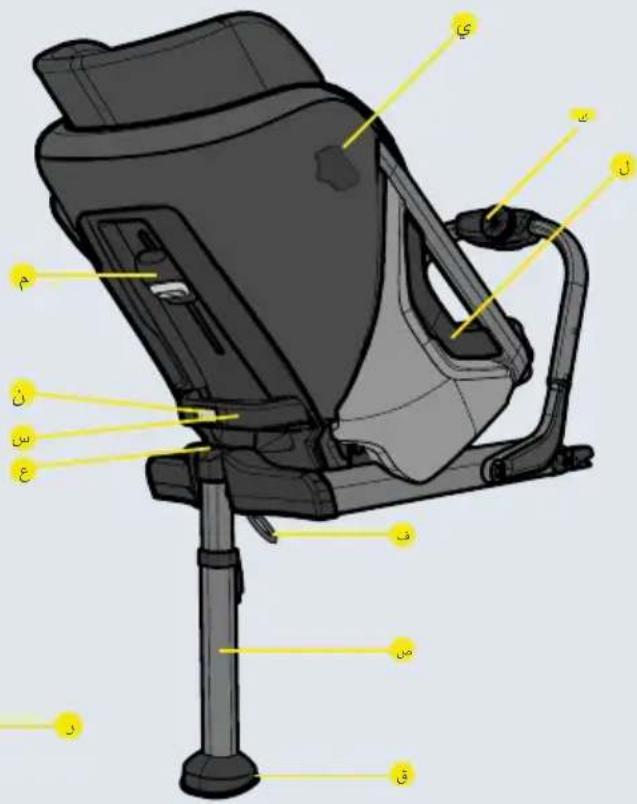
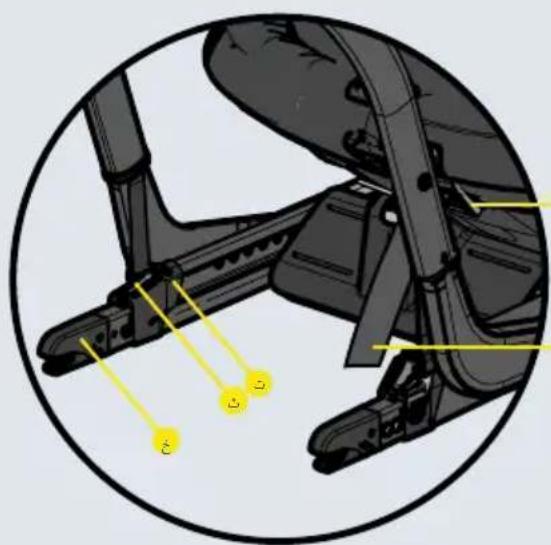
Parts
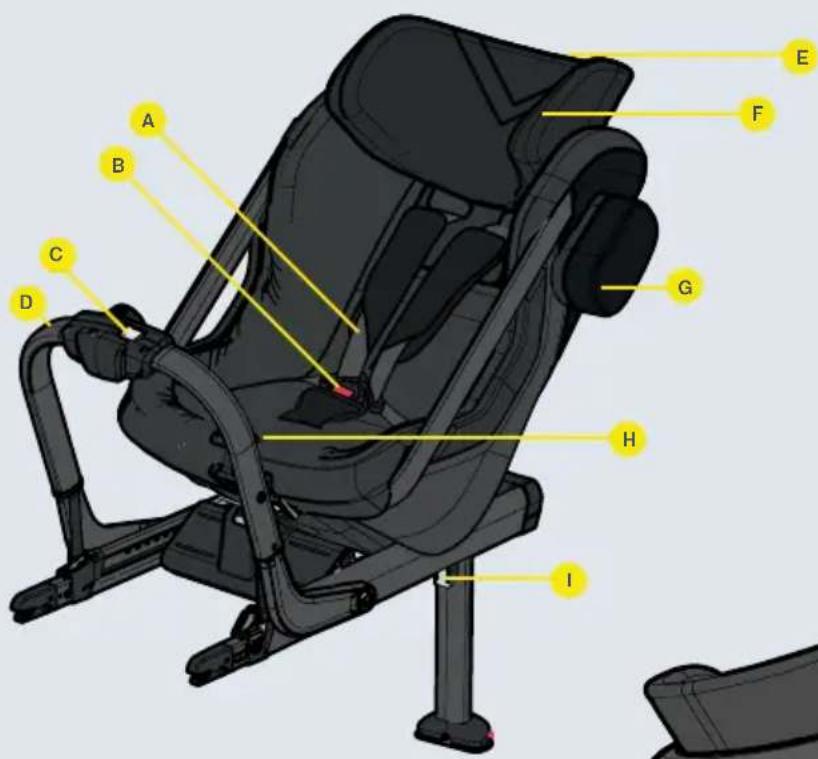


| Shoulder straps (A) | Headrest adjustment buttons (M) |
| Buckle release button (B) | Legroom adjustment button (N) |
| Front brace release button (C) | Back handle (O) |
| Front brace (D) | Support-leg position indicator (P) |
| Headrest (E) | Support-leg release strap (Q) |
| Eye level indicator (F) | Support-leg (R) |
| ASIP pad (G) | Sound indicator (S) |
| Recline position knob (H) | Harness release button (T) |
| Support-leg button (I) | Harness tension strap (U) |
| ASIP connector (J) | ISOFIX locking indicators (V) |
| Front brace knob (K) | ISOFIX buttons (X) |
| Side cover (L) | ISOFIX connectors (Y) |
Allowed and disallowed positioning of Axkid One car seat
Axkid One car seat can only be installed rear-facing using ISOFIX. It is approved for use in all i-Size approved seating positions but may also fit in other non i-Size-approved ISOFIX seating positions. Check your vehicle instruction manual to find suitable seating positions and check the vehicle list on www.axkid.com
| Front passenger seat with ISOFIX (no active airbag) YES/NO* | |
| Front passenger seat with ISOFIX (active airbag) NO | |
| Rear passenger seat with ISOFIX YES | |
| Side and rear facing seats with ISOFIX NO | |
| Seats without ISOFIX NO |
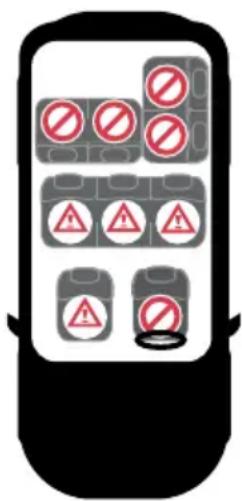
IMPORTANT: If you wish to install your Axkid One car seat in a location where a frontal airbag is fitted, the airbag must be disconnected according to your vehicle manufacturer instruction. Note that some vehicles require an authorized service center to disconnect the airbag.
* The General Regulation of Traffic in Spain, in its article 117, establishes the prohibition of driving with children of stature equal to or less than 135 centimeters located in the front seats of the vehicle, without exceptions.

Never install a child restraint in a passenger seat where an active airbag is fitted.

Installing Axkid One car seat in the vehicle
1
2
3
4
5
6
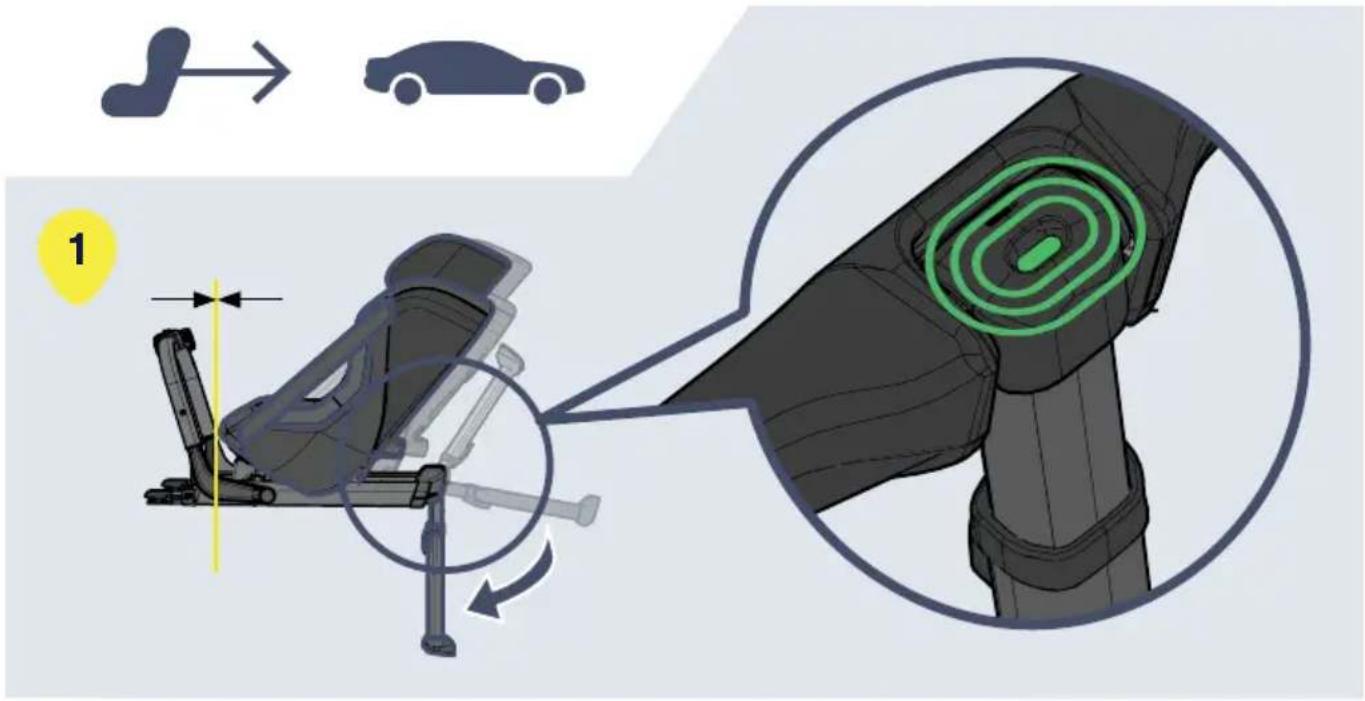
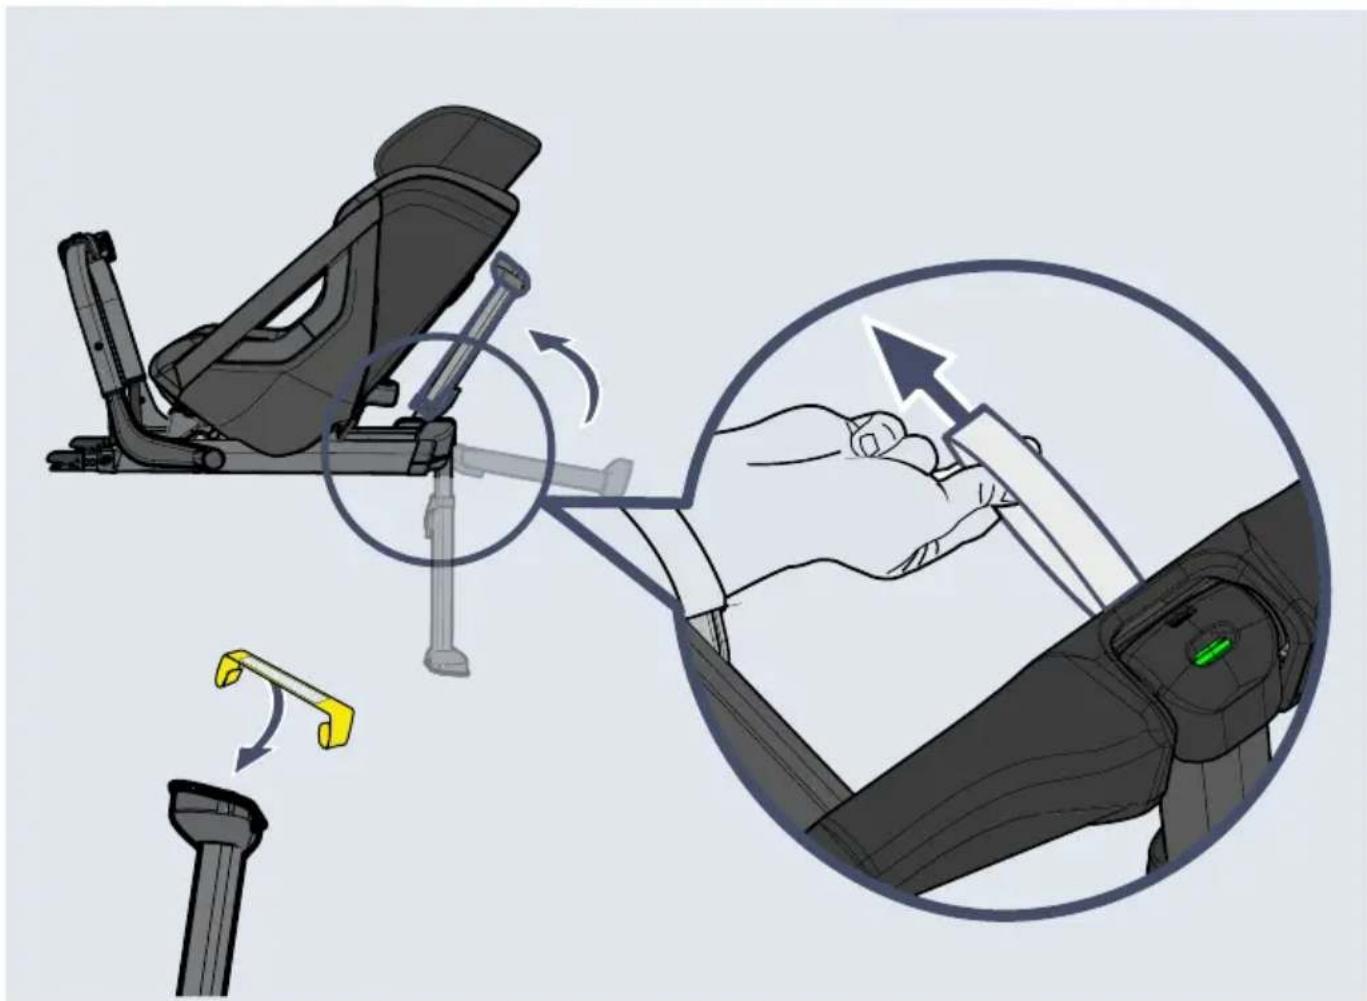
Before installing Axkid One car seat in your vehicle, minimize its size by releasing the legroom adjustment button (N) and slide the seat towards the front brace (D). Fold down the support-leg (R) until a click can be heard and the support-leg position indicator (P) turns green.
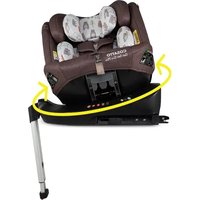
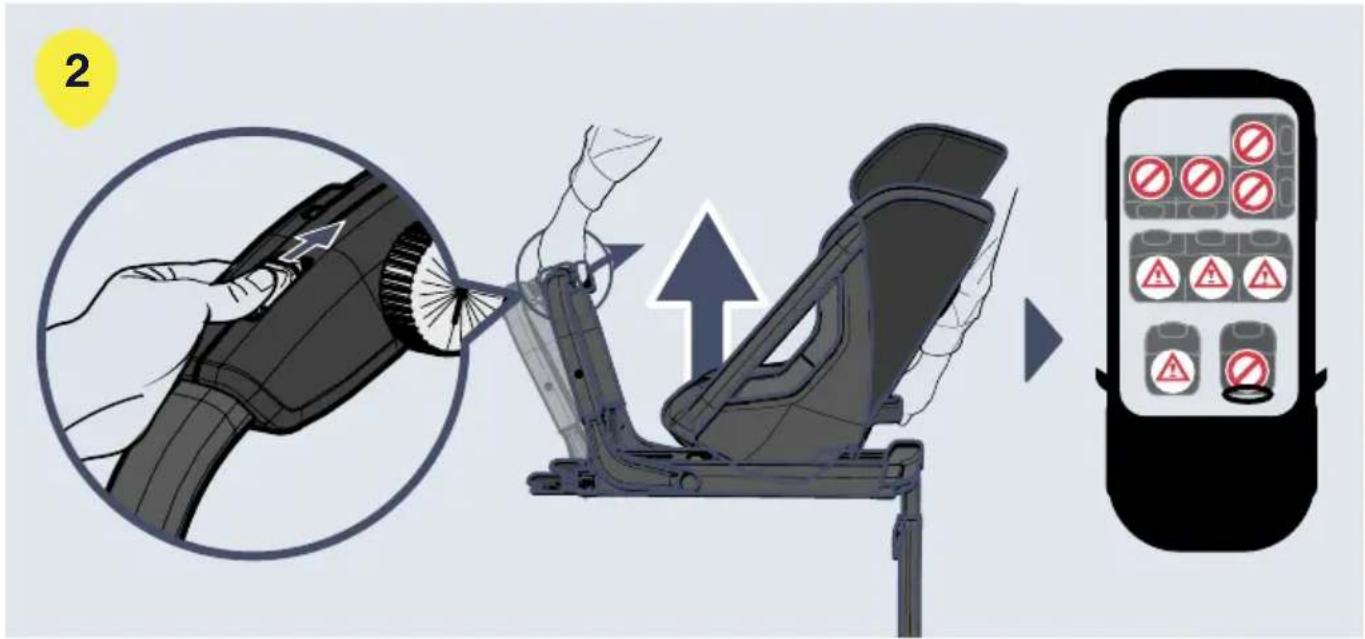
Release the front brace release button (C) and fold the front brace (D) towards the seat. Keep holding the front brace (D) with one hand and grab the back handle (O) with the other hand and lift the Axkid One car seat into your vehicle with the front brace (D) first and then turn it to a rear-facing position.
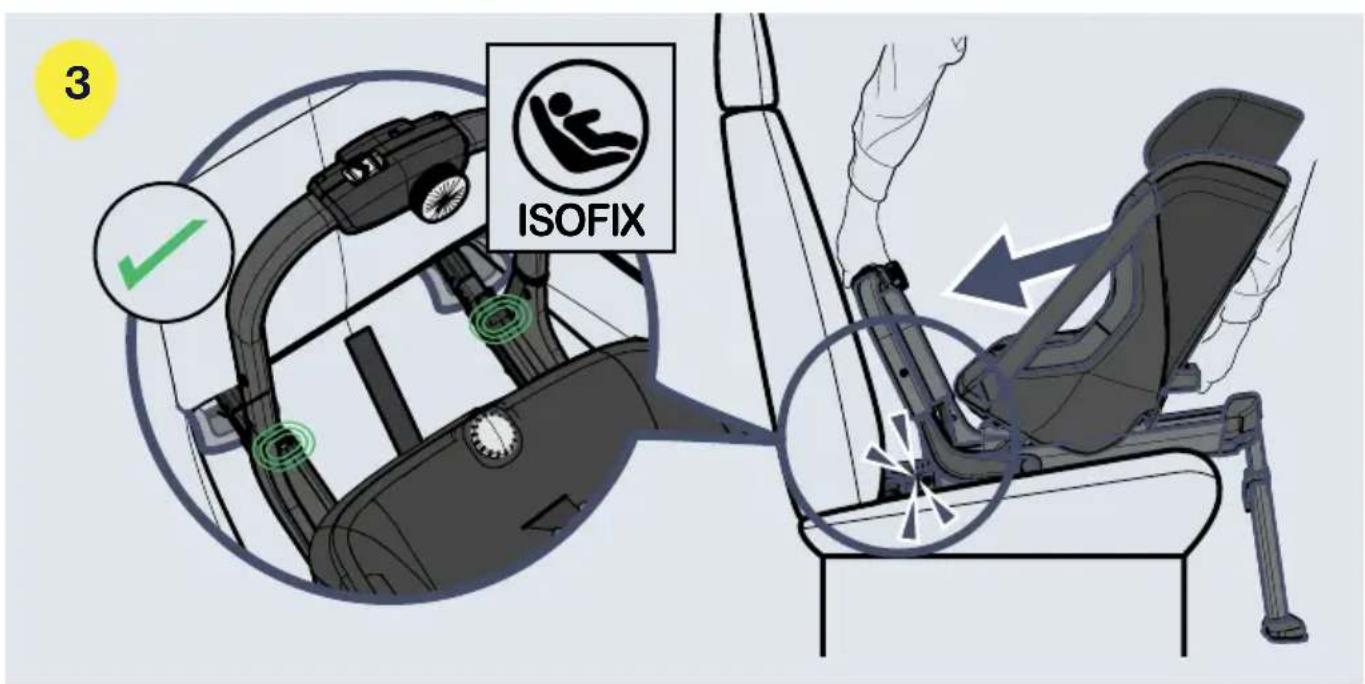
Push the ISOFIX connectors (Y) into the ISOFIX connection points in the vehicle until you hear a click and both ISOFIX locking indicators (V) turn green.
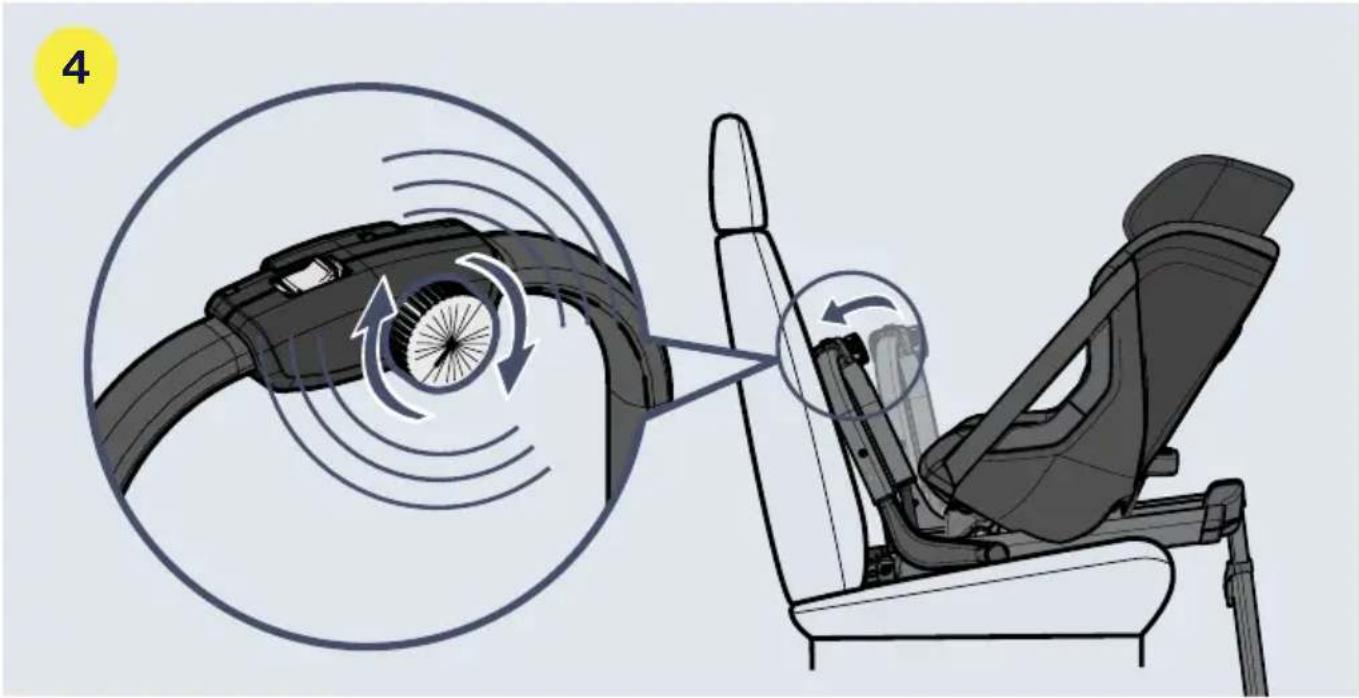
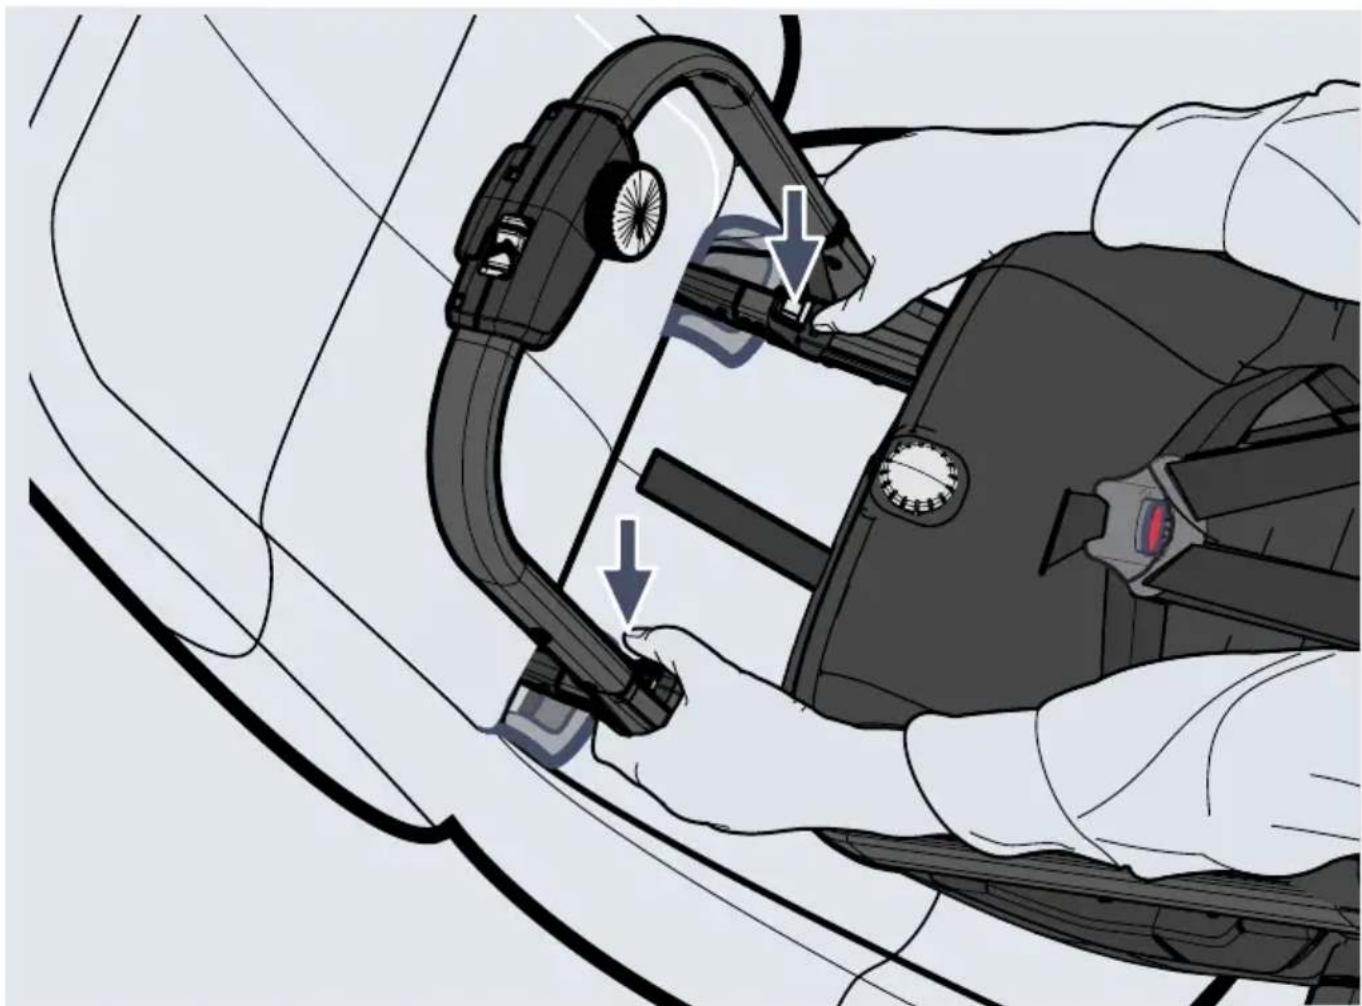
Let go of the front brace (D) which will start tensioning itself against the vehicle seat. When it stops, turn the front brace knob (K) clockwise until you feel and hear a click, the front brace (D) should now be firmly pressed against the vehicle seat. The front brace knob (K) has a built-in torque limiter and the click indicates that the front brace (D) is tightened correctly and cannot be tightened any more.
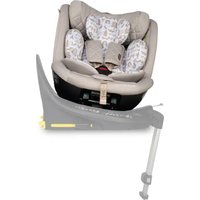
Push the support-leg button (I) and pull the support-leg (R) downwards until it is in contact with the vehicle floor. Let go of the support-leg button (I) and lift the car seat upwards to further extend the support-leg (R) until you hear a click. The support-leg (R) should now be locked and firmly pressed against the vehicle floor. Note: The Axkid One car seat is equipped with a beeping sound indicator (S) that will keep beeping until the support-leg (R) is firmly pressed against the floor, indicating a correct installation.
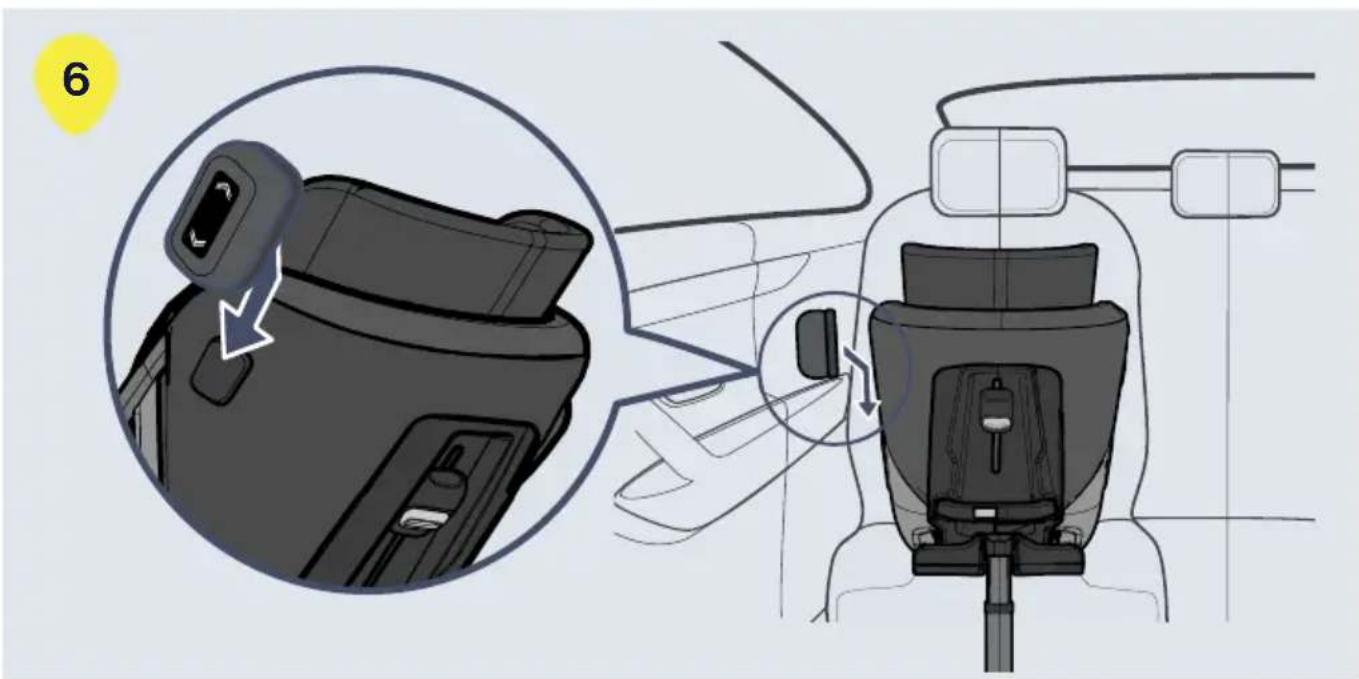
Push the ASIP pad (G) into the slots on the ASIP connector (J) and slide downwards, the ASIP pad (G) will click into place. If there is a plastic cover on the ASIP connector (J), remove it and place it on the ASIP connector (J) on the opposite side of the seat before fitting the ASIP pad (G). Make sure the ASIP pad (G) is attached on the side of Axkid One car seat that is closest to the vehicle door.
Restraining your child in Axkid One car seat
Before restraining your child in the Axkid One car seat, make sure you have the correct insert installed in the seat. Axkid One is designed to grow with your child and to ensure a comfortable and safe fit for all children.
Axkid recommends using the relevant insert until it is too tight for your child, but to a minimum length according to table below (note that the age is just an indication):
| Age Height | |||
| Infant0-6 month(Axkid One + only) | 0–60 cm | 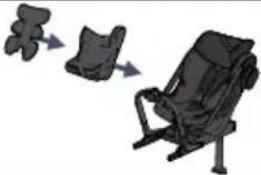 | |
| Toddler0-3 years | 61–105 cm | 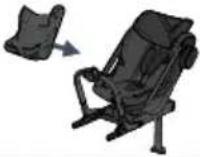 | |
| Child3-7 years | 106–125 cm | 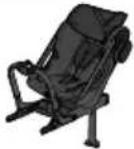 | |

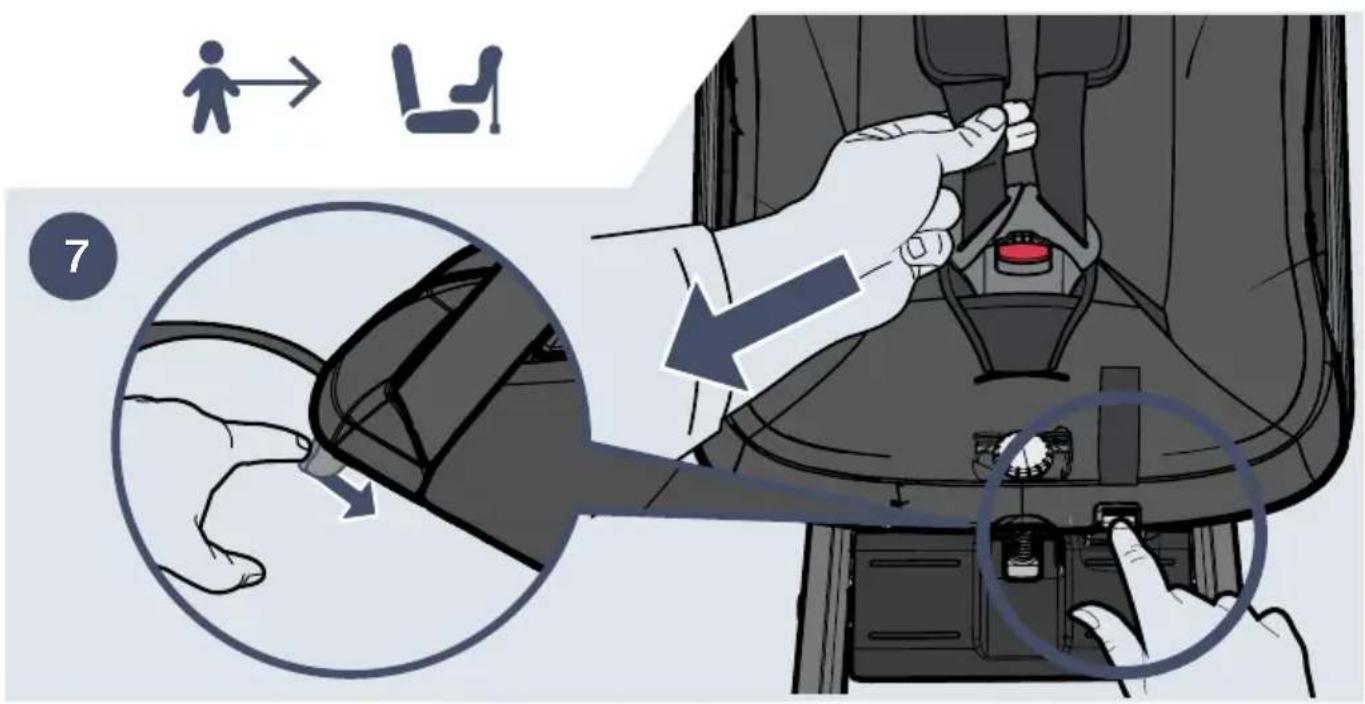
Loosen the harness by pressing the harness release button (T) and pull out both shoulder straps (A) at the same time. Avoid pulling only one strap at the time since it may cause the shoulder straps (A) to become uneven.

Unlock the buckle by pressing the buckle release button (B) and place the straps outside of the seat.

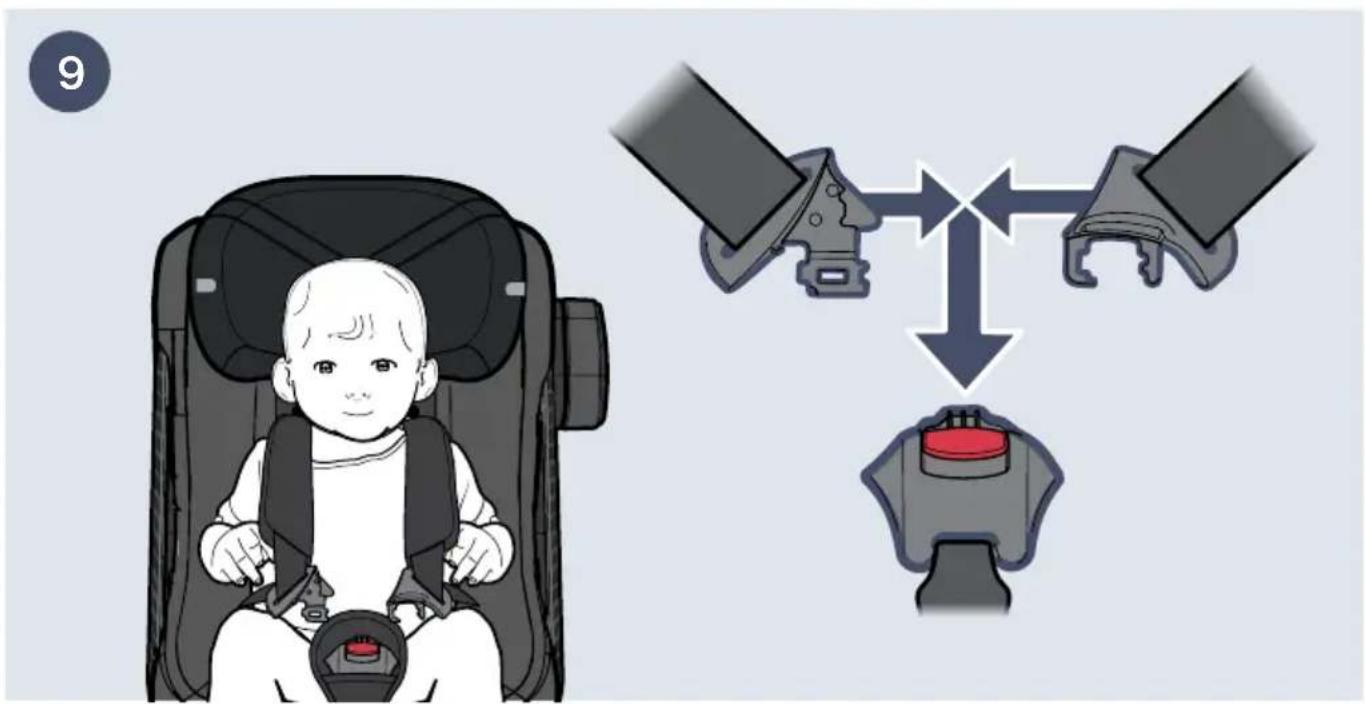
Place your child in the seat and place the shoulder straps (A) over your child's shoulder. Lock the harness by first positioning the parts of the buckle that is attached to the shoulder straps (A) together and then push them into the buckle until you hear a click.

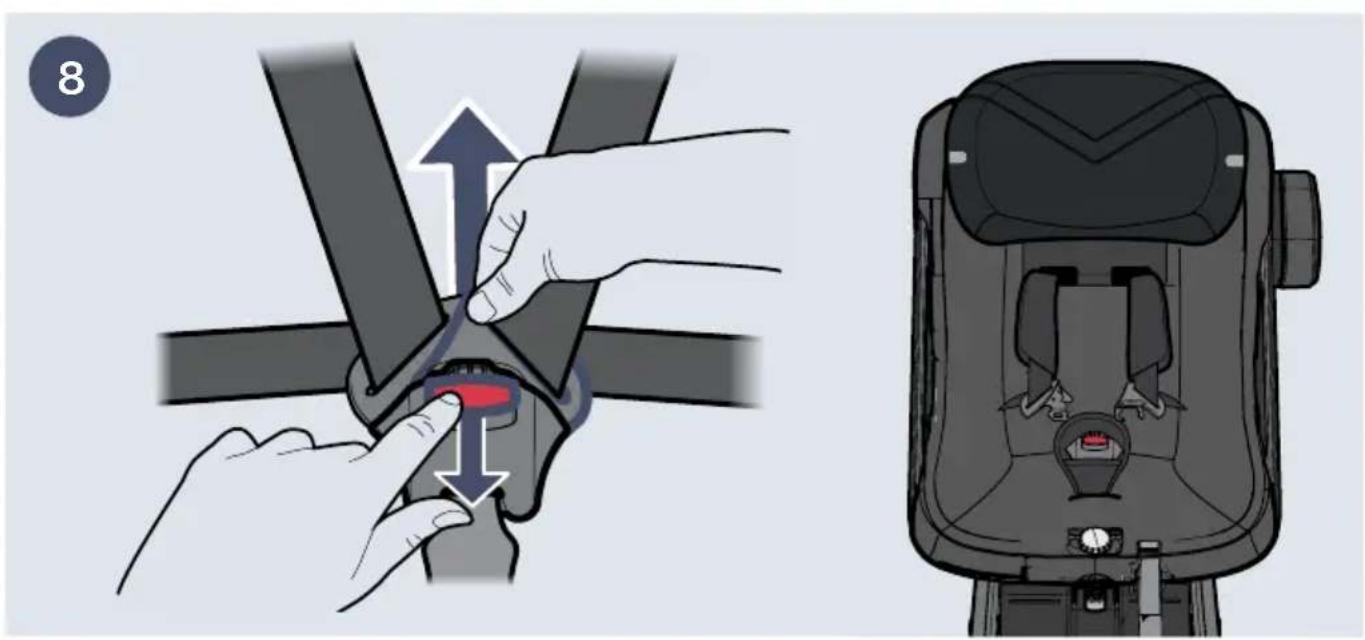
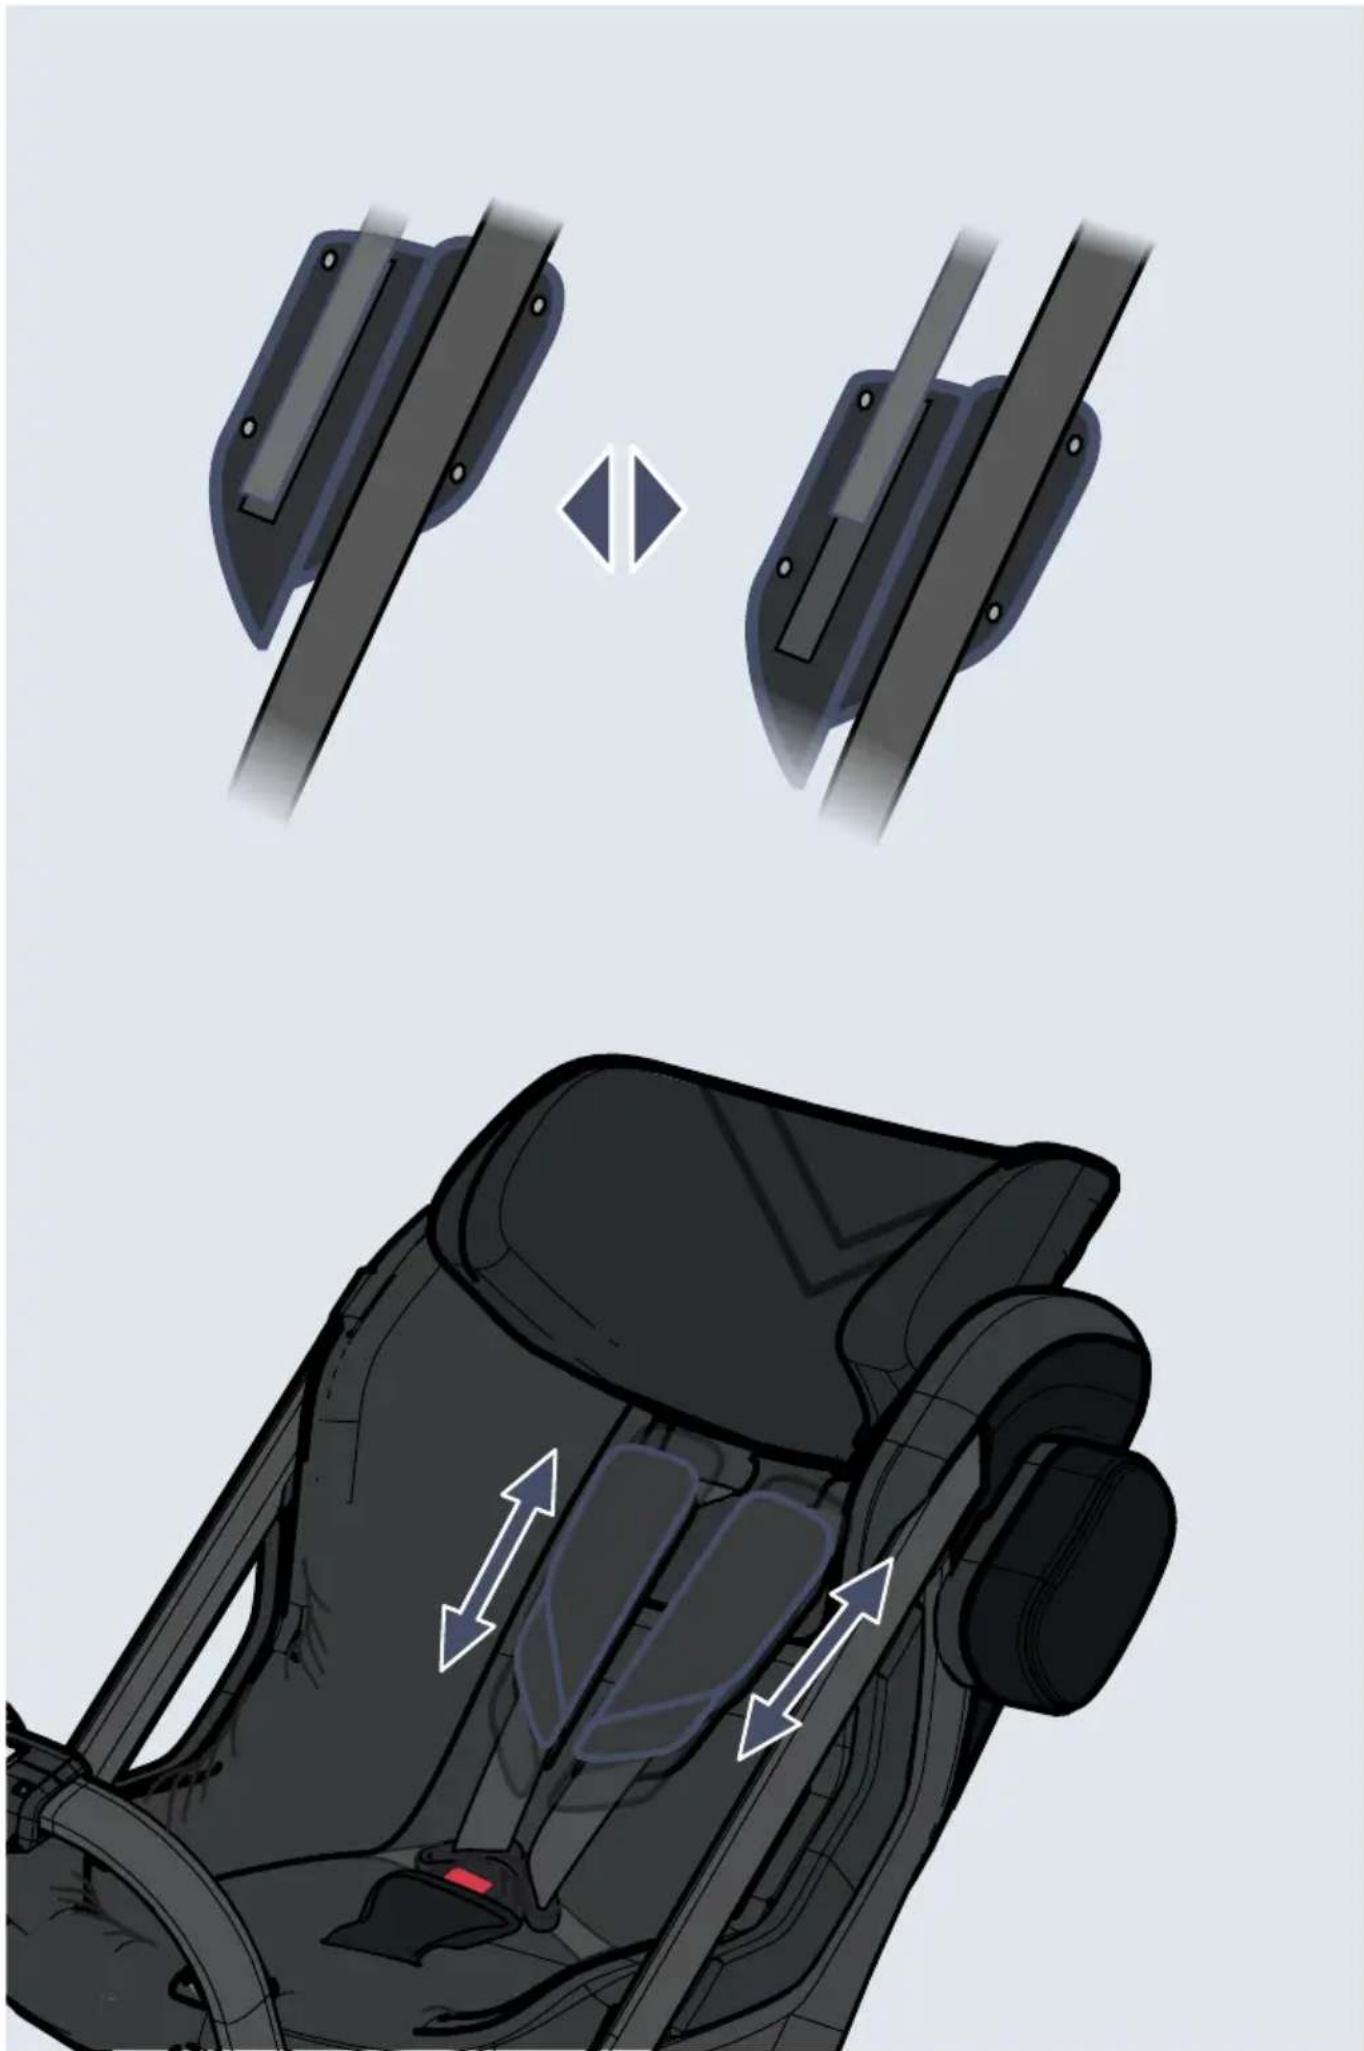
Adjust the headrest (E) until the eye level indicators (F) is in line with your child's eyes by pushing both headrest adjustment buttons (M) and slide it upwards or downwards. Note: the eye level indicators (F) shall not be used when using the infant insert (Axkid One + only). When using Axkid One + for infants, always make sure that the headrest is in the lowest position.

Check that the shoulder straps (A) is going through the seat straight from your child's shoulders or maximum 1 cm above. You might need to adjust the headrest (E) again, even if it makes the eye level indicator get out of line with your child's eyes. Now pull on the shoulder straps (A) to tighten the harness over your child's hips. While keeping tension in the shoulder straps (A), pull the harness tension strap (U) until the harness is tightened enough, you should not be able to fit more than one finger between the shoulder straps (A) and your child's shoulders.
Seat adjustments
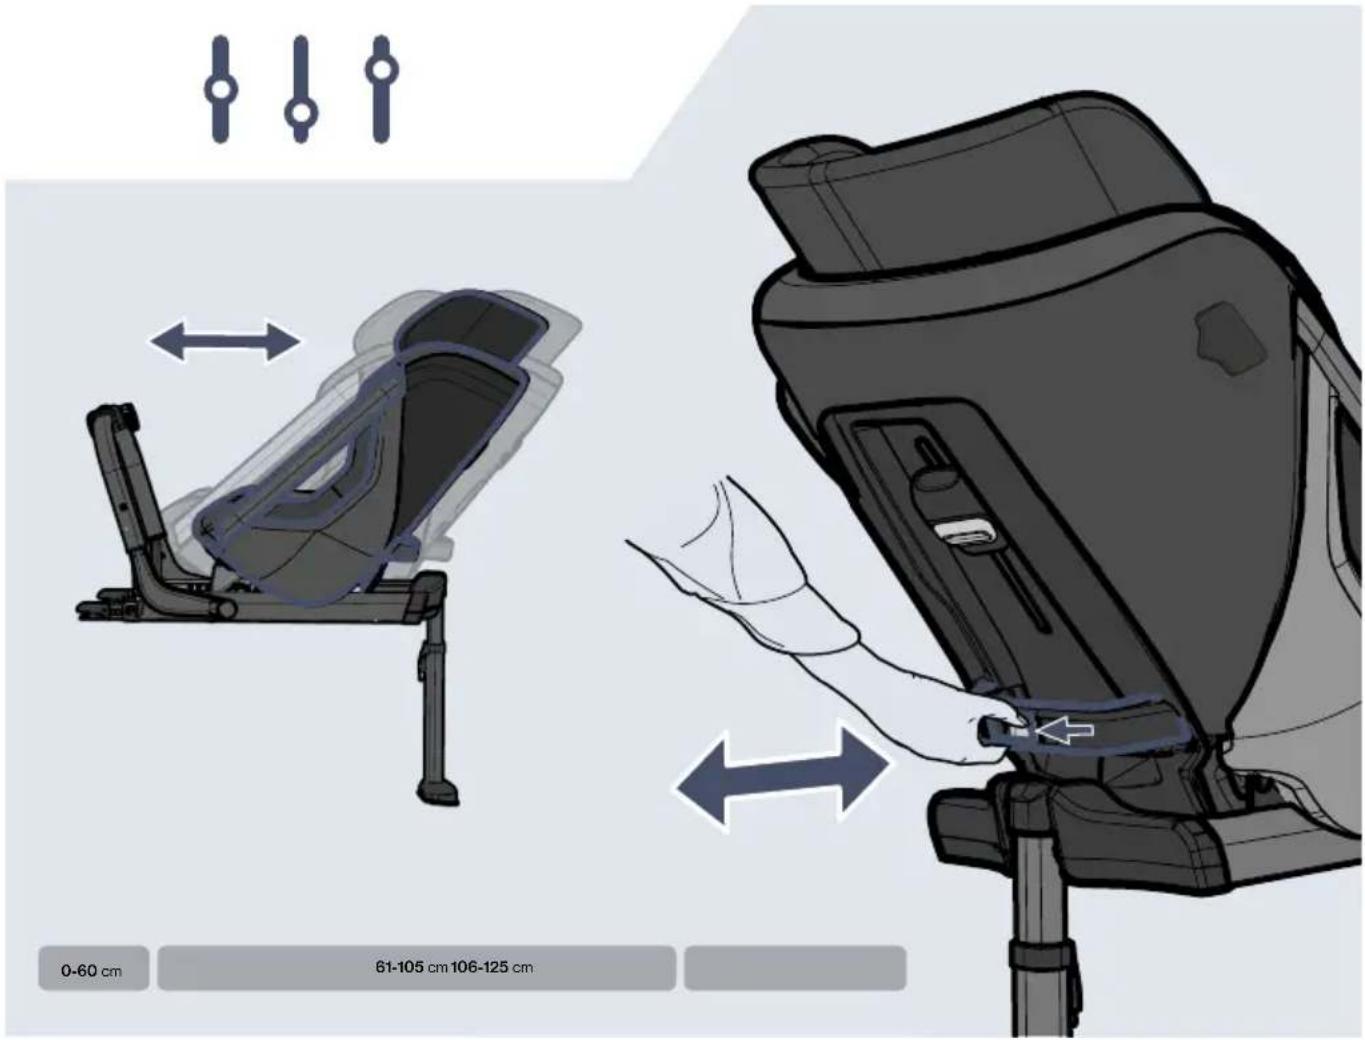
After the Axkid One car seat has been installed in your vehicle you can easily adjust both the legroom and the recline position for your child. This can also be done while your child is restrained in the car seat.
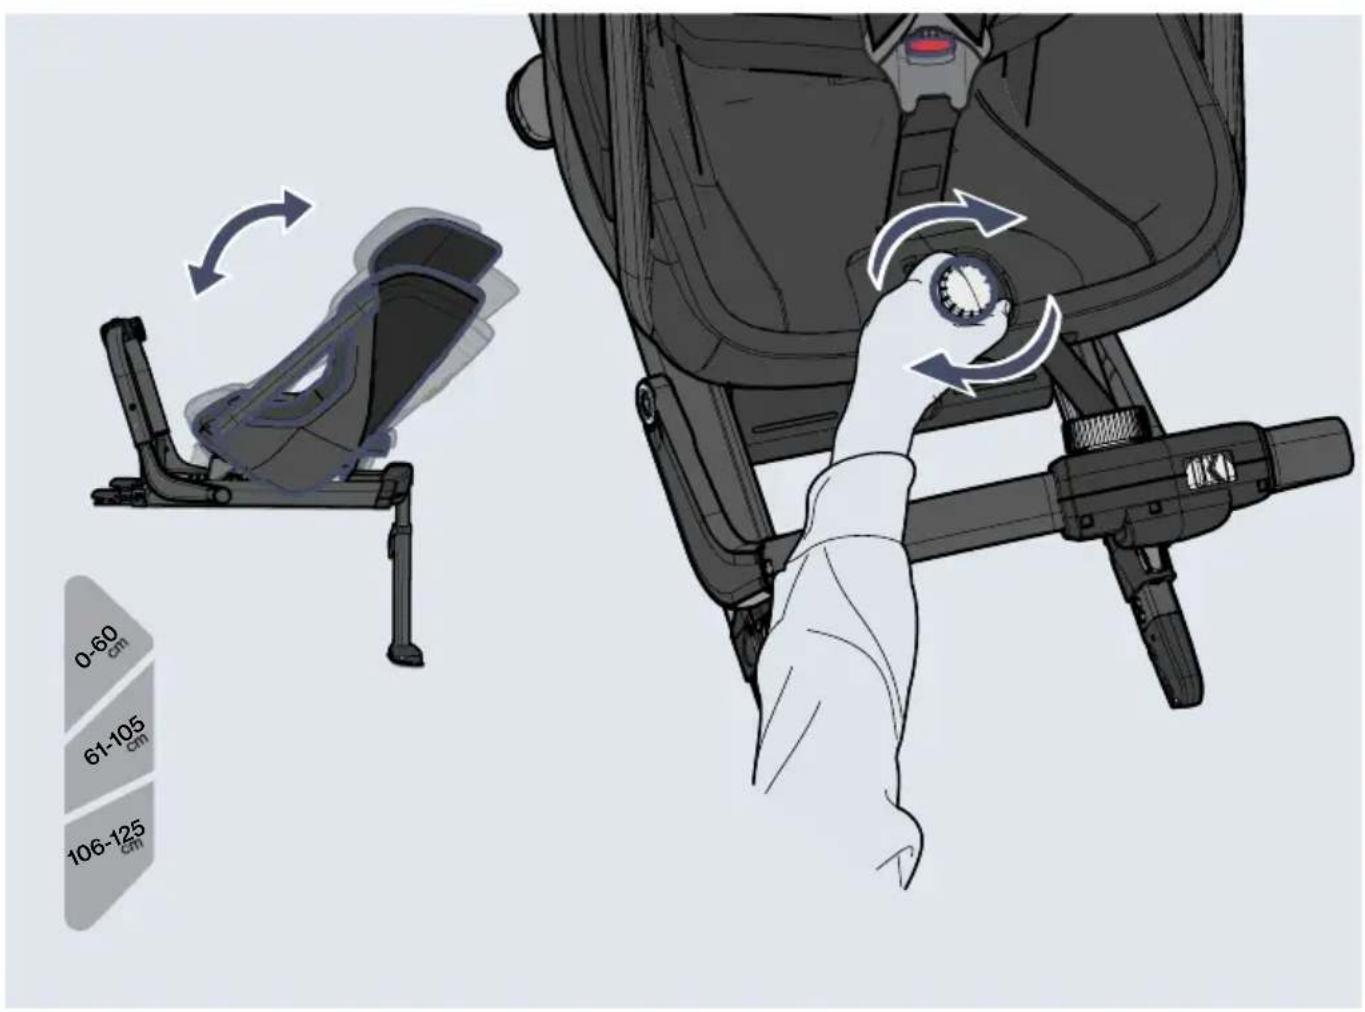
To ensure a good fit in all cars and give the best protection for your child, Axkid strongly recommends that you use the guided positions marked on the side of the car seat. As your child grows it is important to adjust the recline to a more upright position to give the best possible protection for your child's neck in the case of an accident. The size indication is based on your child's length. Make sure both arrows points at the correct zone.
| Age Adjustment | ||
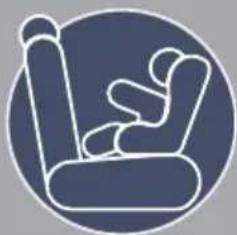
| Infant0-6 month(Axkid One + only) | Maximum reclineMinimum legroom | 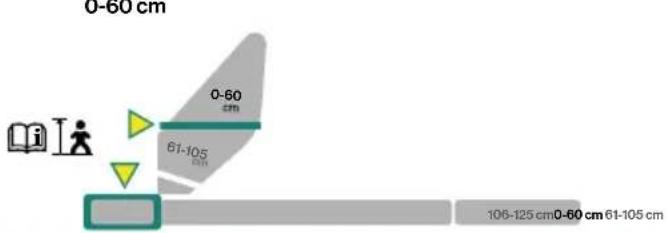 |
| Toddler0-3 years | All recline positionsSeveral legroom positions | 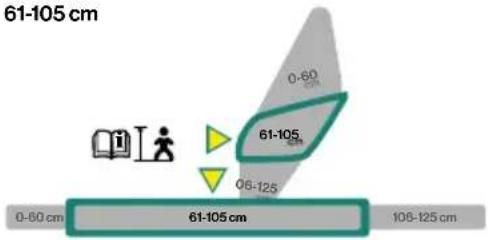 |
| Child3-7 years | Maximum upright positionMaximum legroom | 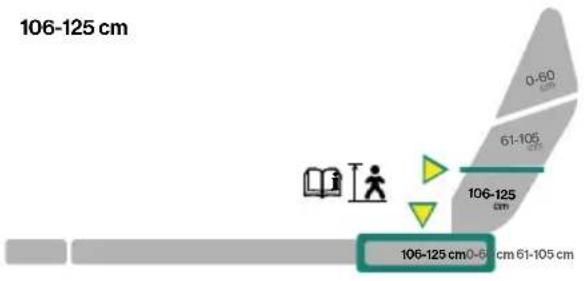 |
Adjusting Axkid One car seat
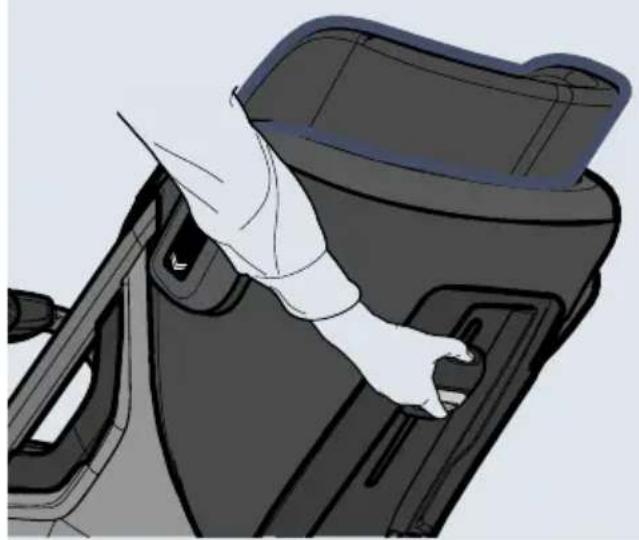
- The legroom is adjusted by releasing the legroom adjustment button (N) and sliding the seat forward or backwards. To avoid Axkid One from accidentally sliding forward, grab the back handle (O) and gently pull it backwards before releasing the legroom adjustment button (N).
- The recline position of the car seat can be adjusted by turning the recline position knob (H).
Removing Axkid One car seat from your vehicle
- Push the support-leg button (I) and collapse the support-leg (R) to its shortest position.
- Slide the front brace release button (C) and fold the front brace (D) towards the seat to release the tension against the vehicle seat.
- Disconnect the ISOFIX connectors (Y) by pushing down on the ISOFIX buttons (X) and then slide them backwards, away from the vehicle seat.
- Keep holding the front brace (D) with one hand and grab the back handle (O) with the other hand and lift Axkid One car seat out of your vehicle.
- Fold up the support-leg (R) by pulling the support-leg release strap (Q) and folding the support-leg (R) upwards.
Care and maintenance
- The seat textile cover can be machine washed at 30^ on a gentle cycle. Do not put the cover in a dryer as this can damage the cover and the padding may separate from the fabric. Visit www.axkid.com to find videos explaining how to remove and attach the cover.
- To remove the textile cover from the seat, pull outwards on the side cover (L) and de-attach the Velcro. Open the zippers at the backrest and gently remove the cover from the seat. Make note how it is attached around the seat to make it easier to put back. When reinstalling the side cover (L), insert it under the aluminum frame and simply push back into the snap attachment. To remove the headrest cover, open the zippers on the bottom of the headrest and gently remove the cover.
- If the seat cover needs replacing, ensure only original products from Axkid are used. If other products are used, Axkid One car seat's safety system may be compromised and could lead to severe injury in case of an accident.
- Any plastic parts of Axkid One car seat can be cleaned with mild detergent and water. Do not use aggressive chemicals containing solvents or similar, as this can cause damage to the plastic and compromise the safety of the car seat.
- All materials used in Axkid One car seat are recyclable and should be recycled as per your local legislation. Ask your local recycling center for advice when recycling this product.
- The sound indicator (S) contains a replaceable CR1632 battery. Please remove and recycle the battery according to your local legislation when the Axkid One car seat should no longer be used. Unscrew the two screws at the bottom of the support-leg (R) and remove the cover to gain access to the battery.
• Do not make any modifications or alterations to Axkid One car seat other than those described in this instruction manual.
- Any repairs must be carried out by the manufacturer or agent.
Warranty
Axkid One car seat is covered by a 24-month warranty from date of purchase. Ensure you save your receipt and bring it to your place of purchase if you have any warranty issues.
The warranty does not cover:
• Normal wear and tear
- Damage due to incorrect use, neglect or accident
• If repairs have been carried out by a third party
- All materials used have a very high UV-resistance rating. However, UV-light is very aggressive and will ultimately lead to fading of the seat cover. This is not covered by our warranty as it is considered normal wear and tear.
- Handle the seat with care. Note that the backside mesh fabric scratches easily and damages other than factory faulty mesh, will not be covered by the warranty.


natural_image
Mechanical assembly diagram showing a bracket with yellow annotation lines pointing to specific components (no text or symbols present)natural_image
Circular logo with a black and white spiral arrow design, no text or symbols present.
AXKID
EN NO
DE DK
ES FI
IT LV
FR PT
PL RO
SV AR