Valley - Vacuum Cleaner UFESA - Free user manual and instructions
Find the device manual for free Valley UFESA in PDF.

User questions about Valley UFESA
0 question about this device. Answer the ones you know or ask your own.
Ask a new question about this device
Download the instructions for your Vacuum Cleaner in PDF format for free! Find your manual Valley - UFESA and take your electronic device back in hand. On this page are published all the documents necessary for the use of your device. Valley by UFESA.
USER MANUAL Valley UFESA
natural_image
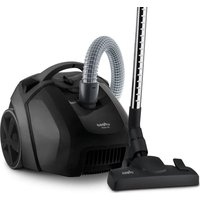
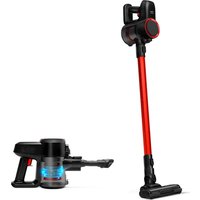
Black and silver compact vacuum cleaner with adjustable handle and control panel (no visible text or symbols)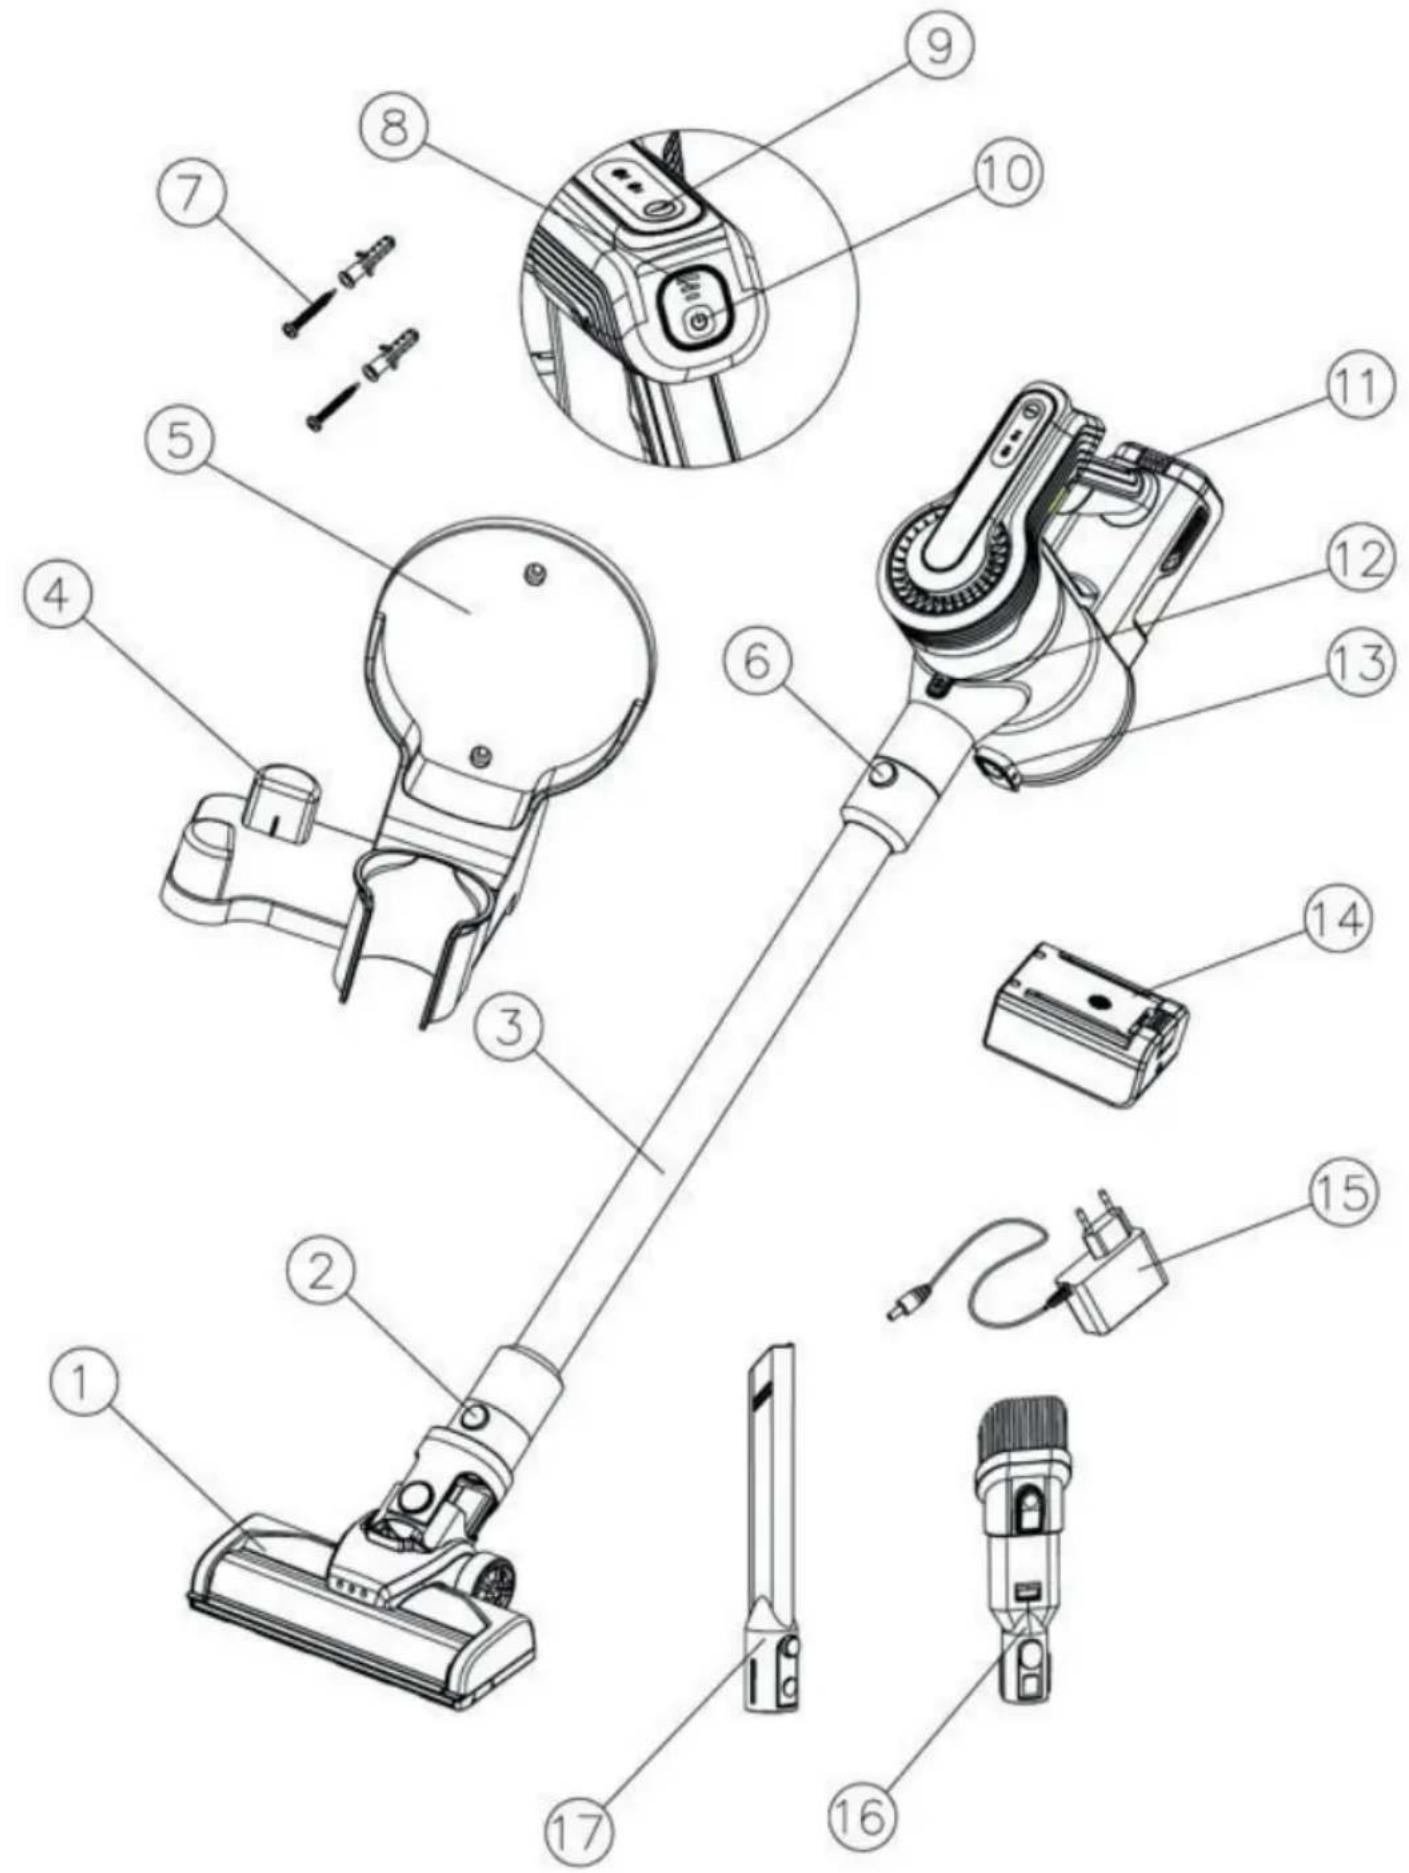
text_image
Exploded view diagram of a vacuum cleaner with numbered parts for identification and assembly reference.ESPAÑOL
natural_image
Technical line drawing of a mechanical device with an inset showing a component detail (no text or symbols)natural_image
Technical line drawing of a mechanical device with labeled component A (no text or symbols beyond label)Paso 6
natural_image
Technical line drawing of a mechanical device with an inset showing a close-up view of a component (no text or symbols present)natural_image
Technical line drawing of a mechanical device with labeled component A (no text or symbols present)Passo 6
WE WOULD LIKE TO THANKS YOUR FOR CHOOSING UFESA, WE WISH THE PRODUCT PERFORMS TO YOUR SATISFACTION AND PLEASURE.
WARNING
PLEASE READ THE INSTRUCTIONS FOR USE CAREFULLY PRIOR TO USING THE PRODUCT. STORE THESE IN A SAFE PLACE FOR FUTURE REFERENCE.
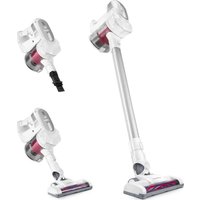
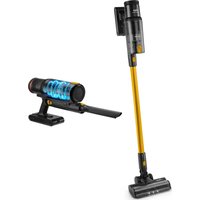
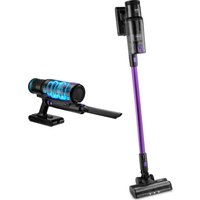
DESCRIPTION
- Floor power brush
- Floor power brush release button
- Conductive metal tube
- Accessory holder
- Wall-mounted storage base
- Extension metal tube release button
- Screws
- Battery capacity indicator
- Speed control button
- ON/Off switch button
- Battery release button
- Dust container release button
- Dust cover release button
- Battery
- Charger
- 2in1 upholstery nozzle
- Narrow crevice tool
SAFETY INSTRUCTIONS
This appliance can be used by children aged from 8 years and above and persons with reduced physical, sensory or mental capabilities or lack of experience and knowledge if they have been given supervision or instruction concerning use of the appliance in a safe way and understand the hazards involved. Children shall not play with the appliance. Cleaning and user maintenance shall not be made by children without supervision.
The adaptor cable cannot be replaced.
If the cable is damaged, the adaptor will be discarded.
This device can only be used with the adapter model supplied with the device and powered with the safety voltage indicated in the rating plate of the device.
Plug must be removed from socket-outlet before cleaning or maintaining the appliance. 19
This device can only be used with the adapter model supplied with the device and powered at very safety voltage indicated on the appliance specifications plate.
Follow the DEVICE CHARGE instructions in order to charge it. Follow the device BATTERY REMOVAL
instructions for removal of the batteries from the device.
This appliance is intended for use at a maximum altitude of 2000m above sea level.
This symbol means that the appliance is intended to be supplied from a detachable supply unit. The appliance contains batteries that are only replaceable by skilled persons. Due to the plastic housing of the vacuum cleaner, keep the appliance away from all the heat sources (radiators, stoves, etc). Do not block the vacuum cleaner inlet and outlet openings! Turn off the vacuum cleaner before replacing equipment.
BATTERY REMOVAL
The appliance must be disconnected from the supply mains when removing the battery.
Make sure the battery broom is fully discharged.
Press the battery removal button and remove the battery from the product.
IMPORTANT WARNINGS
Prior to plugging in the product, check that your mains voltage is the same as the one indicated on the product label.
The mains connection cable must not be tangled or wrapped around the product during use. Do not pull on the connection cord in order to unplug it.
Do not use, connect or disconnect the device to the mains with your hands or feet wet. Proceed according to the conservation and cleaning section of this manual for cleaning.
Unplug the product immediately from the mains in the event of any breakdown or damage and contact an authorised Technical support service.
In order to prevent any risk of danger, do not open the device. Only qualified technical personnel from the brand's Official Technical support service may carry out repairs or procedures on the device.
Any incorrect use or improper handling of the product shall render the warranty null and void. Only an authorised technical support service centre may carry out repairs on this product.
This appliance is designed exclusively for domestic use, in no case should be a commercial or industrial use. In case of misuse or tampering with the product, it will be out of warranty.
Do not use the appliance to vacuum liquids (water, etc), sharp objects (pins, pins, nails, glass, etc), incandescent objects (matches, cigarettes).
Never use the turbobrush to: Polish floors, suck (Liquids, wet or damp dust, hot ash, burning objects, such as cigarettes, matches, sharp and hard items, such us: razors, pins, thumbtacks, pieces of glass, etc), flour, cement, plaster, printer or photocopier toner, etc.
B&B TRENDS SL. disclaims all liability for damages that may occur to people, animals or objects, for the non-observance of these warnings.
QUICK GUIDE
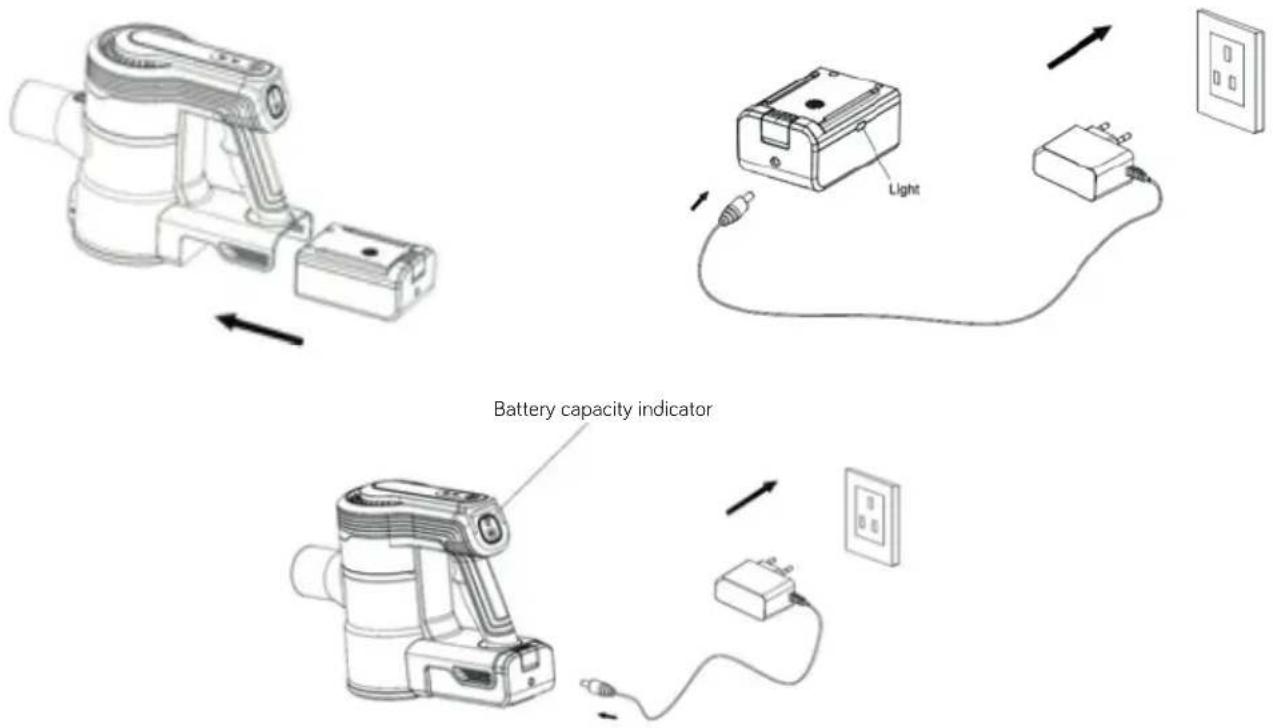
Two different ways of charging, either through the handheld vacuum cleaner or separately
text_image
Battery capacity indicatorStep 1
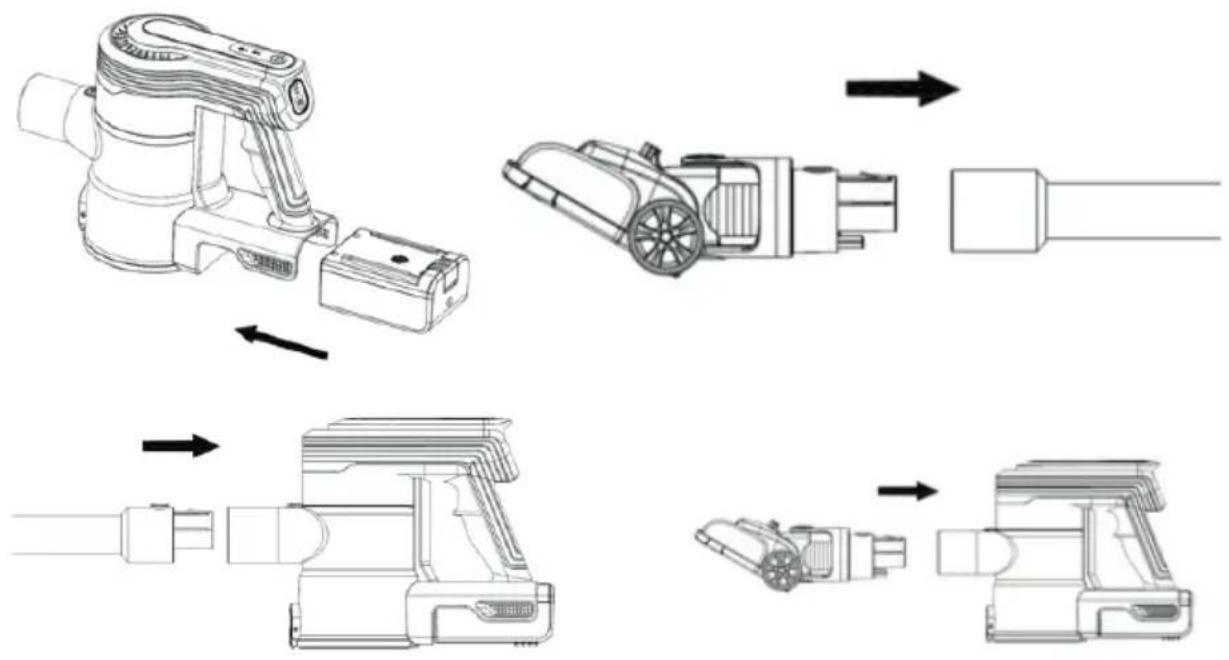
Installation of battery, electric floor brush, metal tube and handheld vacuum cleaner
flowchart
graph TD
    A["Engine Pump"] --> B["Assembly Module"]
    B --> C["Assembly Bracket"]
    C --> D["Assembly Tool"]
    D --> E["Final Motor Assembly"]
Step 2
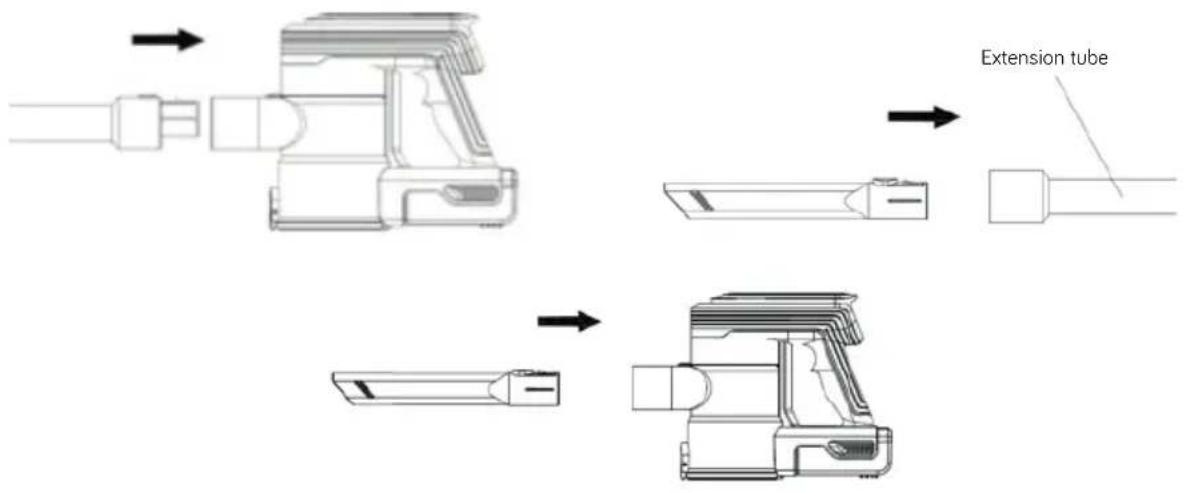
Accessories attachment
text_image
Extension tubeStep 3
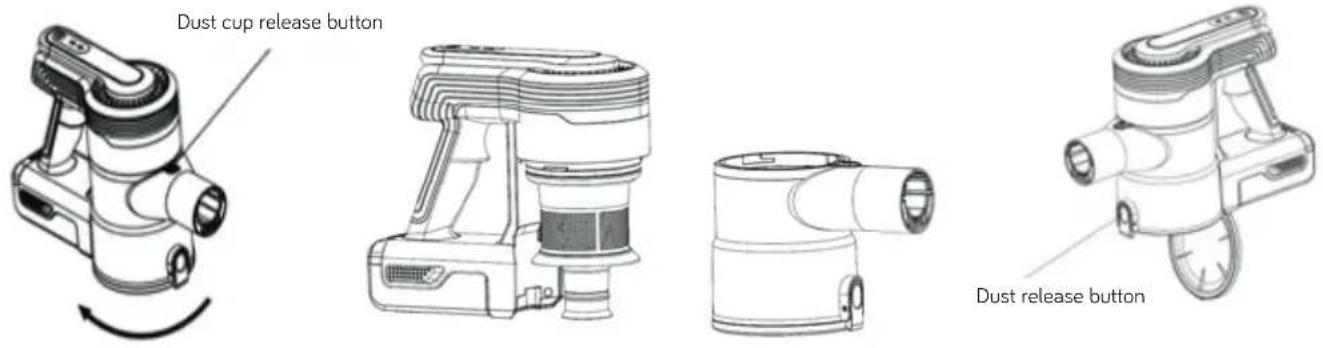
Cleaning of dust container
text_image
Dust cup release button Dust release buttonStep 4
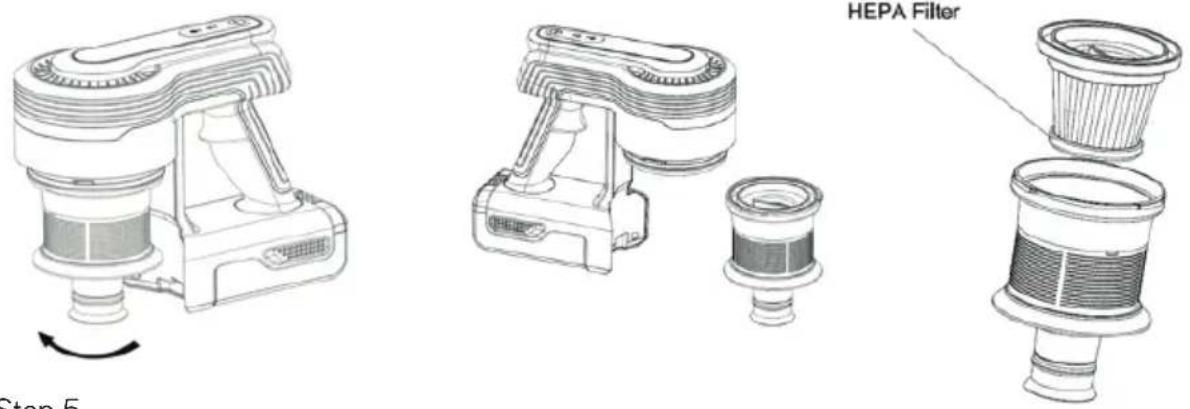
Cleaning of filters
text_image
HEPA Filter Step 5Step 5
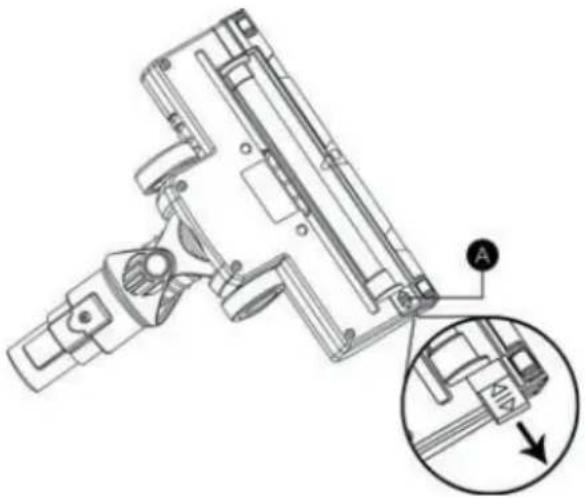
Cleaning the brush roll:
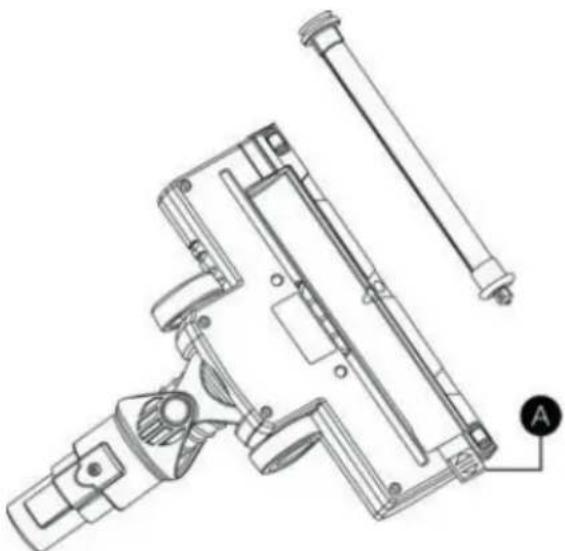
- Remove the brush roller from the brush housing. Slide the brush roller fastener "A" away from the brush as below.
natural_image
Technical line drawing of a mechanical device with an inset showing a close-up view of a component labeled 'A' (no text or symbols present)-
Carefully clean and remove the hairs and debris from the brush roller. Wipe to clean only, do not use any soap or harsh cleaning solvents.
-
If brush roller becomes damp, allow to dry naturally before replacing.
-
Slide fastener "A" to original position to secure the brush roller.
natural_image
Technical line drawing of a mechanical device with labeled component A (no text or symbols beyond label)Step 6
Installation of battery pack and charging (Step 1)
When the vacuum cleaner power is insufficient, please promptly charge the vacuum cleaner. The device can be charged in 2 different ways. It can be charged directly through the handheld vacuum cleaner (the three lights on the back of the body will indicate the state of the battery) or the battery can be removed and charged separately. Please remember to charge the battery after each cleaning session or when the battery is low.
Charge battery separately:
Plug the cable into the power inlet located on the top of the battery. When charging, the energy indicator light will be illuminated Blue. Once fully charged this indicator light will keep bright in Blue. Once fully charged, turn off the charger plug from the power socket.
Charge battery on the unit: When no power, three lights give a flickering light. While charging, the light will become from one light to two lights, that means the battery is 50% charged. If the light illuminates 3 lights, that means 100% power.
The charging time is about 4-5 hours.
NOTE:
- In the event of a maintenance issue with the product such as a jammed brush roll, all three BLUE indicator lights will flash on and off until the issue is resolved, in this case turn the cleaner off until the issue is rectified.
- Ensure that the air vent, floor brush and metal tube are free from blockages and dust. Should they suddenly become clogged, switch off the appliance immediately and clear the blockage before attempting to use the vacuum again.
- Remove any sharp or large objects from the path of the vacuum before use as these may irreparably damage the appliance.
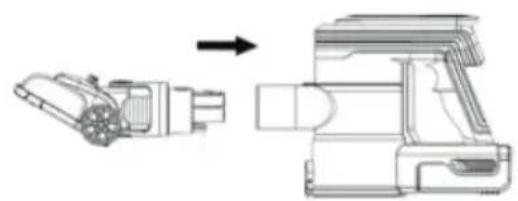
Installation of electric floor brush, metal tube and handheld vacuum cleaner (Step 2)
NOTE: Before assembling the appliance fix the included wall-mounted storage base. Ensure it is placed high enough for the vacuum to be securely mounted.
- Install the battery into the housing by sliding it into the appropriate slot. It will "click" into place.
- Insert the connector of the floor power brush into the base of the metal tube by clicking it into place.
- Attach the floor power brush and metal tube to the main body by slotting it into place via the air duct connector.
- If using the floor power brush without the tube, simply attach it to the main body via the air duct connector. It will "click" when secure.
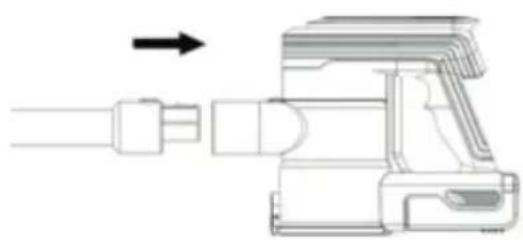
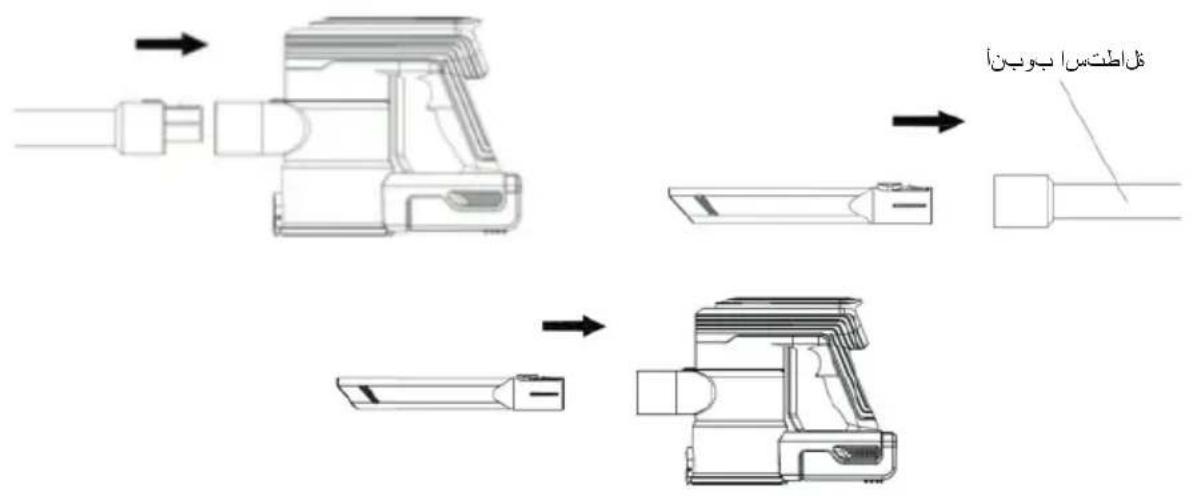
Attachment of accessories (Step 3)
- Attach the metal tube to the main body by slotting it into place via the duct connector.
- Attach the narrow crevice tool to the base of the metal tube via the connector. It will "click" into place.
- If using accessories without the tube, simply attach them to the main body via the air duct connector. It will "click" when secure.
- Attach the sofa nozzle to the metal tube or the main body, same as the narrow crevice tool.
Use sofa nozzle to vacuum fabric furnishings such as sofas, armchairs and curtains.
Use narrow crevice tool to vacuum narrow spaces such as corners and hard to reach areas.
OPERATION METHOD
CAUTION: The vacuum must be fully charged before using for the first time.
- Remove the vacuum cleaner from the wall mounted base. If using as a hand held unit, disassemble the metal tube and attach the desired accessory.
- Use the Power ON/OFF button to turn on the appliance.
- For a stronger suction, press the speed control button to select maximum suction. You can switch to ECO and max (turbo) speed by pressing the speed control button. The power level can be adjusted at any moment by pressing this button.
- To turn off the vacuum, press the Power ON/OFF button again.
Cleaning and maintenance
- Do not use abrasive scouring pads, powders or cleaners to clean the device.
- Use a soft, dampened and clean cloth to clean the products' outer surface.
- Do not let water enter into the vacuum cleaner.
- Keep the appliance in a cool, dry place and out of reach from children.
- Do not immerse the device in water and do not clean any of its parts in the dishwasher.
Cleaning of the dust bin (Step 4)
- Press the dust cup release button and rotate the cup clockwise.
- Take off the dust cup from the main body.
- Over a waste bin, press the dust release button to open the bottom cover and throw away any dust, dirt and debris. Wipe clean only, do not submerge in water.
NOTE: It is recommended to clean the dust bin after each use. You should remove plastic filter firstly.
Cleaning of filters (Step 5)
If the filters are so dusty that suction does not return to 100%, it is suggested to be cleaned or washed. if necessary, they can also be replaced. It is suggested to clean the filters regularly (at least once a month) to ensure maximum efficiency. They can be cleaned with cold or warm water. It is suggested to replace the HEPA filter twice a year. Both cleaning and replacement depends on use.
ATTENTION: Dry them thoroughly before installing them back in the unit. Allowed them to dry 24 hours by airing not near the fire or some high temperature objects before refitting into the vacuum
- Remove the dust container from the main body.
- Twist the steel-filter clockwise and take off the filter
- Remove the HEPA filter from steel-filter
- Rinse thoroughly under clean fresh water. Do not use soap or other cleaning agents.
- Allow filter to dry naturally before placing back into the vacuum. Do not place on radiators or use additional appliances, such as a hair dryer, to dry the filter. Doing so may cause the filter to warp or for other irreparable damage to occur.
Cleaning of floor power brush and rollers (Step 6)
After the floor power brush has been used for a long time, its brush may wind around the hairs and the long flosses. It is important to clean the floor power brush regularly to avoid hair and other foreign objects from tangling, prevent blockages and ensure the vacuum cleaner can work more efficiently.
- Pull downwards the brush roll securing clip from the brush and remove the safety brush roller clip.
- Remove the roller from the brush housing.
-
Carefully clean and remove any hairs and fibers from the roller. Wash them under running water, do not use harsh cleaning agents.
-
If rollers become damp during cleaning, allow to dry naturally before replacing them into the housing.
- Pull downwards the brush roll securing clip and hold. Place the safety brush roller clip into initial position and release the securing clip.
PRODCUT DISPOSAL
This product complies with European Directive 2012/19/EU on electrical and electronic devices, known as WEEE (Waste Electrical and Electronic Equipment), provides the legal framework applicable in the European Union for the disposal and reuse of waste electronic and electrical devices. Do not dispose of this product in the bin, instead going to the electrical and electronic waste collection centre closest to your home.
The product may contain batteries. Remove them before disposing of the product and dispose in special containers approved for this purpose.
FRANÇAIS
NOUS VOUS REMERCIONS D'AVOIR CHOISI UFESA, NOUS SOUHAITONS QUE CE PRODUIT VOUS APPORTE SATISFACTION ET PLAISIR.
AVERTISSEMENT
VEUILLEZ LIRE ATTENTIVEMENT LES INSTRUCTIONS D'UTILISATION AVANT D'UTILISER LE PRODUIT. VEUILLEZ CONSERVER CES INSTRUCTIONS DANS UN ENDROIT SÛR POUR POUVOIR VOUS Y RÉFÉRER ULTÉRIEUREMENT.
DESCRIPTION
natural_image
Technical line drawing of a mechanical assembly with an inset showing a component detail (no text or symbols)natural_image
Technical line drawing of a mechanical device with labeled component A (no text or symbols beyond label)Étape 6
natural_image
Technical line drawing of a mechanical assembly with an inset showing a component detail (no text or symbols)natural_image
Technical line drawing of a mechanical device with labeled component A (no text or symbols beyond label)Passo 6
flowchart
graph TD
    A["Engine Pump"] --> B["Assembly Module"]
    B --> C["Car Part"]
    C --> D["Final Vehicle"]
Schritt 2
natural_image
Technical line drawing of a mechanical assembly with an inset showing a component detail (no text or symbols)natural_image
Technical line drawing of a mechanical device with labeled component A (no text or symbols beyond label)Schritt 6
natural_image
Technical line drawing of a mechanical device with directional arrows indicating assembly or transformation (no text or symbols present)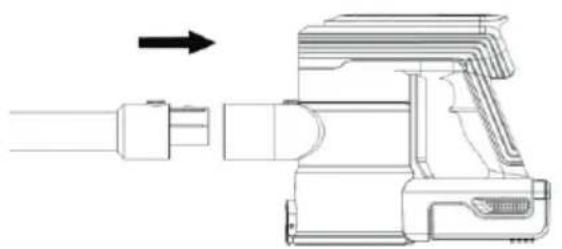
natural_image
Technical line drawing of a mechanical device with an arrow indicating direction (no text or symbols present)Стъпка 2
natural_image
Technical line drawing of a mechanical assembly showing a component before and after assembly (no text or symbols)Приставка за аксесоари
natural_image
Technical line drawing of a mechanical device with an arrow indicating direction (no text or symbols)
natural_image
Technical line drawing of a mechanical device with an arrow indicating transformation (no text or symbols present)natural_image
Technical line drawing of a mechanical assembly with labeled component A, showing internal components and a magnified inset (no text or symbols)natural_image
Technical line drawing of a mechanical device with labeled component A (no text or symbols beyond label)Стъпка 6
text_image
Diagram showing two types of waste sorting symbols: one with a lid and crossbones, the other with a bin and weight.natural_image
Technical line drawing of a mechanical device with labeled component A (no text or symbols present)6 alخطوة
natural_image
Technical line drawing of a vacuum cleaner device with rotating arm (no text or symbols)natural_image
Technical line drawing of a mechanical device with a cylindrical component (no text or symbols)
natural_image
Technical line drawing of a mechanical component with a spool and cylindrical shaft (no text or symbols)5 alخطوة
تنظيف المرشحات
تنظيف بكرة الفرشاة
natural_image
Technical line drawing of a mechanical assembly with an inset close-up showing a component detail (no text or symbols)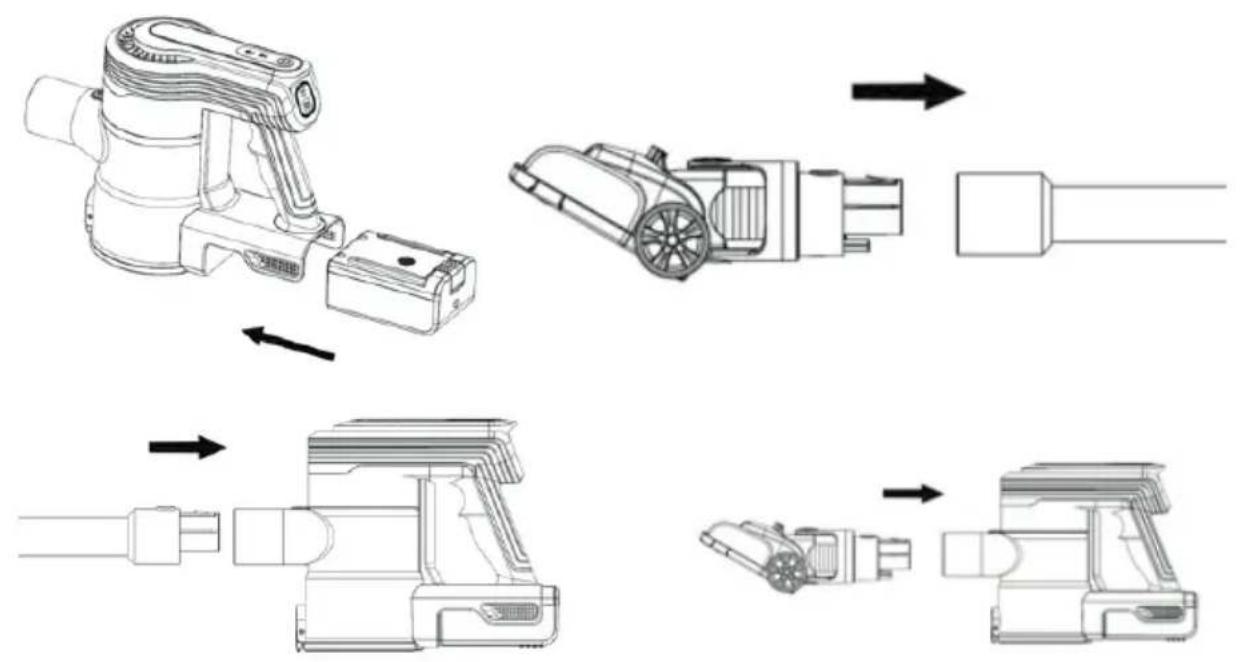
flowchart
graph TD
    A["Engine Pump"] --> B["Add Air Filter"]
    B --> C["Transfer to Air Purifier"]
    C --> D["Assembly to Air Filter"]
    D --> E["Final Component"]
2 alخطوة
توصيل الملحقات
text_image
فَلَ اطْتَسَا بِوْنِنَB&B TRENDS, SL. guarantees compliance of this product, for the use for which it is, during the period established by the legislation in force in the country of sale. In the case of breakdown during the term of this warranty, users are entitled to repair or else the replacement of the product at no charge if the former is unavailable, unless one of these options proves impossible to fulfil or is disproportionate. In this case, you can then opt for a reduction in price or cancellation of the sale, which must be dealt with directly with the sales vendor. This also covers replacement of spare parts provided that the product has been used according to the recommendations specified in this manual for both cases, and has not been tampered with by any third party that is not authorised by B & B TRENDS, SL. The warranty will not cover any parts subject to wear and tear. This warranty does not affect your rights as a consumer in accordance with the provisions in Directive 1999/44/EC for member states of the European Union.
USE OF WARRANTY
Customers must contact a B&B TRENDS, SL., authorised Technical Service for repair of the product. Since any tampering of the same by anyone not authorised by B&B TRENDS, SL., or the careless or improper use of the same shall render this warranty null and void.
You must keep the purchase invoice, receipt or delivery docket in order to exercise your warranty rights.
For technical service and after-sales care outside the Spanish territory, please submit your query to the point of sale where you purchased the item.
BON DE GARANTIE
Check out your nearest service station at https://sat.ufesa.com/
ufesa
B&B TRENDS, S.L. · C.I.F. B-86880473