
KCA-R110 - Dashcam KENWOOD - Free user manual and instructions
Find the device manual for free KCA-R110 KENWOOD in PDF.

| Product Type | Dashcam |
| Brand | Kenwood |
| Model | KCA-R110 |
| Dimensions | 50 x 27 x 32 mm |
| Weight | 300 g |
| Power Supply | DC 5.0 V, 300 mA |
| Image Sensor | 2 megapixels |
| Recording Resolution | 1920 x 1080 pixels |
| Recording Format | H.264 (MP4) |
| Frame Rate | 30 fps |
| Lens | Fixed focal length F=2.0 |
| Field of View | 131.6° (diagonal) |
| Operating Temperature | -10 °C to 60 °C |
| Cable length (rear camera) | 8 m |
| IP rating (rear camera) | IP67 |
| Main functions | Front and rear video recording, parking recording, event recording |
| Maintenance and cleaning | Clean with a soft, dry cloth; lens with a slightly damp cloth. Do not use solvents. |
| Safety | Do not operate while driving. Install without obstructing view or airbags. |
| Spare parts and repairability | No repairable parts inside. Do not attempt to repair. |
Frequently Asked Questions - KCA-R110 KENWOOD
User questions about KCA-R110 KENWOOD
0 question about this device. Answer the ones you know or ask your own.
Ask a new question about this device
Download the instructions for your Dashcam in PDF format for free! Find your manual KCA-R110 - KENWOOD and take your electronic device back in hand. On this page are published all the documents necessary for the use of your device. KCA-R110 by KENWOOD.
USER MANUAL KCA-R110 KENWOOD
Rear Camera for Dashboard Camera
INSTRUCTION MANUAL
JVCKENWOOD Corporation
- Updated information (the latest Instruction Manual, etc.) is available from https://www.kenwood.com/cs/ce/.
For your records
Record the serial number, found on the back of the unit in the spaces designated on the warranty card, and in the space provided below. Refer to the model and serial numbers whenever you can upon your KENWOOD dealer for information or service on the product.
Model KCA-R110
Serial Number
US Residents Only
Register Online
Register your KENWOOD product at www.kenwood.com/usa
Contents
EN
Before Use.... 01
Precautions for Use.... 01
Accessories 03
Parts Name 03
Installation and Connection 04
Specifications 10
Before Use
- The screen images and operation examples in this document were created for explaining the operating procedures.
- There may be screen images that differ from the actual screens or examples of operations not actually performed.
Disclaimer
- Please note that JVCKENWOOD shall not be responsible for any damages suffered by the customer or a third party as a result of incorrectly using this product, a failure during use of this product, or other trouble, or due to the use of this product, unless such liability is acknowledged by law.
Copyrights
- Recorded video, image, and audio content cannot be used for other than personal enjoyment without the consent of the copyright holder as specified in the Copyright Act.
- Please note that the recording of an event such as a show, performance, or exhibition may be restricted even when doing so for personal enjoyment.
Precautions for Use
Precautions and notices
Warning! Do not operate the device while driving. Using this product does not change the requirement for a driver to take full responsibility for his or her behavior. This responsibility includes observing all traffic rules and regulations in order to avoid accidents, personal injury or property damage.
- For your own safety, do not operate the controls of the product while driving.
- Make sure to place your cable, so as not to obstruct the driver's view or deployment of airbags.
- Do not attempt to service the unit. There are no serviceable parts inside. Replace the unit if it is damaged or exposed to excess moisture.
Caring for your device
Taking good care of your device will ensure trouble-free operation and reduce the risk of damage.
- Keep your device away from excessive moisture and extreme temperatures.
- Avoid exposing your device to direct sunlight or strong ultraviolet light for extended periods of time.
- Do not place anything on top of your device or drop objects on your device.
- Do not drop your device or subject it to severe shock.
- Do not subject your device to sudden and severe temperature changes. This could cause moisture condensation inside the unit, which could damage your device. In the event of moisture condensation, allow the device to dry out completely before use.
- Never clean your device with the power on. Use a soft, lint-free cloth to wipe the screen and the exterior of your device.
- Never attempt to disassemble, repair or make any modifications to your device. Disassembly, modification or any attempt at repair could cause damage to your device and even bodily injury or property damage and will void any warranty.
- Do not store or carry flammable liquids, gases or explosive materials in the same compartment as your device, its parts or accessories.
- To discourage theft, do not leave the device and accessories in plain view in an unattended vehicle.
• Overheating may damage the device.
Precautions for installation
• Install the device in a position where it will not block the view of the driver.
- Install the device within the wiping range if equipped the wiper.
• Take care not to install the device over the vehicle inspection sticker or other sticker.
• Take care not to install the device where it will interfere with driving or airbag operation.
- If the device is installed incorrectly, event recording or parked recording may not work correctly.
- Refer to "Installation and Connection" for the installation orientation, angle, and other information and then install the device correctly.
- Do not install the device near a digital terrestrial television antenna or an electrical component. Otherwise it may reduce receiver sensitivity or cause flickering and noise.
- When fixing the device with the adhesive mount, use a commercially available cleaning cloth or the like to wipe off all dirt and grease on the mounting surface. If the device is re-affixed or mounted using, for example, general-purpose double-sided tape, the adhesion strength may weaken and cause the device to fall.
- After mounting the device, leave it for 24 hours before use to enable the mounting strength of the adhesive mount to improve. Failing to do so may result in the adhesion of the adhesive mount becoming weak and the device falling.
- Fix the cord in place with tape or the like so that it does not interfere with driving.
Precautions for use
- Do not block the camera lens, get dirt on it, or place a reflective object near it.
- When LED traffic lights are recorded, video in which they appear to be flickering or flashing may be recorded. JVCKENWOOD assumes no responsibility with regard to the distinguishing or recording of traffic lights.
- If coating is used on the windshield of the vehicle, recording quality may be affected.
- There is no guarantee that the device can record video in all conditions.
Cleaning the device
- When the device is dirty, wipe it with a dry silicone cloth or other soft cloth. If the device is very dirty, remove the dirt with a cloth with neutral cleaner on it then wipe off the cleaner. Wiping the device with a hard cloth or using a volatile substance such as thinner or alcohol may cause scratches, deformation, deterioration or other damage.
- When the lens is dirty, gently wipe it with a soft cloth dampened with water. Rubbing the lens strongly with a dry cloth may cause scratches.
If you notice a problem with the device, turn off the power of the device and then contact your dealer or nearest JVCKENWOOD service center.
Accessories
Before you get started, check you have everything below.
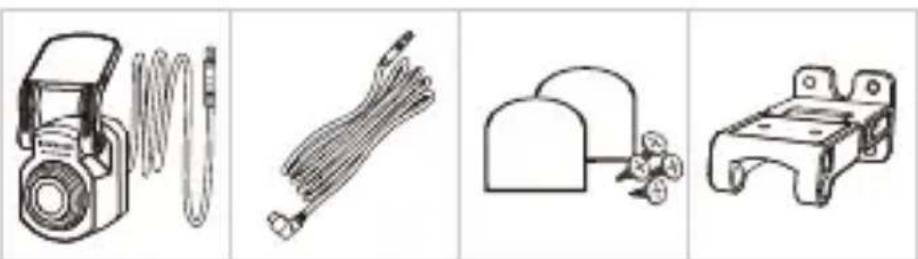
2.5m Rear Camera 5.5m USB-C Cable Adhesive Pads and Double-joint Bracket screws
* Product appearance may differ slightly from that shown above.
Parts Name
Rear Camera
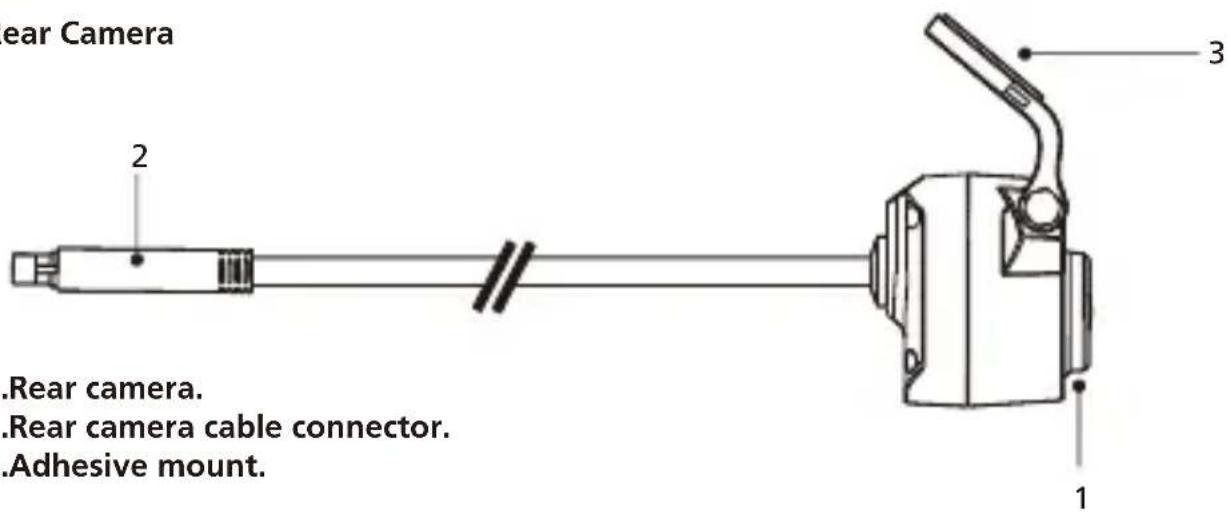
- Rear camera.
- Rear camera cable connector.
- Adhesive mount.
Rear Camera Cable
4.Cable connector.
5.CAM-IN connector.
For the first installation, follow the instructions below:
Recommended installation position
• Install the device in a position where it will not block the view of the driver.
• Install the device within the wiping range if equipped the wiper.
! Caution
When passing the power cord through the front pillar or another part, observe the points below when performing the wiring work.
- Wire the power cord farther forward or farther rearward than the airbag so that it does not interfere with the airbag.
- In the case of a vehicle in which the pillar cover is fixed in place with special clips or the like, the clips may need to be replaced after you remove the pillar cover. For how to remove the pillar cover, the availability of replacement parts and other information, contact the vehicle dealer.
- Fix the power cord in place with commercially available tape or the like so that it does not interfere with driving.
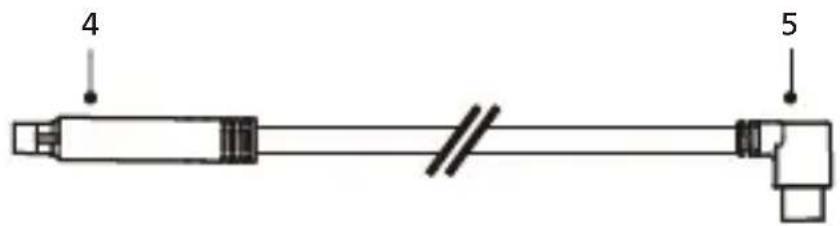
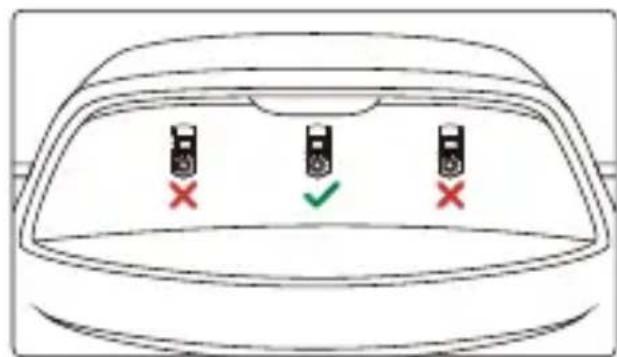
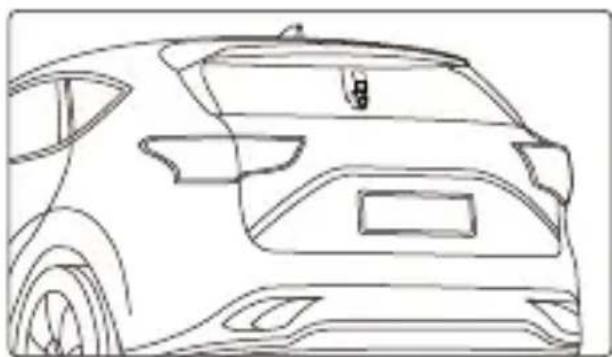
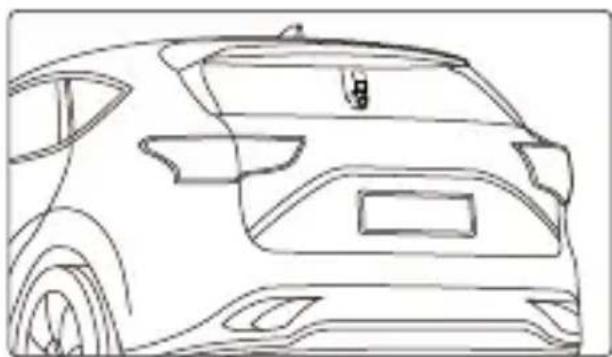
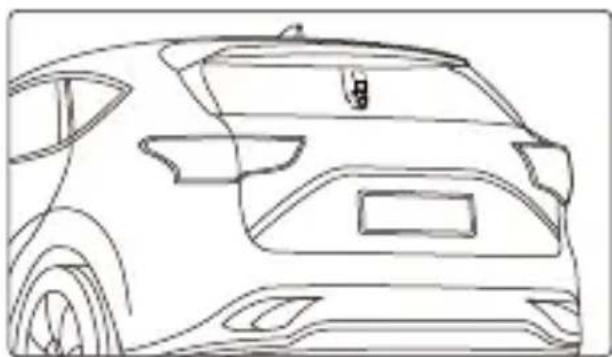
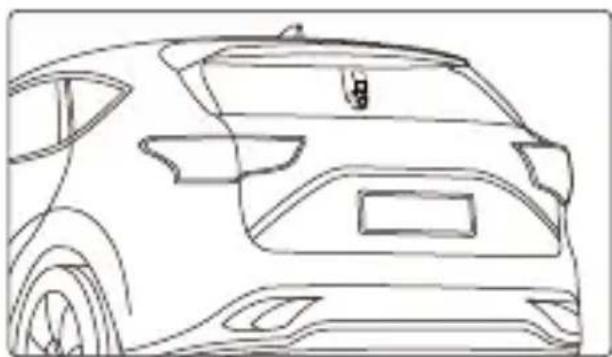
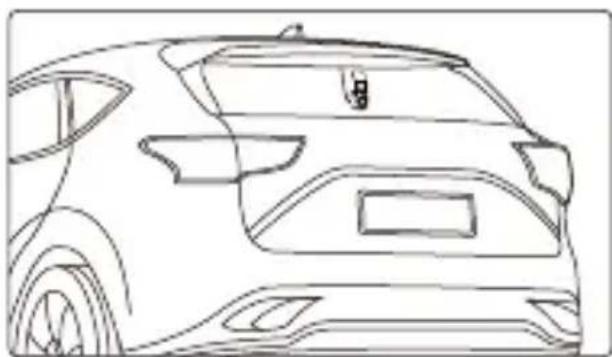
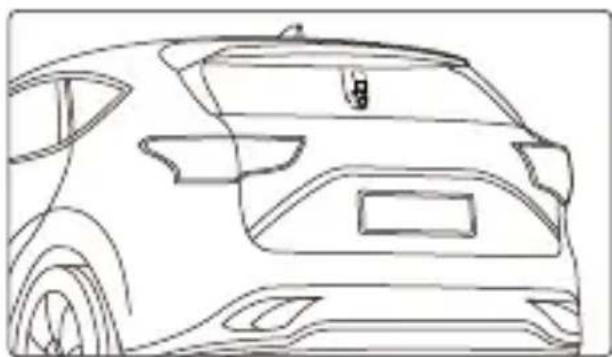
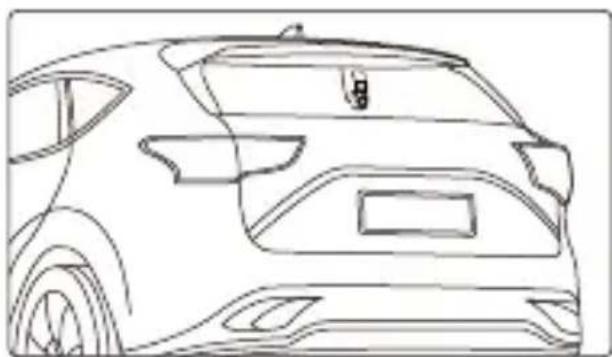
1. SELECT A LOCATION ON THE REAR WINDSHIELD
Select a location on the rear windshield, attach the adhesive mount, and place the rear camera in place. The rear camera mount is designed for sloping windows or vertical / flat windows.
natural_image
Front view line drawing of a car (no text or symbols)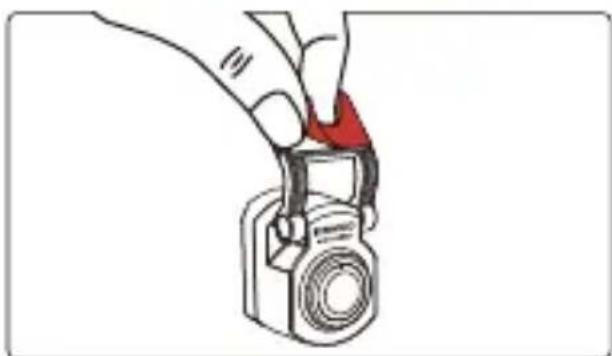
natural_image
Illustration of a hand holding a camera with a red triangular clip (no text or symbols)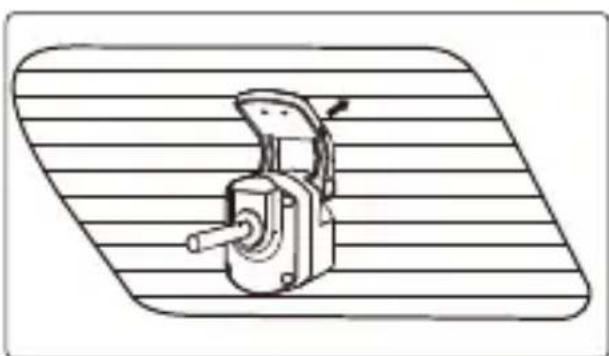
natural_image
Technical line drawing of a mechanical device with a handle and lever, mounted on a striped surface (no text or symbols)Note:
- It is recommended to place the rear windshield camera within the windshield wiping area at the top of the rear windshield to record as clear an image as possible. Make sure the heating grid lines do not obstruct the view.
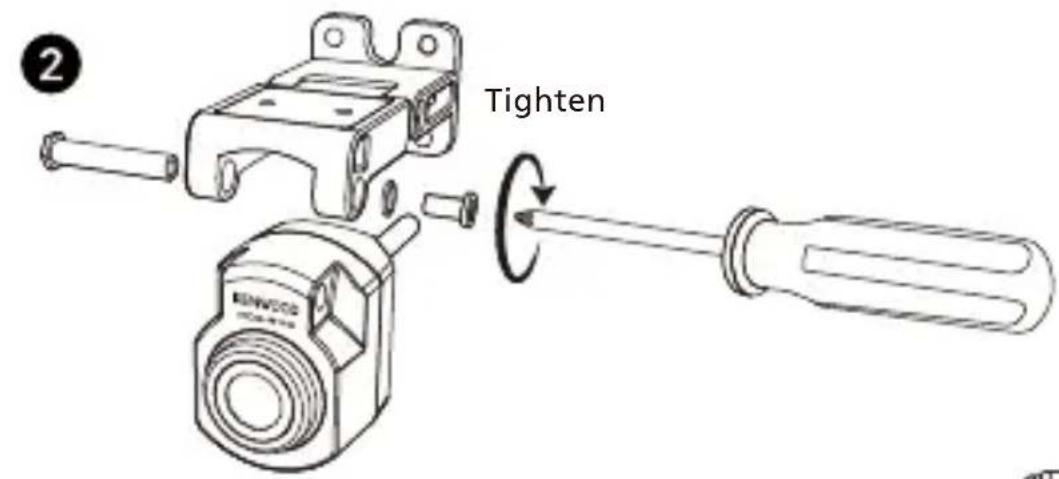
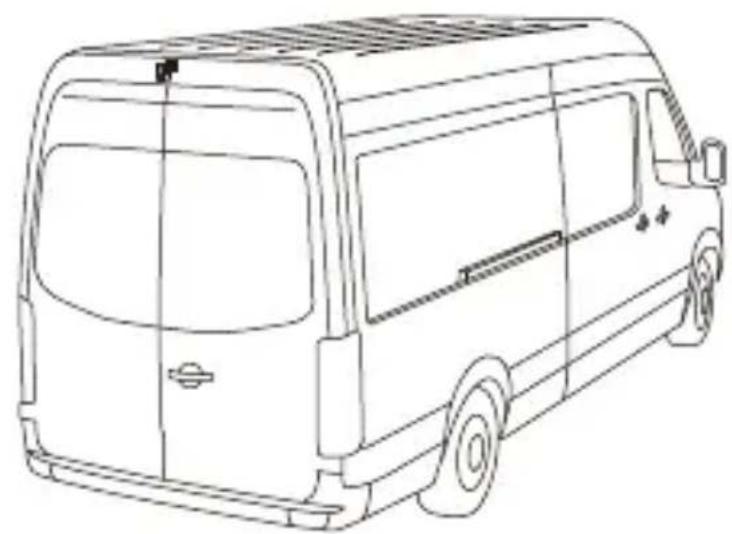
The additional special double-joint bracket allows you to install the rear camera on a vertical surface, supporting various angles of installation and compatibility with various car models.

natural_image
Line drawing of a van with blank windows and side door (no text or symbols)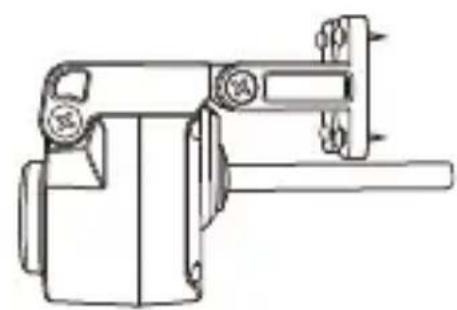
natural_image
Technical line drawing of a mechanical device with no visible text or symbols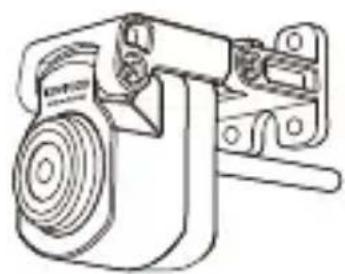
natural_image
Technical line drawing of a mechanical device with no visible text or symbols2. CONNECT THE REAR CAMERA CABLE
Use the CAM IN port on the side of the front dash cam and plug in the rear camera cable.
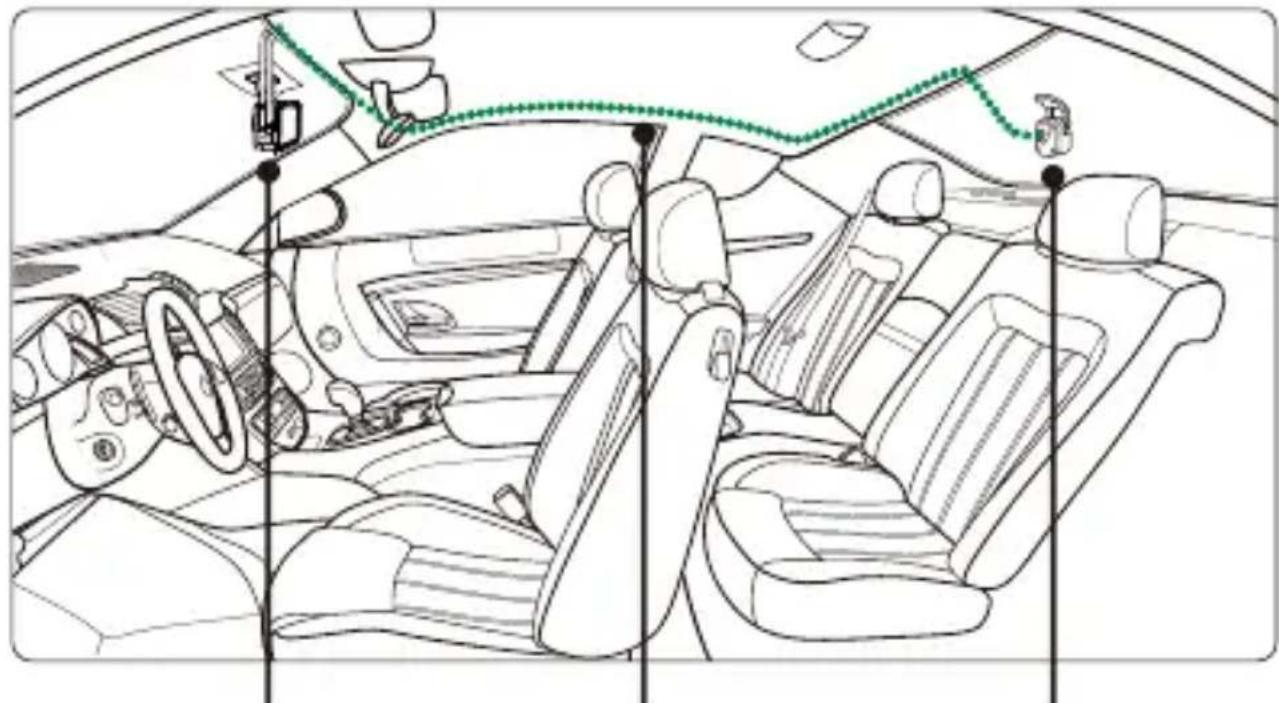
3. ROUTE THE REAR CAMERA CABLE
Route the rear camera cable through the vehicle to the rear windshield and tuck the cable away. The end of the cable should run through from the side of the headliner at the rear of the vehicle for you to connect and mount the rear camera to your selected position.
natural_image
Interior view of a car showing driver, seatbelt, and dashboard (no text or symbols)Dash Cam Rear Camera Cable Rear Camera

natural_image
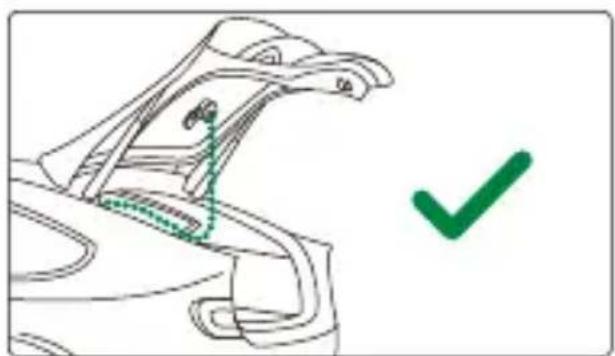
Line drawing of a car with a sensor or connection point connected by a green dotted line (no text or symbols)Note:
- For hatch back trunk opening, leave about 3-5 inches of extra cable at the vehicle's end to ensure adequate cable connections, and comfortably open the trunk without moving the rear camera.
natural_image
Line drawing of a car's seat and roof structure with a green checkmark (no text or symbols)
natural_image
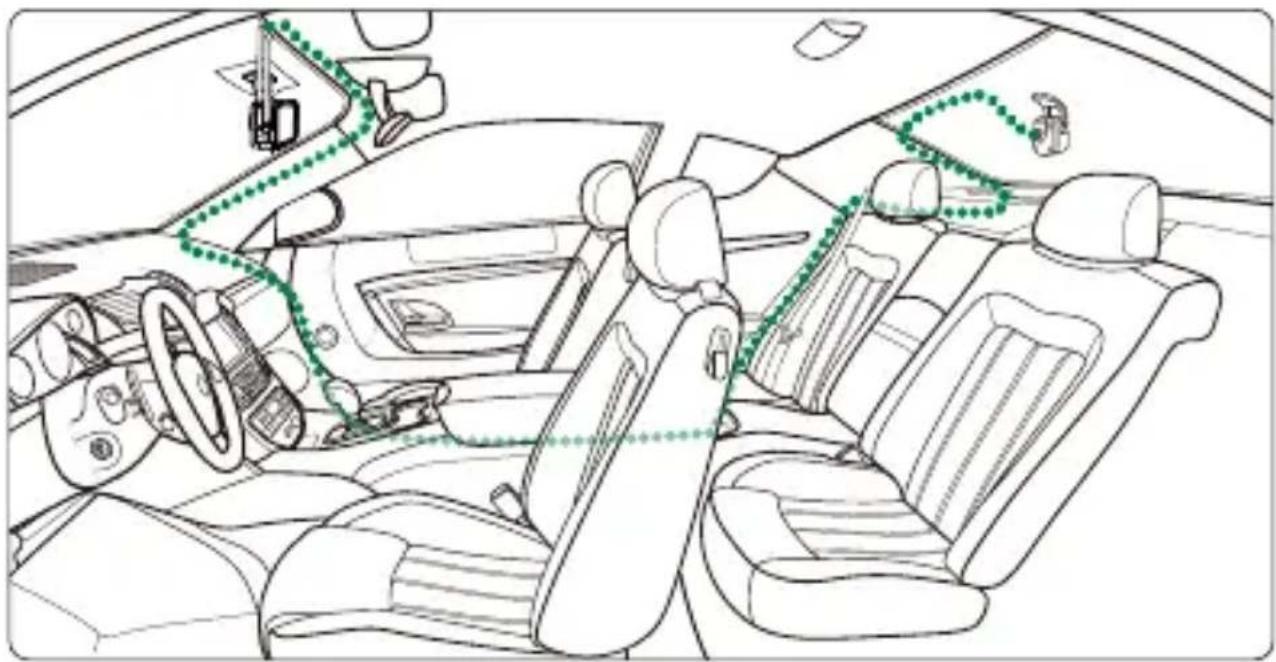
Line drawing of a bird's head with a green dotted line and a red 'X' symbol, no text or labels present- Check all airbags locations on the vehicle owner's manual. DO NOT route cable over the airbags to avoid potential interference with airbag deployment and posing a problem with proper airbag operation.
- For vehicles that have headliner and curtain airbag, the wire should run through from the bottom of the passenger side carpet trim, along the rear seat side, to the rear windshield molding, and to the selected position.
natural_image
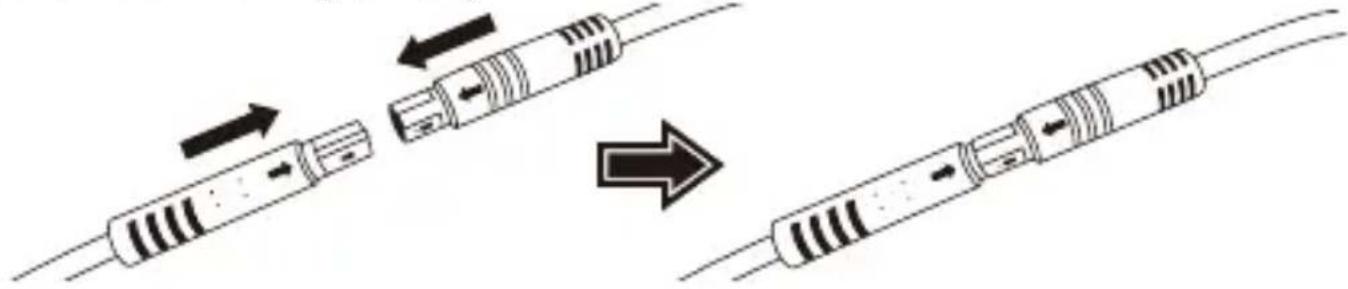
Interior view of a car showing dashboard, steering wheel, and seatbelt layout (no text or symbols)4. CONNECT THE REAR CAMERA CABLE TO THE REAR CAMERA
When all the cable is in place, connect the rear camera cable to the rear camera, line up cable pins to secure the cable connection. Check the front dash cam to ensure the rear camera is working correctly.
natural_image
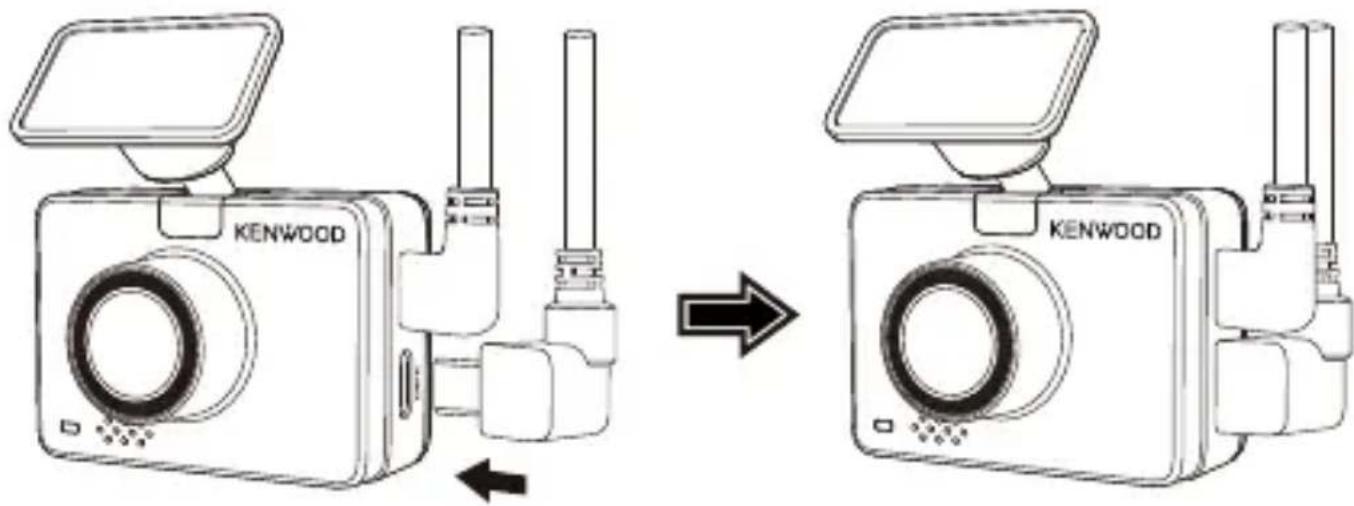
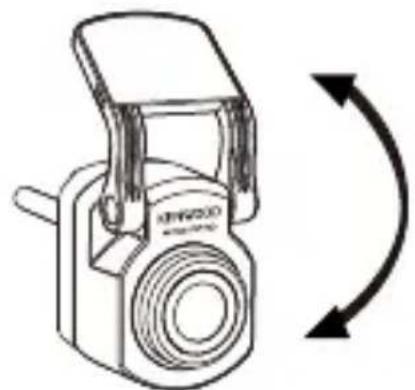
Diagram showing three stages of a resistor cable assembly with arrows indicating direction (no text or labels)5. ADJUST THE REAR CAMERA
Once the mount is set to the rear windshield, ensure the display on the front dash cam (front and rear views) are level. Press the Screen Select Button when recording to switch from the rear display to full screen, adjusting the rear camera accordingly. Ensure the display is in the center, DO NOT attempt to adjust the dash cam while driving.
natural_image
Line drawing of a digital camera with an arrow indicating rotational direction (no text or symbols)
natural_image
Video frame showing a scenic highway with arched bridge and green hills, captured on 04/25/2024 (no readable text or symbols)Note:
- You can also connect the dash cam to your mobile device and download KENWOOD DASH CAM MANAGER on App Store / Google Play. Use its Live View function to adjust the rear camera.
- If you still find it too much trouble or don't want to do it yourself. It is recommended to find your local reliable Auto Dealer Service Department, Car stereo Installer, and Auto Mechanic shop to ask about dash cam installation. Fees may vary from one shop to another. Please ask and check the reputation of the shop before installing it.
- We have designed the rear camera to be waterproof with an IP67 rating (IP67 waterproof rating for the camera part), allowing you to place the camera outside of the car without fear of heavy rain or snow. This provides you with clearer video footage. Unlike regular dash cams that can only be placed on the rear windshield, placing the camera outside of the car directly captures better quality footage as there are no heat-insulating films obstructing the view. However, installing it outside your car requires professional wiring and installation. If you want to install it externally, please go to a relevant store and have a professional install it for you to avoid danger or damage.
Specifications
| Image Sensor | 2M Pixel |
| Frame Rate | 30fps |
| Recording Resolution | 1920 x 1080 (2M) |
| Recording Format | H.264 (MP4) |
| Lens | F=2.0 Fixed Focus Lens |
| Field of View | Diagonal :131.6° |
| Operating Voltage | DC5.0V |
| Current Consumption | 300mA |
| Operating Temperature | -10°C to 60°C |
| Dimensions | 2" x 1-1/16" x 1-1/4"50mm x 27mm x 32mm |
| Weight | 10.6oz / 300g |
| Cable Length | 26'-3" / 8m |
Inhalt
DE
Vor dem Einsatz 01
natural_image
Front view line drawing of a car (no text or symbols)
natural_image
Illustration of a hand holding a camera with a red handle, no text or symbols present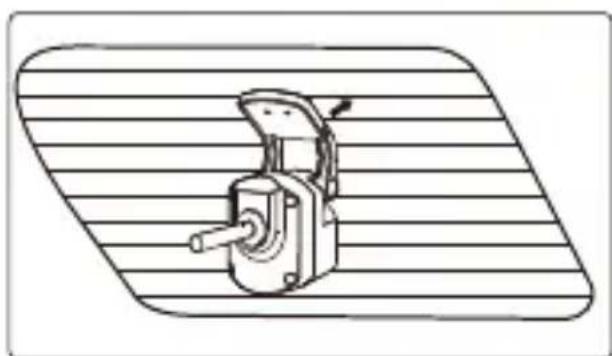
natural_image
Technical line drawing of a mechanical device with a handle and lever, mounted on a striped surface (no text or symbols)Hinweis:
natural_image
Interior view of a car showing dashboard, steering wheel, and dashboard lift (no text or symbols)natural_image
Line drawing of a car with a sensor or sensor connected to the roof, showing no text or symbols.Hinweis:
natural_image
Line drawing of a car's head and shoulders with a green checkmark indicating selection (no text or symbols)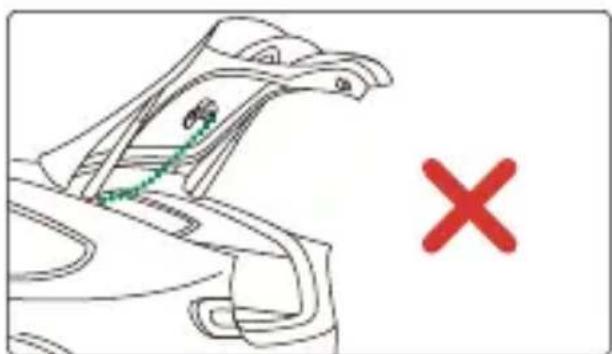
natural_image
Line drawing of a car's roof structure with a red X mark (no text or symbols)natural_image
Interior view of a car showing dashboard, steering wheel, and seatbelt layout (no text or symbols)natural_image
Diagram showing a cable being inserted into two different types of resistors, illustrating the process (no text or labels present)natural_image
Line drawing of a vintage digital camera with an arrow indicating rotational direction (no text or symbols)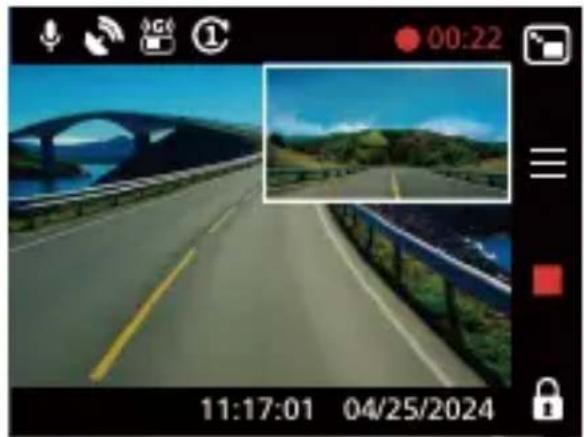
natural_image
Photo of a scenic road with bridge and green hills under blue sky, captured in a video camera interface (no readable text or symbols on the road itself)Hinweis:

natural_image
Line drawing of a car front view showing rear and side profiles (no text or symbols)
natural_image
Illustration of a hand holding a camera with a red handle, no text or symbols present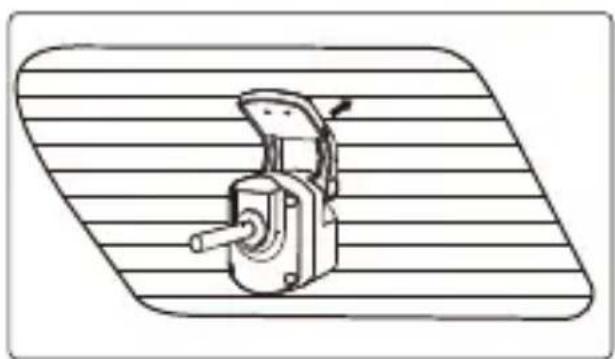
natural_image
Technical line drawing of a mechanical device with a handle and lever, mounted on a striped surface (no text or symbols)Remarque :
natural_image
Line drawing of a van with blank windows and side door (no text or symbols)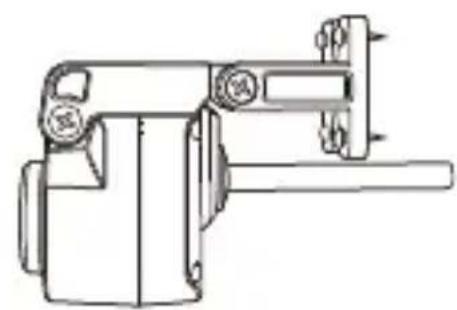
natural_image
Technical line drawing of a mechanical device with no visible text or symbols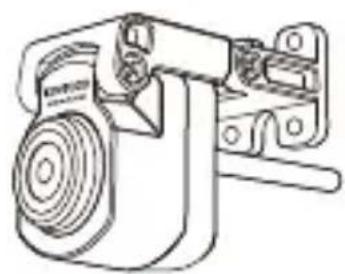
natural_image
Technical line drawing of a mechanical device with no visible text or symbols(2) CONNECTER LE CÂBLE DE LA CAMÉRA ARRIÈRE
(3) FAIRE PASSER LE CÂBLE DE LA CAMÉRA ARRIÈRE
natural_image
Interior view of a car showing dashboard, steering wheel, and seatbelt (no text or symbols)natural_image
Line drawing of a car with a sensor or sensor connected to the roof, showing no text or symbols.Remarque :
natural_image
Line drawing of a car's seat and roof structure with a green checkmark indicating selection (no text or symbols)
natural_image
Line drawing of a car's head and shoulders with a green checkmark and red X mark (no text or symbols)natural_image
Interior view of a car showing steering wheel, dashboard, and seatbelt layout (no text or symbols)(4) CONNECTER LE CÂBLE DE LA CAMÉRA ARRIÈRE À LA CAMÉRA ARRIÈRE
natural_image
Diagram showing a cable being inserted into two different types of resistors, with arrows indicating the process (no text or labels present)(5) AJUSTER LA CAMÉRA ARRIÈRE
natural_image
Line drawing of a digital camera with an arrow indicating rotational direction (no text or symbols)
natural_image
Highway scene with bridge and river, captured by a camera interface (no readable text or symbols)Remarque :
natural_image
Front view line drawing of a car (no text or symbols)
natural_image
Illustration of a hand holding a camera with a red handle, no text or symbols present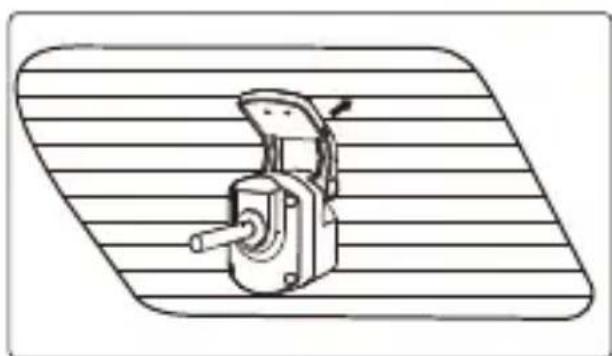
natural_image
Technical line drawing of a mechanical switch or lever device mounted on a striped base (no text or symbols)Opmerking:
natural_image
Line drawing of a van with blank windows and side door (no text or symbols)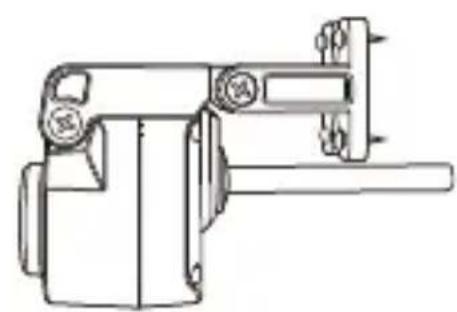
natural_image
Technical line drawing of a mechanical device with no visible text or symbols
natural_image
Technical line drawing of a mechanical device with no visible text or symbols(2) SLUIT DE KABEL VAN DE ACHTER CAMERA AAN
natural_image
Interior view of a car showing dashboard, steering wheel, and dashboard lift (no text or symbols)Dash cam Achterste camera kabel Achtercamera

natural_image
Line drawing of a car with a dotted green line connecting its top and side panels, showing no text or symbols.Opmerking:
natural_image
Line drawing of a car's seat and roof structure with a green checkmark indicating selection (no text or symbols present)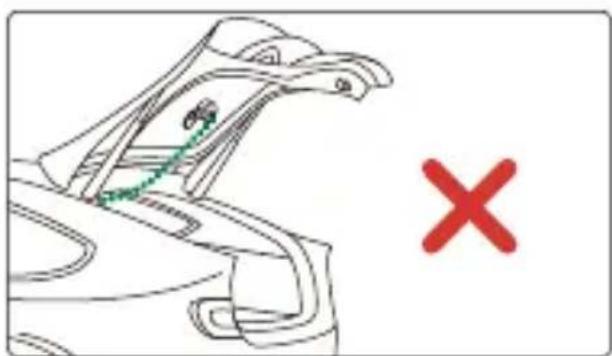
natural_image
Line drawing of a bird's head with a green line and a red 'X' mark, no text or symbols presentnatural_image
Interior view of a car showing dashboard, steering wheel, and seatbelt layout (no text or symbols)(4) SLUIT DE KABEL VAN DE ACHTERCAMERA AAN OP DE ACHTERCAMERA
natural_image
Diagram showing a cable being inserted into two types of resistors, illustrating the process (no text or symbols present)natural_image
Line drawing of a digital camera with an arrow indicating rotational direction (no text or symbols)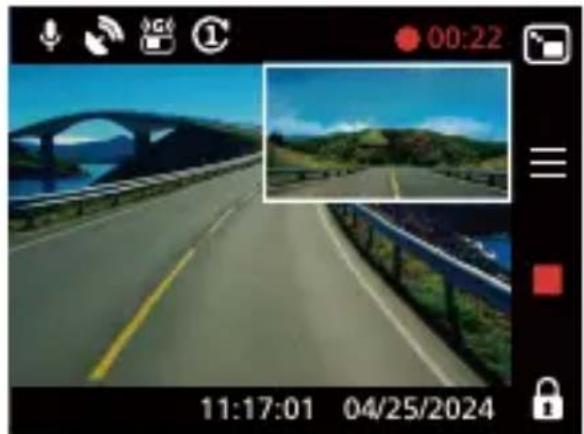
natural_image
Street view of a highway with bridge and river, captured in a video camera interface (no readable text or symbols)Opmerking:
Precautions and notices
natural_image
Front view line drawing of a car (no text or symbols)
natural_image
Illustration of a hand holding a camera with a red arrow pointing to the handle (no text or symbols)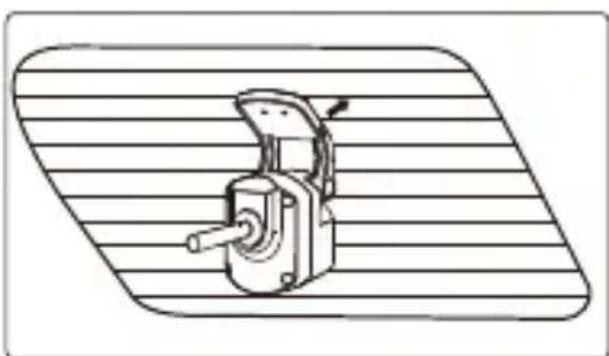
natural_image
Technical line drawing of a mechanical device with a handle and lever, mounted on a striped surface (no text or symbols)Nota:
natural_image
Line drawing of a van with blank windows and side-mounted door (no text or symbols)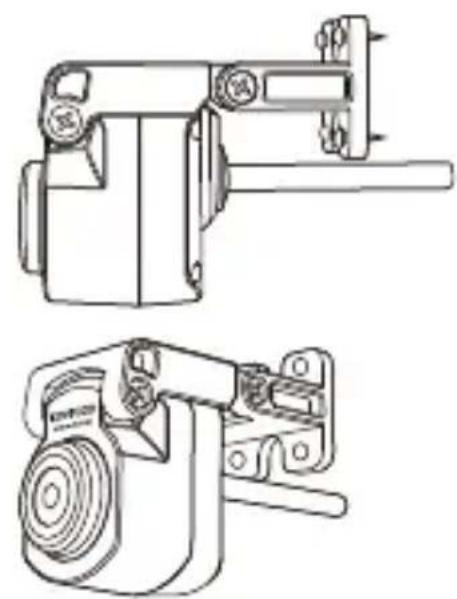
natural_image
Technical line drawings of two mechanical components (no text or symbols)(2) COLLEGARE IL CAVO DELLA TELECAMERA POSTERIORE
(3) PASSAGGIO DEL CAVO DELLA TELECAMERA POSTERIORE
natural_image
Line drawing of a car with a sensor or connected device on the roof, showing no text or symbols.Nota:
natural_image
Line drawing of a car's seat and roof structure with a green checkmark indicating selection (no text or symbols)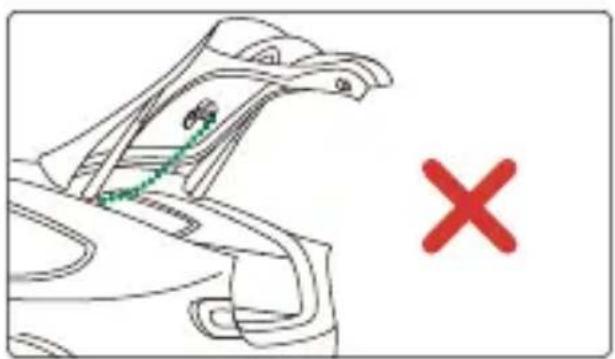
natural_image
Line drawing of a bird's head with a green bird perched on its neck and a red X symbol below (no text or labels)natural_image
Interior view of a car showing dashboard, steering wheel, and seatbelt layout (no text or symbols)(4) COLLEGAMENTO DEL CAVO DELLA TELECAMERA POSTERIORE ALLA TELECAMERA POSTERIORE
natural_image
Diagram showing a cable being inserted into two different types of resistors, with arrows indicating the process (no text or labels present)(5) REGOLAZIONE DELLA TELECAMERA POSTERIORE
natural_image
Line drawing of a digital camera with an open lid and circular base, accompanied by a curved arrow indicating rotation (no text or symbols)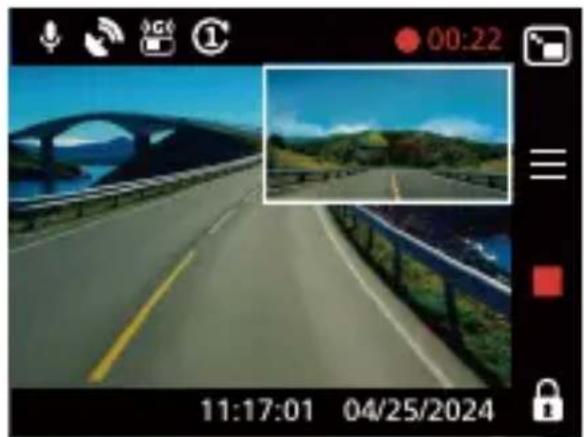
natural_image
Highway scene with bridge and roadside, captured in a video camera interface (no readable text or symbols)Nota:
natural_image
Four-panel line drawing showing different types of electrical components: a motor, coiled cable, a device with a bulb, and a bracket (no text or symbols)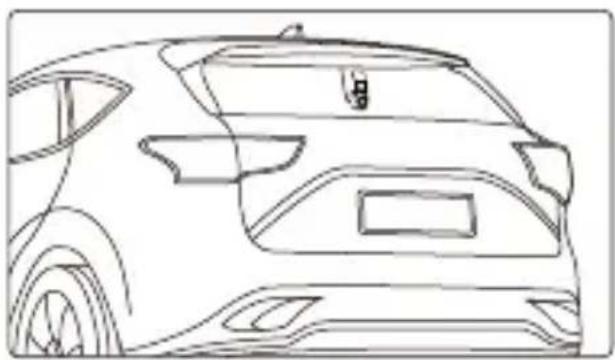
natural_image
Line drawing of a car rear view showing front and side profiles (no text or symbols)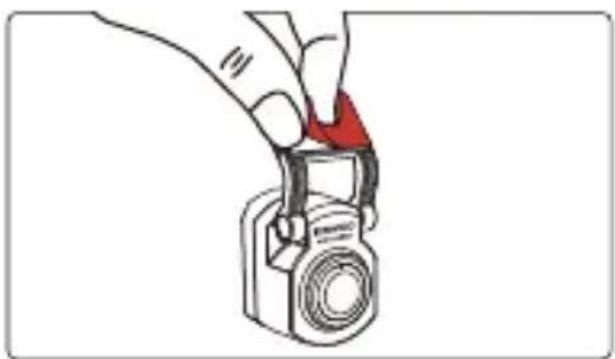
natural_image
Illustration of a hand holding a camera with a red clip attached (no text or symbols)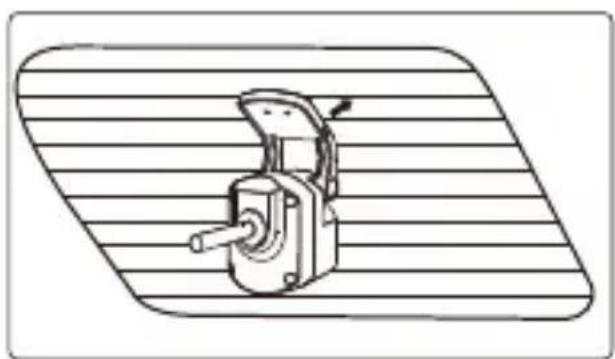
natural_image
Technical line drawing of a mechanical device mounted on a striped surface (no text or symbols)Nota:
natural_image
Line drawing of a van with blank windows and side door (no text or symbols)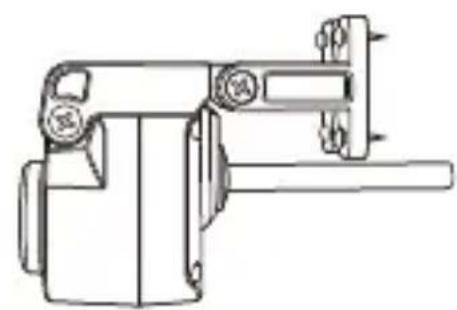
natural_image
Technical line drawing of a mechanical clamp or bracket assembly (no text or symbols)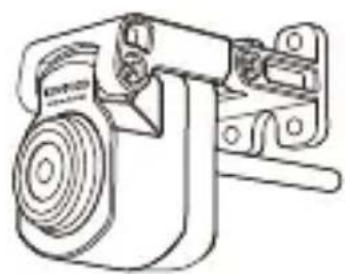
natural_image
Technical line drawing of a mechanical device with no visible text or symbols(2) CONECTE EL CABLE DE LA CÁMARA TRASERA
(3) DIRIJA EL CABLE DE LA CÁMARA TRASERA
natural_image
Line drawing of a car with a sensor or sensor connected to the roof, showing no text or symbols.Nota:
natural_image
Line drawing of a car's seat and roof structure with a green checkmark indicating selection (no text or symbols)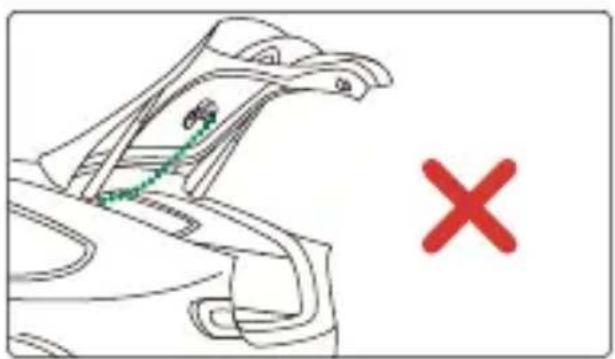
natural_image
Line drawing of a car's head and shoulders with a green checkmark and red X mark (no text or symbols)natural_image
Interior view of a car showing dashboard, steering wheel, and seatbelt layout (no text or symbols)(4) CONECTE EL CABLE DE LA CÁMARA TRASERA A LA CÁMARA TRASERA
natural_image
Line drawing of a vintage camera with an open lid and curved arrow indicating rotation (no text or symbols)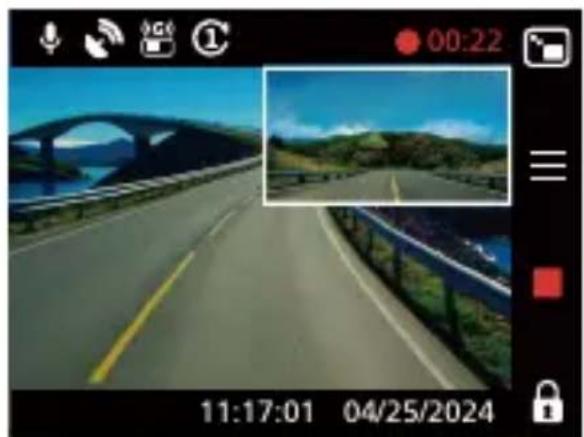
natural_image
Screenshot of a video camera interface showing a highway scene with a scenic bridge and green hills under a blue sky (no readable text or symbols)Nota:
natural_image
Front view line drawing of a car (no text or symbols)
natural_image
Illustration of a hand holding a camera with a red handle, no text or symbols present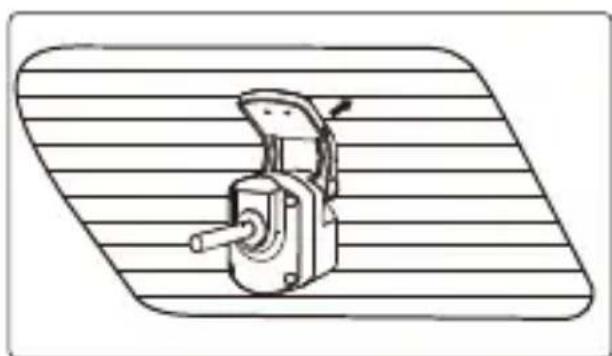
natural_image
Technical line drawing of a mechanical switch or lever device on a striped background (no text or symbols)Nota:
natural_image
Line drawing of a van with blank windows and side door (no text or symbols)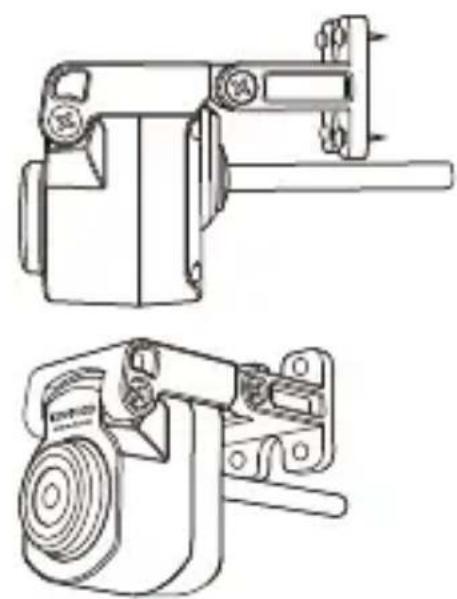
natural_image
Technical line drawings of two mechanical components (no text or symbols)(2) LIGUE O CABO DA CÂMARA TRASEIRA
(3) ENCAMINHE O CABO DA CÂMARA TRASEIRA
natural_image
Line drawing of a car with a sensor or sensor connected to the roof, showing no text or symbols.Nota:
natural_image
Line drawing of a car's seat and roof structure with a green checkmark indicating selection (no text or symbols)
natural_image
Line drawing of a car's seat with a red X mark, no text or symbols presentnatural_image
Interior view of a car showing dashboard, steering wheel, and seatbelt layout (no text or symbols)(4) LIGUE O CABO DA CÂMARA TRASEIRA À CÂMARA TRASEIRA
natural_image
Diagram showing a cable being inserted into two different types of resistors, with arrows indicating the process (no text or labels present)(5) AJUSTE A CÂMARA TRASEIRA
natural_image
Line drawing of a vintage digital camera with an arrow indicating rotational direction (no text or symbols)
natural_image
Highway scene with arched bridge and green hills under blue sky, captured by camera interface (no readable text or symbols)Nota:
natural_image
Front view line drawing of a car (no text or symbols)
natural_image
Illustration of a hand holding a camera with a red triangular clip (no text or symbols)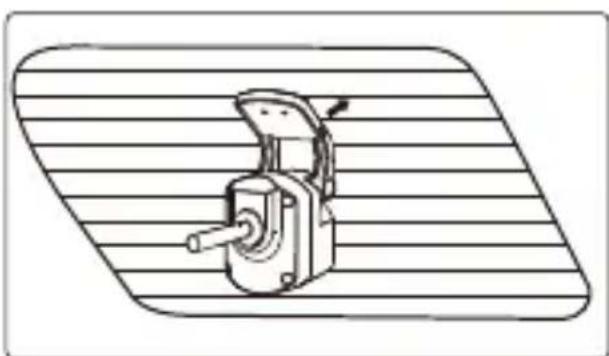
natural_image
Technical line drawing of a mechanical device with a handle and lever, mounted on a striped surface (no text or symbols)Uwaga:
natural_image
Line drawing of a van with blank windows and side door (no text or symbols)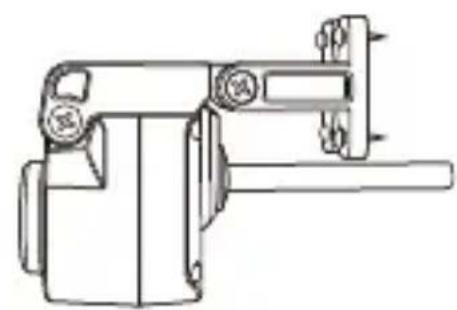
natural_image
Technical line drawing of a mechanical clamp or bracket assembly (no text or symbols)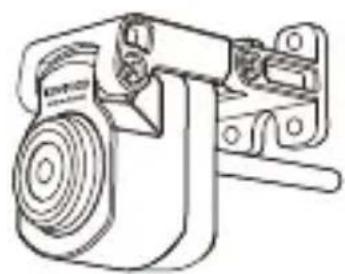
natural_image
Technical line drawing of a mechanical device with no visible text or symbols(2) PODŁĄCZ KABEL KAMERY TYLNEJ
(3) POPROWADŻ KABEL KAMERY TYLNEJ
natural_image
Interior view of a car showing dashboard, steering wheel, and dashboard lift (no text or symbols)natural_image
Line drawing of a car with a sensor or connected device on the roof, showing no text or symbols.Uwaga:
natural_image
Line drawing of a car's seat and roof structure with a green checkmark indicating selection (no text or symbols)
natural_image
Line drawing of a car's seat with a red X mark, no text or symbols presentnatural_image
Interior view of a car showing dashboard, steering wheel, and seatbelt layout (no text or symbols)(4) PODŁĄCZ KABEL KAMERY TYLNEJ DO KAMERY TYLNEJ
natural_image
Diagram showing a cable being inserted into two different types of resistors, with arrows indicating the process (no text or labels present)(5) WYREGULUJ KAMERE TYLNA
natural_image
Line drawing of a vintage digital camera with an open lid and circular arrow indicating rotation (no text or symbols)
natural_image
Photo of a highway with scenic landscape and bridge, captured on a digital camera interface (no readable text or symbols)Uwaga:
natural_image
Four technical illustrations of electrical components: motor, cable, socket, and bracket (no text or symbols)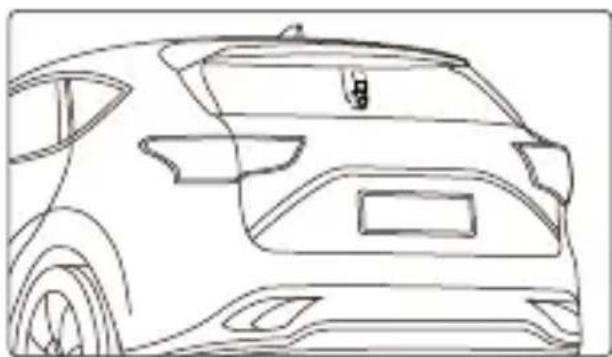
natural_image
Front view line drawing of a car (no text or symbols)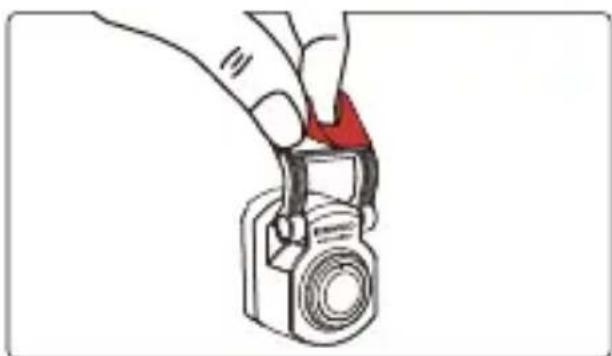
natural_image
Illustration of a hand holding a camera with a red triangular clip (no text or symbols)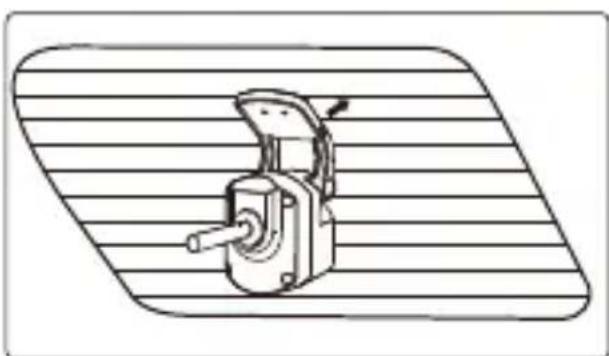
natural_image
Technical line drawing of a mechanical device with a handle and lever, mounted on a striped surface (no text or symbols)Poznámka:
natural_image
Line drawing of a van with blank windows and side door (no text or symbols)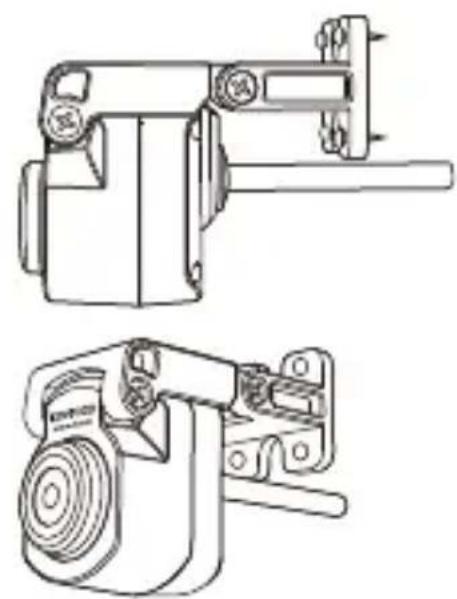
natural_image
Technical line drawings of two mechanical components (no text or symbols)(2) PŘIPOJTE KABEL ZADNÍ KAMERY
(3) PROVEĐTE KABEL ZADNÍ KAMERY
natural_image
Interior view of a car showing driver, seatbelt, and dashboard (no text or symbols)natural_image
Line drawing of a car with a sensor or sensor connected to the roof, showing no text or symbols.Poznámka:
natural_image
Line drawing of a car's seat and roof structure with a green checkmark indicating selection (no text or symbols present)
natural_image
Line drawing of a car's head and shoulders with a green checkmark and red X mark (no text or symbols)natural_image
Interior view of a car showing dashboard, steering wheel, and seatbelt layout (no text or symbols)(4) PŘIPOJTE KABEL ZADNÍ KAMERY K ZADNÍ KAMEŘE
natural_image
Diagram showing a cable being inserted into two different types of resistors, with arrows indicating the process (no text or labels present)natural_image
Line drawing of a digital camera with an open lid and circular button, accompanied by a curved arrow indicating rotation (no text or symbols)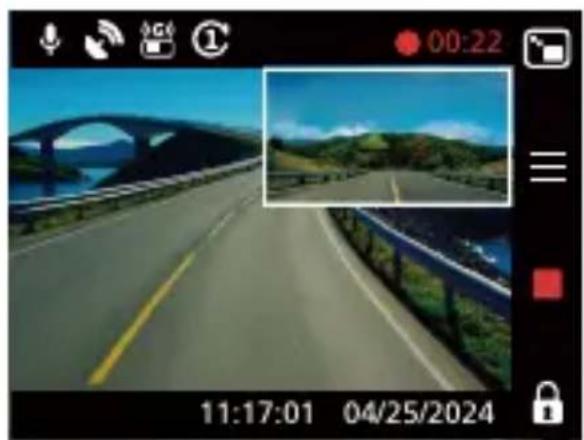
natural_image
Scenic highway view with arched bridge and green hills under blue sky (no text or symbols)Poznámka:
natural_image
Front view line drawing of a car (no text or symbols)
natural_image
Illustration of a hand holding a camera with a red triangular clip (no text or symbols)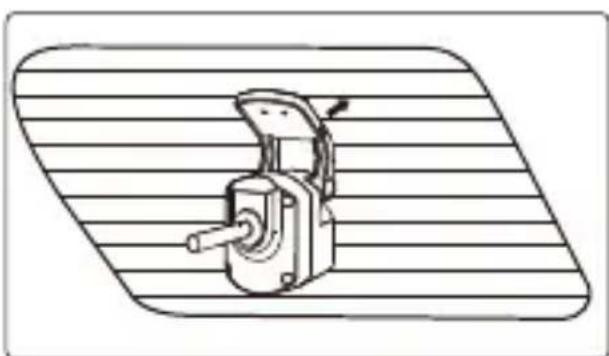
natural_image
Technical line drawing of a mechanical device with a handle and lever, mounted on a striped surface (no text or symbols)Notă:
(3) DIRECTIONATI CABLUL CAMEREI DIN SPATE
natural_image
Line drawing of a car with a sensor or connection point connected by a green dotted line (no text or symbols)Notă:
natural_image
Line drawing of a car hood with a green checkmark indicating selection (no text or symbols present)
natural_image
Line drawing of a bird's head with a green dotted line and a red 'X' symbol, no text or labels presentnatural_image
Interior view of a car showing dashboard, steering wheel, and seatbelt (no text or symbols)(4) CONECTATI CABLUL CAMEREI DIN SPATE LA CAMERA DIN SPATE
natural_image
Diagram showing a cable being inserted into two different types of resistors, illustrating the process (no text or labels present)natural_image
Line drawing of a digital camera with an arrow indicating rotational direction (no text or symbols)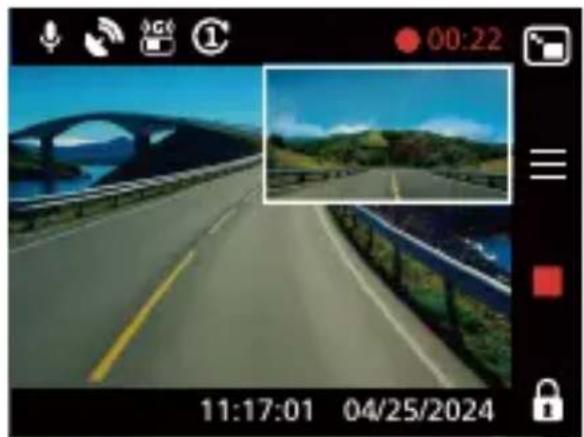
natural_image
Screenshot of a video camera interface showing a highway with scenic background and lock status (no readable text or symbols in the scene)Notă:
Information on Disposal of Old Electrical and Electronic Equipment (applicable for countries that have adopted separate waste collection systems)
Products with the symbol (crossed-out wheeled bin) cannot be disposed of as household waste.
Old electrical and electronic equipment should be recycled at a facility capable of handling these items and their waste by products.
Contact your local authority for details in locating a recycle facility nearest to you.
Proper recycling and waste disposal will help conserve resources while preventing detrimental effects on our health and the environment.

Declaration of Conformity with regard to the EMC Directive 2014/30/EU
Declaration of Conformity with regard to the RoHS Directive 2011/65/EU
Manufacturer:
JVCKENWOOD Corporation
3-12, Moriyacho, Kanagawa-ku, Yokohama-shi, Kanagawa 221-0022, JAPAN
EU Representative:
JVCKENWOOD Europe B.V.
Rendementsweg 20 B-9, 3641 SL Mijdrecht, THE NETHERLANDS
Declaration of Conformity with regard to the Electromagnetic Compatibility Regulations 2016 (S.I. 2016/1091)
Declaration of Conformity with regard to the Restriction of the Use of Certain Hazardous Substances in Electrical and Electronic Equipment Regulations 2012 (S.I. 2012/3032)
Manufacturer:
JVCKENWOOD Corporation
3-12, Moriya-cho, Kanagawa-ku, Yokohama-shi, Kanagawa, 221-0022, JAPAN
UK Importer:
JVCKENWOOD U.K. Limited
First Floor, Gleneagles, the Belfry, Colonial Way, Watford, Hertfordshire WD24 4WH, UNITED KINGDOM
FC
FCC CAUTION
Changes or modifications not expressly approved by the party responsible for compliance could void the user's authority to operate the equipment.
FCC NOTE
- This equipment has been tested and found to comply with the limits for a Class B digital device, pursuant to Part 15 of the FCC Rules. These limits are designed to provide reasonable protection against harmful interference in a residential installation.
- This equipment may cause harmful interference to radio communications, if it is not installed and used in accordance with the instructions. However, there is no guarantee that interference will not occur in a particular installation. If this equipment does cause harmful interference to radio or television reception, which can be determined by turning the equipment off and on, the user is encouraged to try to correct the interference by one or more of the following measures:
- Reorient or relocate the receiving antenna.
- Increase the separation between the equipment and receiver.
- Connect the equipment into an outlet on a circuit different from that to which the receiver is connected.
- Consult the dealer or an experienced radio/TV technician for help.
Supplier's Declaration of Conformity
Trade Name: KENWOOD
Products: Rear Camera
Model Name: KCA-R110
Responsible Party:
JVCKENWOOD USA CORPORATION
4001 Worsham Avenue, Long Beach,
CA 90808, U.S.A
PHONE: 1-800-252-5722
THIS DEVICE COMPLIES WITH PART 15 OF THE FCC RULES. OPERATION IS SUBJECT TO THE FOLLOWING TWO CONDITIONS:
(1)THIS DEVICE MAY NOT CAUSE HARMFUL INTERFERENCE, AND
(2)THIS DEVICE MUST ACCEPT ANY INTERFERENCE RECEIVED, INCLUDING INTERFERENCE THAT MAY CAUSE UNDESIRED OPERATION.
CAN ICES-3(B)/ NMB-3(B)
Trademarks
USB Type-C® and USB-C® are registered trademarks of USB Implementers Forum.