Royal EGH 2440 - Mechanical chipper EINHELL - Free user manual and instructions
Find the device manual for free Royal EGH 2440 EINHELL in PDF.

| Product type | Mechanical shredder |
| Brand | Einhell |
| Model | Royal EGH 2440 |
| Supply voltage | 230 V ~ 50 Hz |
| Power consumption | 2400 W (S6-40%) / 2000 W (S1) |
| No-load speed | 2950 rpm |
| Max branch diameter | 40 mm |
| Sound pressure level | 86 dB(A) |
| Sound power level | 106 dB(A) |
| Weight | 25 kg |
| Shredding capacity | Organic garden waste: leaves, branches, flower residues |
| Duty cycle | S6 (40% load, 4 min load / 6 min idle) |
| Safety brake | Blade stop in less than 5 seconds |
| Motor protection | Overload switch (circuit breaker-protector) |
| Blades | Reversible, replace with original parts |
| Safety | Safety switch on hopper closure |
| Power supply | Power cord with plug |
| Wheels | Yes, for mobility |
| Assembly | Frame and hopper assembly required |
| Maintenance | Clean after use, keep ventilation slots clean |
| Usage | Wear gloves, safety glasses and ear protection |
| Warranty | 2 years |
| Spare parts | Available, use only original parts |
Frequently Asked Questions - Royal EGH 2440 EINHELL
User questions about Royal EGH 2440 EINHELL
0 question about this device. Answer the ones you know or ask your own.
Ask a new question about this device
Download the instructions for your Mechanical chipper in PDF format for free! Find your manual Royal EGH 2440 - EINHELL and take your electronic device back in hand. On this page are published all the documents necessary for the use of your device. Royal EGH 2440 by EINHELL.
USER MANUAL Royal EGH 2440 EINHELL
natural_image
Close-up of a black car door frame with two small white buttons and a numbered label '3' (no text or symbols on the main subject)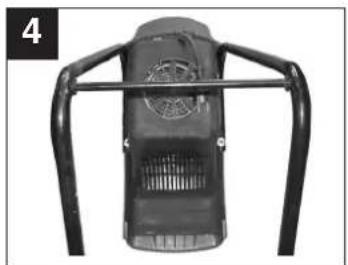
natural_image
Top-down view of a black mechanical device with curved arms and ventilation slots (no visible text or symbols)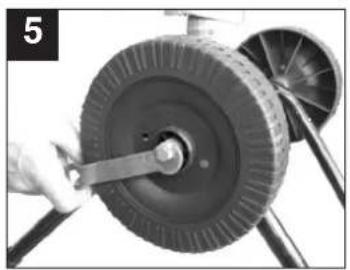
natural_image
Close-up of a hand using a tool to adjust or install a large tire wheel (no visible text or symbols)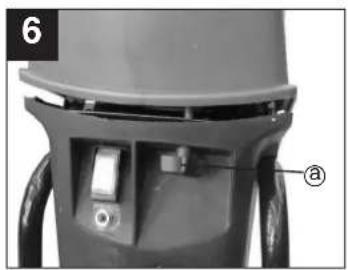
natural_image
Close-up of a mechanical component with labeled parts (a), no readable text or symbols present.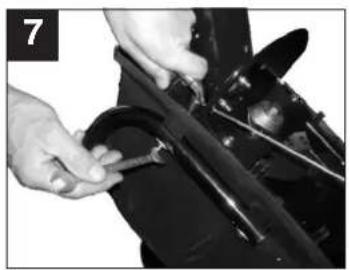
natural_image
Close-up of hands adjusting a mechanical component with tools (no visible text or symbols)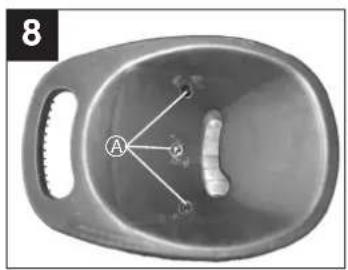
natural_image
Line drawing of a hand holding a mechanical component, no text or symbols present
D
Please read the directions for use carefully and observe the information provided. It is important to consult these instructions in order to acquaint yourself with the machine, its proper use and safety precautions.
Keep these instructions in a safe place.
Improper operation of the electric garden refuse shredder can lead to serious injuries.
This electric garden refuse shredder is designed only for shredding organic garden waste.
Important!
For safety reasons, the electric garden refuse shredder may not be operated by individuals under 16 years of age.
Safety information
Caution! The ON/OFF switch must be set to OFF and the power plug removed from the socket-outlet before cleaning or doing any other work on the shredder and whenever the cable becomes tangled. The shredder will continue to run briefly after it is switched off.
● The shredder is not to be used by individuals under 16 years of age or any other persons who
● The operator is responsible for the safety of third parties within the working radius of the shredder.
● Make sure that the shredder is properly closed (loading funnel and ejector) before you start up the motor.
● The shredder must be placed on a flat and firm surface where it can stand securely.
● Always wear gloves and safety goggles when working with the shredder.
- We recommend ear-muffs when working with shredders which have no noise-insulating features.
● Each time before you leave the shredder, switch off the motor and pull out the ignition key, spark plug connector or power plug.
● Maintenance and cleaning work on the shredder as well as the removal or adjustment of any safety devices may only be performed when the motor is at a standstill and the ignition key, spark plug connector or power plug has been pulled out.
● The safety devices supplied with the shredder (e.g. the ejector) must be used.
Additional Safety information
● The shredder must be assembled correctly before it is put into operation.
● Examine the shredder each time before you use it. Do not use the trimmer if any safety devices are damaged or worn. Never put safety devices out of operation.
● Use the grass trimmer only for the purpose specified in these instructions.
● Work only in good visibility.
- Always make sure of your footing while working.
- Never leave the shredder unattended at your work place. Store the trimmer in a safe place during interruptions.
- If you interrupt your work to move to a different position it is imperative to switch off the shredder while you are moving there.
● Never use the shredder in the rain or in moist or wet conditions.
● Protect the shredder from the damp and rain.
● Always wear suitable clothing to protect your head, hands and feet from injury. Wear a helmet, goggles or visor, high boots or strong shoes, long trousers made of tough material, and work gloves.
- Keep the shredder away from other persons, particularly children and pets.
CAUTION! The guard is vital for your safety and for the safety of others, and it is also essential for the grass trimmer to work correctly. Failure to observe this instruction will not only create a potential hazard, it will also result in the loss of your rights under the warranty.
- Keep the air vents clear of dirt.
● After use, unplug the machine and check it for damage. - When you are not using the shredder, keep it in a dry place out of the reach of children.
- Check the screws regularly to see that they are properly tightened.
● The mains voltage must be the same as the voltage specified on the rating plate.
● Power cables used with the shredder must not be of a lighter duty class than HO7RN-F rubber-insulated flexible cables according to DIN 57282 / VDE 0282 with a minimum diameter of 1.5 mmf. Plug connectors must be equipped with earthing contacts and the coupling must be rain-water-protected.
- Use only original replacement parts for repair and maintenance purposes.
● Have repairs carried out only by a qualified electrician.
GB
● Examine the grass trimmer for signs of wear or damage each time before you use it and after any collisions. Have essential repairs carried out without delay.
● Never use replacement parts or accessories which are not foreseen or recommended by the manufacturer.
● Pull out the power plug before carrying out any inspection, cleaning or other work on the trimmer and whenever it is not being used.
● Before you begin your work, examine the material you want to shred. Remove any foreign bodies. Continue to watch out for foreign bodies while you are working. If you come across any foreign bodies while shredding, shut down the machine and remove the items in question.
- Keep the machine away from other persons, particularly children and pets.
● Use the machine only in the way described in these operating instructions.
● The electric circuit must be protected at least by a 10A fuse.
● The efficiency of the machine will be greatly reduced if a connecting cable with too small a cross section is used. A conductor cross section of at least 3x1.5 mm2 is required for cables up to 25 m long, and one of at least 3x2.5 mm2 for cables longer than 25 m.
- If the machine has to be lifted for transporting, be sure to switch off the motor first and wait for the cutter to come to a standstill. Each time before you leave the machine, switch off the motor and pull out the power plug. Before you connect the machine to the power supply, make sure that the loading funnel is properly connected to the motor housing and the release screw tightened.
- If the garden refuse shredder vibrates excessively, turn off the motor, pull out the power plug, and find out immediately what is causing the vibrations. Intensive vibration is usually a sign that something is wrong.
Caution! The cutters continue to run for a few seconds after the motor is switched off.
2. Description of the warning sign (see Fig. 1) on the machine
- Caution! Rotating cutters. Keep away!
-
Always set the ON/OFF switch to OFF and pull the power plug out of the socket-outlet before doing any work on the shredder, e.g. cleaning the shredder and making adjustments, or if the power cable becomes damaged.
-
Important! Read the operating instructions and follow the warnings and safety Instructions
- Important! Keep a safe distance between yourself and the machine.
- Important! Protect the machine from the damp and never expose it to rain.
- Caution! Rotating cutters. The cutters continue to run after the motor is switched off. Wait for the cutters to come to a standstill. Risk of injury!
- Important! Always wear safety goggles, ear muffs, protective gloves and heavy-duty work clothes!
- Caution! Pieces of shredded material may be catapulted out of the shredder during operation.
3. Technical data
Voltage: 230 V - 50 Hz
Power rating: 2400 W (S6-40%)
2000 W (S1)
Idle speed n0 2950 min
Branch diameter: max. 40 mm
LPA sound pressure level: 86 dB (A)
LWA sound power level: 106 dB (A)
Weight:
25
S6 (40%) stands for a duty cycle based on 4 minutes on-load and 6 minutes off-load operation. Maximum power consumption depends on the consistency of the material being shredded.
4. Layout of the EGH 2440 (Figure 2a /
2b)
1 Loading funnel inlet
2 Loading funnel
3 Motor housing with cutter plate
4 Prodder
5 Complete chassis
6 Complete wheel
7 Axle
8 Mains cable
9 Overload switch
10 ON/OFF switch
11 Release screw
5. Proper use
This electric garden refuse shredder is designed only for shredding organic garden waste. Place biologically degradable material, e.g. leaves, branches, dead flowers etc., into the loading funnel inlet (Figure

GB
2a/Item 1).
Collecting the shredded material
A container can be placed underneath the ejector opening to catch the shredded material.
6. Before starting up
6.1 Assembling the chassis
- Place the motor housing upside down on the floor and fasten the two parts of the frame to the motor housing by screwing on hand-tight with a self-locking hex nut and a special washer (Figure 3).
- Place the axle between the two parts of the frame (Figure 4).
- Use the hex wrench and wrench adapter to mount the wheels on the frame with a spacer, washer and screw (Figure 5). Put on the wheel hubs.
● Screw out the release screw (A) (Figure 6). The loading funnel can then be swung away.
● Tighten the self-locking hex nuts and the fixing screws holding the chassis (Figure 7). - Place the loading funnel inlet (Figure 2a/Item 1) in the loading funnel (Figure 02a) and fasten in place with three screws (Figure 08 / Item A).
7. Starting up
7.1 SAFETY BRAKE
Electric motor is fitted with a safety brake and stops within 5 seconds from being switched off as a consequence the blades rotation stops as well.
7.2 Overload protection (motor circuit-breaker)
If the motor is overloaded for a lengthy period, the overload switch (Fig. 2b/Item 9) will trigger and switch off the machine. The ON/OFF switch is set to "0". After waiting for 1 minute you can press the overload switch and re-set the ON/OFF switch to ON. If the motor fails to start, clean the ejector chute (see 7.3.).
7.3 OPENING THE PLATE-HOPPER (Fig. N,O)
- always wear gloves
- ensure that the switch be on OFF position (Fig. 2b/Item 10)
- disconnect the plug from the mains
- unscrew the knob (Fig. 2b/Item 11) and lift the hopper (Fig. 2a/Item2);
- clean cut and discharge area and remove wood sticks or objects which may clog the blades. Lower the hopper (Fig. 2a/Item 2) and tighten up the knob (Fig. 2b/Item 10) tightly before activating
the On switch.
7.4 SAFETY INTERLOCK
The apparatus is fitted with a safety switch on the closure between the hopper and the lower plate. If the hopper is not perfectly placed and fixed against the lower plate, the SAFETY SWITCH will trigger, stopping the motor from working; should this occur, disassemble the hopper as explained in the previous paragraph. Carefully clean the 2 plates contacting faces. Refit carefully and tighten the knob right down. CAUTION: NEVER slacken off the knob (Fig. 2b/Item 11) without having turned off the switch (Fig. 2b/Item 10) and pulled the plug out of the socket.
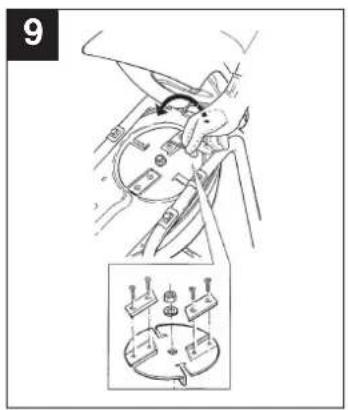
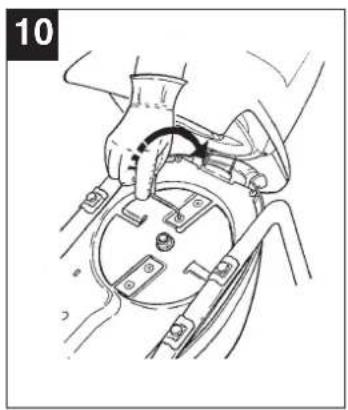
7.5 BLADES
The blades (Fig. 9-10) of the blade-holding plate are reversible. For quality safety' sake, we recommend that, in case of substitution, you use original blades only.
REVERSING, SUBSTITUTION OF BLADES
(fig. 9-10)
We suggest that the above operations be carried out by qualified Service Stations. The (reversible) blades are fixed to the rotary plate with two screws each. Before any maintenance or cleaning work on the blades, always turn the switch OFF and disconnect the plug from the socket.
7.6 Practical tips
- Wear work gloves, goggles and ear muffs.
- Material placed in the loading funnel inlet i automatically drawn into the shredder.
CAUTION! Long pieces of material projecting out of the funnel inlet may whiplash when it is drawn in – keep a safe distance between yourself and the machine.
● Judge the quantity of material which you put into the funnel inlet so that the funnel does not clog.
- If you want to shred withered, damp material that has been lying in the garden for several days, alternate between putting in this material and branches. This will help to prevent the loading funnel becoming clogged with material.
- Do not shred soft waste (e.g. kitchen waste) – put it straight in the compost box.
● Entangled branches and leaves should be thoroughly shredded before loading any more material.
- Do not allow the ejector outlet of the funnel to become clogged with shredded material – risk of
pile-ups.
● Do not cover the vent slots.
8. Care and maintenance
Caution! Interrupt the power supply by pulling the plug out of the socket-outlet before you carry out any checks or maintenance work on the machine.
● Clean the machine regularly. This will help to keep the machine in good working order and is the basis for a long working life.
- When you are finished with your work, take off the loading funnel and clean the inside. Use a brush to remove deposits from metal parts on the inside. When you mount the loading funnel, make sure that the safety switch and the release screw are clean.
- Keep the vent slots clean while you work.
● Clean the plastic body and other plastic parts with a mild household cleaning agent and a damp cloth. Do not use any aggressive agents or solvents for cleaning purposes.
● Never clean the shredder by spraying with water.
● Prevent water getting inside the machine at all cost.
9. Ordering replacement parts
Please quote the following data when ordering
replacement parts:
● Type of machine
● Article number of the machine
● Identification number of the machine
● Replacement part number of the part required
10. Waste disposal
Accessories and packaging should be disposed of in an environment-friendly fashion, i.e. by taking them to a recycling depot. Plastic parts are coded for purposes of separation when recycling.
F
1. Remarques importantes
Der Unterzeichnende erklärt in Namen der Firma die Übereinslimmung des Produktes. The undersigned declares in the name of the company that the product is in compliance with the following guidelines and standards.
Eschenstraße 6 - D-94405 Landau/Isar (Germany)
Info-Tel. 0180-5 120 509 • Telefax 0180-5 835 830
The product described in these instructions comes with a 2-year warranty covering defects. This 2-year warranty period begins with the passing of risk or when the customer receives the product.
For warranty claims to be accepted, the product has to receive the cured maintenance and be put to the proper use as described in the operating instructions.
Your statutory rights of warranty are naturally unaffected during these 2 years.
This warranty applies in Germany, or in the respective country of the manufacturer's main regional sales partner, as a supplement to local regulations. Please note the details for contacting the customer service center responsible for your region or the service address listed below.
NL GARANTIE
E Commercial Finchall, S. 4
Sundential Limited, S.A. Travacia Ville Ester, S.P.
Traveña Villa Estel, S B Delinero Industrial El Nopal
F-28119 Algete-Madrid
© Einhell Portugal Lda.
Apartado 2100
Technical & Commercial Company
- Pepastratou & Askiplou Str.
GB 18545 Piräus
Tel. 0210 4136159
①B Bermuda
Altufyevskoe shosse, 2A
RUS-127273 Moscow
Tel 095 7870179. Fax 095 5401750
LT Dibita
Metallo str. 23
LT-02190 Vilnius
Tel 05 2395769, Fax 05 2395770
CST AS Baltoil
Roiu alev
Haaslava vald
EE-62102 Tartu
Tel 07 301 700, Fax 07 301 701
(2) Halai Trading Co. LLC
POB 9262, Nakheel Rd. Deira, Shop No. 15
UAE-Dubai
Tel. 04 2279554. Fax 04 2217686
IR Alborz Abzar Co. Ltd
No. 111, Baslan Passage, Imam Khomcini Ave.
IR-11146 Teheran
Tel 021 6716072, Fax 021 6727177
Einhell BiH d.o.o.
Poslovni Contar 96
BA-72250 Vitez
(ZA) Eurasia Industrial and Automotive Supply
Bessemer Str.
Duncanville
ZA-Vereeniging 1930
Tel 16 455 571 2, Fax 16 455 571 6
D
The reprinting or reproduction by any other means, in whole or in part, of documentation and papers accompanying products is permitted only with the express consent of ISC GmbH.