ELH 2500 - Mechanical chipper EINHELL - Free user manual and instructions
Find the device manual for free ELH 2500 EINHELL in PDF.
Frequently Asked Questions - ELH 2500 EINHELL
User questions about ELH 2500 EINHELL
0 question about this device. Answer the ones you know or ask your own.
Ask a new question about this device
Download the instructions for your Mechanical chipper in PDF format for free! Find your manual ELH 2500 - EINHELL and take your electronic device back in hand. On this page are published all the documents necessary for the use of your device. ELH 2500 by EINHELL.
USER MANUAL ELH 2500 EINHELL
3
D
Please read the directions for use carefully and observe the information provided. It is important to consult these instructions in order to acquaint yourself with the machine, its proper use and safety precautions.
Keep these instructions in a safe place.
Improper operation of the electric garden refuse shredder can lead to serious injuries.
This electric garden refuse shredder is designed only for shredding organic garden waste.
Important!
For safety reasons, the electric garden refuse shredder may not be operated by individuals under 16 years of age.
Safety information
Caution! The ON/OFF switch must be set to OFF and the power plug removed from the socket-outlet before cleaning or doing any other work on the shredder and whenever the cable becomes tangled. The shredder will continue to run briefly after it is switched off.
● The shredder is not to be used by individuals under 16 years of age or any other persons who are not acquainted with those directions for use.
● The operator is responsible for the safety of third parties within the working radius of the shredder.
● The shredder must be placed on a flat and firm surface where it can stand securely.
● Always wear gloves and safety goggles when working with the shredder.
● Each time before you leave the shredder, switch off the motor and pull out the ignition key, spark plug connector or power plug.
● Maintenance and cleaning work on the shredder as well as the removal or adjustment of any safety devices may only be performed when the motor is at a standstill and the ignition key, spark plug connector or power plug has been pulled out.
● The safety devices supplied with the shredder (e.g. the elector) must be used.
● Before starting or switching on the motor, the funnel inlet must be fully mounted and secure.
● Ear protection is recommended.
- Do not reach with your hands into the funnel inlet or discharge opening.
Additional Safety information
● The shredder must be assembled correctly before it is put into operation.
● Examine the shredder each time before you use it. Do not use the trimmer if any safety devices are damaged or worn. Never put safety devices out of operation.
● Use the grass trimmer only for the purpose specified in these instructions.
● Work only in good visibility.
● Always make sure of your footing while working.
● Never leave the shredder unattended at your work place. Store the trimmer in a safe place during interruptions.
- If you interrupt your work to move to a different position it is imperative to switch off the shredder while you are moving there.
● Never use the shredder in the rain or in moist or wet conditions.
● Protect the shredder from the damp and rain.
● Always wear suitable clothing to protect your head, hands and feet from injury. Wear a helmet, goggles or visor, high boots or strong shoes, long trousers made of tough material, and work gloves.
- Keep the shredder away from other persons, particularly children and pets.
CAUTION! The guard is vital for your safety and for the safety of others, and it is also essential for the grass trimmer to work correctly. Failure to observe this Instruction will not only create a potential hazard, it will also result in the loss of your rights under the warranty.
- Keep the air vents clear of dirt.
● After use, unplug the machine and check it for damage. - When you are not using the shredder, keep it in a dry place out of the reach of children.
- Check the screws regularly to see that they are properly tightened.
● The mains voltage must be the same as the voltage specified on the rating plate.
● Power cables used with the shredder must not be of a lighter duty class than HO7RN-F rubber-insulated flexible cables according to DIN 57282 / VDE 0282 with a minimum diameter of 1.5 mm². Plug connectors must be equipped with earthing contacts and the coupling must be rain-water-protected.
- Use only original replacement parts for repair and maintenance purposes.
● Have repairs carried out only by a qualified
GB
electrician.
● Examine the grass trimmer for signs of wear or damage each time before you use it and after any collisions. Have essential repairs carried out without delay.
● Never use replacement parts or accessories which are not foreseen or recommended by the manufacturer.
● Pull out the power plug before carrying out any inspection, cleaning or other work on the trimmer and whenever it is not being used.
● Before you begin your work, examine the material you want to shred. Remove any foreign bodies. Continue to watch out for foreign bodies while you are working. If you come across any foreign bodies while shredding, shut down the machine and remove the items in question.
- Keep the machine away from other persons, particularly children and pets.
● Use the machine only in the way described in these operating instructions.
● The electric circuit must be protected at least by a 10A fuse.
● The efficiency of the machine will be greatly reduced if a connecting cable with too small a cross section is used. A conductor cross section of at least 3x1.5 mm2 is required for cables up to 25 m long, and one of at least 3x2.5 mm2 for cables longer than 25 m.
- If the machine has to be lifted for transporting, be sure to switch off the motor first and wait for the cutter to come to a standstill. Each time before you leave the machine, switch off the motor and pull out the power plug. Before you connect the machine to the power supply, make sure that the funnel inlet is properly connected to the motor housing.
- If the garden refuse shredder vibrates excessively, turn off the motor, pull out the power plug, and find out immediately what is causing the vibrations. Intensive vibration is usually a sign that something is wrong.
- If the connection lead for this machine is damaged, it must be replaced by the manufacturer or its after-sales service or similarly trained personnel to avoid danger.
Caution! The cutters continue to run for a few seconds after the motor is switched off.
2. Description of the warning sign (see Fig. A) on the machine
- Important! Read the operating instructions
10
and follow the warnings and safety instructions
- Important! Always wear safety goggles, ear protection, protective gloves and heavy-duty work clothes. We recommend that you wear a helmet with a face guard.
- Important! Protect the machine from the damp and never expose it to rain.
- Always set the ON/OFF switch to OFF and pull the power plug out of the socket-outlet before doing any work on the shredder, e.g. cleaning the shredder and making adjustments, or if the power cable becomes damaged.
- Important! If the mains lead is damaged or cut, pull out the power plug immediately.
- Caution! Pieces of shredded material may be catapulted out of the shredder during operation. Keep a safe distance between yourself and the machine.
- Caution! Rotating cutters. The cutters continue to run after the motor is switched off. Wait for the cutters to come to a standstill. Risk of injury!
3. Technical data
Voltage: 230 V \~ 50 Hz
Power rating: 2500 W (S6-40%)
2000 W (S1)
Cutting unit idling speed
40 min
Branch diameter: max. 40 mm
LPA sound pressure level: 81 dB (A)
LWA sound power level: 91 dB (A)
Weight:
26
S6 (40%) stands for a duty cycle based on 4 minutes on-load and 6 minutes off-load operation. Maximum power consumption depends on the consistency of the material being shredded.
4. Layout of the (Figure 1)
1 Funnel inlet
2 Motor protection switch
3 ON/OFF switch
4 Switch for selecting the direction of rotation
5 Integral mains plug
6 Ventilation slits
7 Chassis
8 Discharge opening
5. Proper use
This electric garden refuse shredder is designed only
for shredding organic garden waste. Place biologically degradable material, e.g. leaves, branches, dead flowers etc., into the loading funnel inlet.
Collecting the shredded material
A container can be placed underneath the ejector opening to catch the shredded material.
6. Before starting up
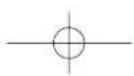
6.1 Assembly (Fig. 2)
● Take all the parts out of the packaging.
- Remove the two plastic parts fitted on the underside of the housing to protect the assembly screws for the chassis during transport.
● Fit the chassis to the housing using the two lock nuts (item 2). Use the assembly tool provided for the purpose.
● Fit the axle (item 3) to the chassis using the two M6 x 50 screws (item 4) and nuts (item 2). Use the assembly tool provided for this purpose.
● Push the wheels (item 5) on to the axle.
- Secure the wheel cover (item 6) on the axle using a hammer.
7. Starting up
7.1 ON/OFF switch (Fig. 1 / item 3)
- Press the green knob to switch on the shredder.
- Press the red knob to switch it off.
Important: The machine has a zero voltage switch. This prevents the machine restarting unintentionally after a power failure.
7.2 Switch for selecting the direction of rotation (Fig. 1 / Item 4)
Important! The switch for selecting the direction of rotation can only be moved when the shredder is switched off.
Position "1"
The material is automatically drawn in by the blade and shredded.
Position "0"
The blade rotates in the opposite direction to release jammed material. After moving the selector switch to the "0" position, press and hold the green knob of the ON/OFF switch. The blade will start to rotate in the opposite direction. As soon as you release the ON/OFF switch, the shredder will stop automatically. Important! Always wait until the shredder has reached a standstill before you switch it on again.
Large items or pieces of wood will be discharged both in the cutting and in the release direction after the blade has been started and reversed several times.
7.3 Motor protection (Fig. 1 / Item 2)
An overload (for example if the blade is jammed) will cause the machine to cut out after a few seconds. To protect the motor from damage the motor protection switch stops the power supply automatically. Wait for at least one minute before you press the reset knob so that you can restart the machine.
Then press the ON/OFF switch.
If the blade becomes jammed, turn the switch for selecting the direction of rotation to the left to position "1" before you switch on the shredder again.
7.4 Practical tips
● Read the special and general safety instructions
(section 1).
● Wear work gloves, goggles and ear protection.
● Place the material you wish to shred into the opening on the right-hand side (the blade rotates anti-clockwise).
- The material is drawn into the shredder automatically. CAUTION! Long pieces of material projecting out of the funnel inlet may whiplash when it is drawn in – keep a safe distance between yourself and the machine.
● Judge the quantity of material which you put into the funnel inlet so that the funnel does not clog.
- If you want to shred withered, damp material that has been lying in the garden for several days, alternate between putting in this material and branches. This will help to prevent the loading funnel becoming clogged with material.
- Do not shred soft waste (e.g. kitchen waste) – put it straight in the compost box.
● Entangled branches and leaves should be thoroughly shredded before loading any more material.
- Do not allow the discharge opening to become clogged with shredded material – risk of pile-ups.
- Do not cover the ventilation slits.
- Do not place heavy material or thick branches into the machine continuously. This may cause the blade to jam.
- Use a plunger or hook to remove jammed objects from the funnel or discharge openings.
Important: The material will be crushed, mashed and shredded by the cutting unit, thus accelerating
GB
GB
the decomposition process for composting.
and release the jammed material.
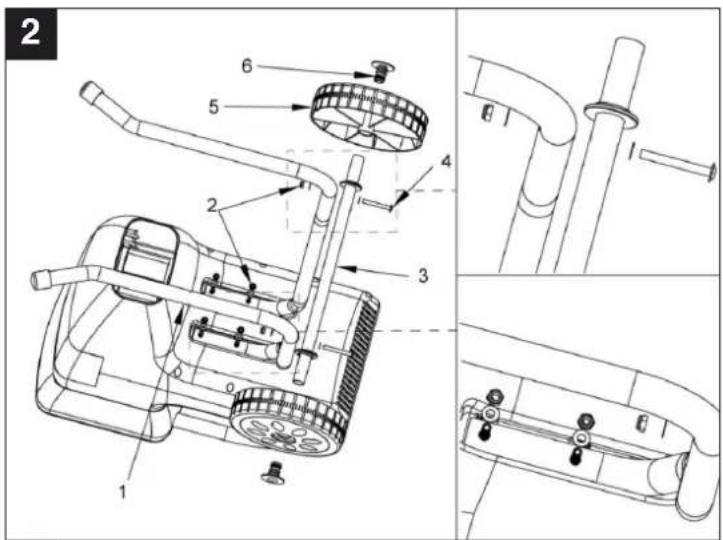
7.5 Adjusting the counter blade (Fig. 3)
The counter blade and cutting unit are perfectly adjusted at the factory. Only if it suffers wear does the counter blade require adjustment (switch the machine on for this purpose). To ensure the best possible results from your shredder, the gap between the counter blade (item B) and the shredding blade (item A) should be approx. 0.50 mm. There is an adjustment device on the right-hand side of the plastic housing for this purpose. Insert the supplied Allen key (item D) and turn it clockwise so that the screw (item C) moves towards the shredding blade. After a half-turn the counter blade will have moved 0.50 mm closer to the shredding blade. After completing this adjustment check whether the blade produces the desired results.
IMPORTANT: If the shredding blade touches the counter blade, it will cut it and small metal chips may fall out of the discharge opening. This is not a fault, but it must only be adjusted as much as necessary since otherwise the counter blade will suffer premature wear.
8. Troubleshooting
Motor does not run
- The motor protection switch has tripped. Move the switch for selecting the direction of rotation to position "0" and press the reset knob. Press and hold the ON/OFF switch to switch on the shredder after a brief delay. Once the blockage has been cleared, return the switch for selecting the direction of rotation to position "1".
● Power failure Check the mains lead, plug and fuse.
Material is not drawn in by the shredder
● The shredding blade rotates backwards Check the direction of rotation
- Material blockage in the funnel
Move the switch for selecting the direction of rotation to position "0" and switch on the shredder. Pull the material out of the funnel. Feed in thick branches again so that the blade does not immediately engage again in the notches it previously cut.
- The shredding blade is jammed
Move the switch for selecting the direction of rotation to position "0" and switch on the shredder. The blade will now rotate in the opposite direction
Important! Do not change the direction of rotation until the shredder has reached a complete standstill.
9. Care and maintenance
Caution! Interrupt the power supply by pulling the plug out of the socket-outlet before you carry out any checks or maintenance work on the machine.
● Clean the machine regularly. This will help to keep the machine in good working order and is the basis for a long working life.
- Keep the vent slots clean while you work.
● Clean the plastic body and other plastic parts with a mild household cleaning agent and a damp cloth. Do not use any aggressive agents or solvents for cleaning purposes.
● Never clean the shredder by spraying with water.
● Prevent water getting inside the machine at all cost.
- Check the chassis securing screws from time to time to ensure that they are tight.
- If you do not intend to use the shredder for a lengthy period, protect it from corrosion using environmentally friendly oil.
10. Ordering replacement parts
Please quote the following data when ordering
replacement parts:
● Type of machine
● Article number of the machine
● Identification number of the machine
● Replacement part number of the part required
11. Waste disposal
Accessories and packaging should be disposed of in an environment-friendly fashion, i.e. by taking them to a recycling depot. Plastic parts are coded for purposes of separation when recycling.
1. Remarques importantes
Position "0" Couche "1" Position "0"
The undersigned declares in the name of the company that the product is in compliance with the following guidelines and standards.
The image contains no text or characters.
□
□
×
The image contains a single, solid horizontal line. According to the instructions, specifically the rule for ignoring such lines, there is no actual text content to extract or convert under these specific rules. Therefore, the correct OCR output is an empty string.
89/686/EWG
87/404/EWG
R&TTED 1999/5/EG
2000/14/EG: LWM 88 dB(A); LWA 93 dB(A)
95/54/EG
ISC GmbH
Eschenstraße 6
D-94405 Landau/Isar
EN 13683: 2003; EN 60335-1: 1994+A11+A1+A12-A16; EN 55041-1; EN 55014-2; EN 61000-3-2; KBV V
Landau/lsar, den 05.05.2004

Brunhózl
Eschenstraße 6 - D-94405 Landau/Isar (Germany)
Info-Tel. 0180-5 120 509 · Telefax 0180-5 835 830
The reprinting or reproduction by any other means, in whole or in part, of documentation and papers accompanying products is permitted only with the express consent of ISC GmbH.
F
The product described in these instructions comes with a 2-year warranty covering defects. This 2-year warranty period begins with the peasing at risk or when the customer receives the product.
For warranty claims to be accepted, the product has to receive the correct maintenance and be put to the proper use as described in the operating instructions.
Your statutory rights of warranty are naturally unaffected during these 2 years.
This warranty applies in Germany, or in the respective country of the manufacturer's main regional sales partner, as a supplement to local regulations. Please note the details for contacting the customer service center responsible for your region or the service address listed below.
NL GARANTIE
Truero Villo Enter, D.F.
Traveña Vila Esler, 3 D Relicipo Industrial El Nocal
F-28119 Algate-Madrid
P Einbell Portugal Ltd
Aportado BIRD
Altsy Geame mab Yasemin Sck. No: 19
TR 34843 Maltepe - Istanbul
Tel. 0216 4594865. Fax 0216 4429325
SK Vobler s.r.o
Zupná 4
SK-95301 Zlate Morave
Tel. 37 6426255, Fax 37 26256
(2) Turkestan
Vovalech S.I.I. Ed. Leeroy Cataraju 24.25
Bu. Lasar Catalgiu 24-25
Sc. A, AP 9 Sector T PO 75121 Busurol
RO-75121 Bucuresti Tel: 031-4104900 Fax: 031-4102568
EZ Poker Plus S B O
4051-11-Hosbavoo
Areal 10 Bc Budava 10 P
CZ-19011 Prahe - Bechovice 911
BG Slav GmbH
Mövel Koloni-kl. 10 W
BG-9000 Vama
Tel. 052 605254
(HR) Einhell Croa
Volvo Vys 2
VERKA 9152 HR-48324 L
Tel 049 342 441. Fax 049 342 392
© GMA-Elektromechanika d.p.p
Costa Anónia Bilanca 115
SLO 1000 Ujubilene
Tel 01/5838304. Fax 01/5183603
© An Mavoplietopuia S. A
Technical & Commercial Company
Technical & Commercial Company 12. Paparistratu & Arkliniqu Sir
GB 18545 Piräus
Tel. 0210-413515
483 Formas
Altufovskog shasse. 2A
RUS-127273 Moscow
Tel. 095 7870179, Fax 095 5401750
H Dirbita
Meralo str. 23
LT-02190 VIIpl
Tel. 05-2095789 Fax 05-2095770
(57) AS Bail
Boju alay
Haaskava valid
EF-52102 Terts
Tel 07 301 700. Fax 07 301 701
© Halai Trading Co. LLC
POB 9282, Nakheel Rd. Deira. Shop No. 15
UAE-DUBA
Tel 04 2279554, Fax 04 2217686
(in) Alborz Abzar Co. Ltd.
No. 111, Bastan Passage, Imam Khomeini Ave
IR-11146 Teheran
Tel 021 6716072, Fax 021 6727177
③ FIS d.o.o
Poslovni Centar 96
BA-87000 Vitez
Tel 030 715 267, Fax 030 715 320
© MANIMEX d.o.o
Uzicke republike 83
SCG-31000 Uzior
Tel 031 551 393
(26) Eurasia Industrial and Automotive Supply
Bessemer Str
Duncanville
ZA-Vereeniging 1930
Tel 16 455 571 2, Fax 16 455 571 6
EH 05/2004