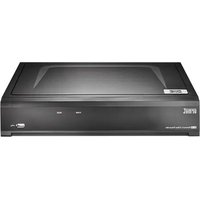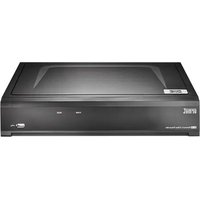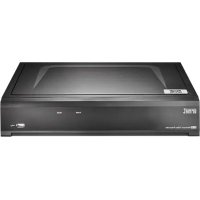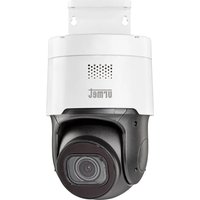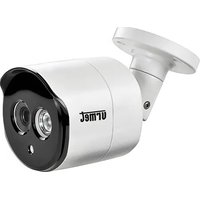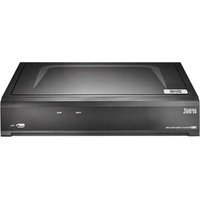
NVR 1098/332 - VCR GROTHE - Free user manual and instructions
Find the device manual for free NVR 1098/332 GROTHE in PDF.


| Product type | H.265 Network Video Recorder (NVR) |
| Brand / Model | Grothe / NVR 1098/332 |
| Power supply | 12 V DC (power adapter included) or PoE on PoE models |
| Power consumption | Approximately 15 W (without hard drive) |
| Dimensions (W x D x H) | 260 x 230 x 45 mm |
| Weight | 1.2 kg (without hard drive) |
| Internal hard drive | 1 SATA bay for 3.5-inch hard drive (not included) |
| Video outputs | 1x HDMI, 1x VGA |
| Network ports | 1x RJ45 10/100/1000 Mbps, PoE ports (depending on model) |
| Maximum recording resolution | 2592 x 1520 pixels (main stream) |
| Video codec | H.265, H.264 |
| Number of channels | 8 IP channels |
| Main features | Continuous, scheduled, motion-triggered recording; local, Web, smartphone viewing; playback, fast forward, slow motion; PC browsing manager |
| Smartphone app | URMET iUVS plus (iOS and Android) |
| PC client software | URMET UVS (Windows and Mac) |
| Default password | 00000000 (eight zeros) |
| Maintenance and cleaning | Disconnect before cleaning; use a dry cloth, possibly dampened with a mild detergent; do not use solvents or sprays |
| Safety | Do not open the device; avoid moisture, impact, dust; do not block ventilation slots; maintain 5 cm clearance around when rack-mounted |
| Spare parts and repairability | Hard drive replaceable by a professional; repair only by authorized service center |
| General information | Designed for CCTV systems; comply with privacy protection laws; perform a test recording before use |
Frequently Asked Questions - NVR 1098/332 GROTHE
User questions about NVR 1098/332 GROTHE
0 question about this device. Answer the ones you know or ask your own.
Ask a new question about this device
Download the instructions for your VCR in PDF format for free! Find your manual NVR 1098/332 - GROTHE and take your electronic device back in hand. On this page are published all the documents necessary for the use of your device. NVR 1098/332 by GROTHE.
USER MANUAL NVR 1098/332 GROTHE
natural_image
Simple 3D illustration of a rectangular box with a circular hole on top, set against a light blue background (no text or symbols)IT | EN | FR | ES | DE
www.urmet.com
Indice
text_image
Diagram of a network device rear panel with labeled ports and connectors, including USB port, USB drive, and I/O ports.Pannello posteriore case NVR da 4 HD
text_image
3 6 4 2 1 5flowchart
graph TD
    A["Computer monitor"] --> B["User interface with monitor display"]
    B --> C["User interface with microphone"]
    C --> D["User interface with mouse"]
    D --> E["Wall-mounted switch"]
    E --> F["User interface with security device"]
    F --> G["Computer monitor"]
CONFIGURAZIONE CANALI NVR DA MONITOR LOCALE
text_image
Devices Manual Adding Import Devices Online Device Select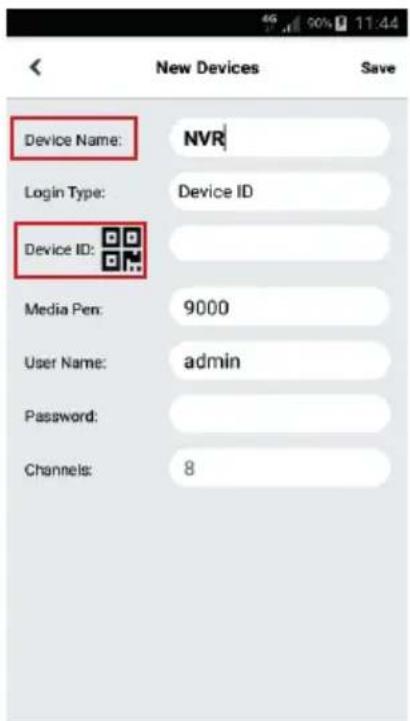
text_image
Device Name: NVR Login Type: Device ID Device ID: Media Pen: 9000 User Name: admin Password: Channels: 8text_image
User Info Username admin Password ****** Device Info Start IP Media Port Web Port Gateway Net Mask Net Mode Static Modifytext_image
urmet Live Playback Remote Setting Local Settings Channel 1.04 Main Stream Sub Stream Multi Stream CH01 CH02 CH03 CH04 R R R RNVR channel configuration by manual assignment 26
NVR channel configuration using a PC 30
RECORD AND PLAYBACK 30
Recording Parameters 30
Playback 33
DISPLAY FROM THE SMARTPHONE 34
DISPLAY WITH PC BROWSER 36
DISPLAY FROM SOFTWARE CLIENT 37
General Information
Dear Customer,
Thank you for having purchased this Urmet product.
This document describes how to install and use the NVR models for URMET NVR Boost 3.0 Series.
Read this quick guide which contains information for correct, safe use carefully.
Keep this quick guide at hand so that you can refer to it when needed.
\*NOTE
For more detailed information about the devices, refer to the complete user manual available on the Urmet website (see QR code printed on the Addendum sheet).
WARNINGS
Power
Check mains rating before plugging the power unit in.
Do not pull the cable to unplug the device.
Switch the device off before unplugging power unit. This operation must not be performed when the NVR is recording, playing or from the configuration menu. Stop recordings and playback in progress before disconnecting power from the device to prevent damaging the hard disk beyond repair.
Safety precautions
Keep the device away from rain and humidity to prevent risk of fire and electrocution. Do not introduce material (solid or liquid) inside. If this should accidentally occur, disconnect the device from the mains and have it inspected by qualified personnel.
Never open the device. In all cases, contact a qualified personnel or authorised service centre for repairs (www.urmet.com >> Contacts >> Export Sales Network).
Keep the device away from children, to prevent accidental damage.
Do not touch the device with wet hands to prevent electrical shock or mechanical damage.
Do not use the device if it should fall or the external casing is damaged. Risk of electrocution if the device is used in such conditions. Contact the retailer or authorised installer.
Installation precautions
To prevent overheating the device, arrange it in a position allowing the flow of air through the slots in the casing. Ensure at least 5 cm of free space when installing inside a rack. For the same reason, do not install sources of heat, such as radiators or hot air ducts. Keep away from direct sunlight. Do not install in areas subject to excessive dust, mechanical vibrations or shocks.
Do not arrange this device on an unstable surface, such as a tottering or slanted table. The device could fall causing injury or mechanical failures.
Do not install the device in a place where it could be exposed to humidity or water. Do not direct a jet of water onto the device: risk of fire, electrocution or mechanical failure.
Stop using the device if water or other material should penetrate inside: risk of fire and electrocution. Contact the retailer or authorised installer.
Do not place heavy or heat generating objects on top of the device: this could damage the casing and/or increase internal temperature causing faults.
Do not cover the device with a cloth while it is running to prevent deforming the external casing and overheating the internal parts: risk of fire, electrocution and mechanical failure.
Keep magnets and magnetised objects away from the device to prevent faults.
Do not use the device in presence of smoke, vapour, humidity, dust or intense vibrations.
Wait for a while before operating a device immediately after transporting it from a cold place to a warm place and vice versa. Wait on average for three hours: this will allow the device to adapt to the new ambient (temperature, humidity, etc.).
Cleaning the device
Rub delicately with a dry cloth to remove dust and dirt.
Dip the cloth in neutral detergent if dirt cannot be eliminated with a dry cloth alone.
Do not use volatile liquids (such as petrol, alcohol, solvents, etc.) or chemically treated clothes to clean the device to prevent deformation, deterioration or scratches to the paint finish.
Hard disk
The hard disk installed in this device is sensitive to shocks, differences in temperature and vibrations. Disrespect of these precautions can compromise correct operation of the device and cause loss of data stored on the hard disk.
If repairs are required, it is advisable to backup all important data before taking the device to the service centre. URMET S.p.A. is not liable for loss of stored data.
The addition of a hard disk must be performed by qualified technical personnel or by contacting the technical assistance service.
Image recording
This device was designed to record images, not as a burglar alarm. URMET S.p.A. cannot be held liable for loss or damage following theft sustained by the user.
Make a test recording before using the device to make sure that is working correctly. Please note that URMET S.p.A. is not liable for loss of stored data consequent to loss or damage caused by incorrect observation installation, use, improper use or malfunctioning of the device.
This device contains precision electronic components. Protect the device from shocks to ensure correct recording of images.
Privacy and Copyright
The NVR (Network Video Recorder) is a device for CCTV systems. Recording of imagines is subject to the laws in force in your country. Recording of images protected by copyright is forbidden.
Product users shall be responsible for checking and respecting all local rules and regulations concerning monitoring and recording video signals. The manufacturing SHALL NOT BE LIABLE for use of this product not in compliance with the laws in force.
Software upgrades
Regularly check the specific section of the manufacturer's web site at at www.urmet.com >> Download >> Software for software upgrades.
Firmware upgrades
Call URMET S.p.A. Customer Service for firmware upgrades.
Network installation
The factory default IP address of the NVR is DHCP.
Using the NVR Network OSD Menu, assign the NVR an IP address which hasn't been assigned to other devices in order to prevent any network conflict.
After assigning a proper IP address to the NVR, it can be connected to the Network.
Network connection
When connecting to a remote PC (using Client Software or I.E.), remember that all video channels used by the PC correspond to a “unicast” type connection (TCP, RTP, UDP etc).
Installation
Use a monitor with VGA or HDMI input for device start-up. Carefully follow the instructions below.
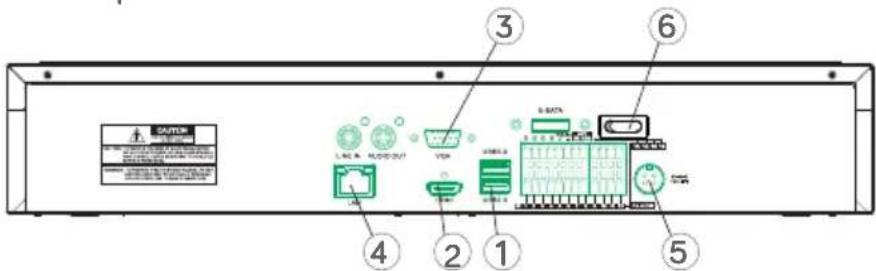
2 HDD housing's rear panel
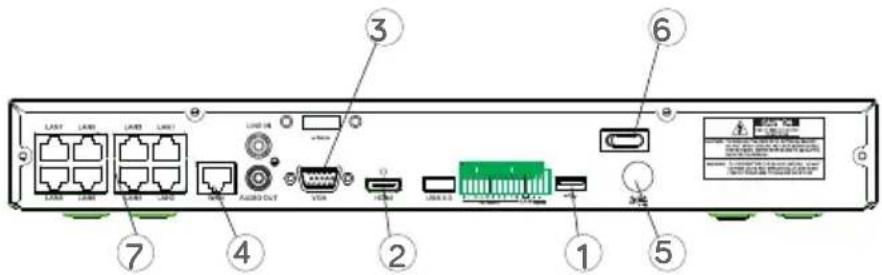
text_image
Diagram of a network device rear panel with labeled ports and connectors, showing numbered parts from 1 to 7.4 HDD housing's rear panel
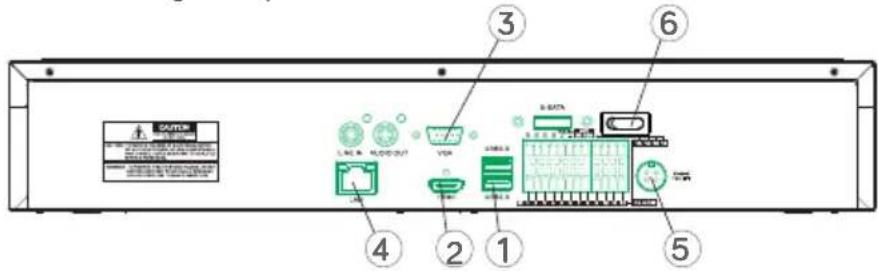
text_image
3 6 4 2 1 5① USB port
② HDMI output
③ VGA output
④ Network Connection Port (to: router, switch, PoE switch)
⑤ Plugs
⑥ Switches
⑦ PoE Ports (available on PoE NVR models) for direct connection to IP camera (straight cable)
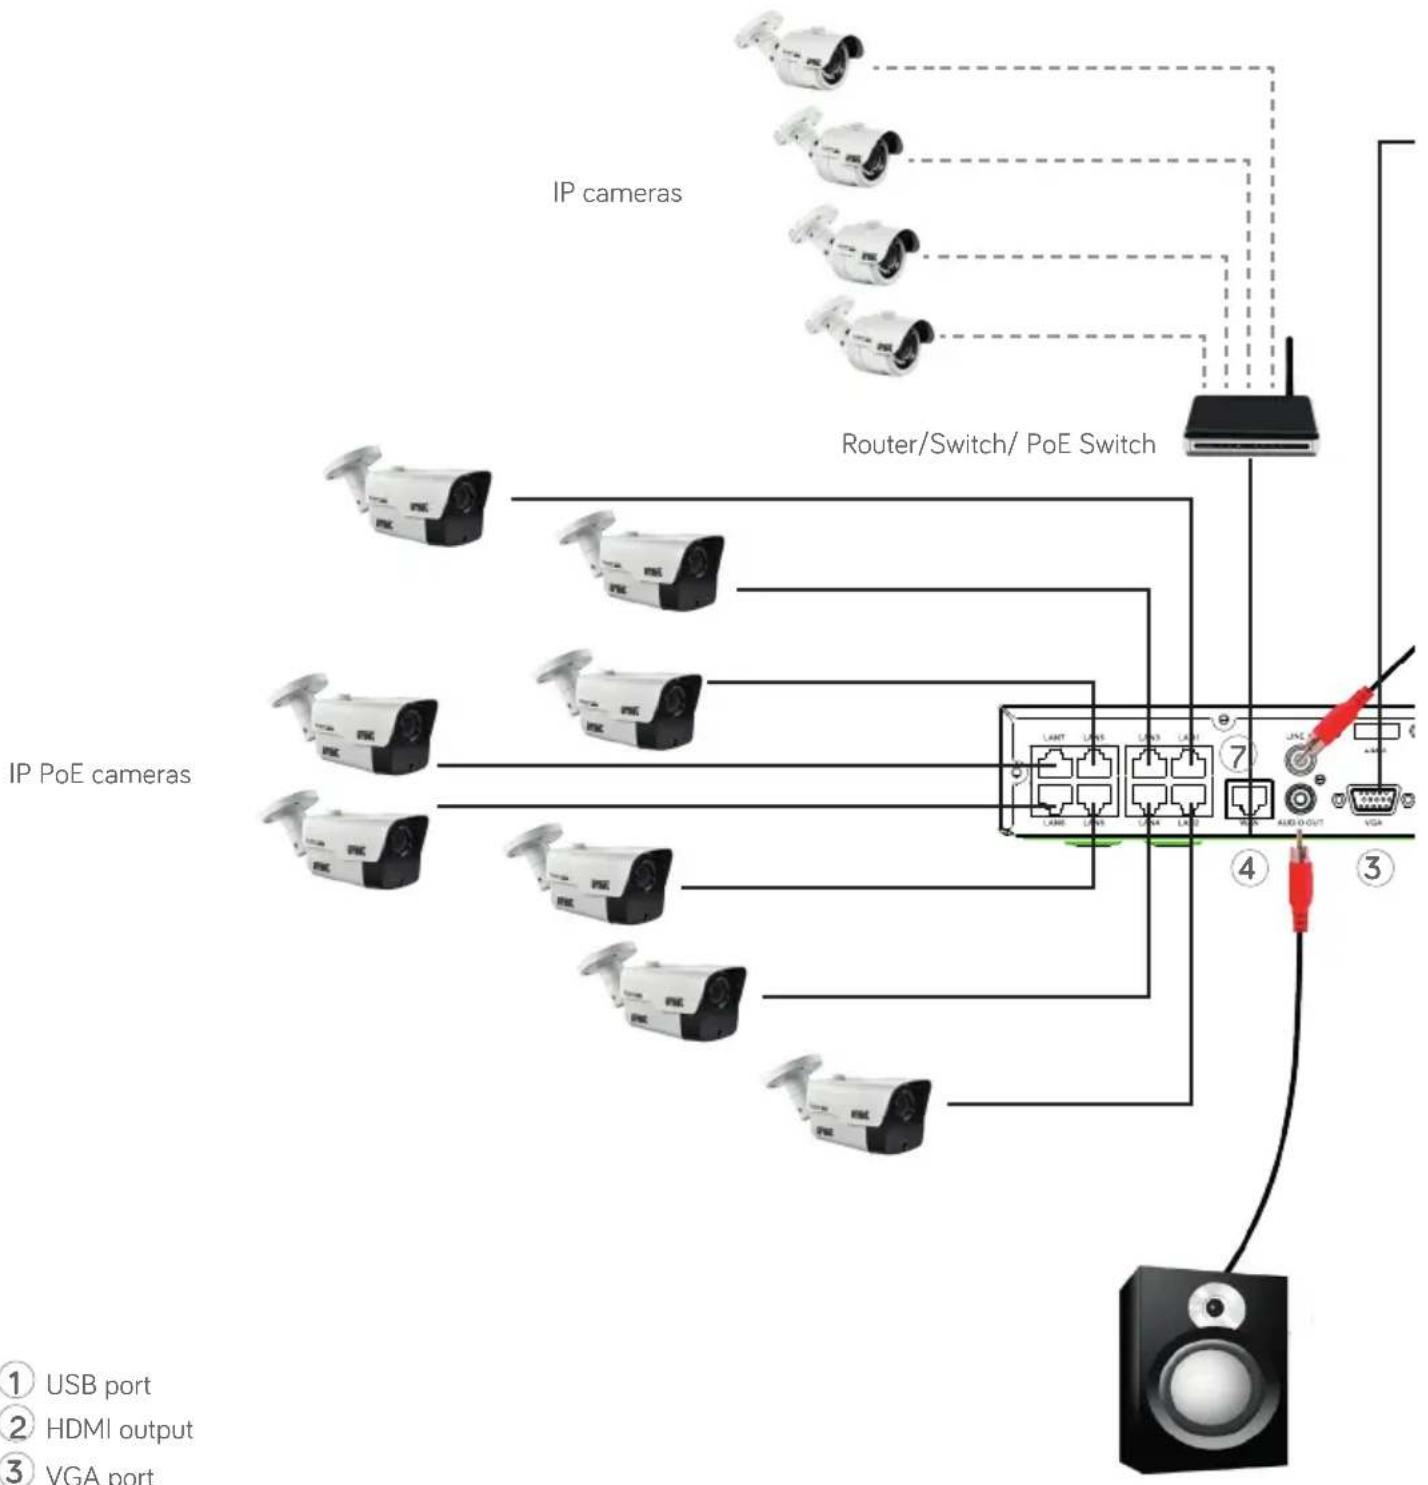
Before installing the NVR, check that IP cameras are properly working and connected (via cable or WiFi) to the same network as the NVR. For more details about camera configurations see the instructions provided with cameras.
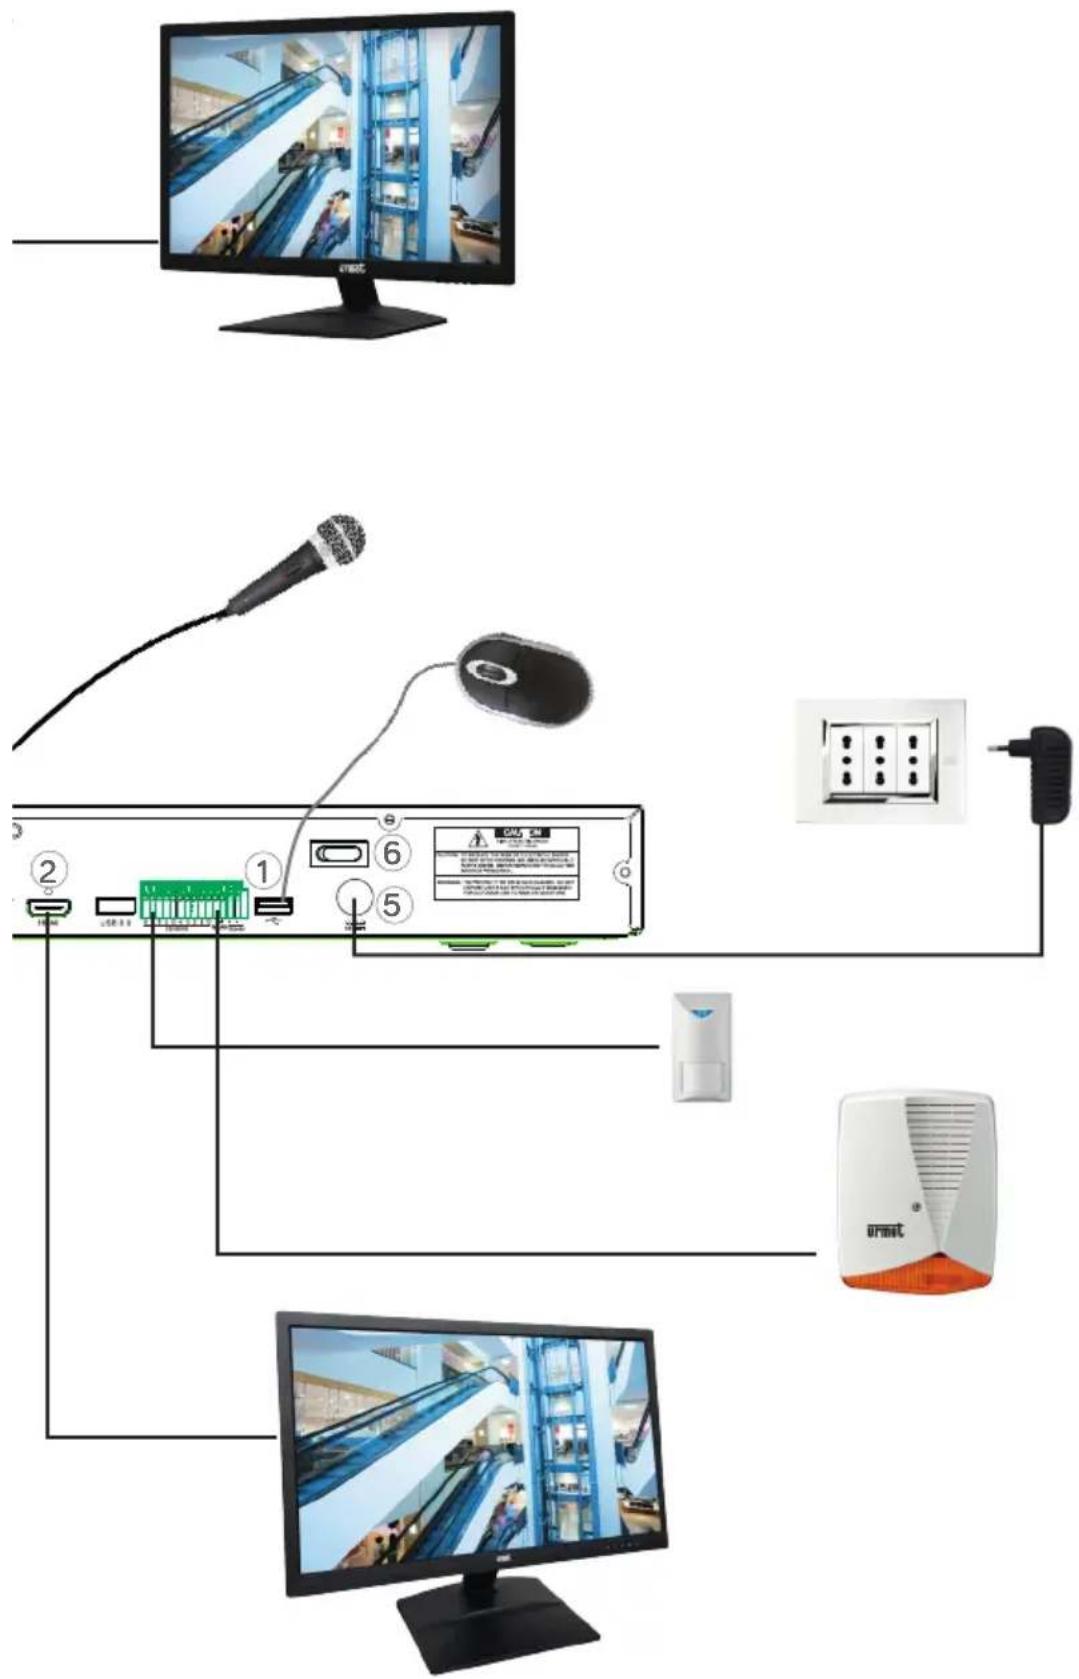
For NVR Installation follow these step:
- Connect the mouse to the USB port ①.
- Connect the HDMI Output ② or VGA Output ③ to the monitor used for the configuration of the IP cameras.
- Connect the network cable to the port ④.
Only for PoE Series: Connect one or more IP PoE Cameras with straight cable to one or more ports ⑦
- Switch on the device inserting the power connectors inside the plugs ⑤ and position the switches ⑥ on position 1.
flowchart
graph TD
    A["IP PoE cameras"] --> B["Router/Switch/ PoE Switch"]
    C["IP cameras"] --> B
    D["IP PoE camera"] --> B
    E["IP PoE camera"] --> B
    F["IP PoE camera"] --> B
    G["IP PoE camera"] --> B
    H["IP PoE camera"] --> B
    I["IP PoE camera"] --> B
    J["IP PoE camera"] --> B
    K["IP PoE camera"] --> B
    L["IP PoE camera"] --> B
    M["IP PoE camera"] --> B
    N["IP PoE camera"] --> B
    O["IP PoE camera"] --> B
    P["IP PoE camera"] --> B
    Q["IP PoE camera"] --> B
    R["IP PoE camera"] --> B
    S["IP PoE camera"] --> B
    T["IP PoE camera"] --> B
    U["IP PoE camera"] --> B
    V["IP PoE camera"] --> B
    W["IP PoE camera"] --> B
    X["IP PoE camera"] --> B
    Y["IP PoE camera"] --> B
    Z["IP PoE camera"] --> B
    AA["IP PoE camera"] --> B
    AB["IP PoE camera"] --> B
    AC["IP PoE camera"] --> B
    AD["IP PoE camera"] --> B
    AE["IP PoE camera"] --> B
    AF["IP PoE camera"] --> B
    AG["IP PoE camera"] --> B
    AH["IP PoE camera"] --> B
    AI["IP PoE camera"] --> B
    AJ["IP PoE camera"] --> B
    AK["IP PoE camera"] --> B
    AL["IP PoE camera"] --> B
    AM["IP PoE camera"] --> B
    AN["IP PoE camera"] --> B
    AO["IP PoE camera"] --> B
    AP["IP PoE camera"] --> B
    AQ["IP PoE camera"] --> B
    AR["IP PoE camera"] --> B
    AS["IP PoE camera"] --> B
    AT["IP PoE camera"] --> B
    AU["IP PoE camera"] --> B
    AV["IP PoE camera"] --> B
    AW["IP PoE camera"] --> B
    AX["IP PoE camera"] --> B
    AY["IP PoE camera"] --> B
① USB port
② HDMI output
③ VGA port
④ Network Connection Port (to: router, switch, PoE switch)
⑤ Plugs
⑥ Switches
⑦ PoE Ports (available on PoE NVR models) for direct connection to IP camera (straight cable)
flowchart
graph TD
    A["Computer monitor"] --> B["User interface with monitor display"]
    B --> C["User interface with microphone"]
    C --> D["User interface with mouse"]
    D --> E["Wall-mounted switch"]
    E --> F["User interface with security device"]
    F --> G["Computer monitor"]
Starting up NVR
NVR CHANNEL CONFIGURATION BY MANUAL ASSIGNMENT
Here follow the step in order to add IP cameras to NVR channels using local Monitor:
- Access the NVR OSD menu by pressing the right mouse button and enter the administrator password (default: 00000000), to check the firmware version that is currently installed in the NVR, access the menu page "System" -> "Info". If the version is not recent, the NVR system software (firmware) can be updated by following the instructions described in User Manual available in Urmet Web site (see QR code printed on the Addendum sheet).
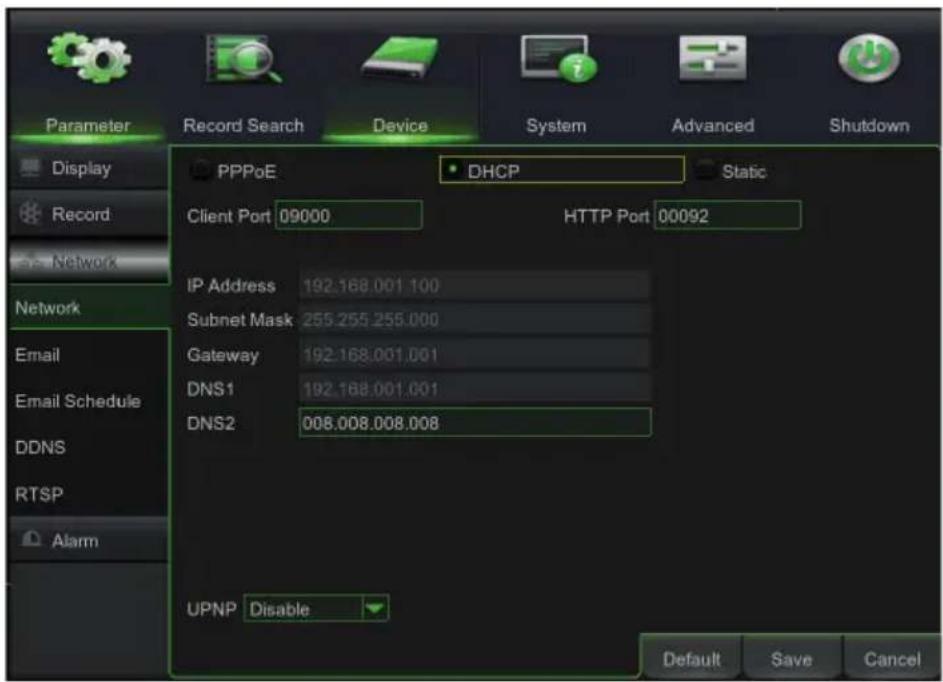
- In the page "Main Menu" -> "Parameter" -> "Network" display the NVR current network parameters: wait about ten seconds for assignment and automatic display of network parameters.
text_image
Parameter Record Search Device System Advanced Shutdown Display Record Network Network Email Email Schedule DDNS RTSP Alarm PPPoE DHCP Static Client Port 09000 HTTP Port 00092 IP Address 192.168.001.100 Subnet Mask 255.255.255.000 Gateway 192.168.001.001 DNS1 192.168.001.001 DNS2 008.008.008.008 UPNP Disable Default Save Cancel- If the LAN network doesn't support the DHCP service, in the NVR page "Main Menu" -> "Parameter" -> "Network" change from DHCP mode to "Static" mode, then manually enter the suitable network parameters: IP address, Mask, Gateway, DNS.
IMPORTANT
To prevent video loss on the IP channels, make sure IP cameras have a static IP address configured. The IP Camera Address can be changed from DHCP to Static using the button (see next steps).
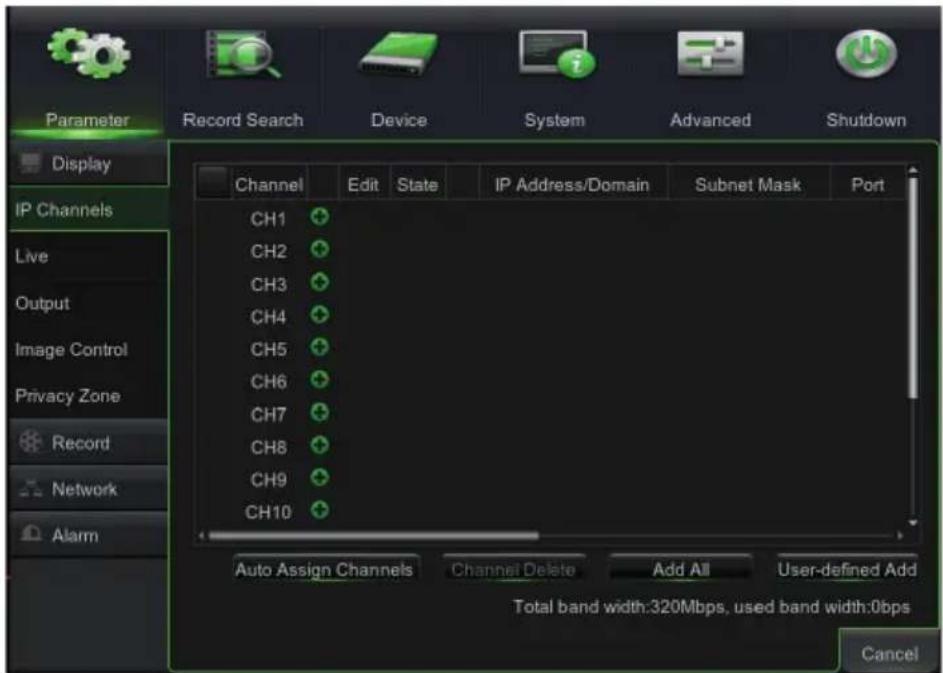
- In order to add IP cameras manually and assign them in the LAN network to NVR channels, press the button “+” as shown in the picture below:
text_image
Parameter Record Search Device System Advanced Shutdown Display IP Channels Live Output Image Control Privacy Zone Record Network Alarm Channel Edit State IP Address/Domain Subnet Mask Port CH1 CH2 CH3 CH4 CH5 CH6 CH7 CH8 CH9 CH10 Auto Assign Channels Channel Delete Add All User-defined Add Total band width:320Mbps, used band width:0bps Cancel- To continue the manual addition of IP cameras:
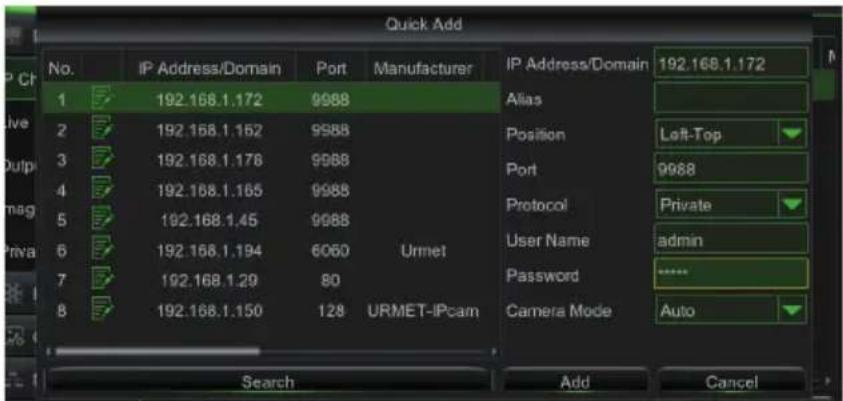
- Select "Search" button, select the wished IP camera that you want to add manually and fill the password field (i.e. Default Password: admin), then check that the Protocol and Port are set correctly as shown in the following pictures. Select "Add" button and wait for the device to become online (icon state becomes green).
text_image
Quick Add No. IP Address/Domain Port Manufacturer IP Address/Domain 192.168.1.172 1 192.168.1.172 9988 2 192.168.1.162 9988 3 192.168.1.178 9988 4 192.168.1.165 9988 5 192.168.1.45 9988 6 192.168.1.194 6060 Urmet 7 192.168.1.29 80 8 192.168.1.150 128 URMET-IPcam Alias Position Left-Top Port 9988 Protocol Private User Name adults Password Camera Mode Auto Search Add Cancel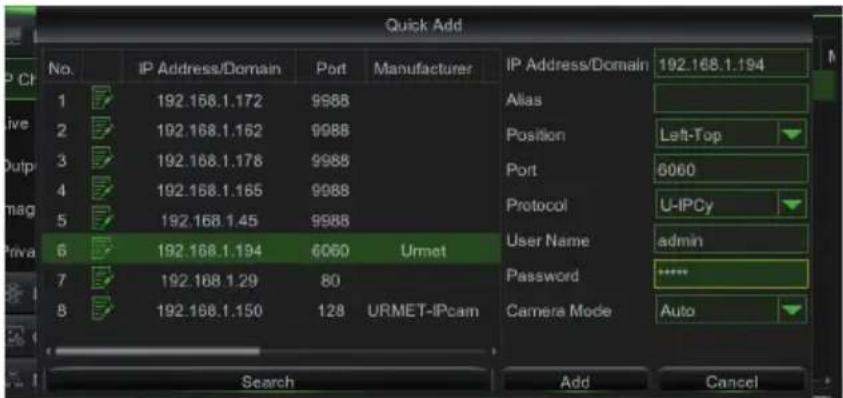
text_image
Quick Add No. IP Address/Domain Port Manufacturer IP Address/Domain 192.168.1.194 1 192.168.1.172 9988 Alias 2 192.168.1.162 9988 Position Left-Top 3 192.168.1.178 9988 Port 6060 4 192.168.1.165 9988 Protocol U-IPCy 5 192.168.1.45 9988 6 192.168.1.194 6060 Urmet User Name hemin 7 192.168.1.29 80 Password 8 192.168.1.150 128 URMET-IPcam Camera Mode Auto Search Add Cancel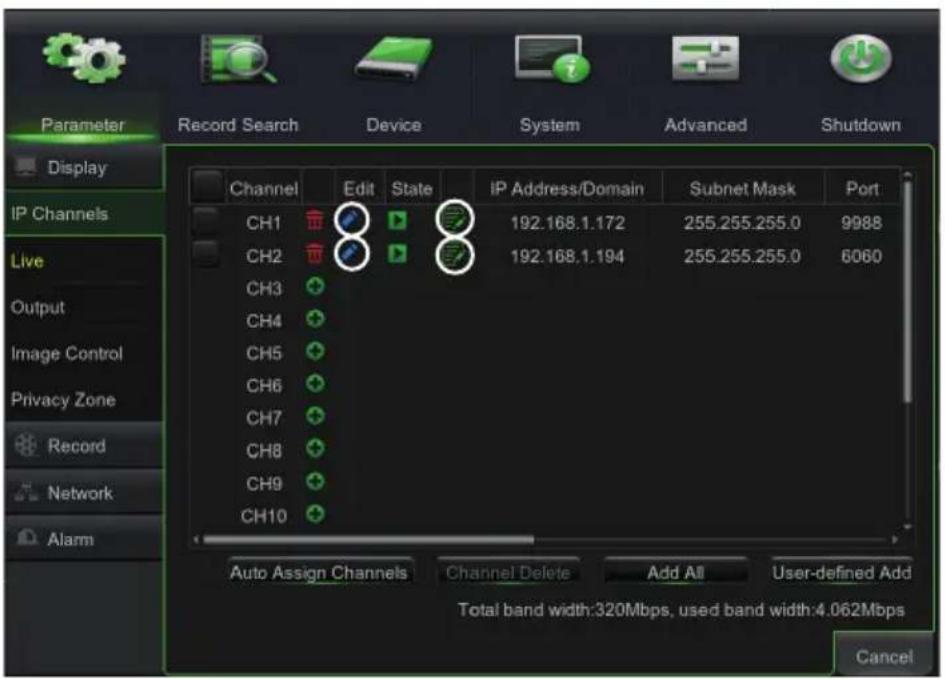
text_image
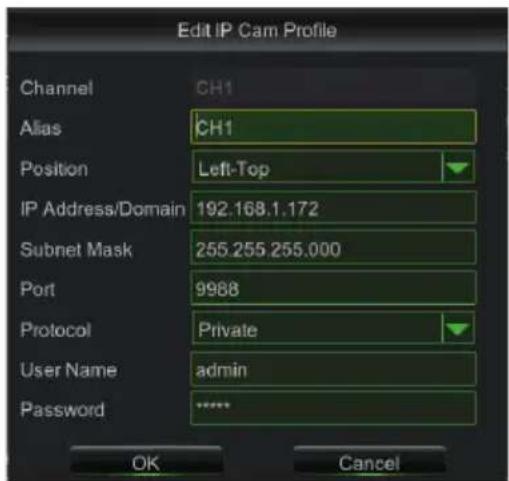
Parameter Record Search Device System Advanced Shutdown Display IP Channels Live Output Image Control Privacy Zone Record Network Alarm Channel Edit State IP Address/Domain Subnet Mask Port CH1 192.168.1.172 255.255.255.0 9988 CH2 192.168.1.194 255.255.255.0 6060 CH3 CH4 CH5 CH6 CH7 CH8 CH9 CH10 Auto Assign Channels Channel Delete Add All User-defined Add Total band width:320Mbps, used band width:4.062Mbps Cancel- It is possible to modify the parameters used by the NVR to establish the connection to each added channel selecting the button (see the circles in previous picture).
text_image
Edit IP Cam Profile Channel CH1 Alias CH1 Position Left-Top IP Address/Domain 192.168.1.172 Subnet Mask 255.255.255.000 Port 9988 Protocol Private User Name admin Password ****. OK Cancel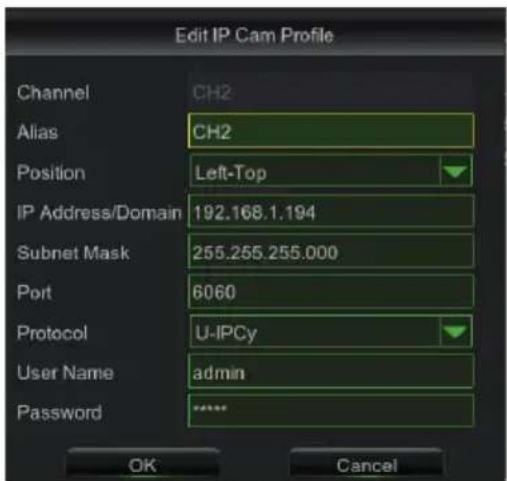
text_image
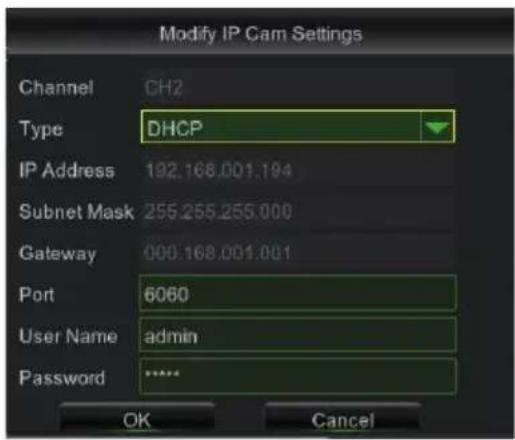
Edit IP Cam Profile Channel CH2 Alias CH2 Position Left-Top IP Address/Domain 192.168.1.194 Subnet Mask 255.255.255.000 Port 6060 Protocol U-IPCy User Name admin Password **** OK Cancel- To modify the connected cameras' Network Settings (e.g. to modify the camera IP address from DHCP to Static, Subnet Mask, Gateway, Port) select 📋 (see the circles in previous picture).
text_image
Modify IP Cam Settings Channel CH2 Type DHCP IP Address 192.168.001.194 Subnet Mask 255.255.255.000 Gateway 000.168.001.001 Port 6060 User Name admin Password ****. OK Cancel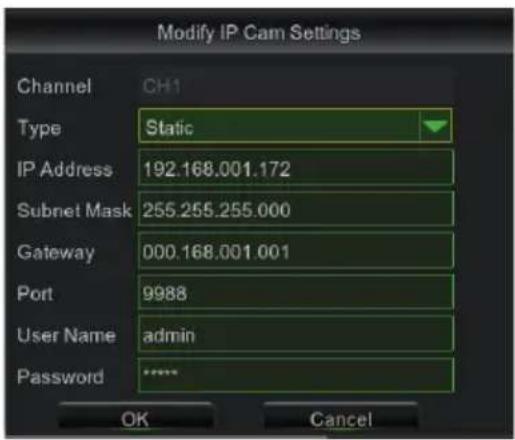
text_image
Modify IP Cam Settings Channel CH1 Type Static IP Address 192.168.001.172 Subnet Mask 255.255.255.000 Gateway 000.168.001.001 Port 9988 User Name admin Password ****. OK Cancel-
The NVR is configured to automatically start the continuous recording of the cameras assigned to the channels. Check that the red icon "R" is displayed for each camera.
-
In the LIVE Preview grid, by default the NVR displays the MAINSTREAM of all IP channels enabled and configured, but if there are not enough resources to do so, the NVR automatically displays the SUBSTREAM of all the IP channels.
-
Whenever the message "Not enough resources" is displayed in the IP channels LIVE grid, please reduce the MAINSTREAM or SUBSTREAM frame-rate and bitrate settings in the NVR OSD menu at the IP channel settings page selecting "Main Menu" -> "Parameter" -> "Record" -> " mainstream" o "Main Menu" -> "Parameter" -> "Record" -> "SubStream".
-
If some IP camera parameters (example Mainstream, Substream, Mobile stream...) are modified using the camera's integrated webpage, it is then necessary to reboot the NVR to have the modified parameters updated in the NVR menu page of the corresponding IP channel.
-
Once the network configuration has been completed, the NVR and the cameras can be remotely displayed by iOS or Android smartphone by URMET iUVS plus application or from a PC station with Internet Explorer/ Firefox or UVS client software.
\*NOTE
- NVR default password is 00000000. It is suggested to change the password at the first menu access in the page "Main Menu" -> "System" -> "Users".
- If the IP camera is not detected then try to add it manually.
- For further details see the instruction manual downloading from Urmet Web site (see QR code printed on the Addendum sheet).
NVR CHANNEL CONFIGURATION USING A PC
Follow the instructions present in User Manual downloading from Urmet Web Site, for showing how to add the device rapidly directly from a PC without needing to connect it to a monitor (see QR code printed on the Addendum sheet to download the Manual).
Record and Playback
RECORDING PARAMETERS
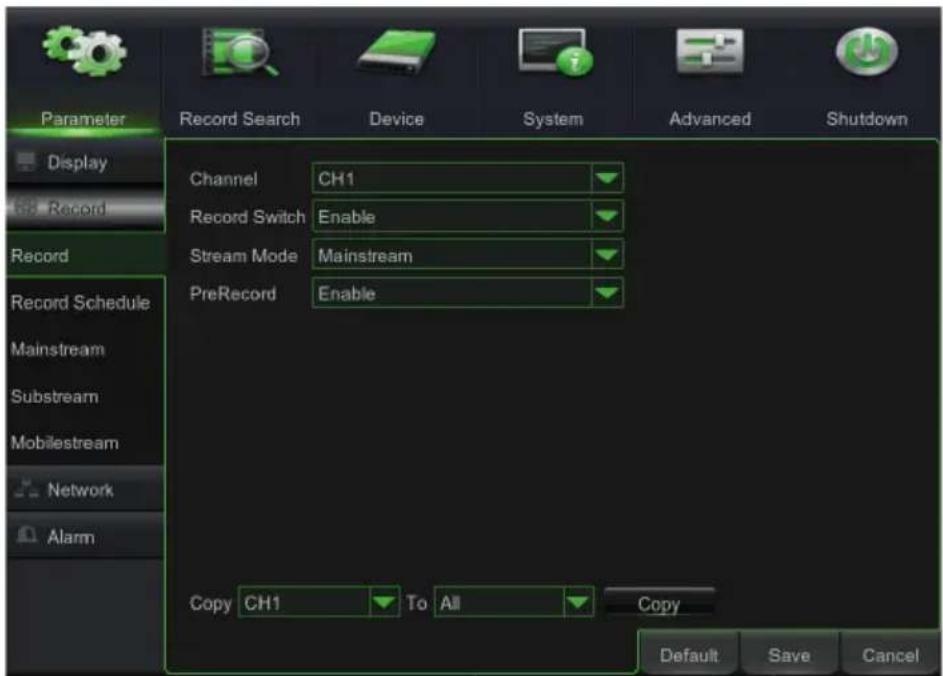
Select "Main Menu" -> "Parameter" -> "Record" to access the menu "Record". The following functions are available:
- The menu "Schedule" allows to set recording options: 24 hours or Normal, on Motion/Alarm; recording time tables can be customized. It is also possible to program bothrecording options, Normal/Alarm within the same time tables.
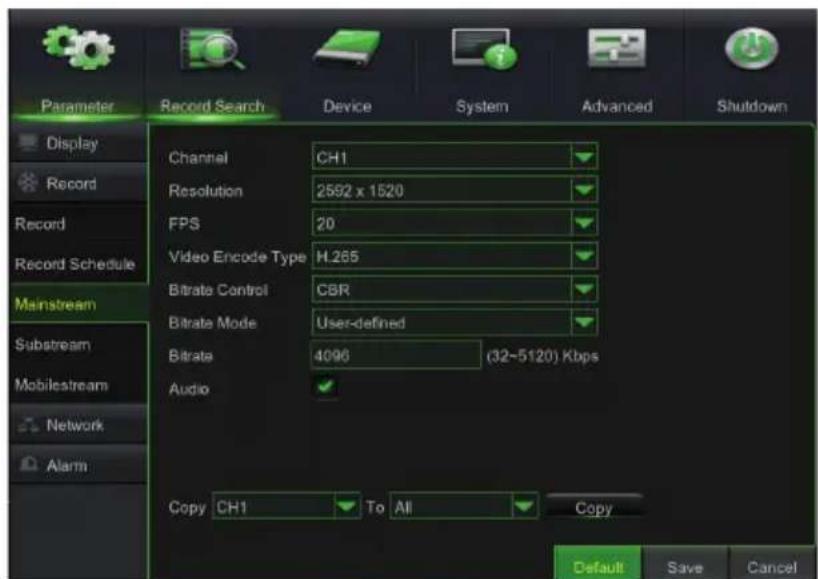
- It is possible to set the wished resolution, frame rate value and bit rate value for each channel in "Main Stream" Menu.
text_image
Parameter Display Record Record Record Schedule Mainstream Substream Mobilestream Network Alarm Record Search Device System Advanced Shutdown Channel CH1 Record Switch Enable Stream Mode Mainstream PreRecord Enable Copy CH1 To All Copy Default Save Cancel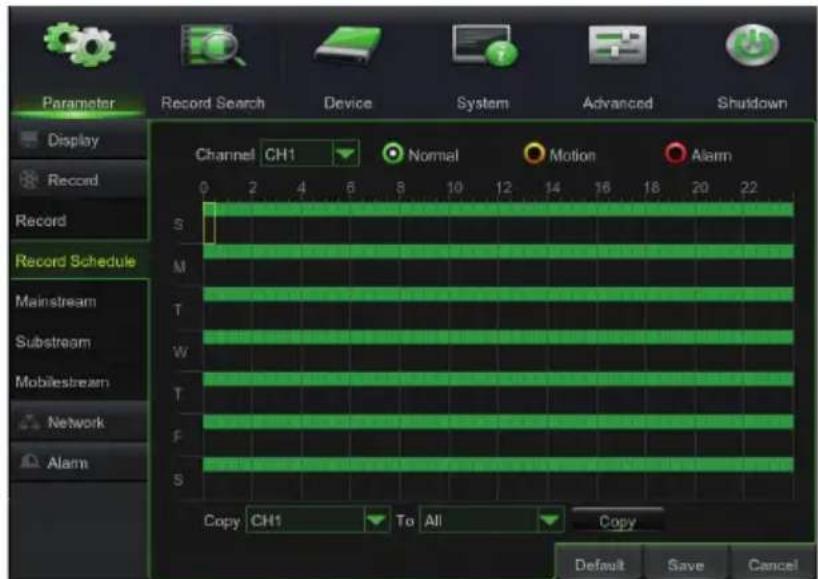
text_image
Parameter Record Search Device System Advanced Shutdown Display Record Record Schedule Mainstream Substream Mobilestream Network Alarm Channel CH1 Normal Motion Alarm 0 2 4 6 8 10 12 14 16 18 20 22 S M T W T F S Copy CH1 To All Copy Default Save CancelThe NVR manages three different video streams for each camera associated to one of its channels:
IMPORTANT
In case of Motion type planning, enable and configure the Motion function for each single channel on the "Parameter" -> "Alarm" -> "Motion" page.
- Main stream: max. resolution stream, used for video-recording on hard disk and displaying on local network
- Sub stream: medium/high resolution stream, for remote displaying
- Mobile stream: low resolution stream, for remote displaying.
To configure each stream open the OSD menu page "Network" and select the stream to be configured:
- In Main stream menu page select "Default" and check that the factory default parameters are set. Select "Copy" to copy the same parameters to all the channels and click on "Save" to save parameters in the cameras.
text_image
Parameter Record Search Device System Advanced Shutdown Display Record Record Record Schedule Mainstream Substream Mobilestream Network Alarm Channel CH1 Resolution 2592 x 1520 FPS 20 Video Encode Type H.265 Bitrate Control CBR Bitrate Mode User-defined Bitrate 4096 (32-5120) Kbps Audio Copy CH1 To All Copy Default Save Cancel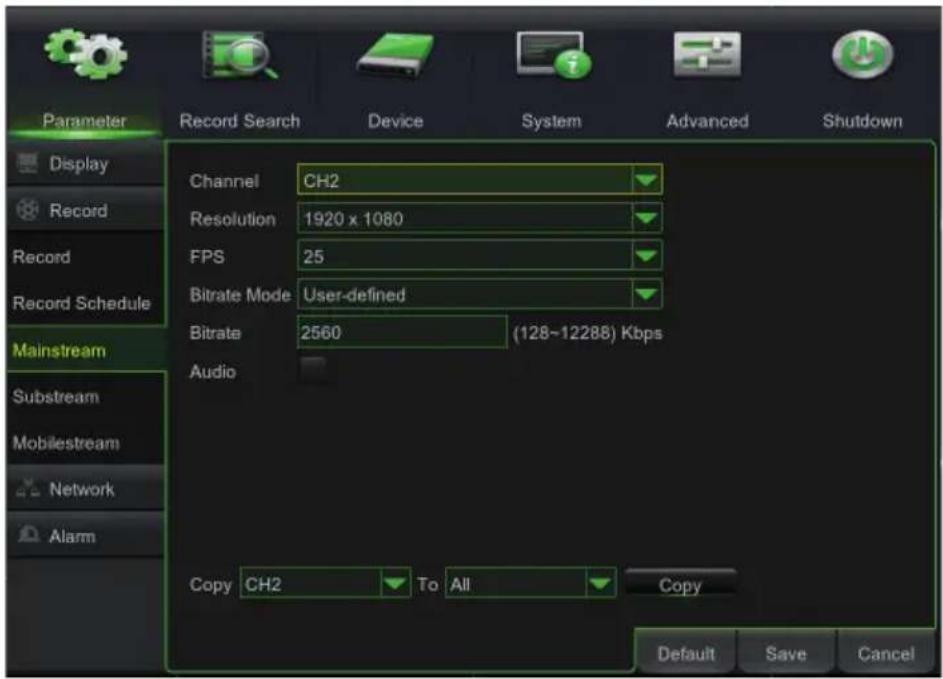
text_image
Parameter Record Search Device System Advanced Shutdown Display Record Record Record Schedule Mainstream Substream Mobilestream Network Alarm Channel CH2 Resolution 1920 x 1080 FPS 25 Bitrate Mode User-defined Bitrate 2560 (128~12288) Kbps Audio Copy CH2 To All Copy Default Save Cancel- In Sub stream menu page select "Default" and check that the factory default parameters are set.
Select "Copy" to copy the same parameters to all the channels and click on "Save" to save parameters in the cameras. - In Mobile stream menu page select "Default" and check that the factory default parameters are set.
Select "Copy" to copy the same parameters to all the channels and click on "Save" to save parameters in the cameras.
IMPORTANT
These factory settings are the suggested ones for video streams in order to obtain the right balance between video quality and fluidity, in locally and remotely recording and LIVE displaying. However, it is possible to manually set stream parameters different from the factory ones described above.
- After having made the recording settings, save the changes and quit. The "R" icon on the screen for each channel in LIVE mode indicates that the device is currently recording.
PLAYBACK
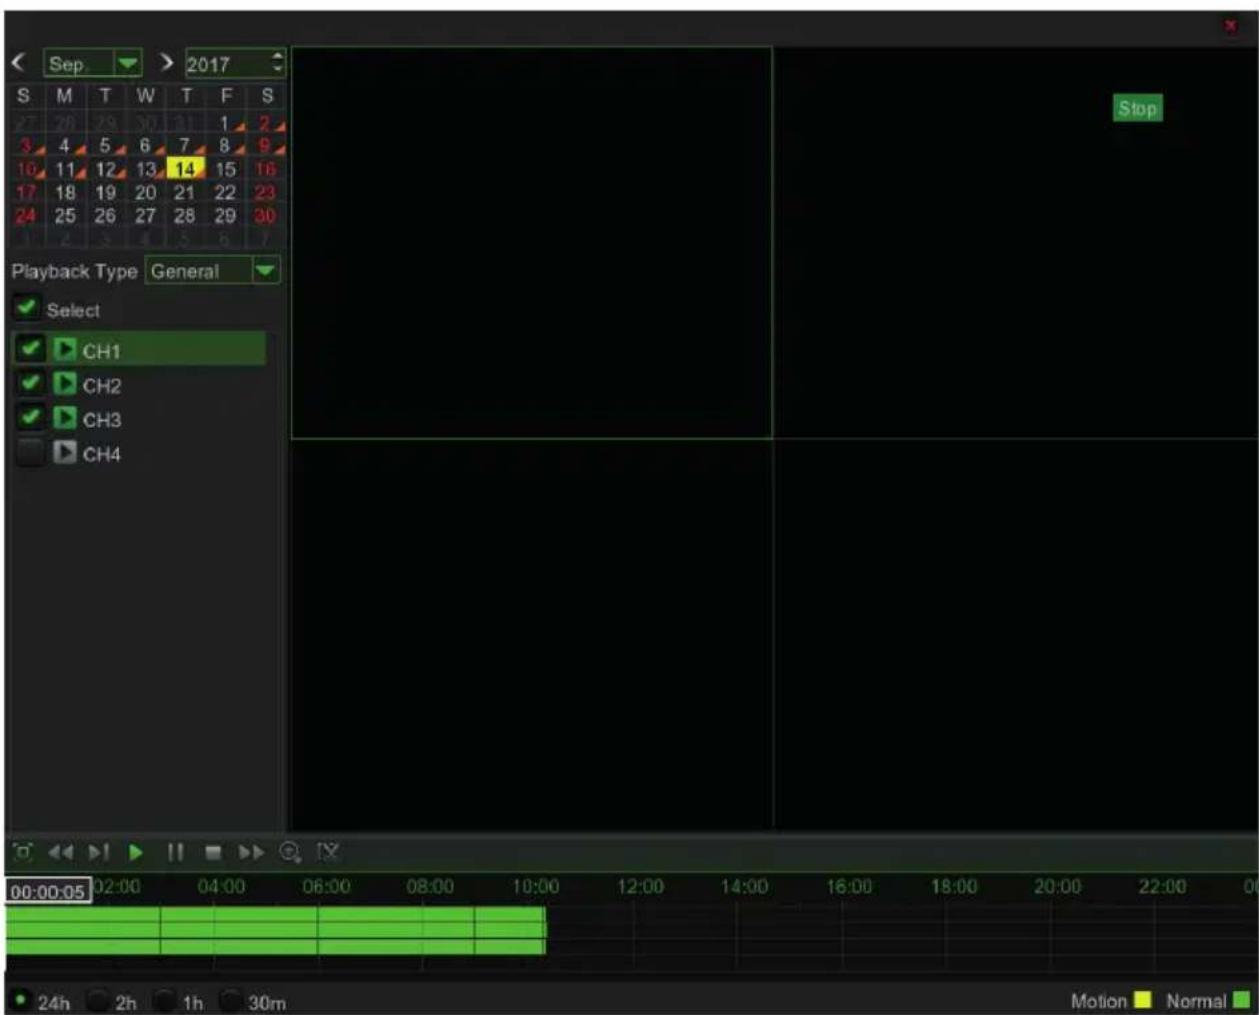
Click "Main Menu" -> "Record search" -> "General" and press "Play" button to open the interface shown here.
Then tick-select the channel you want to playback; and click "Play" button to enter into the playback mode shown as below.
You can use the Playback Control bar to operate the Fast Forward (X2, X4 and X8), Slow play (1/2, 1/4 and 1/8 speed), Play, Pause/Frame, Rewind(X2, X4 and X8).
The playback control bar shows the current playback progress as shown below.
text_image
Sep. > 2017 S M T W T F S 27 26 25 30 31 1 2 3 4 5 6 7 8 9 10 11 12 13 14 15 16 17 18 19 20 21 22 23 24 25 26 27 28 29 30 Playback Type General ✓ Select ✓ CH1 ✓ CH2 ✓ CH3 ✓ CH4 Stop 00:00:05 02:00 04:00 06:00 08:00 10:00 12:00 14:00 16:00 18:00 20:00 22:00 0 Motion NormalDisplay from the Smartphone
In order to remote display images on iPhone or Android smartphone, configure NVR and cameras networks and download URMET iUVS plus application from the respective stores.
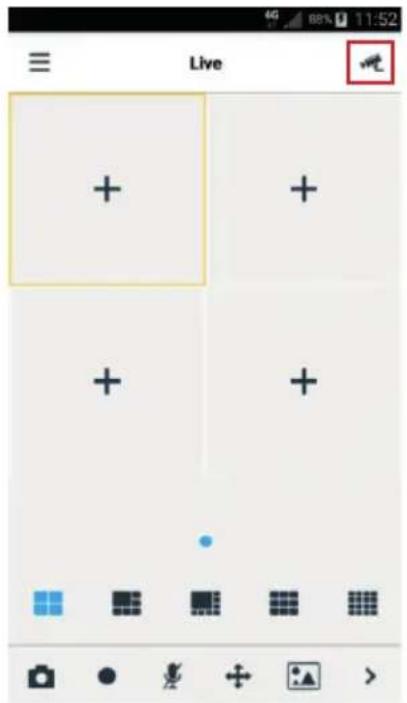
After the application has been downloaded from the store and installed, to add and display the NVR on smartphone by using a P2P connection perform as follows:
text_image
Live + + + + + -
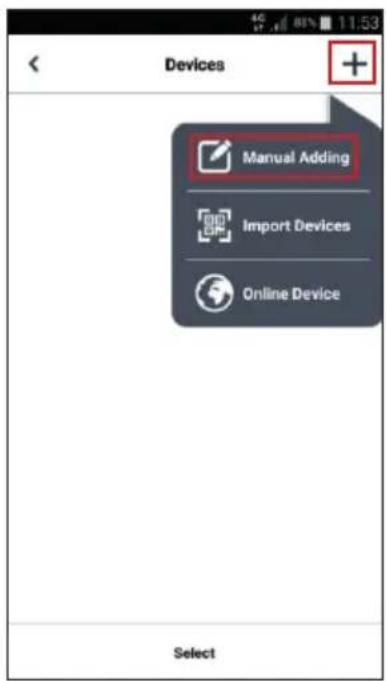
text_image
Devices Manual Adding Import Devices Online Device Select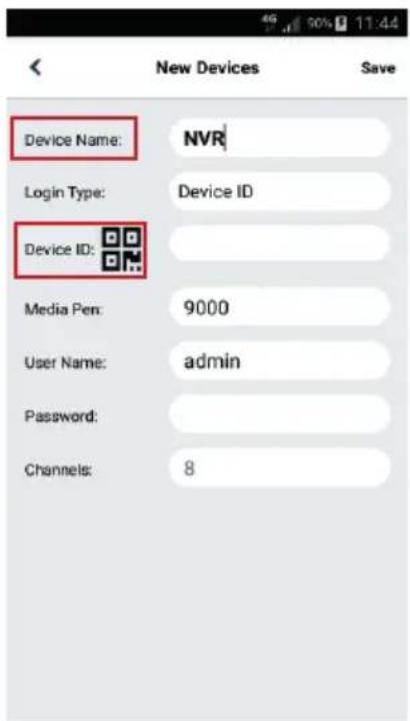
text_image
Device Name: NVR Login Type: Device ID Device ID: Media Pen: 9000 User Name: admin Password: Channels: 8Fill in the field "Device name".
Select the icon to enter the NVR ID reading the QR code. If absent, install the QR code reader application in the smartphone, then scan the QR code on the NVR case.
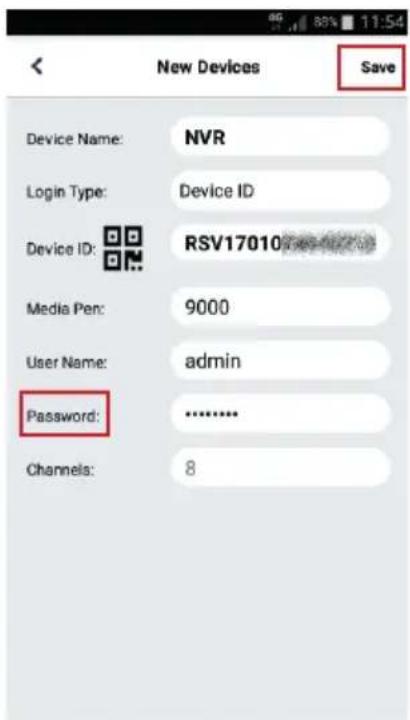
text_image
New Devices Save Device Name: NVR Login Type: Device ID Device ID: RSV17010 Media Pen: 9000 User Name: admin Password: .......... Channels: 8Fill in the field "Password" by entering the NVR password (default: 00000000), then select "Save" and wait about 10 seconds until the NVR LIVE video is automatically loaded.
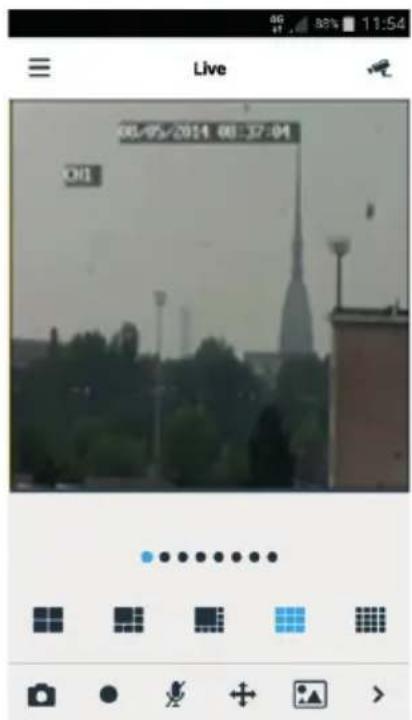
text_image
Live 08/05/2014 08:37:04 08IMPORTANT NOTE
- Besides P2P mode, it is also possible to remote display the NVR on the smartphone with DDNS Urmet service. To do this, the router must be set for port opening and forwarding. For further details about DDNS Urmet service see the NVR manual (see QR code printed on the Addendum sheet).
- To display the NVR in LAN network, it is possible to add it to the app by using its IP address. In order to know the NVR local IP address see the menu page "Menu" -> "Network" of the NVR.
Display with PC Browser
Once the NVR and cameras have been configured it is possible to connect to the NVR by browser from:
- PC station with Windows operating system and Internet Explorer browser
- MAC station with 10.8.0 operating system or higher version and Safari 6.0 version browser or higher version.
PC or MAC stations must be connected to the same LAN as the NVR.
In order to establish a connection to NVR (only for Windows O.S.) follow the following step:
- Install the "Device Config Tool" software on the CD supplied with the product on a PC with Windows operating system connected to the same network as the NVR. Once installed, software will detect the NVR on the LAN and show it in a list.
- A valid IP address will be automatically assigned to the NVR if the LAN to which the NVR is connected is provided with automatic routing service (DHCP). It will appear in the "Device Config Tool" list:

text_image
Device Search Search Upgrade Config Filtration IP No. IP Media Port Web Port Channel Device Name Device Version Net M 1 102.168.1.169 9000 80 4 V6.0.0-201710201098/30485.255- A valid IP address must be assigned to the device manually if the LAN to which the NVR is connected does not support DHCP. To do this, set the required parameters to be assigned to the NVR on the bottom of the "Device Config Tool" screen: IP, Gateway, Net Mask, then enter the password (default: 00000000) and press "Modify" to save the network parameters in the NVR settings:

text_image
User Info Username admin Password ***** Device Info Start IP Media Port Web Port Gateway Net Mask Net Mode Static Modify- Now, click on the IP address of the NVR shown in the "Device Config Tool" list to open Internet Explorer automatically. At the first connection, the browser will ask to install a software component (ActiveX in the case of Internet Explorer) downloaded directly by the NVR. Accept the installation of the component and continue. For details on ActiveX activation, please refer to the complete user manual available on the Urmet website (see QR code printed on the Addendum sheet).
-
It is also possible to reach the NVR without using Device Config Tool software. Open the browser (Internet Explorer for Windows and Safari for MAC) and enter the NVR IP address in the navigation bar. To know the NVR IP address open the menu page "Menu" -> "Network" on the NVR monitor.
-
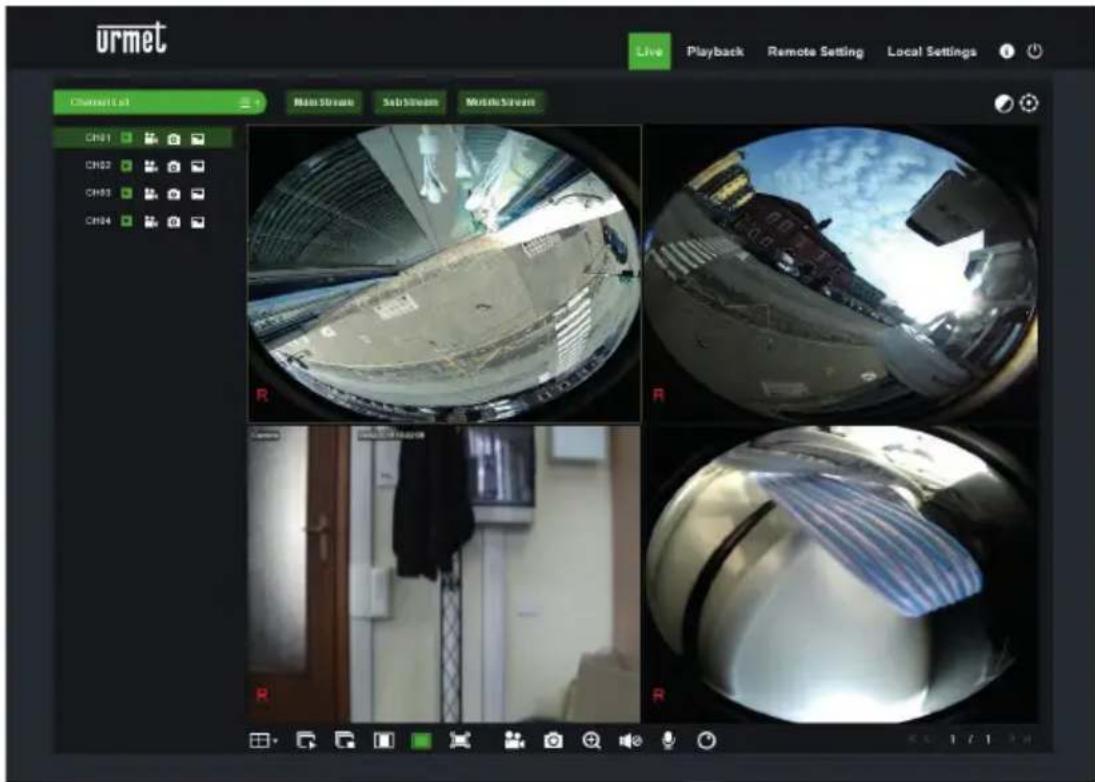
Once the component has been installed, the browser will display the login page: enter the NVR password (default: 00000000) and select "Login" to start the connection and display the video streams inside the browser window.
text_image
urmet Live Playback Remote Setting Local Settings Channel 1.04 Main Stream Sub Stream Multi Stream CH01 CH02 CH03 CH04 R R R RFor further details about NVR use with browser, see the manual available in the Urmet Web site (see QR code printed on the Addendum sheet).
Display from Software Client
It is also possible to simultaneously connect to one or more NVR with UVS URMET software client, available in the CD provided with the product. UVS URMET software is available in two versions: for Windows operating system and MAC version 10.8.0 operating system or higher version.
For further details about UVS URMET software client see the manual in the CD provided with the product or on Urmet website.
Index
GÉNÉRALITÉS 39
Avertissements 39
INSTALLATION 41
MISE EN MARCHE DU NVR 44
text_image
Diagram of a network device rear panel with labeled ports and connectors, including USB port, audio output, and I/O ports.flowchart
graph TD
    A["Caméras IP"] --> B["Router/Switch/ PoE Switch"]
    C["Caméras IP PoE"] --> B
    D["Port USB"] --> B
    E["Sortie HDMI"] --> B
    F["Port VGA"] --> B
    B --> G["Speaker"]
    style G fill:#f9f,stroke:#333
    style H stroke:#ff0,stroke-width:2px
    style I stroke:#ff0,stroke-width:2px
    style J stroke:#ff0,stroke-width:2px
    style K stroke:#ff0,stroke-width:2px
    style L stroke:#ff0,stroke-width:2px
    style M stroke:#ff0,stroke-width:2px
    style N stroke:#ff0,stroke-width:2px
    style O stroke:#ff0,stroke-width:2px
    style P stroke:#ff0,stroke-width:2px
    style Q stroke:#ff0,stroke-width:2px
    style R stroke:#ff0,stroke-width:2px
    style S stroke:#ff0,stroke-width:2px
    style T stroke:#ff0,stroke-width:2px
    style U stroke:#ff0,stroke-width:2px
    style V stroke:#ff0,stroke-width:2px
    style W stroke:#ff0,stroke-width:2px
    style X stroke:#ff0,stroke-width:2px
    style Y stroke:#ff0,stroke-width:2px
    style Z stroke:#ff0,stroke-width:2px
flowchart
graph TD
    A["Computer monitor"] --> B["User interface with monitor display"]
    B --> C["User interface with microphone"]
    C --> D["User interface with mouse"]
    D --> E["Wall-mounted switch"]
    E --> F["User interface with security device"]
    F --> G["Computer monitor"]
text_image
Devices Manual Adding Import Devices Online Device Select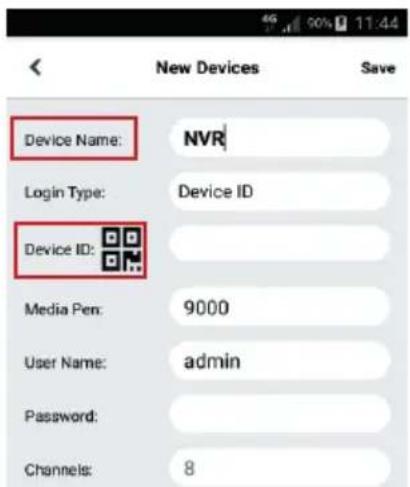
text_image
Device Name: NVR Login Type: Device ID Device ID: Media Pen: 9000 User Name: admin Password: Channels: 8text_image
User Info Username admin Password ****** Device Info Start IP Media Port Web Port Gateway Net Mask Net Mode Static Modifytext_image
urmet Live Playback Remote Setting Local Settings Channel 1st Main Stream Sub Stream Multi Stream CH01 CH02 CH03 CH04 R R R Rtext_image
Labeled diagram of a network device rear panel showing ports, connectors, and ports with numbered annotationstext_image
Diagram showing connections between a computer monitor, microphone, mouse, wall-mounted switch, and network device with labeled components.Encender el NVR
text_image
Devices Manual Adding Import Devices Online Device Select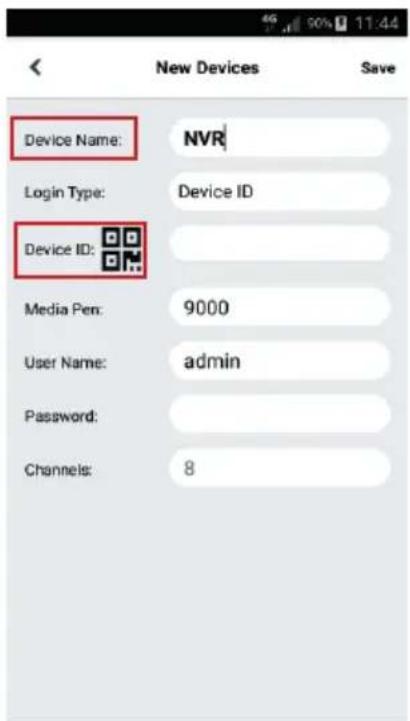
text_image
Device Name: NVR Login Type: Device ID Device ID: Media Pen: 9000 User Name: admin Password: Channels: 8text_image
User Info Username admin Password ***** Device Info Start IP Media Port Web Port Gateway Net Mask Net Mode Static Modifytext_image
urmet Live Playback Remote Setting Local Settings Connect list Main Stream Sub Stream Mobile Stream CH01 CH02 CH03 CH04 R R R Rtext_image
Labeled diagram of a network device rear panel showing ports, connectors, and ports with numbered annotationsflowchart
graph TD
    A["Computer monitor"] --> B["User interface with monitor display"]
    B --> C["User interface with microphone"]
    C --> D["User interface with mouse"]
    D --> E["Wall-mounted switch"]
    E --> F["User interface with security device"]
    F --> G["Computer monitor"]
Start des NVR
KONFIGURATION DER NVR-KANÄLE ÜBER LOKALEN MONITOR
text_image
Devices Manual Adding Import Devices Online Device Select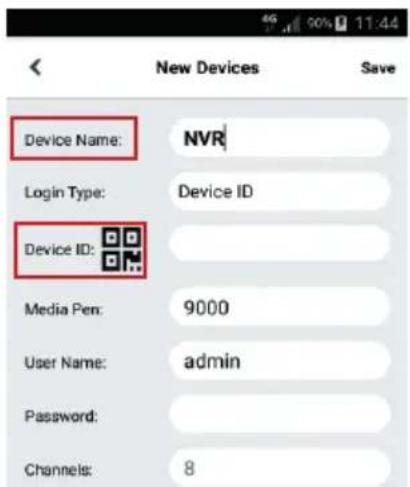
text_image
Device Name: NVR Login Type: Device ID Device ID: Media Pen: 9000 User Name: admin Password: Channels: 8text_image
User Info Username admin Password ****** Device Info Start IP Media Port Web Port Gateway Net Mask Net Mode Static Modifytext_image
urmet Live Playback Remote Setting Local Settings Channel List Main Stream Sub Streams Multi Streams CH01 CH02 CH03 CH04 R R R Rtext_image
QR code image containing encoded data, no visible human-readable texttext_image
QR code image containing encoded data, no visible human-readable textFor assistance and information about Urmet products and systems you can scan this QR code with your smartphone or visit
www.urmet.com >> Contacts >> Export Sales Network
Urmet S.pA. reserves the right to make changes to its products at any time, without prior notice.
Released in March 2018.
www.urmet.com | info@urmet.com
All Urmet products bear the mark C€
Made in China to Urmet specifications.