Aerospace B70 Orbiter - Watch Breitling - Free user manual and instructions
Find the device manual for free Aerospace B70 Orbiter Breitling in PDF.

| Product type | Multifunction chronograph watch |
| Brand | Breitling |
| Model | Aerospace B70 Orbiter |
| Movement | SuperQuartz™ COSC certified chronometer |
| Precision | ±15 seconds per year |
| Calendar | Date, month, year (programmed until 2099) |
| Display | Analog (hands) and digital LCD |
| Functions | 1/100th chronograph, split times, tachymeter, dual alarm, time zone, countdown timer, backlight |
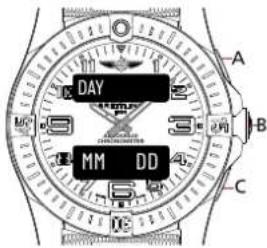
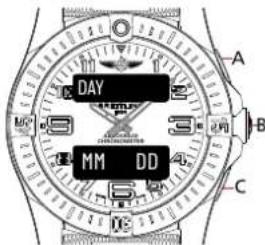
| Controls | Push buttons A, B, C |
| Water resistance | 10 bars / 100 meters |
| Bezel | Rotating bezel with rider tabs (4 indexes) |
| Strap | Genuine leather or metal (depending on version) |
| Crystal | Sapphire |
| Power | Lithium battery |
| Battery life | Approximately 2 to 3 years |
| Maintenance | Periodic maintenance at Breitling or an authorized dealer |
| Cleaning | Rinse with clean water, gentle brushing |
| Repairability | Original parts available, authorized after-sales service |
| Accessories included | User manual |
Frequently Asked Questions - Aerospace B70 Orbiter Breitling
User questions about Aerospace B70 Orbiter Breitling
0 question about this device. Answer the ones you know or ask your own.
Ask a new question about this device
Download the instructions for your Watch in PDF format for free! Find your manual Aerospace B70 Orbiter - Breitling and take your electronic device back in hand. On this page are published all the documents necessary for the use of your device. Aerospace B70 Orbiter by Breitling.
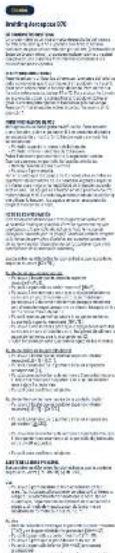
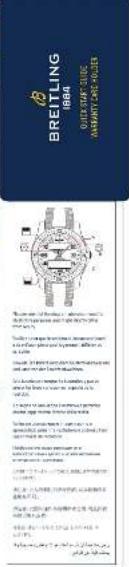
USER MANUAL Aerospace B70 Orbiter Breitling
BREITLING 1884
INSTRUCTIONS FOR USE
AEROSPACE B70
AEROSPACE B70

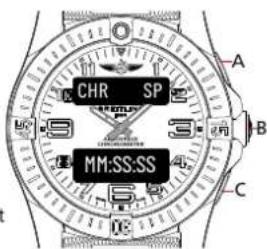
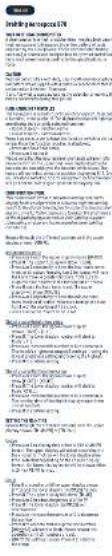
Aguille des heures Hour hand Stundenzeiger Lancetta delle ore Aguja de las horas Puntaira dos horas Часовая стрепка 時針 時針 时針

Poussoir secondaire (activation ou réloque du mode) Secondary pusher (mode activation or setting) Sekundärer Drücker (Modusaktivierungoder -einstellung) Pulsante secondario (attivazione o impostazione della modalità) Pulsador secundario (activación de modo o ajuste) Botto secundária (attivazione de modo ou definição) Knonna «Старт/стон» 第2プッシャー(モードの起動または設定) 補助按継(模式啟動或設置) 副按钮(模式激活或设置)

Aguille des minutes Minute hand Minutenzeiger Lancetto dei minuti Apuja de los minutos Punteiro dos minutes Munutная стрелка 分計 分計 分計

Poussoir principal (sélection du mode) Main Pusher (mode activation or setting) Reuptdrücker (Rodassauswahl) Pulsante principale (sezione della modalità) Pulsador principal (sezione de modo) Botto principal (selecto de mode) Kwonia c/cipoca メインブッケー (モードの選択) 主接組 (模式選擇) 主接組 (模式选择)
Poussoir secondaire (activation ou réglage du mode) Secondary pusher (mode activation or setting) Sekundärer Drücker (Rodassaktivierung oder -einstellung) Pulsante secondaria (attivazione o impostazione della modalità) Pulsador secondaria (activazione di modo a ajuste) Botto secondaria (ativazione do modo ou definizione) Kwonia «Crapt/cron» 第2アッチャー (シードの起動または設定) 前接後継 (模式設定を設定) 副接組 (模式禁止或設置)

Ern supérieur (function sélectionnée) Upper display (selected function) ObereAnzeige (ausgewählteFunktion) Display superiore (funzioneselezionata) Pantallasuperior (funciónselecionada) Mostradorsuperior (funciónselecionada) Hacoanal crpenna 上段表示(選択された機能) 上部顯示(選定功能) 上部显示屏(選定功能)

Ecran inférieur [detaileds de la function] Lower display [function details] Unteränzeige [Funktionsdetails] Display inferiore (dettagli delle funzioni) Pantella inferior [detalles de la funzione] Mestrodor inferior [detalhes da funzione] Minutная ströppa 下段表示(摘要内容) 下部顯示(功能详情) 下部显示屏(功能详情)
VUE D'ENSEMBLE DE L'AFFICHAGE
PRESS A OR C to switch in-between the dials

CONFIGURATION
DATE
PRIMARY
IME DISPLAY
SECONDARY TIME DISPLAY
TIME ZONE
ALARM
SPLIT-TIME
LAP-TIME
TIMER

For the Alarm only:
- PRESS A to activate or
• Pressing C to switch between
alarm 1 and alarm 2.


Depending on the PRIMARY TIME DISPLAY selected,
other functions displaying a time will either be shown with in
An/Fit of 24-h format as a result, such as TIME ZONE OF ALARM. The format are only be adapted on the PRIMARY TIME DISPLAY
The format can only be adapted on the PRIMARY TIME DISPLAY screen.
Depending on context:
X for a number
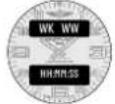
HH for hours / MM for minutes / SS for seconds / ZZ for 100 ^th of seconds
DAY for day / HUN for month / DU for date / HI for month /
YY or TYYY for year / WK of WW for week
Up-to-date user manuals are available on breitling.com under SERVICE section.
VOTRE CHRONOMÈTRE BREITLING
HEURE PRINCIPALE
Standard
Utilisation
Standard
A chronometer is a high-precision instrument that has successfully passed the entire battery of tests imposed by the COSC (Swiss Official Chronometer Testing Institute), a neutral and independent body which individually tests each movement according to the prescriptions in force.
The certification test for wristwatch chronographs with quartz oscillators consists in observing each movement for 13 days and 13 nights, in several positions and at 3 different temperatures (8°C, 23°C, 38°C). To earn the prestigious chronometer label, a movement's performances must meet 6 very strict criteria, including a daily variation in rate of within ±0.07 seconds, corresponding to an annual precision of ±25 seconds. The variation in rate of the SuperQuartz™ calibre fitted in your Breitling watch far and above exceeds these demands, achieving a level of ±15 seconds per year.
The term "chronometer" should not be confused with that of "chronograph", which is a complicated watch fitted with an additional mechanism used for measuring the duration of an event. A chronograph is not necessarily chronometer-certified, but all Breitling chronographs carry the much-coveted title of "chronometer".
MAIN HANDLING PRINCIPLES
The Aerospace is a multi-function chronograph. To access a function, press pusher B. The digital displays will light up and display the currently selected function:
- Upper display = function name,
- Lower display = function details,
Press B again in order to have the function switch to the next in line.
Once the function required is displayed,
- Hold B for a moment to access and set up the function,
- Press A or C to use the function,
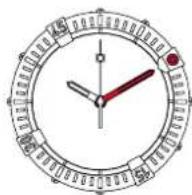
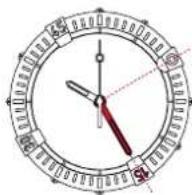
Please note that the hour and minute hands will promptly move away from the upper and lower digital displays to increase the readability of the function while in use.
The hands will move into a neutral position displaying 9:15.
Once you are done selecting and/or using the function, the hands will go back to their original position displaying time.
PREPARATION FOR USE
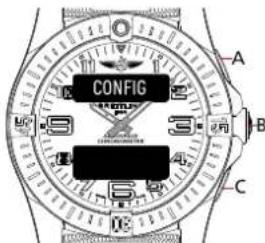
CONFIGURATION MODE
This mode is dedicated to the basic analog and digital display configuration. It allows you to align the analog hands to the digital time display (in case of a misalignment due to a shock). It also allows you to adapt the brightness of the digital displays as well as their lighting duration (depending on your preferences and exterior lighting conditions).
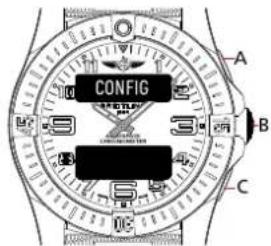
Browse through the different functions until the upper display shows [CONFIG].
Analog hands setup
- Press A or C until the upper display shows [HANDS],
- Press B. The upper display will show [HOUR],
- Press A or C repeatedly to have the hour hand move in either direction. A longer press & hold of A or C will have the hand travel a greater distance, up to 15min increments. Make sure to align the hour hand with the marking at 12 o'clock.
- Press B once the hour hand is set. The upper display will show [MINUTE].
- Press A or C repeatedly to have the minute hand move in either direction. Make sure to align the minute hand with the marking at 12 o'clock.
- Press B once the minute hand is set
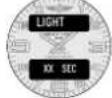
Digital display brightness setup
- Press A or C until the upper/lower display shows [LIGHT] / [LX],
- Press B. The lower display number will start to flash [L X ].
- Press A to increase this number or C to decrease it. The watch's brightness ranges 5 settings: 1 being the lowest brightness setting and 5 being the highest.
- Press B to confirm setting.
Digital display lighting time setup
- Press A or C until the upper/lower display show [LIGHT] / [XX SEC],
- Press B. The lower display number will start to flash [XX SEC].
- Press A to increase this number or C to decrease it. The running time of the digital display ranges from 3 to 20 seconds.
- Press B to confirm setting
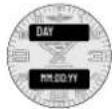
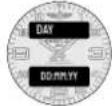
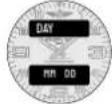
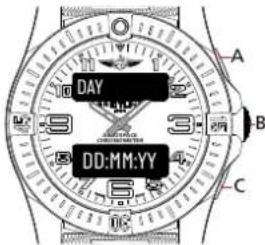
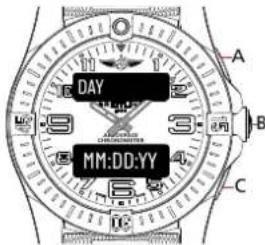
DATE
CONFIGURATION MODE
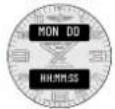
Browse through the different functions until the upper display shows the first three letters of a weekday, for example [MON] for Monday.
Setup
The date can only be set up in the following order:
Year
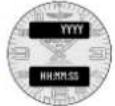
- Keep B pressed in until the upper display shows [YEAR] and the lower display flashes [YYYY].
- Press B. [YYYY] will start flashing.
- Press A to increase the number or C to decrease the number.
- Press B to validate and set up the next number. Please repeat this operation until all numbers are set.
- [YYYY] will flash again. Press B to validate the year setup.
MAIN DATE DISPLAY 1
Month
• The upper display will now show [MONTH]. Press B.
- The lower display will start to flash [MM]. Press A to increase the number or C to decrease the number.
- Press B to validate and set up the next number [MM]. Press B to validate the month setup.
Day
• The upper display will now show [DAY]. Press B.
- The lower display will start to flash [DD]. Press A to increase the number or C to decrease the number.
- Press B to validate and set up the next number [DD]. Press B to validate the day setup.
MAIN DATE DISPLAY 2
MAIN DATE DISPLAY 3

Usage
- When on the main date display, press A or C to switch in-between the different display alternatives.
- A secondary date display is available. Press B to browse through the different functions until the upper display indicates [MM DD]. The date cannot be set via this display mode..
Nota Bene
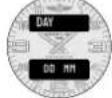
Main date display
DAY for day of the week / DD for date of the month /
MM for month of the year / YY for the year
Secondary date display
MM for month / DD for day
H for hours / M for minutes / S for seconds
SECONDARY DATE DISPLAY

MAIN TIME
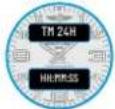
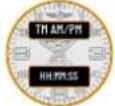
Browse through the different functions until the upper display shows [TM AM/PM] or [TM 24H]
Usage
- Press A or C to display the time either in 24H or AM/PM format. The upper display will adapt accordingly to the chosen format, and so will the lower display show time. Note that depending on the chosen display format, the Alarm display mode will be shown either in 24H or AM/PM format.
AM/PM TIME DISPLAY

Setup
- Keep pressing B until the upper display shows [TIME] and the lower display flashes [HH:MM:SS].
- Press B. The upper display will show [TM AM].
- Press A or C to adapt the period to AM or PM.
- Press B. The lower display will start flashing.
- Press A to increase the number or C to decrease the number.
- Press B to validate and set up the next number. [HH:MM:SS] will start to flash. Please repeat this operation until all numbers are set.
- [HH:MM:SS] will flash again. Press B to validate the setup.
24H TIME DISPLAY
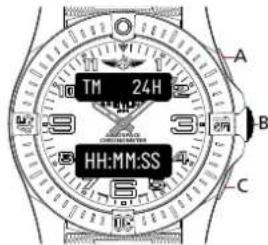
Nota bene
H for hours / M for minutes / S for seconds
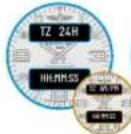
TIMEZONE
Browse through the different functions until the upper display shows [TZ 24H] or [TZ AM/PM]
Usage
- Make sure to set the main time before setting the time zone as this function relates to it.
• The time zone displays time in 24H mode.
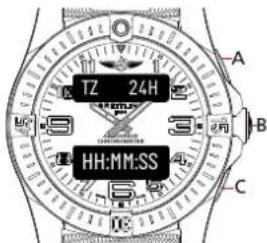
Setup
- Press B until the lower display starts to flash.
- Press A to increase or C to decrease the time difference displayed. Time can be increased or decreased by jumps of 15min up to a maximum of 24h. While setting the time difference, the upper display indicates [TM SUB] for setting a negative time difference or [TM ADD] for a positive time difference.
- Press B once the time zone is set.
Nota bene
H for hours / M for minutes / S for seconds
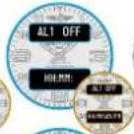
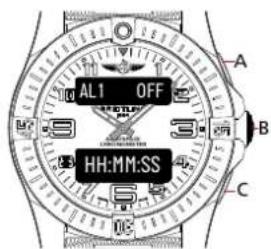
ALARM
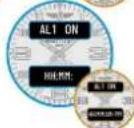
Browse through the different functions until the upper display shows [AL1 OFF/ON] or [AL2 OFF/ON]
Usage
- The watch has two independent alarms. The upper display will either show [AL1 OFF/ON] or [AL2 OFF/ON].
- The upper display will show [AL1 OFF] if the alarm is turned off and [AL1 ON] if the alarm is turned on,
- In AM/PM mode, the lower display will show the alarm time setup [HH:MM:PM] if the alarm is set for PM and [HH:MM:AM] if the alarm is set for AM.
- When in alarm mode, press C to switch between alarms 1 or 2.
- When in alarm mode, press A to set the alarm displayed to ON or OFF.
Setup
- Press B until the upper display shows [ALARMX] and the lower display flashes [HH:MM: ].
- Press B. In AM/PM mode, the upper display will show [AL1 AM] or [AL1 PM]. Press A or C to choose either AM or PM for the alarm time. If you had previously selected the 24h format for the main time display, please note that this step is not relevant.
- Press B. The lower display [HH:MM ] will start flashing. Press A to increase the number or C to decrease the number.
- Press B to validate and set up the next number. [HH:MM ] will start to flash. Please repeat this operation until all numbers are set.
- Press B once all numbers are set. The lower display will flash and display the alarm setup.
- Press B to confirm the setting.
Nota bene
H for hours / M for minutes
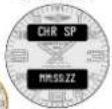
USING THE 1/100 ^TH CHRONOGRAPH
CONFIGURATION MODE
Browse through the different functions until the upper display shows [CHR SP].
The split-time functions enable you to mark intermediate times while your chronograph continues running. Each split measurement, therefore, counts back to when your chronograph first started.
Usage
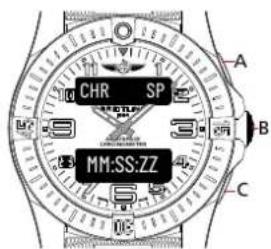
Standard
- Press A to start.
- Press A to stop. The lower display will show the time [MM:SS:ZZ].
- Press C to restart.
Split-time
- Press A to start.
- Press C to mark a split time.
- The upper display will show [CHR 1], which corresponds to your first split-time measurement.
- The lower display will flash the corresponding split time [MM:SS:ZZ] 4 times and then go back to the standard display of the chronograph, which continued running in the background.
- Press A to stop. The lower display will show the final time [MM:SS:ZZ].
- Press C to restart.
Nota bene
M for minutes / S for seconds / Z for 100° of seconds
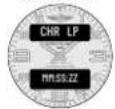
LAPE TIME
Browse through the different functions until the upper display shows [CHR LP].
The lap-time function enables you to calculate the time between two split measurements while your chronograph continues running. Each split measurement, therefore, counts back to the last split measurement done. In a race, if you mark a split time at each lap, this helps you understand how fast you were during each lap and overall if you are getting faster or slower. In the meantime, the clock continues timing the overall race.
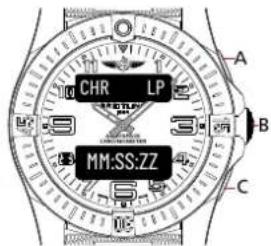
Usage
Standard
- Press A to start.
- Press A to stop. The lower display will show the time [MM:SS:ZZ].
- Press C to restart.
Split-time
- Press A to start.
- Press C to mark a lap time.
- The upper display will show [CHR 1], which corresponds to your first lap time measurement.
- The lower display will flash the corresponding lap time [MM:SS:ZZ] 4 times and then go back to the standard display of the chronograph, which continued running in the background.
- Press A to stop. The lower display will show the final time [MM:SS:ZZ].
- Press C to restart.
Nota bene
M for minutes / S for seconds / Z for 100 ^th of seconds
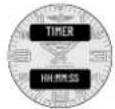
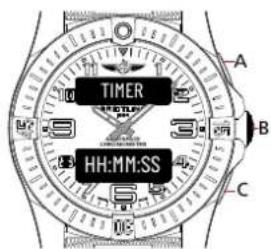
TIMER
Browse through the different functions until the upper display shows [TIMER].
Usage
Standard
- Press A to start or stop the timer.
- Press C to restart the timer.
- Once the alarm rings, press B to stop it.
Setup
- Keep B pressed in until the lower display [HH:MM:SS] flashes.
- Press B. [HH:MM:SS] will start flashing.
- Press A to increase the number or C to decrease the number.
- Press B to validate and set up the next number. [HH:MM:SS] will start flashing. Please repeat this operation until all numbers are set.
• [HH:MM:SS] will flash again. Press B to validate the setup.
Nota bene
H for hours / M for minutes / S for seconds
SPECIAL CHARACTERISTICS

RIDER-TAB BEZEL
The bezel of your watch is fitted with 4 hour-markers called rider-tabs: they are used as points of reference to mark a start time or a limit time you wish to remember. On models without a chronograph, they also provide a "minute chronograph" function enabling you to measure time elapsed in minutes.
Rider-tabs make it easier to rotate the bezel by giving a better grip (especially when wearing gloves) and additionally protect the glass.
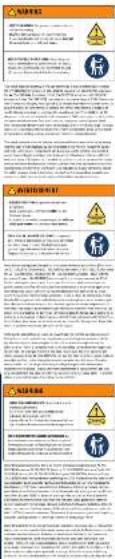
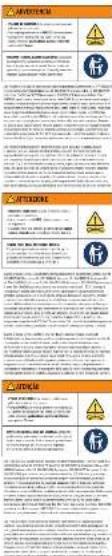
RECOMMENDATIONS
Used batteries and used watch components should not be disposed of like regular garbage, but be correctly recycled. We recommend returning them to your point of sale. You will thereby contribute to environmental and public health protection.

MAINTENANCE
Your Breitling chronometer is a sophisticated instrument which is constantly subjected to a wide variety of stresses and strains. Within a very small volume, a large number of components contribute to handling all the functions. Their mechanical action inevitably leads to a certain amount of wear and tear, which may be controlled by maintenance consisting of relubrication and replacing worn components. Like any precision measurement instrument, your watch must be regularly maintained in order to function at its highest level of potential: the frequency of this operation varies according to actual use. Breitling or your authorized retailer will be happy to handle the procedure.
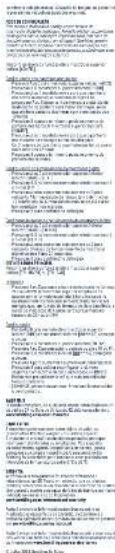
WATER RESISTANCE
The movement of your chronometer is protected by a complex case fitted with gaskets to ensure its water resistance. Under the influence of various external agents - perspiration, chlorinated or salt water, cosmetics, fragrances or dust - these gaskets gradually deteriorate. That is why water resistance cannot be permanently guaranteed. If used intensively in water, we recommend having an annual water resistance check conducted. In any event, such an appraisal must be done every two years. This operation, which takes only a few minutes, may be conducted by a Breitling authorized maintenance centre, or by an authorized retailer [www.breitling.com].
Breitling models are water-resistant to varying degrees. The extent of the water resistance, expressed in metres [M], is a standard value and does not indicate an absolute immersion depth. The crown and pushpieces must not under any circumstances be operated under water or when the watch is wet. The table below indicates the conditions in which your watch may reasonably be used, according to its degree of water resistance:
| ACTIVITIES / DEGREE OF WATER RESISTANCE | 3 bar/30 M/100 FT | 5 bar/50 M/165 FT | 10 bar/100 M/330 FT | 50 bar/500 M/1650 FT+ |
| Splashing | √ | √ | √ | √ |
| Shower, swimming, surface water sports | √ | √ | √ | |
| Water-skiing, dives, snorkelling | √ | √ | ||
| Diving | √ |
If your watch is equipped with a screw-lock crown, ensure that this is locked before any use in water. This also applies to screw-lock pushpieces.
USEFUL TIPS
Breitling genuine leather straps are crafted with the most refined materials and represent extremely high-quality products. Like all objects in natural skin (shoes, gloves, etc.), their length of life varies considerably, according to the conditions in which they are worn. In particular, water, cosmetics and perspiration accelerate the ageing process. A metal or
synthetic Breitling bracelet is thus better suited to activities involving frequent contact with water or moisture.
Breitling metal cases and bracelets are made from the finest alloys and guarantee sturdiness and wearer comfort. Regular cleaning by rinsing and brushing in clean water will keep your watch shiny. This operation is strongly recommended after each immersion in salty or chlorinated water. For watches fitted with a leather strap, the same advice applies, as well as avoiding getting the strap wet.
WHAT TO AVOID
Like any valuable objects, Breitling chronometers deserve special care. It is important to protect them from jarring and knocks by hard objects, and not to expose them to chemical products, solvents, dangerous gases, or magnetic fields. Moreover, your Breitling chronometer is designed to run smoothly at temperatures ranging between 0°C and 50°C.
IHR BREITLING-CHRONOMETER
HAUPTZEIT
Verwendung
Standard
Verwendung
Standard
ORARIO PRINCIPALE
Usage
Standard
USO
Standard
HORA PRINCIPAL
Estándar
- Pulsa A para iniciar.
- Pulsa A para parar. La pantalla inferior mostrará la hora [MM:SS:ZZ].
- Pulsa C para reiniciar.
Uso
Estándar
- Pulsa A para iniciar.
- Pulsa A para parar. La pantalla inferior mostrará la hora [MM:SS:ZZ].
- Pulsa C para reiniciar.
HORA PRINCIPAL
Normal
Utilização
Normal
Использование
Использование
ご使用前の準備
設定モード
メイン時刻
標準
使用法
標準
使用前準備
配置模式
備用主顯示3
用法
主時間
分段計時
標準
使用前准备
设置模式
备用主显示屏3
用法
主时间
Browse through the different functions until the upper display shows [TZ 24H] or [TZ AM/PM]
用法
标准
标准
This booklet is completely made from residues of sugar cane instead of wood. The paper is biodegradable, compostable, and recyclable.


The following table is in English:
(4)2018, 2019(24-27):500 (其中:500,000)
The following table is provided in the image.
2.10.1.1.1.
(2) 100% of the company's shareholding and investment
(2) 1986.05.14
In millions of dollars, the company has
10.00
: d'apprisie 2019, il mottir spendire
2.1.3.4.5.6.7.8.9.
The following table provides the results of the 2017 and 2018 results: "I've left us a question at home? I've left you?"
(2)转让方:罗丽华(2013)4号
(1) f_i()
特此公告。
附后八:
如A非正,需不遵守在规定条件之前可再作
in supple 4, p10, p11, p12, p13, p14, p15, p16, p17, p18, p19, p20, p21, p22, p23, p24, p25, p26, p27, p28, p29, p30, p31, p32, p33, p34, p35, p36, p37, p38, p39, p40, p41, p42, p43, p44, p45, p46, p47, p48, p49, p50, p51, p52, p53, p54, p55, p56, p57, p58, p59, p60, p61, p62, p63, p64, p65, p66, p67, p68, p69, p70, p71, p72, p73, p74, p75, p76, p77, p78, p79, p80, p81, p82, p83, p84, p85, p86, p87, p88, p89, p90, p91, p92, p93, p94, p95, p96, p97, p98, p99, p100
(1)

- 2014年1月1日
2018年1月1日
的前言:
2019年1月1日
19世纪40周年世界第25次
(一)增加注册资本的议案
(1) 民生化成山(2): 2018-10.13
The following table provides the information in English: "Wealthem Plus Company Limited" and "Wealthem Plus Company Limited" (A)