Palazzo Style - Parasol Glatz - Free user manual and instructions
Find the device manual for free Palazzo Style Glatz in PDF.

User questions about Palazzo Style Glatz
0 question about this device. Answer the ones you know or ask your own.
Ask a new question about this device
Download the instructions for your Parasol in PDF format for free! Find your manual Palazzo Style - Glatz and take your electronic device back in hand. On this page are published all the documents necessary for the use of your device. Palazzo Style by Glatz.
USER MANUAL Palazzo Style Glatz
natural_image
Line drawing of a simple outdoor umbrella with a flat roof and support structure (no text or symbols)EN Installation and operating instructions 18
- Beller, 100% of 100% of 30% of 25% of 25% of 150% of 100%.

1
[Non-Text]
[Non-Text]
[Non-Text]
[Non-Text]
。
。
-
1
1
1
(
1
1
1
1
1
1
1
-
-
1
1
1
4
3
-
m = 311
广力云
[Non-Text]
[Non-Text]
[Non-Text]
[Non-Text]
[Non-Text]
[Non-Text]
[Non-Text]
[Non-Text]
[Non-Text]
[Non-Text]
[Non-Text]
[Non-Text]
[Non-Text]
[Non-Text]
[Non-Text]
[Non-Text]
[Non-Text]
-
1
[Unreadable]
m = 311
-
[Non-Text]
[Non-Text]
[Non-Text]
。
1
h
ψ
-
5
[Non-Text]
[Non-Text]
[Non-Text]
[Non-Text]
[Non-Text]
[Non-Text]
[Non-Text]
[Non-Text]
[Non-Text]
[Non-Text]
[Non-Text]
[Non-Text]
[Non-Text]
[Non-Text]
[Non-Text]
[Non-Text]
[Non-Text]
[Non-Text]
[Non-Text]
[Non-Text]
[Non-Text]
[Non-Text]
[Non-Text]
[Non-Text]
[Non-Text]
[Non-Text]
[Non-Text]
[Non-Text]
[Non-Text]
[Non-Text]
[Non-Text]
[Non-Text]
[Non-Text]
[Non-Text]
[Non-Text]
[Non-Text]
[Non-Text]
[Non-Text]
[Non-Text]
[Non-Text]
[Non-Text]
[Non-Text]
[Non-Text]
[Non-Text]
[Non-Text]
[Non-Text]
[Non-Text]
[Non-Text]
[Non-Text]
[Non-Text]
[Non-Text]
[Non-Text]
[Non-Text]
[Non-Text]
[Non-Text]
[Non-Text]
[Non-Text]
[Non-Text]
[Non-Text]
[Non-Text]
[Non-Text]
[Non-Text]
[Non-Text]
[Non-Text]
[Non-Text]
[Non-Text]
[Non-Text]
[Non-Text]
[Non-Text]
[Non-Text]
[Non-Text]
[Non-Text]
[Non-Text]
[Non-Text]
[Non-Text]
[Non-Text]
[Non-Text]
[Non-Text]
[Non-Text]
[Non-Text]
[Non-Text]
[Non-Text]
[Non-Text]
[Non-Text]
M
• L
• L
• F
• C
• S
• T
10
[Non-Text]
[Non-Text]
[Non-Text]
[Non-Text]
[Non-Text]
[Non-Text]
[Non-Text]
[Non-Text]
[Non-Text]
[Non-Text]
[Non-Text]
[Non-Text]
[Non-Text]
[Non-Text]
[Non-Text]
[Non-Text]
[Non-Text]
[Non-Text]
[Non-Text]
[Non-Text]
[Non-Text]
[Non-Text]
[Non-Text]
[Non-Text]
[Non-Text]
[Non-Text]
[Non-Text]
[Non-Text]
[Non-Text]
[Non-Text]
[Non-Text]
[Non-Text]
[Non-Text]
[Non-Text]
[Non-Text]
[Non-Text]
[Non-Text]
[Non-Text]
[Non-Text]
[Non-Text]
[Non-Text]
[Non-Text]
[Non-Text]
[Non-Text]
[Non-Text]
[Non-Text]
[Non-Text]
[Non-Text]
[Non-Text]
[Non-Text]
[Non-Text]
[Non-Text]
[Non-Text]
[Non-Text]
[Non-Text]
[Non-Text]
[Non-Text]
[Non-Text]
[Non-Text]
[Non-Text]
[Non-Text]
[Non-Text]
[Non-Text]
[Non-Text]
[Non-Text]
[Non-Text]
[Non-Text]
[Non-Text]
[Non-Text]
[Non-Text]
[Non-Text]
[Non-Text]
[Non-Text]
[Non-Text]
[Non-Text]
[Non-Text]
[Non-Text]
[Non-Text]
[Non-Text]
[Non-Text]
[Non-Text]
[Non-Text]
[Non-Text]
[Non-Text]
[Non-Text]
[Non-Text]
(二)
M
[Unreadable]
[Non-Text]
-
•
• L
3
-
1
■
1
1
三
•
•
■
1
。
1
[Non-Text]
[Non-Text]
[Non-Text]
。
。
1
m = 311
1
1
1
1
1
1
1
1
1
1
-
m = 311
-
1
1
1
1
m = 311
Electrical supply 18
Safe information 19
Technical data
20
Assembly and commissioning 20
22
Appliances Overview
22
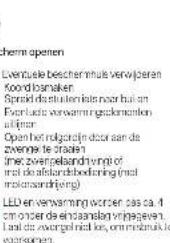
Opening/doing the perasol
[Non-Text]
Control of light and heating 23
[Non-Text]
Change of battery on the remote 23
Emergency closure / Restart 23
What do you have in cd? 24
Handing and maintenance 24
Disassembly/Wintering 24
25
Extensioning the parasol
25
Warranty
25
EC Conformity declaration
[Non-Text]
Disposal 25
nterced use
The product serves as a device for the protection of the human body from solar radiation. The product may only be used in or sale households, in the catering and hotel sector or in a comparable environment. The product may only be used in accordance with these installation and operating instructions. Any use either than the uses described in these installation and operating instructions shall be considered improper use. We reserve the right to make modifications due to technical advances. In these instructions the PAI A770 may also be referred to as "the product" or "present."
Warning words used
!DANGEROUS Immediately dangerous situation which can result in death at severe injuries.
ICAUTION Potentially dangerous situation which can result in minor or moderate injuries.
!NOTICE A situation that can lead to property damage.
Welcome
Congratulations on the purchase of your new PA.AZZO. You have purchases a high quality counsel. These instructions form part of this product. It contains important safety, usage and disposal information for users of the product. Please familiarize yourself with all the information listed before using the product. The product may only be used as described herein and for the use sequence stated. If you continue to use it and care for it properly, your PA.AZZO parsed will serve you well for many years to come.
Optional accessories
A high quality range of accessories is included with your parasite: it includes, among other things, the following products, which go perfectly with your parasite.
• Base
• Rain gutters
• Mounting place
• Securing systems
Ground socket
• Who shed
• 10.05.2017
Figure 2.06.13: Deviation of this
01524, 03-02 (2019)
Electrical supply
Electrical connection for paraval without motor Remote control LED 230V, 15A, 140Hz, 50Hz, <0.2kW Battery DH2800 LED 400V, 16A, 3L, 197E, 50Hz, <6.0kW LED Lighting 400V, 16A, 3L, 197E, 50Hz, <6.2kW Ejection class P3A
Electrical connection for parasol with motor
| 230V, 13A, 1k+PE, 50Hz, <0.2KW | |
| -LED | 230V, 13A, 1k+PE, 50Hz, <0.3KW |
| -Heating | 400V, 16A, 3L+N+E, 50Hz, <0.2KW |
| LED -Heating | 400V, 16A, 3L+N+E, 50Hz, <0.2KW |
| I protection class I*53 | |
Safety information
READ ALL THE SAFETY INFORMATION CAREFULLY AND MAKE SURE THAT YOU UNDERSTAND THEM.
- Follow all the instructions to avoid accidents, fire, explosions, electric shock or other hazards that could cause property damage and/or severe or fatal injuries.
- Ensure that each person using the product has read and observes these warnings and instructions.
- Keep these installation and operating instructions for the future. It must be passed on to subsequent users of the product.
- The manufacturer is not liable for material damages or injuries caused by incorrect use or the failure to observe the safety instructions. The warranty becomes invalid in such cases.
- The protective effect against hazardous UV radiation varies depending on the environment. Additional measures to protect your skin are possibly also necessary.
• Children must not play with the product,
- IDANGER Always keep children away from packaging material - this constitutes a choking hazard. Children underestimate risks. This product is not a loy.
- Children aged 8 years or over and persons with reduced physical, sensory or mental capabilities, lack of experience or knowledge may only use the appliance if they are supervised by a person who is responsible for their safety or if they have been shown how to use the appliance safety and they have understood the risks inherent in its use. Clearing and maintenance tasks may not be carried out by children without supervision.
- Do not use the device if you are suffering from a lack of concentration/attention or under the influence of drugs, alcohol or medication.
- The product must be placed in a base or a ground sleeve that is firmly anchored.
- Do not allow the product to fall or knock against anything.
- Check the span of the parasol before opening / closing it.
- Make sure there are no persons / objects in the movement area when opening / closing it. Otherwise, injuries / damage may occur.
- !DANGER Close the parasol when the wind picks up, in stormy weather conditions and / or when snow is falling
• Always secure closed parasols with the binding belt. The
cinding belt must be looped over the hook provided.
- Observe the specifications concerning the maximum permissible wind speed for a fixed ground anchorage (ground sleeve inserted in concrete). The permissible wind speed is reduced if a different anchorage method is used.
- Unattended parasols may not remain opened. Any damage is not covered by the warranty. Always secure closed parasols with a binding belt or a suitable securing system.
- Only use original accessories / spare parts.
• Product and technical modifications are not permitted.
• The parasol must be monitored during opening and closing.
- Check parasol and accessories regularly to be sure that no undue wear and tear or damage has occurred. If defects are found, have them repaired before further use.
- Do not use any solvents or abrasive cleaning agents.
• Dismantled parasols should only be stored lying down.
- Power supply: The voltage must correspond to the information on the charging station nameplate.
- Do not kink or pinch the power supply cable or pull it over sharp edges. Never operate defective appliances. Damaged power supply lines must be replaced by the professional.
- Never place the appliance / connecting cables on hot surfaces, never expose it to extreme heat or place it in the proximity of naked flames.
- If smoke arises from appliance, switch off immediately.
- In high or strong wind regions, dismantle the parasol in the fall after the end of the season and store it in a dry place for the winter.
- Set up new parasols in spring before the start of the season.
- Close protective covers completely and close them with rope. They must not flap.
Technical data Style/E
| Size (mm) | Base area (m2) | Closing height without Wall thickness and wall | Passage height of Wall thickness and wall | Overall height and kg (mm/h) | Minimum weight (kg/m3) | Maximum wind speed (s) |
| 630 | 87 | 11754 | 23520 | 855 | 80 | 18.16 |
| 640 | 72 | 12570 | 23520 | 108 | 100 | 24.10 |
| 650 | 152 | 13150 | 23520 | 906 | 100 | 25.56 |
| 660 | 77 | 18848 | 23520 | 403 | 240 | 65.80 |
| 670 | 258 | 14824 | 23520 | 495 | 310 | 57.45 |
| 680×80 | 8.8 | 6365 | 23520 | 377 | 80 | 106.00 |
| 690×80 | 10.5 | 13378 | 23520 | 302 | 100 | 26.00 |
| 700×80 | 8.0 | 10675 | 23520 | 322 | 80 | 65.00 |
| 700×80 | 8.0 | 1092 | 23520 | 368 | 80 | 81.96 |
| 700×80 | 8.0 | 10854 | 23520 | 354 | 240 | 78.69 |
| 700×80 | 9.0 | 14277 | 23520 | 363 | 100 | 10.78 |
| 700×80 | 12.3 | 14495 | 23520 | 307 | 340 | 19.20 |
| 700×80 | 8.0 | 12456 | 23520 | 556 | 240 | 88.32 |
| 700×80 | 20.9 | 13975 | 23520 | 422 | 310 | 70.69 |
Batch processing the 104 ground
24kct
mational wind speed after the
securities processes in the ground
Cuiu a ter-persu re buit-in fobingè 3000 K
Maximum bright trees built-in light angle 450^ to 5000 meters, depending on the size
Technical data Noblesse/E
| Size (cm) | Basic area m^2 | Closing height with/without traversed land | Passage height with/without traversed land | Overall height (mm) | Minimum width (mm) | Maximum width (mm) |
| e - 450 | 14.3 | 16,418 | 235,230 | 369 | 243 | 65,981 |
| e500 | 7.7 | 158,418 | 235,230 | 370 | 240 | 73,166 |
| e600 | 22.5 | 184,418 | 235,230 | 447 | 424 | 84,186 |
| e800 | 36.8 | 158,418 | 235,230 | 458 | 526 | 79,466 |
| kW_0 = 260 | 15.8 | 158,418 | 235,230 | 557 | 340 | 65,581 |
| kW_0 = 250 | 7.8 | 16,465 | 235,230 | 602 | 340 | 68,190 |
| kW_0 = 400 | 70.1 | 158,465 | 235,230 | 420 | 330 | 70,466 |
| kW_0 = 400 | 24.8 | 95,465 | 235,230 | 447 | 410 | 77,166 |
| kW_0 = 500 | 8.0 | 9,456 | 235,230 | 481 | 333 | 83,166 |
| kW_0 = 600 | 24.0 | 9,456 | 235,230 | 410 | 434 | 78,166 |
| kW_0 = 600 | 30.0 | 28,457 | 235,230 | 478 | 416 | 78,166 |
| kW_0 = 400 | 36.6 | 19,166 | 235,230 | 454 | 380 | 75,700 |
| kW_0 = 260 | 26.3 | 38,457 | 235,230 | 417 | 426 | 84,186 |
| kW_0 = 500 | 28.0 | 54,459 | 235,230 | 419 | 436 | 76,466 |
| kW_0 = 500 | 36.8 | 58,459 | 235,230 | 472 | 570 | 78,166 |
| kW_0 = 600 | 36.6 | 8,456 | 235,230 | 458 | 430 | 65,186 |
The following table is in the image.
[Unreadable]
The following table is in Chinese:
seclrewanchored in the ground.
Coorter Peres Reit-mling 3000K
Maximum brightness built, a light gain of 5000 to (500) lumbar spacing on the size
Assembly and commissioning
- The appropriate remote control is tuned into the paraval ex works.
- The power supply line must be provided by the customer on site. It must be possible to disconnect this for installation and maintenance purposes and to secure it against unintentional reconnection
- Set up the connection between the power supply cable and the powerway by means of the connecting plug supplied. The connector plug can be showed away either in the support tube or in the ground sleeve.
- For connection values see the section on Electrical supply.
- Secure all screws with reduced-strength thread sealant (blus). When reassembling clear the screws or use new screws.
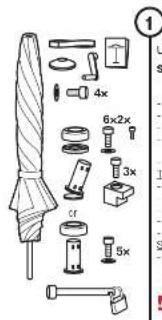
text_image
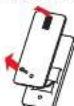
4x 6x2x 3x 5x cfUnpacking the parasol
Supplied with:
Parasol binding belt, support tube or tip over hinge, top, crank (not with motor variant) - Installation and operating instructions - Cover to support tube or lip-over hinge - Miscellaneous electrical material
- Safety bolt with lock-4½ standpipe fixing
W3705
4 teachers 1/2
Top-Over finger
-2 DOCKING SCREENING
pressing
3 clamping clocks W
-6hong screen 80
- 6 washers M/O for pressing ring
Support tube
- 5 fastening screws Mid
Swatchers M'Or
5 set spectra MIO
- Disperse of packaging material property
and sees away from children.
Do not make use of defective material. In
the event of any damage, inform the
transcord serv on provider immediately

Placing the parasol down
! Carefully place the parsecis on a clean, horizontal surface. The parsecis is very heavy. Work in a threesome and hold the parsecis securely.

Mount parasol top
1. Successed lost
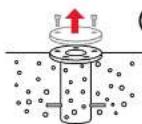

Prepare ground fastening
Remove the protective cover, place the ground sleeve according to the separate instructions. Observe weights for case and wind resistance. Note the final alignment of the paracol (NB notch)
! The parasol is very heavy. Work in a three-some and hold the parasol securely. Ensure that the electrical cable is not damaged or pinched.
If mounting with support tube...

Pre-assemble support tube
- Place support tube on ground fastening
- Make sure the notches are aligned
- Using the 5 stud screws, ensure that the support tube is vertically aligned
- Place 5 support screws
- Pre-assemble support tube with 5 fastening screws
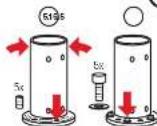

Prepare set up
- Slide on the support tube cover
- Establish plug connection. Observe the polarity of the plug
! Position power cable so there is no strain on it. Ensure that the cable is not pinched.

if mounting with tip-over hinge...


Pre-assemble the tip-over hinge
-
Slide on the hinge cover
-
Loose/remove/kg bar
-
Slide on press ring
-
Focus the p-over hings on the ground
[asunro fill, hings under the creek handel]
- Tioner (32)et the line-per-bien at the floor
tatering with 3 clamping books
-
Remove 2 locking screws
-
Til, la lio-zyat bina sidaeans

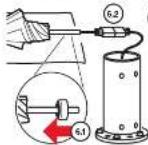
Connect the parasol with the hinge
-
Load the cable through the bino
-
Lesu the cable through the hinge
-
Elvis the name over the pin, workpiece
-
side the parado over the p-0c
-
tipton 2 loupas passan (50 km)
-
12.1012 (2017)
-
Establishing connection. Observe the
polarity of ceping
-
Carefully erect the parasal
-
Tighten 2 locking screws (6 Nm)
- Make sure that the electrical cable is not
dlya##r pinched. Run position con-
tered with top-over hinge.

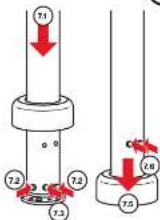
Completing the assembly
-
Align parasol
-
Adjust leveling screws
-
Lower the press ring, tighten (32 Nm)
-
Lower the hinge cover
-
Tighton 2 upper cross (56 km)
-
It necessary secure the parseo under buge
over with lock to prevent theft
2013-4th, 2014-12-21, 2015-06-29
! Realign the parasol: Remove press ring.
adjust evening screws, tighter everything
again
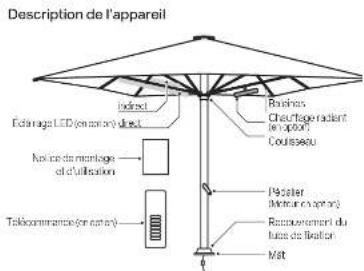
Appliance overview
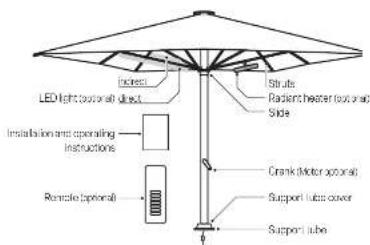
text_image
LED light (optional) direct Insert Inserts Radient heater (out panel) Side Installation and operating Instructions Remote (optional) Crank (Motor optional) Support tube cover Support tubeOpen / close parasol
1 Operation of the parallel with cardies drill is prohibited
pen the parasol
-
Remove any protective cover
-
Release binding be
-
Spread: such is highly outward
-
for any hedging elements
-
Group names are using the crack (or
a. open-parks by driving important (no park drive) or with the remote control
(for motor drive)
LED and heating are only released ap-
prox. 4 cm below the end stop. Do not
leave the crank reeerted to

Close parasol
- Allow any heating elements to cool
down for at least 30 minutes
-
Close any resting elements
-
Release announcing liver, close period
-
P.I.100, ANSABIOI SEPTEN
-
Appybrang:der.
-
Apply protective cover if necessary
Only wrap / pack < completely dry pane-
so s. Damage caused by flapping.com
pression and chating must be avoided.
Controlling the light and heat
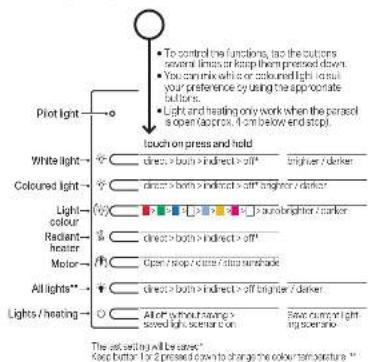
text_image
To control the functions, too the cutters several limits or keep them pressed down. You can make what is or coloured light to call your preference by using the appropriate callions. Light and heating only work when the process is open (approx. 4 cm below end stop). Pilot light touch on press and hold White light direct > both > indirect > off* Coloured light direct > both > indirect > off Light- colour (d) direct > both > indirect > off* Radiant- heater (d) direct > both > indirect > off* Motor Open loop / other / film/meshade All lights** direct > both > indirect > off Lights / heating direct > both > indirect > off served light scenario on Save current light scenario The setting will be saved* Keep better for a pressed way to change the colour temperature *Changing the battery on the remote control
- Always keep batteries out of the reach of children if a battery is swallowed.
seek magical help immediately
• If case of incorrect use, there is a risk of explosion.
• Always back batteries when storing or disposing of them to prevent
• Always dispose of batteries properly in accordance with the current law

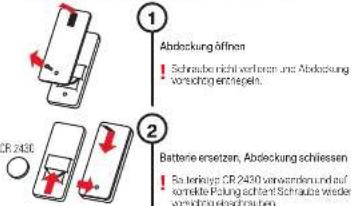
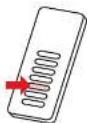
Open cover
Do not lose stress, and carefully detach
•
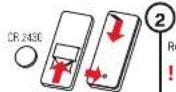
Replace battery, close cover
Use battery type CR 2430 and ensure
that the polarity is cancel Tighter screw
again carefully
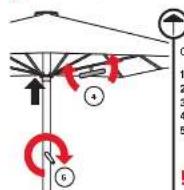
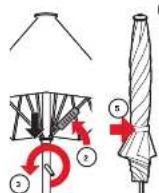
Emergency closure / Restart
The motor drive is protected against overheating and ceases to function if there is a danger of overload, to example it severe opening and closing manoeuvres have been carried out within a short time. Proper functioning cannot be ensured again until the motor has cooled down sufficiently (around 5 to 10 minutes). The emergency closure function is not part of normal use and should only be carried out in an emergency.
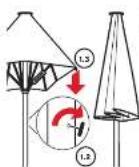

Unlock motor drive
-
Insert ailer key
-
Turn slen key around 180° to the
night and decouple drive
- Close sunshade manually
Manual closure should preferably
be carried out by two people on the supporting arm at the most.

Reset motor drive
-
Use the remote control to move the motor drive into the closed position (end position)
-
Wall until the weather season is too!
off after reaching the stop position.
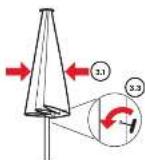

Restart
- Manually close sunshade completely
-
Insert aler key
-
Turn allen key around 160° to the left
and couple in the an
- Release ability
- Check proper functioning using the remote control
! After restan., be sure to carry out the function test to ensure proper functioning.
Problem Solution / tip
| Parasol is difficult to open. I meet the frame with silicon spray from time to time. | |
| Bliding marks on the aluminium frame. | There are norms signs of water and can be exposed with a lamp cloth. |
| LED input / heater does not work. Charge the battery of the remote control, check the power supply to the project. Make sure that the parasite is fully known. | |
| LED input / heater do not re spond or the remote control. | Change the battery of the remote control or reduce the distance between the parasol and the remote. |
Handling and maintenance
- Allow the paraxel to dry when acetate to prevent the formation of rapids and discolouration.
- A protective sleeve protects the paracol and will extend its service life.
- City bull the protective scene over the dry parlor when it is cry
- Do not clean the protective sleeve in the washing machine. Do not use chemi- cake.
- Clear the paracetol cover when needed with lukewarm water, line detergents and a sponge.
- Do not use any bleach or sharp objects, to avoid damage to the cover.
- Check the tightness of all screws from time to time and tighter them / necessary.
- If the parasol is located in a highly exposed position, increased wear and tear must be expected. In such cases we recommend more intensive care and maintenance
- In most cases, defective parasite can be repaired by your GLATZ partner. Only use original replacement parts FROM GLATZ
- Wipe the radiant heater unit from time to time with a clamp, non-abrasive cloth. The radiant heater unit must not be immersed in liquids.
- The frame can be rubbed with water. The coating colors can be refreshed with a car polish. Paint damage can be touched up with the paint recain kit available from GLATZ
Disassembly / Wintering What do you have to do if...
DANGERIDANGER OF TIPPING DANGER OF INJURY IF THE PARASOL TOP PLESOVER
-
Close and tie the parasol property.
-
Disaffle the parapsol in reverse mounting direction
-
Stars na parasa in lying position together with all accessories in a city place
CAUTIONI Check the parasol for condition and proper function before using it again. In case of deformations, cracks and wobbly connections have the parasol professionally revised.
2524
Retentioning the parasol

When the parasite shall open To extend the life and provide optimum wind stability.
-
Loosen the threaded screw
-
Adjust the initial extension profile
- Tighten the headless screw
Warranty
Please contact your GLATZ partner before returning the product. The warranty on the paraval tests for 24 months from the date of purchase. The warranty expires in the following case:
• External application of excessive force
• inappropriate operation or maintenance of the parado
• Damage arising from force majeure
The wind guarantee for an open parasol is limited. The maximum permissible wind speeds always require a fixed anchorage in the ground. If there are several perasols, a minimum distance of 25 cm must be maintained between any one of them. Likewise, a minimum distance of 25 cm must be maintained between the parasol and walls.
EC Conformity declaration
We, Glatz AG, Naubolschase 12, CH-8500 Frauenfeld, SWITZERLAND, hereby declare that this product complies with the directives of the European Community. The applicable declarations of conformity can be found on our Download area at www.glatz.com.
Disposal

This symbol on the product accessories or packaging indicates that the product must not be realized as anorted domestic was a but must be disposed of separately. Disposa of the product at a designated recycling collect on point. The disposal of electricity and electronics is important within the EU and in other Europe.
- 2006 and 2007 are the first year of the European countries is carried out through selection points that have systems for the separate selection of electrical and electronic equipment.
by disposing of the product commodity, you will help to avoid possible environmental and health hazards that may be caused by improper treatment of waste equipment. Recycling materials helps to conserve natural resources. So please do not dispose of old electrical or electronic equipment with an electric domestic waste.
The packaging is made of environmentally friendly materials that can be disposed of any local recycling facilities. By disposing of the product correctly, you will help to avoid possible environmental and health hazards. The product is made of metal and synthetic parts. End-of-life disposal must be carried out in accordance with regional environmental and waste regulation.
Indice
Borreselli 26
H. 2017, 16:30-4E, 50Hz <8.0kV
- 230V, 3A, L N FE, 50\~2<0.2×N
-LED 250V 3A L-N+FE 50-2.003kW
-10.52.48cm3 4.07.0 16.4, 34.4×10 ^-1 , 50.1H 6.92.25
+ F7 + 2400x-500, 400V 16A, 3 + 2400, 500Hz, 65.2kW
Garcic protection
text_image
Technical diagram of a mechanical assembly with labeled parts including umbrella, washers, and bolts- Sales of the company is available for
-
Conducted cost of the network
-
Serrare 2 % EIBOCAGGE (ON)
- Hoggler's market is ... Flas/Brill's /spira
7
• In contrast to the process of operations, we also
Data-based data processing methods
(https://doi.org/10.1034)
10485
text_image
4x 6x2x 3x 5xThe Ground Truth image displays a single, solid horizontal line. According to Rule 2 (UNDERSCORE & LINE RULES), this is a stylistic or background line, not a placeholder underscore. Therefore, the OCR result must ignore it. The provided OCR content is "____", which consists of four underscores. This is an incorrect interpretation of the line as a placeholder, violating the rule that stylistic lines must be ignored. The OCR has hallucinated text (underscores) where none should exist, violating the rule to ignore such lines. Hence, the OCR result is inconsistent with the Ground Truth.
Octobrele accessoires 42
The following section is
We'll tell you about the 37% of the U.S.
Elektrische voeding
Elektrische anguiting parasol zonder motor
(1) 2379 13A +44E 51.00 <0.28V
E. stockkeeping 1999
Afstandshodlening
45 ch 142430
text_image
Technical diagram of a mechanical assembly with labeled parts including an umbrella, bolts, and parts like 4x, 6x2x, 3x, and 5x.Parasol uitpakken
- Scheer, bawstigingsband, stancipin of
bavestigingscarrier, top coverpha, wargelite net rep coation? - Montage-er backeringstandelizing
Afdeiking voor standpjo of bevestigings schartier - Veiligheidsbout met sox 4 bevestigungsre
gerwerstandgaben MIZ - 4 slathingen MIZ
Bevestigungsschamer - D'orgson dever - I ruk podu rup
- 3 Kammenslokkan mal schreven MID
- 6 bevestigungsachroever MID
- Stamminger Mio 7501 Peralty
Standby:
5 cevasi
-5 slaringan MID wai perwing -5 stevengan MCI
■ 1.2.3.1.1
text_image
Diagram illustrating wind turbine blade rotation and deflection with labeled arrows and numbered components。
natural_image
Line drawing of a simple outdoor umbrella with a flat roof and support structure (no text or symbols)GLATZ AG
Neuhofstrasse 12
CH-8500 Frauenfeld
GLATZ France SARL
411 Allée des Noisetiers
F-69760 Limonest
glatz.com