Alu-Smart - Parasol Glatz - Free user manual and instructions
Find the device manual for free Alu-Smart Glatz in PDF.

User questions about Alu-Smart Glatz
0 question about this device. Answer the ones you know or ask your own.
Ask a new question about this device
Download the instructions for your Parasol in PDF format for free! Find your manual Alu-Smart - Glatz and take your electronic device back in hand. On this page are published all the documents necessary for the use of your device. Alu-Smart by Glatz.
USER MANUAL Alu-Smart Glatz
natural_image
Line drawing of a simple outdoor umbrella with a circular base (no text or symbols)EN Operating instructions and options 28
natural_image
Technical line drawing of a mechanical component with no visible text or symbols1
Déballez le parasol
natural_image
Line drawing of a mechanical tool with a conical tip, a flat blade, and a separate flat component (no text or symbols)2
natural_image
Diagram of a mechanical device with a red downward arrow indicating force or movement (no text or symbols present)5
natural_image
Simple line drawing of a conical object with a red downward arrow indicating compression or dislocation (no text or symbols)Utilisation
Optional accessories 33
Installation and set-up 34
Use
36
What you should do if... 38
Maintenance and care 38
Disassembly 39
Disposal 39
Welcome!
Congratulations on buying your new ALU-SMART. You have acquired a high quality sunshade. These instructions are an integral part of the product. They contain important information about safety, use and disposal for users of the product. Please make yourself familiar with all the information specified before using the product. The product may only be used as described here and in the scenarios indicated. If you follow correct use and care, the ALU-SMART will serve you well for years to come.
Intended Use
This product serves as equipment for protecting the human body from solar radiation. The product may only be used in private households, in catering and hotels or in comparable environments. The product may only be used according to these instructions for use. Any use other than as described in these instructions for use is considered incorrect use. The right of modification resulting from technical progress is reserved. In these instructions ALU-SMART is also referred to as the «product» or «sunshade».
Symbols used
!DANGER immediately dangerous situation, which could lead to death or severe injuries.
!CAUTION potentially dangerous situation which could result in minor or moderate injury.
!NOTICE a situation which could lead to property damage.
Safety information
READ OVER ALL SAFETY INSTRUCTIONS CAREFULLY AND ENSURE THAT YOU UNDERSTAND THEM.
- Please comply with all instructions to avoid accidents, explosions, electric shocks and other dangers which could result in damage to property and/or to serious or lethal injuries.
- Ensure that every person that uses this product has read these warnings and instructions and complies with them.
- Save all safety information and instructions for future use. They must be given to subsequent users of the product.
- The manufacturer is not liable for material damages or injuries which are caused by incorrect use or non-compliance with safety instructions. In such situations the warranty will become void.
- The protective effect against dangerous UV radiation is different depending on the environment. Additional measures for skin protection may be necessary.
• Children must not play with the product. - !DANGER Always keep children away from packing material - this poses a risk of suffocation. Children underestimate dangers. This product is not a toy. Children aged 8 years or over and persons with reduced physical, sensory or mental capabilities, lack of experience or knowledge may only use the product if they are supervised by a person who is responsible for their safety or if they have been shown how to use the product safely and they have understood the risks inherent in its use. Cleaning and maintenance tasks may not be carried out by children without supervision.
- Do not use the product where concentration/attention is lacking or under the influence of drugs, alcohol or medication.
- The product must be positioned in a base or ground socket with fixed anchorage.
- When using a base, the minimum weight of the base is to be taken into consideration. Further information can
be obtained from GLATZ or the retailer.
- When using a fixed ground anchorage, the installation must be carried out by specially trained persons in accordance with the separate assembly instructions.
- !DANGER Never place the closed sunshade against the wall without support. Since its centre of gravity is very high, it can easily fall over.
- Do not light an open flame near or under the sunshade.
- Do not hang any objects from the sunshade's supporting rods. No pull-ups from the sunshade's supporting rods.
- Do not let the product fall or be hit.
- Check the span width of the sunshade before opening/closing.
- When opening/closing, ensure that no persons/objects are in the area of movement. Otherwise injuries/damages could occur.
- !DANGER Close the sunshade in rising wind, stormy weather and/or snow.
- Please observe the specifications for maximal wind speed limits with fixed ground anchorage (ground socket fixed in cement). If another method of fixing is used, the maximal wind speed limit is reduced.
- Unsupervised shades may not be left open. Any possible damages do not fall under the warranty.
- The belt must be adjusted to match the size of the sunshade canopy.
- Use only original accessories/replacement parts.
- Changes to the product and technical modifications are not permitted.
Warranty
Please contact your GLATZ partner before you send in the product. The warranty period is 24 months from the date of purchase. Defective product must be returned to the manufacturer within 2 weeks.
The warranty becomes void in the following circumstances:
• externally applied force
- incorrect maintenance
• non-compliance with the operating instructions
• damages from lightning strike
The wind warranty for an open shade is restricted. The maximal wind speed limits always require a fixed anchorage in the ground. Where there are several sunshades, a minimum distance of 20cm between two shades is to be observed. Likewise, a minimal distance of 20cm between shades and a wall is to be observed.
Technical data
| Size [cm] | Area m^2 | Closing height [cm] | Clearance [cm] Upright Tilted | |
| ø 200 | 2.6 | 70...130 | 150...210 | 95...155 |
| ø 220 | 3.4 | 65...125 | 150...210 | 90...150 |
| ø 250 | 4.4 | 50...110 | 150...210 | 80...140 |
| ø 300 | 6.4 | 50...90 | 170...210 | 85...125 |
| 210 x 150 | 3.2 | 50...110 | 150...210 | 110...170 |
| 250 x 200 | 5.0 | 40...80 | 170...210 | 110...150 |
| 200 x 200 | 4.0 | 35...95 | 150...210 | 95...155 |
| 240 x 240 | 5.8 | 30...70 | 170...210 | 100...140 |
Optional accessories
There is widely varied range of accessories for your sunshade. It includes, among other things, the following products, which go perfectly with your sunshade:
- A variety of bases
- Support pipes
- Ground sockets
- Wall brackets
- Lawn spikes
- Protective covers
- LED-lighting elements
Ask your GLATZ dealer about them.
Installation and set-up
natural_image
Technical line drawing of a mechanical component with no visible text or symbols1
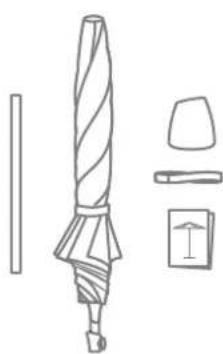
Unpack the shade
Supplied with:
- Upper pole with shade canopy
- Lower pole
- Shade finial
- Belt (possibly sewn int)
- Operating instructions
Please dispose of the packing material appropriately and keep away from children.
text_image
4.1 4.2 4.34
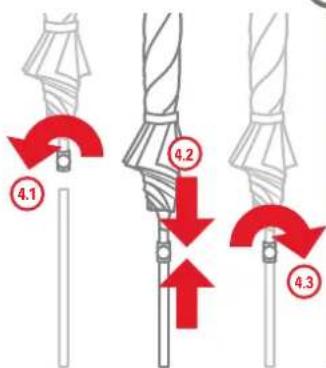
Put the sunshade together
- Loosen the clamping screw sufficiently
- Push the upper pole into the lower pole
- Tighten the clamping screw
- Check that it is firmly attached
In order to avoid damages, do not over-tighten the clamping screw.
natural_image
Line drawing of a mechanical tool with a conical tip, a flat blade, and a separate flat component (no text or symbols)2
Check material for damages
Before first installation check the material delivered for completeness and sound condition. Do not install defective material.
In the case of damages, inform the transport service provider immediately.
natural_image
Diagram of a mechanical device with a red downward arrow indicating force or movement (no text or symbols present)5
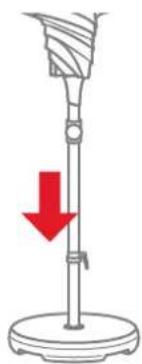
Place shade in base
Set up base on even and stable surface.
i Shade bases, ground sockets, wall brackets and/or lawn spikes are available at your GLATZ dealer.
Minimal base weights
natural_image
Simple line drawing of a conical object with a red downward arrow indicating compression or dislocation (no text or symbols)3
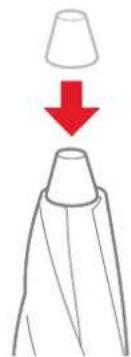
Mount the shade finial
- Put on the shade finial
- Screw the shade finial on well
- Check that it is firmly attached
Do not use the sunshade without correctly mounted shade finial.
| Size[cm] | Base weight[kg] | Wind speed*[km/h (Bft.)] |
| 200 >30<75(9) | ||
| 220 >30<65(8) | ||
| 250 >40<50(7) | ||
| 300 >40<35(5) | ||
| 210×150>30<55(7) | ||
| 250×200>40<40(6) | ||
| 200×200>40<50(7) | ||
| 240×240>40<40(6) |
* maximal wind speed with fixed ground anchorage
Use
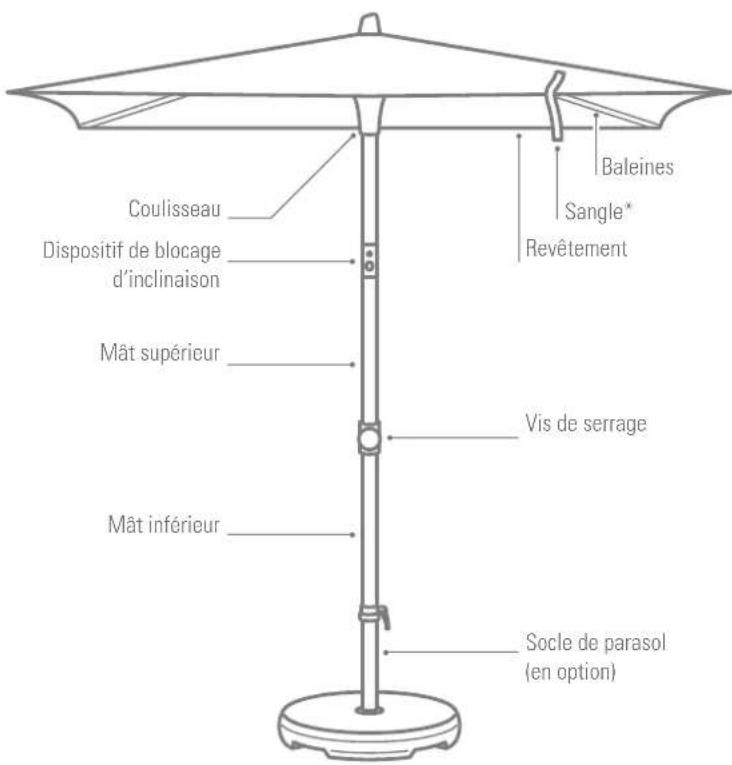
text_image
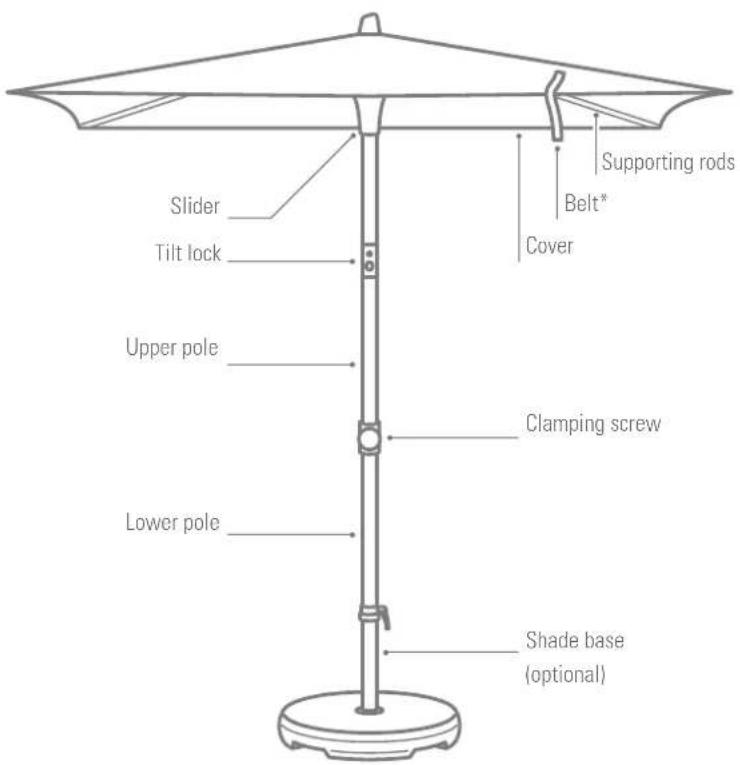
Slider Tilt lock Upper pole Lower pole Supporting rods Belt* Cover Clamping screw Shade base (optional)* depending on the fabric class, either separate or sewn onto the cover
text_image
Click)
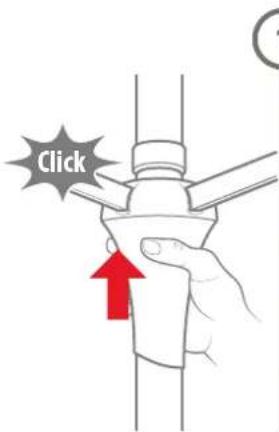
Open shade
Remove the protective cover, if present
- Loosen the belt
- Pull the supporting rods outwards slightly
- Slide the slider upwards
- Slider engages audibly above
! The slider must engage audibly above. Ensure that the area around the shade is free of obstacles.
text_image
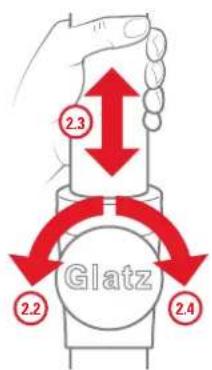
Glatz 2.3 2.2 2.42
Adjust the shade height
When adjusting the shade height, keep a firm hold on the upper pole, to prevent it lowering accidentally.
- Hold upper pole firmly
- Loosen clamping screw
- Adjust shade height to suit
- Tighten the clamping screw

text_image
3.3 3.23
Tilt the shade canopy
When adjusting the shade height, keep a firm hold on the moving part of the upper pole, to prevent it tipping over accidentally.
- Hold moving part firmly
- Push tilt lock in completely
- Tilt shade
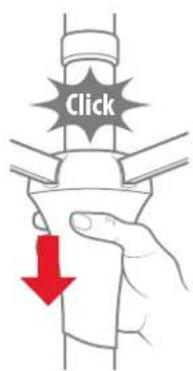
text_image
Click
4
Close shade
- Shade canopy in an upright position
- Unlatch the slider downwards
- Pull the slider downwards
- Fix/wrap the cover
- Attach the belt
If required, pull over the protective cover (shade must be dry).
! The tilt-lock must audibly engage when putting the sunshade in upright position!
What you should do if...
? Problem! Possible solutions
| The shade is hard to open. Service the rods occasionally with silicon spray. | |
| Slip-marks on the aluminium rods. | These are normal marks of use which can be removed with a damp cloth. |
| The shade cannot be tilted. Push tilt lock in fully. | |
| Service the angle joints occasionally with silicon spray. | |
| The shade height cannot be adjusted. | Loosen the clamping screw so that it no longer has any clamping effect. Service the upper and lower pole occasionally with silicon spray. |
Maintenance and care
- Allow the sunshade to dry out in an open position to prevent development of mould, odours and discolouration. Store the sunshade in a dry place once it is completely dry.
- Clean the canopy of the sunshade if required with lukewarm water, mild detergent and a sponge. If required, the fabric can be re-impregnated with a fluorine containing spray.
- The optionally available protective cover should only be pulled over the dry shade when dry.
- The optionally available protective cover is not to be washed in the washing machine nor dry cleaned.
- Do not use bleach or sharp objects to prevent damage to the coating of the canopy.
- Clean the shade framework regularly to ensure that the moving parts move smoothly. If required, use a silicon or Teflon dry lubricant. Wipe away any slip marks on the aluminium rods with a damp cloth.
- If the sunshade is standing in a very exposed place, increased wear must be expected. In such cases we recommend more intensive maintenance and care.
- In most situations, defective shades can be repaired by your GLATZ partner. Use only original replacement parts from GLATZ.
Disassembly
Disassemble the sunshade if it is not going to be used for a longer period. WARNING! DANGER OF TIPPING. DANGER OF INJURY CAUSED BY SUNSHADE TIPPING OVER.
1 Close the sunshade correctly and tie up.
2 Take the sunshade out of the base/ground socket and lay it down.
3 Store the sunshade in a lying position along with all accessories in a dry place.
Disposal
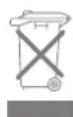
This symbol on the product, accessories or the packaging indicates that the product cannot be treated as unsorted domestic waste but must be disposed of separately. Dispose of the product in a recycling collection point intended for this purpose. Disposal of electrical and electronic devices within the EU and in other
European countries is carried out via collection points which have a system for separate collection of electrical and electronic devices. By correctly disposing of the product, you are helping to prevent possible dangers for the environment and for health which can be caused by incorrect disposal of old devices. Re-use of materials contributes to the maintenance of natural resources. Therefore, do not dispose of any old electrical and electronic devices with the unsorted domestic waste. The packaging is made from environmentally friendly materials which can be disposed of in your local recycling facility. By correctly disposing of the packaging and packaging waste, you are helping to prevent possible dangers for the environment and for health. The product consists of metal and plastic parts. Disposal at the end of service life must be carried out under the terms of the regional environment and waste regulations.
40
Contenuto
Benvenuti! 41
natural_image
Technical line drawing of a mechanical component with no visible text or symbols1
natural_image
Line drawing of a mechanical component with a cylindrical shaft, flange, and base (no text or symbols)2
natural_image
Diagram of a mechanical device with a red downward arrow indicating force or direction (no text or symbols present)5
natural_image
Diagram showing a conical object with a red downward arrow pointing to a tapered tip (no text or symbols)3
natural_image
Technical line drawing of a mechanical component with no visible text or symbols1
Desempaquetar la sombrilla
natural_image
Technical line drawing of a mechanical tool with three views: straight, twisted tip, and flat (no text or symbols)2
text_image
Diagram showing a mechanical device with a red downward arrow indicating force or change, likely illustrating a physical setup or motion.5
natural_image
Simple line drawing of a conical object with a red downward arrow indicating compression or dislocation (no text or symbols)3
natural_image
Technical line drawing of a mechanical component with no visible text or symbols
Parasol uitpakken
Leveringsomvang:
natural_image
Technical line drawing of a drill bit with three views: straight, angled, and flat (no text or symbols)
text_image
Diagram showing a mechanical device with a red downward arrow indicating force or direction, likely illustrating a compression or lifting operation.
natural_image
Simple line drawing of a conical object with a red downward arrow indicating compression or dislocation (no text or symbols)