
One - Electrical stimulation device COMPEX - Free user manual and instructions
Find the device manual for free One COMPEX in PDF.

| Product type | Electrical stimulation device |
| Brand | Compex |
| Model | One |
| Number of channels | 4 independent and individually adjustable channels |
| Pulse shape | Constant rectangular current with compensated impulses |
| Maximum intensity | 100 mA |
| Pulse amplitude | 60 to 400 μs |
| Pulse frequency | 1 to 150 Hz |
| Power supply | Rechargeable NiMH battery 4.8 V / ≥1200 mAh |
| Charger included | Yes, reference 68302x |
| Electrodes included | 1 pack small (5x5 cm) + 1 pack large (5x10 cm) |
| Programs included | Several programs: Sculpt my abs, Develop my biceps, Draw my pecs, Strengthen my thighs, Regenerating massage, Firm my stomach, Firm my arms, Sculpt my glutes, Tone my thighs, Heavy legs |
| Operating conditions | Temperature: 0°C to 40°C, humidity: 30 to 75%, pressure: 700 to 1060 hPa |
| Storage conditions | Temperature: -20°C to 45°C, max humidity 75%, pressure: 700 to 1060 hPa |
| Maintenance and cleaning | Clean with a soft cloth and a solvent-free alcohol-based detergent |
| Safety - Contraindications | Pacemaker, epilepsy, pregnancy (abdomen), circulatory disorders, abdominal/inguinal hernia |
| Standards | IEC 60601-1, IEC 60601-1-2, IEC 60601-2-10, directive 93/42/EEC |
| Included accessories | Stimulator, charger, stimulation cables (4 colors), electrodes, user guide CD, quick start guide, transport pouch, battery pack |
| Warranty | Refer to the included manual |
Frequently Asked Questions - One COMPEX
User questions about One COMPEX
0 question about this device. Answer the ones you know or ask your own.
Ask a new question about this device
Download the instructions for your Electrical stimulation device in PDF format for free! Find your manual One - COMPEX and take your electronic device back in hand. On this page are published all the documents necessary for the use of your device. One by COMPEX.
USER MANUAL One COMPEX
natural_image
Blue handheld medical device with display screen and control buttons (no visible text or symbols)USER MANUAL .... 1
GUIDE DE L'UTILISATEUR.....29
I INTRODUCTION .... 3
II WARNINGS.... 3
CONTRAINDICATIONS.... 3
SAFETY MEASURES.... 4
III PRESENTATION....8
WARRANTY 9
MAINTENANCE....9
STORAGE AND TRANSPORTATION CONDITIONS.... 9
USE CONDITIONS 9
ELIMINATION 9
STANDARDS 9
PATENTS....10
STANDARDIZED SYMBOLS.... 10
TECHNICAL CHARACTERISTICS.... 10
IV HOW DOES ELECTROSTIMULATION WORK? ...... 12
V USAGE GUIDELINES 14
PLACEMENT OF ELECTRODES.... 14
STIMULATION POSITIONS 15
ADJUSTING STIMULATION ENERGIES.... 15
VI HOW IT WORKS.... 16
DESCRIPTION OF THE DEVICE.... 16
BATTERY INSERTION....17
CONNECTIONS.... 17
PRELIMINARY SETTINGS 18
SELECTING A CATEGORY 19
SELECTING A PROGRAMME.... 19
ADJUSTING STIMULATION ENERGIES....20
PROGRAMME PROGRESSION 21
END OF PROGRAMME 21
BATTERY LEVEL AND RECHARGING 22
PROBLEMS AND SOLUTIONS.... 23
EN
VII PROGRAMMES 24
FOR HIM....24
GET A 6-PACK 24
BUILD YOUR BICEPS 24
BUILD YOUR PECS 25
GET STRONGER QUADS....25
REVIVING MASSAGE 26
FOR HER....26
CUT YOUR ABS 26
FIRM YOUR ARMS....27
SHAPE YOUR BUTTOCKS 27
GET FIRMER THIGHS 28
HEAVY LEGS....28
I INTRODUCTION
Please read this manually carefully prior to using your One stimulator. You are strongly advised to read Chapter 2 of this manual. One is a stimulator intended for muscular training and pain relief. Any person excepted those mentioned in the Chapter 2 "Warnings" can use the One stimulator.
II WARNINGS
CONTRAINDICATIONS
Contraindications
• Cardiac stimulator (pacemaker)
- Epilepsy
• Pregnancy (do not use on abdominal region)
• Serious arterial circulation disorders in lower limbs
• Abdominal or inguinal hernia
Osteosynthesis equipment
The presence of osteosynthesis equipment (metallic equipment in contact with the bone: pins, screws, plates, prostheses, etc.) is not a contraindication. The electrical currents of the One stimulator are specially designed to have no harmful effect on osteosynthesis equipment.
Important!
- Do not use One stimulator programmes if you have sensitivity problems.
- Never use the One stimulator for prolonged periods without medical advice.
- Consult your doctor if you are in any doubt whatsoever.
- Read this manual carefully, in particular chapter 7, which provide information concerning the effects and indications of each stimulation programme

SAFETY MEASURES
- Do not apply stimulation near the area of an implant, such as cochlear, pacemakers, skeletal or electrical.
- Do not apply stimulation in the vicinity of metal. Remove jewellery, body piercings, buckles or any other removable metallic product or device in the area of stimulation.
- If pregnant or menstruating, do not place electrodes directly over the uterus or connect pairs of electrodes across the abdomen.
- Do not use the One stimulator in water or in a humid atmosphere (sauna, hydrotherapy, etc.).
- Do not use the One stimulator in an oxygen-rich atmosphere.
- Never carry out an initial stimulation session on a person who is standing. The first five minutes of stimulation must always be performed on a person who is sitting or lying down. In rare instances, very highly strung people may have a vagal reaction. This is of psychological origin and is connected with a fear of the muscle stimulation as well as surprise at seeing one of their muscle contracts without having intentionally contracted it themselves. This vagal reaction produces a feeling of weakness with a fainting tendency, slowing down of the heart rate and a reduction in arterial blood pressure. If this does occur, all that is required is to stop the stimulation and lie down with the legs raised for the time it takes for the feeling of weakness to disappear (5 to 10 minutes).
- Never allow movement resulting from muscular contraction during a stimulation session. You should always stimulate isometrically; this means that the extremities of the limb in which a muscle is being stimulated must be firmly fixed, so as to prevent the movement that results from contraction.
- Do not use the One stimulator if you are connected to a high-frequency surgical instrument as this could cause skin irritation or burns under the electrodes.
- Do not use the One stimulator within one metre of short wave or microwave devices as this could alter the currents generated by the stimulator. If you are in any doubt as to the use of the stimulator close to another medical device, seek advice from the manufacturer of the latter or from your doctor.
- Do not use the One stimulator in areas where unprotected devices are used to emit electromagnetic radiation. Portable communications equipment can interfere with electrical medical equipment.
- Only use stimulation cables supplied by Compex.
- Do not disconnect any stimulation cable during a session while the stimulator is switched on. Switch the stimulator off first.
- Never connect stimulation cables to an external power supply. There is a risk of electric shock.
- Never use a battery not supplied by Compex.
- Never recharge the stimulator without first disconnecting the stimulation cables.
• Always use the charger provided by Compex to recharge the stimulator. - Never use the stimulator or the charger if it is damaged or if the battery compartment is open. There is a risk of electric discharge.
- Disconnect the charger immediately if the device "bleeps" continuously, if there is abnormal heating or smell, or if smoke comes from the charger or the stimulator.
- Do not recharge the battery in a confined space (carrying case, etc.). There is a risk of fire or electric shock.
- Keep the One stimulator and its accessories out of reach of children.
- Do not allow any foreign bodies (soil, water, metal, etc.) to penetrate the device, the battery compartment and the charger.
- Sudden temperature changes can cause condensation to build up inside the stimulator. Use the device only once it has reached ambient temperature.
- Do not use the stimulator while driving or operating machinery.
- Do not apply stimulation while sleeping.
- Do not use the stimulator at altitudes of over 3,000 metres.
• The long-term effects of electrical stimulation are unknown.

PRECAUTIONS WHEN USING THE ONE STIMULATOR
• After trauma or a recent operation (less than 6 months)
- Muscular atrophy
- Persistent pain
- Need for muscular rehabilitation
WHERE NEVER TO APPLY THE ELECTRODES
• In the vicinity of the head.
- At the front and side areas of the neck.
- Contralaterally, i.e. do not use two poles connected to the same channel on opposite sides of the body.
- On or near skin lesions of any kind (wounds, swelling, burns, irritation, eczema, cancer lesion, etc.).

PRECAUTIONS WHEN USING THE ELECTRODES
- Only use electrodes supplied by Compex. Other electrodes may have electrical properties that are unsuitable for the One stimulator. Caution should always be exercised with current densities greater than 2mA/cm2.
• Always turn off the stimulator before moving or removing any electrode during a session. - Do not place the electrodes in water.
- Do not apply solvents of any kind to the electrodes.
- Do not attempt to place electrodes on any part of the body not directly visible without assistance.
-
For best results, wash and clean the skin of any oil and dry it before attaching the electrodes.
-
Attach the electrodes in such a way that their entire surface is in contact with the skin.
- For obvious reasons of hygiene, each user must have his/her own electrodes set. Do not use the same electrodes on different people.
- Never use a set of adhesive electrodes for more than 15 sessions as the quality of the contact between the electrode and the skin, which is important for the comfort and effectiveness of stimulation, progressively degrades.
- Some people with very sensitive skin may experience redness under the electrodes after a session. Generally, this redness is completely harmless and disappears after 10 to 20 minutes. However never start another stimulation session in the same area if the redness is still visible.
III PRESENTATION
EN
natural_image
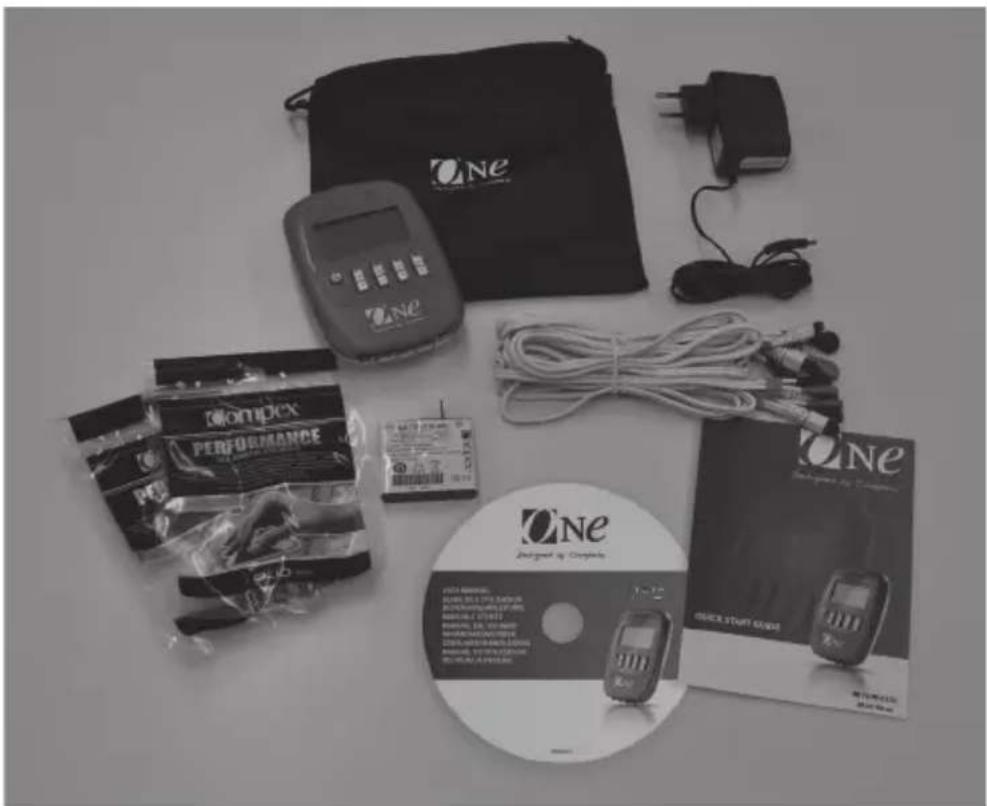
Assorted electronic devices and accessories including a One device, capacitors, and a CD (no visible text or symbols)Reception of equipment and accessories
Your kit contains:
A 1 stimulator (1530000)
B 1 charger (68302x)
C 1 set of white Snap cables for electrodes, colour-coded (blue, green, yellow, red) (601136)
D 1 bag of small electrodes (5x5 cm) (42215)
E 1 bag of large electrodes (5x10 cm) (42216)
F 1 user manual on a CD-rom (880044)
G 1 quick start guide (M321319)
H 1 travel pouch (680038)
1 battery pack (94121x)
Warranty
See the enclosed leaflet.
Maintenance
Clean with a soft cloth and an alcohol based, solvent-free cleaning product. Use only a minimum amount of liquid when cleaning the unit. Do not disassemble the stimulator or charger as all these contain high voltage components that could cause electric shock. This may only be done by persons or repair services authorized by Compex. Your stimulator does not require calibration. If your stimulator contains parts that seem worn or defective, please contact your nearest Compex customer service centre.
Storage and transportation conditions
The stimulator must be stored and transported in accordance with the following conditions:
Temperature: - 20°C to 45°C
Maximum relative humidity: 75%
Atmospheric pressure: 700 hPa to 1060 hPa
Use conditions
Temperature: 0^ C to 40^ C
Relative humidity: 30 % to 75 %
Atmospheric pressure: 700 hPa to 1060 hPa
Do not use in areas where there is a risk of explosion.
Elimination
Battery must be disposed in compliance with relevant national regulatory requirements. Any products bearing the WEEE marking (a crossed-out wheeled bin) must be separated from ordinary household waste and sent to special collection facilities for recycling and recovery.
Standards
To guarantee your safety, the stimulator has been designed and manufactured in compliance with the requirements of the European Medical Device Directive 93/42/EEC as amended.
The One stimulator also complies with the general safety standard for electromedical equipments, EN 60601-1. It also complies with the electromagnetic compatibility standard, EN 60601-1-2 and the standard on particular safety requirements for nerve and muscle stimulators, EN 60601-2-10.
Current international standards require that a warning be given concerning the application of electrodes to the thorax (increased risk of cardiac fibrillation).
The device also complies with Directive 2002/96/EEC on waste electrical and electronic equipment (WEEE).
Patents
The One device incorporates several innovations with patents pending or delivered.
Standardized symbols

on: Read the user manual or operating instructions.

stimulator is a class II device with internal electric power and type BF ed parts.

and address of the manufacturer and manufacturing date.
and address of the authorised representative in the an Community.

device must be separated from ordinary household waste and sent cial collection facilities for recycling and recovery.

On/Off button is a multi-function button.
Technical characteristics
A General information
94121x Battery
Nickel metal-hybrid (NiMH) rechargeable (4.8 V/≥1200 mA/h).
Battery chargers: Only battery chargers bearing the part number 68302x can be used to recharge the battery supplied with the One stimulator.
B Neurostimulation
All electrical specifications are given for an impedance of 500-1000 ohms per channel.
Channels: four independent and individually adjustable channels that are electrically isolated from each other.
Impulse shape: constant rectangular current with pulse compensation to eliminate any direct current component to prevent residual polarisation at skin level.
Maximum pulse intensity: 100 mA.
Pulse intensity increments: manual adjustment of stimulation intensity from 0 to 694 (energy) in minimum increments of 0.5 mA.
Pulse width: 60 to 400 s.
Maximum electrical charge per pulse: 80 microcoulombs (2 × 40 μC, compensated).
Standard pulse ramp-up time: 3 s (20%-80% of maximum current).
Pulse frequency: 1 to 150 Hz.
C Information related to electromagnetic compatibility (EMC)
The One stimulator is designed to be used in typical domestic environments and is approved according to the EMC safety standard of EN 60601-1-2.
This device emits very low levels in the radio frequency (RF) interval and is therefore not likely to cause any interference with nearby electronic equipment (radios, computers telephones etc.).
The One stimulator is designed to withstand foreseeable disturbances originating from electrostatic discharges, mains supply magnetic fields or radio frequency transmitters.
Despite this, it is not possible to guarantee that the stimulator is not affected by strong RF (radio frequency) fields emitting from for example mobile phones.
For more detailed information regarding electromagnetic emission and immunity, please contact Compex.
IV HOW DOES
ELECTROSTIMULATION WORK?
The principle of electrostimulation is to stimulate nerve fibres by means of electrical impulses transmitted by electrodes. The electrical pulses generated by stimulators designed by Compex are high quality pulses - offering safety, comfort and efficiency - which can stimulate different types of nerve fibres:
-
The motor nerves, to stimulate a muscular response. The quantity and the benefits obtained depend on the stimulation parameters and this is known as electromuscular stimulation (EMS).
-
Certain types of sensitive nerve fibres to obtain analgesic or pain-relieving effects.
1. Motor nerve stimulation (EMS)
In voluntary activity, the order for muscular work comes from the brain, which sends a command to the nerve fibres in the form of an electrical signal. This signal is then transmitted to the muscle fibres, which contract. The principle of electrostimulation accurately reproduces the process observed during a voluntary contraction. The stimulator sends an electrical current impulse to the nerve fibres, exciting them. This excitation is then transmitted to the muscle fibres causing a basic mechanical response (= muscular twitch). The latter constitutes the basic requirement for muscular contraction. This muscular response is completely identical to muscular work controlled by the brain. In other words, the muscle cannot distinguish whether the command comes from the brain or from the stimulator.
The parameters of the programmes (number of impulses per second, contraction time, rest time, total programme time) subject the muscles to different types of work, depending on the muscle fibres. In fact, different types of muscle fibres may be distinguished according to their respective contraction speed: slow, intermediate and fast fibres. The fast fibres will obviously predominate in a sprinter, while a marathon runner will have more slow fibres. With a good knowledge of human physiology and a perfect mastery of the stimulation parameters of the various programmes, muscular work can be directed very precisely towards the desired goal (muscular reinforcement, increased blood flow, firming up, etc.).
2. Stimulation of the sensory nerves
The electrical impulses can also excite the sensory nerve fibres to obtain an analgesic or pain relieving effect. The stimulation of the tactile sensory nerve fibres blocks the transmission of pain by the nervous system. The stimulation of another type of sensory fibres creates an increase in the production of endorphins and, therefore, a reduction in pain. With pain relief programmes, electrostimulation can be used to treat localised acute or chronic pain as well as muscle pain.
Attention: Do not use the pain relief programmes for a long period without medical advice.
Benefits of electrostimulation
Electrostimulation is a very effective way to make your muscles work:
• with significant improvement of different muscle qualities
• without cardio-vascular or mental fatigue
- with limited stress on the joints and tendons. Electrostimulation thus allows a greater quantity of work to be done by the muscles compared with voluntary activity.
To be effective, this work must involve the greatest possible number of muscle fibres. The number of fibres that are working depends on the stimulation energy. It will therefore be necessary to use the maximum tolerable energy. The user controls this aspect of stimulation. The higher the stimulation energy, the greater the number of muscle fibres that are working and, therefore, the more significant the progress achieved. To maximize your results, Compex recommends that you complement your electrostimulation sessions with other efforts, like:
• regular physical exercise
• proper and healthy nutrition
• balanced lifestyle
V USAGE GUIDELINES
The usage guidelines presented in this section should be considered as general rules.
For all programmes, it is recommended that you read carefully the usage information and advice presented in chapter 7.
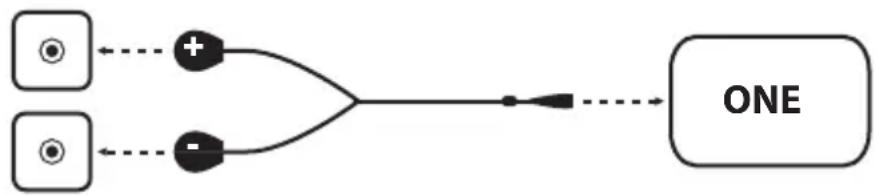
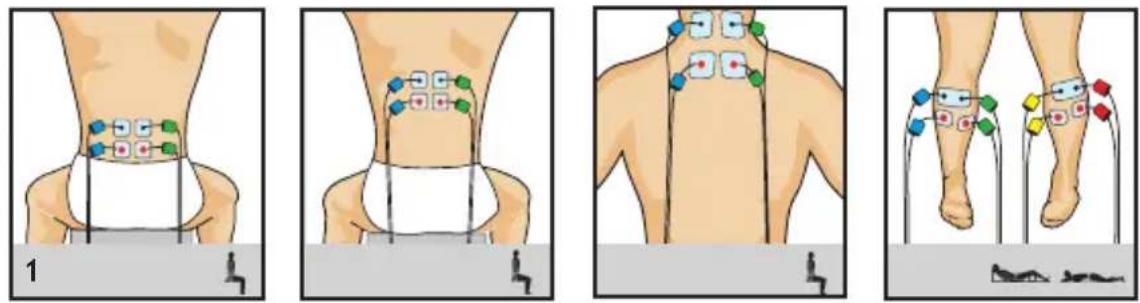
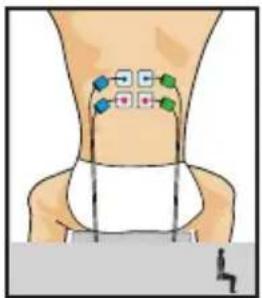
Placement of electrodes
For optimal results, use the electrode positions recommended. Each stimulation cable has two poles:
A positive pole (+) = red connection
A negative pole (-) = black connection
A different electrode must be connected to each pole.
Note: It is possible and normal to have an electrode arrangement that leaves one electrode connection free from a cable.
Depending on the characteristics of the current, efficacy can be optimised in certain programmes by placing the electrode connected to the positive pole (red connection) "strategically".
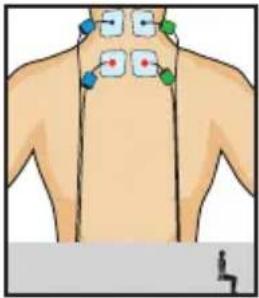
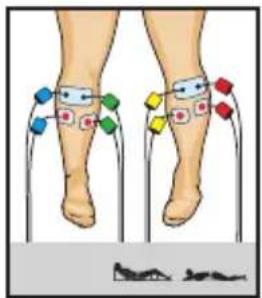
For programmes which force muscles to contract, it is important to place the positive electrode on the motor point of the muscle. It is crucial to choose the right size of electrodes (large or small) and correctly position these on the muscle group you want to stimulate so as to ensure the efficacy of the treatment. Therefore, always use the size of electrodes shown in the pictures. Unless you have other specific medical instructions, always follow the placement directions in the pictures. Where necessary, look for the best possible position by slowly moving the positive electrode over the muscle until you find the point that will produce the best contraction or the most comfort for you.
Compex disclaims all responsibility for consequences arising from electrodes placed in other positions.
Stimulation positions
This position will vary depending on the position of the electrodes, the muscle group you wish to stimulate, and the programme you are using. For programmes which involve powerful muscular contractions, the muscle should always be stimulated in an isometric way. You must therefore fix the extremities of your limbs securely. In this way, you provide maximum resistance to the movement and prevent any shortening of the muscle during the contraction, which could create cramp pains and serious stiffness after the session. For example, when stimulating the quadriceps, the user should be in a seated position with the ankles fixed with straps to prevent extension of the knees.
For programmes, which do not induce powerful muscle contractions, but only muscle twitches, position yourself as comfortably as possible.
Adjusting stimulation energies
In a stimulated muscle, the number of recruited fibres depends on the stimulation energy. For programmes which involve powerful muscular contractions, you must therefore use maximum stimulation energies (up to 694), always at the limit that you can endure, in order to recruit the maximum number of fibres.
VI HOW IT WORKS
EN
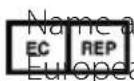
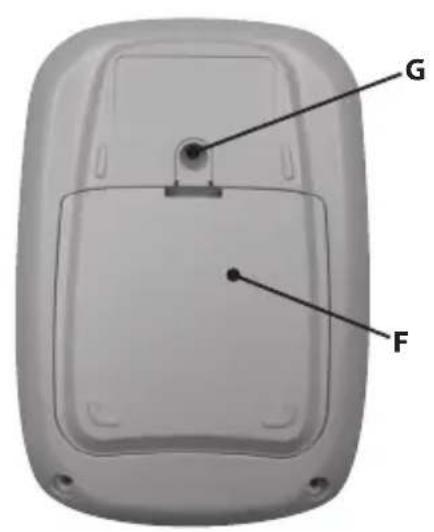
Description of the device
You are strongly advised to read carefully the contraindications and safety measures described at the start of this manual in Chapter 1 prior to using your stimulator.
A On/Off button
B Sockets for the 4 stimulation cables
C Stimulation cables
Channel 1 = blue Channel 2 = green Channel 3 = yellow Channel 4 = red
D +/- buttons for the 4 stimulation channels
E Socket for the charger (Slide the red cover to the right to free the charger connector)
F Battery compartment
G Belt clip socket
Battery insertion
Open the cover of the battery compartment and insert the battery with the label upwards so that the + and - poles of the battery are facing the contacts of the device. Then put the cover back in place. If the device is not to be used for more than 3 months, ensure the battery is fully charged. If the device is not to be used for more than 6 months, ensure the battery is fully charged and remove it from the stimulator. Before removing the battery, switch off the stimulator.
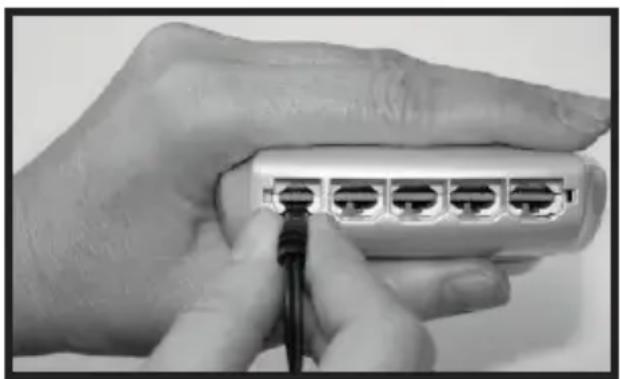
Connections
Connecting the charger
natural_image
Close-up of a hand holding a network switch device with five ports, no visible text or symbolsThe One stimulator has considerable operating autonomy, as it uses a battery. To recharge it, connect the charger supplied with your device to the base of the device, then plug the charger into a socket. Remove any stimulation cables connected to the stimulator before recharging it. We strongly recommend you to fully charge the battery before using it for the first time as this will improve its performance and life span.
Connecting the cables
The stimulator cables plug into the 4 sockets on the front of the device. Cables can be connected simultaneously to the four channels of the device. Both the sockets and the cables are colour-coded to simplify use and facilitate identification of the different channels:
Blue = channel 1
Green = channel 2
Yellow = channel 3
Red = channel 4
flowchart
graph LR
    A["•"] --> C["+"]
    B["•"] --> D["-"]
    C --> E
    D --> E
    E --> F["ONE"]
Preliminary settings
Before using the unit for the first time, you have the possibility to choose the working language of the device and to specify a certain number of settings (display contrast adjustment, backlight adjustment, and sound volume setting). This options screen can subsequently be accessed by switching off the device and then pressing the On/Off button for more than 2 seconds.
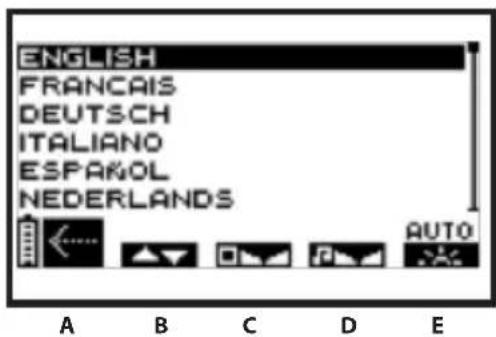
B Use the channel 1 +/- button to choose the language you wish to use.
C Use the channel 2 +/- button to adjust the contrast of the screen.
D Use the channel 3 +/- button to adjust the volume.
E Use the channel 4 +/- button to adjust the backlight.
On: Backlight always on.
Off: Backlight always off.
Auto: Backlight activated whenever a button is pressed.
A Use the On/Off button to confirm and save your choices. The settings will be applied immediately.
Selecting a category
To switch on the stimulator, press the On/Off button briefly. Before choosing a programme, you should select the desired category.
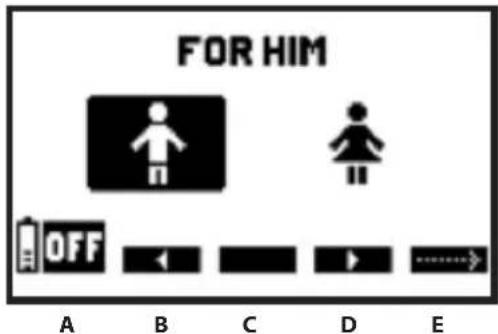
A Press the On/Off button to turn off the unit.
B / D Pressing +/- on channels 1 and 3 enables a category to be selected.
E Press the channel 4 +/- button to confirm your choice.
Selecting a programme
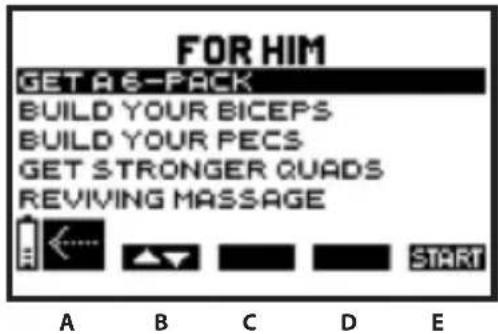
A Press the On/Off button to return to the previous screen.
B Use the channel 1 +/- button to choose a programme.
E Press the channel 4 +/- button to validate your selection and start the stimulation session.
Adjusting stimulation energies
When you start a programme, you will be prompted to increase the stimulation energies. This is critical to the success of any session. To find out what energy level needs to be attained for each programme, refer to chapter 7 of this manual.

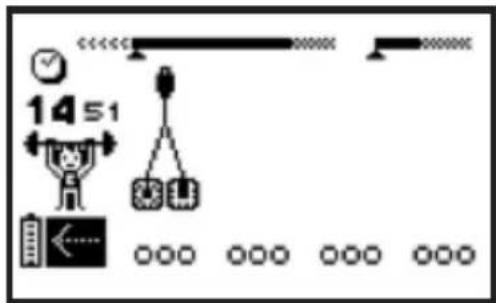
1 Programme duration in minutes and seconds
2 Session progression scale. For details on how this works, see the following section: "Programme progression"
A Press the On/Off button to place the unit in Pause mode.
B C D E The device bleeps and the symbols of the four channels flash, changing from + to 000: the four channels are at 000 energy. You must increase the stimulation energy so that the stimulation can start. To do this, press the + buttons for the relevant channels until the desired setting is reached.
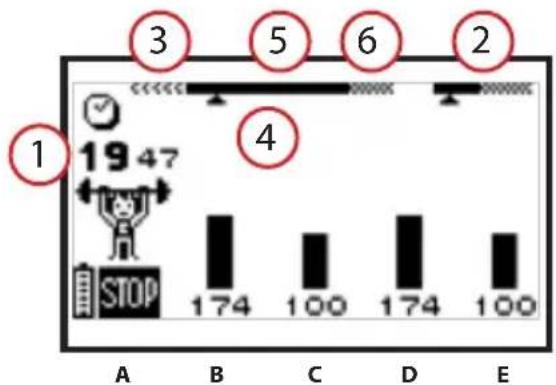
Programme progression
Stimulation actually starts when the stimulation energy has been increased. The examples reproduced below are sufficient to understand the general rules.
bar
| Category | Value | |---|---| | A | 174 | | B | 100 | | C | 174 | | D | 100 | | E | 174 |1 Remaining time (in minutes and seconds) before the end of the programme
2 Time bar showing contraction time and active rest time is shown only during the work sequence
3 Warm-up
4 Session sequences
5 Work period
6 Relaxation
A Press the On/Off button to interrupt the programme momentarily. To restart it, simply press the channel + for one of the channels. The session will resume at 80% of the energy levels that were being used prior to the interruption.
B C D E The different energies reached during the contraction phase are shown by a series of black bar graphs, energies of the rest phase are shown by hatched bar graphs.
N.B.: Active rest phase stimulation energies are automatically set at 50% of contraction energies. These can be modified during the rest phase. Once modified, they will be totally independent of the contraction energies.
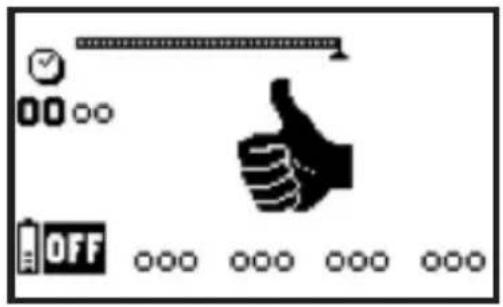
End of programme
At the end of each session, the following screen is displayed and a short melody plays. To switch off the stimulator, press the On/Off button.
Battery Level and Recharging
Never recharge the stimulator without first disconnecting the stimulation cables. Always use the charger provided by Compex to recharge the battery.
The device runs on a battery. The battery's performance depends on the programmes and stimulation energy used. We strongly recommend you to fully charge the battery before using it for the first time as this will improve its performance and life span.
If the device is not to be used for more than 3 months, ensure the battery is fully charged. If the device is not to be used for more than 6 months, ensure the battery is fully charged and remove it from the stimulator. Before removing the battery, switch off the stimulator.
Battery level
The battery icon on the bottom left of the screen indicates the level of charge in the battery. The battery icon flashes when the battery is totally empty. It is no longer possible to use the device. Recharge it immediately.
Recharging
Remove all stimulation cables from the stimulator before recharging it. Plug the charger into a socket and connect the stimulator by sliding the red cover to the right to free the charger connector.
The charge menu illustrated below appears automatically.
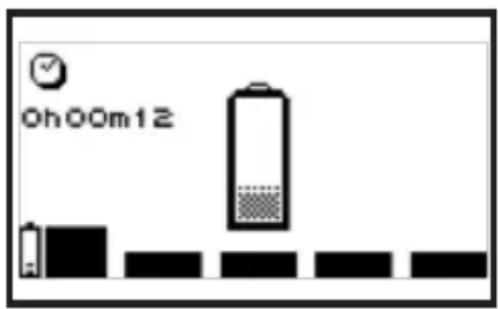
The duration of the charging operation is shown on the screen (a complete charge may take 10 hours). The battery icon is animated while the battery is recharging. When fully charged, the icon will be full and the total time taken to recharge the battery will flash on the screen. Simply disconnect the charger: the stimulator will turn off automatically.
Problems and solutions
Electrode fault
The device "bleeps" and alternatively displays the symbol of a pair of electrodes and an arrow pointing to the channel where a problem has been detected. In the example above, the stimulator has detected an error in channel 1.
- Check that electrodes are connected to this channel.
- Check whether the electrodes are old, worn, and/or the contact is poor: try using new electrodes.
- Try using the stimulation cable on a different channel. If the cable is still showing a fault, replace it (www.compexstore.com).
Stimulation is not producing the usual sensation
- Check that all the settings are correct and ensure the electrodes are positioned properly.
- Change the positioning of the electrodes slightly.
The stimulation effect causes discomfort
- The electrodes are beginning to lose adhesion and no longer provide good contact on the skin.
• The electrodes are worn and need to be replaced. - Slightly change the positioning of the electrodes.
The stimulator is not working
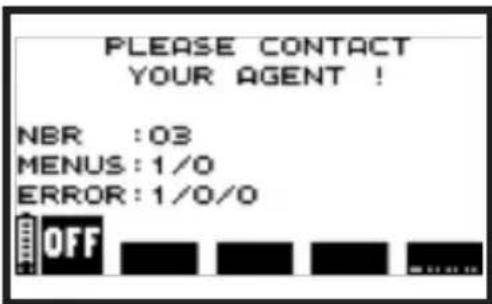
- If an error screen appears while the equipment is in use, note the error number (in the example error 1/0/0) and contact the consumer service approved by Compex.
VII PROGRAMMES
EN
For Him
Get a 6-pack
To restore or develop the qualities of your abdominal muscles, you have to perform a lot of intensive work. If the voluntary exercises of the abdominal belt are not performed correctly, they can cause crushing of the lumbar spine accompanied, as a consequence, by the onset or aggravation of pain in the lower back. "Get a 6-pack" programme offers a specific stimulation mode to make your abdominal belt firmer, improve its tone and give it a more harmonious shape, or even to develop a "rockhard" abdomen. All this can be achieved without any stress and danger for the lumbar spine.
Length: 6 weeks, 3 sessions/week. Having completed the programme, you may continue with 1 session/week as maintenance.
Electrode position:
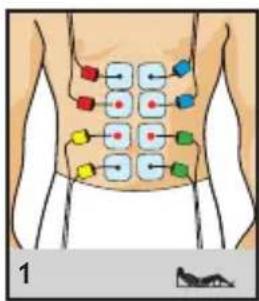
Stimulation energy: maximum bearable energy.
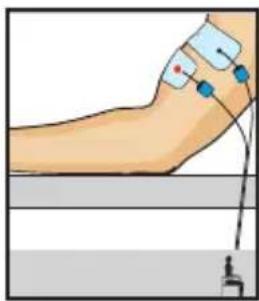
Build your biceps
The specific stimulation imposed by "Build your biceps" programme increases significantly the volume of the stimulated muscles. In addition, for a similar session time, this programme provides a greater volume gain than voluntary training. The additional training imposed by this programme provides a solution for the harmonious development of your biceps.
Length: 6 weeks, 3 sessions/week. Having completed the programme, you may continue with 1 session/week as maintenance.
Electrode position:
natural_image
Illustration of a human arm with electrodes and a medical device attached to the leg (no text or symbols)Stimulation energy: maximum bearable energy.
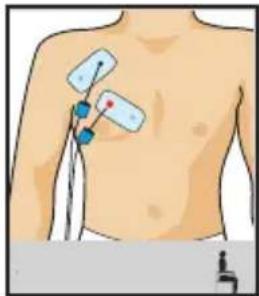
Build your pecs
To obtain well developed pectoral muscles you should subject them to intensive workout. In voluntary training, this type of work involves exercises with heavy loads in a fitness centre. But this kind of work can be traumatic for the joints and tendons involved. "Build your pecs" programme is the perfect solution for working on these muscles and achieve a harmonious development of muscular volume.
Length: 6 weeks, 3 sessions/week. Having completed the programme, you may continue with 1 session/week as maintenance.
Electrode position:
natural_image
Illustration of a human torso with an ECG electrode inserted, showing electrode placement on the chest (no text or symbols present)Stimulation energy: maximum bearable energy.
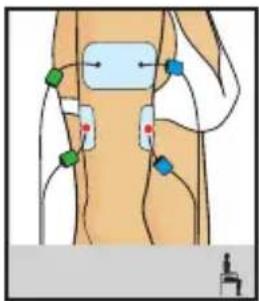
Get stronger quads
The quadriceps muscles are among those placed under the greatest stress during locomotory movement such as walking, and to an even greater extent during physical activities that involve running, jumping, movement through water, etc. A sedentary lifestyle impairs the quality of these muscles. The specific stimulation imposed by “Get stronger quads” programme increases the strength of these muscles and provides a greater force gain than voluntary training.
Length: 6 weeks, 3 sessions/week. Having completed the programme, you may continue with 1 session/week as maintenance.
Electrode position:
Stimulation energy: maximum bearable energy.
Reviving massage
This programme is indicated for reducing unpleasant muscle tension and creating a relaxing sensation of well-being, in particular after a tiring day. It induces a state of optimal, very pleasant relaxation.
Usage: to be used on the muscles whenever an occasional sensation of painful muscular tension is felt; to be repeated, if necessary, in cases of particularly severe muscle tension.
Electrode position:
Stimulation energy: increase the stimulation energy gradually until you obtain clearly visible muscular twitches.
For Her
Cut your abs
To maintain or restore a satisfactory body image, stimulation of the abdominal muscles is of particular relevance. In fact, the tone of the muscle fibres of which these muscles are formed normally enables the muscles to support and hold the organs in place. When the tone becomes inadequate due to lack of appropriate physical activity, their supporting role is not properly assured, which has negative consequences for the figure. "Cut your abs" programme subjects the abdominal belt muscles to appropriate and progressive stimulation, thus enabling a slimmer waist and firmer stomach to be regained.
Length: 6 weeks, 3 sessions/week. Having completed the programme, you may continue with 1 session/week as maintenance.
Electrode position:
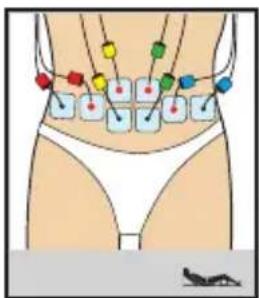
Stimulation energy: maximum bearable energy.
Firm your arms
The anatomical region of the arms, particularly the triceps muscles, is a location where fat readily accumulates and the skin easily becomes saggy. This sagging is in part due to muscular insufficiency and to the particular thinness of the skin. The natural ageing of the skin is resulting in a progressive sagging of the tissues and a flabby appearance that is most frequently visible on the posterior part of the arms. "Firm yours arms" programme offers a progressive stimulation of the arm muscles, which is able to restore good muscle tone.
Length: 6 weeks, 3 sessions/week. Having completed the programme, you may continue with 1 session/week as maintenance.
Electrode position:
Stimulation energy: maximum bearable energy.
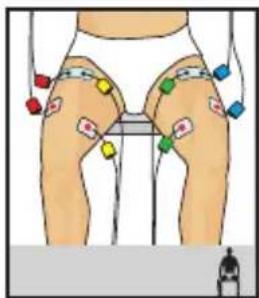
Shape your buttocks
The buttocks are one of the so-called "problem areas" of the female body. This is due to the elasticity of the tissues and the specific structure of the adipose cells. These two phenomena favour the accumulation of fat and water, resulting in flabbiness and an orange-peel appearance. "Shape your buttocks" programme consists of making the buttock muscles work and subjecting them to the specific activity required to improve their firmness and give the buttocks a rounded and sculpted appearance.
Length: 6 weeks, 3 sessions/week. Having completed the programme, you may continue with 1 session/week as maintenance.
Electrode position:
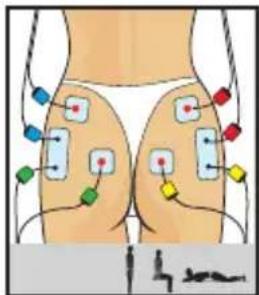
Stimulation energy: maximum bearable energy.
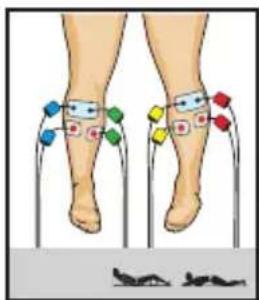
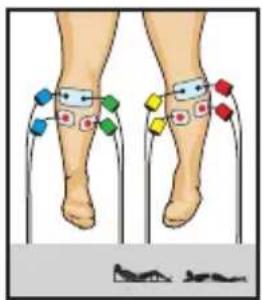
Get firmer thighs
A sedentary lifestyle impairs the quality of the thighs muscles, so that they become increasingly slack and no longer perform their supporting function correctly, which results in the thighs having a flabby and plump appearance. "Get firmer thighs" programme has the objective of submitting the muscles of progressively greater levels of activity, thus enabling restoration and/or maintenance of a muscle tone that can improve the thigh firmness and appearance.
Length: 6 weeks, 3 sessions/week. Having completed the programme, you may continue with 1 session/week as maintenance.
Electrode position:
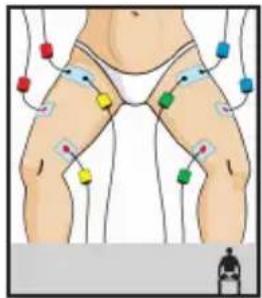
Stimulation energy: maximum bearable energy.
Heavy legs
This programme is intended to eliminate the sensation of heaviness and discomfort in the legs which is felt in particular circumstances (standing for prolonged periods, excessively high ambient temperature, hormonal imbalance related to the menstrual cycle, etc.). It quickly induces a feeling of lightness and suppleness.
Usage: to be used whenever an occasional feeling of heaviness in the legs occurs.
Electrode position:
Stimulation energy: increase the stimulation energy gradually until you obtain clearly visible muscular twitches.
I INTRODUCTION 31
PROGRESSION DU PROGRAMME....49
FIN DU PROGRAMME....49
NIVEAU ET CHARGEMENT DE LA BATTERIE .... 50
PROBLÈMES ET SOLUTIONS....51
VII PROGRAMMES 52
POUR LUI 52
SCULPTER MES ABDOS....52
DÉVELOPPER MES BICEPS 52
DESSINER MES PECS 53
MUSCLER MES CUISSES 53
natural_image
Assorted electronic devices and accessories including a One device, capacitors, and a CD with visible labels (no readable text in image)
natural_image
Close-up of a hand holding a network switch device with four ports, being inserted with cables (no visible text or symbols)natural_image
Illustration of a human arm with electrodes and a medical device attached to the leg (no text or symbols)natural_image
Illustration of a human torso with an ECG electrode inserted, showing electrode placement and body positioning (no text or symbols)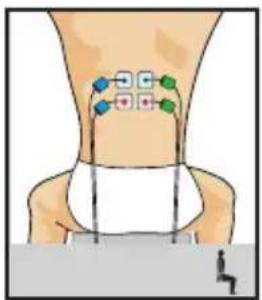

natural_image
Assorted electronic devices including a One device, capacitors, and a CD with a battery pack (no visible text or symbols)
natural_image
Close-up of a hand holding a network switch device with five ports, no visible text or symbolsnatural_image
Illustration of a human arm with electrodes and a medical device attached to the leg (no text or symbols)natural_image
Illustration of a human torso with an electronic device on the chest (no text or symbols present)DOVE NON APPLICARE MAI GLI ELETTRODI
natural_image
Assorted electronic devices and components including a One device, capacitors, and a CD with a battery (no visible text or symbols)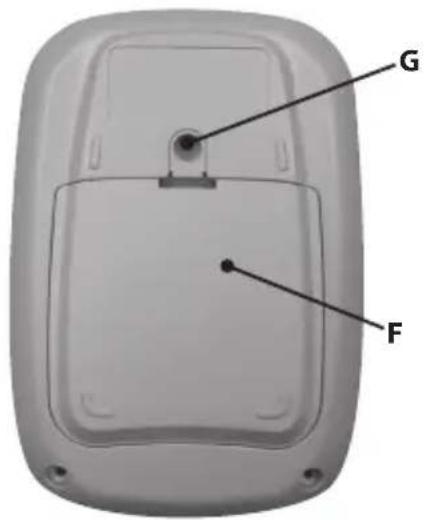

natural_image
Close-up of a hand holding a network switch device with four ports, being inserted with a cable (no visible text or symbols)natural_image
Illustration of a human arm with an electrode and catheter attached, no text or symbols presentnatural_image
Illustration of a human torso with an ECG electrode inserted, showing electrode placement on the chest (no text or symbols present)RECICLAJE DEL EQUIPO....121
NORMATIVA 121
PATENTES....122
SÍMBOLOS NORMALIZADOS....122
CARACTERÍSTICAS TÉCNICAS 122
natural_image
Assorted electronic devices and accessories including a handheld device, CD, earplifier, and battery pack (no visible text or symbols)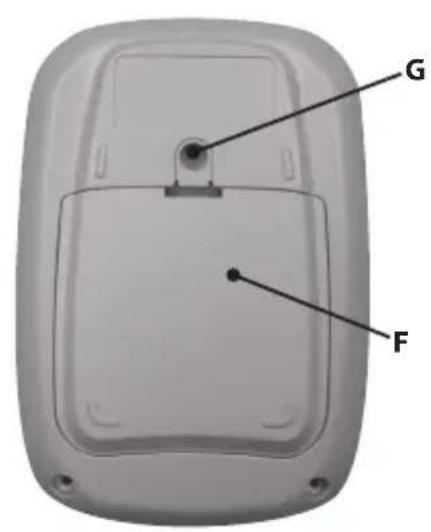
natural_image
Close-up of a hand holding a network switch device with four ports, being inserted with a cable (no visible text or symbols)natural_image
Illustration of a human leg with an electric device and electrode, no text or symbols presentnatural_image
Illustration of a human torso with an ECG electrode placement on the chest (no text or symbols)BYGG UPP DINA BRÖSTMUSKLER....165
natural_image
Assorted electronic devices and components including a One device, capacitors, and a CD with a battery (no visible text or symbols)
natural_image
Close-up of a hand holding a network switch device with four ports, being inserted with a cable (no visible text or symbols)natural_image
Illustration of a human arm with an electrode and forceps attached to the leg (no text or symbols)Strömstryka: Högsta tolerans
natural_image
Illustration of a human torso with an ECG electrode inserted, showing electrode placement on the chest (no text or symbols)Strömstryka: Högsta tolerans
Stärk dina lärmuskler
Strömstryka: Högsta tolerans
Strömstryka: Högsta tolerans
Stärk dina armar
Strömstryka: Högsta tolerans
Strömstryka: Högsta tolerans
Stärk lärmusklerna
Strömstryka: Högsta tolerans
Trötta ben
I INLEIDING 171
II WAARSCHUWINGEN....171
CONTRA-INDICATIES 171
VEILIGHEIDSMAATREGELEN 172
III INTRODUCTIE 176
GARANTIE 177
ONDERHOUD 177
OPSLAG- EN VERVOERSOMSTANDIGHEDEN 177
GEBRUIKSOMSTANDIGHEDEN 177
VERWIJDERING....177
NORMEN....177
PATENTEN 178
GESTANDAARDISEERDE SYMBOLEN 178
natural_image
Assorted electronic devices and accessories including a One device, capacitors, and a CD with visible labels (no readable text in focus)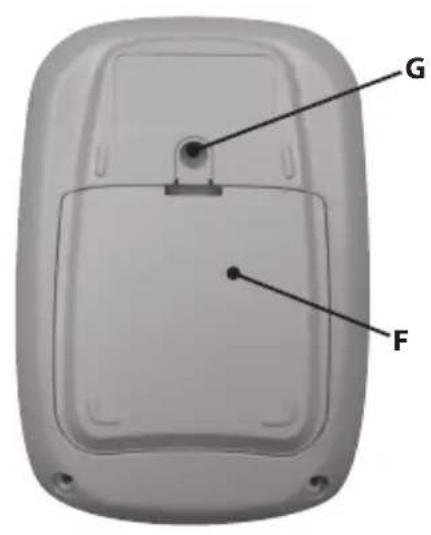
natural_image
Close-up of a hand holding a network switch device with four Ethernet ports (no visible text or labels)Stimulatie-energie: maximaal verdraagbare energie.
Opbouw biceps
natural_image
Illustration of a human arm with electrodes and a medical device attached to the lower leg (no text or symbols)Stimulatie-energie: maximaal verdraagbare energie.
Opbouw pectoralis
natural_image
Illustration of a human torso with an ECG electrode inserted, showing electrode placement on the chest (no text or symbols)Stimulatie-energie: maximaal verdraagbare energie.
Versterk je q ceps
Stimulatie-energie: maximaal verdraagbare energie.
Vitaliserende massage
Stimulatie-energie: maximaal verdraagbare energie.
Vormgeving armen
Stimulatie-energie: maximaal verdraagbare energie.
Lift je bilspieren
Stimulatie-energie: maximaal verdraagbare energie.
Verstevig je dijen
Stimulatie-energie: maximaal verdraagbare energie.
Verhelp zware benen
PROBLEMAS E SOLUÇÕES 219
VII PROGRAMAS....220
PARA ELE 220
OBTENHA UM "6-PACK"....220
TRABALHE OS SEUS BÍCEPS 220
TRABALHE OS SEUS PEITORAIS....221
FORTALEÇA OS QUADRICÍPETES 221
MASSAGEM REVITALIZANTE 222
PARA ELA....222
ACTUE NOS SEUS ABDOMINAIS 222
FIRME OS SEUS BRAÇOS 223
MODELE OS SEUS GLÚTEOS....223
FIQUE COM COXAS FIRMES 224
PERNAS PESADAS 224
I INTRODUÇÃO
natural_image
Assorted electronic devices including a One device, CD, and earplifier with visible packaging and wiring (no readable text or symbols)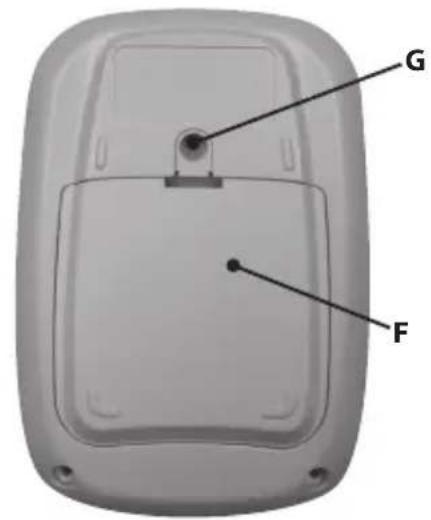
natural_image
Close-up of a hand holding a network switch device with four ports (no visible text or labels)natural_image
Illustration of a human arm with electrodes and a medical device attached to the leg (no text or symbols)natural_image
Illustration of a human torso with an ECG electrode placement on the chest (no text or symbols)KONIEC PROGRAMU....245
POZIOM NAŁADOWANIA I ŁADOWANIE BATERII....246
PROBLEMY I ICH ROZWIAZANIA 247
VII PROGRAMY 248
DLA NIEGO....248
WEŻ 6-PACK....248
ZBUDUJ SWOJE BICEPSY....248
ZBUDUJ SWOJA KLATE 249
UZYSKAJ SILNE MIĘŚNIE CZWOROGŁOWE 249
MASAŻ ODNAWIAJĄCY....250
DLA NIEJ....250
TRENUJ MIĘŚNIE BRZUCHA 250
WZMOCNIJ SWOJE RAMIONA 251
KSZTAŁTUJ SWOJE POŚLADKI....251
WZMOCNIJ SWOJE UDA 252
ZREDUKUJ UCZUCIE CIĘŻKICH NÓG 252
I WSTEP
natural_image
Assorted electronic devices including a One device, CD, and earplifier with visible packaging and wiring (no readable text or symbols)
natural_image
Close-up of a hand holding a network switch device with five ports, being inserted with a cable (no visible text or symbols)natural_image
Illustration of a human leg with electrode placement and medical device attached (no text or symbols)natural_image
Illustration of a human torso with an ECG electrode inserted, showing electrode placement on the chest (no text or symbols present)
- EN
- VII PROGRAMMES 24
- I INTRODUCTION
- II WARNINGS
- CONTRAINDICATIONS
- Osteosynthesis equipment
- Important!
- SAFETY MEASURES
- PRECAUTIONS WHEN USING THE ONE STIMULATOR
- WHERE NEVER TO APPLY THE ELECTRODES
- PRECAUTIONS WHEN USING THE ELECTRODES
- III PRESENTATION
- Reception of equipment and accessories
- Warranty
- Maintenance
- Storage and transportation conditions
- Use conditions
- Elimination
- Standards
- Patents
- Standardized symbols
- Technical characteristics
- A General information
- B Neurostimulation
- C Information related to electromagnetic compatibility (EMC)
- IV HOW DOES
- ELECTROSTIMULATION WORK?
- Motor nerve stimulation (EMS)
- Stimulation of the sensory nerves
- V USAGE GUIDELINES
- Placement of electrodes
- Stimulation positions
- Adjusting stimulation energies
- VI HOW IT WORKS
- Description of the device
- Battery insertion
- Connections
- Connecting the cables
- Preliminary settings
- Selecting a category
- Selecting a programme
- Programme progression
- End of programme
- Battery Level and Recharging
- Battery level
- Recharging
- Problems and solutions
- VII PROGRAMMES
- For Him
- Get a 6-pack
- Build your biceps
- Build your pecs
- Get stronger quads
- Reviving massage
- For Her
- Cut your abs
- Firm your arms
- Shape your buttocks
- Get firmer thighs
- Heavy legs
- VII PROGRAMMES 52
- POUR LUI 52
- DOVE NON APPLICARE MAI GLI ELETTRODI
- Stärk dina lärmuskler
- Stärk dina armar
- Stärk lärmusklerna
- Trötta ben
- Opbouw biceps
- Opbouw pectoralis
- Versterk je q ceps
- Vitaliserende massage
- Vormgeving armen
- Lift je bilspieren
- Verstevig je dijen
- Verhelp zware benen
- VII PROGRAMAS....220
- PARA ELE 220
- PARA ELA....222
- I INTRODUÇÃO
- VII PROGRAMY 248
- DLA NIEGO....248
- DLA NIEJ....250
- I WSTEP
Brand : COMPEX
Model : One
Category : Electrical stimulation device